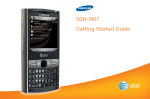
1
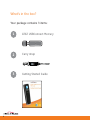
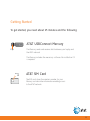
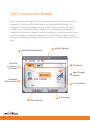
AT &T U SB C on n ec t
Me rcur y
Getting Started Guide
Welcome to AT&T
Thank you for purchasing the AT&T
USBConnect Mercury.
Please use either this Getting Started Guide
or our web tutorial available at
att.com/WirelessTutorials
for the most complete and up-to-date
information available to set up your device.
2
Table of Contents
What’s in the box?
4
Getting started
Insert the SIM Card
5
6
Windows Vista, XP, and 2000
Install the software
Connect to the AT&T network and access the Internet
7
7
7
AT&T Communication Manager
8
Using AT&T Communication Manager
9
Using AT&T Communication Manager for Wi-Fi
To use AT&T Wi-Fi Service
To connect to other Wi-Fi networks
11
11
12
Mac OS
Install the software
Connect to the AT&T network and access the Internet
Sierra Wireless Watcher
Using Watcher
13
13
13
14
15
Getting to know your device
16
Using a memory card
17
Attaching the carry strap
18
FAQ
19
Troubleshooting your device
19
Find more information
20
3
What’s in the box?
Your package contains 3 items:
4
1
AT&T USBConnect Mercury
2
Carry strap
3
Getting Started Guide
Getting Started
To get started, you need about 15 minutes and the following:
AT&T USBConnect Mercury
Cap
The Mercury sends and receives data between your laptop and
the AT&T network.
The Mercury includes the necessary software. No installation CD
is required.
AT&T SIM Card
The SIM card stores the wireless number for your
Mercury and subscriber information enabling access
to the AT&T network.
5
Insert the SIM Card (time required 1 minute)
1. Remove the cap from the end of the USBConnect Mercury.
2. Insert the notched end of the SIM card into the top slot on
the Mercury above the USB connector. Be sure to push the
SIM card completely into the slot until it clicks into place and
is fully inserted.
If you are running Windows on your computer, go to page 7.
If you are running Mac OS X on your computer, go go page 13.
6
Windows Vista, XP and 2000
Install the software (time required 10 minutes)
AT&T Communication Manager (ACM) supports laptops with Microsoft Windows
Vista, XP and 2000 and allows you to control how and when you connect to wireless networks. ACM will auto-install the first time you insert your Mercury into your
laptop and then be available whenever needed.
1. Carefully push the Mercury into the USB port on your laptop.
2. After you insert the Mercury into the laptop for the first time, the AT&T
Communication Manager (ACM) software will automatically start and guide
you through the installation process.
3. Once installation is complete, restart your laptop when prompted.
If AT&T Communication Manager does not automatically start the first time you
insert the Mercury into your laptop:
1. Double-click My Computer (Windows XP or 2000) or Computer
(Windows Vista) on your desktop.
2. Click the TRU-Install drive (usually E: or F: drive).
3. Under the TRU-Install drive, go to Win/ATT and double-click the Setup.exe file.
4. Leave the Mercury in the laptop and follow the on-screen instructions.
5. Restart your computer when prompted to successfully complete the installation
of AT&T Communication Manager.
Connect to the AT&T network and access the
Internet (time required 3 minutes)
1. Double-click the ACM shortcut icon installed on your desktop.
2. Wait while the USBConnect Mercury initiates.
3. Click the Connect button after it turns orange.
4. Open your browser and access the Internet.
Once connected, the Connect button will change to
Disconnect to allow you to end your session.
7
AT&T Communication Manager
AT&T Communication Manager (ACM) is a software application that lets you control your
connections to either the AT&T mobile network nationwide using the Mercury or to
available Wi-Fi networks including thousands of AT&T hotspots using the built in Wi-Fi
capability of your laptop. ACM offers a range of tools and features to manage those
connections, find the best connection available, and make that connection quickly. Please
note that connections to the AT&T mobile network and AT&T hotspots require that the
Mercury be inserted into the laptop and that the device has an active SIM and a valid rate
plan.
2 Use Wi-Fi Network
1 Use GSM (Mobile) Network
Click Here
to Connect / 9
Disconnect
3 3G Indicator
4
Signal Strength
Indicator
Connection
Status Indicator 8
5 Carrier Indicator
6 Text Messages
7 VPN Connection
8
Using AT&T Communication Manager
1. GSM mobile network interface
The GSM interface allows you to control your connection to mobile
networks worldwide.
2. Wi-Fi network interface
The Wi-Fi interface allows you to control your connections with Wi-Fi networks,
including home, office, and public hotspot networks.
3. 3G indicator
This indicator appears when the AT&T 3G network is available. AT&T 3G networks
are in almost all major metro areas and provide the highest data transfer rates.
When 3G networks are not available, the Mercury will automatically default to
EDGE (also known as 2G) networks.
4. Signal strength indicator
This indicator shows the strength of the wireless signal that you are receiving.
5. Carrier indicator
This indicator shows which wireless network your device is associated with. For
example, if you are connected to AT&T’s mobile network, the wireless carrier
indicator will read “AT&T”.
9
6. Text messages button
Click this button to read and write text messages using Communication Manager.
Messages will be sent and received using your LaptopConnect wireless number.
Please note that additional charges may apply for text messaging services.
7. VPN connection button
If you have configured Communication Manager to launch your Virtual Private
Network (VPN), you may use this button to launch your VPN client. VPN
connections are configured in the VPN tab of the Settings window.
8. Connection status indicator
When this indicator reads “Ready”, simply click the orange Connect button to
connect to a wireless network. When this indicator reads “Connected”, you have
an active session with a wireless network. This indicator can also display error
messages if there is a problem with your connection.
9. Connect / Disconnect button
To connect to the network shown in the Carrier Indicator, click the orange
Connect button. When this button reads “Disconnect”, you have an active
session with a wireless network and may click the button to disconnect from
the network.
10
Using AT&T Communication Manager for Wi-Fi
If your laptop has an internal Wi-Fi modem or Wi-Fi capability, AT&T Communication
Manager can be used to manage your connection to any home, business or AT&T hotspot.
Please note that connection to AT&T hotspots requires a qualified AT&T DataConnect
service plan. See www.att.com/laptopconnect for eligibility details.
To use AT&T Wi-Fi service:
1.
Insert your Mercury and launch ACM.
2.
ACM will automatically identify available Wi-Fi networks.
Click Connect when prompted to connect to an AT&T hotspot. ACM will take a
moment to establish your connection.
3.
After ACM confirms a connection is established, launch your browser, email
application or other Internet application.
11
To connect to other Wi-Fi networks:
1. Launch ACM (you do not need to insert your Mercury).
2. ACM will automatically identify available Wi-Fi networks.
3. To see the list of available networks, click on the xx Wi-Fi networks available
(below the Connect button).
4. Select the network you prefer and click Connect.
5. If the network is secure or encrypted, you may be prompted to enter additional
information for access.
6. After ACM confirms a connection is established, launch your browser, email
application, or other Internet application.
12
Mac OS
Install the software (time required 2 minutes)
Sierra Wireless Watcher supports laptops with Mac OS X 10.4.11 or later and allows you to control
how and when you connect to wireless networks.
1. Insert the Mercury into the USB port on your laptop.
2. Double-click the installer package. If you do not see the installer package, open
Finder and go to “TRU-Install” device.
3. Follow the on-screen instructions.
The Mercury is ready to use once the software is successfully installed.
Connect to the AT&T network and access
the Internet (time required 3 minutes)
1. Click the Watcher icon in the Dock.
2. When the Watcher window opens, click Connect.
13
Sierra Wireless Watcher
Sierra Wireless Watcher lets you control your connections to the AT&T mobile network nationwide
using the Mercury and your Mac laptop. It offers a range of tools and features to manage those
connections, find the best connection available, and make that connection quickly. Please note
that connections to the AT&T mobile network require that Mercury be inserted into the laptop and
that the device has an active SIM and a valid rate plan.
3G Indicator 1
AT&T
Signal Strength 2
Indicator
AT&T
Roaming Indicator 4
Carrier Indicator 3
5 Click here to Connect /
Disconnect
14
Using Watcher
1. 3G indicator
This indicator appears when the AT&T 3G network is available. AT&T 3G networks are in
almost all major metro areas and provide the highest data transfer rates. When 3G networks are not available, the Mercury will automatically default to EDGE (also known as 2G)
networks.
2. Signal strength indicator
This indicator shows the strength of the wireless signal that you are receiving.
3. Carrier indicator
This indicator shows which wireless network your device is associated with. For
example, if you are connected to AT&T’s mobile network, the wireless carrier
indicator will read “AT&T”.
4. Roaming indicator
This indicator shows your roaming status. When the indicator is gray, you are within AT&T’s
local coverage area. When the indicator is black, you are in a “preferred” roaming area.
5. Connect / Disconnect button
To connect to the network shown in the carrier indicator, click the Connect button.
When this button reads, “Disconnect”, you have an active session with a wireless
network and may click the button to disconnect from the network.
15
Getting to Know Your Device
LED - Power
LED Color
16
How
HowToToInterpret
Interpret
LED - Data
LED Color
How To Interpret
Solid
Not powered
Solid
Unable to detect service
Blinking
Firmware is being updated.
Do not remove yourrMercury.
Blinking
3G network detected
Blinking
Initializing
Blinking
2G network detected
Solid
Powered on
Solid
Connected to 3G network
Solid
Mercury error
Solid
Connected to 2G network
Using a Memory Card
The Mercury is built to accommodate an microSD® memory card (not included in package).
A memory card will allow you to store and transfer important data from one computer to
another, expanding the already extensive functionality of this device. The memory card
appears as a USB memory drive. You can copy, paste and drag files to and from it.
Inserting a Memory Card
SIM card slot
Memory
card slot
1. Remove the cap.
2. Insert the memory card into the lower slot at the end
of the Mercury, as shown in the illustration.
3. Insert the Mercury into the computer’s USB slot.
Removing a Memory Card
1. Remove the cap.
2. Push the memory card in and then release it.
3. Gently pull the memory card out.
17
Attaching the Carry Strap
To help protect your Mercury, please keep the cap on the USB connector when not in
use. A short carry strap has been included to keep everything together. It’s a good idea to
thread the carry strap through the cap and Mercury, as shown in the illustrations.
18
1
2
3
4
FAQ
How do I find my wireless number?
If you have ACM open, go to the Help menu and select My Wireless Number. You can also
find your wireless number on your sales receipt and monthly statements.
What do I do if ACM says “No SIM”?
Remove the Mercury from the computer and insert your AT&T SIM card. See page 6 for
details. If you do not have a SIM card, contact AT&T.
Troubleshooting your device
If ACM displays “Mobile Disabled”
If AT&T Communication Manager displays a “Mobile Disabled” error,
1. Enable the Mercury:
a. In the ACM window, click the Connections tab.
b. Position your mouse over the Adapters drop-down menu, and click
Turn on GSM. Wait for the ACM to detect the Mercury.
2. If the ACM still reports “Mobile Disabled”, contact AT&T Customer Support for
assistance.
If ACM displays “No Wireless Device Detected”
If AT&T Communication Manager displays a “No Wireless Device Detected” error,
1. Click Start, and then click Control Panel.
2. Double-click TRU-Install.
3. When you are prompted to switch to modem mode, click OK.
19
Find More Information
On the web
Interactive web tutorials are available at att.com/WirelessTutorials. Select
Manufacturer: Sierra Wireless and Model: Mercury from the drop down menus.
Detailed support information including device specifications, troubleshooting, user
forums and knowledge base articles are available at att.com/DeviceSupport.
From a phone
Call AT&T Customer Care at 800-331-0500 for assistance with your device or service.
Please enter the 10-digit wireless phone number associated with your AT&T
USBConnect Mercury when prompted. This will ensure you get routed to a specialized
Care team.
The wireless phone number associated with your Mercury can be found:
· On your sales receipt; or
· On your monthly statement; or
· In ACM under the Help menu, select My Wireless Number.
Note: You must have the Mercury inserted into your laptop to find your
wireless number.
Sierra Wireless is a trademark of Sierra Wireless, Inc. Microsoft and Windows are either registered trademarks
or trademarks of Microsoft Corporation in the United States and/or other countries. All other brand or product
names are or may be trademarks of, and are used to identify products or services of, their respective owners.
© 2008 AT&T Intellectual Property. All rights reserved. AT&T, AT&T logo and other marks contained herein are
trademarks of AT&T Intellectual Property and/or AT&T affiliated companies.
2130981 - Rev. 1.2
20