1
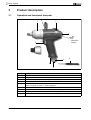
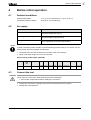
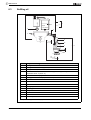
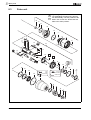
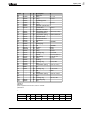
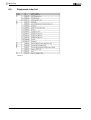
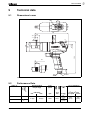
Instruction Manual
P1885E/EN
2008-04
80PTHD…
Pulse shut-off nutsetter
For additional product information visit our website at http://www.cooperpowertools.com
Notes on this instruction manual
The instruction manual has the following purposes:
•
It provides important instructions for safe and effective operation.
•
It describes the function and operation of the pulse shut-off nutsetter.
•
It serves as a reference work for technical data, service intervals
and spare part orders.
•
It points out options.
In the text:
80PTHD…
stands for all of the designs of the
pulse shut-off nutsetter described here.
➔
Identifies instructions to be followed.
•
Identifies enumerations.
<…>
Identifies an index number, see 8 Spare parts, page 25
In graphics:
Identifies movement in a direction.
Identifies function and force.
Disclaimer:
Cooper Power Tools reserves the right to modify, supplement or improve this document or the
product without prior notice. This document may not be reproduced in whole or in part in any
way, shape or form, or copied to another natural or machine-readable language or to a data carrier, whether electronic, mechanical, optical or otherwise, without the express permission of Cooper Power Tools.
2
P1885E/EN 2008-04
85a_ Deckblatt en.fm, 02.04.2008
Contents
1
Safety
5
1.1
1.2
1.3
1.4
1.5
1.6
Warnings and notes ..............................................................................
Basic requirements for safe working practices .....................................
Operator training...................................................................................
Personal protective equipment .............................................................
Designated use.....................................................................................
Noise and vibration ...............................................................................
5
6
6
7
7
7
2
Items supplied
7
3
Product description
8
3.1
Operation and functional elements ....................................................... 8
4
Before initial operation
4.1
4.2
4.3
4.4
Ambient conditions ............................................................................... 9
Air supply ............................................................................................ 9
Connect the tool.................................................................................... 9
Setting up the tool............................................................................... 10
5
Troubleshooting
12
6
Maintenance
13
6.1
6.2
6.3
Service schedule ................................................................................ 13
Activating the reserve oil..................................................................... 15
Refilling oil .......................................................................................... 16
7
Repair instructions
19
7.1
7.2
7.3
7.4
7.5
Disassembling the motor unit .............................................................
Disassembling the throttle valve .........................................................
Disassembling the pulse unit ..............................................................
Assembling the motor unit ..................................................................
Assembling the pulse unit...................................................................
19
19
20
20
24
8
Spare parts
25
8.1
8.2
8.3
8.4
Pistol grip ............................................................................................
Motor unit 935635...............................................................................
Pulse unit ............................................................................................
Equipment order list............................................................................
26
28
30
32
P1885E_EN 80PTHD 0408IVZ.fm, 02.04.2008
P1885E/EN 2008-04
9
3
4
9
Technical data
33
9.1
9.2
Dimensions in mm .............................................................................. 33
Performance Data............................................................................... 33
10
Service
34
11
Disposal
34
P1885E/EN 2008-04
P1885E_EN 80PTHD 0408IVZ.fm, 02.04.2008
Safety
1
Safety
1.1
Warnings and notes
Warning notes are identified by a signal word and a pictogram:
•
The signal word describes the severity and the probability of the impending danger.
•
The pictogram describes the type of danger.
WARNING!
Indicates a potentially hazardous situation
which, if not avoided, could result in death or serious injury.
CAUTION!
Indicates a potentially hazardous situation which, if not avoided, may result in minor or moderate
injury or property and environmental damage. If this warning is not observed, injuries, property
or environmental damage may occur.
NOTE
General notes
include application tips and particularly useful information but no hazard warnings.
86b_1_5 en bedingt.fm, 02.04.2008
P1885E/EN 2008-04
5
1
1
Safety
1.2
Basic requirements for safe working practices
You should read all instructions.
Failure to observe the instructions listed below can result in serious injuries.
CAUTION!
1.3
➔
Before initial operation, check that the suspension bail is properly fastened to the balancer.
➔
Work with a maximum working pressure of 101.5 psi (700 kPa) (measured as the air inlet
tube of the tool).
➔
If you hear unusual noises or vibrations, switch off the tool immediately.
Shut off the air supply immediately.
➔
Before carrying out repairs, adjusting the torque or replacing screw bits, disconnect the
tool from the compressed air line.
➔
The compressed air line must be depressurized before disconnecting it.
➔
Never use the air hose to hold, raise or lower the tool.
➔
Air hoses, the suspension bail and fittings must be regularly checked for damage and
wear. Replace if necessary.
➔
Always carry out assembly according to Chapter 8 Spare parts, page 25.
➔
Use only accessory parts authorized by Cooper Power Tools
(see product catalog).
➔
Adjust the torque using the provided hex wrench only. Never use an angular wrench.
➔
Only use screw inserts for machine-controlled fastening tools.
➔
Make sure that the screw bits are securely inserted.
➔
Inspect screw bits for visible damage and cracks.
Replace damaged screw bits immediately.
➔
The operation, maintenance and repair conditions set forth in the operating instructions
must be observed.
➔
Follow generally valid and local safety and accident prevention rules.
Operator training
Operators must be trained in correct handling of the tool. The user must make the operating
manual available to the machine operator and ensure that the operator has read and understood
it. The tool may be connected, used, serviced and repaired by qualified persons only. The tool
may be repaired by authorized technicians only.
6
P1885E/EN 2008-04
86b_1_5 en bedingt.fm, 02.04.2008
Items supplied
1.4
Personal protective equipment
•
Wear the protective goggles to protect against sprays of metal splinters and fluids.
•
Wear gloves to protect against skin irritation in case of direct contact with oil.
Danger of injury by being wrapped up in and caught by machinery
•
Wear a hairnet.
•
Wear close-fitting clothing.
•
Do not wear jewelry.
Sound level in the area of the user > 80 dB(A), danger of hearing damage
•
1.5
Wear hearing protection.
Designated use
The 80PTHD… is designed exclusively for fastening and releasing threaded fasteners.
1.6
•
Do not use it as a hammer.
•
Do not open it or modify it structurally.
•
Do not use it in areas where there is a risk of explosion.
Noise and vibration
Sound pressure level Lp according to DIN EN ISO 15744
Free speed: < 82 dB(A) for n ≤ 6000 rpm
Vibration values according to DIN EN ISO 20643
Free speed: ahv <6.56 ft/s² (2.0 m/s²) for n ≤ 6000 rpm
Load: ahv <14.76 ft/s² (4.5 m/s²)
2
Items supplied
Check shipment for transit damage and ensure that all items have been supplied:
1 80PTHD…
1 This instruction manual
1 Declaration of Conformity
1 Size 2 hex wrench
86b_1_5 en bedingt.fm, 02.04.2008
P1885E/EN 2008-04
7
2
2
Items supplied
3
Product description
3.1
Operation and functional elements
8
1
7
2
(8)
Alternative
Position
6
3
9
5
4
Pos.
8
Designation
1
Reverse switch
2
Torque adjustment, siehe 4.4.1 Setting the torque, page 10
3
Speed adjustment, siehe 4.4.2 Changing the speed, page 11
4
Air inlet
5
Connection for Pneumatic Torque Verifier TVP100,
signal connection kit, order no. 934918 (optional)
6
Start button
7
Reserve oil adjustment, see 6.2 Activating the reserve oil, page 15
8
Suspension bail
9
Size 2 hex wrench, order no. 935490
P1885E/EN 2008-04
86b_1_5 en bedingt.fm, 02.04.2008
Before initial operation
4
Before initial operation
4.1
Ambient conditions
4.2
Ambient temperature
41 °F (5 °C) to a maximum of +104 °F (+40 °C)
Permissible relative humidity
25 to 90 %, non-condensing
Air supply
Parameter
Data
Air hose
Inner diameter 1/2" (ø 12,5 mm),
maximum length 16.4 ft (5 m)
Working pressure range
58 to 101.5 psi (400 to 700 kPa)
Recommended: 90 psi (620 kPa)
Compressed air
Air quality according to ISO 8573-1, quality class 2.4.3
The compressed air must be clean and dry.
NOTE
To attain consistent results, maintain a constant working pressure using a 1/2" service unit consisting of filter, pressure regulator and lubricator.
➔
The inside of the air hose must be free of residue; clean it if necessary.
➔
Spray a few drops of light oil into the air inlet tube.
Oils according to DIN 51524 / ISO 3498
Order no. Packaging
unit
liter
933090
4.3
2
Designation ARAL
HL32
BP
elf
Aralub Energol Polyelis 32
EE 100 HL 32
Olna 32
ESSO
Nuto
H 32
INA
Mobil
Klüber
SHELL
Hydraol D.T.E.Oil Light
Molina 32
Crukolan 32
A 32
Vactra Oil Light
Molina 22
Connect the tool.
CAUTION!
The air hose can come off by itself and whip around uncontrollably.
➔
Shut off the compressed air before making the connection.
➔
Connect the connection couplings to the tool and compressed air line properly.
➔
Activate the compressed air.
86b_1_5 en bedingt.fm, 02.04.2008
P1885E/EN 2008-04
9
4
Before initial operation
4.3.1
4.4
Testing
➔
Carry out a test in clockwise and counterclockwise rotation at maximum
speed, see 4.4.2 Changing the speed,
page 11.
➔
Check the speed at the output drive.
Target: n > 6000 rpm.
Setting up the tool
The tool must be configured for the desired rundown.
4.4.1
Setting the torque
CAUTION!
Danger of injury from unintended startup.
Shut off the compressed air before adjusting the torque.
CAUTION!
Danger of injury from rotating hex wrench
Adjust the torque using the provided hex wrench only. Never use an angular wrench.
Nm
6
5
4
3
2
Example settings:
Curve for medium
working range
47.9 ft lbf (65 Nm) rundown
90
Torque
1
➔
80
Max.
70
47.9 ft lbf (65 Nm)
Approx. 3 turns of the torque
adjustment screw
Speed: 5000 rpm
60
50
Min.
6000
5500
5000
4500
4000
3500
3000
2800
0
0
Torque adjustment screw
4
rpm
Speed
–
Exhaust air throttle
+
Abb. 4-1
10
P1885E/EN 2008-04
86b_1_5 en bedingt.fm, 02.04.2008
Before initial operation
Torque
1. Hold the output drive firmly.
2. Carefully push the size 2 hex wrench through
the hole of the pistol grip housing until it
reaches the torque adjustment screw .
3. Turn the torque adjustment screw and roughly
set the required torque, see Abb. 4-1 ,
page 10.
Total number of turns = 6.
4. Pull out the hex wrench.
The hole closes automatically when the tool
starts.
5. Carry out the rundown.
6. Check the shut-off mechanism worked properly, see 4.4.3 Measuring the torque, page 12.
7. In case of deviations, correct the torque setting
8. Repeat the rundown.
Abb. 4-2
4.4.2
Changing the speed
Requirement
Measure
Better shut-off accuracy –
particularly for hard joints.
Increase the number of pulses per rundown.
Recommended number of pulses ≥ 6.
➔
Reduce the speed
Reducing the noise pressure level
➔
Reduce the speed
Reducing vibration
➔
Reduce the speed
Shortening the rundown time, particularly for
soft joints.
➔
Increase the speed
1. Unscrew the threaded pin using the size 2
hex wrench.
2. To reduce the speed, turn the exhaust air
throttle
clockwise.
3. To increase the speed, turn the exhaust
air throttle
counterclockwise.
Speed
Abb. 4-3
NOTE
A speed change may be carried out while the compressed air is activated.
After changing the speed, correct the torque if necessary;
see 4.4.1 Setting the torque, page 10.
86b_1_5 en bedingt.fm, 02.04.2008
P1885E/EN 2008-04
11
4
5
Troubleshooting
4.4.3
Measuring the torque
We recommend carrying out a static torque measurement by retightening the rundown.
When carrying out a dynamic measurement using a transducer adapter, also carry out a static
test, for example using a torque wrench (electronic).
4.4.4
Pulse frequency
The pulse frequency is set optimally for most applications. For special applications, such as an
extremely hard joint and small torque, the pulse frequency can be increased at the factory, thus
increasing the shut-off accuracy.
5
Troubleshooting
Error
Tool
does not shut off
Possible causes
Measures and remedies
Torque set too high
¾
Reduce the torque setting, see
4.4.1 Setting the torque, page 10.
Speed set too low
¾
Increase the speed, see 4.4.2
Changing the speed, page 11.
Working pressure < 58 psi (400 kPa)
¾
Check the cross section of the
hose and coupling: Inner
diameter 1/2" (ø 12,5 mm), maximum length 16.4 ft (5 m).
Increase the working pressure.
¾
Reverse button is
not at the detent
¾
Turn the reverse button
to the detent.
Excessive transmission damping due
to extension and worn socket
¾
Increase the speed, see 4.4.2
Changing the speed, page 11.
Use a shorter or more rigid extension.
Replace the socket.
¾
¾
Insufficient oil in the pulse unit (no
pulse build-up)
¾
¾
Insufficient shut-off
accuracy
Fastening time too
long: > 4 seconds
Screen in the air inlet tube /
muffler is dirty
¾
Clean or replace parts.
Number of pulses too low: < 6
¾
Reduce speed,
number of pulses > 6.
Adapter parts
¾
¾
Replace adapter parts.
Use extension and socket with
guide diameter.
Pressure fluctuations in the air network
¾
Use a pressure controller.
Joint too soft; self-locking nuts, drive
screws
¾
Increase the speed.
Use a pulse nutsetter with a
higher capacity.
Use a mechanical screwdriver.
¾
¾
12
See 6.2 Activating the reserve oil,
page 15.
See 6.2 Activating the reserve oil,
page 15.
P1885E/EN 2008-04
86b_1_5 en bedingt.fm, 02.04.2008
Maintenance
6
Maintenance
CAUTION!
Danger of injury due to unintentional activation
– before service, disconnect the tool from the compressed air supply.
6.1
Service schedule
Regular maintenance reduces operating faults, repair costs and downtime.
Maintenance
interval
Rundowns
W1
100,000
W2
W3
500,000
1,000,000
Measures
➔
Check the suspension bail for functional safety.
➔
Check the air hose for wear.
➔
Check the square on the output drive for wear.
➔
Check the air inlet for tight fit.
➔
Check the housing of the pulse unit for tight fit.
➔
Check the max. free speed.
➔
Oil change, see 6.3 Refilling oil, page 16.
➔
Motor service kit, see 3) Part of motor service kit
K1, order no. 935655, page 27.
➔
Hydraulic service kit, see 3) Part of hydraulic service kit K2, order no. 935656, page 31.
➔
Replace muffler, filter.
Check individual parts and replace if necessary.
➔
Suspension bail
➔
Throttle valve
➔
Exhaust air throttle
➔
Motor
➔
Pulse unit
This maintenance schedule uses values that are valid for most applications. For a specific service interval, see 6.1.1 Calculating a customer-specific maintenance plan, page 14.
Implement a safety-related maintenance program that takes the local regulations for repair and
maintenance for all operating phases of the tool into account.
86c_Wartung en bedingt.fm, 02.04.2008
P1885E/EN 2008-04
13
6
6
Maintenance
6.1.1
Calculating a customer-specific maintenance plan
A service interval W(1,2,3) depends on the following factors:
Factor
Value assumed in
6.1, "Maintenance
plan"
Description
V
V1 = 100,000
V2 = 500,000
V3 = 1,000,000
Number of rundowns after a maintenance measure is prescribed by Cooper Power Tools.
T1
1.8 seconds
Specific rundown time, measured in life and endurance tests.
T2
2 seconds
Actual rundown time, depending on the hardness of the joint.
S
1; 2; 3
Number of shifts per day.
VS
750
Number of rundowns per shift.
T2, S and VS are variable factors and can differ depending on the specific application.
Example for service interval W2:
After 500,000 rundowns (V),
a specific rundown time of 1.8 seconds (T1)
with an actual fastening time of 3 seconds (soft joint) and
3 completed shifts per day and 750 rundowns per shift:
V × T1
W ( 1, 2, 3 ) = -----------------------------T 2 × S × VS
500000 × 1, 8
W2 = --------------------------------3 × 3 × 750
= 133 ( days )
You have to carry out the maintenance measures marked W2 after an operating time of
133 days.
14
P1885E/EN 2008-04
86c_Wartung en bedingt.fm, 02.04.2008
Maintenance
6.2
Activating the reserve oil
If pulse build-up stops, some of the oil in the pulse unit has been used up. The reserve oil must
be activated. If the equalizing piston reaches the limit stop, oil must be refilled the next time (see
6.3 Refilling oil, page 16).
!
1.
2. Align both ends as shown in the illustration.
<66>
SW15
<70>
<68>
4. Turn <68> clockwise till the detent.
5. Turn <68> approx. 2,5 turns anticlockwise…
3.
<66>
<70>
<71>
6. …until <70> can be reinserted again.
86c_Wartung en bedingt.fm, 02.04.2008
P1885E/EN 2008-04
The reserve oil can be adjusted approx.
1 – 2 times until <71> is at the detent and
<70> can still be reinserted.
If necessary, turn back to the next groove.
15
6
6
Maintenance
6.3
Refilling oil
2
4
Approx.
7 oz. (200 ml)
7
1
3
5
6
9
15
14
10
8
4
Approx.
0.35 oz
(10 ml)
X
+
–
11
13
12
Item
Designation
1
Oil filling device asm.1)
2
Oil filling device without filling piece 1)
3
Filling piece asm.1)
4
Oil order no. 925715, ESSO-UNIVIS HVI26, approx. 2.1 qt (2 liters),
temperature 68 ±9 °F (20 ±5 °C)
5
Quick disconnect coupling
6
Working pressure 65 – 80 psi (450 – 550 kPa)
7
Shut-off valve
8
Pulse unit
9
Hydraulic rotor
10
Bearing ring
11
Equalizing piston
12
O-ring
13
Sleeve
14
Ball
15
Threaded pin
1) See 8.4 Equipment order list, page 32
16
P1885E/EN 2008-04
86c_Wartung en bedingt.fm, 02.04.2008
Maintenance
1.
Remove the threaded pin 15 and ball 14.
2.
Remove the O-ring 12 and sleeve 13.
3.
Align the output drive and claw as shown in the illustration, see 6.2 Activating the reserve
oil, page 15.
4.
Rotate the equalizing piston 11 clockwise as far as it will go until X = 0 (starting point).
5.
Unscrew the equalizing piston 11 counterclockwise by 1,0 turns (reserve oil volume).
6.
Connect the pulse unit 8 to the quick disconnect coupling 5 using the adapter.
7.
Close the shut-off valve 7.
8.
Set the working pressure to approx. 73 psi (500 kPa).
9.
Slowly open the shut-off valve 7 all the way until the
gauge shows a negative pressure of –13 psi (–90 kPa).
10. Wait approx. 2 minutes until the number of vacuum bubbles has reduced significantly.
11. Close the shut-off valve 7 slowly. The gauge shows atmospheric pressure again. Missing oil
is pushed into the pulse unit 8 .
12. Repeat steps 8 through 11 if necessary until the number of bubbles approaches zero.
13. Uncouple pulse unit 8, unscrew the adapter and add a couple of drops of oil using the injector.
14. Mount the ball 14 and screw the threaded pin 15 into place (0.75+0.25 ft lbf, or 1 +0.3 Nm).
15. Turn the equalizing piston 11 another 2,5 turns counterclockwise, or slightly more if necessary, until the sleeve 13 can be inserted (oil compensation volume).
16. Install the sleeve 13 and O-ring 12.
NOTE
Small air bubbles that become visible due to the high pressure during filling do not mean that the
pulse unit is leaking.
The filling process is not impaired.
86c_Wartung en bedingt.fm, 02.04.2008
P1885E/EN 2008-04
17
6
6
Maintenance
18
P1885E/EN 2008-04
86c_Wartung en bedingt.fm, 02.04.2008
Repair instructions
7
Repair instructions
Refer also to 8 Spare parts, page 25 and 8.4 Equipment order list, page 32
7.1
Disassembling the motor unit
<C3>
<C3>
<61>
<C2>
<54>
<C1>
<59>
<C1>
<59>
Changing blades
7.2
Changing bearing / rotor
Disassembling the throttle valve
<G>
Size 3/8"
1.
86d_Reparatur en bedingt.fm, 02.04.2008
2.
P1885E/EN 2008-04
3.
19
7
7
Repair instructions
7.3
Disassembling the pulse unit
Size 1/2"
CAUTION!
Skin irritation in case of direct contact with oil.
Wear protective gloves.
<D>
CAUTION!
Hydraulic blade is under spring pressure!
Wear protective goggles.
<65>
NOTE
Permitted only if filling is guaranteed with oil filling
device, see 6.3 Refilling oil, page 16. The pulse unit
must have cooled to room temperature.
Abb. 7-1
7.4
Assembling the motor unit
CAUTION!
•
•
Always carry out assembly according to the exploded drawing, see 8 Spare parts, page 25.
Incorrect assembly causes uncontrollable reactions, such as unexpected startup or ejection
of parts.
Tighten all screwed joints of the tool carefully, according to the specifications.
NOTE
To prevent damage, lubricate the gaskets and O-rings using grease (order no. 914392) before
assembly.
20
P1885E/EN 2008-04
86d_Reparatur en bedingt.fm, 02.04.2008
Repair instructions
7.4.1
Assembling the end plate
<59>
<C8>
<54>
<59>
<54>
<55>
<C4>
<C5>
<C6>
<C7>
X
Dimension X = 0.00" to 0.00236"
(0.00 to 0.06 mm)
1. Press in <59>, see dimension X.
Test force
1.12 – 3.37 lbf (5 – 15 N)
Y
Y
Dimension Y = 0.0002" to 0.0006"
(0.005 to 0.015 mm)
2. Check dimension Y.
<C…>
<C8>
<C4>
<C5>
<C6>
<C7>
Dimension X
<C4>
0.00
<C5>
0.00079" (0.02 mm)
<C6>
0.00158" (0.04 mm)
<C7>
0.00236" (0.06 mm)
<61>
<60>
<59>
<54>
<55>
<56>
<C9>
3. Press in <59> again if nec., see dimension X.
86d_Reparatur en bedingt.fm, 02.04.2008
<C8>
4. Press <61> against <60> until flush.
P1885E/EN 2008-04
21
7
7
Repair instructions
7.4.2
Assembling the shut-off piston
!
<44>
Do not use grease –
to hold the balls in place!
<49> (3×)
1.
<45>
<47>
<48>
2.
<59>
Size 4
3.
<44>
<47>
4.
<50>
5.
22
P1885E/EN 2008-04
86d_Reparatur en bedingt.fm, 02.04.2008
Repair instructions
7.4.3
Assembling the actuating ring
<E>
<E>
!
<32>
<44>
<47>
<55>
<32>
click!
<34>
<40>
33 (3×)
<56>
<60>
1.
3.
2.
Dimension X
< 0.053" (1,35 mm)
<34>
935465
0.059±0.0059" (1,5±0.15 mm) 935464
> 0.065" (1,65 mm)
935463
<34>
<44> Dimension X =
<34>
0.059±0.0059"
(1,5±0.15 mm)
4.
86d_Reparatur en bedingt.fm, 02.04.2008
5.
<47>
P1885E/EN 2008-04
6.
23
7
7
Repair instructions
7.5
Assembling the pulse unit
NOTE
To prevent damage, lubricate the gaskets and o-rings using grease (order no. 914392) before
assembly.
7.5.1
Assembling the hydraulic blades
<78>
<73>
<77>
<73>
<F1>
<F1>
2.
1.
<77>
<75>
<76> (2×)
<74>(2×)
4.
3.
5.
Size 1/2"
<73>
<F2>
<F1>
<D>
133+7.4 ft lbf
(180+10 Nm)
!
<65>
<F1>
<71>
6.
24
7.
P1885E/EN 2008-04
8.
86d_Reparatur en bedingt.fm, 02.04.2008
Spare parts
8
Spare parts
Note
Always use only original CLECO replacement parts. Failure to comply with this instruction can
result in decreased performance and an increased need for maintenance. Installing replacement
parts from other manufacturers will void all manufacturer's warranties.
We would be glad to prepare a special quote for you for spare and wear parts. Please provide us
with the following information:
•
Tool model
•
Number of tools
•
Number of rundowns per day or per shift
•
Shut-off torque
•
Fastening time per rundown
85e_Ersatzteile en.fm, 02.04.2008
P1885E/EN 2008-04
25
8
8
Spare parts
8.1
Pistol grip
OFF
0,7±0,1 Nm
0.5±0.1 lbf.ft
1 / ISO 4757
11
12
10
!
click
23
(22)
5
(24)
22
26
25
13
14
OFF
0,7 ±0,1 Nm
0.5 ±0.1 lbf.ft
15
1
935490 SW2
16
17
18
2
19
OFF
1
3
1,5+0,2 Nm
1.1+0.15 lbf.ft
931030 SW2,5
9
20
OFF
3+1 Nm
2.2+1 lbf.ft
21
<G>: 933375
4
5
4
6
OFF
20+2 Nm
14.8+1.5 lbf.ft
SW17
7
8
26
Connection for evaluation electronics TVP100
Adhesive, order no. 914860
Grease, order no.-Nr. 914392
P1885E/EN 2008-04
85e_Ersatzteile en.fm, 02.04.2008
Spare parts
Index
1
2
3
4
5
6
7
8
9
10
11
12
13
14
15
16
17
18
19
20
21
22
23
24
25
26
1)
935602
934917
935720
935434
922660
935437
905031
905599
S905998
935613
931792
935442
935482
539188
935441
504970
935440
912150
935439
905086
935446
911315
903764
935635
916772
917815
2)
1
1
1
1
1
1
1
1
1
1
1
1
1
1
1
1
1
1
1
1
1
1
1
1
1
1
3)
K1
K1
K1
K1
K1
K1
K1
K1
K1
K1
K1
K1
K1
K1
Description
pistol grip housing asm.
pipe plug
muffler
exhaust air throttle
o-ring
air inlet
screen
retaining ring
set bolt
reverse button
countersunk screw
suspension bail
compression spring
o-ring
piston
o-ring
control push rod
o-ring
plug
o-ring
push-button
ball
o-ring
motor unit
needle roller
retaining ring
4)
M 5X5
16,X1,5
11,X1, IR
M 4X4
M 3X 14
0,5 X 6,X 23,8
9,X1,
7,65X1,78
12,X1,
4,X1,
3,000MM
41,X2,
3,X9,8
45,X1,75IR
1)Order no.
2)Quantity
3)Part of motor service kit K1, order no. 935655
4)Dimesions
85e_Ersatzteile en.fm, 02.04.2008
P1885E/EN 2008-04
27
8
8
Spare parts
8.2
Motor unit 935635
Axial clearance, see 7.4.1 Assembling the end plate, page 21
Reference dimension X, see 7.4.3 Assembling the actuating ring, page 23
28
P1885E/EN 2008-04
85e_Ersatzteile en.fm, 02.04.2008
Spare parts
Index
30
31
32
33
34
35
36
40
41
44
45
47
48
49
50
51
52
53
54
55
56
58
59
60
61
1)
935479
902862
935443
935405
935463
935464
935465
935404
935451
935491
902862
935431
926570
935614
917793
911315
935444
935450
917794
935498
926565
935624
935630
935627
935628
935621
915832
2)
1
1
1
3
1
1
1
1
1
1
1
1
1
1
1
3
1
1
1
1
1
1
1
7
1
1
1
3) Description
K1 washer
K1 retaining ring
actuating ring
K1 ball
K1 ball sleeve 3,8
K1 ball sleeve 3,5
K1 ball sleeve 3,2
K1 washer
K1 compression spring
torque adjustment screw asm.
K1 retaining ring
shut-off piston
K1 o-ring
air distributor
K1 ball
K1 ball
sleeve
K1 compression spring
K1 ball
K1 compression spring
K1 ball bearing
rotor cover
rotor cylinder
K1 blade
rotor
rotor cover
K1 ball bearing
4)
7,1 X 2,4 X 1,5
10,X1, AR
4,76MM (3/16")
Ø6 × 3,8MM
Ø6 × 3,5MM
Ø6 × 3,2MM
0,7 X 14,5 X 17,
10,X1, AR
10,X1,
2,500MM
3,000MM
0,53X 5,27 X 13,5
4,500MM
0,85X 3,5X 26,
10,X 22,X 6,
L30,01 D1,5 H 9,5
17,X 30,X 7,
1)Order no.
2)Quantity
3)Part of motor service kit K1, order no. 935655
4)Dimesions
85e_Ersatzteile en.fm, 02.04.2008
P1885E/EN 2008-04
29
8
8
Spare parts
8.3
Pulse unit
66
Tightening torque, see
7.5 Assembling the pulse unit, page 24
For disassembly, note the position of the
balls in the control disc. Reassmble the
balls in the same position.
70
67
68
69
(70)
77
71
76
72
78
65
94
93
92
75
73
79
7
80
!
74
3
81
73
82
83
84
86
101
!
85
87
88
OFF
89
fest
tight
902904 ø53
OFF
1+0,3 Nm
0.75+0.25 lbf.ft
935490 SW2
90
30
P1885E/EN 2008-04
85e_Ersatzteile en.fm, 02.04.2008
Spare parts
Index
65
66
67
68
69
70
71
72
73
74
75
76
77
78
79
80
81
82
83
84
85
86
87
88
89
90
91
92
93
94
95
96
97
98
99
100
101
102
1)
*
921623
922645
935622
916809
935652
935960
916772
*
935631
935616
935632
935615
935618
935612
917793
935608
911315
919140
S909126
935646
902106
935633
921414
935647
935626
933818
914433
9D6481
26989
935651
*
*
*
*
*
935725
935644
2)
1
1
1
1
1
1
1
1
1
2
1
2
2
1
1
8
1
1
1
1
1
1
1
1
1
1
1
1
1
1
1
1
1
1
1
1
1
1
3)
K2
K2
K2
K2
K2
K2
K2
K2
K2
K2
K2
K2
K2
K2
K2
K2
K2
K2
K2
K2
Description
4)
pulse unit
o-ring
22 × 1,5
o-ring
28 X1,5
equalizing piston
o-ring
40,X1,5
sleeve
hydraulic cylinder asm.
needle roller
3, X9,8
hydraulic rotor asm.
compression spring
0,36 X 2,5 X 26,2
control blade asm.
compression spring
0,43X 2,8 X 51,8
hydraulic blade
control blade asm.
control disc
ball
2,500MM
bearing ring
ball
3,000MM
set bolt
M4X5
o-ring
20,X2,
o-ring
38,X1,5
retaining ring
33,X1,2IR
washer
25,0 X 31,8 X 1,0
ball bearing
20, X 32, X 7
o-ring
52,X1,5
housing
retaining ring
20,X1,2 AR
plug
0,3 X 3,2 X 9,2
compression spring
pin
retaining ring
18, X1,2 AR
ball
6,000
sleeve
compression spring
1,2 X 22, X 33,4
ring
retaining ring
18, X1,2 AR
supporting ring
ring
1)Order no.
2)Quantity
3)Part of hydraulic service kit K2, order no. 935656
4)Dimesions
*
Order no.
<65>
<73>
80PTHD604
935641
935600
–
–
–
–
–
80PTHD60Q
935640
935961
903231
935634
935648
935649
935651
85e_Ersatzteile en.fm, 02.04.2008
<96>
<97>
P1885E/EN 2008-04
<98>
<99>
<100>
31
8
8
Spare parts
8.4
Equipment order list
1)Order no.
32
P1885E/EN 2008-04
85e_Ersatzteile en.fm, 02.04.2008
Technical data
9
Technical data
9.1
Dimensions in mm
SW2,5
19,7
190
27,6
194
18
ø29,5
ø16 f8
ø57
ø53 -0,1
ø3
4
46
15,1
192
25
Ø29
29,1
SW17
1/4-18NPT
Abb. 9-1
9.2
Performance Data
Order no.
Recommended
torque range
ft.lbf (Nm)
min.
max.
80PTHD604
85f_TechnDaten en.fm, 02.04.2008
Air consumption
rpm
10.9
mm
6000
M10
1/2"
37 (50)
80PTHD60Q
Free
speed
59 (80)
7/16"
P1885E/EN 2008-04
lb (kg)
3.1
(1,40)
3.2
(1,45)
ft3/min (m3/min)
Free speed Pulses
26.5
(0,75)
19.4
(0,55)
33
9
10
Service
10
Service
NOTE
If repair is required send the complete 80PTHD… to Cooper Power Tools. It may be repaired
only by authorized technicians. If the tool is opened, the warranty is voided.
11
Disposal
CAUTION!
Injuries and environmental damage from improper disposal.
The components and auxiliary materials of a machine incorporate risks to health and the environment.
34
➔
Catch auxiliary materials (oils, greases) when drained and dispose of them properly.
➔
Separate the machine parts by material and dispose of them properly.
➔
Separate the components of the packing and dispose of them by segregating them
clearly.
➔
Wear suitable protective clothing at the time of disposal.
➔
Follow the general prevailing disposal guidelines.
➔
Follow the locally applicable regulations.
P1885E/EN 2008-04
85f_TechnDaten en.fm, 02.04.2008
Sales & Service Centers
Note: All locations may not service all products. Please contact the nearest Sales & Service Center for the
appropriate facility to handle your ser vice requirements.
Dallas, TX
Cooper Power Tools
Sales & Service Center
1470 Post & Paddock
Grand Prairie, TX 75050
Tel: (972) 641-9563
Fax: (972) 641-9674
Detroit, MI
Cooper Power Tools
Sales & Service Center
4121 North Atlantic Blvd.
Auburn Hills, MI 48326
Tel: (248) 391-3700
Fax: (248) 391-6295
Cooper Power Tools
P.O. Box 1410
Lexington, SC 29071-1410
USA
Tel: 800-845-5629
803-359-1200
Fax: 803-359-0822
Cooper Power Tools
4121 North Atlantic Blvd.
Auburn Hills, MI 48326
USA
Tel: (248) 391-3700
Fax: (248) 391-6295
Houston, TX
Cooper Power Tools
Sales & Service Center
6550 West Sam Houston
Parkway North, Suite 200
Houston, TX 77041
Tel: (713) 849-2364
Fax: (713) 849-2047
Lexington, SC
Cooper Power Tools
670 Industrial Drive
Lexington, SC 29072
Tel: (800) 845-5629
Tel: (803) 359-1200
Fax: (803) 358-7681
Cooper Power Tools
de México S.A. de C.V.
Libramiento La Joya No. 1
Bodega No. 2
Esq. Politécnico
Barrio San José
Cuautitlán, Edo de México
C.P. 54870
Tel: +52-55-5899-9510
Fax: +52-55-5870-5012
Cooper Tools Industrial Ltda.
Av. Liberdade, 4055
Zona Industrial - Iporanga
18087-170 Sorocaba, SP
Brazil
Tel: +55-15-3238-3929
Fax: +55-15-228-3260
Cooper Industries, Ltd.
600 Travis, Ste. 5800
Houston, TX 77002-1001
Tel: 713-209-8400
www.cooperindustries.com
PL12EN-1660 022108
Specifications subject to change without notice. © 2008 COOPER INDUSTRIES, INC.
Seattle, WA
Cooper Power Tools
Sales & Service Center
2865 152nd Ave N.E.
Redmond, WA 98052
Tel: (425) 497-0476
Fax: (425) 497-0496
York, PA
Cooper Power Tools
Sales & Service Center
3990 East Market Street
York, PA 17402
Tel: (717) 755-2933
Fax: (717) 757-5063
Canada
Cooper Power Tools
Sales & Service Center
5925 McLaughlin Road
Mississauga, Ont. L5R 1B8
Canada
Tel: (905) 501-4785
Fax: (905) 501-4786
Cooper Power Tools SAS
Zone industrielle – B.P. 28
77831 Ozoir-la-Ferrière Cedex
France
Tel: +33-1-6443-2200
Fax: +33-1-6440-1717
Cooper Tools Hungária Kft.
Berkenyefa sor 7
H-9027 Györ
Hungary
Tel: +36-96-505 300
Fax: +36-96-505 301
Cooper Power Tools
GmbH & Co. OHG
Postfach 30
D-73461 Westhausen
Germany
Tel: +49 (0) 73 63/ 81-0
Fax: +49 (0) 73 63/ 81-222
E-Mail:
[email protected]
Cooper (China) Co., Ltd.
955 Sheng Li Road,
Heqing Pudong, Shanghai
China 201201
Tel: +86-21-28994176
+86-21-28994177
Fax: +86-21-51118446
www.cooperpowertools.com