1
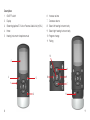
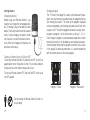
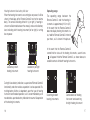
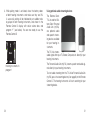
Beltone Direct
Remote Control 2
Instructions for use
Welcome
Statement:
Congratulations on your purchase of a Beltone Direct Remote
Control 2.
This device complies with Part 15 of the FCC Rules.
Remote Control 2 will allow you to operate your Beltone wireless hearing instruments. It is both an elegant and user-friendly
remote control as well as status reader which gives you access
to wireless functions on your hearing instruments.
The Remote Control 2 can be used to tune both of your hearing instruments simultaneously. Or you can control both hearing
instruments individually, allowing you to perfectly fine-tune your
hearing instruments to any specific hearing situation.
Please read this manual carefully to fully benefit from the
Remote Control 2. Ask your hearing care professional if you
have any questions.
For further information you can also visit the
www.beltone-hearing.com web site.
For your safety, carefully read the chapter Important Information, on pages 31-35
Operation is subject to the following two conditions: (1) this device
may not cause harmful interference, and (2) this device must accept any interference received, including interference that may
cause undesired operation.
Note: This equipment has been tested and found to comply with
the limits for a Class B digital device, pursuant to part 15 of the
FCC Rules. These limits are designed to provide reasonable protection against harmful interference in a residential installation.
This equipment generates, uses and can radiate radio frequency
energy and, if not installed and used in accordance with the instructions, may cause harmful interference to radio communications.
However, there is no guarantee that interference will not occur in a
particular installation. If this equipment does cause harmful interference to radio or television reception, which can be determined
by turning the equipment off and on, the user is encouraged to
try to correct the interference by one or more of the following
measures:
FCC ID: X26RC-2
2
3
• Reorient or relocate the receiving antenna
National restrictions:
• Increase the separation between the equipment and receiver.
Norway: You are not allowed to operate the equipment within 20
km of the centre of Ny Ålesund.
• Consult the dealer or an experienced radio/TV technician for
help.
Changes or modifications can void the user’s authority to operate
the equipment.
Intended use
Remote Control 2 is intended to let the user control a Beltone
wireless hearing instrument remotely. The essential performance
of the Remote Control 2 is to transfer signals to a Beltone wireless
hearing instrument for adjustment of volume and program.
This product is in compliance with the following regulatory standards:
In EU: The device conforms to the Essential Requirements according to - Annex I of Council Directive 93/42/EE C for medical
devices (MDD ) and essential requirements and other relevant
provisions of Directive 1999/5/EC (R&TTE). The declaration of
conformity may be consulted at www.beltone-hearing.com
In US: FCC CFR 47 Part 15, subpart C.
Other identified applicable international regulatory requirements
in countries outside EU and US. Please refer to local country requirements for these areas.
List of countries
IC: 6941C-RC2
Products are intended for sale in countries within European Economic Area as well as Switzerland.
This Class B digital apparatus complies with Canadian ICES 003.
Cet appareil numérique de la classe B est conforme à la norme
NMB-003 du Canada.
Operation is subject to the following two conditions: (1) this device may not cause interference, and (2) this device must accept
any interference, including interference that may cause undesired
operation of the device.
4
5
L’exploitation est autorisée aux deux conditions suivantes : (1)
l’appareil ne doit pas produire de brouillage, et (2) l’utilisateur
de l’appareil doit accepter tout brouillage radioélectrique subi,
même si le brouillage est susceptible d’en compromettre le fonctionnement.
Contents
In JP:
Return to Home settings ......................................................... 14
This device has been granted a designation number by Ministry of
Internal Affairs and Communications under „Ordinance concerning Technical Regulations Conformity Certification etc. of Specified Radio Equipment (特定無線設備の技術基準適合証明 等に
関する規則)“ Article 2-1-19 “This device should not be modified
(otherwise the granted designation number will be invalid)“
Battery low indicator ............................................................... 15
Description................................................................................8
Getting Started ....................................................................... 10
Adjust volume ......................................................................... 12
Operating range ...................................................................... 17
Screen display ........................................................................ 18
Remote Control 2 performance .............................................. 18
Pairing ..................................................................................... 19
Using optional audio streaming devices.................................. 21
Activating streaming from Beltone Direct TV Link ...................22
Streaming mode volume adjustement .................................... 24
Phone (optional) ......................................................................27
Appendix: exceptions to normal operation..............................28
Important information.............................................................. 31
Technical specifications ..........................................................36
Warranty .................................................................................37
Troubleshooting guide ............................................................40
Notes ......................................................................................46
6
7
Description
ON/OFF switch
6
Display
7
Decrease volume
3
Streaming (optional TV Link or Personal Audio Link (myPAL)
8
Select left hearing instrument only
4
Home
9
Select right hearing instrument only
5
Hearing instrument microphone mute
10 Program change
1
2
Increase volume
11 Pairing
10
2
6
4
5
8
9
1
7
3
8
11
9
Getting Started
Charging the Battery
Before using your Remote Control 2, you
need to fully charge the rechargeable battery. To charge it, plug in the cable as shown
below. Then plug the other end into a power
outlet. During charging, the battery meter
will show one, two and three bars continuously. When fully charged, all three bars will
be shown continuously.
Changing program
The “P” button (10 on page 9) is used to switch between the programs that your hearing care professional has programmed into
your hearing instruments. The name of the program displayed
can be configured by your hearing care professional. Each time
you press the “P” button the program advances one step, returning back to program 1 at the end of each cycle (e.g. 1, 2, 3, 1).
Each change in program is accompanied by beep tones in both
hearing instruments, if not disabled by your hearing care professional during the fitting, and the program currently in use is shown
in the display. For optimal performance, it is recommended that
both instruments be set to the same program.
Turning your Remote Control 2 ON and OFF
To turn your Remote Control 2 ON, slide the ON/ OFF switch (1 on
page 8) down to the ON position. A white ”I” icon will be visible on
the base of the switch and the display will turn on.
To turn your Remote Control OFF, slide the ON/OFF switch up to
the OFF position.
Basic
Program 1 ‘Basic’
Restaurant
Program 2 ‘Restaurant’
Do not charge the Remote Control 2 while it is
on your body.
10
11
Adjust volume
Adjust volume on both hearing instruments
The “+” and “-“ keys are used to adjust volume
(6 and 7 on page 9). Volume may be adjusted
Restaurant
on both hearing instruments simultaneously or
on each side independently. By default, both
hearing instruments are “active” which is indicated in the display by two arrowheads (< and
>) located next to the volume bars. Both hearing instruments can
simultaneously be made louder by pressing the “+” key or softer
by pressing the “-“ key. Each adjustment is accompanied by beep
tones in the hearing instruments, if not disabled by your hearing
care professional during the fitting, as well as a visual change in
the volume bars shown in the display. Default volume level is indicated by a horizontal green line in the volume bars.
Adjust volume on the left hearing instrument only
To adjust volume on the left side only, first press
the “<” key on the keypad (8 on page 9). Doing
so will make the left hearing instrument “active”
and the right hearing instrument “inactive”. This
will be indicated by a left arrowhead (<) in the
display, with the right arrowhead turned off and
a dimmed volume bar on the right side. Now
12
press “+” or “-“ to adjust volume on the left hearing instrument
only.
Adjust volume on the right hearing instrument only
To adjust volume on the right side only, first
press the “>” key on the keypad (9 on page 9).
Doing so will make the right side “active” and
Restaurant
the left side “inactive”. This will be indicated by
a right arrowhead (>) in the display with the left
arrowhead turned off and a dimmed volume
bar at the left side. Now press “+” or “-“ to adjust volume on the right side only.
To return to simultaneous adjustment mode, press either the <
or > (8 or 9 on page 9) keys on the keypad until both arrowheads
appear in the display, indicating that both hearing instruments are
again “active”.
i
Restaurant
Note: If ear to ear synchronization is enabled in your hearing
instruments, individual volume adjustment may be automatically
realigned across the left and right hearing instruments.
Mute/Unmute (Not available with Beltone True hearing aids)
You can mute and unmute the hearing instrument microphones by
pressing the mute button (5 on page 8) on the Remote Control 2.
13
Muting or unmuting applies to both hearing instruments simultaneously and cannot be selected for the left or right instrument
separately.
When the microphones are muted, the microphone icon
will
be replaced by a microphone muted icon
and the volume
bars will be dimmed. To unmute the hearing aid microphones
press the mute button again.
Activate streaming
If you are using an optional Beltone streaming device, such as
the Beltone Direct TV Link or Beltone Direct Personal Audio Link
(myPAL), input from these devices can be activated by pressing
the streaming button (3 on page 8). Also see the chapter on Using
optional audio streaming devices.
Low battery indicator
Remote Control 2 low battery indicator
The battery level of the Remote Control 2 is indicated by a battery
meter holding three bars. As the battery is gradually depleted, the
bars will disappear one by one. When the battery is low on power
the battery meter will start flashing, indicating that recharging is
needed.
Low battery on
Remote Control 2
Restaurant
Return to Home settings
Home settings, i.e. those that apply whenever the hearing instruments are first turned on, will be activated by pressing the Home
button (4 on page 8). Pressing the Home button will:
a. Activate program 1 in both hearing instruments
b. Adjust both hearing instruments to default volume settings
c. Set volume to simultaneous adjustment mode
The Home button will also terminate any streamed audio signals
from any optional Beltone streaming device.
14
15
Hearing instrument low battery indicator
When the hearing instruments are running low on power, it will be
shown in the display of the Remote Control 2 next to the volume
bar(s). The arrows indicating either left (<) or right (>) hearing instrument will alternate between the arrow(s) and a vertical battery
icon, indicating which hearing instrument (left or right) is running
low on power.
Restaurant
Low battery on left
hearing instrument
Restaurant
The operating range between the
Remote Control 2 and the hearing instruments is approximately 100 cm (40”).
In the event that the Remote Control 2
does not display hearing instrument status, hold the Remote Control 2 in front of
your chest, as it is shown in the picture.
In the event that the Remote Control 2
cannot find the status of the hearing instruments, search icons
will appear. Hold the Remote Control 2, as shown above, to
establish contact with both hearing instruments.
Low battery on right
hearing instrument
During this low battery indication, suspension of Remote Control 2
functionality and other wireless operation is to be expected. Remaining battery lifetime is dependent upon the type of hearing
instrument and mode of operation, so it is recommended to put in
new batteries upon low battery indication to resume full operation
of the hearing instruments.
16
Operating range
Basic
Searching for both
hearing instruments
Connected to left hearing
instrument and searching
for right hearing instrument
17
i
Screen display
Pairing
To conserve battery life, the Remote Control 2 has a standby
feature that automatically puts it into a “sleep” mode after 20
seconds of non-use. Whenever the display is dark, simply press
any button on the keypad to awaken the display and then perform
the desired action.
Note! The following information is intended primarily for your hearing care professional, who in most cases will complete the tasks
that are necessary before the Remote Control 2 can be used with
your hearing instruments. However, the process is designed to
be simple and should be easily accomplished by almost anyone.
Remote Control 2 performance
Pairing is the process of setting up an exclusive communication between your hearing instruments and your
Remote Control 2. Your hearing care professional can set up pairing during the fitting of your hearing instruments. Alternatively, you
can follow the below steps to pair your hearing instruments to the
Remote Control 2:
The Remote Control 2 performs best when buttons are pressed
one step at a time, rather than in rapid sequence. When adjusting volume, for example, briefly press a button and wait a short
moment for the beep tones* to be heard before continuing. This
tip applies to all button use but is especially relevant to volume
adjustments.
1. Make sure the Remote Control 2 is fully charged and is turned
ON. Your hearing instruments must be off – open the battery
doors.
*Please note that tones may have been disabled by your hearing
care professional during fitting
18
2. Press the pairing button on the
Remote Control 2 (11 on page 9)
one time. This will activate the pairing mode which will be active for 20
seconds.
Searching for hearing instruments
19
3. While pairing mode is activated, close the battery doors
of both hearing instruments and make sure they are ON.
A successful pairing will be indicated by an audible melody played in both hearing instruments, and shown in the
Remote Control 2 display with active volume bars and
program “1” (see below). You are now ready to use the
Remote Control 2!
Basic
Hearing instruments in
program 1
Using optional audio streaming devices
The Beltone Direct
TV Link and the Beltone Direct Personal
Audio Link (myPAL)
are optional audio
and speech streaming devices available
for your hearing instruments.
The TV Link streams
audio signals from your TV, Stereo, Computer, etc. directly in your
hearing instruments.
The Personal Audio Link (myPAL) streams speech and audio signals directly to your hearing instruments.
To start audio streaming from the TV Link or Personal Audio Link
(myPAL) press the streaming button (3 on page 8) on the Remote
Control 2. The hearing instruments will start searching for your
streaming device.
20
21
Activating streaming from Beltone Direct Line TV Link
To start audio streaming from the TV, stereo or another device connected to your TV Link, simply turn on the audio device and then press the streaming button (3 on page 8). The
hearing instruments will instantly start searching for the TV Link
and connect to it.
TV
No TV found
TV
Searching for TV
22
TV
You can have up to 3 streaming devices set up for your hearing
instruments. Each streaming device is indicated in the display by
a letter designation: A, B or C. If more than one streaming device
is in use, press the streaming button again until the desired audio
signal is heard.
Connected to TV
23
Streaming mode volume adjustment
audio” volume bar will be dimmed.
(Limited functionality for Beltone True wireless hearing instruments. See “Beltone True streaming mode volume adjustments“
section).
Press “+” or “-“ (6 or 7 on page 9) to adjust hearing instrument volume.
When in streaming mode, both hearing instruments volume (left
volume bar) and streamed audio volume (right volume bar) adjustments are by default “active”. This is indicated in the display by
the two arrowheads (< and >) located next to the volume bars.
To adjust both hearing instrument and streamed audio volume
simultaneously, press the “+” or “-“ key (6 or 7 on page 9) on the
Remote Control 2.
Note: If you are using two hearing instruments, any volume adjustment will apply to both hearing instrument in parallel.
It is also possible to make individual volume adjustments for the
hearing instruments and the streamed audio signal respectively.
Adjust hearing instrument volume only
To adjust the hearing instrument volume, press the left “<” key on
the keypad (8 on page 9) once. Now you will see two arrowheads
“<>” next to the hearing instrument volume bar and the “streamed
24
TV
To return to simultaneous adjustment mode,
press the “>” key (9 on page 9) on the keypad until one arrowhead appears next to each
volume bar in the display, indicating that both volume levels are
“active”.
Adjust streamed audio volume only
To adjust the streamed audio volume, press the right “>” key on
the keypad (9 on page 9) once. Now you will see two arrowheads
“<>” next to the streamed volume bar and the “hearing instrument” volume bar will be dimmed.
Press “+” or “-“ (6 or 7 on page 9) to adjust the streamed audio
volume.
To return to simultaneous adjustment mode,
press the “<” key (8 on page 9) on the keypad
until one arrowhead appears next to each volume bar in the display, indicating that both volume levels are “active”.
TV
25
Phone (optional)
Beltone True streaming mode volume adjustments
If you are using Beltone True wireless hearing instruments volume
adjustment will apply to the streamed audio signal only.
If necessary, adjust volume using the “+” and “-“ keys (6 or 7 on
page 9). The volume of the streamed audio signal can also be adjusted individually for left and right hearing instrument by pressing
< or > (8 or 9 on page 9).
To stop streaming and return to the previous program, press the
“P” button (10 on page 9). Alternatively, press the Home button
(4 on page 8), which will reset your hearing instrument to default
settings (see section on “Return to Home settings”) and also reset
the Remote Control 2 to simultaneous adjustment mode.
26
The Beltone Direct Phone Link 2 or the Auto-Phone hearing instrument feature also work with the Remote Control 2. When using the Phone Link 2 or Auto-Phone this will be indicated on the
display:
TV
Once the phone call has ended, the hearing
instruments will return to the previously used
program. That program is shown on the display
of the Remote Control 2. Volume adjustments
made during the phone call will not be transferred to your previously used program.
Phone calls will temporarily disrupt streaming from your optional
streaming devices, but streamed audio will be restored once the
phone call has ended.
27
Appendix: exceptions to normal operation
It is recommended that both hearing instruments be set to the
same program at all times. However, it is possible to have different programs on the two hearing instruments, such as program 1
on the left side and streamed audio on the right. Under conditions
such as these the Remote Control 2 functions slightly differently,
as the following examples illustrate.
Situation #1: You have started with program 1 on both sides but
have changed the right side to program 2 using the push button
on the right hearing instrument. If you now press the “P” button on the Remote Control 2, the left instrument will advance to
program 2, matching that on the right. Further presses of the “P”
button will advance both instruments, thus keeping the same program on both sides.
Situation #2: You have set the left instrument to program 1 and
the right instrument to program 2. If you now press the Streaming button, both instruments will receive streamed audio from
the same source (e.g. the TV). If you now press the “P” button,
streaming will be cancelled on both sides and both instruments
will return to their former programs (program 1 and program 2).
Situation #3: You have program 1 on the left side but have started
streaming on the right side using a long button press on the right
hearing instrument. If you now press the “P” button, your right
28
hearing instrument will return to the program it came from, and
your left hearing instrument will advance to the next program following the one it is in. Another press on the “P” button will align
both hearing instruments to the same program.
If you press the Streaming button instead, both instruments will
be set to the same streamed audio program.
Situation #4: Both instruments are set to program 1 but you are
using the Auto-Phone feature on the left side. If during the call you
press the “P” button, the right side will advance to program 2 but
this will not disrupt the call. After the call, the left side will remain
in program 1. If during the call you press the Streaming button
instead, streaming will start on the right side only, also allowing
the call to continue on the left side.
Situation #5: The Streaming button has been used to start
streamed audio on both sides but you are using the Auto-Phone
feature on the left side. If during the call you press the “P” button, streaming will be cancelled on the right side but this will not
disrupt the call. If during the call you press the Streaming button instead, streaming on the right side will advance to the next
Streaming program on the right side only, also allowing the call
to continue.
Situation #6: If your hearing instruments are in different hearing
instrument programs, only the program numbers for each hearing
instrument will be shown. No program label/name will be shown.
29
Situation #7: If one hearing instrument is in streaming mode and
the other one is in one of the hearing instrument programs, only
the streaming display will be shown with no indication of hearing
instruments program number and label/name.
Important information
Maintenance and care
i
• Clean the Remote Control 2 using a damp cloth. Never use
household cleaning products (washing powder, soap, etc.) or
alcohol to clean the device.
• Protect the Remote Control 2 from excessive moisture (bathing, swimming) and heat (radiator, car, dashboard). Protect it
from excessive shock and vibration.
General warnings
i
• Keep the Remote Control 2 out of reach of children under 3
years.
• Remote Control 2 uses low-powered digitally coded transmissions in order to communicate with other wireless devices.
Although unlikely, nearby electronic devices may be affected.
In that case, move the Remote Control 2 away from the affected electronic device.
• When using Remote Control 2 and the device is affected by
electromagnetic interference, move away from the source.
30
31
General precautions
i
• Your hearing instrument and the Remote Control 2 were given
a unique communication network code during the fitting. This
ensures that the Remote Control 2 will not affect hearing instruments worn by others.
• High-powered electronic equipment, larger electronic installations and metallic structures may significantly reduce the
operating range.
• Use only original Beltone accessories.
• Do not make any changes or modifications to the Remote
Control 2.
• Opening the Remote Control 2 might damage it. If problems
occur which cannot be resolved by following the remedy
guidelines in the troubleshooting section of this user guide,
consult your hearing care professional.
• The Remote Control 2 may only be repaired by an authorized
service center.
• Do not use Remote Control 2 in areas where RF transmission
is prohibited, e.g. air planes etc.
BUILT-IN BATTERY CARE:
i
Please observe the following if the product contains a battery
• Your product is powered by a rechargeable battery.
• The full performance of a new battery is achieved only after
two or three complete charge and discharge cycles.
• The battery can be charged and discharged hundreds of
times, but will eventually wear out.
• Unplug the charger from the electrical plug and the product
when not in use.
• If left unused, a fully charged battery will lose its charge over
time.
• Leaving the product in hot places, such as in a closed car in
the summer conditions, will reduce the capacity and lifetime
of the battery.
• A product with a cold battery may not work temporarily, even
when the battery is fully charged. Battery performance is particularly limited in temperatures well below freezing.
• Do only connect Remote Control 2 to connections which it is
explicitly intended for.
32
33
Battery warning
i
• ”Caution” – The battery used in this product may present a risk
of fire or chemical burn if mistreated.
• Do not attempt to open the product or replace the battery.
• It is built-in and not changeable. Use of other batteries may
present a risk of fire or explosion and the warranty will be terminated.
• The battery in your product can not be removed or replaced
by the user. Any attempt to do so is risky and may result in
damage of the product.
• Only recharge the Remote Control 2 with a power supply unit
that has been supplied together with the product.
• Dispose of batteries according to local regulations. Please recycle when possible.
• Do not dispose the battery as household waste or in a fire as
it may explode.
• Batteries may explode if damaged.
i
Charger Care
Please observe the following if the product is supplied with a
charger
• Do not attempt to charge your product with anything other
than the AC adapter provided. The use of any other types may
damage or destroy the product and could be dangerous.
• Use of other chargers may invalidate any approval or warranty.
• For availability of approved enhancements, please check with
your hearing care professional.
• Charge the product according to the instructions supplied
with the product.
Charger warning
i
• When you disconnect the power cord or any enhancement,
grasp and pull the plug, not the cord.
• Never use a charger that is damaged.
• Do not attempt to disassemble the charger as it may expose
you to dangerous electric shock.
• Incorrect reassembly can cause electric shock or fire when
the product is subsequently used.
• Avoid charging your product in extremely high or low temperatures and do not use the charger outdoors or in damp areas.
34
35
Warranty
Technical specifications
Operating range:
up to 3 meters
Wireless:
2,4 GHz
Operating temperature:
0 to 55 °C
Storage temperature:
-20 to 60 °C
The Beltone Direct Remote Control 2 is covered by a limited warranty issued by the manufacturer for a period of 12 months from
the day of the original purchase. Please notice that extended warranties may apply in your country. Please contact your local hearing care professional for more information.
Temperature test, transport and storage information
What is covered by this warranty?
The product is subject to various tests in temperature and damp
heating cycling between -25 °C and +70 °C according to internal
and industry standards.
Any electrical component, that because of workmanship, manufacturing or design defects fails to function properly under normal
use during life of this warranty will be replaced or repaired at no
charge for parts or labour when returned to the point of purchase.
If it is determined that repair is not feasible, the entire unit may be
replaced with an equivalent unit upon mutual agreement of the
hearing care professional and the customer.
36
37
What is not covered by this warranty?
Problems arising from improper handling or care, excessive use,
accidents, repairs made by an unauthorized party, exposure to
corrosive conditions or damage due to foreign objects entering
the device are NOT covered by the limited warranty and may void
it. The above warranty does not affect any legal rights that you
might have under applicable national legislation governing sale
of consumer products. Your hearing care professional may have
issued a warranty that goes beyond the clauses of this limited
warranty. Please consult your hearing care professional for further information.
Serial number:
Date of purchase:
38
39
TROUBLESHOOTING GUIDE
SYMPTOM
CAUSE
The display remains The Remote Control 2 is switched
turned off when pressing off
a key on the
Remote Control 2 The battery in the Remote Control 2
is depleted
No information is shown The Remote Control 2 and hearing
in the display after it has instruments have not been paired
been activated
The pairing button on
the Remote Control 2 is
pressed but the ’search’
icon on the display does
not become substituted
by the status of the hearing instrument
40
POSSIBLE REMEDY
Turn the Remote Control 2 on by sliding the ON/OFF down to
the ON position
Recharge the battery
Carry out the pairing process
The Remote Control 2 and hearing
instrument are not within wireless
range
Assure that Remote Control 2 and hearing instrument are within wireless range, and repeat pairing process
The Remote Control 2 and hearing
instrument have not been simultaneously in pairing mode
Repeat pairing process and assure that the battery doors on
both hearing instruments are closed within 20 seconds after
the pairing button has been pressed on the Remote Control 2
41
TROUBLESHOOTING GUIDE
SYMPTOM
CAUSE
The ’search’ icon on the The Remote Control 2 and hearing
Remote Control 2 display instrument are not within wireless
is displayed constantly range
Assure that Remote Control 2 and hearing instrument are within wireless range
The hearing instrument is not powered on
Power on the hearing instrument
The battery in the hearing instrument is depleted
Replace the battery in the hearing instrument with a new one
Two different program The two hearing instruments are
numbers or icons are not in the same program. This can
shown on the display
be for several reasons, e.g. that
one of the hearing instruments
was not within wireless range
when a command was given from
the Remote Control 2, or because
you have changed program on
one of the hearing instruments by
pressing its pushbutton
42
POSSIBLE REMEDY
Align hearing instrument program either using the Remote
Control 2 or the program button on the hearing instrument
Note: Due to an internal priority scheme, this command will
not have any effect on a hearing instrument being in the phone
program (i.e. a phone icon is shown on the Remote Control 2
display)
43
TROUBLESHOOTING GUIDE
SYMPTOM
CAUSE
POSSIBLE REMEDY
When changing volume
on the hearing instruments using the ”+” or ”-”
keys, the volume does not
change on one hearing
instrument
Volume control is activated for one
hearing instrument only (i.e. only
one of the ”<” and ”>” arrowheads
are shown on Remote Control 2
display)
Press the ”<” or ”>” key as appropriate to activate volume control also for the other hearing instrument
44
45
Notes:
46
Notes:
47
Notes:
48
Notes:
49
Be aware of information marked with the warning symbol
i
WARNING points out a situation that could lead to serious injuries,
CAUTION indicates a situation that could lead to minor
and moderate injuries
i
Advice and tips on how to handle your Beltone Direct
accessory better.
Equipment includes RF transmitter
Please ask your local hearing care professional
concerning disposal of your Beltone Unite accessory
Product is a Type B applied part
Any issues relating to the EU Medical Device Directive
93/42/EEC and R&TTE Directive 1999/5/EEC should
be directed to GN Hearing A/S, Lautrupbjerg 7,
DK 2750 Ballerup, Denmark
50
51
Beltone
8001 E. Bloomington Freeway
Bloomington, MN 55420-1036
1-800-BELTONE
400254011 Rev.A
© Beltone 2013
Beltone Canada
301 Supertest Road
Toronto, Ontario M3J 2M4
Canada
1-800-387-3744
www.beltone.com