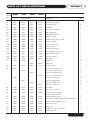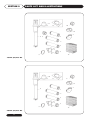
1
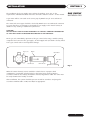
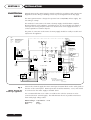
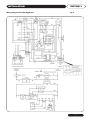
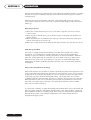
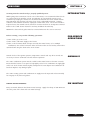
Wednesbury One,
Black Country New Road
Wednesbury,
West Midlands WS10 7NZ
Tel: +44 (0)121 506 7400
Fax: +44 (0)121 506 7401
Email: [email protected]
Website: www.andrewswaterheaters.co.uk
11/02
INSTALLATION
GUIDE,
OPERATION
AND SERVICE
MANUAL
NATURAL GAS,
PROPANE & BUTANE
FIRED STORAGE
WATER HEATERS
MODELS
CSC 39
CSC 59
CSC 78
CSC 93
CSCL 39
CSCL 59
CSCL 78
CSCL 93
Auto Ignition
T H I S
M A N U A L
M U S T
B E
K E P T
W I T H
T H E
A P P L I A N C E
Part No. E191
© Copyright Andrews Water Heaters 2002
Reproduction of any information in this publication by any method is not permitted
unless prior written approval has been obtained from Andrews Water Heaters.
Andrews Storage Water Heaters have been designed and manufactured to comply
with current International standards of safety. In the interests of the health and
safety of personnel and the continued safe, reliable operation of the equipment,
safe working practices must be employed at all times. The attention of U.K. users is
drawn to their responsibilities under the Health and Safety Regulations 1993.
All installation and service on the Andrews Water Heater must be carried out by
properly qualified personnel, and therefore no liability can be accepted for any
damage or malfunction caused as a result of intervention by unauthorised
personnel.
The Andrews Water Heaters policy is one of continuous product improvement, and
therefore the information in this manual, whilst completely up to date at the time of
publication, may be subject to revision without prior notice.
Further information and assistance can be obtained from:
Andrews Water Heaters
Wednesbury One, Black Country New Road
Wednesbury, West Midlands WS10 7NZ
Tel: +44 (0)121 506 7400 Fax: +44 (0)121 506 7401
Email: [email protected]
Website: www.andrewswaterheaters.co.uk
THE ANDREWS WATER HEATERS COVERED IN THIS MANUAL
ARE FOR USE WITH NATURAL GAS OR LPG (PROPANE OR BUTANE) GAS ONLY
CONTENTS
SECTION 1
PAGE
GENERAL AND SAFETY INFORMATION
General Information
British Standards and Codes of Practice
Health and Safety Regulations 1993
Effectiveness in Combating Legionellae
2
2
3
3
SECTION 2
TECHNICAL DATA
4
SECTION 3
INSTALLATION
Introduction
Location
Gas Supply - Natural Gas
Gas Supply - LPG (Propane or Butane) Gas
Electrical Supply
Flue Systems
Air Supply and Ventilation
Water Quality and Treatment
Water Connections
SECTION 4
COMMISSIONING
Filling the Heater with Water
Draining Water from the Heater
Lighting the Burner
Shutting Off the Burner
Checking Main Burner Pressure
Checking Pilot and Burner Flames
User's Safety Guide
SECTION 5
25
25
25
26
26
26
27
OPERATION
Operating Sequence
ECO (Energy Cut-Off)
Temperature Stratification (Stacking)
SECTION 6
6
6
7
8
10
12
18
20
21
28
28
28
SERVICING
Introduction
Pre-Service Operations
Annually
Six Monthly
Burner Assembly
Gas Control Valve
Magnesium Anodes
Combined Temperature and Pressure Relief Valve
Cleaning the Storage Vessel
Restart
29
29
29
29
30
30
30
31
31
31
SECTION 7
FAULT FINDING
32
SECTION 8
PARTS LISTS AND ILLUSTRATIONS
34
SECTION 1
GENERAL
INFORMATION
GENERAL AND SAFETY INFORMATION
The Andrews Water Heater has been designed for use with NATURAL GAS OR LPG
(PROPANE OR BUTANE) GAS only and is manufactured to give an efficient, reliable and
long service life.
To ensure the continued, trouble-free operation of your heater at maximum efficiency, it
is essential that correct installation, commissioning, operation and service procedures are
carried out strictly in accordance with the instructions given in this manual. By law,
installation and commissioning of the heater must be carried out by properly qualified
personnel.
The
The
The
The
heater(s) must be installed in accordance with the following requirements;
current GAS SAFETY (INSTALLATION AND USE) REGULATIONS
current BUILDING REGULATIONS
WATER SUPPLY (WATER FITTINGS) REGULATIONS 1999
Additionally, installation should be performed in accordance with all relevant
requirements of the Gas Supplier, Local Authority and recommendations of the British
Standards and Codes of Practice detailed below.
BRITISH
STANDARDS
AND CODES OF
PRACTICE
2
STANDARD RANGE
BS 6700: 1997
Specification for design, installation, testing and maintenance of
services supplying water for domestic use within buildings and their
curtilages. This standard supersedes the following British Standards
and Codes of Practice: CP99, CP310, CP324, 202, CP342 Part 2,
Centralised Hot Water Supply.
BS 5440:2000
Installation of flues and ventilation for gas appliances of rated output
not exceeding 60kW.
BS 6644
Installation of gas fired hot water boilers of rated inputs between
60kW and 2MW.
BS 5546:1990
Installation of gas hot water supplies for domestic purposes.
BS 6891
Installation of low pressure gas pipework of up to 28mm in domestic
premises.
BS 7206:1990
Specification for unvented hot water storage units and packages.
I/M2
I/M11
I/M16
Purging procedures for industrial and commercial gas installations.
Flues for commercial and industrial gas fired boilers and air heaters.
Notes on installation of gas pipework (excluding 25mm and below).
NOTE:
Consideration should be given to amendments or updates to
the above standards.
GENERAL AND SAFETY INFORMATION
It is the duty of manufacturers and suppliers of products for use at work to ensure, so far
as is practicable, that such products are safe and without risk to health when properly
used and to make available to users, adequate information about their safe and proper
operation.
Andrews Water Heaters should only be used in the manner and purpose for which they
were intended and in accordance with the instructions in this manual. Although the
heaters have been manufactured with paramount consideration to safety, the basic safety
precautions highlighted in this manual must be observed by the user.
SECTION 1
HEALTH AND
SAFETY
REGULATIONS
1993
It is imperative that all users of the heater must be provided with all the information and
instruction necessary to ensure correct and safe operation.
Water systems in buildings have been associated with outbreaks of Legionnaires' Disease,
particularly in health care facilities where occupants are significantly more susceptible to
infection.
In recognition of the risks in hospitals, a Code of Practice for the Control of Legionellae
in Health Care premises has been issued by the Department of Health (1991). Codes of
Practice applicable to other premises have been published by other organisations,
principally the Health and Safety Executive (HS)(G70) and the Chartered Institute of
Building Services Engineers (CIBSE, TM13).
EFFECTIVENESS
IN COMBATING
LEGIONELLAE
All Codes of Practice draw attention to the design and operation of water systems with
reference to avoidance of factors that favour colonisation by Legionellae bacteria. These
factors include stagnation, lukewarm conditions (20ºC to 45ºC) and the accumulation of
debris, scale and corrosion in the base of tanks and calorifiers.
Andrews Water Heaters has commissioned an independent evaluation of their products
to investigate their resistance to build-up of legionellae bacteria.
Experiments were conducted to determine whether, following a substantial challenge by
legionellae pneumophilia, after overnight and stagnation conditions, the system was
rendered free from viable recoverable legionellae. It was found that at 61ºC, following a
challenge of approximately 107 organisms per litre, within one hour, more than 99.999%
of organisms had been killed. After a subsequent stagnation period, sampling did not
reveal any residual contamination. The design of the base of the water heater precludes
legionellae colonisation, even after build-up of debris. The burner positioning ensures
that the water at the bottom of the heater reaches the same, or higher temperature as in
the rest of the heater.
Based on data obtained through experiment, the Andrews Water Heater can be described
as legionellae resistant as it is considered unlikely that, at the temperature tested, the
organism would colonise the water heater and present a possible health risk.
3
SECTION 2
DIMENSIONS
AND
CLEARANCES
TECHNICAL DATA
ANDREWS MODEL NO.
Induced Draft Blower:
Fasco 7182-6453C;
230V/50Hz.
Sealed shaft and seams.
4
CSC59
CSCL59
CSC78
CSCL78
CSC93
CSCL93
Storage Capacity
l
gal
276
61
276
61
276
61
350
77
Recovery thro' 44ºC/80ºF
l/h
gal/h
749
165
1149
253
1517
334
1808
398
Recovery thro' 56ºC/100ºF
l/h
gal/h
600
132
922
203
1213
267
1445
318
Heat Input
kW
Btu/h
44
150,128
66
225,192
88
300,256
106
361,672
Heat Output
kW
Btu/h
38.7
132,044
59.4
202,673
78.3
257,159
93.3
318,339
Gas Flow Rate
m3/hr
ft3/hr
4.09
144.6
6.15
217.2
8.20
289.8
9.88
349.2
Gas Flow Rates LPG
m3/hr
ft3/hr
1.78
63
2.54
90
3.39
120
4.09
144.6
12H NATURAL and I3LPG
Gas Family
Control Package:
Pactrol integrated board
intermittent pilot system. White
Rogers 11B79-15 Aquastat with
manual reset ECO.
Gas Valve Honeywell VR8304H.
Alternate: Johnson Controls
G770 Ignition Module (LPG).
CSC39
CSCL39
Feed /Flow Connections
Rp (BSP)
11⁄ 2
11⁄ 2
11⁄ 2
11⁄ 2
Return Connections
Rp (BSP)
3
3
3
3
Gas Connection
Rp (BSP)
3
3
3
3
Fuel Gas Temperature
ºC
132
132
171
171
Fuel Gas Volume
m3/hr
110
109
140
164
Max. Working Pressure
bar
lbf/in2
10
150
10
150
10
150
10
150
Min. Working Pressure
bar
lbf/in2
0.15
2.2
0.15
2.2
0.15
2.2
0.15
2.2
Burner Pressure
Natural Gas
mbar
ins wg.
11.25
4.5
11.25
4.5
11.25
4.5
11.25
4.5
Burner Pressure
Propane & Butane
mbar
ins wg.
25
10
25
10
25
10
25
10
Injector Diameter
(Natural Gas)
mm
in
2.4
0.094
2.9
0.114
2.9
0.114
3.1
0.122
Injector Diameter (LPG)
mm
In
1.65
0.064
1.95
0.076
1.90
0.074
2.1
0.082
Weight Empty
kg
Lb
340
750
340
750
345
760
381
840
Weight Full
kg
Lb
636
1402
636
1402
641
1412
727
1603
Shipping Weight
kg
Lb
354
780
354
780
358
790
399
880
Shipping Dimensions Height
mm
In
2110
83
2110
83
2110
83
2110
83
Shipping Dimensions Width
mm
In
770
30
770
30
770
30
770
30
Shipping Dimensions Depth
mm
In
1210
47
1210
47
1210
47
1210
47
Mains Voltage
V
Frequency
Hz
50
Fuse
A
5
⁄4
⁄4
⁄4
⁄4
⁄4
⁄4
220/240 - IP 20
⁄4
⁄4
TECHNICAL DATA
SECTION 2
Horizontal or
Vertical Flue
1168mm
Minimum
Service
clearance
with
standard
Anodes.
Adaptor
CSC39 and CSC59 Alternative Flue Systems
615mm
Minimum
Service
clearance
with Correx
Anodes.
H
I
Cold Water
Inlet 1“
B.S.P.
Drain or Return
3/4” B.S.P.
UNVENTED SYSTEM
Ideal Service clearance Dimensions
1125
90.0
275.0
500mm Recommended
for panel access and
switching. Absolute
min 300mm.
Horizontal
Flue can
be rotated
360º
725.0 Min.
500mm Recommended for
panel access and switching.
Absolute min 300mm.
Tee & T/P Valve
supplied
VENTED SYSTEM
Can be
used for
Hot Water
outlet or
can be
capped
300mm
H
K
‘X’
I
If side connection is
used for Hot Water
outlet Air vent must
be fitted at ‘X’
Alternative
Hot Water
outlet
475.0
CSC78 and CSC93 Alternative Flue Systems
Vent from here
if used for Top
Hot Water outlet
Minimum
N.B. Access of 500mm must be provided
one side for 6 months fan lubrication
ANDREWS MODEL NO.
CSC39
CSC59
CSC78
CSC93
A. Height of Heater
mm
In
1623
64
1623
64
1623
64
1851
73
B. Diameter
mm
In
720
28
720
28
720
28
720
28
C. Gas Connection
mm
In
355
14
355
14
355
14
355
14
D. Cold Inlet
mm
In
530
21
530
21
530
21
530
21
E. Optional Front Outlet
mm
In
1307
51
1307
51
1535
60
1535
60
F. Height to Centre of Flue
mm
In
2060
81
2060
81
1980
78
2217
87
G. Height to Flue Spigot
mm
In
1780
70
1780
70
1780
70
2020
80
H. Min. Flue Horizontal
mm
In
1100
43
1100
43
1260
50
1260
50
Max. Flue Horizontal
mm
In
7000
276
7000
276
7000
276
7000
276
Min. Flue Vertical
mm
In
1310
51
1310
51
1610
63
1610
63
Max. Flue Vertical
mm
In
7000
276
7000
276
7000
276
7000
276
J. Electrical Connection
mm
In
1250
49
1250
49
1250
49
1480
58
K. Flue Diameter
mm
100/150
100/150
130/200
130/200
L. Flue Adaptor
mm
In
95
4
95
4
I.
DIMENSIONS
AND
CLEARANCES
Not supplied with
these models
5
SECTION 3
INTRODUCTION
INSTALLATION
THE LAW REQUIRES THAT INSTALLATION IS CARRIED OUT BY A
PROPERLY QUALIFIED PERSON
Installations must be carried out in accordance with Gas safety (Installation and Use)
Regulations 1998, Building Regulations, The Water Supply (Water Fittings) Regulations
1999 and any requirements of the local Gas Authority, Local Authority, Water and Fire
Authorities and the current British Standards and Codes of Practice listed in Section 1.
LOCATION
The location selected for installation of the heater must allow the provision of a
satisfactory flue, adequate air supply, drain facilities and must be well illuminated.
A purpose built boiler room or compartment is strongly recommended.
A manual valve for isolation of the boiler room should be installed in the gas supply; it
should be clearly identified and readily accessible for use at all times.
If a purpose built boiler room is not available, measures should be taken to protect the
heater from damage and prevent any extraneous matter from being stored on or around
the heater. See BS 6644 Clauses 4, 5 and 6 for details.
The heater must not be installed in any location which contains a bed, bath or shower.
There must be easy access to the boiler room and heater at all times.
The water heater must be located in an area where leakage from the tank, water
connections or the combination temperature and safety valve will not result in damage to
the area adjacent to the water heater. When such locations cannot be avoided, a suitable
drain tray must be installed under the water heater. The drain tray must be no deeper
than 38mm (1.5in) and have a minimum length and width of 100mm (4in).
The drain tray must be piped to an adequate drain using 20mm (0.75in) diameter pipe,
angled for proper drainage.
Access must be provided to the front of the water heater and adequate clearance for it's
servicing and operation.
The floor on which the heater is installed must be flat, level and of sufficient strength to
withstand the weight of the heater when filled with water, and should satisfy the
requirements of the Local Authority & Building Regulations.
Any Combustible material adjacent to the heater must be so placed and shielded as to
ensure that it's temperature does not exceed 66ºC (150ºF).
The minimum clearance to combustibles for the heater Is:
50mm (2in) from the front of the burner access box.
Zero clearance from the air intake boot and vent tubes.
300mm (12in) from the direct vent terminal.
A minimum of 726mm (30 inches) from the burner access panel shall be provided for
inspection and servicing.
All service clearances to the water heater must be maintained as specified in the
CSC Range Installation and Design Guide.
6
INSTALLATION
SECTION 3
The installation of the gas supply must conform, depending on it's size, to the
requirements of British Standards and Codes of Practice listed in Section 1 of this manual.
GAS SUPPLY
NATURAL GAS
A gas meter will be connected to the service pipe by British Gas plc or it's authorised
contractor.
The meter and service pipe should be checked by British Gas or it's authorised contractor
to ensure that they are adequate to deal with the gas supply to the water heater(s) in
addition to any existing or additional requirements.
CAUTION!
DO NOT APPLY HEAT IN CLOSE PROXIMITY TO THE GAS CONTROL THERMOSTAT
AS THIS WILL RESULT IN DAMAGE OCCURRING TO THE CONTROL.
Fit the gas cock immediately upstream of the gas control valve using a suitable jointing
compound and connect to the gas supply. An inlet nipple and m/f elbow is factory fitted
to the gas control valve to avoid possible damage.
Gas Cock
Nipple
M/F Elbow
Gas Valve
BSP Thread
U.P.T. Thread
Fig 1.
Where the water heater(s) is(are) installed in a boiler house or purpose built
compartment, a manually operated valve for the boiler house must be fitted in
accordance with the Gas Safety (Installation and Use) Regulations 1998. The valve must
be easily identified and readily accessible.
After installation, the system should be pressure tested for soundness and purged in
accordance with BS 6891 or IM/2 and IM/5 as appropriate.
7
SECTION 3
INSTALLATION
GAS SUPPLY
PROPANE OR
BUTANE
Contact Calor Gas who will provide the appropriate type and size of LPG supply vessel
and ensure it's safe location and installation.
The installation of the gas supply must conform to LPGA Code of Practice, 22 LPG Piping
Systems: Design and installation plus the requirements of British Standards and Codes of
Practice listed in Section of this manual.
Andrews water heaters are unregulated and a second stage regulator must be installed to
give an inlet pressure to the appliance as follows: ( See fig. 2).
PROPANE:
37mbar (14.86 in wg)
BUTANE:
28mbar (11.26 in wg)
When using propane or butane cylinders, connect a minimum number of cylinders as
listed below, together with a manifold before connecting to the union.
Use a minimum pipe size of 3⁄ 4in bore.
Two Cylinders CSC 39 and CSC 59
Three Cylinders CSC 78
Four Cylinders CSC 93
WARNING!
PROPANE AND BUTANE CYLINDERS MUST BE USED AND STORED IN
ACCORDANCE WITH 'THE HIGHLY FLAMMABLE LIQUIDS AND LIQUIFIED
PETROLEUM GASES REGULATIONS 1972', AND SHOULD COMPLY WITH LPGA
CODE OF PRACTICE 7, 'STORAGE OF FULL AND EMPTY LPG CYLINDERS AND
CARTRIDGES.
8
INSTALLATION
Regulator Set to
give 37 mbar
(14.86” Wg)
Propane
SECTION 3
1” Heavy Steel Sleeved
Pipe Through Wall
Regulator normally
fitted at tank
BULK STORAGE
VESSEL
INSTALLATION
Gas emergency
control at entry
point to building
Steel Liner sealed to
pipe at inside end
To bulk Supply
Installation of
Propane supply
3/4” Spring loaded gas cock
Pigtail
Assembly
Automatic
change over
device
Nipple
1” Heavy Steel Sleeved
Pipe Through Wall
CYLINDER
INSTALLATION
Gas emergency
control at entry
point to building
Steel Liner sealed to
pipe at inside end
Cylinder regulator Set to give
37 mbar (14.86”) Propane
3/4” Spring loaded gas cock
Propane cylinder must be
outside building
Fig 2.
9
SECTION 3
INSTALLATION
ELECTRICAL
SUPPLY
External wiring to the water heater(s) must be installed in accordance with current I.E.E.
Regulations for the wiring of buildings and to any Local Regulations that may apply.
The Auto Ignition Heater is designed to operate from a 220/240V, 1Phase supply. The
fuse rating is 5 amps.
The method of connection to the mains electricity supply should facilitate complete
Electrical isolation of the appliance, preferably by use of a fused double pole switch or
fused spur box serving only the heater. The disconnection of the supply shall have a
contact separation of 3mm in all poles.
The point of connection to the mains electricity supply should be readily accessible and
adjacent to the appliance.
KEY
TERMINAL
BLOCK
brown
yellow
yellow
GREEN
LED
RED
LED
YELLOW
LED
MAINS
ON
OVERHEAT
MAIN
FLAME
FAILURE
IGNITION HT
ELECTRODE
green/yellow
FLAME
DETECTION
ELECTRODE
brown
24Vac
ON/OFF
SWITCH
FUSE
315mAT
ON/OFF
O
W (FLAME SENSE)
G
HT
EMC
FILTER
CONSUMPTION :(RUN STATE)
PRIMARY 110mAac
25VA max.
brown
blue
white
Fan L
INDUCED
DRAFT
BLOWER
black
Fan N
230Vac
VOLT FREE
CONTACTS
24V MAX.
OH2
1
E
SUPPLY :230Vac / 50Hz
MFF1
TIMER
LINK
1
F-DET
EARTH
N
N
green/yellow
MFF2
FLUE
DAMPER
LINK
F-DET
FUSE
4AT
L
L
blue
blue
FIRST/PILOT GAS VALVE
SECOND/MAIN GAS VALVE
AIR PRESSURE SWITCH
ENERGY CUT-OFF
FLUE DAMPER
OH1
TIM1
24Vac
TIM2
24Vac
FD 24V
PACTROL P.C. BOARD
NO
FD 0V
FD2
ECO2
ECO1 STAT
TIMER
COM
GV1 GV2 GV
ground
terminal
G/Y
STAT
ECO
24Vac
Y-PV/MV
R-PV
BR-MV
24Vac
PV
FITTING OPTIONS:-
orange
yellow
A.P.S.
MV
orange
yellow
(OPTIONAL)
NC
orange
FD1
yellow
GAS
VALVE
GROUND
white
GVI/PV
GV2/MV
A.P.S.
E.C.O
F.D.
24Vac
GAS VALVE
1. TO FIT TIMER, MOVE TIMER LINKS TO 'OFF'
POSITION & CONNECT AS SHOWN.
238-41465-00A
Fig 3.
Wiring diagram for
natural gas appliance.
Connect the electrical supply the main control panel terminal block via the cable glands in
the base of the control panel. Mains input cable should be 0.75mm2, 3 core, and should
be connected to the mains supply as detailed above.
It is recommended that screen cable is used where the volt-free contacts are to be
connected from an external supply. This will eliminate the risk of possible interference
from nearby high voltage cables.
Mains Voltage: 220/240Volts - IP 20
Frequency:
50Hz
Fuse:
5 Amps
10
INSTALLATION
Wiring Diagram for LPG Appliance
SECTION 3
Fig 4.
11
SECTION 3
FLUE
SYSTEMS
INSTALLATION
Your Andrews Water Heater is a Direct Fan Flued Gas Water Heater where all air for
combustion is obtained from the outside atmosphere and all flue gases are charged to the
outside atmosphere. The flue system is a single coaxial (pipe within pipe) design where
the flue products are discharged through the inside flue tube and the combustion air
supply surrounds the flue surrounded by the outside pipe. The flue system incorporates
both combustion air supply and the flue exhaust. The flue system component which is
outside the building and takes in the combustion air supply and discharges the flue
products (whilst keeping them separate) is referred to as the 'direct flue terminal'.
WARNING!
The direct flue system must be properly installed. Failure to do so could result in property
damage or personal injury. DO NOT install any damaged components. Contact Andrews
Water Heaters for replacement parts. The flow of combustion air must not be restricted.
Keep direct flue terminal openings clear of any objects likely to cause flow restriction.
Direct Flue Terminal
Shall terminate at least 1.5m (5ft) above any forced air inlet located on the same wall.
This provision does not apply to the combustion air intake of a direct flue appliance or
the circulating air inlet and flue gas discharge of listed outdoor appliances.
Shall be installed with at least a 300mm (12in) flue termination clearance from any air
opening into a building.
The bottom of the direct flue terminal shall be located at least 300mm (12in) above
ground.
HORIZONTAL
AND VERTICAL
DIRECT FLUE
LENGTHS
The Andrews Direct Fan Flued Gas Water Heater is supplied with one direct flue kit.
The flue system supplied with this water heater is a coaxial design with the flue discharge
tube on the inside and combustion air supply on the outside. Optional direct flue
components are available that can extend the horizontal length and/or vertical height of
the direct flue to the maximum distances listed in the table below. This water heater
must be installed using the supplied or optional listed components without modification.
Refer to the table on Page 37 for the various vertical and horizontal direct flue system
components.
NOTE! The supplied horizontal flue terminal may be used through outside walls up to
600mm (24in) thick.
Maximum Flue Distances (Horizontal or Vertical)
Number of 90º Elbows
0
1
2
3
Maximum length of straight pipe
(excluding vent terminal) to exterior wall
7m
6m
5m
4m
(22ft
(19ft
(16ft
(13ft
9in)
6in)
3in)
0in)
NOTE! Each 45º elbow reduces the maximum flue distance by 500mm (19.5in).
IMPORTANT! Do not exceed the flue distances or the number of elbows listed
above. This may cause heater malfunction or an unsafe condition.
12
INSTALLATION
SECTION 3
Installation Procedure
HORIZONTAL
AND VERTICAL
DIRECT FLUE
LENGTHS
Determine location of flue exit.
1. The supplied kit includes a horizontal (through the wall) flue terminal, an elbow,
flue connector clamps and 2m (6.5ft) of coaxial flue pipe. The 150mm (6in) diameter
flue system is also supplied with a 200mm (8in) to 150mm (6in) reducer for the
waterheater flue connection. The coaxial flue pipe includes both the flue exhaust
(inside pipe) and combustion air (outside pipe). The coaxial flue pipe may be cut on
the unflared end (end without gasket) as required for the installation.
2. Determine if additional flue components are required for the installation. Refer to the
flue component table below for available optional flue components.
3. Ensure that the flue terminal location complies with requirements described earlier and
the Local Gas Authority.
4. Measure the vertical and horizontal distance from the water heater flue connection to
determine the number of vent flue needed.
Flue Component Table for 150mm (concentric) (6in) Diameter Flue Size
(58.7 kWh 199,999 Btu/h Input Models).
SUPPLIED KIT COMPONENTS
Quantity
Flue Length
1
Part Description
Part Number
90º Elbow
E205
Horizontal Flue Terminal
E236
1
Large Stepped Adaptor Connection Clamp
E237
1
200mm (8in) to 150mm (6in) flue reducer
E238
1
600mm (24in)
13
SECTION 3
FLUE
SYSTEMS
INSTALLATION
Optional Components for 150mm (concentric) (6in) Diameter Flue Size
Quantity
Flue Length
Part Description
1
1 mtr
Flue Pipe with clamp
E202
1
1 mtr
Cutable Flue Pipe with clamp
E203
1
0.5 mtr
Flue Pipe with clamp
E204
1
90º Elbow
E205
1
45º Elbow
E206
Vertical Flue Terminal
E239
1
Flat roof flashing for vertical
flue terminal with adjustable cap
E207
1
Roof flashing for pitched roofs
150mm (6in) dia vent size
E208
1
Wall Clamp 150mm (6in) dia.
E209
1
1360mm (54in)
Part Number
Flue Component Table for 200mm (concentric) (8in) Diameter Flue Size
(88 kWh/300,00 Btu/h and 105.6kW/360,000 Btu/h Input Models.
SUPPLIED KIT COMPONENTS
Quantity
Flue Length
1
1
600mm (24in)
1
Part Description
Part Number
90º Elbow
E215
Horizontal Flue Terminal
E240
Large Stepped Adopter
Connection Clamp
E237
Optional Components for 200mm (concentric) (8in) Diameter Flue Size
Quantity
14
Flue Length
Part Description
Part Number
1
1 mtr
Flue Pipe with clamp
E212
1
1 mtr
Cutable Flue Pipe with clamp
E213
1
0.5 mtr
Flue Pipe with clamp
E214
1
90º Elbow
E215
1
45º Elbow
E216
1
Flat roof flashing for vertical
flue terminal with adjustable cap
E217
1
Roof flashing for pitched roofs
150mm (6in) dia flue size
E218
1
Wall Clamp 200mm (8in) dia.
E219
INSTALLATION
SECTION 3
INSTALLING THE FLUE TERMINAL
NOTE! The horizontal flue terminal supplied may be used through outside walls up to
600mm (24in) thick.
FLUE
SYSTEMS
1. Horizontal flue Terminal (Through the Wall) supplied
a) Cut an opening of at least 165mm (6.5in) diameter through the outside for the
58.7kWh input models or 216mm (8.5in) for the 88kWh and 105.6kWh input models.
b) Slide the flue terminal through the wall opening to the rib closest to the intake air
openings of the terminal even with the outside wall.
Hole through Wall
flue Terminal
Outer Wall
Mount Plate
Wall Anchor
(4 Places)
Screw
(Supplied)
(4 Places)
Fig 5.
Intake Air Openings
(Must Face Ground)
c) Slide the outside wall plate over the flue terminal and fasten to the wall with four
screws. Depending on the wall construction, wall anchors may be required to reinforce
the screws.
d) Install inside wall plate on the inside wall and secure with four screws. Depending on
wall construction, wall anchors may be required to reinforce the screws.
Hole through Wall
Flue Terminal
Inner Wall
Mount Plate
Wall Anchor
(4 Places)
Screw
(Supplied)
(4 Places)
Fig 6.
15
SECTION 3
FLUE
SYSTEMS
INSTALLATION
2. Vertical Flue Terminal (Through the Roof - Optional)
a) Determine the exact location where the roof flue terminal will exit the roof, ensuring
the flue system clears all obstructions. For pitched roofs, the flue cap must be the
distance above the roof line as specified, (300mm to base of Flue Clamp, minimum).
The top of the roof terminal may extend up to 760mm (2.5ft) above the roof line as
required.
b) Run the coaxial flue system to the proper distance below the roof sheathing required
for the correct distance of the roof terminal above the roof surface. See the following
sections on installing the rest of the flue system.
c) Cut a minimum 165mm (6.5in) diameter hole for the smaller flue size or a 216mm
(8.5in) minimum diameter hole for the larger flue size centred in the desired location
for the roof terminal. See Fig. 7.
d) Centre the roof flashing over the hole using either the flat roof flashing or universal
flashing for pitched roofs.
e) Slip the storm collar supplied with the roof flashing kit over the outside of the flue
terminal and align with the flue pipe end below roof opening. Insert the terminal into
the flue pipe.
f) Fasten the roof flashing with nails. Seal the flue terminal and flashing to the roof.
g) Install the gasketed clamp around the joint between the flue terminal and flue pipe.
Flue Terminal
Flat Roof
Storm Collar
Roof Flashing
(Nail & Seal
To Roof)
Flue Terminal Pipe
Flue Terminal Pipe
Fig 7.
Hole Through Roof
Flue Pipe
(From Water Heater)
INSTALLING FLUE PIPING SECTIONS
a) The coaxial flue pipe sections are designed to fit tightly together and seal with the
integral flue pipe seal and supplied pipe clamps. No silicone caulk or special tools are
required.
b) All flue sections and fittings come complete with silicone flue pipe gaskets and outside
gasketed pipe clamps for making air tight connections between the flue pipe
connections.
d) Raise the flue pipe to the flue terminal connection with the gasketed end of the flue
pipe towards the flue terminal. Insert the flue pipe into the flue terminal connection
and grasp the end of the flue pipe while twisting and pushing the pipe until inserted
all the way into the flue terminal.
e) Connect the outside pipes together using the gasketed clamps provided. The flue
pipes have ribs located near each end. When the flue piping is connected, the
gasketed clamps shall cover the ribs and joints of the connecting flue tubes. Support
each pipe section with hangers attached to the supporting joists in the wall or ceiling.
f) Continue connecting pipe sections together with clamps and supporting with hangers.
16
INSTALLATION
SECTION 3
Straight End
(Ungasketed)
Gasket End
Ribs Locked Beneath
Gasketed Clamp
FLUE
SYSTEMS
Fig 8.
g) The last pipe section may be cut to fit the distance required to reach the water heater
flue connections. First, install the supplied condensate trap with crimped end into the
gasketed end of the elbow (horizontal flue installations) and clamp the condensate tee
and elbow together. Then install the crimped end of the elbow into the flue
connection of the water heater. On vertical installations, install the the crimped end of
the condensate trap directly onto the water heater flue connection. The 58.7kWh
models require the installation of a flue reducer (supplied) into the water heater flue
assembly before attaching the elbow or condensate trap (vertical flue).
IMPORTANT! In order for the condensate trap to collect and dispose of the
condensate from the flue pipe, the flue system must have a downward slope
of 21mm per metre (0.25in/ft) towards the condensate trap. The condensate trap
must be installed as close as possible to the flue adaptor to prevent condensate
from accumulating and draining into the flue adaptor or blower.
h) Carefully measure the length of straight flue pipe needed, allowing for about 50mm
(2in) insertion into the elbow. Mark the ungasketed end of the pipe to be cut and
carefully make a straight cut on the outside pipe to the desired length. Make sure the
inside tube is not cut. Then cut the inside flue pipe about 50mm (2in) less than the
outside pipe so that the flue pipe protrudes slightly beyond the outside pipe. Connect
the flue pipe and clamp at each end.
i) Use the large clamp supplied in the flue kit with the stepped gasket to seal the elbow
or condensate trap to the blower flue connector. The larger step of the gasket seals
the flue pipe to the cast flue adaptor.
j) Condensate disposal: Connect either a 32mm (1.25in) slip joint drain connection or a
25mm (1in) PVC compression coupling from the condensate trap nipple to 25mm
(1in) PVC piping to a drain or condensate disposal pump. Install a drain trap after the
condensate fitting to seal the flue system.
Note: On all flue installations, for distances over 1.5 metres, we recommend that a
condensate trap is fitted.
Condensate Trap Nipple
1”(25mm) Compression
Coupling or 11⁄ 4” (32mm)
Slip joint Connection
1”(25mm) PVC Piping
Drain Trap
To Suitable Drain or
Condensate Disposable Pump
Fig. 9
17
SECTION 3
AIR SUPPLY
AND
VENTILATION
INSTALLATION
The following notes are intended to give guidance:
Where the heater is to be installed in a room, NO VENTS ARE REQUIRED.
Where the heater is to be installed in a compartment, permanent air vents are required in
the compartment at high and low level. These air vents must either communicate with a
room or internal space or be direct to outside air.
The minimum effective areas of the permanent air vents required in the compartment are
as follows:
Air Vents Areas
Position of Air Vents
Air from Room or Internal Space
Air Direct from Outside
High Level
10cm2 per kW
5cm2 per kW
Low Level
10cm2 per kW
5cm2 per kW
In a Room or
Internal Space
No Requirement for Ventilation
Note: - Both air vents must communicate with the same room or internal space or
must both be on the same wall to outside air.
Air vents should have negligible resistance and must not be sited in any position where
they are likely to be easily blocked or flooded or in any position adjacent to an extraction
system which is carrying flammable vapour.
Consideration must be given to the position of the high level ventilation opening. A high
level vent must not be sited within 300mm (1ft) measured vertically, of the flue terminal.
Grilles and louvres should be so designed that high velocity air streams do not occur
within the space housing the heater(s).
The grilles should have a total minimum free area for the water heater(s) in addition to
any other requirements as follows: • Low Level (inlet)
540cm2 plus 5cm2 per kilowatt in excess of 60kW total rated input.
• High Level (outlet)
270cm2 plus 2.5cm2 per kilowatt in excess of 60kW total rated output.
18
INSTALLATION
IMPORTANT:
1. The effective area requirements specified in the table are related to the maximum heat
input of of the heater(s), and are equivalent to those specified in BS6644.
SECTION 3
AIR SUPPLY
AND
VENTILATION
2. The free area of the grilles should not be less than the size of the recommended
ventilation opening.
3. The supply of air to a space housing the heater(s) by mechanical means should be:(a) Mechanical inlet with natural extraction.
(b) Mechanical inlet with mechanical extraction.
NB!! Natural inlet with mechanical extraction must not be used.
Where a mechanical inlet and mechanical extraction system is used, the design
extraction rate must not exceed one third of the design inlet rate.
All mechanical ventilation systems must be fitted with automatic gas shut off safety
systems which cut off the supply of gas to the heater(s) in the event of failure of either
the inlet or extract fans.
The requirements for air supply by mechanical ventilation are given in BS6644
Clause 19.3.
The permanent air vents shall be sited away from the extract fans. It may be necessary
to increase the ventilation area to compensate for the extractor fan.
19
SECTION 3
WATER
QUALITY AND
TREATMENT
INSTALLATION
Where extreme conditions of water hardness exist, scale can form in any water heating
equipment, especially when the heater is working under conditions of constant heavy
demand and at high temperatures.
Each water heater is fitted with one or more magnesium anode(s) which protects the
tank from corrosion caused by electrolytic action. Magnesium anodes are sacrificial in
that they corrode as they protect. When the anode has eroded to less than 50% of it's
original diameter, it may not offer protection. The anodes should be inspected annually
and replaced as necessary. Frequency of anode replacement will vary, dependent on
water quality.
Andrews Water Heaters offer CorrexTM UP powered anodes as an alternative to the
standard magnesium anodes. These anodes do not need maintenance or replacement.
The potentiostat which regulates the current to the CorrexTM anode features an indicator
light which shows green to indicate the correct function and red to indicate the
malfunction. These anodes are available as an optional extra on all Andrews heaters.
In hard water areas, scale formation can occur in hot water systems and hot water
heaters and the higher the temperature and volume of water used, the more problematic
the scale build-up can be. Water treatment is normally recommended when the hardness
reaches 100 - 150ppm (7 - 10 degrees Clark) and above. This problem can be minimised
by reducing the water temperature in the heater and by fitting suitable water pretreatment equipment.
When installing Andrews Water Heaters in hard water areas we would recommend
that a water treatment specialist is consulted.
Hydrojet System
Tank
Heater
Casing
1/4 x 1/2 slot
see note
Hydrojet Inlet Nipple
(Front Cold Inlet
Connection)
Note:
When installing or making
final connections to the
Hydrojet Cold inlet nipple, it
is important to ensure that
the slot is located in the
position as shown above.
The heater is fitted with the Hydrojet Total Performance System incorporated in the cold
inlet nipple. The system is designed to increase turbulence and reduce sediment
build-up, reduce thermal stacking and increase delivery.
20
INSTALLATION
The water heater must be fed from a cold water feed cistern or static water tank.
A safety valve must be fitted as specified in BS 6644 Clause 9.
The safety valve must be fitted either directly to an upper tank tapping or not further
than 1 metre along the outlet flow pipe of size not less than the safety valve.
SECTION 3
WATER
CONNECTIONS
VENTED SYSTEMS
There must be no valve separating the heater from the safety valve.
The size of the discharge pipe must be not less than the nominal size of the safety valve
outlet. It should be self-draining and any water discharged must be visible and create no
hazard to persons in or about the building.
A low pressure open vented system can be used or where the natural circulating pressure
is insufficient, pumped circulation can be employed.
The heater must be fitted with an open vent pipe which is not valved and which rises
continuously to the open vent. It should be sized with reference to Technical Data,
BS 6644 Clauses 9 and 10 and CP 342. Local Regulations and Bye-Laws must be
observed when installing the system.
Front Cold inlet / Top Hot outlet water connections / Optional Front Hot outlet
water connection
Select the hot outlet location required, and using a suitable jointing compound blank off
the outlet not required. We recommend that the top hot outlet water connection is used.
Assemble onto the 3⁄ 4 BSP thread, the 3⁄ 4 BSP coupler socket and drain cock using a
suitable jointing compound.
Water draw-off dead legs should comply with CP 342 Part 2, Table 1 and BS 6700.
NOTE:
When using a secondary return circuit, see Fig 10 for the location of the return
tappings.
It is recommended that all water connections be made to the heater(s) using union
fittings for ease of servicing. Pipe support intervals should comply with CP 342,
Part 2 Table 4.
After Installation of the water system, open the main water supply valve, flush the system
and fill the heater. Open the hot taps to allow air to escape from the system. When the
system is free of air, close the taps and check for leaks at the thermostats, drain cock and
pipe connections on the heater.
Typical water service layout for a vented system is shown in Fig 10.
21
SECTION 3
INSTALLATION
WATER
CONNECTIONS
VENTED SYSTEMS
Open Vent
Stop Valve
Overflow
Cold Water Feed
Optional
Hot Water Service
Cold Water
Cistern
Hot Water Service
Secondary Return
Check Valve
Fig 10.
Typical Installation
Vented System
22
Cold Water
Inlet Valve
INSTALLATION
SECTION 3
Unvented Systems should be fitted by an Approved Installer
When used in an unvented system, the Andrews water Heater will supply hot water at a
pressure of 3.5bar (51lbf/in2), provided that this pressure is available at the mains feed.
During conditions of no-flow, system pressure may rise to a maximum of 6bar (87lbf/in2)
whilst the burner is operating. When testing the system, it is recommended that a
maximum test pressure of 8.6bar (125 lbf/in2)is employed.
WATER
CONNECTIONS
UNVENTED
SYSTEMS
The heater can be used on unvented hot water storage systems, with the addition of an
Unvented Systems Kit, part number B228 or B248 available from Andrews Water Heaters.
See Parts List Pages 38/39. The Wall mounting assembly is available as an optional extra.
C5
Temperature/
Pressure
Relief Valve
OPTIONAL PARTS
C4
C7
⁄2”x 1”
Reducing
Bush
1
C10
Wall bracket Assembly
C6
11⁄2” Sq Tee
C9
Hose Assembly
Cold Water
Inlet of
Water Heater
C2 Check Valve/
C3 Expansion Valve
(a)
Cold Water Inlet
C1 Pressure Reducing
Valve / Strainer
Balance Cold Water
Take-off
(if required)
C8 Tundish
NB. Tees, elbows, stop valves and
pipework not supplied.
Fig 11.
Item C5 must be fitted into C6 and C7 as required and fitted on the hot water outlet nipple
(See fig.12).
When assembling items C1 and C2, ensure that the flow arrows marked on the components
are pointing in the direction of flow, i.e. towards the water heater.
The cold water for services may be drawn from the 22mm compression port on item C1(a).
The water pressure at this point will be similar to that available at the hot water outlet of
the water heater. If port (a) is not used, it should be sealed with the blanking plug supplied.
23
SECTION 3
WATER
CONNECTIONS
INSTALLATION
If higher flow rates are required for the cold water services, a suitable tee fitting should
be fitted to the pipework, upstream of item C1.
The pipework fitted to the tundish outlet should be one size larger than the outlet pipe of
the safety device and should be terminated at a suitable drain.
(See Building Regulations 1992 Approved Document G3).
All fittings and materials must be suitable for use with drinking water and listed in the
current Water Research Centre " Materials and Fittings Directory".
Installation of unvented hot storage water systems must comply with Part G3 of the
Building Regulations 1992.
Typical water service layout for unvented system is shown in Fig 12.
Hot Water Service
Optional Hot Water
Service
Balanced
Cold Water
Take Off
Secondary Return
Cold Water
Inlet Valve
Check Valve
Fig 12.
24
To Drain
COMMISSIONING
SECTION 4
CAUTION! DO NOT OPERATE THE WATER HEATER UNTIL THE STORAGE
VESSEL IS COMPLETELY FILLED WITH WATER, WITH WATER RUNNING FROM
ALL HOT TAPS.
Open the main gas supply cock after all connections to the gas control are completed
and test all connections, using proprietary leak detection fluid.
Filling the Heater with Water
1.
2.
3.
4.
5.
Close the water heater drain valve.
Open the cold water supply valve.
Open several hot water taps to allow air to escape from system.
When a steady stream of water flows from the taps. the heater is filled.
Close the taps and check for leaks at the drain valve, temperature/pressure relief valve
and the hot and cold water connections.
Draining Water from the Heater
If it becomes necessary to drain the heater, follow the steps below.
1. Depress control panel rocker switch to the OFF position (see Operating).
2. Rotate and partially depress gas control knob clockwise to OFF position.
3. Shut off the gas supply to the heater.
4. Close the cold water supply shut-off valve.
5. Open the drain valve on the water heater.
6. Open a hot water tap to allow air to enter the system.
Refill the water heater as described above.
Lighting the Burner
1.
2.
3.
4.
Ensure gas supply is ON.
Turn gas control knob to ON position.
Using control thermostat, select required water temperature.
Move electrical ON/OFF switch to ON. After a delay of about 10 seconds, the burner
will light.
5. Check pilot and main gas connections at gas control valve using leak detection fluid
whilst burner is alight. Turn off, seal any leakages, then re-test.
25
SECTION 4
COMMISSIONING
Shutting Off The Burner
1. For long periods only, (7 days or more) move electrical ON/OFF switch to OFF, then
turn gas control knob to OFF. Turn off gas service cock. For shorter periods, leave
heater under thermostat control.
B
Gas control
Knob
Fig 13.
A
Checking Main Burner Pressure
1.
2.
3.
4.
Turn gas control knob to OFF.
Release bleed screw (A) and connect pressure gauge tube to port (A).
Light burner as described previously.
Remove valve cap from port (B) and adjust pressure using exposed screw in
accordance with data plate. Turn screw clockwise to increase pressure and
counterclockwise to decrease. If possible, check gas rate (see Technical Data) with
meter and watch. Refit valve cap to port (B).
5. Turn gas control to OFF. Remove pressure gauge tube and tighten bleed screw (A).
6. Turn gas control knob to ON and light burner as described above.
Checking Pilot and Burner Flame
1. Visually check that pilot and burner flames are burning properly.
2. The main burner and pilot flame may be viewed through the viewing window on the
front of the combustion air box.
3. Adjustment to the air shutter setting is not normally required for the heater.
4. Some LPG models may be factory pre-set with the burner air shutters closed most of
the way.
5. The burner flames should be blue with yellow tips.
6. A blue/orange flame is characteristic of LPG operation.
If the burners resonate (produce an harmonic noise and vibration, usually with LPG gas),
close down the burner air shutters until the resonance stops. The resonance during
burner operation should only be checked with the front panel held in place, since
resonance may be more pronounced with the front panel off. Ensure flame appearance
is satisfactory after adjusting the burner air shutters as described above.
IMPORTANT! IN THE EVENT OF AN EMERGENCY, TURN OFF GAS AND
ELECTRIC SUPPLY.
26
COMMISSIONING
For your safety read before lighting the appliance.
WARNING
SECTION 4
USER'S SAFETY
GUIDE
1. Always follow manufacturer's instructions when lighting the appliance. Failure to do so
may result in damage to property, personal injury or loss of life.
2. Before lighting, check all around the appliance area for gas. Be sure to check at low
level because some gas (i.e. LPG) is heavier than air and will settle on the floor.
3. Do not make any attempt to re-light the appliance if the main burner has
extinguished. Wait at least 5 minutes to allow for any unburnt gas to disperse.
Ventilate the area if possible.
FOR YOUR SAFETY IF YOU SMELL GAS
1.
2.
3.
4.
Turn off gas supply and open windows.
Do not operate electrical switches.
Extinguish any naked flames.
Contact gas supplier if the smell of gas persists.
FOR YOUR SAFETY
Do not store or use petrol, aerosol or other flammable vapours or liquids in the vicinity of
this or any other atmospheric gas appliance.
WARNING
Hotter water increases the risk of scalding. Before changing the temperature, refer to the
instruction manual or data label. Hot water can produce third-degree burns in:6 seconds at 140ºF (60ºC)
30 seconds at 130ºF (54ºC)
27
SECTION 5
OPERATION
When properly installed and adjusted, the heater will require minimal attention. Should it
become necessary to completely drain the heater, follow instructions given in Section 4,
Commissioning.
Whenever the heater is filled with cold water, condensation will form on the storage
vessel surfaces when the burner is lit. This is normal and will disappear when the heater
warms up.
Operating Sequence
1. When the control thermostat senses too-cool water, a signal is sent to the control
sequence unit.
2. When the pilot solenoid opens, gas is allowed to pass to the pilot and simultaneous
ignition begins?
3. When the pilot flame is established, the main gas solenoid is allowed to slowly open
and the main burners or burner is lit.
4. When the control thermostat is satisfied, both pilot and main gas solenoids are closed.
ECO (Energy Cut-Off)
The heater is equipped with an ECO (Energy Cut-Off) device, fitted to the control
thermostat. It is a temperature sensitive switch which opens at high temperature,
shutting off gas to the burners, including the pilot in an overheat condition. When the
water has cooled sufficiently, the manual reset on the ECO needs to be depressed to
allow the heater to be re-lit. If the pilot goes out and is associated with high water
temperature, the ECO is probably operational and the cause of overheating should be
investigated.
Temperature Stratification (Stacking)
When small amounts of hot water are drawn repeatedly, the thermostat responds to each
feed of cold water and activates the main burners. Each time this occurs, more heat may
be put back in the tank than was drawn off. As this continues, water in the upper level
of the tank gets hotter than the thermostat setting. This hotter water does not mix
completely with the cold inlet water, but rises in a 'chimney effect' to the top of the tank.
Many repetitions of this over a short time period results in accumulation of excessively
hot water in the upper part of the tank, even when the thermostat control is within
limits. This is known as stacking.
To counter this condition, an upper thermostat phial is fitted which senses abnormally hot
water and shuts down the main burner until the water cools. Most modern commercial
pipe installations include a circulating pump which keeps hot water moving continuously
throughout the heater. This stabilises temperatures in the water heater tank and
throughout the pipe system.
28
SERVICING
Servicing must be carried out by a properly qualified person.
SECTION 6
INTRODUCTION
Whilst giving these instructions for the care of the Heater, it is recommended that checks
are carried out by the installer or local gas authority, at least annually. Ensure good
ventilation by keeping the heater free of extraneous materials and clear of dust and lint.
Keep pipework, flue and tops of heaters clear of any combustible materials. A water
softener or lime inhibitor should be employed in hard water areas. The heater should be
inspected every few months via the hand hole cleanout and lime or silt deposits removed.
Failure to do so will shorten heater life and may invalidate the warranty.
NOTE! The cleanout hole gasket must be renewed whenever the cover is removed.
Before servicing, carry out the following operations.
1) Turn off the gas service cock.
2) Turn off the cold water supply to the heater.
3) Turn on the hot water draw-off taps served by the water heater, or, for multiple
installations, turn off the hot water outlet connection valve and secondary return valve.
4) Drain down using the drain valve on the heater.
Annual checks of the ignition systems, temperature controls and any other controls are
necessary to ensure continued safe and efficient operation.
PRE-SERVICE
OPERATIONS
ANNUALLY
The entire combustion system must be sealed for this water heater to function correctly.
Ensure that the burner access panel is kept tightly sealed. The combustion air supply pipe
at the rear of the heater must be tightly clamped to the vent adopter and combustion air
box boot. Replace any damaged parts.
The entire venting system and combustion air supply must be inspected at least annually
for integrity of all joints and gaskets.
BLOWER MOTOR BEARINGS
SIX MONTHLY
Every six months lubricate the blower motor bearings. Apply four drops of SAE 20 motor
oil to the ports of the front and rear motor bearings.
29
SECTION 6
BURNER
ASSEMBLY
SERVICING
Annually, remove the main burner rack assembly to clean orifices and related parts of any
dirt or other foreign matter. Inspect the burner ports for obstructions or debris and clean
with a wire brush, vacuum, or use a mild detergent to clean as necessary. Inspect the
pilot. Carefully clean the electrode and flame sense rod with emery cloth. The spark
electrode (rod closest to the pilot hood) gap should be 1/8 in.
NOTE: It is vital for proper and safe operation that the main burner rack is replaced in it's
original position.
To remove the burner rack assembly, follow the procedures outlined below.
a) Shut off the gas and electrical supply to the heater.
b) Remove the pilot tube fittings at the gas valve and combustion box.
c) Disconnect wires to gas valve. Open control box and disconnect pilot spark and flame
sense wires. Remove the wire raceway cover below the control box.
d) Disconnect the gas pipe union below the gas valve.
e) Remove the three screws securing the gasketed manifold pipe flange on the left side of
the combustion box.
f) Remove the burner access panel from the front of the combustion box.
g) Carefully remove and push the pilot wire grommet into the combustion box with the
pilot wires.
h) Disconnect the pilot tube fitting on the inside bulkhead fitting of the combustion box.
i) Unthread the gas pipe assembly from the manifold inside the combustion box.
j) Remove the screw securing the burner rack on the top right panel of the combustion
box.
k) Slide out the burner rack assembly.
To re-install the burner rack, reverse the above procedures.
GAS CONTROL
VALVE
The gas control valve should be checked and cleaned. Remove any debris from the valve
inlet filter using a soft brush or by blowing with low pressure air.
After servicing, Check:1. Soundness of any gas joints broken or disturbed and seal any leaks.
2. Burner pressure/gas rate at maximum thermostat setting.
3. Operation of heater is correct. Reset controls to user's requirements.
MAGNESIUM
ANODES
Magnesium sacrificial anode(s) is (are) fitted to the top of the storage vessel. The anode
will prevent corrosion of the storage vessel. Anode condition should be checked annually
and replaced if excessive wear is present.
1. Withdraw each anode using an 11⁄ 16 in AF socket spanner. A new anode measures
21mm diameter.
2. An anode should be replaced, if, at any point along it's length, the diameter is reduced
to half, or less of original. Particular attention should be paid to the ends.
3. If the anode is encrusted with limescale, it should be either wire brushed to reveal
bright metal or replaced.
Where CorrexTM anodes are fitted, no maintenance is necessary.
30
SERVICING
Check the condition and operation of this component at least once a year to ensure
it is free from limescale deposits.
Lift the lever at the top of the valve several times until the valve seats properly without
leakage and operates freely.
SECTION 6
COMBINED
TEMPERATURE
AND PRESSURE
RELIEF VALVE
Clean or replace as necessary.
The storage vessel should be checked and cleaned annually
Scale formation in the base of the vessel may occur, particularly in hard water areas and
is normally associated with high usage and high water temperatures. It is characterised by
a rumbling noise when the main burner is lit. Scale formation in the base of the vessel
will affect the efficency of the water heater and reduce the life of the storage vessel.
It should be noted that the failure of the storage vessel due to scale formation on
the base will not be covered by the terms of the warranty.
Any scale formation which cannot be removed by normal means of cleaning should be
removed by chemical descaling. See below.
CLEANING
THE
STORAGE
VESSEL
Descaling
When descaling the heater, attention is drawn to the following guidelines.
CAUTION!
DUE TO THE CORROSIVE NATURE OF DESCALING FLUID, IT IS ESSENTIAL THAT
SUITABLE PROTECTIVE CLOTHING IS USED AND ADEQUATE VENTILATION
AVAILABLE.
1.
2.
3.
4.
Turn gas control to OFF and isolate gas supply.
Close water inlet valve and drain heater tank.
Remove magnesium anode(s). It is recommended that new anode(s) is (are) fitted.
Add suitable hydrochloric acid based descale fluid. The requirement is normally
10 litres or more dependent on amount of limescale present.
5. After a minimum of one hour, restore gas supply and turn on main gas burner for 2
minutes maximum.
6. Isolate gas supply and drain descale fluid through drain port.
7. Open cold water feed valve and fill heater tank.
8. Drain and flush out heater for 20 minutes minimum.
9. Replace anode(s).
10. Restore gas supply and re-light heater.
IMPORTANT
Remove CorrexTM anodes if fitted and plug off the connections using 3/4” BSP plugs.
Re-fit the CorrexTM anodes when the descaling operation is complete.
Re-light and carry out commissioning checks as detailed in Section 4, Commissioning.
Set the thermostat control to the required user setting.
RESTART
31
SECTION 7
32
FAULT FINDING
FAULT
ACTION
WATER DOES
NOT GET HOT
(a) Check gas service cock is open.
(b) Check water valves are open.
(c) Check thermostat setting. (reset to higher temperature)
HEATER SOOTING,
YELLOW FLAME
(POOR
COMBUSTION)
(a) Check gas burner. If possible, check heat input with meter
and watch.
(b) Clean burners and injectors.
(c) Flue obstruction. Clean flue ways.
(d) Check flue and termination position.
(e) Check for correct ventilation.
WATER
TEMPERATURE
TOO HIGH
(a) Reset thermostat to lower temperature.
(b) Thermostat faulty. Check and replace if necessary.
(c) Main gas valve not closing. Clean or replace.
NOT ENOUGH
HOT WATER
(a) Check gas pressures at burner and at gas inlet to heater.
(b) Check amount of water being used against recovery rate
given on data plate. If usage too high, more heating
capacity needed.
WATER DRIPPING
FROM BASE OF
HEATER
(a) Check if this stops when water in heater is hot. If yes, then
condensation is the problem caused by incorrectly designed
flue or by tank cooling excessively, i.e. more hot water
being used than recovery rate of heater. If so, more
heating capacity needed.
(b) If water continues to drip when heater is hot, problem is
leaking joint or storage vessel.
FAULT FINDING
FAULT
ACTION
RUMBLING NOISE
(a) Scale formation in heater, consult water treatment
specialist. Heater must be descaled and suitable water
treatment provided to avoid re-occurrence.
CONTINUOUS
IGNITION
NO PILOT FLAME
(a) Check gas service cock is open.
(b) Check gas control knob is ON.
(c) Check ECO for failure.
PILOT LIGHTS BUT
MAIN BURNER
DOES NOT
(a) Main gas valve not energised. Check for loose contacts.
(b) Check for 24V AC at intermittent pilot ignition.
Replace control if faulty.
(c) Check for 24V AC at main gas valve terminals. Replace
valve if faulty.
NO IGNITION AT
PILOT
(a) Electrical ON/OFF switch is not ON.
(b) Thermostat set too low.
(c) Power to unit interrupted.
SECTION 7
33
SECTION 8
PARTS LIST AND ILLUSTRATIONS
A16
C4
C3
A1
C5
A4
A5
A3
A9
A2
A7
A6
C6
A10
A11
A12
A14
B2
C2
A8
B3
A13
A15
B1
B6
B5
C1
34
B4
B7
PARTS LIST AND ILLUSTRATIONS
Model
Ref.
CSC39
CSC59
CSC78
SECTION 8
CSC93
Part Numbers
Description
Qty
A1
E221
E221
E221
E221
Fan Motor Assembly
1
A2
E222
E222
E222
E296
Sacrificial Anode
4
A3
E223
E223
E223
E223
Flue Baffle
9
A4
C991
C991
C991
C991
Control Circuit Board
1
A5
C521
C521
C521
C521
On / Off Switch
1
A6
E193
E194
E195
E196
Data Badge Nat. Gas
1
A7
C534
C534
C534
C534
Nipple 1 ⁄2” BSP
A8
E050
E050
E050
E050
Hydrojet Cold Inlet 1 ⁄2” BSP
1
A9
E224
E224
E224
E295
Pressure Switch
1
A10
C299
C299
C299
C299
Cleanout Pad Seal
1
A11
C300
C300
C300
C300
Cleanout Pad
1
A12
C301
C301
C301
C301
Cleanout Pad Cover
1
A13
C247
C247
C247
C247
Drain Tapping Connector
1
A14
C381
C381
C381
C381
Drain Cock BS2879 ⁄4”
1
A15
C103
C103
C103
C103
Socket Coupler 3⁄4”
1
A16
E346
E346
E346
E346
Fan Motor
1
B1
E225
E225
-
-
Burner bar
5
-
-
E225
E225
Burner bar
7
B2
E226
E226
E226
E226
Pilot Assembly
1
B3
E227
-
-
-
Injector 2.4mm Nat. Gas
5
-
E228
-
-
Injector 2.9mm Nat. Gas
5
-
-
E228
-
Injector 2.9mm Nat. Gas
7
-
E229
Injector 3.1mm Nat. Gas
7
1
1
1
3
E230
-
-
-
Injector 1.65mm LPG
5
-
E231
-
-
Injector 1.95mm LPG
5
-
-
E232
-
Injector 1.90mm LPG
7
-
E233
Injector 2.1mm LPG
7
B4
E234
E234
E234
E234
Gas Valve
1
B5
C498
C498
C498
C498
Gas Cock 3⁄4” BSP FxF
1
B6
E235
E235
E235
E235
Control Thermostat with
Remote Phial and ECO
1
B7
E386
E386
E386
E386
Combustion Box Cover
1
C1
E348
E348
E348
E348
Gas Valve Assembly complete with fittings LPG
1
C2
E349
E349
E349
E349
Pilot Assembly (PSE-43L) LPG
1
C3
E350
E350
E350
E350
Transformer LPG
1
C4
E351
E351
E351
E351
Relay LPG
1
C5
E352
E352
E352
E352
Ignition Control Jc G770 LPG
1
C6
E365
E366
E367
E368
Data Badge LPG
1
35
SECTION 9
PARTS LIST AND ILLUSTRATIONS
11
12
10
14
1
9
6
8
2
7
3
5
13
150mm (6in) Flue Kit
10
11
9
13
1
8
7
2
6
3
5
200mm (8in) Flue Kit
36
12
PARTS LIST AND ILLUSTRATIONS
Ref.
Part No.
Description
1
2
3
4
5
6
7
8
9
10
11
12
13
14
E205
E202
E236
E209
E237
E238
E203
E204
E239
E210
E207
E208
E105
E206
90˚ Elbow with Clamp
1 mtr Flue with Clamp
Horizontal Flue Terminal
Wall Clamp (Not Shown)
Large Stepped Adaptor Connection Clamp
200mm (8in) to 150mm (6in) Reducer
1 mtr Cutable Flue with Clamp
0.5 mtr Flue with Clamp
Vertical Flue Terminal
Condensate Trap Tee
Flat Roof Plate
Angled Roof Plate
Horizontal Flue Outlet Terminal Guard
45˚ Elbow with Clamp
SECTION 9
Qty
150mm (6in)
Flue Kit
Note: Extra lengths of flue tubing can be supplied to suit each installation requirement.
Also extra 90˚ and 45˚ elbows can be supplied.
Ref.
Part No.
Description
1
2
3
4
5
6
7
8
9
10
11
12
13
E215
E212
E240
E219
E237
E213
E214
E241
E220
E217
E218
E105
E216
90˚ Elbow with Clamp
1 mtr Flue with Clamp
Horizontal Flue Terminal
Wall Clamp (Not Shown)
Large Stepped Adaptor Connection Clamp
1 mtr Cutable Flue with Clamp
0.5 mtr Flue with Clamp
Vertical Flue Terminal
Condensate Trap Tee
Flat Roof Plate
Angled Roof Plate
Horizontal Flue Outlet Terminal Guard
45˚ Elbow with Clamp
Qty
200mm (8in)
Flue Kit
Note: Extra lengths of flue tubing can be supplied to suit each installation requirement.
Also extra 90˚ and 45˚ elbows can be supplied.
A Terminal Guard Extension Part No. E424 can be supplied upon request.
37
SECTION 9
PARTS LIST AND ILLUSTRATIONS
C5
C4
C7
C10
C6
C2
C9
C3
C8
C1
Unvented System kit
CSC39 Parts List
Ref.
C1
C2
C3
C4
C5
C6
C7
C8
C9
C10
38
Part No.
B228
C784
C785
C786
C782
C914
C856
C911
C384
B173
C788
C787
Description
Unvented Systems Kit Complete
Combined Reducing Valve/Strainer
Check Valve
Expansion Valve
Expansion Vessel (25 Litre)
Temperature/Pressure Relief Valve 1”
11⁄ 2” Square Equal Tee
11⁄ 2”x 1” Reducing Bush
Tundish from Expansion Valve and T/P Valve
Wall Mounting Kit (Optional)
Hose Assembly
Wall Bracket Assembly
Qty
1
1
1
1
1
1
1
1
1
1
1
PARTS LIST AND ILLUSTRATIONS
SECTION 9
C4
C5
C6
C10
C2
C3
C1
C9
C8
Unvented System kit
CSC59, 78 & 93 Parts List
Ref.
C1
C2
C3
C4
C5
C6
C7
C8
C9
C10
Part No.
B248
C784
C785
C786
C782
E242
C856
E236
B173
C788
C787
Description
Unvented Systems Kit Complete
Combined Reducing Valve/Strainer
Check Valve
Expansion Valve
Expansion Vessel (25 Litre)
Temperature/Pressure Relief Valve 11⁄ 2”
11⁄ 2” Square Equal Tee
N/A
Tundish from Expansion Valve and T/P Valve
Wall Mounting Kit (Optional)
Hose Assembly
Wall Bracket Assembly
Qty
1
1
1
1
1
1
1
1
1
1
39