1
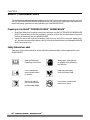
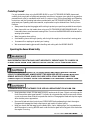
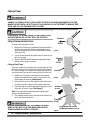
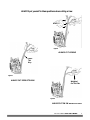
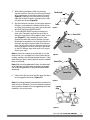
DR® TRIMMER/MOWER™
BEAVER BLADE®
SAFETY & OPERATING INSTRUCTIONS
READ AND UNDERSTAND THIS MANUAL AND ALL
INSTRUCTIONS BEFORE OPERATING THE DR TRIMMER/MOWER
BEAVER BLADE
and congratulations on your purchase of a new DR TRIMMER/MOWER BEAVER BLADE.
We have done our utmost to ensure that your DR TRIMMER/MOWER BEAVER
BLADE will be one of the most trouble-free and satisfying pieces of equipment you
have ever owned. Please let us know of any questions or problems you may have. We
want to answer or correct them as quickly as possible. (When you do call or write,
please have the serial number of your DR TRIMMER/MOWER and/or order
number handy—it will speed things up!) We also hope to hear from you on how much
you like your new helper.
And, please tell your friends about your new DR TRIMMER/MOWER BEAVER
BLADE! Having DR Owners spread the word about our products and our way of
doing business is the best advertising we can have, and the best way to help us provide
even better service in the years to come.
Thanks once again!
for all of us at
Country Home Products, Inc.
COPYRIGHT
2006 Country Home Products, Inc. All rights reserved.
Country Home Products, Inc.
Meigs Road
P.O. Box 25
Vergennes, VT 05491
Toll-free phone: 1-800-DR-OWNER (376-9637)
Fax: 1-802-877-1213
Web site: www.dr-owner.com
E-mail: [email protected]
II
DR® TRIMMER/MOWER™ BEAVER BLADE®
Table of Contents
CHAPTER 1...................................................................................................................1
INTRODUCING THE DR ® TRIMMER/MOWER ™ BEAVER BLADE® ..........................1
Conventions used in this manual .............................................................................1
Additional Information and Potential Changes..........................................................1
CHAPTER 2....................................................................................................................2
SAFETY CONSIDERATIONS ....................................................................................2
Preparing to Use the DR® TRIMMER/MOWER™ BEAVER BLADE®...........................2
Safety Information Labels.........................................................................................2
Protecting Yourself.................................................................................................. 3
Operating the Beaver Blade Safely........................................................................... 3
CHAPTER 3................................................................................................................... 5
INSTALLING YOUR DR® TRIMMER/MOWER™ BEAVER BLADE®........................... 5
Installation.............................................................................................................. 5
CHAPTER 4................................................................................................................... 7
OPERATING YOUR DR® TRIMMER/MOWER™ BEAVER BLADE®........................... 7
Operation............................................................................................................... 7
Felling of Trees ....................................................................................................... 8
CHAPTER 5:.................................................................................................................10
MAINTAINING THE DR® TRIMMER/MOWER™ BEAVER BLADE® ........................10
Sharpening the BEAVER BLADE .............................................................................10
CALL TOLL FREE 1-800-DR-OWNER
III
.
IV
DR® TRIMMER/MOWER™ BEAVER BLADE®
CHAPTER 1
INTRODUCING THE DR® TRIMMER/MOWER™
BEAVER BLADE®
Thank you for the purchase of your new DR TRIMMER/MOWER BEAVER BLADE. This manual will help you
set up and safely operate your new DR TRIMMER/MOWER BEAVER BLADE. Careful adherence to the
safety and operating instructions in this manual will ensure many years of productive use.
Please let us know if you have any questions or problems by contacting us via e-mail or our toll-free phone
number. Our contact information is listed inside the front cover of this manual. When you call or write,
please have the serial number of your DR TRIMMER/MOWER or order number available so we can help
you quickly.
Conventions used in this manual
THIS INDICATES A HAZARDOUS SITUATION, WHICH, IF NOT AVOIDED COULD RESULT IN DEATH
OR SERIOUS INJURY
THIS INDICATES A HAZARDOUS SITUATION, WHICH, IF NOT AVOIDED COULD RESULT IN MINOR
OR MODERATE INJURY
THIS INFORMATION IS IMPORTANT IN THE PROPER USE OF YOUR MACHINE. FAILURE TO FOLLOW
THIS INSTRUCTION COULD RESULT IN DAMAGE TO YOUR MACHINE OR PROPERTY.
Tip: This is a helpful hint to guide you in getting the most out of your DR TRIMMER/MOWER
BEAVER BLADE.
Tools and Supplies Needed: This indicates you will need a special tool and supplies to perform a
maintenance function on your BEAVER BLADE.
Note: This information may be helpful to you.
If you are ever unsure about an action you are about to take, contact Country Home Product’s toll-free
support at 1-800-DR-OWNER (376-9637)
Additional Information and Potential Changes
Country Home Products, Inc. reserves the right to discontinue, change, and improve its products at any
time without notice or obligation to the purchaser. The descriptions and specifications contained in this
manual were in effect at printing. Equipment described within this manual may be optional. Some
illustrations may not be applicable to your machine.
CALL TOLL FREE 1-800-DR-OWNER
1
CHAPTER 2
SAFETY CONSIDERATIONS
Taking the time to read and observe all safety instructions will ensure many years of productive use from
your DR TRIMMER/MOWER BEAVER BLADE and help you avoid injury. Please take a few moments to
read the following guidelines for safely operating your new BEAVER BLADE.
Preparing to Use the DR® TRIMMER/MOWER™ BEAVER BLADE®
•
Read these Safety and Operating Instructions before you use the DR TRIMMER/MOWER BEAVER
BLADE. Become familiar with the installation, operation, and service recommendations to ensure
the best performance from your BEAVER BLADE.
•
Inspect the area in which you will be working. Look for rocks, logs, sticks, rope, wire, garden tools,
etc., and remove these objects before cutting. Cutting over these objects could damage the BEAVER
BLADE and cause injury.
Safety Information Labels
Take some time to become familiar with the following standard safety cautions applicable to your
BEAVER BLADE.
2
Read the Safety and
Operating Instructions.
Always wear safety glasses
or goggles while operating
the machine.
Do not operate the
machine near people
or animals.
Keep body parts away
from the mower blade.
Remove all objects
that could be thrown
by the mower blade.
Use caution operating the
machine on slopes.
DR® TRIMMER/MOWER™ BEAVER BLADE®
Protecting Yourself
For your protection when using the BEAVER BLADE on your DR TRIMMER/MOWER, please read
carefully, and comply with all safety and operating instructions. Improper use or abuse of any gasoline
powered brush cutter or saw blade could result in a serious injury. Follow these Safety and Operating
Instructions and the Operating Instructions provided with your DR TRIMMER/MOWER. If you have
misplaced your Operating Instructions manual, a replacement may be obtained from Country Home
Products.
•
Always wear the protective goggles while cutting to protect your eyes from possible thrown objects.
•
Wear shoes with non-slip treads when using your DR TRIMMER/MOWER BEAVER BLADE. If you
have safety shoes, we recommend wearing them. Do not use the BEAVER BLADE while barefoot or
wearing open sandals.
•
Wear long pants when cutting.
•
Avoid wearing loose clothing or jewelry, which might be caught on the machine’s moving parts.
•
Use earmuffs or earplugs to protect your hearing.
•
We recommend wearing gloves while handling and cutting with the BEAVER BLADE.
Operating the Beaver Blade Safely
THE ITEMS LISTED IN THIS SECTION WILL HELP YOU KEEP YOUR DR TRIMMER/MOWER BEAVER
BLADE OPERATING SMOOTHLY AND, MOST IMPORTANTLY, PREVENT INJURY TO YOURSELF OR
OTHERS. PLEASE REVIEW THEM CAREFULLY BEFORE STARTING TO USE YOUR BEAVER BLADE
THE BEAVER BLADE IS DESIGNED TO CUT WOOD, BRUSH AND SMALL TREES ONLY! BEFORE
USING YOUR BEAVER BLADE, ALWAYS INSPECT THE WORK AREA BEFORE STARTING WORK, AND
REMOVE ANY ROCKS, STONES, GLASS, CANS, WIRE, METAL OF ANY KIND AND ANY OTHER
FOREIGN OBJECTS IF POSSIBLE. AVOID THESE HAZARDS IF YOU'RE UNABLE TO REMOVE THEM.
THE BEAVER BLADE IS NOT INTENDED TO BE USED AS A REPLACEMENT FOR A CHAIN SAW.
•
Keep bystanders at least 100 feet away from your work area at all times. Objects can be thrown far
from the machine and at great speeds. To be safe, do not operate the machine near small children
or pets, and never allow children to operate the machine. Disengage the blade and stop the engine
when another person approaches.
•
Be sure all blade and wheel controls are DISENGAGED before attempting to start the engine.
Engage and disengage the blade a few times to get used to it before cutting.
•
Keep your hands and feet away from the blade, belts, chains, blade pulleys, and concealed areas
while the engine is running. NEVER reach under the deck or grab hold of any part of the deck when
the engine is running.
CALL TOLL FREE 1-800-DR-OWNER
3
4
•
ALWAYS shut off the engine and remove the spark plug wire(s) before adjusting the machine. If you
have to stop to remove grass or debris from the underside of the deck, ALWAYS disconnect the
spark plug wire(s) first.
•
ALWAYS keep the BEAVER BLADE maintained and in good condition.
•
DO NOT use a BEAVER BLADE that is bent, fractured, dulled or damaged in any way.
•
ALWAYS keep the BEAVER BLADE teeth sharpened. A dull blade may lead to improper cutting
action, which could result in serious injury.
•
ALWAYS replace the saw chain with that provided in the appropriate Chain Teeth Pak® only. Our
saw chains are pre-stretched to avoid loosening during use. Using a different saw chain may cause
unsafe operating conditions when installed on the BEAVER BLADE, and could result in serious
injury.
•
When operating over uneven terrain and slopes, use EXTREME CAUTION to ensure solid and firm
footing.
•
DO NOT pound the BEAVER BLADE into vegetation like an axe. Such use may seriously damage the
BEAVER BLADE and machine, and could result in serious injury.
•
DO NOT cut anything except wood and other vegetation. Cutting into dirt, rocks, metal and other
materials could cause injury or damage to the operator and machine and will damage the blade
teeth.
•
Use the machine only in daylight or good artificial light.
•
Use extra caution when cutting in wet or slippery conditions.
•
While using the DR TRIMMER/MOWER BEAVER BLADE, don't hurry or take things for granted.
When in doubt about the equipment or your surroundings, stop the machine and take the time to
look things over. Make sure that you have 100% control of the machine at all times.
•
Never allow children or people who are unfamiliar with these instructions to use the DR
TRIMMER/MOWER BEAVER BLADE.
•
Do not operate the machine when under the influence of alcohol or medication.
•
Watch for traffic when cutting near roadways.
•
NEVER use a BEAVER BLADE in any manner or for any purpose other than those recommended in
these instructions.
DR® TRIMMER/MOWER™ BEAVER BLADE®
CHAPTER 3
INSTALLING YOUR DR® TRIMMER/MOWER™ BEAVER BLADE®
This chapter outlines a few simple steps you will need to follow to set up your new DR
TRIMMER/MOWER BEAVER BLADE before you use it. First identify the model of the mower you have,
then familiarize yourself with the parts of your DR TRIMMER/MOWER BEAVER BLADE assembly by
reviewing Figure 1 before beginning the steps outlined in this chapter.
Installation
THE 12" BEAVER BLADE MAY ONLY BE USED WITH 2000 SPRINT®. OR LATER (YELLOW FRAME) OR
ANY STANDARD, PRO OR COMMERCIAL MODEL DR® TRIMMER/MOWER™ . THE 12" BEAVER BLADE
IS NOT DESIGNED TO BE MOUNTED ON SPRINT® MODELS MANUFACTURED BEFORE 2000
(ORANGE FRAME), OR COMPACT MODELS.
PLEASE NOTE BEFORE INSTALLING THE 12" BEAVER BLADE:
• DO NOT USE THE STANDARD MOW-BALL™ SUPPORT MOUNTING BOLT FOR MOUNTING
THE 12" BEAVER BLADE AS SERIOUS INJURY MAY RESULT. USE THE HARDENED
MOUNTING BOLT SUPPLIED.
• DO NOT USE HEIGHT ADJUSTMENT DISKS OR LINE PLATES WHEN USING THE 12" BEAVER
BLADE. THE HEAT CREATED BY THE FRICTION OF THE BLADE MAY DAMAGE THEM.
Note: When using the aluminum Mow-Ball™ Support, you will NOT need to use the rectangular washer
because one is built in.
BEFORE PERFORMING ANY MAINTENANCE PROCEDURE, STOP THE ENGINE AND DISCONNECT THE
SPARK PLUG WIRE(S).
Tools Needed :
•
Long Phillips head screwdriver or the head-locking tool that was supplied with your Mower
•
Gloves
•
DR®TRIMMER/MOWER™ Safety & Operating Instructions for reference.
1.
Follow the steps in your DR® TRIMMER/MOWER™ Safety & Operating Instructions to remove the
flanged bolt or the standard bolt and rectangular washer insert completely. Store them for future
use, as they will not be required when using the aluminum Mow-Ball™ Support.
Carefully unpack the BEAVER BLADE. Wear gloves when handling the BEAVER BLADE— the teeth
are very sharp!
2.
CALL TOLL FREE 1-800-DR-OWNER
5
3. Choose the package with the hardened mounting bolt, metal spacer and illustration appropriate for
your machine (Figure 1).
4. Mount the BEAVER BLADE as shown in Figure 1. Use the hardened mounting bolt supplied with the
BEAVER BLADE kit. Insert the hardened mounting bolt through the aluminum Mow Ball Support,
the BEAVER BLADE (with the printed side of the blade facing up), the metal spacer (with the beveled
side up), the bearing housing plate (if it’s a later model) and then into the bearing housing. Use a
Phillips head screwdriver or the head locking tool to keep the shaft from turning while tightening the
BEAVER BLADE and Mow-Ball™ Support as described in your DR TRIMMER/MOWER Safety &
Operating Instructions. Tighten the hardened mounting bolt firmly.
Older Standard, Pro & Commercial
models
Kit number 131151
New model – Standard Pro
Commercial & Sprint 2000 model
w/yellow frame
Kit number 146011
Figure 1
6
DR® TRIMMER/MOWER™ BEAVER BLADE®
CHAPTER 4
OPERATING YOUR DR® TRIMMER/MOWER™ BEAVER BLADE®
This chapter covers the procedures for operating your new DR TRIMMER/MOWER BEAVER BLADE.
Note: We again recommend using the aluminum Mow-Ball™ Support with the BEAVER BLADE. It will
withstand the heat generated by heavy or continuous use better than the standard nylon Mow-Ball™ Support.
THE BEAVER BLADE IS DESIGNED TO CUT WOOD, BRUSH AND SMALL TREES ONLY! BEFORE USING
YOUR BEAVER BLADE, ALWAYS INSPECT THE WORK AREA BEFORE STARTING WORK, AND REMOVE
ANY ROCKS, STONES, GLASS, CANS, WIRE, METAL OF ANY KIND AND ANY OTHER FOREIGN OBJECTS
IF POSSIBLE. AVOID THESE HAZARDS IF YOU'RE UNABLE TO REMOVE THEM.
Operation
1.
Start your DR TRIMMER/MOWER as usual. Stand
behind the handlebar in the normal operating
position. DO NOT engage the trimmer head clutch
until you are certain that no one is in the area of the
machine.
2. Always look at the tree or sapling before you begin
cutting to judge the direction it will fall (See paragraph
Felling of Trees on next page). Let the trimmer get up
to full throttle before trying to cut with it.
3. Engage the trimmer head and EASE the blade into the
brush or saplings you wish to cut. Use the side of the
blade to cut instead of heading straight into the trunk
(Figure 2). DO NOT ram the blade into what you are
cutting. Ramming could damage the blade and cause
injury. When cutting small trees that cannot be cut in
one bite, pull the blade back and cut again from the
opposite side. (See paragraph Felling of Trees)
4. Turn off the engine and wait for the blade to stop
turning BEFORE clearing cut debris out of the way.
Figure 2
CALL TOLL FREE 1-800-DR-OWNER
7
Felling of Trees
DO NOT CUT A TREE IN ANY MANNER THAT WOULD ENDANGER PEOPLE, CAUSE PROPERTY
DAMAGE, OR STRIKE A UTILITY LINE. NOTIFY THE UTILITY COMPANY IMMEDIATELY IF A TREE
MAKES CONTACT WITH A UTILITY LINE. IF THIS HAPPENS, DO NOT ATTEMPT TO REMOVE TREE
FROM LINE OR YOUR TRIMMER FROM THE TREE.
CLEAR A PATH TO RETREAT WHEN CUTTING SMALL TREES
BEFORE STARTING TO CUT THE TREE. (SEE FIGURE 3)
Direction
Felling of Saplings less than 3 inches
If you know the direction of fall:
Balance the Trimmer on the wheels so the Mow Ball is
off the ground and the blade is approximately level.
Start the single felling cut on the side away from the
direction of fall.
2. Cut all the way through by rotating the Trimmer to the
left into the tree.
3. Stop the BEAVER BLADE and clear away felled trees
before cutting additional trees.
Felling of Small Trees
Of Fall
45°
1.
The notch method is used when two cuts are required. The
first cut is on the side of the tree in the desired direction of
fall. After a felling cut is made on the opposite side of the
tree, the tree will tend to fall in the direction of the first cut.
Balance the Trimmer on the wheels to the desired
height and make the first (lower) cut through 1/3 of
the diameter of the tree. (See Figure 4)
2. Make the felling cut on the opposite side of the notch
by balancing the Trimmer a little higher if possible.
3. Leave enough uncut wood between the felling cut and
the notch to form a hinge. (See Figure 5)
Figure 3
Direction
Of Fall
Felling Cut
First Cut
1.
Figure 4
Direction
Of Fall
Opening
Of Felling
Cut
Note: The hinge helps to keep the tree from twisting and
falling in the wrong direction.
4. Use a wedge if there is any chance that the tree will not
fall in the desired direction.
STAY ON THE UPHILL SIDE OF THE TERRAIN TO AVOID
BEING IN THE WAY IF THE TREE BEGINS ROLLING OR
SLIDING DOWNHILL AFTER IT IF FELLED.
8
DR® TRIMMER/MOWER™ BEAVER BLADE®
Closing Of
Notch
Figure 5
Hinge Holds The Tree On
Stump And Controls The Fall
ALWAYS put yourself in these positions when cutting a tree:
Wind
Figure 6
ALWAYS CUT UPWIND
Leans
This
Way
Figure 7
ALWAYS CUT OPPOSITE LEAN
Weighted
On This Side
Figure 8
ALWAYS CUT ON UN-WEIGHTED SIDE
CALL TOLL FREE 1-800-DR-OWNER
9
CHAPTER 5:
MAINTAINING THE DR® TRIMMER/MOWER™ BEAVER BLADE®
Regular maintenance is the way to ensure the best performance and long life of your BEAVER BLADE.
Please refer to this manual for maintenance procedures.
•
Use the BEAVER BLADE for cutting wood, brush and small trees ONLY.
•
It's a good practice to sharpen the BEAVER BLADE before each use. This allows you to maintain the
proper cutting angle of the teeth before the chain gets too dull. See the following page for
sharpening instructions.
•
The BEAVER BLADE does not need to be oiled.
•
To avoid premature dulling, keep the blade out of contact with the ground.
•
If you are planning to do heavy brush cutting, please consider purchasing the aluminum Mow-Ball™
Support, which better withstands the heat created by the BEAVER BLADE and is more durable under
heavy use.
•
If you have any questions, please call us TOLL-FREE 1(800)DR-OWNER(376- 9637). One of our
Customer Service Representatives will be happy to help you.
Sharpening the BEAVER BLADE
ALWAYS DISCONNECT THE SPARK PLUG WIRE(S) BEFORE REMOVING THE BEAVER BLADE AND
WEAR EYE PROTECTION AND GLOVES WHEN SHARPENING YOUR BEAVER BLADE.
YOUR BEAVER BLADE CHAIN IS A SEMI-CHISEL CHAIN WITH A .325" PITCH FOR THE 12" BEAVER
BLADE. SHARPENING YOUR CHAIN THE WRONG WAY COULD SERIOUSLY DAMAGE OR DESTROY
IT. IF YOU’VE NEVER DONE THIS PROCEDURE BEFORE, IT’S GOOD TO PRACTICE ON AN OLD
CHAIN FIRST, OR GET SOME TIPS AND ADVICE FROM AN EXPERIENCED CHAIN SHARPENER.
Tools Needed:
•
3/16" (4.8mm) round file (never use a rat-tail file) for the 12" chain.
•
Flat file
1.
2.
Remove the BEAVER BLADE from the cutting (or trimming) head. Leave the chain on the blade.
Draw a mark on the chain or BEAVER BLADE where you will begin sharpening.
TIP: Using a vise to hold the Beaver Blade while sharpening will make it easier to make consistent
sharpening strokes.
Note: File the chain with a light pressure into the cutting edge of the tooth. Do not bear down on the file. Give
each tooth the same number of strokes. The teeth are made of a relatively soft metal. It is not necessary to
remove a lot of metal.
10
DR® TRIMMER/MOWER™ BEAVER BLADE®
3. While holding the beaver blade in a standing
(vertical) position, Place the round file into the tooth
at the same angle as the cutting edge of the tooth
(Figure 9). Lightly push the file across the cutting
edge and through the tooth, twisting the file a half
turn with each stroke (Figure 10).
4. Skip the next tooth (because it is facing the opposite
direction), and sharpen the following tooth and so
on. When you get back to your mark, you are finished
with ONE side of the BEAVER BLADE.
5. Turn the BEAVER BLADE around to sharpen the
other side. Change the angle of the round file to
follow the angle of the cutting edge for teeth on this
side (Figure 11). Start sharpening at your mark.
Sharpen the teeth that have not yet been touched.
Remember to pay attention to the angle of the file on
the tooth and use the same number of strokes per
tooth. Twist the file a half turn with each stroke into
the cutting edge of the tooth, and don’t bear down
on the file. Sharpen every other tooth until you get
back to your mark.
Note: A chain that is sharper on one side than it is on the
other will not cut in a straight line, but will tend to drift up
or down, consistent with the sharper side of the chain. If your
blade drifts up or down, check to see that the chain is equally
sharp on both sides.
Tooth Angle
Raker
Tooth
Figure 9
Round File
First Side
Figure 10
Round File
Note: After the cutting edges are all sharp, the rakers need
to be filed down to give the teeth the proper cutting depth.
See the following procedure to complete the Beaver Blade
sharpening.
Second Side
6. Hold the flat file horizontal and file down the rakers
to the suggested dimension (Figure 12).
Note: If not enough material is removed from the rakers, the
teeth will not cut efficiently. If too much material is removed
from the rakers, the teeth will cut too aggressively and cause
instability in the cutting action.
Figure 11
Cutting
Edge
.025
Raker
Figure 12
CALL TOLL FREE 1-800-DR-OWNER
11
COUNTRY HOME PRODUCTS, Inc.
Meigs Road, P.O. Box 25, Vergennes, Vermont 05491
1-800-DR-OWNER (376-9637) • WWW.DR-OWNER.COM
©
2006 CHP, INC. 144781B