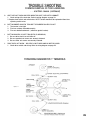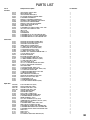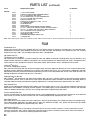
1
CSL2700
ROLL LAMINATOR
O W N E R S
CALL
M A N U A L
TOLL
F R E E
1-800-282-9290
For USI Education or Government Sales 1-800-243-4565
IMPORTANT INFORMATION
PLEASE DO NOT DESTROY THE SHIPPING CARTON!
USI urges you to store the original carton in which your laminator was shipped. Should you ever need to return your laminator to our repair
and service center, it is best repacked in the original carton to avoid damage during transport. Our special foam filled carton ensures
the laminator’s safe transit to our service facility. Failure to use original packaging will result in a repacking fee. If you have any service
inquiries, please contact USI’s Technical Support Hotline, M-F 8am-6pm EST, at 800-752-9131.
Warranty: A Full Two Year Warranty will be issued from date of product shipment. Please supply the model and serial numbers on all
correspondence concerning your laminator.
EQUIPMENT WARRANTY
We warrant to the original purchaser the equipment manufactured to be free from defects in material and workmanship under normal use
and service. Our obligation under this warranty shall be limited to the repair or exchange of any part or parts which may prove defective
under normal use and service within two years from the date of shipment and which our examination shall disclose to our satisfaction to
be defective. Warranty does not include damage due to operator error or general maintenance. When necessary, purchaser shall properly
pack and return the unit to the USI Service Center, freight and insurance prepaid.
THIS WARRANTY IS EXPRESSLY IN LIEU OF ALL OTHER WARRANTIES EXPRESSED OR IMPLIED INCLUDING THE WARRANTIES OF
MERCHANT ABILITY AND FITNESS FOR USE AND OF ALL OTHER OBLIGATIONS OR LIABILITIES ON OUR PART, AND WE NEITHER ASSUME
NOR AUTHORIZE ANY OTHER PERSON TO ASSUME FOR US, ANY OTHER LIABILITY IN CONNECTION WITH THE SALE OF THIS LAMINATING
MACHINE OR ANY PART THEREOF WHICH HAS BEEN SUBJECT TO ACCIDENT, NEGLIGENCE, ALTERATION, ABUSE OR MISUSE. WE MAKE
NO WARRANTY WHATSOEVER IN RESPECT TO ACCESSORIES OR PARTS NOT SUPPLIED BY US. THE TERM “ORIGINAL PURCHASER,” AS
USED IN THIS WARRANTY, SHALL BE DEEMED TO THE PERSON OR COMPANY WHO FIRST PUTS THE EQUIPMENT INTO SERVICE. THIS
WARRANTY SHALL APPLY ONLY WITHIN THE BOUNDARIES OF THE CONTINENTAL UNITED STATES.
Note: You will be charged for the replacement of any parts which are damaged as a result of improper packaging.
READ ME FIRST!
This manual contains all the information you need to properly unpack, operate and maintain your USI Laminator. Before unpacking your
laminator we suggest you read and follow the manual step by step. It contains essential information about each and every facet of your
laminator. Pay special attention to the work environment and safety precautions necessary for your laminating unit.
The manual is organized in the following way:
•There are seven major chapters, each covers a different subject heading.
• Each chapter is further broken down into parts.
Each part contains a detailed discussion, including photographs and figures,
covering either an operation or maintenance procedure for your laminator.
• Photographs and figures are numbered on each page for quick reference.
• Please pay special attention to particular notes and caution statements.
These comments alert you to information the we feel essential to operator
safety and damage prevention to the laminator.
Copyright Information:
IMPORTANT: This manual is copyright protected by USI, Inc. in accordance with the laws and requirements of the United States
Government. Any reproduction of this manual, in part or in full, without the written permission of USI, Inc. constitutes a violation of the
U.S. copyright laws and is subject to prosecution.
2
TABLE OF CONTENTS
Chapter 1 — Preparation
Part ILaminator Introduction . . . . . . . . . . . . . . . . . . . . . . . . . . . . . . . . . . . . . . . . 4,5
Part II
Work Area . . . . . . . . . . . . . . . . . . . . . . . . . . . . . . . . . . . . . . . . . . . . . . . . . . . . 6
Electrical Requirements . . . . . . . . . . . . . . . . . . . . . . . . . . . . . . . . . . . . . . . . . 6
Part III
Unpacking . . . . . . . . . . . . . . . . . . . . . . . . . . . . . . . . . . . . . . . . . . . . . . . . . . . . 7
Part IVLoading Film . . . . . . . . . . . . . . . . . . . . . . . . . . . . . . . . . . . . . . . . . . . . . . . 8-10
Part V
Heat Settings . . . . . . . . . . . . . . . . . . . . . . . . . . . . . . . . . . . . . . . . . . . . . . . . 11
Part VITension . . . . . . . . . . . . . . . . . . . . . . . . . . . . . . . . . . . . . . . . . . . . . . . . . . 12-13
Part VIIReloading A Hot Laminator . . . . . . . . . . . . . . . . . . . . . . . . . . . . . . . . . . . . . . 14
Chapter 2 — Care And Cleaning
Part ICleaning The Heat Shoe . . . . . . . . . . . . . . . . . . . . . . . . . . . . . . . . . . . . . . . . 15
Part IICleaning The Rubber Roller . . . . . . . . . . . . . . . . . . . . . . . . . . . . . . . . . . . . . . 15
Chapter 3 — Common Repair & Accessory Installation
Part I
Upper Heat Shoe Removal . . . . . . . . . . . . . . . . . . . . . . . . . . . . . . . . . . . . . 16
Part IIReinstall The Heat Shoe . . . . . . . . . . . . . . . . . . . . . . . . . . . . . . . . . . . . . . . 17
Part IIIRemoving The Rubber Rollers . . . . . . . . . . . . . . . . . . . . . . . . . . . . . . . . 18-20
Part IV
Pressure Settings . . . . . . . . . . . . . . . . . . . . . . . . . . . . . . . . . . . . . . . . . . . . . 21
Part VLubrication . . . . . . . . . . . . . . . . . . . . . . . . . . . . . . . . . . . . . . . . . . . . . . . . . . 22
Part VICleaning Friction Studs . . . . . . . . . . . . . . . . . . . . . . . . . . . . . . . . . . . . . . . . . 23
Part VIIReplacing the thermostat . . . . . . . . . . . . . . . . . . . . . . . . . . . . . . . . . . . . 24-25
Part VIII
Sprockets . . . . . . . . . . . . . . . . . . . . . . . . . . . . . . . . . . . . . . . . . . . . . . . . . . . 26
Chapter 4 — Common Examples Of Poor Laminating And Their Causes
Part ITrouble Shooting . . . . . . . . . . . . . . . . . . . . . . . . . . . . . . . . . . . . . . . . . . . 27-28
Chapter 5 — Diagrams
Part IThreading Diagram . . . . . . . . . . . . . . . . . . . . . . . . . . . . . . . . . . . . . . . . . . . . 28
Part II
Wiring Diagram . . . . . . . . . . . . . . . . . . . . . . . . . . . . . . . . . . . . . . . . . . . . . . . 29
Chapter 6 — Parts List
Part I
Parts List . . . . . . . . . . . . . . . . . . . . . . . . . . . . . . . . . . . . . . . . . . . . . . . . 30-32
Chapter 7 — Laminating Film
3
Part I
Specialty Film . . . . . . . . . . . . . . . . . . . . . . . . . . . . . . . . . . . . . . . . . . . . . . . . 33
SAFETY PRECAUTIONS
WARNING: Please review the following safety precautions before unpacking your new laminator.
• Use care in unpacking and lifting the laminator. Keep laminator level when lifting or moving.
Larger models weigh 60 pounds or more.
•Consider work area. A cluttered work space can lead to accidents. The laminator should be placed on
a level sturdy surface. Do not attempt to operate the laminator in damp or wet environments. Do not
operate electrical devices in the presence of flammable liquids, solvents or in gaseous/explosive
atmospheres. Keep work area well lit. Allow sufficient access to front and back of machine. See the
manual for additional work space requirements.
•Respect feed rollers. Keep hands away from feed rollers and any other moving parts. Turn drive
switch OFF before attempting to clear film wrap-arounds or jams. Use automatic reverse to clear film.
Do not wear any loose clothing, ties, jewelry, etc., which can be caught
by feed rollers and draw any body part into the machine.
•Respect heat shoes. Operating temperatures are hot enough to burn skin. If clearing a film wrap around or jam on or near heat shoes, first turn the heat switch OFF and allow laminator to cool to
room temperature. If your laminator is equipped with a heat shoe guard, do not operate without this
guard in place.
•Do not operate laminator with any panels or guards removed. Panels and guards protect
operators from such moving parts as the drive chain and sprockets, roller ends, etc.
•Turn the drive switch OFF before walking away or leaving the laminator unattended.
• Before lifting or moving laminator, turn drive switch OFF, turn heat switch OFF, unplug unit and allow
to cool to room temperature. Remove film rolls before lifting or moving machine. Film is easy to
rethread, see the section in this manual.
• Keep children away. Make sure visitors are kept well back from an operating laminator.
•Do not abuse electrical cord. Never pull cord to disconnect it from a receptacle. Do not allow cord
to contact heat, oil or sharp edges. Do not cut off or otherwise bypass the grounding prong on the plug.
•
If an extension cord is necessary be sure it is properly rated and of the same wire gauge or smaller
as the laminator cord. Capacity of the cord must prevent loss of power and overheating. Before using,
inspect extension cord for any damage, including loose or exposed wires, broken fittings, damaged
insulation, etc.
•
If you service the laminator yourself, call USI’s Technical Assistance department (1-800-752-9131)
for additional safety recommendations. Use only USI parts for service or replacement.
Failure to use USI parts could void manufacturer’s warranty. Note: Always turn laminator off and unplug
before servicing.
• Use common sense. Be cautious when operating your laminator. Do not operate laminator when
you are tired or your reactions are impaired in any way.
•Do not allow anyone to operate the laminator who has not received proper instruction and has not
read the safety instructions.
LAMINATOR INTRODUCTION
USI roll laminators are uniquely designed and engineered to be user friendly, reliable and virtually trouble free. USI’s
modular construction makes them easy to maintain and repair. All equipment controls are basic in design, functional
and positioned for easy access.
4
CSL 2700
Feature Location:
ATension Adjusting Knobs
BColor Coded Supply Mandrel (holds film)
C
Heat Guard
D
Side Housing
ETemperature Adjustment knob
F
Built In Handles
G
Heat On/Off Switch
HMotor Drive Switch
I
Paper Guide
J
Feed Tray
K
Heat Shoes (behind heat guard)
L
C
Film Temperature Guide
MThermometer
F
B
D
K
A
L
M
E
G
B
H
5
I
J
FIND A WORK AREA
A separate work station is required to house your USI laminator. Ample room is necessary to access the laminator from all
4 sides. If the laminator is back against a wall, the laminating film may back up and jam the equipment. A USI laminator
cabinet is an excellent choice for a work area. It can easily be moved and provide sufficient storage for film in the cabinet
below.
WARNING: Do not place the laminator where the heat shoes will be in the direct path of a room cooling fan, air conditioner
or similar forced draft.
Tools necessary to set up your laminator include cutting shears and any adhesive tape. For future service or maintenance,
an assortment of Allen wrenches, a flat head screwdriver and a Phillips head screwdriver are necessary.
ELECTRICAL REQUIREMENTS
All USI CSL laminators are powered by a standard 115 volt, three prong outlet.
ELECTRICAL SPECIFICATIONS
CSL2700 . . . . . . . . . . . . . . . . . . . . . . . . . . . . . . . . . . . . . . . . . . . . . . . . . . . . . . . . . . . . . . . . 15 amp /1540 watts
6
UNPACKING YOUR LAMINATOR
Your laminator comes packed in one carton. It
contains (1) laminator, (1) heat guard, (1) top supply
mandrel, (1) bottom supply mandrel, (1) threading
board, (1) feed table with guide, and this operation
and maintenance manual. (See diagram page 5)
First, open the box. Using two people, carefully lift
the laminator from the carton by grasping the side
housings and lifting. Do not lift by the upper idler
bar or supply mandrel. These are not weight bearing
parts and can cause damage to the machine.
For shipping purposes, white plastic tie straps are
used to hold the power cord, heat shoes, and accessories in place. These straps are approximately 1/8”
wide and should be carefully cut and removed prior
to set up.
Photo 7-1
Be sure to save the shipping carton…
Should your laminator ever need to be returned for
service, this carton ensures safe transit.
Your new laminator comes pre-loaded and ready to
run. Install the feed table and heat guard as shown
on page 13. Plug the machine in and turn the heat
switch to the “on” position and allow to heat for
approximately 15 minutes. Check the heat setting
and adjust if necessary as shown on page 11.
Photo 7-2
7
LOADING FILM
Color-coded laminators & film:
(For more information on this revolutionary system see the back cover)
Select the two rolls of laminating film that you wish to use. Both rolls of film should be of the same size, type and
thickness. Next, take the bottom supply mandrel (marked with the blue Color-Code) and insert it into the roll of film so
the blue end of the mandrel matches the blue end of the film roll. While inserting the mandrel, rotate it in the opposite
direction of which the “gripper dog” points while pressing into the roll of film and center on the mandrel. Place the
loaded mandrel on the machine by matching the blue end with the blue friction stud. To load the top, do the same as
the lower, only match the red ends.
RED
“Finish”
Side
Adhesive
Side
RED
TOP
Round End
Square
End
Gripper
Dog
Adhesive
Side
BLUE
“Finish”
Side
BLUE
LOW
Round
End
Gripper
Dog
Square
End
Figure 8-1
For non-Color-Coded laminators & film:
Select the two rolls of laminating film that you wish to use. Both rolls of film should be of the same size, type and
thickness. Next, take the bottom supply mandrel (labeled “Low”) and insert it into the roll of film until the “gripper dog”
meets the film’s cardboard core (photo 9-1). Rotate the mandrel in the opposite direction from which the “gripper dog”
points. As you rotate, apply pressure to force the mandrel into the roll of film and proceed to center it on the mandrel.
See Figure 8-1.
Place the loaded mandrel on the laminator. Insert the right side first and then lower the left side into the roll bracket.
Take the top supply mandrel (labeled “Top”), insert it into the roll of laminating film, and place it in the top position as
with the lower (process shown in photos 9-1, 9-2 & 9-3).
Note: 1” core laminating film is rolled adhesive side in (”poly in”). When loading fim on mandrel, be sure roll is positioned correctly to unroll as shown in figure 8-1. If the roll is loaded in reverse, the film could adhere to the laminator
when heated.
8
Note: When loading your laminating film, check for film splices.
These rolls will be clearly marked. Splices are not common, but are
unavoidable. If you find a spliced roll, place it in the top position on
the laminator so that the splice can be monitored carefully. When
the splice is ready to come through the laminator, turn the drive and
heat off, allow the machine to cool, and rotate the roll of film by hand
so the film tension is very loose. Turn the drive switch on again and
allow the splice to run through. If necessary, keep turning the roll of
film by hand to keep it slack until the splice has passed through.
Caution: Do not apply excessive force to the ends of the mandrel
(i.e. with a hammer, etc.). Excessive force will damage the mandrel.
When loading the laminator, be sure the heat is turned off and the
machine is cool to avoid chance of burns.
Photo 9-1
Note: Film rolls must be centered on supply mandrels.
If the rolls are not aligned, hot adhesive will be deposited on the
heatshoes and rubber rollers, necessitating a cleaning operation.
Caution: When loading the laminator, be sure that the heat is turned
off and the machine is cool.
Photo 9-2
THREADING DIAGRAM
Photo 9-3
9
Figure 9-4
Thread the top roll of film under the idler roller as shown in the
threading diagram on previous page (see Figure 9-4). Pull the
film down so that the films lead edge is below the lower heat
shoe. Next thread the bottom roll of film under the lower idler
bar pulling film upward until it is even with the top heat shoe
(the film will overlap). Tape it to the top film edge. This creates
a film “Web” (Photo 10-1 & 10-2).
Photo 10-1
Using Tension Adjustment knobs, loosen tension on both rolls
of laminating film. Turn on the “Drive” switch and using the
threading board—push the film web into the laminating rollers.
This process will push the web into the pull rollers and exit.
Ensure that the threading board and film exit between the rear
pull rollers (Photo 10-3 & 10-4).
Photo 10-2: Creating Film Web
NOTE: If you lose your threading board or if it becomes damaged, you can make your own with a piece of poster board.
Cut poster board 12” wide by
the length of the laminator (27”).
Your laminator is now loaded and ready to be heated. Remove
the threading board and save for your next use.
Photo 10-3: Threading board and film web entering.
Photo 10-4: Threading board and film web exiting pull rollers.
10
HEAT SETTINGS
Prior to laminating, allow the machine to pre-heat at least 15 minutes in order to stabilize the
temperature. Temperature settings depend on the film type being used. The temperature is preset at the factory, but
may require adjustment depending on what type of film you are using.
Turn the heat on by depressing the heat power switch on the left side panel. The red indicator light will illuminate and
remain lit while the machine is in the “on” position.
After the machine has been heated for 15 minutes, adjust the heat knob located on the end of the machine, in the
side housing, to the desired temperature setting. Allow the machine to heat for another 5 minutes in order to get an
accurate reading. Check your thermometer to confirm your temperature setting.
Photo 11-1
TYPE
Standard
Opti Clear
Photo Plus
DigiSeal 11
HEAT RANGE
260-290°F
210-245°F
220-250°F
180-220°F
SETTING TENSION
To adjust tension for upper and lower rollers, the laminator must be loaded and heated.
Remove the heat guard and feed tray. Loosen both tension control knobs by turning counterclockwise until there is no
tension on upper or lower film rolls.
Photos 12-1, 12-2.
Film should pull freely.
As film runs through it will appear wrinkled and bubbly, as pictured in photo 13-1.
Gradually increase tension on both rolls, by turning knobs clockwise, until film is smooth
on heat shoes. Once film is smooth, stop tightening knobs.
NOTE: For best results, reset tension with EACH new pair of film rolls.
NOTE: As the film roll supply becomes low it is necessary to decrease tension on the rolls.
NOTE: Too little tension on the top or bottom roll causes vertical or diagonal streaks in the
film as it passes over the heating shoe.
WARNING: Excessive tension will lead to increased wear and tear on the laminator.
Once the laminator is loaded, heated, tension adjusted—install the Feed Tray and Heat Guard, as shown below in
Photos 13-2 and 13-3.
Photo 12-2
Photo 12-1
Photo 12-2
12
Photo 13-1
Feed Tray Photo 13-2
13
Heat Shoe Guard Photo 13-3
RELOADING A NEW ROLL OF FILM
ON A HOT LAMINATOR
Allow the old film to run to a point just before it pulls off the cardboard cores.
Turn the drive switch to “OFF.”
Cut the film web with a blade so that
approximately 5” of film extends beyond
the idler bar. Photo 14-1.
CAUTION: When using a sharp object to
cut film (blade or shears), avoid contact
with heat shoes or rubber rollers.
Photo 14-1
Remove the old cardboard cores and replace with new rolls of film. Photo 14-2.
Loosen the tension on the top film roll.
Thread the new web of film around the
idler bar and tape it to the remaining
segment of the expended roll.
Photo 14-3.
Repeat this procedure for the bottom
film roll. Use caution when threading film
near hot heat shoe.
Run film through the laminator until the
new web of film clears the pull rollers.
Photo 14-4.
Readjust tension.
Photo 14-2
Photo 14-3
Photo 14-4
14
CLEANING THE HEAT SHOES
With continuous use the heat shoes and rubber rollers may accumulate adhesive and dirt. It is recommended that you periodically
inspect them for adhesive build-up. Use USI’s Laminator Cleaning
Kit, which contains cleaning fluid, a coarse scrubbing pad and a
mesh covered sponge, for removal of any adhesive build up.
Moisten the sponge pad with cleaning fluid and wipe down the
heat shoes.
NOTE: Be sure to clean the heat shoes only when the laminator is
cool.
CAUTION: Teflon coated heat shoes are scratchable.
Photo 15-2
Periodically inspect the rubber laminating and pull rollers for adhesive build-up.
Remove the upper heat shoe to gain access to the laminating rollers for cleaning.
CLEANING THE RUBBER ROLLERS
NOTE:
If indentations begin to appear on the surface of finished laminations, this may indicate that cleaning of the rollers is
necessary.
Before cleaning be sure the laminator is cool.
Use a dry Scotch Brite® pad to remove excess adhesive from the
rollers. Photo 15-3.
Turn the drive switch on and off to advance the rollers and clean
each section at a time.
Wipe clean with the sponge pad and cleaning solution from USI’s
Laminator Cleaning Kit.
NOTE:
Use cleaning solution sparingly. Do not allow to “run”
onto wiring or into “ends” of laminator.
Photo 15-3
WARNING: Do not use any sharp metallic objects or steel wool to
clean the rubber rollers.
Use of such abrasive objects can damage the rubber surface of the
rollers. USI strongly recommends the Laminator Cleaning Kit for all
of your cleaning needs.
15
UPPER HEAT SHOE REMOVAL INSTRUCTIONS
1. Unplug laminator and allow it to cool to room temperature.
2. Remove the left side housing. First remove the thermometer & temperature knob
(shown in figure 16-1). The temperature knob has a small Allen head set screw retaining it.
Then remove the housing by unscrewing 4 Allen head screws. Set housing assembly aside.
3. Unplug the upper heat shoe wires (A) from the terminal block (B). [Figure 16-2]
4. Gently lift the heat shoe and pull forward. Be careful not to damage the wires.
Lift from the right side first.
A
B
4
Thermometer
3
2
1
Figure 16-2
Temp. Knob
Figure 16-1
16
TO REINSTALL THE HEAT SHOE
1. Be sure laminator is unplugged.
2. Guide heat shoe wires exiting from the left end of the heat shoe through the
slot in the left side of frame.
3.Lower the left end of the heat shoe onto its bracket first, then lower the right end
and lock in place.
4. Plug the heat shoe wires into the terminal block.
5.Carefully install the left side housing and 4 Allen head screws. Replace the
temperature knob and thermometer
17
REMOVING THE RUBBER ROLLERS
NOTE: Only remove rollers if they are cut or in poor
condition.
NOTE: The following procedure removes all 4 rollers.
In certain instances, it is not necessary to remove all 4 rollers,
therefore, remove as required.
STEP 1:
Remove all film from laminator. Photo 18-1.
STEP 2:
Unplug laminator. Make sure it is cool.
Photo 18-1
STEP 3:
Remove the thermometer and heat knob from the left side
of laminator. Remove the side housing on both sides of the laminator.
STEP 4:
Remove the top heat shoe. Photo 18-2.
Refer to diagram and instructions on page 16.
STEP 5:
Unfasten and remove the pressure adjusting screws on
both sides of the laminator. Photos 18-3, 18-4.
Photo 18-2
Photo 18-3
Photo 18-4
Photo 18-5
STEP 6:
Loosen the Allen head set screws on the left and right ends
of the top rubber rollers. Photo 18-5.
18
STEP 7:
To remove the upper roller, slide
the roll shaft out of the roller and
then lift the top rubber rollers from
the laminator (top laminating roller
shown). Photos 19-1 and 19-2
Photo 19-1
STEP 8:
Loosen the set screws of
the lower roller sprockets
(laminating roller shown)
Photo 19-3.
STEP 9:
Loosen the Allen head set
screws on the left and right
ends of the lower rubber
rollers. (Lower laminating
roller shown.) Photo 19-4.
Photo 19-2
Photo 19-3
Photo 19-4
Photo 19-5
STEP 10:
Slide the roll shaft out of the rubber
roller and the roll sprocket. (laminating roller shown.) Photo 19-5.
NOTE: The chain can now be
removed without loosening
the motor mounting screws. Photo
20-1.(next page)
19
STEP 11:
To install a new roller or replace the original roller, reverse the removal procedure. Be sure to properly reposition
the sprockets and align the chain. All three sprockets should be in line with each other. Since the motor sprocket
was not removed, use it as a guide for alignment of the pull roll and laminating roll sprockets.
•The pull rollers on this laminator are interchangeable
with the laminating rollers. If the laminating rollers have
minor damage, each can be replaced by pull rollers. If
the laminating rollers are too badly damaged, they must
be replaced. The condition of the laminating rollers is
very important for a good lamination.
• If the chain feels too loose, it may be tightened as follows:
Loosen the motor mounting screws. Push down on the
motor sprocket and refasten the motor mounting screws.
Photo 20-2.
NOTE: Be sure to adjust the pressure on both pressure adjusting screws. 2-3 threads should show through the
adjusting screw mounting bracket. See page 21.
Photo 20-1
Photo 20-2
20
PRESSURE
The pressure settings for the rubber rollers on USI Laminators are preset at the factory and should not require adjusting.
In most cases, it is necessary to adjust pressure after the rollers have been removed for service. (Generally this is the
only time an adjustment is required.)
If an adjustment is necessary, disconnect electrical power and remove both the left and right
housings.
Photo 21-2
Locate the Slotted Screw holding Compression Spring.
Slotted Screw and Compression Spring locations are
identical on both sides of the laminator. Photo 21-2.
Photo 21-3
To increase pressure, turn the flat head screw clockwise.
There should be 2-3 threads of the screw showing through
the bottom of the bracket. Photo 21-3.
WARNING: It is extremely important that pressure
adjustments are always made exactly the same on both
sides of the laminator in order to maintain even pressure.
21
LAMINATOR LUBRICATION
Oil the drive chain once every six months with a light weight oil.
To avoid binding of the laminating and pull rollers, periodically oil the black plastic bushings. Bushings are located at
the end of each roller. To gain access remove side housings. See important information under “Removing Upper Heat
Shoe” pg 16.
Photo 22-1
Photo 22-2
NOTE: Any type of light oil (i.e. WD40) can be used for the above purposes. Use sparingly.
22
CLEANING FRICTION STUDS
If film rolls begin to shudder or squeak, cleaning of tension assembly is required.
STEP 1:
Remove the film rolls.
STEP 2:
Remove the right side housing.
STEP 3:
Disassemble the friction stud by unfastening
and removing the knob. Photo 23-1.
Photo 23-1
STEP 4:
Remove the spring, metal washer, leather
washer and the friction stud. Photo 23-2.
STEP 5:
To clean, wipe the mounting hole free of excess
debris. Use rubbing alcohol. Photo 23-3.
Photo 23-2
STEP 6:
Clean the friction stud groove and leather washer.
Use the Scotch Brite® pad from the Cleaning Kit.
STEP 7:
To reassemble, reverse the procedure as noted
above. Reset the tension as on page 12.
23
Photo 23-3
REPLACING THE THERMOSTAT
Step 1: Unplug the laminator.
Step 2: Remove the left side housing. See Upper Heat Shoe Removal Instructions (pg 16).
Step 3: Loosen, but do not remove the small set screw on the bottom of the lower heatshoe
(Photo 25-1).
Step 4: Unplug the two blue leads from the bottom of the thermostat.
Mark where the leads went to ease reassembly.
Step 5: Remove the two screws retaining the thermostat bracket to the laminator. Note: The motor-run capacitor is
also retained by one of these screws (the long one). When removing this screw and repositioning the capacitor to gain
access to the thermostat use caution. Do not touch the terminals on the capacitor or allow them to contact any metal
part of the laminator. Contact USI for any further information on servicing the capacitor.
(Photos 25-2 & 25-3).
Step 6: Gently pull the thermostat away from the laminator.
Step 7: Loosen, but do not remove the two screws retaining the left end of the lower heatshoe
(Photo 25-4).
Step 8: Grasp the capillary tube and gently slide the heat-sensing bulb out of the heatshoe.
Step 9: To install the new part, remove the mounting bracket from the old thermostat and attach it to the new part. The
bracket is held on with two screws on either side of the adjusting knob.
Step 10: Slide the heat-sensing bulb into the opening on the end of the lower heatshoe. Snug the small set screw on
the bottom of the lower heatshoe. Do not over-tighten as this could cause damage to the bulb (Photo 25-1).
Step 11: Tighten the two screws retaining the lower heatshoe (Photo 25-4).
Step 12: Gently coil the capillary tube between the thermostat and the side frame. Use caution not to break or crimp
the capillary tube (Photo 25-5).
Step 13: Re-fasten the thermostat bracket to the laminator. When doing so, use the long screw on the left-hand side
of the thermostat to hold the motor-run capacitor. Position the capacitor so the top (terminal end) is angled toward the
rear of the laminator. Use caution not to touch the terminals or allow them to contact any metal part of the laminator
(Photo 25-6).
Step 14: Plug the two blue leads into the new thermostat.
Step 15: Reinstall the side housing, heat control knob, and switch plate.
24
25
Photo 25-1
Photo 25-2
Photo 25-3
Photo 25-4
Photo 25-5
Photo 25-6
TIGHTENING SPROCKETS
STEP 1:
Remove the right side housing. Locate loose sprocket.
Each sprocket has a 3/32” Allen set screw located along
the outer edge. If the set screw loosens, it will allow the
sprocket to spin on the roll shaft, causing the rollers to
slip.
Laminating Roll
Sprocket
Pull Roll Sprocket
Motor Sprocket
STEP 2:
Align the set screw with the flat spot on the roll shaft. This
can be accomplished by either turning the drive on and off
or by using the manual crank (if equipped). Each shaft has
a flat spot, causing the shaft to be D shaped. The sprocket
set screw must be lined up on top of the flat spot.
Photo 25-1
Lower laminating roll shaft.
Set Screw
Set Screw
Flat Spot
Photo 25-2
Photo 25-3
Photo 25-4
STEP 3:
Using a 3/32” Allen wrench, remove the
set screw. Clean the set screw and apply
a drop of Loctite® or similar compound to
the threads. Insert set screw, but do not
tighten. Align the teeth of the sprocket with
the teeth (or outerface) of the other two
sprockets (the drive chain must travel in a
straight line). Tighten the set screw.
STEP 4:
Reinstall the right side housing.
Photo 25-6
26
TROUBLE SHOOTING
COMMON EXAMPLES OF POOR LAMINATING . . . and their causes.
A. FILM NOT BONDING TO SUBJECT OR TO ITSELF AT SEALED EDGES
Causes:
1.The heat is set too low.
2. Film tension is too tight.
3. Bottom roll of film is threaded incorrectly.
4.The pressure setting is not correct.
B. WRINKLES OR IRREGULAR WAVES RUNNING ACROSS THE LAMINATED WEB
(PERPENDICULAR TO THE EDGE)
Causes:
1.The heat set is too high.
2.Not enough tension on the supply mandrels. (Large, irregular waves).
3.Too much tension on the supply mandrels. (Small, fine wrinkles - “orange peel” effect).
4.The rubber laminating rollers are not clean.
5.The pressure adjustment for the laminating and pull rollers is out of adjustment.
C. STRETCH LINES RUNNING WITH WEB (PARALLEL TO THE EDGE)
Causes:
1.Too much tension on the supply mandrels.
2.The heat is set too high.
3.The heating shoes or rollers are not clean.
D. BLISTERS ON SURFACE OF SUBJECT OR ALONG EDGE OF SUBJECT
Causes:
1.The heat is set too high.
2. Excessive moisture in the paper being laminated. (If inks are not dry, this may also cause
blisters).
3.The rubber laminating rollers are not clean, or are damaged.
E.CURLING OF THE FINISHED LAMINATION
Causes:
1. Unbalanced tension on the supply rolls. Too much tension on the top supply roll will
cause the web to curl up. Too much tension on the bottom roll will cause a downward
curl in the web.
2. Bottom roll of film has been threaded incorrectly.
F. WRINKLING AROUND EDGE OF LAMINATED ITEM
Causes:
1. Item to be laminated is too thick.
Possible Solutions:
a. Loosen tension
b. Use film with thicker adhesive layer
c. Flush cut item
27
TROUBLE SHOOTING
COMMON EXAMPLES OF POOR LAMINATING
. . . and their causes. (continued)
G. HEAT DOES NOT WORK AND RED INDICATOR LIGHT DOES NOT ILLUMINATE
1.Check wiring of the laminator. Refer to wiring diagram on page 29.
2. Replace heat switch and switch wires. NOTE: Switch should not be replaced without also
replacing switch wires.
H.
BOTTOM RUBBER ROLLERS TURN BUT TOP RUBBER ROLLERS DO NOT
1.The tension is too tight.
2. Film has not been threaded correctly.
3. Film was loaded backwards. (adhesive against heaters)
I.
BOTTOM ROLLERS DO NOT TURN (BOTH OR INDIVIDUAL)
1. Be sure drive chain has not fallen off.
2. Be sure sprocket set screws are securely fastened.
3. Be sure roller set screws are securely fastened.
J.DRIVE DOES NOT WORK - ROLLERS DO NOT WORK AND NO MOTOR SOUND
1.Check drive switch and wiring. Refer to wiring diagram on page 29.
THREADING DIAGRAM FOR 1” MANDRELS
Figure 31-1
28
29
CSL 2700 WIRING
DIAGRAM
CSL Series
IV WIRING DIAGRAM
PARTS LIST
Part #
Component Description
Per Machine
Left Zone
A5510
HEAT SWITCH LIGHTED 2002
1
A5514DRIVE SWITCH 2002
1
A5846
HEAT CONTROL KNOB (N021)
1
A5888
SET SCREW FOR HEAT CONTROL KNOB
1
A4668CLASSROOM THERMOSTAT
1
A4678
BRACKET, CLASSROOM THERMOSTAT
1
A4707TERMINAL BLOCK NUMBERED W/O JUMPER
1
A9800AUTO SHUT-OFF TIMER/OPTIONAL
1
A4536
BRACKET, AUTO SHUT-OFF/OPTIONAL
1
A4504
STRAIN RELIEF BUSHING (805B)
1
A9906
POWER CORD (806P)
1
A5929CLASSROOM LEFT SWITCH PANEL LABEL 2002
1
A5549LEFT SIDE PLATE COMPLETE 2002
1
A5687
HOLE PLUG
1
A3924
PLASTIC PLUG
1
A4506THERMOMETER
1
A9921CLASSROOM BLUE LEFT SIDE HOUSING 2002 1
A9923CLASSROOM PURPLE LEFT SIDE HOUSING 2002 1
A9925CLASSROOM GREEN LEFT SIDE HOUSING 2002 1
Center Zone
A3882
PRESSURE ADJUSTMENT SPRING (402P)
2
A3883
PRESSURE ADJUSTMENT SCREW (403B)
2
A3884
UPPER ROLLER BUSHING (404B)
4
A3885LOWER ROLLER BUSHING (405B)
4
A3888
27 LOWER HEAT SHOE SPACER (506P)
2
A3905
27 RUBBER ROLLER & TUBING (100C)
4
A3908
27 UPPER ROLLER SHAFT (101B)
2
A3909
27 LOWER ROLLER SHAFT (102B)
2
A4786
EXTERNAL SELF-LOCKING RETAINING RING 1/2”
4
A3907
27 IDLER ROLLER (013B)
2
A4543NYLON IDLER WASHER 4
A4552
IDLER ROLLER DOWEL PIN (014A)
4
A3920
27 UPPER MANDREL COMPLETE (907B)
1
A3921
27 LOWER MANDREL COMPLETE (907B)
1
A4593
27 FEED TABLE ONLY (700C)
1
A3899LEFT FEED GUIDE (701C)
1
A4674
10-32 X 1/2 MACHINE SCREW FEED GUIDE
1
A4675
#10 SPLIT LOCK WASHER FEED GUIDE
1
A4687
FEED GUIDE KNOB 1
A4772
27 UPPER HEATSHOE, BARE (515C)
1
A4785CLASSROOM LOWER HEATSHOE, BARE (516C)
1
A4940
27 PLASTIC DEFLECTOR 2002
1
A5516
27 MOTOR HOUSING COVER PLATE 2002
1
A5935
27 MOTOR HOUSING (702C)
1
A5845
WIRE PROTECTIVE BUSHING (19F)
2
A5880
PRESSURE ADJUSTMENT PLATE 2002 2
A5926
SWITCH PLATE SET BLACK 2002
1
A3937
27 HEATGUARD (512B)
1
A3993
27 REINFORCING BAR (616B)
1
A5844
27 CUT-OFF BRACKET W/KNIFE (605B)
1
Right Zone
A0970BU
BLUE FRICTION STUD (902B)
1
A0970RDRED FRICTION STUD (902B)
1
A0971BU
FRICTION STUD LABEL, BLUE
1
A0971RD
FRICTION STUD LABEL, RED
1
A3226LEATHER WASHER (905B)
2
A5104
FRICTION DISK (906B)
2
A3995
SUPPLY ROLL SPRING (910P)
2
A3998TENSION ADJUSTMENT KNOB (903B)
2
A4696CLASSROOM MOTOR, REVERSIBLE 1
A3874MOTOR SPROCKET (301P)
1
A3876
PULL ROLL SPROCKET (Small) (303P)
1
A3877LAMINATING ROLL SPROCKET (Medium) (302P)
1
A9978DRIVE CHAIN (304PA)
1
A5930CLASSROOM RIGHT PANEL LABEL 2002
1
A5559RIGHT SIDE PLATE COMPLETE 2002
1
A9920CLASSROOM BLUE RIGHT SIDE HOUSING 2002 1
A9922CLASSROOM GREEN RIGHT SIDE HOUSING 2002 1
A9924CLASSROOM PURPLE RIGHT SIDE HOUSING 2002 1
A1150CABLE TIE 8”
2
A1151CABLE TIES 4”
7
A1152CABLE TIES 18”
8
A4523
#8 EXTERNAL TOOTH LOCK WASHER (4W)
1
30
PARTS LIST (continued)
Part #
Component Description
Per Machine
Common
A4525
1/4 SPLIT LOCK WASHER
A4526
BLIND RIVET, GRIPPER DOG, TINNERMAN BRACKET
A4528
#8 X 1/4 HEX WASHER HEAD SCREW
A4555
#4 FLAT WASHER ZINC PLTD, FOR TINNERMAN BKT
A4676
10-32 X 3/8 BUTTON HEAD CAP SCREW A5553
BLIND RIVET AD64BS (14V)
A5524
BLIND RIVET FLAT WASHER 3/16 DIA., 1/2”x1/2”
A3970
USI THREADING BOARD A4505TIE MOUNTING PAD
A4507DECALS/LABELS
A4508NYLON SPACER, MOTOR CONTROL OR TIMER BOARDS
A4510
10-32 X 1” SOCKET CAP SHOULDER SCREW, LOWER HEATSHOE R
A4511
10-32 X 1 1/4 SOCKET HEAD CAP SCREW, LOWER HEATSHOE L
A4516
10 X 1/2 PAN HEAD PHILLIPS SCREW (214S)
A4517
1/4-20 X5/8 BUTTON CAP SCREW
A5763
FOAM END CAPS 2002
A5792CLASSROOM OPERATIONS MANUAL 2002
A5813
27 CARTON 2002 2
8
3
4
4
4
4
1
7
1
2
2
2
10
2
1
1
1
NOTE: When ordering parts, please have complete machine model and serial numbers. These are located on an ID tag on the rear of the machine.
FILM
Standard Roll FIlm
Superb value for your dollar, USI’s Standard Roll Film is the obvious choice for schools or anywhere cost is the deciding factor.
Standard Roll Film offers strong bonding characteristics to paper and paper type products. This low density resin has a melting
temperature of 275°-300°F and a bonding temperature 280°F. FDA Approved.
Opti Clear® Roll Film
The Clearest Film In The World
Opti Clear® Roll Film produces a permanent bond to paper and additional substrates including those with wax based ink, clay
coated surfaces and heavy ink laydowns. Opti Clear® has a melting temperature of approximately 220°-250°F. Exceptionally clear
results makes this film the optimum choice for library book jackets, poster boards, menus, educational aids and more.
Photo Plus® Roll Film
#1 Film For Photographic Purposes
USI’s premium Photo Plus® Roll Film utilizes the highest quality and most aggressive adhesive to insure a superior bond to photographic surfaces. Adherence capabilities are numerous and include plastic, metal, vinyl, wax based ink, photographs and color
copy bonding. Excellent resistance to extreme temperatures ensures a hard, solid product that will not crack, break or soften. The
bonding temperature of Photo Plus® Roll Film is 235-250°F.
DigiSeal® Roll Film With UVI
USI’s DigiSeal®, low temperature with Ultra Violet Inhibitors (UVI), Roll Film is the ideal choice for laminating sensitive mediums
or latex based surfaces, such as wide format inkjet output. Designed with special inhibitors that block the damaging effects of
ultraviolet radiation sunlight and fluorescent lighting. DigiSeal® has a melting temperature of approximately 185°-220°F.
Ultra Violet Roll Film
UV Roll Film was designed with UVA and UVB inhibitors that serve to block the sun’s rays. This specially coated film eliminates the
deterioration and breakdown caused by extreme exposure. Laminated projects can be produced well in advance and displayed
indoors or outdoors without worry. UV Film has a melting temperature of approximately 220°-250°F.
Pressure Sensitive Roll Film
Pressure sensitive decals can be manufactured in minutes, saving budgeting dollars. Just remove the release liner on the back and
stick to most any surface! Pressure Sensitive Film has a melting temperature of approximately 235°-275°F.
Ultra Matte Roll Film
Ultra Matte Roll Film easily accepts pen, pencil and marker, while resisting smudging. The frosted glare free finish provides exceptional indoor-outdoor application. Ultra Matte Roll Film offers firm adherence to paper, vinyl, plastic and some metal. Ultra Matte
Film has a melting temperature of approximately 235°-250°F.
Valuewrap™ Roll Film
USI’s most economical film yet, ValueWrap is the perfect film for our price-sensitive customers. This film works best on prints
with low ink coverage, and is a great choice when laminating crafts, projects, and other every day items where the brilliance of
our higher end films is not necessary. Bonding temperature is 260°F.
31
USI’s New Color-Code Film System
USI Color Codes all of its Roll Film
and Roll Laminators!
We are the only lamination company to offer this unique troublefree system. That’s right, we are making film loading even easier.
We have completely removed the possibility of placing the adhesive
side of the film down on the machine. This is a common problem for
most laminator users. That problem will no longer be yours. When
it comes to laminating, USI is here to make the job as easy and
convenient as possible!
Here’s how it works:
Your new roll laminator is color coded on the upper and lower film
supply mandrels and machine side housings. All 1” and 2 1/4” roll
films are also color coded as well. Simply match the red core of
the film roll to the red end of the supply mandrel and machine side
housing. For the bottom mandrel, simply match the blue core of the
film roll to the blue end of the supply mandrel and machine side
housing. Now simply thread the film as shown in the manual and
you’re ready to laminate with confidence!
Color Code helps you easily match up the correct side
of the roll when installing film onto your roll laminator.
Roll Film Rolled Adhesive Side In
Red Core
Blue Core
Adhesive Side (Dull)
Roll Film Rolled Adhesive Side Out
Blue Core
Red Core
Gloss Side
Please feel free to call our Technical Department if you
should have any questions about this process.
800-752-9131
If it’s not color code, it’s too hard to load!
USI Corporate Headquarters:
98 Fort Path Road Madison, CT 06443-2264
(203) 245-8586 • (800) 243-4565 • Fax 24 Hour (203) 245-7337
East Coast Distribution Center: Madison, Connecticut
West Coast Distribution Center: Phoenix, Arizona
Rev 2006