1
HP Integrity Virtual Machines 4.2.5: Release
Notes
HP Part Number: 5900-1482
Published: January 2011, Edition 13.3
© Copyright 2011 Hewlett-Packard Company, L.P.
Legal Notices
Confidential computer software. Valid license from HP required for possession, use or copying. Consistent with FAR 12.211 and 12.212, Commercial
Computer Software, Computer Software Documentation, and Technical Data for Commercial Items are licensed to the U.S. Government under
vendor's standard commercial license.
The information contained herein is subject to change without notice. The warranties for HP products and services are set forth in the express
warranty statements accompanying such products and services. Nothing herein should be construed as constituting an additional warranty. HP
shall not be liable for technical or editorial errors or omissions contained herein.
Acknowledgments
HP-UX Release 10.20 and later and HP-UX Release 11.00 and later (in both 32 and 64-bit configurations) on all HP 9000 computers are Open
Group UNIX 95 branded products.
UNIX is a registered trademark of The Open Group.
Microsoft and Windows are U.S. registered trademarks of Microsoft Corporation.
Intel and Itanium are trademarks or registered trademarks of Intel Corporation or its subsidiaries in the United States and other countries.
Java is a U.S. trademark of Sun Microsystems, Inc.
Oracle is a registered trademark of Oracle Corporation.
VERITAS is a registered trademark of VERITAS Software Corporation in the U.S. and other countries.
Table of Contents
About This Document.......................................................................................................11
Intended Audience................................................................................................................................11
New and Changed Information in This Edition...................................................................................11
Typographic Conventions.....................................................................................................................11
Document Organization.......................................................................................................................12
Related Information..............................................................................................................................12
Publishing History................................................................................................................................12
HP Insight Remote Support..................................................................................................................14
HP Encourages Your Comments..........................................................................................................14
1 Introduction...................................................................................................................15
1.1 New Features and Enhancements in This Version of Integrity VM...............................................16
1.2 Guest and VM Host Support...........................................................................................................16
1.3 Guest Management Software..........................................................................................................17
2 Installation Notes.........................................................................................................19
2.1 Installing Integrity VM....................................................................................................................19
2.2 Changes and Issues in This Release................................................................................................19
2.2.1 Stop Guests Before Installing PHSS_41411 Patch...................................................................19
2.3 Known Issues and Information.......................................................................................................19
2.3.1 After Installation, Integrity VM Might Hang Upon Reboot...................................................20
2.3.2 Unable to Communicate with the FSS Agents Messages in /var/opt/hpvm/common/
command.log ................................................................................................................................20
2.3.3 Compatibility of Insight Dynamics - VSE V6.0 with Integrity VM V4.2.5.............................20
2.3.4 Warning Messages That Can be Ignored................................................................................20
2.3.5 Software Failures on VM Host Due to Use of Large base_pagesize Tunable.........................20
2.3.6 HP-UX Installation and Update Failures When Using Physical Installation Media..............20
2.3.7 After Upgrading to 11i v3, Guests Cannot Start Due to Missing USB DVD Backing
Device..............................................................................................................................................21
2.3.8 HPVM-Guest Bundle on HP-UX Guests No Longer Reduces Value of dma32_pool_size.......22
2.3.9 Clicking Veritas Enterprise Administrator Link on the System Management Homepage
Might Result in VEA Abort and Core Dump..................................................................................22
2.3.10 Failures in Key Applications.................................................................................................23
2.3.11 Installing the Migration Tools Including hpvmmigrate and Physical-to-Virtual Assist
Tools.................................................................................................................................................23
2.3.12 Limitations When using HP Integrity Virtual Machines Manager with Integrity VM
V4.2.5...............................................................................................................................................23
2.3.13 Installing the HP Integrity Virtual Machines Product Over the Evaluation Software.........24
2.3.14 Do Not Install Applications on the VM Host System...........................................................24
2.3.15 Do Not Install Integrity VM on a Virtual Partition...............................................................26
2.3.16 Do Not Install Windows as Alternate Boot on a VM Host System.......................................26
2.3.17 Trunking Software.................................................................................................................26
2.3.18 Warning During Startup if HP SIM is Installed....................................................................26
2.3.19 Patch PHSS_41543 Must be Installed Prior to Guest Activation...........................................26
2.4 HP-UX Patches Required in the VM Host.......................................................................................27
2.5 Patches Required in the HP-UX Guest............................................................................................32
2.6 Patches Required for Ignite/UX Servers..........................................................................................35
2.7 Patches Required for Windows Guests...........................................................................................35
2.8 Patches Required for Red Hat Linux Guests...................................................................................36
Table of Contents
3
2.9 Patches Required for SUSE Enterprise Linux Guests......................................................................36
3 Creating Virtual Machines..........................................................................................37
3.1 Changes and Issues in this Release.................................................................................................37
3.2 Known Issues and Information.......................................................................................................37
3.2.1 Failed API Access to Local Running Guest.............................................................................37
3.2.2 Cell Local Memory on Cellular Hosts.....................................................................................37
3.2.3 Pass-Through Devices Used by Guest Devices Might Not be Valid After Recovery Using
Ignite................................................................................................................................................37
3.2.4 Do Not Run hpvmstart in Background When Starting Multiple Guests With Resource
Conflicts...........................................................................................................................................38
3.2.5 Numbers Reported by Glance 4.6 or Later Running on VM Host Depend on Context.........38
3.2.6 Increasing Guest Default SCSI Queue Depths for MPT Virtual Devices can Lead to I/O
Failures............................................................................................................................................38
4 Installing Guests...........................................................................................................39
4.1 Windows Guests..............................................................................................................................39
4.1.1 Changes and Issues in This Release........................................................................................39
4.1.2 Known Issues and Information...............................................................................................39
4.1.2.1 Disable the NetBIOS Over TCP (NBT) Protocol for Windows Server 2008 Guests........39
4.1.2.2 Removing Media During Installation Hangs Guest.......................................................39
4.1.2.3 Network Driver for Some Windows Guests Not Behaving Correctly............................39
4.1.2.4 Setting a Static IPv4 Address at the SAC> Prompt.........................................................39
4.1.2.5 Guest Kit for Windows Server 2008................................................................................39
4.1.2.6 Palhaltlight in Windows Server 2008 Guests..................................................................40
4.1.2.7 Virtual DVD Misconfiguration can Lead to Windows Slow Down...............................40
4.1.2.8 HP Insight Manager Automatic Server Recovery Does Not Work ................................40
4.1.2.9 Running Windows Guests on a Dual Core Intel Itanium Processor (Montecito)
System........................................................................................................................................40
4.1.2.10 Installing Windows with Virtual NullDVD is Not Recommended..............................40
4.1.2.11 Enabling MP Services on Windows Guest Logs telnetd Errors....................................41
4.1.2.12 Using Windows Firewall Requires ICMP to Allow Echo.............................................41
4.1.2.13 Poor Console Screen Formatting...................................................................................41
4.1.2.14 The hpvmstop Command Does Not Shut Down Windows Guests Gracefully.........41
4.1.2.15 Do Not Delete EFI Shell Boot Option............................................................................41
4.1.2.16 Restoring the NVRAM for Windows Guests................................................................41
4.2 HP-UX Guests.................................................................................................................................42
4.2.1 Changes and Issues in this Release.........................................................................................42
4.2.1.1 Problem Using Local DVD as vMedia to VM Host on Integrity i2–Based server
blades..........................................................................................................................................42
4.2.1.2 System Fault Management (SFM) Support with HP-UX Guests....................................44
4.2.2 Known Issues and Information...............................................................................................44
4.2.2.1 HP-UX Guests Supported on Intel® Itanium® 9300 Processor Series...........................44
4.2.2.2 LV Mirroring Supported on HP-UX Guests....................................................................44
4.2.2.3 Machinfo Problems with VM Guests on Intel® Itanium® 9300 Processor Series
System........................................................................................................................................44
4.2.2.4 HP-UX 11i v3 Guests Might Fail to Configure Interface Cards Due to Lack of
Memory......................................................................................................................................45
4.2.2.5 Patches for HP-UX 11i v3 Guests....................................................................................45
4.2.2.6 Do Not Run Live Kernel Debuggers Inside a Guest.......................................................45
4.2.2.7 Do Not Use the iomap(7) Mechanism on HP-UX Guests............................................46
4.2.2.8 iCAP Commands Fail on HP-UX Guests........................................................................46
4.3 Linux Guests....................................................................................................................................46
4
Table of Contents
4.3.1 Changes and Issues in This Release........................................................................................46
4.3.2 Known Issues and Information...............................................................................................46
4.3.2.1 Using Linux Guests.........................................................................................................46
4.3.2.2 SUSE Linux Cloned Guests Boot-Disk Boot Problems...................................................47
4.3.2.3 TC INIT Dump Messages Fail to Appear in SUSE Linux Guest Consoles Running
Multi CPUs.................................................................................................................................48
4.3.2.4 SLES10 SP2 Guests Supported on Integrity Servers.......................................................48
4.3.2.5 Before Installing the SUSE Linux Guest..........................................................................48
4.3.2.6 Installing Linux Guest Management Software for the First Time..................................49
4.3.2.7 ACPI Warnings, Errors, and Exceptions Displayed when SUSE Guest Booted.............49
4.3.2.8 HP SIM CMS Cannot Connect to SLES10 over SSH.......................................................50
4.3.2.9 Preparing Linux Guests for Integrity Virtual Machines Manager..................................50
4.3.2.10 Linux Guests with FC Tapes Display Errors.................................................................50
4.3.2.11 Disable IPv6 on Linux Guests.......................................................................................51
4.3.2.12 Infrequent “Ooops: timer ticks before it is due” Errors................................................51
4.3.2.13 Infrequent “e1000: eth1: e1000_clean_tx_irq: Detected Tx Unit Hang” Errors.............51
4.3.2.14 Inconsistent “Bogomips” Values between Virtual CPU0 and Other Virtual CPUs......51
4.3.2.15 Incorrect Display of Special Characters when Displayed Using HP-UX Terminal......51
4.3.2.16 Occasional Floating-Point Assist Fault Messages.........................................................51
4.3.2.17 Serviceguard in VM Host Configuration......................................................................52
4.4 OpenVMS Guests ...........................................................................................................................52
4.4.1 Creating OpenVMS Guests.....................................................................................................52
4.4.2 Minimum Processor Requirement for OpenVMS Guests.......................................................52
4.4.3 Minimum VM Host Page Size.................................................................................................52
4.4.4 Guest Device Placement and Adapter Limitation..................................................................53
4.4.5 OpenVMS System Dump Analyzer (SDA).............................................................................53
4.4.6 Formatting SYSTEM UUID.....................................................................................................53
4.4.7 Packaging OpenVMS Guests as Serviceguard Package Not Supported.................................54
4.4.8 TCP/IP and WBEM Services Not Started Automatically at Boot on OpenVMS Guest..........54
5 Using Integrity VM Commands..................................................................................55
5.1 Changes and Issues in This Release................................................................................................55
5.1.1 Integrity VM Command Changes...........................................................................................55
5.1.2 Information Missing from hpvmmigrate -Y and -y Option Manpage Descriptions..........55
5.1.3 hpvmsuspend Manpage Missing -q Option.........................................................................55
5.2 Known Issues and Information.......................................................................................................55
5.2.1 Boot-Problem Messages Now Found In Log File...................................................................55
5.2.2 Display Output from Some Integrity VM Tools Might Change in Form and Content...........55
5.2.3 Enabling or Disabling Virtual CPUs Online...........................................................................55
5.2.4 The hpvmdevmgmt -r Command Might Report an Error When a Device is Marked as
EXIST=NO........................................................................................................................................56
5.2.5 An hpvmmodify Command Not logged in the command.log file for DVDs When Guest
Booted to EFI...................................................................................................................................56
5.2.6 Running the hpvmdevtranslate Script..............................................................................56
5.2.6.1 The hpvmdevtranslate Command Can be Used to Translate Devices Like SecurePath
and AutoPath.............................................................................................................................56
5.2.6.2 Error Comments from hpvmdevtranslate Command...............................................57
5.2.7 Accidental Use of -R Option with hpvmmodify Instead of -r.............................................57
5.2.8 Changing Guest LAN from AVIO to VIO...............................................................................57
5.2.9 The hpvmmodify Command Reevaluates Guest Configurations..........................................57
5.2.10 The hpvmdevmgmt Command Truncates File Sizes.............................................................57
5.2.11 Setting Devices to Sharable Can Lead to Device Conflicts...................................................57
5.2.12 Errors on Displaying Guest or Vswitch Information While that Information is Being
Modified..........................................................................................................................................58
Table of Contents
5
5.2.13 Do Not Attempt to Remove Busy Virtual Devices................................................................58
5.2.14 Missing uuid or .vmid Files................................................................................................58
5.2.15 Maintain Minimum Entitlement...........................................................................................58
5.2.16 Actual Running Entitlement Might Differ from Configured Entitlement............................58
5.2.17 Duplicate Messages when Modifying Running Guests........................................................58
5.2.18 Manpages Display on Linux Guests......................................................................................59
5.2.19 Integrity VM Check Might Fail Because of Bad Switch........................................................59
6 Guest Administration...................................................................................................61
6.1 Changes and Issues in this Release.................................................................................................61
6.1.1 Integrity VM Fully Supported with ID-VSE Logical Server Management 6.2......................61
6.1.2 Storage Requirements for Managing Existing Integrity VM Guests with Logical Server
Management....................................................................................................................................62
6.1.3 Managing Existing Integrity VM Guests With LSM...............................................................62
6.2 Known Issues and Information.......................................................................................................62
6.2.1 Creating Virtual Machine Administrator and Operator Accounts.........................................63
6.2.2 Administrator Account Names...............................................................................................63
6.2.3 Guest User Accounts...............................................................................................................63
6.2.4 Creating Virtual Machine Administrator and Operator Accounts.........................................63
6.2.5 Reconfiguring VM Host CPUs................................................................................................64
6.2.6 Monitor Logs Might Report Warnings....................................................................................64
6.2.7 Warning Message Might Appear When Configuring or Starting Guests...............................64
6.2.8 Do Not Add User Accounts to the hpvmsys Group..............................................................65
6.2.9 Do Not Enter Ctrl/B after Starting Guest with Virtual Console..............................................65
6.2.10 How to Stop Guests...............................................................................................................65
6.2.11 The hpvmconsole pc –cycle Command Occasionally Does not Complete.......................65
6.2.12 How to Recover from a Guest Hang.....................................................................................65
6.2.13 Using HP Serviceguard to Manage Guests...........................................................................65
6.2.13.1 Suspend/Resume not Supported with Serviceguard....................................................65
6.2.13.2 Serviceguard 11.18 No Longer Supported....................................................................65
6.2.13.3 Packaging VM Guest with CFS/CVM Backing Stores as Serviceguard Packages........65
6.2.13.4 File Permission Errors When Checking or Applying Integrity VM Serviceguard
Packages to the Cluster Configuration.......................................................................................66
6.2.13.5 Status of Serviceguard Controlled Distributed Guests can Lag...................................66
6.2.13.6 The hpvmsg_package Does Not Add Appropriate Entries..........................................66
6.2.13.7 Problem Displaying Truncated IPv6 Address for AVIO LAN with hpvmstatus and
hpvmnet Commands.................................................................................................................66
6.2.13.8 Using AVIO LAN Device in a Serviceguard Configured Guest...................................66
6.2.13.9 Required HP Serviceguard Patches...............................................................................66
6.2.13.10 Reenter Command to Start Packages..........................................................................67
6.2.13.11 Do not Use Integrity VM Commands to Manage Distributed Guests........................67
6.2.13.12 Different Cluster Nodes Report Virtual Machine Status Differently..........................67
6.2.13.13 Syslog Entries for cmcld Can Be Ignored...................................................................67
6.2.13.14 Using Integrity Virtual Machines Manager (VMMgr) to Manage Distributed
Guests.........................................................................................................................................67
6.2.14 Managing Guests using gWLM.............................................................................................67
7 Networking Information..............................................................................................69
7.1 Changes and Issues in This Release................................................................................................69
7.1.1 AVIO LAN Driver on OpenVMS Guest Does Not Support Checksum Offloading (CKO)....69
7.2 Known Issues and Information.......................................................................................................69
7.2.1 Configuring VLANs on Virtual Switches...............................................................................69
7.2.1.1 Creating and Managing a vswitch with a VLAN Interface............................................69
6
Table of Contents
7.2.2 AVIO LAN Devices Left Unclaimed by OpenVMS Guest if vswitch is Down at Boot..........70
7.2.3 Known Limitation on OpenVMS Guests and HP-UX Guests Sharing the same vswitch......71
7.2.4 OpenVMS Guests Support vswitch-based VLAN Configuration and Not Guest-based
VLANs.............................................................................................................................................71
7.2.5 Networking Interface Support for OpenVMS Guest..............................................................71
7.2.6 AVIO Non-Physical Network vswitch (localnet) Restrictions................................................71
7.2.7 Location of AVIO Networking Driver for Linux and Windows Guests.................................71
7.2.8 Changing Network Device Type on Linux Guest...................................................................71
7.2.9 Using Network Time Protocol (NTP) in Integrity VM Environments....................................72
7.2.10 Supported Adapters..............................................................................................................73
7.2.11 Calculating the Actual Utilization of the Virtual Network Card..........................................74
7.2.12 Using IP Alias Addresses in the Guest Not Supported for IPv4 or IPv6..............................74
7.2.13 Sufficient Memory for Guests with Virtual LAN Devices....................................................74
7.2.14 Vswitches Are Always in SHARED Mode............................................................................74
7.2.15 Do Not Use the HP A5506B PCI 10/100Base-TX 4 Port Interface for Virtual Networking....74
7.2.16 Integrity VM V4.1 Does not Support Gelan Drivers.............................................................74
7.2.17 MAC Address Validation Can Be Enhanced.........................................................................74
7.2.18 Auto Port Aggregation (APA) is Supported on the VM Host, Not on the Guest.................75
7.2.19 Do Not Run Applications that Set Network Devices into Promiscuous Mode....................75
7.2.20 Guest and Host Communication...........................................................................................75
7.2.21 Do Not Turn on TSO on the VM Host and on HP-UX Guests When Using VIO.................76
7.2.22 Restarting Vswitches.............................................................................................................76
7.2.23 Guest AVIO Interface Behavior.............................................................................................77
7.2.24 AVIO LAN Devices Not Claimed by Guest with DOWN vswitch at Boot Time.................77
7.2.25 Do Not Use TCP Software Packet Reassembly in IGSSN Driver..........................................77
7.2.26 Other Issues and Notes..........................................................................................................78
8 Storage Information.....................................................................................................79
8.1 Changes and Issues in This Release................................................................................................79
8.2 Known Issues and Information.......................................................................................................79
8.2.1 Storage Interface Support for OpenVMS Guests....................................................................79
8.2.2 Slow VM Host Storage Might Result in HP-UX MPT Spinlock Timeout...............................79
8.2.3 HostAVIOStor and GuestAVIOStor Changes.........................................................................79
8.2.4 GuestAVIOStor HBA Driver (gvsd) DLKM............................................................................80
8.2.5 Agile DSFs Change in HP-UX 11i v3 Guest When Migrating Disks Between scsi and
avio_stor......................................................................................................................................80
8.2.6 Agile Device Name Recommendations..................................................................................81
8.2.7 Configuration Limits...............................................................................................................81
8.2.8 Using USB CD/DVD Devices..................................................................................................81
8.2.9 The sam Command might Display Incorrect Number of Disks and Paths on an HP-UX 11i
v2 Guest...........................................................................................................................................81
8.2.10 Crash Dump Collection Might Fail for HP-UX Guests with Attached I/O Devices (VIO)....82
8.2.11 DMP Files Not Supported as Backing Stores .......................................................................82
8.2.12 Assigning a Null Device to a Resource.................................................................................82
8.2.13 Integrity VM Does Not Honor File Permissions on Backing Stores.....................................82
8.2.14 The hpvmmodify Command Fails to Change a DVD..........................................................83
8.2.15 Virtual FileDVD Reverts to Original Resource Statement....................................................83
8.2.16 Physical Device null Assigned to Nonexistent Path...........................................................83
8.2.17 Using sam on Guest Cannot Initialize Disk..........................................................................83
8.2.18 Extending SCSI Whole Disk Backing Stores.........................................................................83
8.2.19 Virtual SCSI (VIO) Device Limitations..................................................................................83
8.2.20 AVIO Limitations...................................................................................................................84
8.2.20.1 iSCSI-Based Backing Stores Not Supported with Physical Volumes Under Certain
Circumstances............................................................................................................................84
Table of Contents
7
8.2.20.2 iSCSI-Based Backing Stores with AVIO Require Host AVIOstor B.11.31.1009.01.........84
8.2.20.3 Modifying the Storage Adapter from scsi to avio_stor.........................................84
8.2.20.4 GuestAVIOStor Bundle not Installed but AVIO Storage Device is Configured...........84
8.2.20.5 Longer Failure Reporting Time for AVIO Devices on 11i v2 Guests............................84
8.2.20.6 Online Modification of AVIO Devices Might Fail.........................................................84
8.2.20.7 Mapping AVIO Storage Devices on HP-UX Guests......................................................84
8.2.21 Guest LUN Does Not Appear After a Delete and Add.........................................................86
8.2.22 Storage for Deactivated Volume Groups not Protected by Integrity VM Storage
Management....................................................................................................................................87
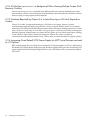
9 Migrating Virtual Machines........................................................................................89
9.1 Changes and Issues in This Release................................................................................................89
9.1.1 Online Migration Support.......................................................................................................89
9.2 Known Issues and Information.......................................................................................................89
9.2.1 Online Migration Support Limited to System with Compatible Processors..........................89
9.2.2 Location of Command Used to Initiate Online Migrations of Serviceguard Guest Packages
not in $PATH...................................................................................................................................89
9.2.3 Possible hpvmmigrate Command Error Messages...............................................................89
9.2.4 NR Guest State........................................................................................................................90
9.2.5 A Guest Might be Marked Disabled After Failed Offline Migration......................................90
9.2.6 Do Not Migrate Serviceguard Cluster Nodes.........................................................................90
9.2.7 Unpresenting SAN Devices to Integrity VM Hosts................................................................91
9.2.8 Host May Participate in One Online Migration at a Time......................................................91
9.2.9 Online Migration on the Target VM Host is the Same as Starting the Guest on the Target
VM Host...........................................................................................................................................91
9.2.10 Guests Using IPv6 Not Currently Supported for Online VM Migration..............................91
9.2.11 Transient Network Errors Can Cause hpvmmigrate Connectivity Check Failures..........91
9.2.12 Veritas Volumes Not Supported for Online VM Migration..................................................91
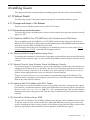
10 Error Logging..............................................................................................................93
10.1 Changes and Issues in This Release..............................................................................................93
10.2 Known Issues and Information.....................................................................................................93
10.2.1 Old Version of /etc/rc.config.d/hpvmconf Not Overwritten....................................93
10.2.2 Guest Log Can Grow Unbounded........................................................................................93
10.2.3 Log Messages Written to Old Log File..................................................................................93
10.2.4 Saved MCA or INIT Register State Can Be Inaccurate..........................................................93
10.2.5 Modifying the Size of the Monitor Log File..........................................................................93
10.2.6 Virtual Console Event Logs Different from Physical Machine Logs....................................94
11 Integrity VM Support Policy.......................................................................................95
11.1 Integrity VM Minimum Support Life............................................................................................95
11.2 Integrity VM Upgrades.................................................................................................................95
11.2.1 Changes in Support...............................................................................................................95
11.2.2 Integrity VM Patch Policy......................................................................................................96
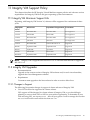
11.3 VM Host OS and Server Support .................................................................................................96
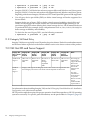
11.4 HP-UX Guest Support...................................................................................................................97
11.5 Windows and Linux Guest Support..............................................................................................98
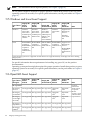
11.6 OpenVMS Guest Support..............................................................................................................98
11.7 HP Serviceguard Support..............................................................................................................99
11.8 Storage Interface Support............................................................................................................100
11.8.1 Guest Attached Device Support..........................................................................................100
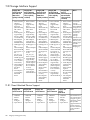
11.8.2 Multipathing Software Support ..........................................................................................101
8
Table of Contents
11.8.3 EVA Series Firmware Requirement.....................................................................................101
11.9 Network Interface Support..........................................................................................................102
11.10 AVIO Support............................................................................................................................102
A hpvmhostgdev Manpage.....................................................................................103
hpvmhostgdev(1M).............................................................................................................................104
Table of Contents
9
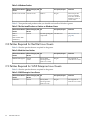
List of Tables
1-1
1-2
2-1
2-2
2-3
2-4
2-5
2-6
2-7
2-8
2-9
10
Guest and VM Host Support.........................................................................................................16
Guest Management Software Kit Locations..................................................................................17
VM Host Patches...........................................................................................................................27
Do Not Install Product or Patch....................................................................................................32
HP-UX Guest Patches....................................................................................................................32
Do Not Install Products or Patches on HP-UX Guests..................................................................35
Ignite/UX Patches..........................................................................................................................35
Windows Patches...........................................................................................................................36
Do Not Install Products or Patches on Windows Guests..............................................................36
Red Hat Linux Patches..................................................................................................................36
SUSE Enterprise Linux Guests......................................................................................................36
List of Tables
About This Document
The HP Integrity Virtual Machines Release Notes document describes the latest enhancements and
changes to the HP Integrity Virtual Machines product (Integrity VM), including limitations and
guidelines for using the Integrity VM software. Always read the release notes before installing
and using the product. For the most current information, obtain the latest version of this document
from Integrity Virtual Machines documentation.
Intended Audience
This document is intended for system and network administrators responsible for installing,
configuring, and managing Integrity VM. Administrators are expected to have an in-depth
knowledge of HP-UX operating system concepts, commands, and configuration. In addition,
administrators must be familiar with the HP Integrity machine console and how to install the
operating systems and applications running on their virtual machines.
New and Changed Information in This Edition
This document supersedes the HP Integrity Virtual Machines Version 4.2.5 Release Notes,
5900–1042.
Typographic Conventions
find(1)
HP-UX manpage. In this example, “find” is the manpage name and “1” is
the manpage section.
Book Title
Title of a book or other document.
Linked Title
Title that is a hyperlink to a book or other document.
http://
www.hp.com
A website address that is a hyperlink to the site.
Command
Command name or qualified command phrase.
user input
Commands and other text that you type.
computer
output
Text displayed by the computer.
Enter
The name of a keyboard key. Note that Return and Enter both refer to the
same key. A sequence such as Ctrl+A indicates that you must hold down
the key labeled Ctrl while pressing the A key.
term
Defined use of an important word or phrase.
variable
The name of an environment variable, for example PATH or errno.
value
A value that you might replace in a command or function, or information
in a display that represents several possible values.
<element>
An element used in a markup language.
attrib=
An attribute used in a markup language.
Intended Audience
11
Document Organization
This document contains information that supplements the information in the Integrity Virtual
Machines Version 4.2: Installation, Configuration, and Administration and includes the following
chapters:
•
•
•
•
•
•
•
•
•
•
•
Chapter 1: “Introduction” (page 15) describes some of the enhancements and quality
improvements in the current release of the HP Integrity Virtual Machines product.
Chapter 2: “Installation Notes” (page 19) contains information about installing and upgrading
Integrity VM and associated products.
Chapter 3: “Creating Virtual Machines” (page 37) contains information about creating virtual
machines.
Chapter 4: “Installing Guests” (page 39) contains information about installing guest operating
system and management software.
Chapter 5: “Using Integrity VM Commands” (page 55) contains information about using
Integrity VM commands.
Chapter 6: “Guest Administration” (page 61) contains information about guest system
administration.
Chapter 7: “Networking Information” (page 69) contains information about virtual
networking resources.
Chapter 8: “Storage Information” (page 79) contains information about virtual data storage
for guests.
Chapter 9: “Migrating Virtual Machines” (page 89) contains information about migrating
virtual machines from one system to another.
Chapter 10: “Error Logging” (page 93) contains information about the message logging
provided by Integrity VM.
Chapter 11: “Integrity VM Support Policy” (page 95) contains tables listing the Integrity
VM support on VM Hosts and guests.
Related Information
The following documents, which are found at the Business Support Center website at http://
www.hp.com/go/virtualization-manuals, might be useful to the reader of this document:
•
•
•
•
•
•
•
HP Integrity Virtual Machines 4.2: Installation, Configuration, and Administration
HP Integrity Virtual Machines Manager 4.1 Software: User Guide
HP Ignite-UX Reference for HP-UX 11i
HP-UX Installation and Update Guide
HP-UX Reference (Manpages)
HP Managing Serviceguard
Windows on Integrity: Smart Setup Guide
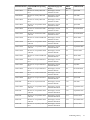
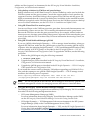
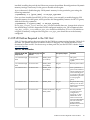
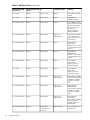
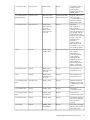
Publishing History
12
Publication Number Supported VM Host Operating
System
Supported Integrity VM
Version
Edition
Number
Publication Date
T2767-90005
HP-UX 11i v2 May 2005 and
later
HP Integrity Virtual
Machines A.01.00
1.0
October 2005
T2767-90010
HP-UX 11i v2 May 2005 and
later
HP Integrity Virtual
Machines A.01.20
2.0
February 2006
T2767-90010
HP-UX 11i v2 May 2005 and
later
HP Integrity Virtual
Machines A.01.20
2.2
February 2006
Publication Number Supported VM Host Operating
System
Supported Integrity VM
Version
Edition
Number
Publication Date
T2767–90014
HP-UX 11i v2 May 2005 and
later
HP Integrity Virtual
Machines A.01.20
2.3
April 2006
T2767-90043
HP-UX 11i v2 May 2005 and
later
HP Integrity Virtual
Machines A.01.20
2.4
June 2006
T2767–90033
HP-UX 11i v2 May 2005 and
later
HP Integrity Virtual
Machines A.02.00
3.0
October 2006
T2767–90076
HP-UX 11i v2 September 2006
and later
HP Integrity Virtual
Machines A.03.00
4.0
April 2007
T2767–90094
HP-UX 11i v2 December 2007
and later
HP Integrity Virtual
Machines A.03.50
5.0
December 2007
T2767–90114
HP-UX 11i v2 December 2007
and later
HP Integrity Virtual
Machines A.03.50
6.0
December 2007
T2767–90150
HP-UX 11i v2 March 2008 and
later
HP Integrity Virtual
Machines A.03.50
7.0
March 2008
T2767–90160
HP-UX 11i v3 September 2008
and later
HP Integrity Virtual
Machines B.04.00
8.0
September 2008
T2767–90179
HP-UX 11i v3 September 2008
and later
HP Integrity Virtual
Machines B.04.00
8.1
September 2008
T2767–90179
HP-UX 11i v3 September 2008
and later
HP Integrity Virtual
Machines B.04.00
8.2
October 2008
T2767–90181
HP-UX 11i v3 March 2009 and
later
HP Integrity Virtual
Machines B.04.10
8.3
March 2009
T2767–90186
HP-UX 11i v3 April 2009 and
later
HP Integrity Virtual
Machines B.04.10
8.4
April 2009
T2767–90191
HP-UX 11i v3 April 2009 and
later
HP Integrity Virtual
Machines B.04.10
8.5
July 2009
T2767–90797
HP-UX 11i v3 April 2009 and
later
HP Integrity Virtual
Machines B.04.10
8.6
December 2009
T2767–90203
HP-UX 11i v3 March 2010 and
later
HP Integrity Virtual
Machines B.04.20
9.0
March 2010
T2767–90209
HP-UX 11i v3 April 2010 and
later
HP Integrity Virtual
Machines B.04.20
10.0
April 2010
5900–0287
HP-UX 11i v3 June 2010 and
later
HP Integrity Virtual
Machines B.04.20
11.0
June 2010
T2767–90212
HP-UX 11i v3 September 2010
and later
HP Integrity Virtual
Machines B.04.20.05
12.0
September 2010
5900–1042
HP-UX 11i v3 September 2010
and later
HP Integrity Virtual
Machines B.04.20.05
13.0
September 2010
5900–1047
HP-UX 11i v3 September 2010
and later
HP Integrity Virtual
Machines B.04.20.05
13.1
October 2010
5900–1277
HP-UX 11i v3 September 2010
and later
HP Integrity Virtual
Machines B.04.20.05
13.2
November 2010
5900–1482
HP-UX 11i v3 January 2011 and HP Integrity Virtual
later
Machines B.04.20.05
13.3
January 2011
Publishing History
13
HP Insight Remote Support
HP strongly recommends that you install HP Insight Remote Support software to complete the
installation or upgrade of your product and to enable enhanced delivery of your HP Warranty,
HP Care Pack Service or HP contractual support agreement. HP Insight Remote Support
supplements your monitoring, 24x7 to ensure maximum system availability by providing
intelligent event diagnosis, and automatic, secure submission of hardware event notifications to
HP, which will initiate a fast and accurate resolution, based on your product’s service level.
Notifications may be sent to your authorized HP Channel Partner for on-site service, if configured
and available in your country. The software is available in two variants:
• HP Insight Remote Support Standard: This software supports server and storage devices
and is optimized for environments with 1-50 servers. Ideal for customers who can benefit
from proactive notification, but do not need proactive service delivery and integration with
a management platform.
• HP Insight Remote Support Advanced: This software provides comprehensive remote
monitoring and proactive service support for nearly all HP servers, storage, network, and
SAN environments, plus selected non-HP servers that have a support obligation with HP.
It is integrated with HP Systems Insight Manager. A dedicated server is recommended to
host both HP Systems Insight Manager and HP Insight Remote Support Advanced.
Details for both versions are available at:
http://www.hp.com/go/insightremotesupport
To download the software, go to Software Depot:
http://www.software.hp.com
Select Insight Remote Support from the menu on the right.
NOTE: HP recommends using Insight Remote Support on the VM Host system. Information
from Insight Remote Support running on virtual machines should not be used to determine the
hardware state.
HP Encourages Your Comments
HP encourages your comments concerning this document. We are truly committed to providing
documentation that meets your needs.
Please submit comments to:
http://www.hp.com/bizsupport/feedback/ww/webfeedback.html
Please include the document title, manufacturing part number, and any comment, error found,
or suggestion for improvement you have concerning this document.
14
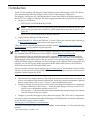
1 Introduction
Thank you for installing HP Integrity Virtual Machines (also called Integrity VM). This Release
Notes document describes the changes in this version of the Integrity VM product.
The Integrity VM Version 4.2.5 release introduces several new features including support for
the HP-UX 11i v3 1009 as a VM Host. The following patches and software products are required:
• On the 11i v3 VM Host:
— PHSS_41543 1.0 HPVM B.04.20.05 CORE
NOTE: Patch PHSS_41543 (or superseding patch) must be installed on the VM Host
prior to any guest activation; otherwise, guests might fail to start. See Section 2.3.19
(page 26).
—
•
PHSS_41550 1.0 HPVM B.04.20.05 HPVM-VMSGTK
Logical Volume Manager (LVM) software
Install LVM B.11.31.1010 on the VM Host. To locate LVM on the software depot website, go
to http://software.hp.com and search for the keyword LVM.
Check the online version of this manual on the BSC website, HP integrity Virtual Machines
documentation, for any addition required patches.
NOTE: Integrity VM patches for fixes developed subsequent to the Integrity VM V4.2.5 release
are available at the HP IT Resource Center (ITRC) website: http://www.itrc.hp.com.
HP recommends that you install the latest AVIO components for both the VM Host and the
guest; however, updating both guest and host components at the same time is not mandatory.
Updating both components ensures that you always receive the latest bug fixes for a complete
solution. HP fully supports different versions of the guest and VM Host AVIO components. For
example, you can run a guest AVIO driver based on the March 2008 Fusion with a VM Host
AVIO driver based on the December 2008 Fusion.
Always check the software depot website,http://software.hp.com, for the latest version of AVIO
software. Search for the keyword HPVM AVIO. In addition, check this website to determine the
required version of Ignite for AVIO.
This manual is organized in the following way:
• This introductory chapter contains a list of the new features provided in the new release, as
well as a description of the manual organization. It also may contain information of general
interest to the release, like Section 1.3 (page 17) and documentation issues.
• Chapter 2 through 10 provide release notes, which each chapter divided into two categories:
— Changes and issues in this release — which describe changes and issues in the V4.2.5
release or new information needed to use V4.2.5.
— Known issues — which describe issues and information persisting from previous releases
and still relevant to the new release.
•
Chapter 11 provides the support policy tables for Integrity VM V4.2.5 and its components.
For the most up-to-date information about HP Integrity Virtual Machines, see the documentation
on the Business Support Center website:
HP Integrity Virtual Machines documentation
For the most recent information relevant to this update, see the README.txt file at the following
location:
/opt/hpvm/doc/readme.txt
15
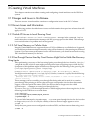
1.1 New Features and Enhancements in This Version of Integrity VM
This section describes how the current version of Integrity VM has been enhanced over previous
versions.
The following feature has been included in this release of Integrity VM:
• Support for the HP Integrity rx2800 i2
• Dynamic memory support enabled by default- Dynamic memory is now enabled by default
for support of the statistics—gathering feature in guests. For guests that are not currently
using dynamic memory, there should be no effect. (See notes on patch requirements.)
The features in the following list have been rolled-into Integrity VM V4.2.5 from the patch kits
that were provided after Integrity V4.2 was released:
• Suspend and Resume support on HP-UX and OpenVMS guests, which allows you to suspend
and resume a virtual machine. See the hpvmsuspend (1M) and hpvmresume (1M) manpages
for details.
• Vswitch can be backed by a VLAN interface (IEEE 802.1Q).
• Support for HP Integrity Superdome 2
• Integrity VM is now fully supported with HP Insight Dynamics - VSE (ID−VSE) 6.2. Logical
Server Management (LSM) and HP Insight Orchestration include support for Integrity VM
Virtualization Provider Version 2.0 (VirtProvider), which is used with logical server features
in Insight Dynamics to manage Integrity VM Hosts and HP-UX guests.
For information about the new support in ID-VSE, see Section 6.1.1 (page 61). For information
about LSM, see HP Insight Virtualization Manager Software with Logical Server Management:
User Guide at www.hp.com/go/insightdynamics/docs. For information about Insight
Orchestration, see the HP Insight Orchestration 6.2 User Guide at www.hp.com/go/
insightdynamics/docs.
•
New hpvmhostgdev script, used to analyze disklist and lvlist output and add
unused gdevs to the Integrity VM database. For information about the hpvmhostgdev
script, see Appendix A (page 103).
•
Support for the latest Intel® Itanium® Processor 9300 series on the following VM Host and
guests:
— HP-UX 11i v3 VM Host — HP-UX 11i v3 1009
— HP-UX 11i v3 guests — HP-UX 11i v3 0903 through 1009
— HP-UX 11i v2 guests — HP-UX 11i v2 0712
— HP OpenVMS V8.4 guests — HP OpenVMS V8.4
•
•
OpenVMS guest support
HP Integrity server blades support
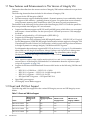
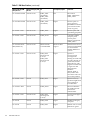
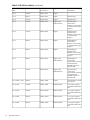
1.2 Guest and VM Host Support
The following table lists support for the various HP Integrity servers and HP Integrity server
blades:
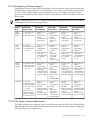
Table 1-1 Guest and VM Host Support
16
Guests
VM Host on HP
Integrity server
blades1
VM Host on HP
Integrity Superdome
21
VM Host on HP
Integrity Servers
VM Host on HP
Integrity rx2800 i2
HP-UX 11i v2 0712
Yes
Yes
Yes
Yes
HP-UX 11i v3 0709
No
No
Yes
No
HP-UX 11i v3 0803
No
No
Yes
No
HP-UX 11i v3 0809
No
No
Yes
No
Introduction
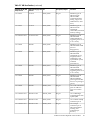
Table 1-1 Guest and VM Host Support (continued)
Guests
VM Host on HP
Integrity server
blades1
VM Host on HP
Integrity Superdome
21
VM Host on HP
Integrity Servers
VM Host on HP
Integrity rx2800 i2
HP-UX 11i v3 0903
Yes
No
Yes
No
HP-UX 11i v3 0909
Yes
No
Yes
No
HP-UX 11i v3 1003
Yes
No
Yes
No
HP-UX 11i v3 1009
Yes
Yes
Yes
Yes
HP OpenVMS V8.4
Yes
No
Yes
No
Microsoft Windows
Server 2008
No
No
Yes
No
Red Hat Enterprise
Linux Advanced
Server 4 Update 5
No
No
Yes
No
SUSE Linux
No
Enterprise Server
(SLES) for HP
Integrity Servers SLES
10 Update 2
No
Yes
No
1
Support for the latest Intel® Itanium® Processor 9300 Series
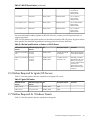
1.3 Guest Management Software
Integrity VM provides specific software for each type of guest operating system. This guest
management software enhances guest performance, enables Integrity VM commands, and
includes providers for virtual management software, such as Integrity Virtual Machines Manager.
The locations and contents of the guest management kits are modified in this version of Integrity
VM. The guest management software is required on each guest.
Guest management software is installed on the guest either remotely, from a software depot, or
locally, after being copied to the guest. The guest management software is located in the /opt/
hpvm/guest-images directory. Table 1-2 lists the location of the guest management software
kit for each type of guest operating system. The instructions for installing the guest management
software are provided in README.txt files in these directories.
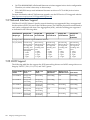
Table 1-2 Guest Management Software Kit Locations
Guest Operating System
Guest Management Software Location
HP-UX 11i v2
/opt/hpvm/guest-images/hpux/11iv2
HP-UX 11i v3
/opt/hpvm/guest-images/hpux/11iv3
Linux
/opt/hpvm/guest-images/linux
Windows
/opt/hpvm/guest-images/windows and /opt/hpvm/guest-images/
windows2008
NOTE:
kit.
The HP OpenVMS guest kit is included in the HP OpenVMS Version 8.4 distribution
Installing the guest management software kit causes the guest to reboot.
Whenever you upgrade Integrity VM, reinstall the guest kit on all the guests. This ensures that
guests run well and continue to be manageable and supportable. Failure to install and upgrade
1.3 Guest Management Software
17
the guest management software on each guest can cause problems that are difficult to diagnose
and solve.
18
Introduction
2 Installation Notes
This chapter contains notes about installing and upgrading Integrity VM and associated software
on the VM Host system.
2.1 Installing Integrity VM
This section describes information about installing the HP Integrity Virtual Machines product
and associated software on the VM Host system.
HP Integrity Virtual Machines B.04.20.05 is supported on HP Integrity servers or nPartitions
running HP-UX 11i v3 September 2010 1009). When you upgrade or reinstall Integrity VM, guests
are stopped, but they are not removed. When the new version of Integrity VM starts, the virtual
machines might also start, depending on the setting of the guest boot attribute.
NOTE: Version 4.2.5 of Integrity Virtual Machines requires the installation of both the
HostAVIOStor and HostAvioLan bundles. Other Integrity Virtual Machines documentation may
state this requirement is optional, but it is not. In addition, to use the AVIO network driver on
a Windows guest, you must install the VMGuestSW bundle.
The VM Host system is not a general-purpose system; it is dedicated to the hosting of virtual
machines. After you install Integrity VM, no operating system or process management
reconfiguration should be performed outside those provided by the Integrity VM interfaces.
Specific examples of actions that are not supported on the VM Host system include:
• Changing priorities or scheduling attributes of processes on the VM Host system.
• Modifying kernel tunables in any way.
Do not install the VM Host software on a VM guest, and do not install the HPVM-Guest software
on the VM Host. Neither configuration is supported.
If the current version of your VM Host AVIO (HostAVIOStor) storage driver is B.11.31.0903 or
later, then before you install Integrity VM V.4.2.5, upgrade the guest AVIO storage driver
(GuestAVIOStor) to B.11.31.1009/B.11.23.0903 or later on both HP-UX 11i v2 and HP-UX 11i v3
guests.
If you do not upgrade your AVIO guest storage drivers, you might see occasional open failures
of AVIO storage devices.
For complete information about the requirements for installing Integrity VM, see the HP Integrity
Virtual Machines 4.2: Installation, Configuration, and Administration manual.
2.2 Changes and Issues in This Release
There following section describes new information in this update to v4.2.5.
2.2.1 Stop Guests Before Installing PHSS_41411 Patch
Installing the patch kit PHSS-41411 HPVM-CORE patch on the VM Host causes a reboot. Be sure
to stop all guests before installing this patch:
# /sbin/init.d/hpvm stop
2.3 Known Issues and Information
The following sections describe known issues and information from previous releases that still
apply to V4.2.5.
2.1 Installing Integrity VM
19
2.3.1 After Installation, Integrity VM Might Hang Upon Reboot
Due to a timing issue, Integrity VM V4.2.5 might hang upon reboot after it is installed. This is
an intermittent issue. To fix the problem, install patch PHKL_41227, which will be available from
the HP IT Resource Center website: http://itrc.hp.com by the middle of August 2010.
2.3.2 Unable to Communicate with the FSS Agents Messages in /var/opt/hpvm/
common/command.log
When Integrity VM is stopped either with the /sbin/init.d/hpvm stop command or as a
result of removing or updating the version of Integrity VM on the VM Host, messages of the
following form might be logged in the /var/opt/hpvm/common/command.log file:
ERROR|host|root|Unable to communicate with the FSS agent
The messages, which are a result of interactions with the performance metrics processes scopeux
and perfd, are normally transient and stop after about a minute. Approximately 60-70 messages
might be generated in that time. You can clear this condition by either rebooting the VM Host
or by stopping and restarting the metrics collection processes.
To stop and restart the perfd process, use the following commands:
# /sbin/init.d/pctl stop
# /sbin/init.d/pctl start
To stop and restart the scopeux process, use the following commands:
# /sbin/init.d/ovpa stop
# /sbin/init.d/ovpa start
2.3.3 Compatibility of Insight Dynamics - VSE V6.0 with Integrity VM V4.2.5
You can use Version 6.0 of the Insight Dynamics — VSE with Integrity VM Version 4.2.5, but
this version of Insight Dynamics - VSE does not support the new features in Integrity VM Version
4.2.5.
2.3.4 Warning Messages That Can be Ignored
During the installation or update of Integrity VM along with the HostAvioLan and/or the
HostAVIOStor products, you might see the following warning messages in the /var/adm/
syslog/syslog.log file:
WARNING: mod_uninstall: Attempt to uninstall hvsd module: Module is not installed
WARNING: mod_uninstall: Attempt to uninstall hssn module: Module is not installed
These warning messages can be safely ignored.
2.3.5 Software Failures on VM Host Due to Use of Large base_pagesize Tunable
Integrity VM Version 4.2 and later support both 4KB (default) and 64KB settings for the
base_pagesize tunable. In previous versions, installation of Integrity VM set the base_pagesize
tunable to 64KB, because of the significant improvements in memory efficiency that resulted.
HP still recommends setting the base_pagesize tunable to 64K for this reason. However, there
are several defects that can significantly hamper software installation and operation when HP-UX
is configured with 64K base_pagesize. For more details, see the white paper on this topic, Tunable
Base Page Size available from http://www.hp.com/go/hpux-core-docs/.
2.3.6 HP-UX Installation and Update Failures When Using Physical Installation Media
The update from 0903 OE media might fail on VM Host (physical) systems, leaving the operating
system in an unusable state. This is caused by a defect in HP-UX when running with a
base_pagesize of 64K. Installation of Integrity VM sets the base_pagesize (BPS) to 64K, and
Integrity VM Version 4.1 requires HP-UX 0903 on the VM Host system. The failure manifests in
at least two ways:
20
Installation Notes
•
You might receive a read error while reading filesets from the OE media, with a “Bad Address
(14)” wording in the error message.
Workaround: Install the PHKL_39114 patch.
•
The update might hang while installing the filesets from the March 2009 OE media. Installing
PHKL_39114 does NOT fix this critical problem. This problem results when you update the
OE from 0809 to 0903 using physical (DVD) media. This problem does not occur with any
of the following conditions:
— You use Update-UX with a network source depot.
— You are cold-installing from OE media or a network depot.
— You are updating from a release prior to September 2008.
— Your system is set to a BPS of 4K before the update.
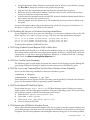
Follow these steps to work around this problem:
1. Check the state of BPS on your system by running:
# kctune base_pagesize
Tunable Value Expression
base_pagesize 64 64
If it is 4 instead of 64, then you can proceed directly with the update.
2.
3.
Gracefully shut down all VMs running on the VM Host system.
Shut down Integrity VM:
# /sbin/init.d/hpvm stop
4.
Change the BPS value to 4K with the following command:
# kctune base_pagesize=4
5.
6.
7.
Reboot your system, and verify the 4K BPS value as in Step 1.
Update the system with the OE media by completing all Update-UX steps.
After your system has updated and rebooted, set the BPS to the original value:
# kctune base_pagesize=64
8.
9.
Reboot your system, and verify the original BPS value (in this case, 64K) as in Step 1.
Verify that Integrity VM has started successfully using the hpvmstatus command.
For more information, see the HP-UX 11i v3 Read Before Installing or Updating March 2009. For the
latest information on this issue, including the updated recovery instructions, see CRs
QXCR1000868519 and QXCR1000907205. You can search for them by following these steps:
1. Go to the IT Resource Center at this website: http://www.itrc.hp.com.
2. Click “Search knowledge base”.
3. Select “Search by document ID” for your search mode.
4. Enter "ttr_na-SSB_1000868519" or "ttr_na-SSB_1000907205" in the box.
2.3.7 After Upgrading to 11i v3, Guests Cannot Start Due to Missing USB DVD
Backing Device
If you have recently upgraded or are planning to upgrade to HP-UX 11i v3, (0903 or later) from
either HP-UX 11i v2 or an earlier version of HP–UX 11i v3, note that this release contains a new
USB driver that uses a different device name for a USB . Guests that have been configured to use
a USB DVD as a backing storage device require modifications to access the new device name for
the USB DVD. If no modifications are made to those guests, they will not be able to access the
USB DVD and might fail to boot due to a change in the EFI boot-path device.
2.3 Known Issues and Information
21
NOTE: Patch PHKL_37815 contains the new USB driver delivered with HP–UX 11i v3 (0903).
Consequently, if you install this patch on an HP–UX 11i v3 system that is older than 0903, you
might experience the same problem.
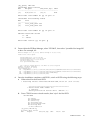
You can use a single hpvmdevmgmt command to modify all guests to use the new USB DVD
device. Run the following command when all affected guests are off or not running:
/opt/hpvm/bin/hpvmdevmgmt -n gdev:old_USB_devicename:new_USB_devicename
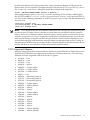
The new USB DVD devices appear in the default ioscan command as follows:
usbmsvbus
ext_bus
target
disk
target
disk
0
1
4
7
3
6
255/0
255/0/0
255/0/0.0
255/0/0.0.0
255/0/0.2
255/0/0.2.0
mass_storage CLAIMED VIRTBUS USB Mass Storage
usb_ms_scsi CLAIMED INTERFACE USB Mass Storage SCSI
tgt CLAIMED DEVICE
sdisk CLAIMED DEVICE HP
tgt CLAIMED DEVICE
sdisk CLAIMED DEVICE HP DVD Writer 630c
For information about ioscan output for USB devices, see the Understanding HP-UX 11iv2 and
v3 USB ioscan white paper.
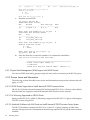
The following ioscan command gives you all agile device names for the DVD on the system.
Generally, there is one that is either directly connected or connected using the USB controller:
ioscan -FN | grep DVD | awk
-F:
‘{print "/dev/rdisk/disk" $13}’
For information about updating to the new USB driver on HP-UX 11i v3, see the Update to USB
Driver Support on HP-UX 11i v3 white paper.
2.3.8 HPVM-Guest Bundle on HP-UX Guests No Longer Reduces Value of
dma32_pool_size
The HPVM-Guest bundle on HP-UX guests no longer reduces the value of dma32_pool_size.
Contact HP Technical Support for suggested values of dma32_pool_size, if necessary.
The HPVM-Guest bundle can be installed on physical Integrity servers where appropriate to
facilitate migration or cloning of that system image onto a virtual machine. When installed
directly onto a physical Integrity server, a warning is issued indicating that the bundle is intended
for use on a virtual machine. There is no known adverse impact resulting from its installation.
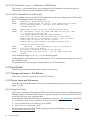
Users can configure dma32_pool_size to the value set when the V4.0 and V3.5 HPVM-Guest
software was installed, with the following command:
# kctune dma32_pool_size=4194304
The virtual machines must be rebooted for this setting to take effect.
2.3.9 Clicking Veritas Enterprise Administrator Link on the System Management
Homepage Might Result in VEA Abort and Core Dump
Starting with the September 2008 OEUR, clicking the Veritas Enterprise Administrator (VEA)
link on the System Management Homepage might result in VEA aborting and dumping core.
This problem happens when HP-UX has been configured to use large pages (64K base page size)
and VEA is bundled with a lower version of JRE.
This problem is also seen with VEA and the Integrity VM Host, as the Integrity VM default
configuration includes large page size for performance optimization.
To work around this problem, install the patch, PHCO_37694, which updates the version of JRE
without requiring a reboot. For availability of the patch, check the HP IT Resource Center site:
http://itrc.hp.com. For additional information about adjusting base page sizes, see the Tunable
Base Page Size information at: Tunable Base Page Size white paper.
22
Installation Notes
2.3.10 Failures in Key Applications
Some applications fail when run on HP-UX with large pages configured (larger than 8K). Those
that are frequently used on the VM Host and instructions for how to address problems with
those applications follow:
• Veritas Enterprise Services Administrator
The Veritas Enterprise Services Administrator, part of the Symantec VxVM product, as
delivered into Update 3, bundles in a version of the Java Virtual Machine that does not work
with values of the system base-page size greater than the default. This situation is remedied
by a patch to the VxVM product that was released in October 2008. The patch, whose identifier
is PHCO_37694, is now available on the HP patch hub.
•
Opsware AMS Client
The aistat, rgetver, aiinv, aicfg, and aiclient executables might fail with the
error message:
crt0: ERROR: mmap failed for dld (text) errno:000000022
The failure is caused by a defect in the dynamic linker provided with HP-UX. Installation
of the patch with identifier PHSS_39094 resolves the problem.
For more information, see the white paper Tunable Base Page Size at: Tunable Base Page Size for
issues with other applications on the VM Host system.
2.3.11 Installing the Migration Tools Including hpvmmigrate and Physical-to-Virtual
Assist Tools
The VMMigrate SD-UX bundle no longer exists. The functionality delivered with this bundle is
now delivered with installation of the Integrity VM bundle T2767CC. Installation of T2767CC
causes the old VMMigrate bundle to be automatically removed. The functionality previously
delivered with the VMMigrate bundle has been replaced by the contents of two SD-UX products
within the T2767CC bundle, VMMIGRATE and VMCONVERT. The VMMIGRATE product
contains the hpvmmigrate command along with its supporting tools and manual. The
physical-to-virtual tools and documentation are delivered in the VMCONVERT product. These
SD-UX products and others can be seen with the swlist command:
swlist -R T2767CC
The repackaging of the physical-to-virtual tools in the T2767CC.VMCONVERT product, allows
them to be installed on any Integrity HP-UX 11i v3 system, not just on a VM Host or a virtual
machine. This results in more practical use of the physical-to-virtual tools enabling them on
physical Integrity servers, vPars, nPars, and so on.
To install the physical-to-virtual tools on an Integrity HP-UX 11i v3 system, enter the following
command:
# swinstall -s path to Integrity VM install media T2767CC.VMCONVERT
This installs the physical-to-virtual tools without any of the other Integrity VM functionality.
NOTE: Be sure to completely specify T2767CC.VMCONVERT, so that you do not accidentally
transform your host to a VM Host that is left in an unknown state.
2.3.12 Limitations When using HP Integrity Virtual Machines Manager with Integrity
VM V4.2.5
HP Integrity Virtual Machines Manager (VMMgr) Version 4.0 can be used with Integrity VM
V4.2.5. Earlier versions of VMMgr (V3.0 and earlier) do not install or run on an HP-UX 11i v3
VM Host and cannot be used with Integrity VM V4.2.5. Users upgrading to Integrity VM V4.2.5
must upgrade to VMMgr V4.0 or preferably VMMgr V6.1. In addition, users of HP Insight
2.3 Known Issues and Information
23
Dynamics Virtual Software Environment software versions earlier than V4.0 must upgrade to
HP Insight Dynamics — VSE V4.1 (which contains VMMgr V4.0).
VMMgr V4.0 is designed to run on HP-UX 11i v3 with Integrity VM V4.2.5 or earlier. It cannot
use or display any new features in Integrity VM V4.2,5, but does support new features in HP-UX
11i v3, including the new agile addressing hardware paths and device files for storage devices.
This means the following:
• The VMMgr product V4.0 allows the display and setting of the maximum and minimum
setting of vCPUS and entitlement caps and the display of the graceful stop timeout. VMMgr
V4.0 also uses the currently set entitlement caps to validate input on the Modify > Virtual
Machine Entitlement dialog.
• V4.0 does not display any information about MSE group membership for the VM Host, nor
support the initiation of either an offline or online guest migration from one VM host to
another. If a virtual machine is running on one member of an MSE group, it will be displayed
as stopped on a different member of the MSE group without indicating that the virtual
machine is not currently runnable on that host. It would permit a user to attempt to start
the virtual machine. However, in this case, the underlying Integrity VM V4.2.5 hpvmstart
command that VMMgr executes would issue an error message indicating that the virtual
machine is not runnable on the current VM Host.
Also, if a virtual machine that is defined on 2 different VM Hosts in an MSE group has the
same Integrity VM UUID on both hosts, HP Insight Dynamics — VSE V4.1 and V6.0 might
not display the virtual machine as contained in the VM Host where it is currently running
in the Visualization Manager component. It might appear in Visualization Manager as if the
virtual machine is running on one of the other VM Hosts where it is defined.
•
Beginning with VMMgr V4.0, you can display persistent device files (and their associated
LUN hardware paths) as backing device choices when adding a storage device.
The VMMgr product V4.0 correctly displays devices by either legacy and agile specifications
on the storage tab, depending on which was used when the virtual storage device was added
to the virtual machine, and will correctly map those virtual devices to their respective physical
backing devices. In addition, VMMgr V4.0 adds a new simplified display on the storage tab
that eases tracing the connections from the virtual machine's virtual device to the physical
backing device. The original, more complex, display is also available by selecting the "Show
host bus adapter" checkbox on the storage tab. Persistent device files and LUN hardware
paths are displayed in the physical storage device representations (boxes).
These limitations will be addressed in a future release of VMMgr.
2.3.13 Installing the HP Integrity Virtual Machines Product Over the Evaluation
Software
If you installed the evaluation version of Integrity VM, you must remove the evaluation software
before you install the current version of the product. For example, to remove the evaluation
version of Integrity VM, enter the following commands:
# swremove -x autoreboot=true T2801AA vmProvider
# rm -rf /opt/hpvm
# rm -rf /opt/hpvmprovider
Do not remove the directory /var/opt/hpvm. This directory contains all the virtual machine
configurations that were created with the evaluation software.
2.3.14 Do Not Install Applications on the VM Host System
When you install Integrity VM, HP-UX kernel parameters are changed to accommodate the
virtual machine environment. This makes the system unsuitable for running any other
applications. Regardless of whether guests are configured and running, the VM Host system is
not configured to allow applications to share system resources. You can run system management
24
Installation Notes
utilities and Serviceguard, as documented in the HP Integrity Virtual Machines Installation,
Configuration, and Administration manual.
•
Using backup solutions for VM Host and guest backups
Backup solutions such as HP Data Protector or Veritas NetBackup can be used on both the
VM Host system and the guest systems. Consult the support matrix of such products for
supported versions. Install the backup (client) agents on the VM Host and the guests. HP
highly recommends that the /var and /opt directories, in addition to the standard locations,
be backed up regularly on the VM Host system. Do not use the VM Host system as a backup
server. For more information, see the HP-UX 11i v2 Installation and Update Guide.
•
Using HP GlancePlus/iX to monitor guests
You can use Glance on the VM Host to monitor guest data, but recorded measurements can
be misleading. Glance receives the CPU accounting information from the guest kernel.
Because the VM Host can take the guest processor away (for example, when a hardware
interrupt occurs), the time spent running other guests is reported for the state that the guest
was in at the time the CPU was taken away. For more information about using Glance, see
glance(1M).
•
Using HP Global Workload Manager (gWLM)
If you use gWLM within Insight Dynamics — VSE to manage virtual machines, when you
upgrade the VM Host, make sure the gWLM agent on that host is running gWLM A.02.50
or greater. Also, the managing Insight Dynamics — VSE Central Management Station (CMS)
must be running A.02.50 or greater, as described in the HP Insight Dynamics —VSE 6.0:
Integrity CMS Installation and Configuration Guide. To upgrade the VM Host, use the following
procedure:
1. Remove the gWLM agent using the following command:
# swremove gWLM-Agent
2.
3.
Upgrade Integrity VM as described in the HP Integrity Virtual Machines 4.2: Installation,
Configuration, and Administration manual.
Upgrade the gWLM agent, as described in the HP Insight Dynamics — VSE 6.0: Integrity
CMS Installation and Configuration Guide.
If you install the current version of Integrity VM without upgrading to gWLM A.02.50 or
later, and then attempt to use gWLM within Insight Dynamics — VSE to manage virtual
machines, the following error is reported:
Error acquiring workload management lock. Look in the the file
/var/opt/gwlm/gwlmagent.log.0 on hostname for more details.
NOTE: You can use gWLM on the VM Host, but to manage iCAP resources. gWLM is the
workload management solution for managing resource allocation to virtual machines.
•
Using the HP Integrity Virtual Machines Manager (VMMgr)
The VMMgr product provides a graphical user interface (GUI) for Integrity VM. It is available
from either of the following management interfaces:
— HP System Management Homepage (SMH).
For more information about using Integrity Virtual Machines Manager under SMH,
see the HP Integrity Virtual Machines Manager Version 4.0 Getting Started Guide.
—
HP Insight Dynamics — VSE Management Software environment in the HP Systems
Insight Manager (SIM) on the Central Management Server (CMS).
For more information about Insight Dynamics — VSE, see the HP Insight Dynamics 6.0
Getting Start Guide on the BSC website: http://bizsupport2.austin.hp.com/bc/docs/support/
SupportManual/c02048567/c02048567.pdf
2.3 Known Issues and Information
25
If you have installed the HP Integrity Virtual Machines Manager software, you must upgrade
it to a version that supports this version of Integrity VM.
To use Integrity Virtual Machines Manager, you must install the VMProvider bundle that
is provided with Integrity VM. If you upgrade Integrity VM, be sure to keep the VMProvider
up-to-date also. If the VMProvider version does not match the Integrity VM version, the
Integrity Virtual Machines Manager will not work properly.
For Windows guests, install the WMI Utilization Provider (UtilProvider) software provided
with the HP Integrity Support Pack for Windows. Follow the instructions for installing
Windows guests in the HP Integrity Virtual Machines Installation, Configuration, and
Administration manual.
•
Using HP Instant Capacity with Integrity VM
You can use HP Instant Capacity solutions on the VM Host system as you would on any
other HP-UX system.
2.3.15 Do Not Install Integrity VM on a Virtual Partition
HP does not support running Integrity VM in a vPar. If you override the Integrity VM installation
warnings and force this installation, you receive errors during the start of Integrity VM.
2.3.16 Do Not Install Windows as Alternate Boot on a VM Host System
Guest boot disks might become unbootable if the VM Host is restarted as a Windows system.
2.3.17 Trunking Software
Trunking software such as HP Auto Port Aggregation (APA ) is supported on the VM Host and
not on the guest.
2.3.18 Warning During Startup if HP SIM is Installed
Integrity VM generates a warning during startup if HP SIM is installed, but Integrity VM continues
to start. The HP SIM product consumes memory and CPU resources that would otherwise be
available for running virtual machines. The amount of memory and CPU consumed varies
depending on the specific system configuration. On systems that are already tight on memory
or CPU resources, this might cause virtual machines to fail to start.
2.3.19 Patch PHSS_41543 Must be Installed Prior to Guest Activation
If you do not install patch PHSS_41543 prior to activating a guest when updating your image to
Integrity VM B.04.20.05, the guest might fail to start or exhibit other failure symptoms. The exact
symptoms differ depending on the amount of memory assigned to the guest and the guest
configuration. The symptoms include:
• Messages on guest console, like the following:
hpvmdynmem: unable to reach target memory size of 2105 MB after 60 seconds,
MB.
•
resulting memory size is xxxx
Guest panics at boot time due to memory shortage typically when initializing I/O devices,
with stack trace often containing memory allocation related functions, such as
sysmemreserve() and so on.
Another example is panic under gvsd_attach_cleanup() with the following panic string:
Not all objects de-allocated.
•
Guest hangs at boot time typically at the start of rc scripts.
The problem is caused indirectly by Integrity VM V4.2.5 enabling the Integrity VM dynamic
memory feature by default. The default values of ram_dyn_target_start and ram_dyn_max
can default to 2G, which, in the case of a larger memory guest, is not enough memory for the
guest to properly run or even boot. If the guest boot was already attempted before the patch was
26
Installation Notes
installed, installing the patch by itself does not prevent the problem. Reconfiguration of dynamic
memory settings is necessary for the guest to be able to boot again.
As a workaround, disable Integrity VM dynamic memory for the particular guest using the
following command:
# hpvmmodify -P $ {guest_name} -x ram_dyn_type=none
Once you have installed patch PHSS_41543 (or later), you can safely re-enable Integrity VM
dynamic memory for that guest, which provides the manageability features for HP-UX guests,
with the following command:
# hpvmmodify -P ${guest_name} -x ram_dyn_type=any
If ram_dyn_target_start and ram_dyn_max have already been set, change their values to
the desired range, which is dependent on the configured memory size. HP recommends that
ram_dyn_target_start and ram_dyn_min should not fall below 25% or 1 GB (whichever
is higher) of memory configured for the guest. ram_dyn_max should be set to the memory
configured.
2.4 HP-UX Patches Required in the VM Host
Table 2-1 lists the patches that are required in the VM Host system running Integrity VM A.01.00
and later. For patches required for earlier versions of Integrity VM, consult the Release Notes
document for that version. For the most up-to-date patch list, see the HP ITRC website: http://
www.itrc.hp.com.
Table 2-1 VM Host Patches
Affected HP-UX (VM
Host) Version
Affected Integrity VM
Version
Fix
Description/Impact
Comment
11i v2 0505 through
0509
A.01.20 or later
PHKL_33052
(11.23.0512)
FSS
This patch
incorporated into 0512
update.
11i v2 0505 through
0606
A.01.20 or later
PHKL_34082
(11.23.0609)
Bug fix
Resolves panic on host.
11i v2 0512 or later
A.02.00 or later
PHNE_33724
(11.23.0706)
Bug fix
Fixes a problem of a
panic on the VM Host.
Likely on Integrity VM
V2.0 as HP-UX guests
in V1.0 do not do what
the Windows guests do
in V2.0 (ping the
guest).
11i v2 0505 or later
A.02.00 or later
PHNE_34474
Bug fix
Required when using
linkloop over VLANs
between guest and VM
Host VLAN.
11i v2 0505 or later
A.01.00 or later
Cimserver 02.00.09
PHSS_34429
Bug fix
Resolves potential
corruption of guest
configuration,
cimserver, or other
WBEM files when
under extreme load.
Download HP WBEM
Services for HP-UX
Product Bundle
B8465BA from the HP
software depot.
2.4 HP-UX Patches Required in the VM Host
27
Table 2-1 VM Host Patches (continued)
Affected HP-UX (VM
Host) Version
28
Fix
Description/Impact
Comment
11i v2 0505 thru 0606 A.02.00 or later
PHKL_33604
(11.23.0609)
PHKL_33605
(11.23.0609)
FSS
Must install
PHKL_33605 before
PHKL_33604.
11i v2 0512 thru 0606 A.01.00 or later
PHKL_33827
(11.23.0609)
Bug fix
Resolves panic on
guest. Specific to
EVA8000 environment.
(corrected to be Host
patch, not guest)
11i v2 0505 or later
A.01.00 or later
PHKL_34278
Bug fix
Resolves panic and
system hang symptoms
11i v2 0505 or later
A.01.00 or later
PHNE_35182
Bug fix
Cumulative ARPA
transport patch,
resolves panic.
Requires prerequisite
PHNE_32277.
11i v2 Intel Itanium
9000 (Montecito)
A.01.20 or later
HPVM A.02.00
11.23.0609 HWE
Montecito HW
support
HPVM V2.0 or later is
strongly recommended
for use with Intel
Itanium 9000-based
systems.
11i v2 0505 or later
A.01.20 or later
PHSS_35863
(Serviceguard
A.11.16)
PHSS_35427
(Serviceguard
A.11.17)
Bug fix
Specific to
Serviceguard. If
Serviceguard is
running on a node with
one CPU, threads can
get blocked, and the
node will TOC. This
happens on nodes with
a single CPU and
pthreads patch
installed
(PHCO_34944, or
later). Nodes with
more than 1 CPU will
not see this problem.
11i v2 0706 or later
A.03.00
PHSS_36737
Bug fix
Dynamic memory
expansion might fail on
guest running on
11.23.0706 host.
11i v2 0505 to 0706
A.03.50
PHNE_36839
Bug fix
DLPI is modified to
pre-enable network
performance
enhancements.
11i v2 0505 or later
A.03.00 or later
PHSS_36997
(Serviceguard
A.11.18)
Bug fix
Serviceguard support
for 11i v2.
11i v2 0712
A.03.50
PHSS_37306
Bug fix
Mandatory Integrity
VM patch
11i v2 0712
A.03.50
PHSS_37845
Bug fix
Enables users to create
Red Hat 4.6 guests.
Installation Notes
Affected Integrity VM
Version
Table 2-1 VM Host Patches (continued)
Affected HP-UX (VM
Host) Version
Affected Integrity VM
Version
Fix
Description/Impact
Comment
11i v2 0712
A.03.50
PHSS_38297
Bug fix
Mandatory patch:
HPVM A.03.50
HPVM-CORE
(cell-based memory
tuning, support for
USB 2.0 driver, other
fixes).
11i v2 0712
A.03.50
PHSS_38298
Bug fix
Mandatory patch:
HPVM A.03.50
VMAGENT
vmProvider (cell-based
memory tuning).
11i v2 0609 to 0712
A.03.00 or later
PHSS_38610
Bug fix
Mandatory patch:
HPVM B.04.00
VMUPGRADE (for
upgrading from 11i v2
to 11i v3 host).
11i v3 0809
B.04.00
PHSS_38566
Bug fix
Mandatory patch:
HPVM B.04.00 CORE
(fixes for
hangs/panics).
11i v3 0809
B.04.00
PHSS_38567
Bug fix
Mandatory patch:
HPVM B.04.00
VMAGENT (fix for
Insight Dynamics —
VSE/Integrity VM
reported CPU speed;
scheduler
performance).
11i v3 0809
B.04.00
PHSS_38611
Bug fix
Mandatory patch:
HPVM B.04.00
VMUPGRADE (for
upgrading from 11i v2
to 11i v3 host).
11i v3 0809
B.04.00
PHSS_38631
Bug fix
Mandatory patch:
HPVM B.04.00
HPVM-VMSGTK
(Serviceguard Toolkit
fixes for SG packaged
guests).
11i v3 0809
B.04.00
PHKL_39114
Bug fix
11i v3 cdfs cumulative
patch for 64K base
page size. Fixed in
0903.
11i v3 0809 or later
B.04.00 or later
PHCO_37694
Bug fix
11i v3 VRTSobgui
Command Patch with
updated JRE.
11i v3 0809 or later
B.04.00 or later
PHSS_39094
Bug fix
11i v3 Linker and fdp
cumulative patch.
11i v3 0809 or later
B.04.00 or later
PHKL_38750
Bug fix
11i v3 estape
cumulative patch
(Recommended for
working with
multipath tape
devices.)
2.4 HP-UX Patches Required in the VM Host
29
Table 2-1 VM Host Patches (continued)
30
Affected HP-UX (VM
Host) Version
Affected Integrity VM
Version
Fix
Description/Impact
Comment
11i v3 0903
B.04.10
PHSS_39342
Bug fix
HPVM B.04.10 CORE
PATCH
11i v3 0903
B.04.10
PHSS_39354
Bug fix
HPVM B.04.10
HPVM-VMSGTK
11i v3 0903 and later
B.04.10
PHKL_39407
Bug fix
11i v3 USB 2.0, DVD
Write, Cumulative USB
Patch (Avoid lengthy
hpvmcreate and
hpvmmodify
operations when
adding USB DVD.
11i v3 0903 and later
B.04.10
PHSS_39784
Bug fix and
enhancements
HPVM B.04.10 CORE
— Windows Server
2008 * Attached AVIO
Tape Support
11i v3 0903 and later
B.04.10
PHSS_39785
Bug fix
HPVM B.04.10
vmProvider —
Windows Server 2008
* Attached AVIO Tape
Support
11i v3 0903 and later
B.04.10
PHSS_39819
Bug fix
HPVM B.04.10
VMMIGRATE —
Windows Server 2008
* Attached AVIO Tape
Support
11i v3 0903 and later
B.04.10
PHSS_39866
Bug fix
HPVM B.04.10
VMAGENT —
Integrity VM max
entitlement bug fix
11i v3 0809
B.04.00
PHSS_40107
Bug fix
HPVM B.04.00
VMAGENT —
Integrity VM max
entitlement bug fix
11i v3 0903 and later
B.04.10
PHSS_40274
Bug fix and
enhancements
HPVM B.04.10 CORE:
VirtProvider, Attached
AVIO Boot, OVMM
support for Shared
LVM
11i v3 0903 and later
B.04.10
PHSS_40275
Bug fix and
enhancements
HPVM B.04.10
VMMIGRATE:
VirtProvider, Attached
AVIO Boot, OVMM
support for Shared
LVM
11i v3 0903 and later
B.04.10
PHSS_40277
Bug fix and
enhancements
HPVM B.04.10
vmProvider:
VirtProvider, Attached
AVIO Tape Boot,
OVMM support for
Shared LVM
11i v3 0903 and later
B.04.10
PHSS_40152
(Serviceguard
A.11.19)
Enhancements
SG 11.19: Support for
Shared LVM
Installation Notes
Table 2-1 VM Host Patches (continued)
Affected HP-UX (VM
Host) Version
Affected Integrity VM
Version
Fix
Description/Impact
Comment
11i v3 0903 and later
B.04.10
B.11.31.0910.01
(HostAVIOStor)
Enhancements
HostAVIOStor:
Support for Shared
LVM and bug fixes
11i v3 1003
B.04.20
PHKL_40383
Bug fix
HostAVIOStor: AVIO
Host driver
11i v3 1003
B.04.20
PHSS_40875
Enhancements
HPVM core: Itanium
9300 series host and
OpenVMS guest
support
11i v3 1003
B.04.20
PHSS_40876
Enhancements
VMAGENT: Itanium
9300 series host and
OpenVMS guest
support
11i v3 1003
B.04.20
PHSS_40901
Enhancements
VMMIGRATE: Itanium
9300 series host and
OpenVMS guest
support
11i v3 0809 to 0909
B.04.00 and B.04.10
PHKL_40390
Bug fix
HPVM Fix RID length
(vmm_cdio)
11i v3 0809 or later
B.04.00 and later
PHKL_41227
Bug fix
Clock cumulative
patch
11i v3 0809 to 0903
B.04.00 and B.04.10
PHKL_39587
Bug fix
gWLM compatibility
11i v3 1003
B.04.20
PHSS_41247
Bug fix
Oracle SIGSEGV
during speculative
load
11i v3 1009
B.04.20.05
PHSS_41190
Bug fixes
enhancements
HPVM Core:
Superdome 2 support
and OpenVMS support
on Itanium 9300 series
host
11i v3 1009
B.04.20.05
PHSS_41411
Bug fixes and
enhancements
HPVM CORE PATCH
VirtProvider
enhancements and
bug-fixes
11i v3 1009
B.04.20.05
PHSS_41191
Bug fix and
enhancements
HPVM VMMIGRATE
PATCH
11i v3 1009
B.04.20.05
PHSS_41412
Bug fix
HPVM
HPVM-VMSGTK VM
Serviceguard Tool Kit
bug fixes
11i v3 1009
B.04.20.05
PHSS_41413
Enhancements
HPVM vmGuestLib
VirtProvider
enhancements
11i v3 1009
B.04.20.05
PHSS_41543
Bug fixes and
enhancements
HPVM CORE: HP
Integrity rx2800 i2
support and bug fixes
11i v3 1009
B.04.20.05
PHSS_41550
Enhancement
HPVM-VMSGTK:
Integrity VM
Serviceguard Tool Kit
bug fixes
2.4 HP-UX Patches Required in the VM Host
31
Table 2-2 Do Not Install Product or Patch
Affected HP-UX Host
Version
Affected Integrity VM
Version
Fix
Description/Impact
Comment
11i v2 0505 or later
A.02.00 or later
PHNE_35793
igelan patch
An Integrity VM
guest that uses a
virtual interface that
belongs to an
IGELAN interface
configured on the
Integrity VM Host can
experience hangs with
network services like
ping, NFS, rcp, ftp for
data transfers that use
full-sized frames.
2.5 Patches Required in the HP-UX Guest
Table 2-3 lists the patches that are required in HP-UX guests:
Table 2-3 HP-UX Guest Patches
32
Affected Guest OS
and Version
Affected Integrity VM
Version
Fix
Description/Impact
Comment
11i v2 0505
A.01.00 or later
U320 SCSI MPT
driver version
B.11.23.03, bundle
A7173A
Includes fixes for
performance and
stability.
MPT driver update.
This patch is included
in the 0512 update.
11i v2 0505 or later
A.01.00 or later
PHKL_34278
Bug fix
Resolves panic and
system hang
symptoms.
11i v2 0505 through
0606
A.01.00 or later
PHKL_34589
(11.23.0609)
Bug fix
Resolves panic on
guest.
11i v2 0505 or later
A.01.20 or later
PHKL_34540
(11.23.0609 HWE)
PHKL_34336
(11.23.0606)
PHKL_34928
(11.23.0609)
Fix to allow sharing
of idle CPU cycles
between guests.
Ensure loaded when
using 0606 and later.
Must be manually
installed if feature 11i
is not installed.
Without this patch,
Integrity VM might not
detect guest is idle and
not share resources,
heavily impacting
performance.
11i v2 0505 through
0606
A.01.00 or later
PHKL_33823
(11.23.0609)
Bug fix
Resolves panic on
guest.
11i v2 0505 or later
A.02.00 or later
PHSS_34760
Serviceguard Monitor Required for running
fix
in Serviceguard 11.16
environment.
11i v2 0505 or later
A.02.00 or later
PHSS_34337
Serviceguard Monitor Required for running
fix
in Serviceguard 11.17
environment.
11i v2 0505 or later
A.01.00 or later
Cimserver 02.00.09
(PHSS_34429)
Bug fix
Installation Notes
Resolves potential
corruption of guest
configuration,
cimserver, or other
WBEM Services files
when under extreme
load.
11i v2 0505 or later
A.01.00 or later
11i v2 Intel Itanium
9000 (Montecito)
A.01.20 or later
11i v2 0505 or later
PHNE_35182
Bug fix
Cumulative ARPA
transport patch,
resolves panic.
Requires prerequisite
PHNE_32277.
HPVM A.02.00
11.23.0609 HWE
Intel Itanium 9000
hardware support
Integrity VM V2.0 or
later is strongly
recommended for use
with Intel Itanium
9000-based systems.
A.01.20 or later
PHSS_35863
(Serviceguard
A.11.16)
PHSS_35427
(Serviceguard
A.11.17)
Bug fix
Specific to
Serviceguard. If
Serviceguard is
running on a node with
one CPU, threads can
get blocked, and the
node will TOC. This
happens on nodes with
a single CPU and
pthreads patch
installed
(PHCO_34944, or
later). Nodes with
more than 1 CPU will
not see this problem.
11i v3
A.03.00
PHKL_36261
PHKL_36242
Bug fix performance
Without these patches,
11i v3 guest
performance is
severely impacted
when running
applications that
continually spawn a
large number of
short-lived processes
(that is, a software
build environment).
11i v2 0505 or later
A.03.00
PHSS_36997
(Serviceguard
A.11.18)
Bug fix
Serviceguard 11.18
support for 11i v2.
11i v3
A.03.00
PHSS_36998
(Serviceguard
A.11.18)
Bug fix
Serviceguard 11.18
support for 11i v3.
11i v3 0703 through
0709
A.03.00 or later
PHKL_37452
Bug fix
DMA32 exhaustion
during boot on small
(>=2GB) Integrity VM
guests.
11i v2 0505 or later
A.03.50
PHNE_35765
Bug fix
Fixes NAT
consumption panic.
11i v2 0505 through
0706
A.03.50
PHCO_37038
(11.23.0712)
Bug fix
Fixes mkboot
command with AVIO.
11i v2 0505 or later
A.03.50
PHCO_36563
Bug fix
SAM-NNC support in
the guest for Integrity
VM V3.5 AVIO
support.
11i v3 0703
A.03.50
PHKL_36009
(11.31.0709)
Bug fix
Fixes panic caused by
failure to allocate alias
page table entry.
2.5 Patches Required in the HP-UX Guest
33
Table 2-3 HP-UX Guest Patches (continued)
34
11i v2 0505 through
0706
A.03.50
PHKL_37091
(11.23.0712)
Bug fix
11i v3
A.03.50
PHSS_37843
Bug fix
11i v3
B.04.10
PHSS_39376
Bug fix
HPVM-Guest
11i v2
A.04.10
PHSS_39377
Bug fix
HPVM-Guest
11i v2
A.04.10
PHSS_39786
Bug fix and
enhancements
HPVM A.04.10
vmProvider —
Windows Server 2008
* Attached AVIO Tape
Support
11i v2
A.04.10
PHSS_39807
Bug fix
HPVM A.04.10
HPVM-Guest –
Windows Server 2008
* Attached Tape
Support
11i v3
B.04.10
PHSS_39785
Bug fix
HPVM B.04.10
vmProvider —
Windows Server 2008
* Attached AVIO Tape
Support
11i v3
B.04.10
PHSS_39806
Bug fix
HPVM B.04.10
HPVM-Guest —
Windows Server 2008
* Attached AVIO Tape
Support
11i v3
B.04.10
PHSS_40277
Bug fix and
enhancements
HPVM B.04.10
vmProvider:
VirtProvider, Attached
AVIO Tape Boot,
OVMM support for
Shared LVM
11i v2
A.04.10
PHSS_40276
Bug fix and
enhancements
HPVM A.04.10
vmProvider:
VirtProvider, Attached
AVIO Tape Boot,
OVMM support for
Shared LVM
11i v3 0909 or later
B.04.20
PHKL_38604
Bug fix
GuestAVIOStor: AVIO
guest driver
11i v2 0712
A.04.20
PHKL_40684
Enhancements
11i v2 guest support
for Itanium 9300 series
host
11i v2 0712
A.04.20
PHCO_40685
Enhancements
11i v2 guest support
for Itanium 9300 series
host
11i v3 0903
B.04.20
PHCO_38777
Enhancements
11i v2 guest support
for Itanium 9300 series
host
11i v3 0903
B.04.20
PHKL_39482
Enhancements
11i v2 guest support
for Itanium 9300 series
host
Installation Notes
Fixes EFI bootpath
with AVIO.
Table 2-3 HP-UX Guest Patches (continued)
11i v2 0712
A.04.20.05
PHSS_41415
Enhancements
11i v2 guest
vmGuestLib
VirtProvider
enhancements
11i v2 0712
A.04.20.05
PHSS_41416
Enhancements
11i v2 vmTools
Virtprovider
enhancements
11i v3 0803 or later
B.04.20.05
PHSS_41413
Enhancements
11i v3 VMGuestLib
VirtProvider
enhancements
11i v3 0803 or later
B.04.20.05
PHSS_41414
Enhancements
11i v3 vmTools
VirtProvider
enhancements
For more information about updates to HP-UX software, contact your HP representative or
support specialist.
Table 2-4 lists patches and products that you should not install on HP-UX guests. In guests where
these patches are installed, degradations and regressions have been observed.
Table 2-4 Do Not Install Products or Patches on HP-UX Guests
Affected Guest OS and Affected Integrity VM
Version
Version
Fix
Description/Impact
Comment
HP–UX 11i v2 0505 or A.01.00
later
A.01.20
PHKL_33361
Cumulative kernel
SCSI patch
Resolved in Integrity
VM A.02.00 and later.
HP–UX 11i v2 0505 or A.01.00
later
A.01.20
A.02.00
PHKL_35739
PHKL_35891
VxVM 4.1 Kernel
Patch 04 or 05
Installing VxVM 4.1
Kernel Patch 04 onto
HP-UX 11i v2 guest
with VxVM boot disk
results in an
unbootable system.
Resolved in Integrity
VM V3.0.
2.6 Patches Required for Ignite/UX Servers
Table 2-5 lists the patches that are required in the Ignite/UX server:
Table 2-5 Ignite/UX Patches
Affected OS and
Version
Affected Integrity VM
Version
Fix
Description/Impact
HP-UX 11.00
A.01.00 or later
PHNE_25355
tftpd
HP-UX 11.11
A.01.00 or later
PHNE_32825
tftpd
Comment
2.7 Patches Required for Windows Guests
Table 2-6 lists the patches that are required in the guests.
2.6 Patches Required for Ignite/UX Servers
35
Table 2-6 Windows Patches
Affected Guest OS and Affected Integrity VM
Version
Version
Fix
Description/Impact
Comment
Windows Server 2003 A.02.00 or later
SSM 4.6
Bug fix
Microsoft patches
correct a compiler
issue that can affect
Windows guests in
various ways.
Table 2-7 lists patches and products that you should not install on Windows guests.
Table 2-7 Do Not Install Products or Patches on Windows Guests
Affected Guest OS and Affected Integrity VM
Version
Version
Fix
Description/Impact
Comment
SSM 4.5
SSM 4.6
PalHaltLightRegEdit
component
Idle detection
See Section 4.1.2.9
(page 40)
A.02.00
Intel Itanium 9000
(Montecito)
2.8 Patches Required for Red Hat Linux Guests
Table 2-8 lists the patches that are required in the guests.
Table 2-8 Red Hat Linux Patches
Affected Guest OS and Affected Integrity VM
Version
Version
Fix
Description/Impact
Comment
RHEL4U4 through U5 A.03.00
or later
SGLX_00190
(Serviceguard or
Linux A.11.18.02)
Bug fix
Serviceguard on
Linux SG A.11.18.02
2.9 Patches Required for SUSE Enterprise Linux Guests
Table 2-9 lists the patches that are required in the guests.
Table 2-9 SUSE Enterprise Linux Guests
36
Affected Guest OS and Affected Integrity VM
Version
Version
Fix
Description/Impact
Comment
SLES10U1
SGLX_00196
(Serviceguard or
Linux A.11.18)
Bug fix
Serviceguard on
Linux SG A.11.18.02
Installation Notes
A.03.50
3 Creating Virtual Machines
This chapter contains notes about creating and configuring virtual machines on the VM Host
system.
3.1 Changes and Issues in this Release
There are no new virtual machine creation or configuration issues in the V4.2.5 release.
3.2 Known Issues and Information
The following sections describe known issues and information from previous releases that still
apply to V4.2.5.
3.2.1 Failed API Access to Local Running Guest
A Failed API access to local running guest. message in the command.log is a
notification that a communication attempt with the hpvmapp process has failed. This message
is not an indication of a problem and can be ignored.
3.2.2 Cell Local Memory on Cellular Hosts
Integrity Virtual Machine now supports the use of Cell Local Memory on cellular hosts. In general,
you should see performance improvement by using cell local memory when running on cell-based
systems. If you encounter performance issues with this feature, you should revert back to using
100% interleaved memory on the host.
3.2.3 Pass-Through Devices Used by Guest Devices Might Not be Valid After Recovery
Using Ignite
After performing a recovery of the host using Ignite, pass-through devices found in /dev/pt/
* might be invalid, which in turn might prevent guests from recognizing tape or disk devices.
Symptoms of this problem might include error messages like the following in the guest log file
(/var/opt/hpvm/guests/guest image/log):
UsrMapScsiDevice: Opened failed on /dev/pt/pt_tape1: No such device or address
You might receive messages in /var/opt/hpvm/common/command.log file, like the following:
mksf: Couldn't find driver matching arguments
hpvmdevmgmt: ERROR (host): system() failed on command '/usr/sbin/mksf -P -C disk -I 44 2>&1 >/dev/null' - No
such file or directory.
These messages can be caused by pass-through files being stale and in need of re-creation,
pass-through files pointing to devices that no longer correspond to devices that their names
suggest, or device special file names (DSFs) for devices that no longer exist for which
hpvmdevmgmt -I attempts to create pass-through devices.
To correct /dev/pt/* files that might be stale or which might point to the wrong device, do the
following on the VM Host to re-create them:
# rm /dev/pt/*
# rm /var/opt/hpvm/common/hpvm_devinit
# hpvmdevmgmt -I
To correct failed attempts by hpvmdevmgmt -I to create pass-through devices for devices that
no longer exist, use lssf to verify the validity of devices that no longer appear to exist:
# lssf -s
Verify that your guests are not configured to use those DSFs, and then remove them using rmsf:
# rmsf -x
3.1 Changes and Issues in this Release
37
3.2.4 Do Not Run hpvmstart in Background When Starting Multiple Guests With
Resource Conflicts
Do not run the hpvmstart command in the background when starting multiple guests that
have resource conflicts. The locking that would normally catch and report the resource conflicts
does not always work properly in this situation.
3.2.5 Numbers Reported by Glance 4.6 or Later Running on VM Host Depend on
Context
Glance 4.6 or later is supported running in a VM Host or in a guest; however, certain
measurements might not apply in a particular context or report limited results. For example,
measuring CPU utilization on the VM Host reports all the time spent running in guests as "system
time"; to receive "user time" or "nice time" for a given guest, you must run Glance in that guest.
Similarly, memory-related faults, or system calls for a guest, are not visible from Glance running
in the VM Host, from Glance running in that guest. Glance also offers a number of
virtualization-related measurements. Note, Glance refers to virtual machines as logical systems.
3.2.6 Increasing Guest Default SCSI Queue Depths for MPT Virtual Devices can Lead
to I/O Failures
MPT virtual storage devices (VIO) have a maximum SCSI queue depth of 8. This is sufficient for
the default SCSI queue depth of all guest types that have applied their guest kits. Increasing SCSI
queue depths beyond the defaults might result in some I/O failures due to exhaustion of guest
I/O retries.
38
Creating Virtual Machines
4 Installing Guests
This chapter describes notes pertaining to installing guest software on the virtual machines.
4.1 Windows Guests
The following sections contain the release notes specific to installing Windows guests.
4.1.1 Changes and Issues in This Release
There are no new Windows guest issues in the V4.2.5 release.
4.1.2 Known Issues and Information
The following sections describe known issues and information from previous releases that still
apply to V4.2.5.
4.1.2.1 Disable the NetBIOS Over TCP (NBT) Protocol for Windows Server 2008 Guests
Due to instability with the NetBIOS over TCP (NBT) protocol when using network shares in
Windows Server 2008 guests, HP strongly advises that this protocol be disabled until this problem
is fixed in a future release of Windows Server 2008.
For information about this issue, including how to disable the protocol, see the article, Direct
hosting of SMB over TCP/IP, at the Microsoft support website.
4.1.2.2 Removing Media During Installation Hangs Guest
If you begin the installation of the Windows operating system and then eject the media from the
virtual console, the guest hangs. To recover from the problem, restart the guest from the virtual
console.
4.1.2.3 Network Driver for Some Windows Guests Not Behaving Correctly
The network driver for some Windows guests is not behaving correctly if the network device is
configured at PCI bus 0, device 3, function 1, because of an interaction with the console device
at PCI bus 0, device 3, function 0. To avoid this issue, do not specify PCI bus 0, device 3 as an
address when adding network devices to a Windows virtual machine.
There is no issue if hpvmcreate or hpvmmodify automatically assign PCI addresses. This
problem can be corrected by removing any network devices at PCI bus 0, device 3 and adding
them at any other free PCI address.
4.1.2.4 Setting a Static IPv4 Address at the SAC> Prompt
If you want to set a static IPv4 address at the SAC> prompt using the i command after a guest
boot, the first i command entered to set the guest IPv4 address to a static IP address can fail with
the SAC could not set the IP Address. SAC> prompt message. This can cause Remote
Desktop connection to this guest to fail. Enter the same i command to set the static IPv4 address
correctly.
4.1.2.5 Guest Kit for Windows Server 2008
The guest kit for Windows Server 2008 is different from the guest kit for Windows Server 2003.
To operate correctly, each version of Windows (2003 and 2008) must use the guest kit for that
version. Installing the other (wrong) version of the Windows guest kit into either version of the
Windows operating system results in incorrect operation of the Windows guest.
4.1 Windows Guests
39
4.1.2.6 Palhaltlight in Windows Server 2008 Guests
The use of palhaltlight is enabled by default in a Windows 2008 guest, which allows the VM
Host to be notified when the guest is idle, so that the VM Host avoids spinning the physical
processor. The VM Host can then use the physical processor for other useful purposes (for
example, running other guests or running host service processes and threads) whenever the
Windows guest does not need it. Consequently, keep palhaltlight set to on to ensure the best
performance.
4.1.2.7 Virtual DVD Misconfiguration can Lead to Windows Slow Down
Windows 2003 Server constantly polls the status of a DVD. If you configure the virtual DVD
incorrectly, such as inserting a blank DVD as a backing store, the virtual DVD disappears from
the Guest. However, the Windows 2003 Server Guest continues to scan for the DVD to come
back. This scanning activity can cause a slow down in Windows performance. Bad DVD
configurations are reported in the /var/opt/hpvm/common/hpvm_mon_log, like the following:
9
9
ScsiDiskOpen: block open failed dev=1f000000 cdev=bc000000 errno=16
DVD dev 0xbc000000 may be empty
You can correct this error by first placing the virtual DVD into ejection state (vMP> ej) and then
replacing the media in the VM Host CD or with a readable disc.
4.1.2.8 HP Insight Manager Automatic Server Recovery Does Not Work
On Windows guests, the HP Insight Manager product supports Automatic Server Recovery: if
a system does not send out a heartbeat within a specified interval, a user-specified action takes
place (for example, automatic reboot). Integrity VM takes no action if a heartbeat is not detected;
instead, a message is logged on the console and the VM Host System Event Log. You should
monitor these log files and manually perform the reboot if the guest does not respond.
4.1.2.9 Running Windows Guests on a Dual Core Intel Itanium Processor (Montecito) System
If you use a version of the OPK Smart Setup Media released prior to Version 5.0, and wish to
run a Windows guest on an Intel Itanium 9000 server, you must disable the
PalHaltLightRegEdit patch. To do this, go to Add/Remove Programs and remove the
PalHaltLightRegEdit component.
4.1.2.10 Installing Windows with Virtual NullDVD is Not Recommended
To use a Virtual NullDVD as installation media, define the device as a file or as the physical
drive. For example, use one of the following commands:
# hpvmmodify -P guest-name -a dvd:scsi::file:/InstallMedia/Windows.iso
# hpvmmodify -P guest-name -a dvd:scsi::disk:/dev/rdsk/c0t0d0
Insert and remove media (for software installation using multiple CDs) using the hpvmmodify
command (effectively ejecting and inserting files) or, in the case of a physical drive, actually eject
and insert the media in the drive. For example, to change the media in an existing virtual DVD
defined in the above example, enter the following command:
# hpvmmodify -m dvd:scsi:0,0,1:file:/InstallMedia/SmartSetup.iso
Where the path name /InstallMedia/SmartSetup.iso indicates the new media to use.
Defining the virtual DVD as a null type (for example: hpvmmodify -a
dvd:scsi:null:/path/to/media/) is not recommended for software installation.
Software installation from virtual DVDs defined with the null storage type (also referred to as
removable media functionality) often results in installation failures because the removable media
is automatically ejected when the virtual machine is stopped and started during software
installation.
To complete Windows installation from removable media, follow these steps:
40
Installing Guests
•
•
•
•
•
After the automatic reboot, Windows controls the console. When you see the SAC> prompt,
use Esc-Tab to change the channel to the product key prompt.
Stop and start the virtual machine and interrupt the automatic boot sequence.
Before the system is allowed to continue, from the virtual console, execute the necessary
insert (IN) command to reload the media.
After the media is reloaded into the virtual DVD, select the Windows Media install (the first
boot option) and allow the system to boot.
When prompted, enter the product key. The installation process proceeds normally from
this point.
For more information about using removable media, see the HP Integrity Virtual Machines 4.2:
Installation, Configuration, and Administration manual.
4.1.2.11 Enabling MP Services on Windows Guest Logs telnetd Errors
If you enable MP Services on a guest, the following telnetd errors might be written to the VM
Host's log file (/var/adm/syslog/syslog.log). You can safely ignore these messages:
Jun 13 11:41:41 AGTVM telnetd[21551]: getmsg error:no data
Jun 14 20:38:00 AGTVM telnetd[29216]: getmsg error:no data
Jun 14 21:52:07 AGTVM telnetd[29504]: getmsg error:no data
To prevent this problem, disable MP Services.
4.1.2.12 Using Windows Firewall Requires ICMP to Allow Echo
When the Microsoft firewall is on, ICMP must be enabled so that you can ping the guest (echo).
This setting can be found in the network properties applet, as follows: Control Panel => Network
Connections => Local Area Connection/Properties Advanced => Windows Firewall => Settings
ICMP. Check the Allow Incoming Echo Requests box.
4.1.2.13 Poor Console Screen Formatting
The Windows guest console might not format the virtual console display properly. Manage the
guest using the Remote Desktop or make a network connection to the Windows guest.
4.1.2.14 The hpvmstop Command Does Not Shut Down Windows Guests Gracefully
Do not use the following commands to shut down Windows guests:
# hpvmstop -P winguest
# hpvmconsole -P winguest -c "pc -off"
These commands do not stop the Windows operating system gracefully. To shut down a Windows
guest, use the standard Windows operating system commands.
4.1.2.15 Do Not Delete EFI Shell Boot Option
Do not delete the EFI Shell [Built-in] EFI Boot Manager option. Deleting this option
might interfere with the subsequent installation of the guest operating system. To recover if there
are no options present on the EFI Boot Manager menu screen:
1. Enter the Boot option maintenance menu.
2. Select Add a Boot Option.
3. Select Load File [EFI Shell [Built-in]].
4. Save the setting to NVRAM.
4.1.2.16 Restoring the NVRAM for Windows Guests
When a guest has been terminated unexpectedly due to a panic or another critical condition, the
guest's boot settings (which are stored in a per-guest NVRAM file on the VM Host) can become
corrupted. This can cause problems with subsequent reboots of that guest. To correct the problem,
4.1 Windows Guests
41
copy the file /opt/hpvm/guest-images/common/nvram to
/var/opt/hpvm/guests/vm_name/nvram on the VM Host system. This procedure restores
the copy of the NVRAM that was used when the guest was created. Then you can used the EFI
Boot Manager to recreate the guest's boot path and other data. (The installed guest's operating
system should be intact and unaffected by the corruption.)
To build the EFI Boot Menu Entry for Windows Server 2003 guest:
1. From the EFI Shell, enter the following command, which assumes that the guest boot disk
is fs0:
fs0> ls \EFI\Microsoft\WINNT50
Look for the Bootxxxx filename.
2.
Change to the MSUtil directory. For example:
fs0> cd \MSUtil
3.
Enter the following command:
fs0:> nvrboot
4.
Enter the I command to import the Windows boot entry. Then enter the correct location of
the boot entry. For example:
\EFI\Microsoft\WINNT50\Bootxxxx
To build the EFI Boot Menu Entry for a Windows Server 2008 guest:
1. From the EFI Shell, enter the following command, which assumes that the guest boot disk
is fs0:
Shell> bcfg boot add 1 fs0:\EFI\Microsoft\Boot\bootmfgw.efi "Windows Boot Disk"
4.2 HP-UX Guests
The following sections contain release notes specific to installing HP-UX guests.
4.2.1 Changes and Issues in this Release
The following section provides new information or issues for HP-UX guest in the V4.2.5 release.
4.2.1.1 Problem Using Local DVD as vMedia to VM Host on Integrity i2–Based server blades
On an Integrity i2–Based server blade, if you use a local DVD as vMedia to a VM Host and assign
this DVD to a guest for operating system installation, the guest terminates once the installation
starts. To work around this problem, follow these steps:
1. Create ISO images from the original OE DVD media using any DVD-burning software like
Roxio or Nero. In this example, there are two DVD media disks for 11i v3 0909 BOE:
• 1131_0909_DVD1.iso
• 1131_0909_DVD2.iso
2.
Save those .iso images to the VM Host directory. For example:
# my_host :/iso> ll
total 24310112
-rw-r--r-1 root
-rw-r--r-1 root
3.
sys
sys
4575508480 Jun 18 13:59 1131_0909_DVD1.iso
4426500096 Jun 18 14:05 1131_0909_DVD2.iso
Assign those .iso images to the guest by following the instructions in the Chapter 7 of the
HP Integrity Virtual Machines 4.2: Installation, Configuration, and Administration manual. For
example:
# my_host :/> hpvmmodify -P my_guest -a dvd:avio_stor::null:/iso/
4.
42
Start the guest and stop it at the EFI Boot Manager. Launch the virtual console, and select
the first DVD .iso image. For example:
Installing Guests
[my_guest] vMP> in
Insertable Guest Devices
Num
Hw-path
(Bus,Slot,Tgt) Gdev
-------------------------------------------[1]
0/0/1/0.1.0
(0,1,1)
dvd
Enter menu item number or [Q] to Quit: 1
Insertable File Backing Stores
Num
File
--------------------[1]
1131_0909_DVD1.iso
[2]
1131_0909_DVD2.iso
Enter menu item number or [Q] to Quit: 1
Confirm insertion action
G - Go
F - Force
Enter menu item or [Q] to Quit: g
5.
From within the EFI Boot Manager, select “EFI Shell”, then select “just added iso image file”
to boot. For example, fs2:
EFI Boot Manager ver 1.10 [14.62] [Build: Mon Apr 26 10:55:36 2010]
Please select a boot option
HP-UX Primary Boot: 0/0/1/0.0x0.0x0
HP-UX HA Alternate Boot: 0/0/1/0.0x0.0x0
HP-UX Alternate Boot: 0/0/1/0.0x0.0x0
EFI Shell [Built-in]
Boot option maintenance menu
Use ^ and v to change option(s). Use Enter to select an option
Loading.: EFI Shell [Built-in]
EFI Shell version 1.10 [14.62]
Device mapping table
fs0 : Acpi(PNP0A03,0)/Pci(1|0)/Scsi(Pun0,Lun0)/HD(Part1,SigAB25F2B8-7B3B-11DF-8000-D6217B60E588)
fs1 : Acpi(PNP0A03,0)/Pci(1|0)/Scsi(Pun0,Lun0)/HD(Part3,SigAB25F362-7B3B-11DF-8000-D6217B60E588)
fs2 : Acpi(PNP0A03,0)/Pci(1|0)/Scsi(Pun1,Lun0)/CDROM(Entry0)
blk0 : Acpi(PNP0A03,0)/Pci(1|0)/Scsi(Pun0,Lun0)
…
6.
Once the installation completes with DVD1, switch to DVD2 using the following steps:
a. When asked for the second DVD:
* Installing fileset "vmProvider.VM-PROV-CORE,r=B.04.10" (1592 of 1903).
=================================================
* Please insert media number "2".
1) Continue.
Please pick from the choices above. (default: 1):
b.
Press CTRL-B to enter virtual console, then “eject” the first DVD:
vMP MAIN MENU
CO:
CM:
CL:
SL:
VM:
HE:
X:
Console
Command Menu
Console Log
Show Event Logs
Virtual Machine Menu
Main Help Menu
Exit Connection
[my_guest] vMP:VM> ej
Ejectable Guest Devices
Num
Hw-path
(Bus,Slot,Tgt)
Gdev
Pstore
Path
4.2 HP-UX Guests
43
------------------------------------------------------------------------[1]
0/0/0/0.1.0
(0,0,1)
dvd
file
/tmp/iso/1131_0909_DVD1.iso
Enter menu item number or [Q] to Quit: 1
Confirm eject action
G - Go
F - Force
Enter menu item or [Q] to Quit: g
c.
Insert the second DVD:
[my_guest] vMP:VM> in
Insertable Guest Devices
Num
Hw-path
(Bus,Slot,Tgt) Gdev
-------------------------------------------[1]
0/0/0/0.1.0
(0,0,1)
dvd
Enter menu item number or [Q] to Quit:
Insertable File Backing Stores
Num
File
--------------------[1]
1131_0909_DVD1.iso
[2]
1131_0909_DVD2.iso
1
Enter menu item number or [Q] to Quit:
Confirm insertion action
G - Go
F - Force
2
Enter menu item or [Q] to Quit:
[my_guest] vMP> co
d.
g
Press the Enter key or enter the number 1 to continue the installation:
(Use Ctrl-B to return to vMP main menu.)
=================================================
* Please insert media number "2".
1) Continue.
Please pick from the choices above. (default: 1):
4.2.1.2 System Fault Management (SFM) Support with HP-UX Guests
You can use SFM's forward log progress (fpl) and ia64_corehw monitoring with HP-UX guests.
4.2.2 Known Issues and Information
The following sections describe known issues and information from previous releases that still
apply to V4.2.5.
4.2.2.1 HP-UX Guests Supported on Intel® Itanium® 9300 Processor Series
HP-UX 11i v2 (Fusion release December 2007 and later) and HP-UX 11i v3 (Fusion release March
2009 and later) are supported on Intel® Itanium® 9300 Processor Series systems.
4.2.2.2 LV Mirroring Supported on HP-UX Guests
Starting with HP-UX 11i v3 0909, LV Mirroring is supported on HP-UX 11i v3 guests with Integrity
VM V4.0 or later using AVIO.
4.2.2.3 Machinfo Problems with VM Guests on Intel® Itanium® 9300 Processor Series System
The HP-UX machinfo command on HP-UX 11i v2 and 11i v3 guests running on 9300 series
systems will report incorrect information if the following required HP-UX patches have not been
installed:
44
Installing Guests
•
•
HP-UX 11i v2: PHCO_40685 and PHKL_40684
HP-UX 11i v3: PHKL_39482 and PHCO_38777
You can download these patches from the ITRC website, http://itrc.hp.com
4.2.2.4 HP-UX 11i v3 Guests Might Fail to Configure Interface Cards Due to Lack of Memory
HP-UX 11i v3 guests with small memory resources (less than or equal to 2 GB RAM) might fail
to configure one or more virtual interface cards. Messages like the following might be seen on
the guest console:
wsio_claim init failed isc=0xe000000109c41400 name=mpt or
igssn: The device at hardware path 0/0/1/0 failed initialization (3309).
The error messages displayed in the case of guest system installation are as follows:
* Preparing to execute init...
======= 05/02/08 08:07:57 EDT HP-UX Installation Initialization. (Fri May 02
08:07:56 EDT 2008)
@(#)Ignite-UX Revision C.7.0.212
@(#)ignite/launch (opt) $Revision: 10.590.1.2 $ $Date: 2006/12/18
20:51:11 $
* Configuring RAM filesystems...
* Scanning system for IO devices...
WARNING: Could not find Q_BOOT device. Cannot determine what the boot device
was.
ERROR:
Could not get io-device data (ioscan)
WARNING: Could not find source device in ioscan output. You must select from
the list of devices below to use for the source device:
index
HW-path
Class
description
0) 120
processor Processor
1) 121
processor Processor
2) 122
processor Processor
3) 123
processor Processor
4) 124
processor Processor
5) 125
processor Processor
6) 126
processor Processor
7) 127
processor Processor
8) 0/0/0/0
ext_bus
SCSI_Ultra320
9) 0/0/0/0.0x0.0x0
disk
HP_Virtual_LvDisk
10) 0/0/0/0.0x2.0x0
disk
HP_Virtual_FileDVD
11) 0/0/0/0.0x1.0x0
disk
HP_Virtual_FileDVD
The issue is resolved in PHKL_37452 that must be installed on the guest to prevent the problem.
The problem might occur during installation, in which case it results in some devices not being
presented in the installation interface.
The solution is either to install the guest from the 11.31.0803 OE, which does not have the problem,
or temporarily increase memory assigned to the guest above 2GB (for example 2.5GB), and lower
it back to the intended size after the guest OS and PHKL_37452 is installed.
4.2.2.5 Patches for HP-UX 11i v3 Guests
Customers running HP-UX 11i v3 guests should install the following patches (or their superseding
patches) in each guest running HP-UX 11i v3 :
• PHKL_36261
• PHKL_36242
These patches prevent performance problems in environments where applications spawn large
numbers of short-lived processes (such as development environments). To obtain these patches,
contact your support specialist or HP representative.
4.2.2.6 Do Not Run Live Kernel Debuggers Inside a Guest
Do not run tools that write kernel text, such as live kernel debuggers and performance tools such
as kgmon and ktracer inside a guest. Under rare circumstances, these tools cause the guest to
panic.
4.2 HP-UX Guests
45
4.2.2.7 Do Not Use the iomap(7) Mechanism on HP-UX Guests
The iomap(7) mechanism allows you to map physical I/O addresses into the user process
address space. Do not use this command on HP-UX guests.
4.2.2.8 iCAP Commands Fail on HP-UX Guests
iCAP is installed as part of the HP-UX OS installation. Install-time configuration of iCAP reports
failure with messages similar to the following:
NOTE:
ERROR:
ERROR:
ERROR:
Checking for partitionable system.
Software configuration has failed. After addressing the issues
in the following output, configure this software with
'swconfig B9073BA'.
Command not allowed to run on a Virtual Machine Guest.
The "configure" script for "iCOD.ICOD-RUN" failed (exit code
"1"). The script location was
"/var/adm/sw/products/iCOD/ICOD-RUN/configure".
* This script had errors and the execution of this fileset
cannot proceed until the problem is fixed. Check the above
output from the script for further details.
* Running config clean command /usr/lbin/sw/config_clean.
* Summary of Execution Phase:
Installed
iCOD.ICOD-RUN,l=/,r=B.11.23.08.00.00.95
1 of 882 filesets had Errors.
* 881 of 882 filesets had no Errors or Warnings.
ERROR:
The Execution Phase had errors. See the above output for
details.
ERROR:
ERROR:
These startup messages in /etc/rc.log can be disregarded.
iCAP commands cannot be used on virtual machines. iCAP commands are designed to work on
the VM Host system.
This problem is resolved in guests running HP-UX 11i v2 0706 and later.
4.3 Linux Guests
The following sections describe release notes for Linux guests.
4.3.1 Changes and Issues in This Release
There are no new Linux guest issues in the V4.2.5 release.
4.3.2 Known Issues and Information
The following sections describe known issues and information from previous releases that still
apply to V4.2.5.
4.3.2.1 Using Linux Guests
This version of Integrity VM supports SUSE Linux SLES 10 Update 2 guests and Red Hat Linux
Enterprise Edition Advanced Server Release 4 Update 5 guests. You can install the SUSE Linux
or the Red Hat Linux on a virtual machine.
For information about this Red Hat Linux operating system, see www.redhat.com. Specifically:
• Red Hat Enterprise Linux 4 Installation Guide for x86, Itanium, AMD64
• Intel Extended Memory 64 Technology (Intel EM64T)
• Red Hat Linux Customization Guide
For information about the SUSE Linux operating system for HP Integrity servers, see http://
docs.hp.com/en/linuxsuse.html
46
Installing Guests
The guest parameter settings for Linux guests are listed in the HP Integrity Virtual Machines 4.2:
Installation, Configuration, and Administration manual.
For information about installing Linux guests, see the HP Integrity Virtual Machines 4.2: Installation,
Configuration, and Administration manual.
4.3.2.2 SUSE Linux Cloned Guests Boot-Disk Boot Problems
SUSE Linux (SLES) cloned guests have issues with the cloned guest boot disk. The first issue
occurs when a SLES Linux guest is cloned using a new boot device using the hpvmclone -b
option, the cloned guest requires updates in the elilo config file (elilo.conf) and the fstab
file with the new boot device's SCSI WWID before it can be booted to the multi-user mode. The
cloned guest's OS image on the new boot device still contains the orignal guest boot device's
SCSI WWID in these config files. Therefore, the cloned guest with the new boot device fails the
boot when it tries to access the original guest's boot device.
In SLES Linux, the boot config file /boot/efi/SuSE/elilo.conf and /etc/fstab file both
contain the guest boot disk's SCSI WWID. To correct this cloned boot disk boot problem, boot
the cloned guest to the "Rescue System" mode, then mount the cloned guest's boot-disk, root-file
system (where /etc/fstab resides) and boot file system (where elilo.conf resides), update
these config files with the cloned boot disk's SCSI WWID, and then reboot the guest.
The second issue involves the use of the hpvmmigrate command with the offline migration
and backing store copy. The offline-migrated guest encounters this boot failure when the backing
store copy completes and the migrated guest on the target host attempts to boot. This occurs
because the migrated guest's boot disk has been changed to the copied disk, which has a different
WWID.
To correct the cloned-guest, boot-disk boot problems, follow these steps:
1. Boot the guest to the Rescue System mode from the SLES Linux CD 1:
a. Configure the SLES Linux CD onto the guest for boot to the Rescue System mode:
# hpvmmodify -P cl_suse -a dvd:scsi:file:/iso/linux/SLES-10-SP2/SLES-10-SP2-DVD-ia64-RC5-DVD1.iso
b.
Boot the guest:
# hpvmconsole -P cl_sue -fi -c "pc -on"
c.
Interrupt the guest boot from the auto boot, then boot from the Linux CD:
1) Select the “Boot option maintenance menu” in the EFI menu.
2) Select the “Boot from a File” option.
3) Select the “Removable Media Boot” item. (This boots from the SLES Linux CD to
the Installation menu.
d.
e.
At the SLES Linux installation menu, select the item “Rescue System”.
At the Boot: text field, enter console=ttyS0 and press Return. This action boots the
guest to the Rescue login.
To log in, enter the user name, root, at the Rescue Login: prompt and press Return:
f.
Rescue login: root
Rescue:~ #
2.
Mount the guest's root file system /dev/sda3 and boot file system /dev/sda1:
Rescue:~ # mount /dev/sda3 /mnt
Rescue:~ # mount /dev/sda1 /boot
3.
Edit the elilo configuration file, /boot/efi/SuSE/elilo.conf, and the fstab file, /mnt/
etc/fstab, to update all entries of the guest boot disk SCSI WWID with the cloned guest
boot disk's SCSI WWID.
4.3 Linux Guests
47
NOTE: The cloned guest's boot disk SCSI WWID can be copied from the /dev/disk/
by-id/ device names. For example, the cloned guest boot disk device names are as follows:
Rescue:~ # ls -l /dev/disk/by-id
total 0
lrwxrwxrwx 1 root root
9 Dec
5 17:08 scsi-0HP_Virtual_FileDVD_isoLinuxSLES10-SP2SLES-10-SP2-
9 Dec
5 17:08 scsi-3600508b4001049440001200002f20000 -> ../../sda
DVD-i -> ../../sr0
lrwxrwxrwx 1 root root
4.
lrwxrwxrwx 1 root root 10 Dec
5 17:08 scsi-3600508b4001049440001200002f20000-part1 -> ../../sda1
lrwxrwxrwx 1 root root 10 Dec
5 17:08 scsi-3600508b4001049440001200002f20000-part2 -> ../../sda2
lrwxrwxrwx 1 root root 10 Dec
5 17:08 scsi-3600508b4001049440001200002f20000-part3 -> ../../sda3
In /boot/efi/SuSE/elilo.conf, there are two root device entries with the original
quest's boot disk SCSI WWID:
root = /dev/disk/by-id/scsi-3600508b4001049440000d000026c0000-part3
root = /dev/disk/by-id/scsi-3600508b4001049440000d000026c0000-part3
Replace these entries with the cloned boot disk's SCSI WWID:
root = /dev/disk/by-id/scsi-3600508b4001049440001200002f20000-part3
root = /dev/disk/by-id/scsi-3600508b4001049440001200002f20000-part3
5.
In /mnt/etc/fstab, there are three entries (for /, /boot/efi, and swap devices) with the
original guest's boot disk SCSI WWID:
/dev/disk/by-id/scsi-3600508b4001049440000d000026c0000-part3 /
acl,user_xattr
1 1
/dev/disk/by-id/scsi-3600508b4001049440000d000026c0000-part1 /boot/efi
defaults
0 0
/dev/disk/by-id/scsi-3600508b4001049440000d000026c0000-part2 swap
defaults
0 0
reiserfs
vfat
Replace these entries with the cloned boot disk's SCSI WWID:
/dev/disk/by-id/scsi-3600508b4001049440001200002f20000-part3 /
acl,user_xattr
1 1
/dev/disk/by-id/scsi-3600508b4001049440001200002f20000-part1 /boot/efi
defaults
0 0
/dev/disk/by-id/scsi-3600508b4001049440001200002f20000-part2 swap
defaults
0 0
6.
reiserfs
vfat
swap
Reboot the guest:
Rescue:/# reboot
4.3.2.3 TC INIT Dump Messages Fail to Appear in SUSE Linux Guest Consoles Running Multi CPUs
The hpvmconsole TC command causes INIT dump messages to be displayed in the guest
console. These messages appear with the one-way SUSE Linux guest; however, they fail to appear
with SUSE Linux guests with multi-CPUs. The INIT dump is logged into the hpvm_mon_log
file.
To resolve this problem, restart the guest after the hpvmconsole TC command is issued.
4.3.2.4 SLES10 SP2 Guests Supported on Integrity Servers
SLES10 SP2 guests are supported on all Integrity servers except the following:
• HP Integrity rx1600 server
• HP Integrity rx2600 server
• HP Integrity rx5600 server
4.3.2.5 Before Installing the SUSE Linux Guest
You must install the tog-pegasus RPM kit prior to installing the SUSE Linux RPM guest; however,
the SUSE Linux installation media does not contain the tog-pegasus RPM kit. This RPM kit is
available in the “HP Integrity Essentials Foundation Pack for Linux” (also known as HPIEFL for
Linux).
48
Installing Guests
The SUSE Linux RPM guest kit is actually two parts, a guest kit and a provider kit. The
Hpvm.*.rpm kit contains:
• Tuning scripts
• hpvminfo
• hpvmcollect
• Guest library
The Hpvmprovider.*.rpm kit contains the VMprovider and related files. This RPM requires that
both the hpvm and tog-pegasus kits must be installed.
http://h20293.www2.hp.com/portal/swdepot/displayProductInfo.do?productNumber=T2387AA
The information you need is provided in Chapter 5 of the HP Integrity Essentials Foundation Pack
for Linux User's Guide.
To download the HPIEFL for Linux kit, click the link http://www.hp.com/go/
integritylinuxessentials listed in Chapter 5, then click Download for HP Integrity Essentials Foundation
Pack for Linux link on this website.
4.3.2.6 Installing Linux Guest Management Software for the First Time
The first time you install the Linux guest management software, the following error might occur:
=== from /var/log/messages file ===
Jan 18 22:45:00 1sn000 kernel: ipmi_si: Error clearing flags: cl
=== from "dmesg" command ===
ipmi_si: Error clearing flags: cl
You can ignore this error message.
4.3.2.7 ACPI Warnings, Errors, and Exceptions Displayed when SUSE Guest Booted
When an installed SUSE guest is booted, messages similar to the following are displayed on the
guest's console:
Loading processor
ACPI Error (acpi_processor-0500): Invalid PBLK length [0] [20060127]
ACPI Error (acpi_processor-0500): Invalid PBLK length [0] [20060127]
ACPI Error (acpi_processor-0500): Invalid PBLK length [0] [20060127]
ACPI Error (acpi_processor-0500): Invalid PBLK length [0] [20060127]
ACPI Warning (acpi_processor-0555): BIOS reporting wrong ACPI id for the processor [20060127]
ACPI Exception (evxface-0538): AE_BAD_PARAMETER, Removing notify handler [20060127]
ACPI Error (acpi_processor-0500): Invalid PBLK length [0] [20060127]
ACPI Warning (acpi_processor-0555): BIOS reporting wrong ACPI id for the processor [20060127]
ACPI Exception (evxface-0538): AE_BAD_PARAMETER, Removing notify handler [20060127]
ACPI Error (acpi_processor-0500): Invalid PBLK length [0] [20060127]
ACPI Warning (acpi_processor-0555): BIOS reporting wrong ACPI id for the processor [20060127]
ACPI Exception (evxface-0538): AE_BAD_PARAMETER, Removing notify handler [20060127]
ACPI Error (acpi_processor-0500): Invalid PBLK length [0] [20060127]
ACPI Warning (acpi_processor-0555): BIOS reporting wrong ACPI id for the processor [20060127]
ACPI Exception (evxface-0538): AE_BAD_PARAMETER, Removing notify handler [20060127]
ACPI Error (acpi_processor-0500): Invalid PBLK length [0] [20060127]
ACPI Warning (acpi_processor-0555): BIOS reporting wrong ACPI id for the processor [20060127]
ACPI Exception (evxface-0538): AE_BAD_PARAMETER, Removing notify handler [20060127]
ACPI Error (acpi_processor-0500): Invalid PBLK length [0] [20060127]
ACPI Warning (acpi_processor-0555): BIOS reporting wrong ACPI idfor the processor [20060127]
ACPI Exception (evxface-0538): AE_BAD_PARAMETER, Removing notify handler [20060127]
ACPI Error (acpi_processor-0500): Invalid PBLK length [0] [20060127]
.
.
.
ACPI Warning (acpi_processor-0555): BIOS reporting wrong ACPI id for the processor [20060127]
ACPI Exception (evxface-0538): AE_BAD_PARAMETER, Removing notify handler [20060127]
These warnings, errors, and exceptions occur because some optional elements are not provided
by the Integrity VM ACPI table. These messages are printed because the SUSE startup/initialization
code is trying to reference these optional elements, particularly for configured guest CPUs.
The messages do not impede the SUSE boot process; the boot/startup process completes. The
known side-effect of these messages is that there is an extra CPU created in the /proc/acpi/
4.3 Linux Guests
49
processor file system, which might lead to confusion as to the actual number of CPUs configured
in the guest.
4.3.2.8 HP SIM CMS Cannot Connect to SLES10 over SSH
SSH password authentication is turned off by default in SLES10. In this default setting, HP SIM
CMS cannot connect to the SUSE guest.
To enable password authentication for SSH, do the following:
1. Login to SUSE.
2. Edit the /etc/ssh/sshd_config file.
3. Set passwordauthentication value to yes.
4. Restart sshd.
For more information, see Secure Shell (SSH) in HP SIM 5.x, Troubleshooting section (page 31).
4.3.2.9 Preparing Linux Guests for Integrity Virtual Machines Manager
If Linux guests are to be managed by Integrity Virtual Machines Manager:
1. Install the tog-pegasus package.
2. On Red Hat Enterprise Linux, modify the file /etc/Pegasus/access.conf to allow
WBEM access using your designated WBEM user name and password. Follow the steps
below to configure this file. In this example, your designated WBEM user name is assumed
to be wbemuser.
a. Look for the following line in this file:
-: ALL EXCEPT pegasus:wbemNetwork
b.
Change this line to either of the following options:
• # Allow access from user 'wbemuser':
-: ALL EXCEPT wbemuser pegasus:wbemNetwork
•
3.
# Allow access by all users:
+: ALL EXCEPT :wbemNetwork
Start the tog-pegasus package by executing the following command:
# /etc/init.d/tog-pegasus start
For information about where to download the Utilization Provider for the Red Hat Linux guest,
see the HP Insight Software 6.0 Installation and Configuration Guide at the BSC website: http://
bizsupport2.austin.hp.com/bc/docs/support/SupportManual/c02048569/c02048569.pdf.
NOTE: If using SUSE Linux SLES10 SP2 guests, install the HP Integrity Essentials Foundation
Pack for Linux (HPIEFPL) Version 2.1 kit or later to get an appropriate version of the Utilization
Provider. To get the VMProvider for the SLES10 guest, install the HPIEFPL Version 2.2 kit or
later or make sure you install the Integrity VM V3.5 guest kit. For more information about
obtaining the Utilization Provider, see the HPIEFPL 2.2 Release Notes.
4.3.2.10 Linux Guests with FC Tapes Display Errors
MPT errors might appear while booting a Linux guest if FC tapes are attached to it. FC tape
devices return EIO on device reset, which causes timeout of the MPT reset. The boot proceeds
after the reset timeouts; these errors can be ignored. For example:
Use ^ and v to change option(s). Use Enter to select an option
Loading: Red Hat Enterprise Linux AS
Starting: Red Hat Enterprise Linux AS- - - - - - - - - - - ELILO boot: Uncompressing Linux... done
Loading initrd initrd-2.6.9-42.EL.img...done
i8042.c: i8042 controller self test timeout.
Red Hat nash version 4.2.1.8 starting
50
Installing Guests
mptbase: ioc0: ERROR - Doorbell ACK timeout (count=4999), IntStatus=80000000!
mptbase: ioc0: ERROR - Doorbell ACK timeout (count=4999), IntStatus=80000000!
Reading all physical volumes. This may take a while...
Found volume group "VolGroup00" using metadata type lvm2
2 logical volume(s) in volume group "VolGroup00" now active
INIT: version 2.85 booting
Welcome to Red Hat Enterprise Linux AS
4.3.2.11 Disable IPv6 on Linux Guests
Integrity VM does not support IPv6 on Linux guests. Red Hat Linux enables IPv6 by default.
When the Linux guest boots, the following message is displayed:
printk: 1 message suppressed
The dmesg command reports numerous duplicate address detected! messages on every
IPv6 configured interface. These messages indicates an issue in the IPv6 DAD (Duplicate Address
Detect) mechanism and are harmless. You can ignore them, or you can disable them by including
the following line in the/etc/modprobe.conf file:
alias net-pf-10 off
4.3.2.12 Infrequent “Ooops: timer ticks before it is due” Errors
Infrequent Ooops: timer ticks before it is due messages appear on the console. You
can safely ignore this message, because it is harmless.
4.3.2.13 Infrequent “e1000: eth1: e1000_clean_tx_irq: Detected Tx Unit Hang” Errors
Infrequent e1000: eth1: e1000_clean_tx_irq: Detected Tx Unit Hang messages
appear on the console. You can safely ignore this message, because it is harmless.
4.3.2.14 Inconsistent “Bogomips” Values between Virtual CPU0 and Other Virtual CPUs
“Bogomips” values can be inconsistent between virtual CPU0 and other virtual CPUs. This
condition is harmless. To prevent this problem, add the lpj=4000000 boot option in /boot/
efi/efi/redhat/elilo.conf. For example:
# cat elilo.conf
prompt
timeout=20
default=linux
relocatable
image=vmlinuz-2.6.9-42.EL.img
label=linux
initrd=initrd-2.6.9-42.EL.img
readroot=/dev/VolGroup00/LogVo100
append="console=tty0 console=ttyS0 rhgb quiet lpj=4000000
4.3.2.15 Incorrect Display of Special Characters when Displayed Using HP-UX Terminal
The Linux Red Hat installation program does not display correctly when run within hpvmconsole
on an HP-UX terminal. It displays accented A characters instead of boxes.
4.3.2.16 Occasional Floating-Point Assist Fault Messages.
Occasional floating-point assist fault messages appear when running Mozilla. This problem also
occurs on native Integrity servers running Linux. For more information, see the “Developer &
Solution Partner Program (DSPP)” webpage on http://www.hp.com, and search for “floating-point
assist fault”.
4.3 Linux Guests
51
4.3.2.17 Serviceguard in VM Host Configuration
The default KILLTIME of 10 seconds (in hpvmsg_stop for a legacy package) and a wait of 10
seconds (in hpvmsg_ext for a modular package) might be too aggressive in some environments
and can result in a file system corruption on Linux guests. HP recommends that you tune this
value, so that the file systems on the guests are successfully unmounted before the guest is
powered off.
4.4 OpenVMS Guests
The following sections contain the release notes specific to OpenVMS guests.
4.4.1 Creating OpenVMS Guests
To create an OpenVMS guest (virtual machine) on the VM Host, use the following command,
where vmsg1 is the name of the guest:
# hpvmcreate -P vmsg1 -O OpenVMS -c 2 -r 2g
For information about installing OpenVMS guests, see the HP OpenVMS V8.4 for Integrity Servers
Upgrade and Installation Guide at the following website: OpenVMS Documentation.
4.4.2 Minimum Processor Requirement for OpenVMS Guests
OpenVMS guests are supported on Integrity VM Host systems with Intel® Itanium® 2 9000/9100
Series processors or later processors that OpenVMS supports natively.
4.4.3 Minimum VM Host Page Size
The OpenVMS guest might have problems booting if one or more of the following occurs:
• The VM Host is under memory pressure due to frequent allocations and freeing large
amounts of memory.
• The VM Host has just enough physical memory to support the guest's requirements and the
VM Host's base_pagesize is set to 4K.
OpenVMS expects a guest pagesize of 8K, and the boot processing can have issues loading an
in-memory disk used during the boot process. If either of the following situations occur, setting
the VM Host's base_pagesize to 64K or setting the guest's preferred pagesize to 8K should resolve
the problem:
• The following message is written to the VM Host's /var/opt/hpvm/common/
hpvm_mon_log file:
#
#
#
WARNING: Host memory is fragmented.
Reducing VHPT preferred page size from 64K to 16K.
This may result in degraded performance for this virtual machine.
Where # is a guest vm number assigned by hpvmdvr.
•
Depending on how fragmented and how small the VM Host pagesizes are, the following
OpenVMS error message and text appear on the guest’s console:
%SYSBOOT-F-LDFAIL, unable to load SYS$PUBLIC_VECTORS.EXE, status = 00000044
**************************************************************
* Exception taken before exception handler has been loaded! *
* Unable to take crashdump.
*
**************************************************************
* Exception Frame Display: *
…
Crash dump information follows this output.
52
Installing Guests
Use one of the following solutions to fix either of these issues:
• Set the VM Host base_pagesize = 64K (See the base_pagesize(5) manpage for details of
determining and setting the VM Host’s base_pagesize.)
• Set the guest preferred pagesize to 8K:
# hpvmmodify -P vm-name -x tunables=ptsz=13
4.4.4 Guest Device Placement and Adapter Limitation
The OpenVMS guest utilizes the PKDRIVER SCSI port driver and the DKDRIVER SCSI class
driver. A guest configuration uses a UNIX-like algorithm to place storage devices on an AVIO
storage adapter starting with entry “0,0” and continuing through “7,7”, where each AVIO storage
adapter can have up to 128 targets. The default device placement algorithm places 14 devices on
each adapter, in order. Thus, when the guest creation (hpvmcreate) or modification
(hpvmmodify) utility attempts to add a device (using the –a option), it adds, in order, from
“0,0,0” through “0,0,14” before creating a new adapter and starting over again with “0,1,0”
through “0,1,14”. You can specify usage of any target value from 0 through 127.
Each Integrity VM adapter corresponds to the OpenVMS controller letters A through Z. The
exact mapping depends on the order of devices found in the guest configuration file. Typically,
“0,0” maps to PKA/DKA, while “0,1” maps to PKB/DKB, and so on. The following are known
restrictions:
• The guest target value is a pure number assigned as the unit number of the device. The guest
target value is not the same as a hardware SCSI target, where the disk in the 0th slot would
be DKA0, the disk in the 1st slot would be DKA100, the disk in the 2nd slot would be DKA200,
and so forth. Furthermore, it is not possible to assign the ‘lun’ number for the storage devices,
such as DKA101. Placing a device at “0,0,1” results in the guest device “DKA1:”.
• 16 unique DKDRIVER SCSI class adapters can be created. OpenVMS identifys them as
DKAn: through DKPn:, where ‘n’ is the target value. Attempts to use a 17th adapter results
in a port class PKQ0: being created with no corresponding DKQn: devices. The Integrity
VM guest creation (hpvmcreate) and modification (hpvmmodify) utilities are not aware
of this restriction.
You can add devices dynamically by using the hpvmmodify command on the VM Host to add
the storage in conjunction with the OpenVMS command sysman io autoconfigure all
on the guest to find the storage.
4.4.5 OpenVMS System Dump Analyzer (SDA)
Using the OpenVMS SDA command CLUE CONFIG the first time results in a
CLUE-W-NOSYMBIOS, cannot access SYMBIOS table warning. Subsequent CLUE CONFIG
commands display incorrect data. Additionally, using EXAM/PHYS FE000 to view the guests
SMBIOS data results in the message %SDA-E-NOREAD, unable to access location
00000000.000FE000. This issue seems to affect the SDA utility.
4.4.6 Formatting SYSTEM UUID
The sys$getsyi() or f$getsyi lexical for SYSTEM_UUID appear to return a UUID that is incorrectly
formatted as compared to the value seen in the VM Host's guest configuration output
(hpvmstatus –V –P vm-name). However, the returned value is normal and expected. The
returned string needs to be properly formatted to be viewed as a “normal” UUID. Use the
following DCL code to format and print the UUID value:
$! Format and print a UUID
$uuid = f$getsyi("system_uuid")
$len=f$len(uuid)
$if (len .eq. 32)
$then
$
part1 = f$fao("!AS",f$ext(24,8,uuid))
4.4 OpenVMS Guests
53
$
$
$
$
$
$
$
part2
part3
part4
part5
=
=
=
=
f$fao("!AS",f$ext(20,4,uuid))
f$fao("!AS",f$ext(16,4,uuid))
f$fao("!AS!AS",f$ext(14,2,uuid),f$ext(12,2,uuid))
f$fao("!AS!AS!AS!AS!AS!AS", f$ext(10,2,uuid),f$ext(8,2,uuid), f$ext(6,2,uuid),f$ext(4,2,uuid), f$ext(2,2,uuid),f$ext(0,2,uuid))
pr_uuid = f$edit("''part1'-''part2'-''part3'-''part4'-''part5'", "lowercase")
write sys$output "SYSTEM_UUID=''pr_uuid'"
4.4.7 Packaging OpenVMS Guests as Serviceguard Package Not Supported
There is no Serviceguard support for OpenVMS guests in Integrity VM V4.2.5.
4.4.8 TCP/IP and WBEM Services Not Started Automatically at Boot on OpenVMS
Guest
TCP/IP Services and WBEM Services do not start by default after an OpenVMS guest boots. You
must manually restart them or include the command in a startup script. You might see Utilization
Data for OpenVMS guests after a fresh installation or after rebooting and OpenVMS guest.
If the guest has been installed and booted for the first time, configure and start TCP/IP and WBEM
Provider Service manually. For subsequent reboots, starting of these services must be added in
a startup script, so that it starts automatically when a guest boots.
For information about setting up and configuring TCP/IP and WBEM Provider Services, see the
OpenVMS Documentation website.
54
Installing Guests
5 Using Integrity VM Commands
This chapter contains notes about the Integrity VM commands.
5.1 Changes and Issues in This Release
The following sections describe changes, issues, and new information pertaining to this release.
5.1.1 Integrity VM Command Changes
The Integrity VM commands have changed in the following ways:
• The following new commands have been added:
— hpvmresume command
— hpvmsuspend command
— hpvmmove_suspend
NOTE: These commands are not supported with VMs as Serviceguard Nodes and VMs as
Serviceguard Packages.
5.1.2 Information Missing from hpvmmigrate -Y and -y Option Manpage
Descriptions
The hpvmmigrate -Y and -y options have the following effect:
• -Y skips encryption.
• -y forces encryption.
5.1.3 hpvmsuspend Manpage Missing -q Option
The -q option is missing from the hpvmsuspend manpage. This option sets the quiet flag, which
slightly reduces the messages.
5.2 Known Issues and Information
The following sections describe known issues and information from previous releases that still
apply to V4.2.5.
5.2.1 Boot-Problem Messages Now Found In Log File
Boot-problem messages generated by either the hpvmcreate, hpvmmodify, or hpvmstart
command and displayed on your screen are now also saved to your log file, /var/opt/hpvm/
common/command.log.
5.2.2 Display Output from Some Integrity VM Tools Might Change in Form and
Content
Specific display output from some Integrity VM tools, such as the hpvmstatus command, is
subject to occasional changes of form and content. Program scripts should always use
machine-readable output options (for example, hpvmstatus -M) whenever available to avoid
future script maintenance.
5.2.3 Enabling or Disabling Virtual CPUs Online
Starting with HP Integrity VM V4.2, it is possible to change the number of enabled CPUs in
HP-UX guests, using the hpvmmgmt –c num command. This command sets the number of
enabled virtual CPUs to the number indicated by num, and disables the others. Depending on
5.1 Changes and Issues in This Release
55
the kernel version, Linux guests might support enabling or disabling virtual CPUs by writing
into /sys/devices/system/cpu/cpuN/ online, as on a physical system. Disabled virtual
CPUs no longer show up in the guest in commands such as top or GlancePlus, and no longer
consume resources on the host. However, disabled virtual CPUs still appear on the host, for
example in the hpvmsar command.
5.2.4 The hpvmdevmgmt -r Command Might Report an Error When a Device is
Marked as EXIST=NO
On HP-UX 11i v3 VM Hosts, the device management report and repair function hpvmdevmgmt
-r might successfully complete, but generate one or more instance of the following error message
(one for each legacy device without a corresponding agile device name):
# hpvmdevmgmt -r
INFO - Analyzing all devices in /dev/rdsk for their device identification
strings. This may take a while.
hpvmdevmgmt: ERROR (host): Could not find an agile device name that
corresponds to the legacy device name: '/dev/rdsk/cxtxdxsx'.
This error might be reported when a device entry in /var/opt/hpvm/common/hpvm_mgmtdb
has been marked as no longer existing (attribute set to EXIST=NO). The report and repair function
attempts to examine all the disks it finds in /dev/rdsk and /dev/rdisk, looking for a match
between the stored World-Wide ID (WWID) for the device that no longer exists and a WWID of
a device that does exist.
If a legacy device (in /dev/rdsk or /dev/rscsi) is found on the VM Host that does not have
an agile-name device equivalent (in /dev/rdisk or /dev/pt), the error message might be
displayed for each device without a corresponding agile-named device.
You may safely ignore this error if you are not using the legacy device with any virtual machine.
5.2.5 An hpvmmodify Command Not logged in the command.log file for DVDs
When Guest Booted to EFI
You might receive the following note-level message in the /var/opt/hpvm/common/
command.log file under certain circumstances:
mm/dd/yy hh:mm:ss|NOTE|host|root|Unable to open file '/dev/rdisk/diskxxx' - Device busy.
This note might be logged if,:
• A guest is configured with an attached scsi burner:
resource: -a burner:scsi:[b,d,t]:attach:pass-through-device-path
•
•
The guest is then booted to EFI.
Then the hpvmmodify command is run to add a device or remove a device other than the
burner.
You may safely ignore this note.
5.2.6 Running the hpvmdevtranslate Script
Running the hpvmdevtranslate script produces a new copy of the Integrity VM device database
that is missing the default restricted directories, such as /etc and /stand. To restore the default
restricted directories, run hpvmdevmgmt -I either immediately after you run the
hpvmdevtranslate script or after you run the hpvm_dev_convert script that is generated
by the hpvmdevtranslate script.
5.2.6.1 The hpvmdevtranslate Command Can be Used to Translate Devices Like SecurePath
and AutoPath
The hpvmdevtranslate command can be used to translate devices like SecurePath and AutoPath
after starting Integrity VM Version 4.0 on HP-UX 11i v3. The devices are translated to agile
56
Using Integrity VM Commands
devices if they have legitimate WWIDs in the /var/opt/hpvm/common/hpvm_mgmtb_pre1131
device database file.
5.2.6.2 Error Comments from hpvmdevtranslate Command
The hpvmdevtranslate command creates ERROR messages for all devices used by guests that
have WWID set to WWID_NULL. This message indicates that no translation could be done.
These ERROR messages can often be ignored, because they relate to devices like network adapters
(lan0, lan1) or vswitches (localnet, hostnet) that have no unique identifiers.
However, when these ERROR messages reference device backing storage items like a disk,
volume, file, or directory; check to see if they really do reference the correct device, volume, file,
or directory. If they do not, then the guest that uses these devices might not be fully functional.
The following are example ERROR messages:
#
#
#
#
#
#
#
#
ERROR:
ERROR:
ERROR:
ERROR:
ERROR:
ERROR:
ERROR:
ERROR:
No
No
No
No
No
No
No
No
mapping
mapping
mapping
mapping
mapping
mapping
mapping
mapping
for
for
for
for
for
for
for
for
device
device
device
device
device
device
device
device
/var/opt/hfs_1_system/file_1500 with wwid WWID_NULL
/var/opt/hfs_1_system/file_500 with wwid WWID_NULL
/hfs_0_system/file_500 with wwid WWID_NULL
/hfs_0_system/file_1500 with wwid WWID_NULL
lan0 with wwid WWID_NULL
myswitch with wwid WWID_NULL
localnet with wwid WWID_NULL
lan1 with wwid WWID_NULL
5.2.7 Accidental Use of -R Option with hpvmmodify Instead of -r
The hpvmmodify command supports two options related to guest memory configuration, -r
and -R. Accidental confusion of one for the other might create undesired results with your guest
configuration. For an explanation of these command options, see the hpvmmodify manpage.
The -R option, with the same meaning, is accepted by the hpvmcreate and hpvmclone
commands, but use of the -R option with those commands is currently unsupported. Nevertheless,
similar undesired results might occur with a similar mistaken use of -R for -r with those
commands.
5.2.8 Changing Guest LAN from AVIO to VIO
When changing a guest LAN from AVIO to VIO, you must restart the vswitch that the LAN is
on. Use the following commands:
hpvmnet -h -S switchname // for the vswitch associated with the LAN change
hpvmnet -b -S switchname
5.2.9 The hpvmmodify Command Reevaluates Guest Configurations
When you use the hpvmmodify command to modify a guest, the entire guest configuration is
reevaluated. Any problems that might prevent the guest from starting are reported. For example,
if a guest has a reference to a host device that no longer exists, and you enter an hpvmmodify
command that modifies the guest but does not fix the bad reference, a warning message is
generated.
5.2.10 The hpvmdevmgmt Command Truncates File Sizes
When you use the -S option on the hpvmdevmgmt command to create a file to be used as a
virtual device, you can specify the file size. The file size must be specified in whole integers.
Anything after the initial whole integer is ignored. For instance, both the hpvmdevmgmt -S 1G
command and the hpvmdevmgmt -S 1.5G command create a 1 GB file.
5.2.11 Setting Devices to Sharable Can Lead to Device Conflicts
Integrity VM allows Virtual FileDVDs and attached devices ( avio_stor type) to be shared by
guests. With HP Serviceguard, you can share Virtual Disks. Other types of storage devices are
not supported for sharing and cannot be allocated to multiple guests. Be careful when you set a
5.2 Known Issues and Information
57
virtual device to sharable using the hpvmdevmgmt command. Incorrectly marking a virtual
device as sharable can lead to device conflicts and data corruption if multiple guests access it
concurrently. In particular, attached devices using scsi (as opposed to the avio_stor) adapter type
(tape, burner, or changer) should not be made sharable.
5.2.12 Errors on Displaying Guest or Vswitch Information While that Information is
Being Modified
The hpvmstatus, hpvmmodify, hpvmcreate, hpvmclone, and hpvmremove commands
might return the following error when another command accesses the same guest's configuration
files at the same time:
hpvm_guest_get_state:103:No Guest by that name or number
If you receive this error when you try to display a guest or vswitch configuration, enter the
command again.
5.2.13 Do Not Attempt to Remove Busy Virtual Devices
Before removing virtual devices with the hpvmmodify command, make sure that the guest
operating system is no longer directing I/O to the device. Unmount the device if it is mounted.
If you attempt to remove a device that has I/O in progress, the hpvmmodify command incorrectly
removes the device from the guest configuration file. The hpvmstatus command no longer
displays the device, and the hpvmmodify command does not retry the device removal, but the
guest operating system sees the device as available. To remove the device, restart the guest.
5.2.14 Missing uuid or .vmid Files
If you use Integrity VM commands while guests are being removed, you might receive errors
about missing uuid or .vmid files. Enter the command after the guest removal has completed.
5.2.15 Maintain Minimum Entitlement
The hpvmcreate and hpvmmodify commands do not allow the minimum CPU entitlement to
be set below 5%. If you force the entitlements below 5%, boot time and potential runtime failures
occur.
Set entitlement percentages in integers, not fractions. Fractions are ignored.
5.2.16 Actual Running Entitlement Might Differ from Configured Entitlement
Displayed and reported guest entitlement settings can differ from values that are specified. This
occurs when entitlement settings have a granularity of one percent of the VM Host CPU capacity.
An entitlement specified in cycles can be rounded to an integral percentage of VM Host cycles.
For example, if you specify the guest entitlement as -E 100 on a 900 MHz host system, it is
rounded to 108 MHz (12%).
5.2.17 Duplicate Messages when Modifying Running Guests
Using the hpvmmodify command to add zero-length files to file-backed virtual disks can result
in duplicate warning messages. For example:
# hpvmmodify -P test_duperr -a disk:scsi::file:/tmp/zero.size.1 \
-a disk:scsi::file:/tmp/zero.size.2
hpvmmodify: WARNING (test_duperr): File size of: 0 (bytes) for disk backing file:
/tmp/zero.size.1 must be equal to or greater than: 512 (bytes),
or the device may not show up in the guest when booted.
hpvmmodify: WARNING (test_duperr): File size of: 0 (bytes) for disk backing file:
/tmp/zero.size.2 must be equal to or greater than: 512 (bytes),
or the device may not show up in the guest when booted.
hpvmmodify: WARNING (test_duperr): File size of: 0 (bytes) for disk backing file:
/tmp/zero.size.1 must be equal to or greater than: 512 (bytes),
or the device may not show up in the guest when booted.
58
Using Integrity VM Commands
hpvmmodify: WARNING (test_duperr): File size of: 0 (bytes) for disk backing file:
/tmp/zero.size.2 must be equal to or greater than: 512 (bytes),
or the device may not show up in the guest when booted.
Remove the failing device from the guest configuration using the hpvmmodify command.
5.2.18 Manpages Display on Linux Guests
The hpvmcollect and hpvminfo commands are available on Linux guests after installing the
Linux guest management software kit, as described in the HP Integrity Virtual Machines Installation,
Configuration, and Administration manual. To view the command displays properly, enter the
following commands on the Linux guest:
# export LANG=en_US.iso88591
# export TERM=vt200
Exporting these environment variables allows you to display the manpage content from a Linux
guest console. Some minor differences in the appearance of the manpages as displayed on HP-UX
and as displayed on Linux are expected.
5.2.19 Integrity VM Check Might Fail Because of Bad Switch
The Cisco switch for HP BladeSystem c-Class Server Blades has a protocol error that causes it to
respond to every MAC address. Because MAC addresses are unique, Integrity VM checks that
the generated guest virtual MAC address is unique. If one of these bad switches is on your
network, Integrity VM's check will fail.
The hpvmcreate command might fail with messages like the following:
hpvmcreate:
hpvmcreate:
WARNING (host): Failed after 3 attempts.
WARNING (host): Unable to create Ethernet MAC Address.
Similarly, the hpvmstart command might fail with messages like the following:
# hpvmstart -P vm2
HPVM guest vm2 configuration problems:
Warning 1 on itme nic1: Guest MAC address for switch nic1 is in use.
Cisco Systems, Inc. released a fix for the Cisco Catalyst Blade Switch 3020 in December 2006,
which is available from the Cisco Systems website:
http://cco.cisco.com
It is also available from the HP website:
http://www.hp.com
From the HP website, select Software & Driver downloads and search for switch cisco 3020. The
minimum required firmware version is 12.2(35) SE.
5.2 Known Issues and Information
59
60
6 Guest Administration
This chapter contains information about managing Integrity VM guests.
6.1 Changes and Issues in this Release
The following sections discuss new guest administration information in the V4.2.5 release.
6.1.1 Integrity VM Fully Supported with ID-VSE Logical Server Management 6.2
Integrity VM now fully supports ID-VSE Logical Server Management (LSM). With this version
of Integrity VM, administrators can now manage the full life-cycle of VMs with the following
LSM operations: create, modify, delete, activate, deactivate, power on/off, import, move, and
unmanage.
NOTE: The following steps must be run on the Integrity VM Host before you can use LSM to
create Integrity VM guests and before you can use HP Insight Orchestration to provision VMs.
To create Integrity VM guests using ID-VSE LSM 6.2, you must adhere to the following:
1. Create the appropriate size SLVM volume group (VG) for the device management database
using LVM Version 2.1 or later. For example:
• Create the volume group using LVM Version 2.1:
# vgcreate -V 2.1 -s 4m -S 100g /dev/slvm_v21 /dev/disk/disk61
•
Create the volume group using LVM Version 2.2:
# vgcreate -V 2.2 -s 4m -S 70g /dev/slvm_v22 /dev/disk/disk70
2.
For information about creating SLVM volume groups, see the HP Integrity Virtual Machines
4.2: Installation, Configuration, Administration manual at HP Integrity Virtual Machines and
Online VM Migration and the SLVM Online Volume Reconfiguration whitepaper at SLVM
Online Volume Reconfiguration.
Add SLVM volume groups into the device database using the hpvmdevmgmt command.
For each SLVM volume group you add to the device management database, set the device
attribute VIRTPTYPE to container_volume_SLVM, with the PRESERVE=YES attribute
setting. For example:
# hpvmdevmgmt -a gdev:/dev/slvm_v22:attr:VIRTPTYPE=container_volume_SLVM,PRESERVE=YES
For information about storage requirements for importing logical servers with backing
storage from SLVM volume groups, see Section 6.1.2 (page 62)
3.
Run hpvmhostrdev —u to add the underlying disks of the created SLVM volume groups
into the device database as restricted devices.
NOTE: The SLVM volume groups must be in the activated mode before running the
hpvmhostrdev script. For information about deactivated volume groups, see Section 8.2.22
(page 87).
4.
Execute the Integrity VM hpvmhostgdev -a command to ensure that all devices are
populated in the gdev database. The hpvmhostgdev command analyzes disklist and
lvlist output and adds unused gdevs to the Integrity VM device database.
6.1 Changes and Issues in this Release
61
NOTE: If you add new devices in the future, run the hpvmhostgdev -a script again. If
you want to select the guest devices instead of adding all of them to the gdev database,
create a list of unused disks and logical volumes with the -l option and pipe them to a file.
Use the specified device-list file to add devices for guest use with the -f option.
# hpvmhostgdev -l > devicelist
# hpvmhostgdev -f devicelist
For information about the hpvmhostgdev script, see Appendix A (page 103).
5.
Managing VMs does not require them to be in a VM as a Serviceguard Package. However,
if you plan to use clustered VMs, ensure that the Integrity VM Host is properly configured
with Serviceguard (11.19 or 11.20) and Shared Logical Volume Manager (SLVM).
NOTE: For information about configuring Serviceguard and SLVM, see the Using HP
Serviceguard Integrity VM section of the HP Integrity Virtual Machines 4.2: Installation,
Configuration, and Administration manual.
If you already have your VMs clustered in a VM as a Serviceguard Package, but prefer not
to manage them this way, run the following Serviceguard command to properly deconfigure
(delete) the package:
# hpvmsg_package -U -P package_guest_name
6.1.2 Storage Requirements for Managing Existing Integrity VM Guests with Logical
Server Management
To use Logical Server Management (LSM) to manage virtual machines created outside of LSM,
the guest backing storage needs to be the following:
• Whole LUNs — The supported LSM operations are: Import, Online Move, Power On, Power
Off, and Unmanage.
• SLVM-based logical volumes (LVs) — The volume group (VG) type must be
container_volume_SLVM in the Integrity VM device management database.
The supported operations are: Import, Online Move, Power On, Power Off, Activate, and
Deactivate, and Unmanage.
NOTE: For information about virtual machines created with LSM or HP Insight Orchestration
using SLVM-based LVs, see Section 6.1.1 (page 61).
6.1.3 Managing Existing Integrity VM Guests With LSM
You can import existing Integrity VM guests that are configured with whole LUNs, and perform
the following LSM operations on these VMs: Online Move, Power On, Power Off, and Unmanage.
All other operations are not supported with these imported guests.
Integrity VM Hosts that are managing only VMs with whole LUNs do not need to be configured
with Serviceguard and SLVM. If you plan to create new guests on that VM Host, follow the steps
in Section 6.1.1 (page 61).
6.2 Known Issues and Information
The following sections describe known issues and information from previous releases that still
apply to V4.2.5.
62
Guest Administration
6.2.1 Creating Virtual Machine Administrator and Operator Accounts
In versions of Integrity VM prior to A.03.00, Admin console access is available, and one such
account per guest is allowed. The administrator account name must match the guest name. The
new version of Integrity VM provides proper access controls and individual accountability for
these accounts. For more information, see Section 6.2.4 (page 63).
6.2.2 Administrator Account Names
Integrity VM Version 4.0 and later lifts the restriction that the virtual console administrator
account names must be the same as the guest name. As a result, the virtual console administrator
name can be any valid HP-UX login name. To continue accessing the virtual console, existing
guest console accounts must be added to the authorization list for the associated guest with the
usermod command. This allows multiple accounts to map to the guest, and requires the account
names to be valid HP-UX login strings.
Authorization of access to the virtual console is determined by the guest configuration file (set
using the -u and -g options to the hpvmcreate, hpvmmodify, and hpvmclone commands).
This controlled access allows you to temporarily block access by using the hpvmmodify command
to change the virtual console administrator account name.
6.2.3 Guest User Accounts
The configuration for captive hpvmconsole guest user accounts has changed in Integrity VM
Version 4.0 and later to support additional access controls and configurations. This change
requires that the guest user accounts have the correct home directory. It is also necessary to list
the console access account in the guest configuration file.
For example, using a guest named compass1 (and therefore a user account named compass1),
the home directory for user compass1 must be /var/opt/hpvm/guests/compass1. To
ensure that the user continues to have administrative console access, use the following command:
# hpvmmodify -P compass1 -u compass1:admin
6.2.4 Creating Virtual Machine Administrator and Operator Accounts
In prior versions of Integrity VM, admin console access is available, and one such account per
guest is allowed. The administrator account name must match the guest name. The new version
of Integrity VM provides proper access controls and individual accountability for these accounts.
A captive virtual console account is a special-purpose user account created on the VM Host for
each guest administrator. These types of user accounts use /opt/hpvm/bin/hpvmconsole
for a shell, and the desired guest's per-guest directory for a home directory. For virtual console
access, the account also requires a password, and access to its associated guest. You create this
account with the hpvmcreate, hpvmclone, or hpvmmodify command. You can establish group
membership of the account using the -g option to those commands, or user membership, using
the -u option to those commands.
NOTE: Do not use the hpvmsys group for user accounts. This group is used for security isolation
between components of Integrity VM.
The HP-UX useradd command might not work as expected. To create user accounts for virtual
console access, use the useradd command before you create the virtual machine. Alternatively,
specify the user account directory completely in the /etc/passwd file, ensuring the entry is
unique.
In the following example, the useradd command is used to create three user accounts on the
VM Host system (testme1, testme2, and testme3):
# useradd -r no -g users -s /opt/hpvm/bin/hpvmconsole \
-c "Console access to guest 'testme'" \
-d /var/opt/hpvm/guests/testme \
6.2 Known Issues and Information
63
testme1
# useradd -r no -g users -s /opt/hpvm/bin/hpvmconsole \
-c "Console access to guest 'testme'" \> -d /var/opt/hpvm/guests/testme \
testme2
# useradd -r no -g users -s /opt/hpvm/bin/hpvmconsole \
-c "Console access to guest 'testme'" \
-d /var/opt/hpvm/guests/testme \
testme3
The following command creates the virtual machine named testme:
# hpvmcreate -P testme -u testme1:admin -u testme2 -u testme3:oper
At this point, users testme2 and testme3 both have oper level access to the virtual console,
and user testme1 has admin level access. In order to make these accounts usable, set passwords
for them, as follows:
# passwd testme1
...
# passwd testme2
...
# passwd testme3
...
Because of the way the useradd command works, an attempt to create an additional account
might result in an error. For example, the following command attempts and fails to add the
testme4 user account:
# useradd -r no -g users -s /opt/hpvm/bin/hpvmconsole \
> -c "Console access to guest 'testme'" \
> -d /var/opt/hpvm/guests/testme \
> testme4
'/var/opt/hpvm/guests/testme' is not a valid directory
To enter the command correctly, include the entire directory path. For example:
#
>
>
>
#
#
useradd -r no -g users -s /opt/hpvm/bin/hpvmconsole \
-c "Console access to guest 'testme'" \
-d /var/opt/hpvm/guests/testme/. \
testme4
hpvmmodify -P testme -u testme4
passwd testme4
Note the addition of the slash and period (/.) to the end of the argument to the -d option, which
ensures there is no confusion with HP-UX shared home directories.
6.2.5 Reconfiguring VM Host CPUs
Do not reduce the physical CPU count below the virtual CPU (vCPU) count of any guest. No
running guest should be allocated more vCPUs than the VM Host system has physical processors.
6.2.6 Monitor Logs Might Report Warnings
On rare occasions, the monitor log might report warnings such as the following:
Warning: VCPUn not scheduled for x ms, command 0x0.
Warning: No recorder entry on VCPUn for x ms.
These warnings are generally harmless, but might indicate performance problems with your
virtual machines, such as system or I/O overloads.
6.2.7 Warning Message Might Appear When Configuring or Starting Guests
When configuring or starting Integrity VM guests, the following warning message might be
displayed if storage associated with the guest appears to be performing very poorly.
hpvmcreate: WARNING (host): Device /dev/rdsk/c6t9d0 took 32 seconds to open.
If this message is appearing when configuring or starting a guest, Integrity VM does not support
running that guest with the devices specified in this message. Replace the devices with different
64
Guest Administration
devices in the guest configuration and evaluate the Host storage configuration with respect to
these devices and the adapters used to access them.
6.2.8 Do Not Add User Accounts to the hpvmsys Group
The hpvmsys group implements the security model for the VM Host and guests. The hpvmsys
group is automatically added to /etc/group when Integrity VM is installed. Do not add user
accounts to this group.
6.2.9 Do Not Enter Ctrl/B after Starting Guest with Virtual Console
When you use the pc -on command inside the Integrity VM virtual console to start the guest,
do not enter Ctrl/B; this will interrupt the guest boot process. Wait for the guest boot to complete
and the virtual console prompt to return. Then enter Ctrl/B.
6.2.10 How to Stop Guests
To stop a guest, HP recommends that you perform an operating system shutdown from a
privileged account on the guest. If the guest is not responding, use the hpvmstop -g command
on the VM Host. Do not stop a guest by killing the hpvmapp process.
6.2.11 The hpvmconsole pc –cycle Command Occasionally Does not Complete
If the guest hpvmconsole pc –cycle command doesn’t complete and restart the guest, enter
Ctrl/B to interrupt the command and then press Enter to return to the virtual console. Exit the
virtual console by entering the X command. At the VM Host command prompt, enter the following
command to start the guest:
# hpvmstart –P guestname
6.2.12 How to Recover from a Guest Hang
If a guest hangs, attach to the guest's virtual console using the hpvmconsole command, then
use Ctrl/B to enter the virtual console. Enter the tc command to reset the guest. The guest
captures a memory dump of the machine state, which can be used later for offline diagnosis. Do
not kill the guest from the VM Host or use the virtual console to power down a hung guest.
Doing so can corrupt the guest file system.
6.2.13 Using HP Serviceguard to Manage Guests
This section lists release notes specific to using Serviceguard in the Integrity VM environment.
Do not attempt to use guests as Serviceguard packages and guests as Serviceguard nodes at the
same time on the same VM Host system.
You can install HP Serviceguard A.11.16 or 11.17 on the VM Host or on the HP-UX guest. You
can install HP Serviceguard 11.18 on guests running HP-UX 11i v3.
6.2.13.1 Suspend/Resume not Supported with Serviceguard
The hpvmsuspend and hpvmresume commands are not supported with either VMs as Serviceguard
Nodes or VMs as Serviceguard Packages.
6.2.13.2 Serviceguard 11.18 No Longer Supported
Starting with HP Integrity Virtual Machines, Version 4.2, Serviceguard 11.18 is no longer
supported with Integrity VM.
6.2.13.3 Packaging VM Guest with CFS/CVM Backing Stores as Serviceguard Packages
When creating a Serviceguard cluster with virtual machines acting as packages, the
hpvmsg_package script correctly identifies CVM logical volumes and CFS files backing stores
6.2 Known Issues and Information
65
used by guests but requires users to verify or provide activation modes and package dependencies
for the backing stores.
The hpvmsg_package script creates the package configuration in the package directory:
/etc/cmcluster/hpvm-name/hpvm-name.conf. Inside the configuration file are instructions,
examples, and default and assigned named-values pairs describing the resources used by the
virtual machines and controlled and monitored by Serviceguard.
For information about selecting the appropriate values for these items, see the templates files in
the Managing Servicguard manual and the Veritas Storage Foundation 5.0 Cluster File System
Administration Guide Extracts for HP Serviceguard Storage Management Suite.
6.2.13.4 File Permission Errors When Checking or Applying Integrity VM Serviceguard Packages
to the Cluster Configuration
Depending on the system configuration, you might see an error similar to the following when
running cmcheckconf or cmapplyconf to the virtual machine packages:
# cmapplyconf -P /etc/cmcluster/hpvm-sg1-g4/hpvm-sg1-g4.conf
Incorrect permissions for /etc/cmcluster/hpvm-sg1-g4 (40777). Directory must be executable for owner, and not
writable by group and others on node hpvm-sg1-h1.
cmapplyconf: Error found in package file: /etc/cmcluster/hpvm-sg1-g4/hpvm-sg1-g4.conf.
To correct this issue, use a chmod command similar to the following to correct the permission
of the package directory on each of the cluster members:
# chmod go-w /etc/cmcluster/hpvm-name
6.2.13.5 Status of Serviceguard Controlled Distributed Guests can Lag
When Integrity VM guests are configured as packages in a Serviceguard (SG) cluster, hpvmstatus
displays which VM Host is running the distributed guests as an SG package. Because this
information comes from SG, it can be delayed by as much as 10 seconds. This delay does not
cause any risk of starting the same guest on two different Integrity VM Hosts, because SG is
controlling the start of these guests and allows a single instance to run at any one time.
6.2.13.6 The hpvmsg_package Does Not Add Appropriate Entries
The hpvmsg_package does not add appropriate entries to the package configuration and control
script files. After running the /opt/cmcluster/toolkit/hpvmsg_package script to package
a guest that contains CVM or CFS backing stores, review and modify the package configuration
and control scripts for each cluster member. As part of this process, add CVM and/or CFS backing
store entries to these files.
The package configuration and control scripts can be found at: /etc/cluster/guest-name/
6.2.13.7 Problem Displaying Truncated IPv6 Address for AVIO LAN with hpvmstatus and
hpvmnet Commands
For a guest configured with the AVIO adapter as a network device (avio_lan) and also configured
with an IPv6 address, the IPv6 address displayed by hpvmstatus -V and hpvmnet -V may
be truncated.
6.2.13.8 Using AVIO LAN Device in a Serviceguard Configured Guest
When using AVIO networking devices for guests that are configured as Serviceguard Packages,
be sure that all Serviceguard standby lans are configured using PPA devices supported by
AVIO. Failure to do so causes network connectivity to be lost even if the standby link is up.
6.2.13.9 Required HP Serviceguard Patches
To use Serviceguard to manage HP-UX guests, make sure the required patches are installed. For
more information, see Section 2.4 (page 27).
66
Guest Administration
6.2.13.10 Reenter Command to Start Packages
The procedure for configuring and starting guest packages includes the cmrunpkg command.
This command does not always work the first time you enter it. If the command does not start
the package, re-enter the command.
6.2.13.11 Do not Use Integrity VM Commands to Manage Distributed Guests
Guests configured as Serviceguard packages should be stopped and started using Serviceguard
package control commands. Do not use the Integrity VM commands (hpvmstart, hpvmstop,
and hpvmconsole) to start and stop these types of guests. For more information about using
Serviceguard to manage virtual machines, see the HP Integrity Virtual Machines 4.2: Installation,
Configuration, and Administration manual.
6.2.13.12 Different Cluster Nodes Report Virtual Machine Status Differently
Integrity VM commands can receive different warnings and errors from guests running on
different Serviceguard nodes. For example, the Serviceguard node that is starting a guest as part
of a package knows that the guest is running before any other nodes know. (The delay is usually
less than 10 seconds.) Commands that are run on different servers report different errors or
warnings depending on whether the guest is running or not.
6.2.13.13 Syslog Entries for cmcld Can Be Ignored
With Serviceguard and Integrity VM running, you might see the following types of message in
the syslog file:
Syslog entries - cmcld[XXXX]: Warning: cmcld process was unable to run for the last X.XX seconds
These messages can be ignored.
6.2.13.14 Using Integrity Virtual Machines Manager (VMMgr) to Manage Distributed Guests
The following situation might occur when you are using Insight Dynamics — VSE to manage
distributed guests (guests that are configured as Serviceguard packages):
• There is a guest configuration file for each guest on each VM Host. Therefore, when you
modify a distributed guest you must modify the guest on each VM Host that is a cluster
node.
6.2.14 Managing Guests using gWLM
Guests configured with processing power specified in cycles instead of percentage are
incompatible with gWLM A.02.50 and earlier versions.
If gWLM/Insight Dynamics — VSE produces an error message similar to the following, a guest
is configured with the processing power specified in cycles:
A VM encountered with no size
This is apparent when using gWLM A.02.50 with Integrity VM A.03.00. You can correct the
problem by modifying the guest and specifying processing power in percentage rather than CPU
cycles. For example, to modify the guest named compass1 to use 10% of the CPU processing
power, enter the following command
# hpvmmodify -P compass1 -e 10
You must boot the guest to initiate this setting for gWLM.
Alternatively, upgrade gWLM to A.03.00 for use with Integrity VM A.03.00.
6.2 Known Issues and Information
67
68
7 Networking Information
This chapter contains notes about configuring networks for virtual machines.
7.1 Changes and Issues in This Release
The following sections provide new networking information for the patch kit applied to the
V4.2.5 release.
7.1.1 AVIO LAN Driver on OpenVMS Guest Does Not Support Checksum Offloading
(CKO)
OpenVMS does not support checksum offloading. Turning on CKO on the physical device will
cause failure of communications in the following scenarios:
• VM Host to OpenVMS guest and OpenVMS guest to VM Host
• OpenVMS guest to a non-OpenVMS guest on the same VM Host
To workaround this problem, turn off the Checksum offloading in the VM Host interface driver
and restart the associated virtual switch. For example:
• Turn off the CKO on PPA 4 by entering this command on the VM Host:
# nwmgr -s -A tx_cko=off –c lan4
•
Restart the virtual switch by entering this command on the VM Host:
# hpvmnet -r -S switch1
This problem will be fixed in a future release.
For more information, see Section 7.2.20 (page 75).
7.2 Known Issues and Information
The following sections describe known issues and information from previous releases that still
apply to V4.2.5.
7.2.1 Configuring VLANs on Virtual Switches
The VLAN-backed vswitch feature (VBVsw) enables a virtual switch (vswitch) to be backed by
a physical network device with HP-UX VLAN (IEE 802.1Q) configured. The feature allows this
type of vswitch to function just like a vswitch that is bound to a physical interface or an aggregate.
Each VLAN backing the vswitch can be considered as a single network even though it is a discrete
logical LAN being managed by the VM Host.
On the VM Host, multiple VLAN interfaces can be configured on a guest LAN backed by VBVsw
type vswitch is created, the network traffic delivered to and from the guest is filtered using the
VLAN ID. Guest LANs backed to the same vswitch that has VLAN configured share the same
VLAN ID. Thus, these guest LANS can communicate with each other as if they were on the same
physical network.
For information about VLANs on HP-UX, see the HP-UX VLAN Administrator's Guide for HP-UX
11i v3 and Planning and Implementing VLANs with HP-UX manual.
7.2.1.1 Creating and Managing a vswitch with a VLAN Interface
To illustrate how to create and manage a vswitch with a VLAN interface, assume that your
system has physical and aggregate interfaces as shown by the following format:
Name/
Interface Station
SubInterface
Related
ClassInstance State
Address
system
Type
Interface
============== ========= ============== ======== ============== =========
7.1 Changes and Issues in This Release
69
lan0
lan1
lan2
lan3
lan900
lan901
lan902
lan903
lan904
UP
UP
UP
UP
UP
DOWN
DOWN
DOWN
DOWN
0x0017A4AB5461
0x0017A4AB5460
0x001A4B06E90A
0x001A4B06E90B
0x001A4B06E90B
0x000000000000
0x000000000000
0x000000000000
0x000000000000
igelan
igelan
iether
iether
hp_apa
hp_apa
hp_apa
hp_apa
hp_apa
1000Base-T
1000Base-T
1000Base-T
1000Base-T
hp_apa
hp_apa
hp_apa
hp_apa
hp_apa
lan900
To configure a PPA of the VLAN interface (VPPA) with a VLAN ID = 20 on the lan900 aggregate,
enter the following:
# nwmgr -a -S vlan -A vlanid-20, ppa=900
VLAN interface lan5000 successfully configured.
lan5000 current values:
VPPA = 5000
Related PPA = 900
VLAN ID = 20
VLAN Name = UNNAMED
Priority = 0
Priority Override Level = CONF_PRI
ToS = 0
ToS Override Level = IP_HEADER
VLAN
Interface
Name
=============
lan5000
Related
Interface
=========
lan900
VLAN
ID
Pri
Pri
ToS
Override
Level
===== ==== ========== ====
20
0
CONF_PRI
0
Tos
Name
Override
Level
========== ================
IP_HEADER UNNAMED
To create, boot and display a vswitch bound to VLAN lan5000, enter the following:
# hpvmnet -c -S vs5020 -n 5000
# hpvmnet -b -S vs5020
# hpvmnet -S vs5020
Name
Number State
Mode
NamePPA MAC Address
IPv4 Address
======== ====== ======= ========= ======== ============== ===============
vs5020
18 Up
Shared
lan5000
0x001a4b06e90b
[Port Configuration Details]
Port
Port
Port
Number State
Adaptor
======= ============ ========
1
Reserved
avio_lan
2
Reserved
avio_lan
3
Active
avio_lan
Untagged
VLANID
========
none
none
none
Number of
Active VM
Reserved VMs
============ ============
2
1
1
u03
Tagged
VLANIDs
=============
none
none
none
To enable the VLAN-backed vswitch (VBVsw) feature, HP-UX PHNE_40215 patch is required
on the VM Host. This patch is available as an individual patch or as part of "FEATURE11i" bundle.
To verify that the patch is installed, enter the following:
# swlist -l product | grep PHNE_40215
PHNE_40215
1.0
LAN cumulative patch
The dlpi_max_ub_promisc kernel tunable needs to be set to 16 when using a VBVsw type
vswitch. Otherwise, attempting to boot the vswitch fails with the following error message from
the hpvmnet command:
# hpvmnet -b -S vs5000
hpvmnetd: setup_downlink: promisc failed, recv_ack:
promisc_phys: UNIX error - Device busy, errno 5
To set the kernel tunable, enter the following:
# kctune dlpi_max_ub_promisc=16
7.2.2 AVIO LAN Devices Left Unclaimed by OpenVMS Guest if vswitch is Down at
Boot
If you boot an OpenVMS guest while the vswitch is not UP, AVIO interfaces associated with the
vswitch might not be claimed in the guest. For example, this issue might occur if the guest is
70
Networking Information
booted prior to booting the vswitch, or if the corresponding network interface on the VM Host
is not cabled during the guest boot time.
If you encounter this problem, perform the following steps:
1. Fix the vswitch state; that is, ensure that the hpvmnet command displays the vswitch state
as UP.
2. Once the vswitch is started, reboot the OpenVMS guest to get the AVIO LAN devices
recognized, which ensures that all the AVIO LAN interfaces that are configured through
this vswitch are recognized by the guest.
7.2.3 Known Limitation on OpenVMS Guests and HP-UX Guests Sharing the same
vswitch
If you configure an HP-UX guest and an OpenVMS guest with the same vswitch, the network
communication between these guests fail. This problem will be fixed in a future version of
OpenVMS.
To workaround this problem, configure the HP-UX guest and the OpenVMS guest with different
vswitches.
7.2.4 OpenVMS Guests Support vswitch-based VLAN Configuration and Not
Guest-based VLANs
AVIO LAN drivers on OpenVMS guests are VLAN tag-unaware and support vswitch-based a
VLAN configuration. Use the following command to configure VLAN for an OpenVMS guest:
# hpvmnet -S vswitch-name -u portid:portnum:vlanid:vlandid
See the HP Integrity Virtual Machines 4.2: Installation, Configuration, and Administration manual on
the BSC website, http://www.hp.com/go/virtualization-manuals.
7.2.5 Networking Interface Support for OpenVMS Guest
The OpenVMS guest supports the AVIO interface; however, Integrity VM commands allow you
to configure either AVIO or VIO devices to a guest, and these devices might not give any apparent
errors during the startup. VIO devices are not supported on OpenVMS guests.
7.2.6 AVIO Non-Physical Network vswitch (localnet) Restrictions
OpenVMS guests that are created (hpvmcreate) or modified (hpvmmodify) to add and use a
non-physical vswitch must use the same vswitch by name for each OpenVMS guest. The following
scenarios fail:
• Attempting to start an OpenVMS guest that is using two different localnet vswitches on the
same guest
• Using a different localnet vswitch than an already active OpenVMS guest is using
7.2.7 Location of AVIO Networking Driver for Linux and Windows Guests
AVIO networking driver for Linux and Windows are available in VMGuestSW bundle of Integrity
VM host software on the http://software.hp.com website. Go to this website, and search for the
VMGuestSW bundle.
7.2.8 Changing Network Device Type on Linux Guest
If you change the type of network device on a Linux guest, either from VIO to AVIO or AVIO
to VIO, follow these steps:
1. Specify the correct network driver associated with the device type in the /etc/
modprobe.conf file. For example, if the eth0 network device type is changing from VIO
to AVIO and the existing alias line reads alias eth0 e1000, change it to the following::
7.2 Known Issues and Information
71
alias eth0 lgssn
2.
Issue the depmod -a command to inform the kernel of the device type change. After you
issue the command, you should see the following (or similar) line in modules.dep file:
/lib/modules/2.6.9-55.EL/kernel/drivers/net/lgssn/lgssn.ko:
For example:
# grep lgssn /lib/modules/2.6.9-42.EL/modules.dep
/lib/modules/2.6.9-42.EL/kernel/drivers/net/lgssn/lgssn.ko:
These two steps enable automatic loading of the AVIO Linux LAN guest driver (lgssn) at boot
time.
7.2.9 Using Network Time Protocol (NTP) in Integrity VM Environments
Using NTP in Integrity VM environments is recommended to keep time-of-day clocks in sync
and correct. Use xntpd on HP-UX and ntpd on Linux to synchronize time use NTP.
NTP Configuration on a VM Host
On each VM Host, NTP should be configured just as it would be on any typical (non-virtual)
system. In /etc/ntp.conf, specify a drift file and one or more high quality time servers:
driftfile /etc/ntp.drift
server <A-HIGH-QUALITY-TIME-SERVER> prefer # a preferred time source
server <ANOTHER-HIGH-QUALITY-TIME-SERVER> # a backup time source
server <YET-ANOTHER-HIGH-QUALITY-TIME-SERVER>
The local clock should also be configured as a fall back if necessary:
server 127.127.1.0
fudge 127.127.1.0 stratum 10
# use local clock as backup
# show poor quality
If you have a group of VM Hosts that you would like to synchronize, you can add "peer" references
in the /etc/ntp.conf file for each of those associated VM Hosts, so they will do mutual
synchronization:
peer <AN-ASSOCIATED-VM-HOST>
peer <ANOTHER-ASSOCIATED-VM-HOST>
peer <YET-ANOTHER-ASSOCIATED-VM-HOST>
After configuring the Host's /etc/ntp.conf file, assuming the NTP is already enabled, (that
is, the XNTPD variable in /etc/rc.config.d/netdaemons is set to 1, as in export XNTPD-1),
you can execute /sbin/init.d/xntpd start to restart xntpd on the HP-UX VM Host.
NTP Configuration on a VM Guest
Because NTP was not designed to run inside a virtual machine, using NTP on VM guests requires
special configuration to be stable. Using a typical default NTP configuration on a VM guest might
result in NTP instability and failure to synchronize, or in apparent lost time on the guest. To
avoid these virtualization related NTP issues, each VM guest should get its time directly from
the VM Host. Also, VM guests should not serve time to any other systems.
You can monitor NTP status by using the ntpq -p command and noting the offset and the disp
values. Ideally both values will be well under 100. For information about how to check NTP
stability, see the HP-UX Internet Services Administrators Guide.
You can improve time stability on VM guests by tuning NTP to poll more frequently for time
corrections. The default NTP values for the minpoll and maxpoll intervals are 6 (64 seconds) and
10 (1024 seconds) respectively. NTP adjusts the current polling interval depending on network
quality and delays. A VM guest uses a virtual lan that can cause NTP to set the polling value
incorrectly. To help mitigate this issue use the minpoll and maxpoll directives in the ntp.conf
file to change the polling intervals.
Start with minpoll at 4 (16 seconds) and maxpoll at 6 (64 seconds) and then reduce maxpoll
towards 4 if necessary to force shorter polling intervals. HP recommends that a VM guest never
72
Networking Information
be allowed to deliver time (allow guests to be a time consumers). Because a VM guest never
delivers time, you do not need to configure the local clock (server 127.127.1.0) or an ntp.drift
file. So, the ntp.conf file on a VM guest should be as simple as the single line:
server <VM-HOST-SERVER-NAME> minpoll 4 maxpoll 6
After configuring the guest's /etc/ntp.conf file, assuming NTP is already enabled (that is,
the XNTPD variable in /etc/rc.config.d/netdaemons is set to 1, as in export XNTPD=1),
you can run the following commands on an HP-UX guest to sync its time with the VM Host and
restart xntpd:
/sbin/init.d/xntpd stop
/usr/sbin/ntpdate -b <VM-HOST-SERVER-NAME>
/sbin/init.d/xntpd start
NOTE: For VM guests that are on a different subnet than the VM Host, the VM Host may not
be the best source of time if there is another accurate time server available with less network
latency. In the case of different subnets, measure latency from the guest to various time servers
using the ping and traceroute commands to determine which potential time server has the
least network latency. Using the VM Host may be the best solution, but this depends on your
local network topology and the relative network distance to alternate time servers. If using an
alternate (non-VM-Host) time server appears best, it may be helpful for the alternate time server
and the VM Host to use each other for peer mutual time synchronization.
7.2.10 Supported Adapters
Integrity VM supports those adapters that are of Ethernet or the IEEE 802.3 CSMA/CD network.
Note that AVIO interfaces are supported by a select set of Ethernet host NICs. The following
Ethernet cards are supported with AVIO on HP-UX guests:
• A6794A — Core
• A6825A — Core
• A7109A — Core
• A6847A — Add-in
• AB465A — Combo Add-in
• A9782A — Combo Add-in
• A9784A — Combo Add-in
• AB352 — Core
• AB545A — Networking Add-in
• A7011A — Networking Add-in
• A7012A — Networking Add-in
• AB290A — Combo Add-in
• AB287A — Add-in (10GbE)
• AD331A — Add-in
• AD332A — Add-in
• AD193A — Combo Add-in
• AD194A — Combo Add-in
• AD221A — Add-in
• AD222A — Add-in
• AD337A — Add-in
• AD338A — Add-in
• AD339A — Add-in
• AD385A — Add-in (10GbE)
• AD386A — Add-in (10GbE)
7.2 Known Issues and Information
73
•
•
NC360m — C-class Mezz card
NC364m — C-class Mezz card
7.2.11 Calculating the Actual Utilization of the Virtual Network Card
The emulation of the virtual network I/O card is based on the Intel I8254X family. Thus, the
virtual network card (vNIC) is presented to the guest operating system as PCI-X 1000Base-T with
the speed of 1 Gb regardless of the physical network interface card backing the vswitch. This
emulation could lead to an incorrect calculation of vNIC performance by some network
performance applications on the guest. For example, on a Windows guests, the Task Manager
—> Network Performance display shows 1 Gb utilization. All calculations on the Windows
utilization are then based upon this value rather than the speed of the backing device on the VM
Host.
To accurately calculate vNIC performance, take into consideration the speed of the backing
device on the Integrity VM Host.
7.2.12 Using IP Alias Addresses in the Guest Not Supported for IPv4 or IPv6
Integrity VM Version 4.1 does not support the use of IP alias addressing in the guest for either
IPv4 or IPv6.
7.2.13 Sufficient Memory for Guests with Virtual LAN Devices
If the guest is configured with a number of virtual LAN devices and the guest does not have
sufficient memory, some of the devices could be missing after the guest is booted. To resolve
this issue, increase the size of guest memory with the hpvmmodify -r command.
For more information, see Section 4.2 (page 42).
7.2.14 Vswitches Are Always in SHARED Mode
The hpvmnet command displays the status of the vswitches, including the mode. The vswitches
are always in SHARED mode. No other modes are supported at this time.
7.2.15 Do Not Use the HP A5506B PCI 10/100Base-TX 4 Port Interface for Virtual
Networking
Host to guest connectivity might not be reliable when using the HP A5506B PCI 10/100Base-TX
4 Port interface for guest networking.
7.2.16 Integrity VM V4.1 Does not Support Gelan Drivers
Gelan drivers are not supported with Integrity VM Version 4.1 and later.
7.2.17 MAC Address Validation Can Be Enhanced
When you add a virtual NIC to your guest, Integrity VM checks to make sure the MAC address
is unique.
By default, Integrity VM makes three attempts (each with a one-second timeout) to determine
the validity of the MAC address for the virtual NIC. This process can result in up to ten seconds
of delay for each defined virtual NIC. To speed up this processing, add the following tunable to
the /etc/rc.config.d/hpvmconf configuration file:
HPVMMACADDRFRAMES=n
Where n is the number of attempts (1 to 30). The default is 3. A value of 1 or 2 increases
performance at the risk of missing a response from a slow NIC.
74
Networking Information
You can set the HPVMMACADDRFRAMES tunable to zero (0), which completely eliminates the MAC
address verification. However, HP recommends that you do so after you configure all of your
guests and confirm that there are no conflicts with MAC addresses in your network environment.
To boost virtual network performance, create additional vswitches and allocate them across
guests.
7.2.18 Auto Port Aggregation (APA) is Supported on the VM Host, Not on the Guest
Integrity VM does not support running APA on a guest. You can run APA on the VM Host.
APA can be configured on the VM Host to provide a highly available LAN for the vswitch (APA
in active/passive mode) or to increase the bandwidth of the vswitch LAN (APA active/active
mode). Before you stop APA, use the hpvmnet -h command to halt the vswitch. If you do not
halt the vswitch first, the hpvmnet command reports an incorrect MAC address for the vswitch.
7.2.19 Do Not Run Applications that Set Network Devices into Promiscuous Mode
Vswitches must not be connected to network devices that are set to promiscuous mode. Do not
run applications like tcpdump on the VM Host on interfaces that are used for virtual switches.
7.2.20 Guest and Host Communication
Checksum offloading (CKO) is not supported. On most of the physical interfaces that are not of
10 Gigabyte type, CKO is turned off by default. Consult your interface card documentation for
details.
Turning on CKO can cause host-to-guest connections as well as guest-to-host communication
over a VLAN to fail. If you are receiving failures with host-to-guest connections or guest-to-host
communication using a VLAN, ensure that the CKO is turned off in the host interface driver. If
that does not fix the problem, reboot the vswitch.
To turn off the CKO on the VM Host, identify the PPA of the network interface for the vswitch
using the hpvmnet command. For example:
# hpvmnet
Name Number State Mode PPA MAC Address IP Address
======== ====== ======= ========= ====== ============== ===============
localnet 21 Up Shared N/A N/A
vmlan0 22 Up Shared lan0 0x00306ea72c0d 15.13.114.205
vmlan4 23 Up Shared lan4 0x00127942fce3 192.1.2.205
vmlan900 24 Up Shared lan900 0x00306e39815a 192.1.4.205
NOTE: The lanadmin command is deprecated and will be removed in a future HP-UX release.
HP recommends that you use the nwmgr command to perform all network interface-related
tasks.
The following table shows the nwmgr command that performs the same task as the lanadmin
command:
Task
nwmgr Command
Legacy Command
Check the status of the transmit CKO. # lanadmin -x cko 4
Hardware TCP/UDP (IPv4)
transmit checksum offload
is currently enabled.
Hardware TCP/UDP (IPv4)
receive checksum offload is
currently disabled.
# nwmgr -g -A all -c lan4 |
grep Checksum
Transmit Checksum Offload=Off
Receive Checksum Offload=On
7.2 Known Issues and Information
75
In this example, the VLANs are configured over the vswitch vmlan4. This vswitch is created on
PPA 4 on the VM Host.
The following table shows the nwmgr command that performs the task as the lanadmin
command:
Task
Legacy Command
nwmgr Command
Turn off CKO on PPA 4 by entering
this command on the VM Host.
# lanadmin -X send_cko_off
4
Hardware TCP/UDP (IPv4)
transmit checksum offload
is currently disabled.
# nwmgr -s -A tx_cko=off -c
4
lan2 current values:
Transmit Checksum Offload=Off
7.2.21 Do Not Turn on TSO on the VM Host and on HP-UX Guests When Using VIO
TCP Segmentation Offload (TSO) is turned off by default in HP-UX. HP recommends that you
leave it turned off on both the VM Host system and on HP-UX guests if you are using the VIO
interface. This applies to both the virtual network interface cards in the guest and any physical
network interface cards in the VM Host that are used by vswitches. When TSO is enabled, guest
networks are interrupted.
Note that this restriction applies to VIO interfaces.
NOTE: The lanadmin command is deprecated and will be removed in a future HP-UX release.
HP recommends that you use the nwmgr command to perform all network interface-related
tasks.
The following table shows the comparable nwmgr command to use to replace the lanadmin
command:
Task
Legacy Command
Verify whether TSO is turned on. n # lanadmin -x vmtu n
is the VM Host interface, as displayed
by the hpvmnet command.
nwmgr Command
# nwmgr -g -A vmtu -c lann
Verify that TSO is on for lan0.
# lanadmin -x vmtu 0
# nwmgr -g -A vmtu -c lan0
Driver/Hardware supports TCP lan0 current values:
Segmentation Offload,
Virtual MTU = 32160
Current VMTU = 32160
TCP Segmentation Offload
is now disabled.
Turn TSO off on lan0.
# lanadmin -X vmtu 0 0
Virtual MTU is set to 0
# nwmgr -s -A vmtu=0 -c lan0
lano current values:
New Virtual MTU=0
Allow the TSO attribute change along
with the rest of the lan attributes to
be perserved between system reboots
by saving the current attributes to the
lan configuration file.
Manually edit the configuration file
in /etc/rc.config.d, or use SAM
interface. See the Ethernet Support
Guide for details.
# nwmgr -s -c lan0 -A all
--sa -fr cu
7.2.22 Restarting Vswitches
It is necessary to restart the vswitch when:
• You replace the physical network card associated with the vswitch.
• You change a VM Host IP address associated with the vswitch's network interface card.
76
Networking Information
•
•
You change the network interface characteristics on the VM Host; for example, by using the
nwmgr command to change checksum offloading (CKO).
You notice that there is no communication from an avio_lan interface to a lan interface
after booting the guest(s) while the vswitch is down.
For information about how to restart vswitches, see the HP Integrity Virtual Machines 4.2:
Installation, Configuration, and Administration manual.
When you restart a vswitch, it is not necessary to restart the guests using the vswitch.
7.2.23 Guest AVIO Interface Behavior
The following list describes the guest AVIO interface behavior when guest boots while vswitch
is down or resetting:
•
•
•
If you boot a guest while the vswitch is not up, AVIO interfaces associated with the vswitch
might not be claimed in the guest. For example, this might occur if the guest is booted prior
to booting the vswitch or if the corresponding network interface on the VM Host is not
cabled. If you encounter this problem, first fix the vswitch state (that is, ensure that hpvmnet
displays its state as Up), and then execute the ioscan command in the guest. These actions
will claim the AVIO interfaces.
After ioscan claims the AVIO devices in the guest, you might notice that the AVIO devices
cannot communicate with another VIO guest interface configured on the same vswitch.
When this occurs, invoke the hpvmnet -r option on the vswitch to restore connectivity.
If the vswitch is in an unstable state while the guest is booting, guest AVIO interfaces might
fail initialization and move to the DOWN state (as displayed by thelanscan command).
When this occurs, first ensure that the vswitch enters a stable state, then reset the guest
interface using nwmgr.
7.2.24 AVIO LAN Devices Not Claimed by Guest with DOWN vswitch at Boot Time
In addition to running ioscan, you must re-run the necessary network startup scripts, so that
IP addresses can be reconfigured on the network interface cards (NICs). For example:
/sbin/rc2.d/S340net start
/sbin/rc2.d/S340net-ipv6 start
7.2.25 Do Not Use TCP Software Packet Reassembly in IGSSN Driver
For AVIO, there have been problems with TCP Software Packet reassembly in the igssn driver
in a guest HP-UX image. For this release, do not enable it on a guest. By default, software packet
reassembly (known with acronyms as drv_pr for driver packet reassembly) is enabled in igssn
in the guest.
To determine if drv_pr is enabled, an administrator can execute the following command:
lanadmin -x drv_pr ppa
where ppa is the Card instance # (Crd in#) from lanscan.
To manually disable drv_pr, an administrator can execute the following command:
lanadmin -X drv_pr_off ppa
To manually enable drv_pr, an administrator can execute the following command:
lanadmin -X drv_pr_on ppa
7.2 Known Issues and Information
77
NOTE: These change are not carried over to subsequent reboots of the system. To maintain the
configuration over reboots of the guest, the administrator must edit the guest file, /etc/
rc.config.d/hpigssnconf.
For each igssn device that must have drv_pr disabled, you must construct a block of information
in the hpigssnconf file. For example, if your guest needed to have both lan0 and lan3 disable
drv_pr, you might have:
HP_IGSSN_INTERFACE_NAME[0]=lan0
HP_IGSSN_STATION_ADDRESS[0]=
HP_IGSSN_MTU[0]=
HP_IGSSN_DRV_PR[0]=0
HP_IGSSN_INTERFACE_NAME[3]=lan3
HP_IGSSN_STATION_ADDRESS[3]=
HP_IGSSN_MTU[3]=
HP_IGSSN_DRV_PR[3]=0
7.2.26 Other Issues and Notes
The following list provides additional issues with the Integrity VM V4.2.5 release of which you
should be aware :
•
•
•
78
If you modify the MAC address of an interface in the guest, the hpvmstatus command
in the VM Host does not display the current MAC address correctly. There is no fix or
workaround for this problem at this time.
Just as with physical devices on a network, for communication to occur uninterrupted
between all stations on a LAN segment, the MTUs of all the systems on the LAN segment
or VLAN must match, whether they are physical systems or guests. The VM Host does not
check for MTU mismatches for its guests.
The lanadmin card specific options that are supported on igssn on the guest are:
— -x:speed,fctrl,cko,type,card_info,stats drv,vmtu,and drv_pr.
— -X:drv_pr_on,drv_pr_off,stats clear
Networking Information
8 Storage Information
This chapter contains information about storage devices used as backing stores for guest virtual
devices.
8.1 Changes and Issues in This Release
There are no new storage issues in the V4.2.5 release.
8.2 Known Issues and Information
The following sections describe known issues and information from previous releases that still
apply to V4.2.5.
8.2.1 Storage Interface Support for OpenVMS Guests
The OpenVMS guest supports the AVIO interface, however, Integrity VM commands allow you
to configure both AVIO and VIO devices to a guest. These VIO devices might not give any
apparent errors during the startup. VIO devices are not supported on OpenVMS guests.
8.2.2 Slow VM Host Storage Might Result in HP-UX MPT Spinlock Timeout
If the VM Host storage used by a virtual MPT adapter is slow due to hardware problems or
heavy I/O loads, the following HP-UX spinlock timeout might occur inside an HP-UX guest:
============== EVENT ============================ = Event #0 is CT_PANIC on CPU #2; = p crash_event_t
0xe000000100385000 = p rpb_t 0xe0000001011e4ff0 ============== EVENT ============================
RR0=0x00800831 RR1=0x00000831 RR2=0x02cd0031 RR3=0x02450031
RR4=0x03450031 RR5=0x00ffff31 RR6=0x07ff8031 RR7=0x00dead31
BSP
SP
IP
0xe000000200024810 0xe0000002000434f0 0xe000000001f3d7c0 panic+0x410
0xe0000002000247b8 0xe000000200043500 0xe000000001fa8320 too_much_time+0x380
pdk_spinlock.c:1619 wait_for_lock_spinner(inlined)
0xe0000002000246b8 0xe000000200043500 0xe000000000de4c80 wait_for_lock+0x670 0xe000000200024680 0xe000000200043570
0xe000000000d7d820 spinlock+0xe0
0xe000000200024628 0xe000000200043570 0xe000000000c61de0 fw_lock_acq+0x70
0xe0000002000245b8 0xe000000200043570 0xe000000000c61be0 sal_proc_real+0x100
0xe000000200024588 0xe000000200043570 0xe0000000012ef860 cec_cfg_inX+0xd0 0xe000000200024560 0xe000000200043570
0xe000000001306650 cec_cfg_in16+0x30
0xe000000200024538 0xe000000200043570 0xe00000000158d0a0 gh2p_rd_cfg_w+0x60
0xe000000200024508 0xe000000200043570 0xe0000000021d3f10 wsio_cfg_in16+0x70
BSP
SP
IP
0xe000000200024460 0xe000000200043570 0xe00000012f7313a0 mpt:mpt_handle_chip_fault+0xe0
0xe0000002000243e8 0xe000000200043580 0xe00000012f730fe0 mpt:mpt_ch_task_mgmt+0x540
0xe0000002000243a8 0xe0000002000437b0 0xe00000012f7a0e20 mpt:$cold_mpt_io_active+0x540
0xe000000200024388 0xe0000002000437b0 0xe00000012f76b9b0 mpt:mpt_handle_address_reply+0x210
0xe0000002000242c8 0xe0000002000437b0 0xe00000012f76cd00 mpt:mpt_isr+0xa00
BSP
SP
IP
0xe000000200024298 0xe0000002000437c0 0xe000000000eb2ca0 sapic_interrupt+0x60
0xe0000002000241b8 0xe0000002000437c0 0xe000000000eb1e20 external_interrupt+0x4b0 0xe000000200024190
0xe0000002000437f0 0xe000000001d9a780 bubbleup+0x880
+------------- TRAP ---------------------------| External Interrupt in KERNEL mode
|
IIP=0xe000000000d7d910:1
| p struct save_state 0xdead31.0xe000000200043800
+------------- TRAP ---------------------------0xe000000200024170 0xe000000200043b90 0xe000000000d7d911 spinunlock+0x51
pm_swtch.c:3829 idle_drop_spu_state_locks(inlined)
0xe000000200024000 0xe000000200043b90 0xe000000000e6dc10 idle+0x1a50
Converting the guest's virtual MPT adapters to AVIO storage adapters prevents this spinlock
timeout.
8.2.3 HostAVIOStor and GuestAVIOStor Changes
The following changes have been made to HostAVIOStor and GuestAVIOstor drivers:
• The HostAVIOStor version for HP–UX 11i v3 1003 is B.11.31.1003.
• The GuestAVIOStor version for HP–UX 11i v3 1003 is B.11.31.1003.
• The HP–UX 11i v3 1003 HostAVIOStor has a dependency on the PHKL_40383 ESCSI Services
patch.
• The following fixes are included in the HostAVIOStor version HP-UX 11i v3 1003:
8.1 Changes and Issues in This Release
79
—
—
•
If the LV or file backing store file name is 55 characters long and the guest is a HP-UX
11i v3 guest, guest panic or disk dsf name change is seen on subsequent guest reboots.
When guest storage applications (for example, dd, diskinfo, and so on) attempt to access
a device special file, an “Invalid argument” error might be returned. This problem is
seen on HP-UX 11i v2 and HP-UX 11i v3 guests with GuestAVIOStor versions earlier
than 11.23.0903 and 11.31.0903 respectively. In this case, the HostAVIOStor version is
11.31.0903 or 11.31.0909.
The following fixes are included in the GuestAVIOStor version HP–UX 11i v3 1003 driver:
— Unload of HP-UX 11 v3 guest AVIO driver (gvsd) might cause guest to panic.
— When HP-UX 11i v3 guest was cold installed, DSF name changed after HBA migration
between VIO and AVIO
— The scripts, avio-vio and the gvsd-conf were delivered incorrectly on the HP-UX
11i v3 guest.
8.2.4 GuestAVIOStor HBA Driver (gvsd) DLKM
The GuestAVIOStor HBA driver (gvsd) DLKM supports dynamic loading and unloading of the
driver starting with version B.11.31.0903.01 and the B.11.31.0903 version of the HostAVIOStor
HBA driver.
8.2.5 Agile DSFs Change in HP-UX 11i v3 Guest When Migrating Disks Between
scsi and avio_stor
GuestAVIOStor version B.11.31.0810 or higher version fixes the change of agile device names in
the guest OS when HBA is migrated between scsi (VIO) and AVIO storage. Follow these steps
while changing the configuration of a guest HBA between VIO and AVIO. This is to ensure that
agile disk device files under the modified HBA remain the same. If individual devices are moved
between AVIO and VIO using hpvmmodify delete and add, the agile device name will change.
The old device name can be restored using scsimgr or the affected applications modified to
use the new device name. Perform the following steps:
•
•
•
•
Boot the guest with the GuestAVIOStor 11.31.0810 depot. (This step is required even if you
do not have any AVIO devices configured.)
Shut down the guest gracefully using the shutdown(1m)command.
Migrate the HBA from VIO to AVIO (or AVIO to VIO) using the hpvmmodify command.
Boot the guest and verify that all the agile device files are as expected.
The following messages might appear on the guest console during the first boot after a scsi
hba has been changed to avio_stor hba. The LVM error messages are harmless. Use the
lvlnboot –R command to fix the boot information on the root logical volume and eliminate
these boot-time messages:
LVM: Failure in attaching PV (dev=0x3000006) to the root volume group.
The physical volume does not exist, or is not configured in the kernel.
LVM: Activation of root volume group failed
Quorum not present, or some physical volume(s) are missing.
LVM: Scanning for Root VG PVs (VGID 0xef4fbb14 0x48acd569)
LVM: Rootvgscan detected 1 PV(s). Will attempt root VG activation using
the following PV(s):
0x3000003
LVM: Root VG activated
Swap device table: (start & size given in 512-byte blocks)
entry 0 - major is 64, minor is 0x2; start = 0, size = 4194304 Checking root file system.
file system is clean - log replay is not required Root check done.
Create STCP device files
:
:
GuestAVIOStor: Instance numbers for AVIO/VIO disks fixed due to HBA type changes.
GuestAVIOStor: Refer to /etc/opt/gvsd/files//gvsd.log for details.
80
Storage Information
8.2.6 Agile Device Name Recommendations
The Integrity VM commands supports mass storage agile device names. Use of agile device
names (with the exception of attached devices using avio_stor, which uses the hardware path)
for configuring storage devices is highly recommended as it provides VM Host multipathing
benefits.
8.2.7 Configuration Limits
A guest can have up to 158 LUNs — 128 AVIO and 30 VIO. A guest can have a maximum of 30
file backing stores, including both AVIO and VIO.
8.2.8 Using USB CD/DVD Devices
With VIO (scsi adapter type), USB CD/DVD devices are not supported for use as attachable
media. AVIO (avio_stor adapter type) supports USB 2.0 DVD burners. Hardware supportability
requirements for Integrity VM are described in the HP Integrity Virtual Machines Installation,
Configuration, and Administration manual.
To identify USB CD/DVD devices, use the ioscan -fun command.
NOTE: Because Integrity VM may do four to six calls to open() on a DVD when accessing it,
and hpvmcreate or hpvmmodify command might take more than a minute to complete when
there is no media in the drive. Example commands that could appear to hang are:
#
#
#
#
hpvmcreate
hpvmcreate
hpvmmodify
hpvmmodify
-P
-P
-P
-P
guest
guest
guest
guest
-a
-a
-a
-a
dvd:scsi::disk:/dev/rdisk/disk5
dvd:scsi::null:/dev/rdisk/disk5
dvd:scsi::disk:/dev/rdisk/disk5
dvd:scsi::null:/dev/rdisk/disk5
8.2.9 The sam Command might Display Incorrect Number of Disks and Paths on an
HP-UX 11i v2 Guest
The number of disks displayed by the sam command using “Sam Areas->Disks and File
Systems->Disk Devices” might be incorrect. The number of paths displayed for a device might
also be incorrect. This problem exists on disks configured under both SCSI and AVIO storage
adapters. ioscan displays all the disks correctly.
For example, the following are the sam output and theioscan output on the same HP-UX 11i
v2 guest:
"Disk Devices" window in sam(1M) shows the following disks and number of paths:
xxxxxxxxxxxxxxxxxxxxxxxxxxxxxxxxxxxxxxxxxxxxxxxxxxxxxxxxxxxxxxxxxxxxxxxxxxxxxxxx
xDisk Devices
0 of 8 selectedx
xxxxxxxxxxxxxxxxxxxxxxxxxxxxxxxxxxxxxxxxxxxxxxxxxxxxxxxxxxxxxxxxxxxxxxxxxxxxxxxx
x Hardware
Number
Volume
Total
x
x Path
of Paths
Use
Group
Mbytes
Description
x
xxxxxxxxxxxxxxxxxxxxxxxxxxxxxxxxxxxxxxxxxxxxxxxxxxxxxxxxxxxxxxxxxxxxxxxxxxxxxxxx
xx 0/0/2/0.0.0
2
VxFS/Swap
-70007
HP
Virtual
x
xx 0/0/5/0.0.0
1
Unused
-69504
HP
Virtual
x
xx 0/0/5/0.1.0
2
Unused
-70007
HP
Virtual
x
xx 0/0/5/0.2.0
2
Unused
-70007
HP
Virtual
x
xx 0/0/6/0.3.0
1
Unused
-70007
HP
Virtual
x
xx 0/0/6/0.4.0
1
Unused
-70007
HP
Virtual
x
"ioscan -kfnC disk" shows the following disks:
Class
I H/W Path
Driver S/W State
H/W Type
Description
=======================================================================
disk
15 0/0/2/0.0.0 sdisk
CLAIMED
DEVICE
HP
Virtual Disk
/dev/dsk/c0t0d0
/dev/rdsk/c0t0d0
/dev/dsk/c0t0d0s1
/dev/rdsk/c0t0d0s1
/dev/dsk/c0t0d0s2
/dev/rdsk/c0t0d0s2
8.2 Known Issues and Information
81
disk
disk
adisk
disk
disk
disk
disk
disk
/dev/dsk/c0t0d0s3
sdisk
CLAIMED
/dev/dsk/c3t0d0
18 0/0/5/0.1.0 sdisk
CLAIMED
/dev/dsk/c3t1d0
20 0/0/5/0.2.0 sdisk
CLAIMED
/dev/dsk/c3t2d0
17 0/0/6/0.0.0 sdisk
CLAIMED
/dev/dsk/c4t0d0
19 0/0/6/0.1.0 sdisk
CLAIMED
/dev/dsk/c4t1d0
21 0/0/6/0.2.0 sdisk
CLAIMED
/dev/dsk/c4t2d0
23 0/0/6/0.3.0 sdisk
CLAIMED
/dev/dsk/c4t3d0
25 0/0/6/0.4.0 sdisk
CLAIMED
/dev/dsk/c4t4d0
16
0/0/5/0.0.0
/dev/rdsk/c0t0d0s3
DEVICE
HP
/dev/rdsk/c3t0d0
DEVICE
HP
/dev/rdsk/c3t1d0
DEVICE
HP
/dev/rdsk/c3t2d0
DEVICE
HP
/dev/rdsk/c4t0d0
DEVICE
HP
/dev/rdsk/c4t1d0
DEVICE
HP
/dev/rdsk/c4t2d0
DEVICE
HP
/dev/rdsk/c4t3d0
DEVICE
HP
/dev/rdsk/c4t4d0
Virtual Disk
Virtual Disk
Virtual Disk
Virtual Disk
Virtual Disk
Virtual Disk
Virtual Disk
Virtual Disk
Workaround: Use the System Management Homepage (SMH) to configure the devices.
8.2.10 Crash Dump Collection Might Fail for HP-UX Guests with Attached I/O Devices
(VIO)
HP-UX guest OS crash might fail to save a crash dump with the following console message:
Error: can't open first dump device /dev/dsk/c0t0d0. Dump aborted.
INIT[0]: OS_INIT ends. Resetting the system
This problem is caused by the HP-UX MPT dump driver in the guest waiting 1 second for a bus
reset to finish. If there is an attached tape or changer sharing the same virtual MPT adapter as
the guest boot disk, the reset time of that attached tape or changer might exceed the 1 second
timeout, resulting in the error message above.
To avoid this problem on HP-UX 11i v2 0505–0706 or HP-UX 11i v3 guests, make sure the guest
boot disk and any attached tape or changer do not share the same virtual MPT adapter. For
information about how to specify bus and device numbers to place the tapes or changers on a
separate MPT adapter than the guest boot disk, see the hpvmresources manpage or the HP Integrity
Virtual Machines Installation, Configuration, and Administration.
For HP-UX 11i v2 0712, HP-UX 11i v3 0803, and all later supported HP-UX guest releases, make
sure the HPVM-Guest depot is installed. The HPVM-Guest depot adjusts the MPT dump reset
timeout allowing for tape and changers to be placed on the same virtual MPT adapter as the boot
disk.
8.2.11 DMP Files Not Supported as Backing Stores
Veritas VxVM DMP device files (files under /dev/vx/rdmp/) are not supported by Symantec
for whole disk backing stores for virtual machines.
8.2.12 Assigning a Null Device to a Resource
When assigning a null device to a resource on a virtual machine, the file name serves as a
placeholder. Therefore, if the file does not exist, you will not receive an error message. For
example, the following command string will not produce an error message if the file XXXX.iso
does not exist:
hpvmmodify -P vm1 -a disk:scsi::null:/opt/XXXX.iso
8.2.13 Integrity VM Does Not Honor File Permissions on Backing Stores
File permission settings do not affect the way Integrity VM accesses backing stores. Backing
stores provided as virtual disks can be written to regardless of the file permission settings on
the backing store. A backing store provided as a virtual DVD is always read-. Attached devices
do not consider file permissions when backing up data.
82
Storage Information
8.2.14 The hpvmmodify Command Fails to Change a DVD
The hpvmmodify command might fail to change a Virtual FileDVD if the device has already
been modified by the virtual console. The hpvmstatus command displays the current status of
the Virtual FileDVD, which might not be in its original resource state. To see the original resource
statement, which is required by the hpvmmodify command to change a Virtual FileDVD, use
the hpvmstatus —D command.
8.2.15 Virtual FileDVD Reverts to Original Resource Statement
A Virtual FileDVD reverts to its original resource statement when the guest shuts down or
reboots. Therefore, after you install a guest from multiple CDs or DVDs, you must reload the
Virtual FileDVD when the guest reboots to complete the installation. Stop the automatic EFI
reboot and insert the CD/DVD using the appropriate IN and EJ commands. When the media is
loaded, proceed with the installation.
8.2.16 Physical Device null Assigned to Nonexistent Path
Devices with physical storage type null might be given device path specifiers that do not exist.
This problem does not prevent guests from starting. In previous versions of Integrity VM, the
guest does not start if the device path for a null physical storage type device does not exist as a
real device, file, or directory.
8.2.17 Using sam on Guest Cannot Initialize Disk
When you create a file system using the sam command on an HP-UX guest, do not initialize the
disk. This option returns an error and the file system is not created.
8.2.18 Extending SCSI Whole Disk Backing Stores
On the VM Host, do not extend a logical volume (LVM or VxVM) used as a backing store for a
guest root disk. If you do this, the guest panics on its next reboot with the following error:
System panic: all VFS_MOUNTROOTs failed: Need DRIVERS.
The guest should be able to boot if the logical volume is reverted (using lvreduce in case of LVM)
to its original size. If this fails, the guest root device has been corrupted, and the guest operating
system must be reinstalled.
An AVIO logical volume backing store not used as a root disk can be extended while the guest
is online. For HP-UX 11i v3 guests using AVIO, the guest is notified of the increased size of the
backing store for logical volumes as well as raw disks, and the guest can take the appropriate
actions to use the larger size.
For a SCSI logical volume used as a backing store for a guest data disk, you can extend the volume
after removing it from the guest using the hpvmmodify command. After extending the volume,
use the hpvmmodify command to add the volume to the guest. Do not modify a logical volume
used as a backing store without first removing it from the guest.
After you extend the logical volume, use operating system commands on the guest to extend its
file system.
8.2.19 Virtual SCSI (VIO) Device Limitations
Although SCSI devices appear to a guest as Ultra320 SCSI controllers claimed by the MPT driver,
this is an emulation. There are several differences from using a real device. Specifically:
• You cannot upload or download firmware for emulated devices.
• Although HP-UX commands such as mptutil(1M) and mptconfig(1M) do not fail when run
in a guest, they do not always return the same information as they would when referencing
a physical device.
• The EFI drvcfg command does not fail when run in a guest, but it returns no useful data.
8.2 Known Issues and Information
83
8.2.20 AVIO Limitations
The following sections describe the current limitations using AVIO.
8.2.20.1 iSCSI-Based Backing Stores Not Supported with Physical Volumes Under Certain
Circumstances
iSCSI-based backing stores are not supported with a physical volume under a logical volume
that is then exposed to guests as a virtual disk using AVIO.
8.2.20.2 iSCSI-Based Backing Stores with AVIO Require Host AVIOstor B.11.31.1009.01
If you plan to use the iSCSI-based backing stores with AVIO, you must install the HostAVIOstor
B.11.31.1009.01 driver on the VM Host.
8.2.20.3 Modifying the Storage Adapter from scsi to avio_stor
If you attempt to modify a storage adapter from scsi to avio_stor on a port for a running
guest, the hpvmmodify command allows the change, but the change lasts until the next guest
startup. In addition, the hpvmnet command displays incorrect port information for the currently
running guest until the guest is stopped and restarted.
8.2.20.4 GuestAVIOStor Bundle not Installed but AVIO Storage Device is Configured
If the GuestAVIOStor bundle is not installed on the HP-UX guest, any configured AVIO Stor
HBAs will not be claimed in the guest, and the LUNs configured under the AVIO Stor HBAs
will not be accessible. If the LUN is a boot disk, boot will fail with a panic indicating missing
drivers.
8.2.20.5 Longer Failure Reporting Time for AVIO Devices on 11i v2 Guests
If a backing store is not responsive due to device errors, it might take up to 30 seconds on an
HP-UX 11i v2 guest to report a failure. For example, the diskinfo command might fail after
30 seconds:
# timex diskinfo /dev/rsdk/c1t14d0:
diskinfo: can't open /dev/rdsk/c1tl4d0: No such device or address
real
0m30.26s
user
0m0.00s
sys
0m0.01s
This delay is caused by the retry of failed commands from the nonresponding backing store.
There is currently no workaround.
8.2.20.6 Online Modification of AVIO Devices Might Fail
Devices configured under AVIO Stor HBA for a guest cannot be deleted (using the hpvmmodify
command) if the guest is at EFI.
Stop the guest using the hpvmstop command and retry the hpvmmodify command.
Devices configured under AVIO Stor HBA for an HP-UX 11i v3 guest cannot be deleted (using
the hpvmmodify command) if the guest is online.
Run ioscan -kfNC tgtpath or ioscan -kfNC lunpath from the guest to obtain the
tgtpath or lunpath H/W Path for the device to be deleted. Remove the device by using rmsf
-H of the lunpath or tgtpath H/W Path from the guest and retry the hpvmmodify command
from the host.
8.2.20.7 Mapping AVIO Storage Devices on HP-UX Guests
This section explains how to map an AVIO storage device on an HP-UX guest to an hpvmstatus
display on the Integrity VM Host either at the EFI console or at the HP-UX operating system.
The following example shows the output of hpvmstatus from the Integrity VM Host:
84
Storage Information
# hpvmstatus -P aviotest
[Storage Interface Details]
Guest
Physical
Device Adaptor
Bus Dev Ftn Tgt Lun Storage
Device
======= ========== === === === === === ========= =========================
disk
avio_stor
0
2
0 22
0 disk
/dev/rdsk/c82t15d3
The following statistics are displayed in this example:
• PciBus = 0
• PciDev = 2
• PciFtn = 0
• Addr (Target Id) = 22 (0x16)
• Lun = 0
Note that Addr (Target Id) is decimal in the hpvmstatus display, and PciFtn and Lun are always
zero (0).
The Integrity VM guest EFI device path encodes PciBus, PciDev, and Addr (Target Id) from the
hpvmstatus display:
PciDev
|
| PCIFtn
PciBus
| |
Addr(Target Id)
|
| |
|
V
V V
V
blk16 : Acpi(PNP0A03,0)/Pci(2|0)/Scsi(Pun16,Lun0)
PciFtn (PCI function) and Lun# are always zero (0). Addr (Target Id) becomes EFI Pun# and is
displayed as a hexidecimal number.
The two methods for mapping an Integrity VM HP-UX 11i v2 guest hardware path or HP-UX
11i v2 Device Special File (DSF) to an Integrity VM Host hpvmstatus display:
1. -e option of the ioscan utility
ioscan -fne displays the HP-UX hardware path/DSF and the EFI device path for the
device. The HP-UX hardware path encodes the following from the hpvmstatus display:
• PciBus
• PciDev
• Addr (Target Id)
Addr (Target Id) is encoded as an HP-UX tgt ID and an HP-UX lun ID in the HP-UX hardware
path.
HP-UX tgt ID and HP-UX lun ID are calculated from Addr (Target Id) in the hpvmstatus
display using the following equations:
HP-UX tgt ID = Addr(Target Id) % 16
HP-UX lun ID = Addr(Target Id) / 16
Note the following example:
# ioscan -fne
disk
PciDev
| PCIFtn
| |(Addr(Target Id) % 16) <-> HP-UX tgt ID
PciBus | | |(Addr(Target Id) / 16) <-> HP-UX lun ID
| | | | |
V V V V V
49 0/0/2/0.6.1
sdisk
CLAIMED
DEVICE
HP
/dev/dsk/c0t6d1
/dev/rdsk/c0t6d1
Acpi(PNP0A03,0)/Pci(2|0)/Scsi(Pun16,Lun0)
^
^ ^
^
|
| |
|
PciBus
| PCIFtn
Addr(Target Id)
|
PciDev
Virtual Disk
8.2 Known Issues and Information
85
In this example, exp1 / exp2 represents the quotient from exp1 divided by exp2 (integer
division), and exp1 % exp2 finds modulo of exp1 divided by exp2 (that is, finds the remainder
of an integer division).
2.
get_info option of the gvsdmgr utility
If you are using the HP-UX DSF, the following gvsdmgr option can be used to get the VSD
LUN ID, which is the same as the Addr (Target Id) in the hpvmstatus display. The gvsdmgr
utility displays VSD LUN Id as a hexidecimal number. The first nibble of VSD LUN Id
becomes HP-UX lun ID, and the second nibble becomes HP-UX tgt ID.
The following example shows the get_info option with the gvdsmgr utility:
# gvsdmgr get_info -D /dev/gvsd0 -q lun=/dev/rdsk/c0t6d1
Tue Oct 2 13:35:32 2007
Lun DSF
VSD LUN Id
Lun Hardware path
LUN State
:
:
:
:
/dev/rdsk/c0t6d1
0x16
0/0/2/0.6.1
UNOPENED
The following is a method for mapping an Integrity VM HP-UX 11i v3 guest hardware path or
HP-UX 11i v3 DSF to an Integrity VM Host hpvmstatus display using the ioscan utility:
# ioscan -m dsf /dev/rdsk/c0t6d1
Persistent DSF Legacy DSF(s)
========================================
/dev/rdisk/disk22 /dev/rdsk/c0t6d1
# ioscan -m lun /dev/rdisk/disk22
Class I Lun H/W Path Driver S/W State H/W Type Health Description
======================================================================
disk 22 64000/0xfa00/0x1 esdisk CLAIMED DEVICE online HP Virtual Disk
0/0/2/0.0x16.0x0
/dev/disk/disk22 /dev/rdisk/disk22
/dev/disk/disk22_p1 /dev/rdisk/disk22_p1
/dev/disk/disk22_p2 /dev/rdisk/disk22_p2
/dev/disk/disk22_p3 /dev/rdisk/disk22_p3
An HP-UX 11iv3 Lun Path hardware path displayed by the ioscan utility can be mapped to
an hpvmstatus utility output as follows:
PciDev
| PCIFtn
| | Addr(Target Id)
PciBus | | |
Lun
| | | |
|
V V V V
V
0/0/2/0.0x16.0x0
8.2.21 Guest LUN Does Not Appear After a Delete and Add
If the guest operating system version is prior to HP-UX 11i v3 0809 (that is, 11i v3 0709 or 0803),
a guest LUN might not appear after a delete and add. For example, this issue might occur with
the following sequence of events::
1. In the guest, execute rmsf for the lun path ( lunpath Class in ioscan display).
2. In the VM Host, delete the lun entry from the guest's configuration using the hpvmmodify
command.
3. In the VM Host, add the lun entry back to the guest's configuration using the hpvmmodify
command.
4. In the guest ioscan, the lun (which was deleted and added back) does not appear.
Perform the following workaround:
86
Storage Information
1.
2.
In the guest, rmsf the target path (tgtpath Class in ioscan display) corresponding to the lun
path.
In the guest, perform an ioscan.
8.2.22 Storage for Deactivated Volume Groups not Protected by Integrity VM Storage
Management
When an LVM volume group is deactivated, the storage (physical volumes) used by that storage
is designated as unused by HP-UX system administration tools such as System Management
Homepage (SMH). This is also true for Integrity VM storage management. As a result, these
physical volumes are not automatically protected from use by virtual machines as virtual disks.
You can resolve this problem in one of two ways:
• If the volume group is to remain deactivated, the VM Host administrator can manually add
the physical volume as a restricted device with the hpvmdevmgmt command.
• Or, after activating the volume group, execute the hpvmhostrdev command, so that the
VM Host storage management database is updated accordingly.
An HP-UX system administrator can deactivate a volume group using the vgchange command.
It can also be deactivated, if it is a shared LVM (SLVM) volume group, whenever the associated
Serviceguard cluster is reconfigured, or the VM Host system is rebooted. Take care to check that
all SLVM volume groups are activated after a VM Host reboot or Serviceguard cluster
reconfiguration.
8.2 Known Issues and Information
87
88
9 Migrating Virtual Machines
This chapter contains information about migrating virtual machines.
9.1 Changes and Issues in This Release
The following section provides updated information about online migration in the V4.2.5 release.
9.1.1 Online Migration Support
The following list provides the supported online migration paths for HP-UX guests:
• A V4.2 guest can be online migrated to V4.2.5.
• A V4.2 guest plus general release patches can be online migrated to V4.2.5.
• A V4.2.5 guest can be online migrated back to a configuration comparable to that on which
it was previously booted:
— A V4.2 guest that has been online migrated to V4.2.5 can be migrated back to V4.2.
— A V4.2 guest also running general release patches that has been online migrated to
V4.2.5 can be migrated back to V4.2 and the exact same set of general release patches.
NOTE: For a list of V4.2 general release patches, see the VM Host and VM Guest patch
tables in Chapter 2 of the HP Integrity Virtual Machines 4.2: Release Notes on the BSC
website: HP Integrity Virtual Machines 4.2: Release Notes.
NOTE:
Online VM Migration is supported with HP-UX and OpenVMS guests.
9.2 Known Issues and Information
The following sections describe known issues and information from previous releases that still
apply to V4.2.5.
9.2.1 Online Migration Support Limited to System with Compatible Processors
Online migration support among Integrity servers is limited by the processor architecture. Online
migration among servers with processor family 31 is supported regardless of the model number
within that family. migration among servers with processor family 32 and model numbers 0 or
1 is supported. Otherwise, online migration is supported among servers with identical processor
family and model number.
To check if a guest can be migrated to the target VM Host, use the -s option to the hpvmmigrate
command.
9.2.2 Location of Command Used to Initiate Online Migrations of Serviceguard Guest
Packages not in $PATH
The hpvmsg_move command is used to initiate online migrations of Serviceguard guest packages.
This command is located in the /opt/cmcluster/toolkit/hpvm directory, which is not added to the
users PATH variable during installation. To initiate an online migration, use the full pathname
to the hpvmsg_move command. The full pathname to the command is:
/opt/cmcluster/toolkit/hpvm/hpvmsg_move
9.2.3 Possible hpvmmigrate Command Error Messages
You might receive the following message after specifying an hpvmmigrate command:
Can't open VM /var/opt/hpvm/uuids/c0c8a8ee-ac67-11dd-ba00-00306ef3bda7/vm_dev:
(55) VMM not loaded
9.1 Changes and Issues in This Release
89
Opening minor device and creating guest machine container
Creation of VM, minor device 1
hpvmmigrate: ERROR (vmname): Remote message: Target guest exited. Status 2.
hpvmmigrate: ERROR (vmname): Remote message: Unable to start guest on target.
In this case, use the following workaround:
1. Enter the following:
# swremove vmOVMMSW.OnlineMigr-SW
2.
Force a reinstall of the 4.1 stack by forcing a reinstall of the T8718AC bundle:
# swinstall -x autoreboot=true -x reinstall=true -s T8718AC
Note, this reinstall reboots the VM Host.
You might receive the following message after specifying the hpvmmigrate command:
Host is not licensed for online migration.
In this case, the workaround is to install the Online VM Migration bundle, T8718AC from the
AR.
9.2.4 NR Guest State
A guest is placed in the Not Runnable (NR) state when it is the source of a successful migration.
The guest is also marked Not Modify and Not Visible. The guest can also be placed in the NR
state by the administrator using the hpvmmodify command, for example:
# hpvmmodify -P guestname -x register_status=disabled
The NR guest state appears on the hpvmstatus command output as Off (NR).
CAUTION: Use of the -x register_status option is highly discouraged and may lead to
accidentally booting a VM on more than one host at once.
NOTE: The -x register_status option has replaced the -x runnable_status status
on the hpvmmodify command line, as changing register_status now affects
runnable_status, modify_status and visible_status.
9.2.5 A Guest Might be Marked Disabled After Failed Offline Migration
It is rare but possible that a guest is marked Not Runnable after a failed offline migration. If this
occurs, use the following command to return the guest to the registered state:
# hpvmmodify -P guestname -x register_status=enabled
Before enabling the guest on the source, check the target to ensure that the guest was not actually
migrated there.
9.2.6 Do Not Migrate Serviceguard Cluster Nodes
Online VM Migration does not support migrating guests that are Serviceguard cluster nodes. If
a Serviceguard node is migrated while online, it might lose connection to other cluster members
and be automatically removed from the cluster.
The Integrity VM software does not know whether you have installed Serviceguard in a guest,
so it cannot automatically restrict online migration of your Serviceguard node. Therefore, you
should disable online migration for all Serviceguard nodes. For example, to disable Online VM
Migration for the guest sgnode, run the hpvmmodify command as follows:
# hpvmmodify -P sgnode -x online_migration=disabled
Disabling online migration for the guest ensures that you do not accidentally attempt to migrate
a Serviceguard node.
90
Migrating Virtual Machines
9.2.7 Unpresenting SAN Devices to Integrity VM Hosts
Unpresenting SAN devices that were configured to be used by guests causes the guest to fail to
start. If SAN devices must be unpresented, guests configured to use those devices should be
reconfigured to no longer require them. After unpresenting a device special file, remove it from
the Integrity VM Host using the following command:
rmsf
–a
device_special_file
The device special file can be derived from the wwid_string, obtained from the SAN appliance,
as follows:
scsimgr -p get_attr -a wwid -a device_file current all_lun | grep wwid_string
9.2.8 Host May Participate in One Online Migration at a Time
A VM Host may participate in one online migration at a time, either as a source or a target. If
two migrations are attempted at the same time, hpvmmigrate might fail quickly with an error.
However, hpvmmigrate does not always detect that a migration is in progress.
In most cases, migrating a guest saturates a 1 GB network. Migrating more than one guest at a
time on a network usually takes longer than migrating them sequentially, and the guest frozen
phase is longer as well.
Do not attempt to migrate more than one guest at a time on a single VM Host or network.
9.2.9 Online Migration on the Target VM Host is the Same as Starting the Guest on
the Target VM Host
Online migration on the target VM Host system is equivalent to starting the guest on the target
VM Host. The same locks are required to safely start the guest on the target VM Host system.
These locks assure that a starting guest can allocate all the resources if requires. one guest start
can occur at any one time. Therefore, while an online migration is being performed on the target,
no other guest starts can proceed, because it could take away resources that are required by the
migrating guest.
9.2.10 Guests Using IPv6 Not Currently Supported for Online VM Migration
IPv6 networks are supported, so long as guests also have some IPv4 networking. Guests using
IPv6 are not currently supported for Online VM Migration.
9.2.11 Transient Network Errors Can Cause hpvmmigrate Connectivity Check
Failures
A transient network error might cause the hpvmmigrate command's vswitch connectivity check
to report a failure. If the connectivity check fails, retry the migration by re-issuing the
hpvmmigrate command.
If the hpvmmigrate command's network connectivity check continues to fail, verify the vswitch
and network configuration, and test connectivity with the nwmgr command as explained in
Section 10.3 of the HP Integrity Virtual Machines 4.2: Installation, Configuration, and Administration
manual.
If the vswitch connectivity required by the guest on the target VM Host is properly configured
and verified, you can use the hpvmmigrate -w option to bypass vswitch connectivity checks.
9.2.12 Veritas Volumes Not Supported for Online VM Migration
Veritas volumes are not supported for Online VM Migration.
9.2 Known Issues and Information
91
92
10 Error Logging
This chapter contains information about the way Integrity VM logs messages.
10.1 Changes and Issues in This Release
There are no new error logging issues in the V4.2.5 release.
10.2 Known Issues and Information
The following sections describe known issues and information from previous releases that still
apply to V4.2.5.
10.2.1 Old Version of /etc/rc.config.d/hpvmconf Not Overwritten
When you install the new version of Integrity VM, a new version of the /etc/rc.config.d/
hpvmconf file is placed on the system. You receive the following messages:
A new version of /etc/rc.config.d/hpvmconf has been placed on the system. The new version is located at /opt/
hpvm/newconfig/etc/rc.config.d/hpvmconf. The existing version of /etc/rc.config.d/hpvmconf is not being
overwritten, since it appears that it has been modified by the administrator since it was delivered.
You might receive the following message:
The postinstall script for HPVM.HPVM-CORE had a warning (exit code 103). The script location was /var/tmp/
BAA008384/catalog/HPVM.1/HPVM-CORE/postinstall. This script has warnings, but the execution of this fileset
will still proceed. Check the above output from the script for
further details.
10.2.2 Guest Log Can Grow Unbounded
The guest monitor log file (/var/opt/hpvm/guests/vm_name/log) records guest start and
stop information. These log files can grow very large. Use the hpvmconsole command
rec -rotate to close the current log file, rename it, and open a new one.
10.2.3 Log Messages Written to Old Log File
Log messages might be written to the command.log.old file instead of the command.log file.
If this is a problem, reboot the VM Host system. This reinitializes the log file for applications that
generate Integrity VM log messages to write to the current command.log file.
10.2.4 Saved MCA or INIT Register State Can Be Inaccurate
Virtual machines do not support standard management processor console errdump commands.
The virtual console's Virtual Machine menu provides the ed command for this purpose. The
options for a virtual machine are -mca and -init. When you examine the saved guest state
using the ed -mca or ed -init command, the preserved branch registers (B1-B5) do not always
contain accurate data.
10.2.5 Modifying the Size of the Monitor Log File
Integrity VM includes a monitor log (/var/opt/hpvm/common/hpvm_mon_log), which
captures the state of the VM Host. The size of the log file is determined by the VMMLOGSIZE
tunable, stored in the /etc/rc.config.d/hpvmconf file.
When the log file reaches VMMLOGSIZE, the current timestamp is appended to the name of the
log file and a new log file is opened. If you see many such files, increase the value of the
VMMLOGSIZE tunable. Do not set the value of the VMMLOGSIZE tunable below its 1024 KB
default.
10.1 Changes and Issues in This Release
93
10.2.6 Virtual Console Event Logs Different from Physical Machine Logs
The virtual console allows you to use the sl command to list the System Event log and the
Forward Progress log. The displays from the virtual console differ from those generated on a
physical machine in the following ways:
• Event numbering is inconsistent for different lines.
• Although the command menu allows you to specify a cell number, virtual machines are not
cellular. Therefore, this option is not functional.
94
Error Logging
11 Integrity VM Support Policy
This chapter describes the HP Integrity Virtual Machine support policies and software version
requirements for Integrity VM Host and guest operating system environments.
11.1 Integrity VM Minimum Support Life
Beginning with Integrity VM Version 3.0, releases will be supported for a minimum of three
years.
Integrity VM
Version
Release Date
Expected End of Support Date Current Status
A.01.00
December 2005
December 2007
Not supported
A.01.20
March 2006
March 2008
Not supported
A.02.00
December 2006
December 2008
Not supported
A.03.00
June 2007
June 2010
Not Supported
A.03.50
December 2007
Same as HP-UX 11i v2
Supported
B.04.00
September 2008
September 2011
Supported
B.04.10
April 2009
April 2012
Supported
B.04.20
March 2010
March 2013
Supported
B.04.20.05
September 2010
September 2013
Supported
NOTE: Integrity VM is supported for the HP-UX 11i v2 VM Host until the end of support of
HP-UX 11i v2.
11.2 Integrity VM Upgrades
•
Recommendation:
Upgrade to the current version of Integrity VM software and, for each virtual machine,
upgrade the Guest Management software.
•
Requirement:
Customers must upgrade to the latest release in order to receive defect fixes.
11.2.1 Changes in Support
The following list contains changes in support in future releases of Integrity VM:
• Use of VIO will not be supported in a future release.
VIO support will be dropped in a future release of Integrity VM, so you should begin
planning to convert from VIO to AVIO at your earliest opportunity. To determine if your
VMs are using VIO, run hpvmstatus -d for all your guests. Look for storage devices that
use scsi and look for network devices that use lan:
11.1 Integrity VM Minimum Support Life
95
# hpvmstatus -P guestname -d | grep -w scsi
# hpvmstatus -P guestname -d | grep -w lan
•
Integrity VM V4.2.5 will be the last release to support Microsoft Windows and Linux guests.
Integrity VM V4.2.5 is the last release that will support Microsoft Windows and Linux guests.
Beginning with the next Integrity VM release, HP-UX and OpenVMS guests will be supported.
•
Use of legacy device special files (DSFs) to define virtual storage will not be supported in a
future release.
Support for the use of legacy DSFs to define virtual storage (including virtual disks and
DVDs) will be dropped in a future release and customers should begin planning to use
persistent (agile) DSFs when defining their virtual storage devices. HP recommends the use
of persistent DSFs (for example, those with pathnames such as /dev/rdisk/disk##) for
better storage availability and reliability.
To check for the use of legacy DSFs, use the following command:
# hpvmstatus -P guestname -d | grep -w rdsk
11.2.2 Integrity VM Patch Policy
Integrity VM does not typically issue GR patches for prior releases. Defect fixes and enhancements
are delivered either as patches on the latest available version or in future versions of the product.
11.3 VM Host OS and Server Support
Integrity VM
Host or Server
Support
Integrity VM
Version
A.03.50
Integrity VM
Version
B.04.00
Integrity VM
Version
B.04.10
Integrity VM
Version
B.04.20
Integrity VM
Version
B.04.20.05
Notes
VM Host OS
Support
HP-UX 11i v2
December
2007
HP-UX 11i v3
September
2008
HP-UX 11i v3
March
through
September
2009
HP-UX 11i v3
March 2010
HP-UX 11i v3
September
2010
VM Host
Server
Support
Integrity VM supports all Integrity servers. New servers are supported on the
latest Integrity VM version concurrent with the shipment of that server.
New Integrity
VM versions
support the latest
HP-UX OE
release at the
time of the
Integrity VM
release.
For more
information
about support
for specific
HP-UX versions,
see an
authorized HP
representative.
For information about installing Integrity VM, see the HP Integrity Virtual Machines 4.2: Installation,
Configuration, and Administration manual.
HP-UX patches might be required for proper operation. Install these patches on HP-UX operating
systems as necessary. For specific patch information, see the patch tables in Chapter 2 (page 19).
96
Integrity VM Support Policy
11.4 HP-UX Guest Support
Integrity VM
Type of Guest Version
OS Support
A.03.50
Integrity VM
Integrity VM
Version
Version B.04.00 B.04.10
Integrity VM
B.04.20
Integrity VM
B.04.20.05
HP-UX 11i v2
HP Integrity
Servers
HP-UX 11i v2
May 2005
through
December
2007
HP-UX 11i v2
September 2006
through
December 2007
HP-UX 11i v2
September
2006 through
December
2007
HP-UX 11i v2
HP-UX 11i v2
December 2007 December
2007
HP Integrity HP-UX 11i v2
server blades May 2005
through
December
2007
HP-UX 11i v2
September 2006
through
December 2007
HP-UX 11i v2
September
2006 through
December
2007
HP-UX 11i v2
HP-UX 11i v2
December 2007 December
2007
HP Integrity Not supported Not supported
server blades
(i2–based)1
Not supported HP-UX 11i v2
HP-UX 11i v2
December 20072 December
2007
HP Integrity
Superdome
21
Not supported Not supported
Not supported Not supported
HP-UX 11i v2
December
2007
HP Integrity
rx2800 i21
Not supported Not supported
Not supported Not supported
HP-UX 11i v2
December
2007
HP-UX 11i v3
March 2007
through
September
2008
HP-UX 11i v3
March 2007
through
September 2008
HP-UX 11i v3
March 2007
through
September
2009
HP-UX 11i v3
September 2007
through March
2010
HP-UX 11i v3
March 2008
through
September
2010
HP Integrity Not supported HP-UX 11i v3
server blades
March 2007
through
September 2008
HP-UX 11i v3
March 2007
through
September
2009
HP-UX 11i v3
September 2007
through March
2010
HP-UX 11i v3
March 2008
through
September
2010
HP Integrity Not supported Not supported
server blades
(i2–based)1
Not supported HP-UX 11i v3
March 2009
through March
20102
HP-UX 11i v3
March 2009
through
September
2010
HP Integrity
Superdome
21
Not supported Not supported
Not supported Not supported
HP-UX 11i v3
September
2010
HP Integrity
rx2800 i21
Not supported Not supported
Not supported Not supported
HP-UX 11i v3
September
2010
Notes
For more
information
about support
for specific
HP-UX
versions, see an
authorized HP
representative.
HP-UX 11i v3
HP Integrity
Servers
1
2
Support for the latest Intel® Itanium® Processor 9300 series
Requires V4.2 with the following VM Host patches:
PHSS_40875 1.0 HPVM B.04.20 CORE PATCH
PHSS_40876 1.0 HPVM B.04.20 VMAGENT
PHSS_40901 1.0 HPVM B.04.20 VMMIGRATE PATCH
11.4 HP-UX Guest Support
97
NOTE:
For information about required patches, see Chapter 2 (page 19).
HP-UX patches might be required for proper operation. Install these patches on HP-UX guest
operating systems as necessary. For specific patch information, see the patch tables in Chapter 2
(page 19) .
11.5 Windows and Linux Guest Support
Type of Guest
OS
Windows
Linux
Integrity VM
Version
A.03.50
Integrity VM
Version
B.04.00
Windows
Server 2003
Data Center
and Enterprise
Editions, SP1
and SP2
Windows
Server 2003
Data Center
and Enterprise
Editions SP2
Windows
Windows
Server 2003
Server 2008
Data Center
SP1
and Enterprise
Editions, SP2
Windows
Server 2008 SP1
Supported on
HP Integrity
Servers :
Red Hat RHEL
4 Update 4
Red Hat RHEL
4 Update 5
4 Update 6
SUSE SLES10,
SP1
Red Hat RHEL
4 Update 5
SUSE SLES 10
SP1
Red Hat RHEL
4 Update 5
SUSE SLES 10
SP2
Supported on
HP Integrity
Servers :
Integrity VM
Version B.04.10
Integrity VM
Version
B.04.20
Red Hat RHEL
4 Update 5
SUSE SLES 10
SP2
Integrity VM
Version
B.04.20.05
Notes
Windows
Server 2008
SP1
Red Hat RHEL
4 Update 5
SUSE SLES 10
SP2
Guest operating systems are supported on VMs that are also supported natively on the physical server running
Integrity VM.
For specific information about requirements for installing any guest OS, see the product
documentation.
Operating system patches might be required for proper operation. Install these patches on guest
operating systems as necessary. For specific patch information, see the patch tables in Chapter 2
(page 19) .
11.6 OpenVMS Guest Support
Type of Guest
OS Support
Integrity VM
Version
A.03.50
Integrity VM
Version
B.04.00
Integrity VM
Version B.04.10
Integrity VM
Version
B.04.20
Integrity VM
Version
B.04.20.05
HP OpenVMS
HP Integrity
Servers1
98
Not supported Not supported Not supported
OpenVMS
V8.42
OpenVMS
V8.4
HP Integrity
Not supported Not supported Not supported
server blades 1
OpenVMS
V8.42
OpenVMS
V8.4
HP Integrity
server blades
(i2–based)3
OpenVMS
V8.42
OpenVMS
V8.4
Not supported Not supported Not supported
HP Integrity
Not supported Not supported Not supported
Superdome 23
Not supported Not supported
HP Integrity
rx2800 i23
Not supported Not supported
Not supported Not supported Not supported
Integrity VM Support Policy
Notes
For more
information
about support
for specific
HP-UX
versions, see an
authorized HP
representative.
1
2
Intel® Itanium® 2 9000 Series and Intel Itanium 2 9100 Series
Requires V4.2 with the following VM Host patches:
PHSS_40875 1.0 HPVM B.04.20 CORE PATCH
PHSS_40876 1.0 HPVM B.04.20 VMAGENT
PHSS_40901 1.0 HPVM B.04.20 VMMIGRATE PATCH
3
Support for the latest Intel® Itanium® Processor 9300 Series
11.7 HP Serviceguard Support
Packages or
Nodes
Integrity VM
Version
A.03.50
Integrity VM
Version
B.04.00
Integrity VM
Version B.04.10
Integrity VM
Version
B.04.20
Integrity VM
Version
B.04.20.05
Notes
Serviceguard –
Virtual
machines as
packages
(Serviceguard
running on
VM Host)
Serviceguard
release
• A.11.16
• A.11.17
• A.11.17 w/
SMS
A.01.00
• A.11.18
• A.11.18 w/
SMS
A.01.01
• A.11.18 w/
SMS
A.02.00
Serviceguard
release
• A.11.18
• A.11.18 w/
SMS
A.02.00
Serviceguard
release
• A.11.18 (not
supported
with Online
VM
Migration)
• A.11.19
Serviceguard
release
• A.11.19
Serviceguard
release
• A.11.19
• A.11.20
New versions of
Integrity VM
support all
guest OS types
and versions
supported by
previous
versions of
Integrity VM
(as long as the
guest OS
version is
supported by
the OS vendor).
Serviceguard –
HP-UX virtual
machines as
nodes
(Serviceguard
running on a
guest)
Serviceguard
release
• A.11.16
• A.11.17
• A.11.17 w/
SMS
A.01.00
• A.11.17.01
(11i v3)
• A.11.18 (11i
v2, 11i v3)
• A.11.18 w/
SMS
A.01.01 (11i
v2)
Serviceguard
release
• A.11.18 (11i
v2, 11i v3)
• A.11.18 w/
SMS
A.01.01
• A.11.18 w/
SMS
A.02.00 (11i
v3)
Serviceguard
— Linux
virtual
machines as
nodes
(Serviceguard
running on a
guest)
Serviceguard
release
• A.11.18
Serviceguard
release
• A.11.18
(RHEL 4
Guest running
Update 5
Red Hat Linux
• A.11.18
Release 4
(SUSE
Updates 4 and
SLES 10
5
SP1)
SUSE Linux
SLES10 SP1
Serviceguard
Serviceguard
release
release
• A.11.18 (11i • A.11.19
v2, 11i v3)
• A.11.18 w/
SMS A.01.01
• A.11.19 w/
SMS A.02.00
(11i v3)
Serviceguard
release
• A.11.19
Serviceguard
release
• A.11.19
(RHEL 4
Update 5
• A.11.19
(SUSE SLES
10 SP2)
Serviceguard
release
• A.11.19
• A.11.20
Serviceguard
release
• A.11.19
SMS is also
known as CFS.
• A.11.20
The version of Serviceguard must be supported with the version of HP-UX on which the VM
Host is running. For specific support information, see the Serviceguard documentation.
11.7 HP Serviceguard Support
99
11.8 Storage Interface Support
Integrity VM
Version A.03.50
(Both VIO and
AVIO unless
explicity excluded)
Integrity VM
Version B.04.00
(both VIO and AVIO
unless explicitly
excluded)
Integrity VM
Version B.04.10
(both VIO and
AVIO unless
explicitly excluded)
Integrity VM
Version B.04.20
(both VIO and AVIO
unless explicitly
excluded)
Integrity VM
Version
V.04.20.05 (both
VIO and AVIO
unless explicitly
excluded)
Notes
• Fibre Channel
adapters
supported by
the FCLP
(FibrChanl-02),
TD or FCD
driver
• SCSI adapters
supported by
the C8xx, MPT,
or CISS drivers
• IDE adapters
supported by
the SIDE driver
• USB support of
the
UsbScsiAdapter
driver and USB
2.0 support of
the
usb_ms_scsi
driver (AVIO
HVSD support
for USB 2.0 as
of 11i v2 0810
web release)
• iSCSI adapters
supported by
the iSCSI
driver
• SAS adapters
supported by
the SASD
driver
• Fibre Channel
adapters
supported by
FCLP
(FibrChanl-02)
TD or FCD
driver
• SCSI adapters
supported by
the C8xx, MPT,
or CISS drivers
• IDE adapters
supported by
the SIDE driver
• USB support of
the
UsbScsiAdapter
driver
• USB 2.0 support
of the
usb_ms_scsi
driver on VIO
• iSCSI adapters
supported by
the iSCSI driver
(AVIO requires
HostAVIOStor
B.11.31.1009.01
or later)
• SAS adapters
supported by
the SASD driver
• Fibre Channel
adapters
supported by
FCLP
(FibrChanl-02)
TD or FCD
driver
• SCSI adapters
supported by
the C8xx, MPT,
or CISS drivers
• IDE adapters
supported by
the SIDE driver
• USB support of
the
UsbScsiAdapter
driver and USB
2.0 support of
the
usb_ms_scsi
driver (AVIO
HVSD support
for USB 2.0 as
of 11i v3 0903)
• iSCSI adapters
supported by
the iSCSI
driver (AVIO
requires
HostAVIOStor
B.11.31.1009.01
or later)
• SAS adapters
supported by
the SASD
driver
• Fibre Channel
adapters
supported by
FCLP
(FibrChanl-02)
TD or FCD
driver
• SCSI adapters
supported by
the C8xx, MPT,
or CISS drivers
• IDE adapters
supported by
the SIDE driver
• USB support of
the
UsbScsiAdapter
driver and USB
2.0 support of
the usb_ms_scsi
driver (AVIO
HVSD support
for USB 2.0 as of
11i v3 0903)
• iSCSI adapters
supported by
the iSCSI driver
(AVIO requires
HostAVIOStor
B.11.31.1009.01
or later)
• SAS adapters
supported by
the SASD driver
• Fibre Channel
adapters
supported by
FCLP
(FibrChanl-02)
TD or FCD
driver
• SCSI adapters
supported by
the C8xx, MPT,
or CISS drivers
• IDE adapters
supported by
the SIDE driver
• USB support of
the
UsbScsiAdapter
driver and USB
2.0 support of
the
usb_ms_scsi
driver (AVIO
HVSD support
for USB 2.0 as
of 11i v3 0903)
• iSCSI adapters
supported by
the iSCSI
driver (AVIO
requires
HostAVIOStor
B.11.31.1009.01
or later)
• SAS adapters
supported by
the SASD
driver
Virtual I/O
storage
interfaces are
those defined
using the scsi
adapter type.
Accelerated
virtual I/O
(AVIO)
storage
interfaces are
defined using
the avio_stor
adapter type.
(See the
hpvmresources
manpage.)
11.8.1 Guest Attached Device Support
100
Integrity VM
Version A.03.50
Integrity VM
Version B.04.00
Integrity VM
Version B.04.10
Integrity VM
Version B.04.20
Integrity VM
Version
B.04.20.05
Notes
• CD/DVD
burners
• Media
changers
• Tape devices
• CD/DVD
burners
• Media
changers
• Tape devices
• CD/DVD
burners
• Media
changers
• Tape devices
• CD/DVD
burners
• Media
changers
• Tape devices
• CD/DVD
burners
• Media
changers
• Tape devices
Attached devices
are supported for
all types of guest
operating systems
that provide
supported drivers
for the physical
device as attached
to the VM Host
device.
Integrity VM Support Policy
11.8.2 Multipathing Software Support
Multipathing software is supported on the Integrity VM Host system. Unless specified otherwise,
multipathing is supported for use with either legacy virtual I/O (virtual adapter type specified
as scsi) or AVIO (virtual adapter type specified as avio_stor). The required version for these
products is determined by the software vendor and the release of HP-UX installed on the VM
Host system.
NOTE: Starting with HP-UX 11i v3 0909, LV Mirroring is supported on HP-UX 11i v3 guests
with Integrity VM V4.0 or later using AVIO.
Backing
Store
Integrity VM
Version A.03.50
Integrity VM
Version B.04.00
Integrity VM
Version B.04.10
Whole
Disk (or
LUN)
• HP Secure Path • HP-UX 11i v3
• HP-UX 11i v3
A-A/A-P
built-in
built-in
multipathing
multipathing
• EMC PowerPath
• • EMC
• • EMC
PowerPath with
PowerPath
legacy DSFs
with legacy
DSFs
LVM
Logical
Volumes
• PV Links
• HP-UX 11i v3
• HP-UX 11i v3 • HP-UX 11i v3
• HP-UX 11i v3
built-in
built-in
built-in
built-in
• EMC PowerPath
multipathing
multipathing
multipathing
multipathing
• HP Secure Path
• PVLinks
• PVLinks
• PVLinks
• PVLinks
A-A/A-P
• EMC PowerPath • EMC
• EMC PowerPath • EMC PowerPath
with legacy
PowerPath
with legacy
with legacy
whole disk DSF
with legacy
whole disk DSF
whole disk DSF
in a Volume
whole disk
in a Volume
in a Volume
Group
DSF in a
Group
Group
Volume Group
VxVM
Logical
Volumes
• Symantec DMP • HP-UX 11i v3
• HP-UX 11i v3 • HP-UX 11i v3
•
built-in
built-in
built-in
• EMC PowerPath
multipathing
multipathing
multipathing
• HP Secure Path
• EMC PowerPath • EMC
• EMC PowerPath •
A-A/A-P
with legacy
PowerPath
with legacy
whole disk DSF
with legacy
whole disk DSF
in a Disk Group
whole disk
in a Disk Group
DSF in a Disk • Symantec DMP •
• Symantec DMP
Group
• Symantec DMP
VxFS Files
•
•
•
•
PV Links
• HP-UX 11i v3
• HP-UX 11i v3
built-in
built-in
Symantec DMP
multipathing
multipathing
EMC PowerPath
•
PVLinks
•
PVLinks
HP Secure Path
• EMC PowerPath • EMC
A-A/A-P
with legacy disk
PowerPath
VxFS files are not
DSF in a
with legacy
supported backing
Volume Group
disk DSF in a
storage with AVIO
Volume Group
for version A.03.50 • Symantec DMP
• Symantec DMP
Integrity VM
Version B.04.20
Integrity VM Version
B.04.20.05
• HP-UX 11i v3
• HP-UX 11i v3
built-in
built-in
multipathing
multipathing
• • EMC
• • EMC
PowerPath with
PowerPath with
legacy DSFs
legacy DSFs
• HP-UX 11i v3
built-in
multipathing
• PVLinks
• EMC PowerPath
with legacy disk
DSF in a
Volume Group
• Symantec DMP
HP-UX 11i v3
built-in
multipathing
EMC PowerPath
with legacy
whole disk DSF
in a Disk Group
Symantec DMP
• HP-UX 11i v3
built-in
multipathing
• PVLinks
• EMC PowerPath
with legacy disk
DSF in a
Volume Group
• Symantec DMP
11.8.3 EVA Series Firmware Requirement
The AVIO Storage Driver supports Active-Active firmware types on EVA series (3000/5000 and
4000/6000/8000). Be sure that the following firmware revision levels are met before configuring
AVIO backing stores on these arrays:
11.8 Storage Interface Support
101
•
•
On EVA 4000/6000/8000, all released firmware revisions support Active-Active configuration.
Therefore, no action is necessary on these arrays.
EVA 3000/5000 arrays need minimum firmware revisions of VCS v4.004 (Active-Active
firmware).
For more information about EVA firmware upgrades, see the HP Services EVA upgrade website:
http://hpswest.corp.hp.com/VCSUpgradeProgram.asp.
11.9 Network Interface Support
VM Host I/O is HP-UX based. Specific network interfaces are supported if they are supported
for the version of HP-UX in use on the VM Host system. The VM Host physical network interface
card can be configured with Auto Port Aggregation (APA), with the resulting port supported
as indicated in the following table:
Virtual Network
Adapter Type
Integrity VM
Version A.03.50
Integrity VM
Version B.04.00
lan (legacy VIO)
All HP-UX supported Ethernet interfaces
avio_lan (AVIO)
The following
Ethernet drivers
are supported,
including Auto
Port Aggregation
(APA) ports:
• iether
• igelan
• ixgbe
The following
Ethernet drivers
are supported,
including APA
ports:
• iether
• igelan
• ixgbe
• icxgbe
Integrity VM
Version B.04.10
The following
Ethernet drivers
are supported,
including APA
ports:
• iether
• igelan
• ixgbe
• icxgbe
Integrity VM
Version B.04.20
Integrity VM
Version
B.04.20.05
The following
Ethernet drivers
are supported,
including APA
ports:
• iether
• igelan
• ixgbe
• icxgbe
The following
Ethernet drivers
are supported,
including APA
ports:
• iether
• igelan
• ixgbe
• icxgbe
11.10 AVIO Support
The following table lists the support for AVIO networking drivers and AVIO storage drivers on
Integrity VM V3.5, V4.0, V4.1, V4.2, and V4.2.5 guests.
102
Integrity VM Host HP-UX 11i v2
Version
Guests
HP-UX 11i v3
Guests
Windows Server
2003 Guests
Windows Server
2008 SP1 Guests
Linux Guests
V3.5 VM Host
Storage and
Networking
Networking
Networking
N.A.
Networking
V4.0 VM Host
Storage and
Networking
Storage and
Networking
Networking
N.A.
Networking
V4.1 VM Host
Storage and
Networking
Storage and
Networking
Networking
Networking
Networking
V4.2 VM Host
Storage and
Networking
Storage and
Networking
N.A.
Networking
Networking
V4.2.5 VM Host
Storage and
Networking
Storage and
Networking
N.A.
Networking
Networking
Integrity VM Support Policy
A hpvmhostgdev Manpage
103
hpvmhostgdev(1M)
NAME
hpvmhostgdev -- Manages Integrity VM Host devices available for virtual machine access.
SYNOPSIS
hpvmhostgdev [-H | [-u] | { -a | -c {disklist|lvlist} | -l [>devlistfile] } | -d
| -f devlistfile| -r | -v { all|assigned|unassigned }]
DESCRIPTION
The hpvmhostgdev command analyzes disklist and lvlist output searching for unused
disks and logical volumes (LVs). It uses its results to add unused devices to the Integrity VM
device database as guest devices (gdevs).
When executed without any options or with the -H option, the hpvmhostgdev command displays
a description of the command.
NOTE: Do not use a disk to create volume group after it has been made a gdev (either by the
script or by hand). Once a disk has been made a gdev, it is free to be used as a disk by a guest.
To use a disk as part of a volume group of which you want to create logical volumes, perform
the following steps:
1. If the disk is a gdev, unmark it as one, if it is not in use by a guest:
# hpvmdevmgmt -d gdev:/dev/rdisk/disk#
2.
Follow one of the following scenarios:
• Scenario 1:
a. Make the disk restricted:
# hpvmdevmgmt -a rdev:/dev/rdisk/disk#
b.
•
Create the volume group with the disk (or add it to an existing volume group),
followed by the LV creation.
Scenario 2:
a. Create the volume group with the disk (or add it to an existing volume group),
followed by the LV creation.
b. Make the disk restricted, by using one of the following commands:
— # hpvmdevmgmt -a rdev:/dev/rdisk/disk#
—
# hpvmhostrdev -u
If many disks are being used for volume groups, then running hpvmhostrdev
—u when you are done is more efficient than running the individual adds with
hpvmdevmgmt -a rdev.
NOTE:
Only a superuser may execute the hpvmhostgdev command.
Options
The
-H
-a
-c
-d
-f
-l
104
hpvmhostgdev command recognizes the following command-line options:
Displays a description of the hpvmhostgdev command.
Adds unused logical volumes and disks for guest use.
Displays the disklist or lvlist command output.
Deletes guest devices added by this script.
Uses specified device-list file to add devices for guest use.
Lists unused devices that can be added for guest use. (For example, pipe -l output to a file
for use with —f.)
hpvmhostgdev Manpage
-r
-u
Recovers the Integrity VM device management database.
Uses disklist device cache (Do not force hardware scan.).
NOTE: This option is used to speed up the disklist command to obtain unused disks.
Use the -u option before using the following options:
• -a
• -c disklist
• -l
-v
Verifies add and delete operations by this script (with the AUTOGDEV=YES attribute).
• all — lists all guest devices.
• assigned — lists all guest devices configured by any guests.
• unassigned — lists all guest devices not configured by any guests.
RETURN VALUES
The hpvmhostgdev command exits with one of the following values:
0: Successful completion.
1: One or more error conditions occurred.
DIAGNOSTICS
The hpvmhostgdev command displays error messages for any of the following conditions:
An invalid option is specified.
An empty or invalid file is specified with the -f option.
EXAMPLES
The following example adds unused disks and logical volumes as gdevs:
#
hpvmhostgdev -a
The following example illustrates how to make a file of unused disk and logical volumes, and
then how to use the list to add them to as gdevs:
# hpvmhostgdev -l > devicelist
# hpvmhostgdev -f devicelist
NOTE: You can edit the devicelist file to remove disks and logical volumes that you do not
want added as gdevs.
The following example verifies guest devices added to the device database by the hpvmhostgdev
script:
# hpvmhostgdev -v all
The following example deletes guest devices added by the hpmvhostgdev script:
# hpvmhostgdev -d
AUTHORS
The hpvmhostgdev command was developed by HP.
SEE ALSO
On the VM Host:
hpvm(5), hpvmcollect(1M), hpvmconsole(1M), hpvmcreate(1M), hpvmdevinfo(1M), hpvmdevmgmt(1M),
hpvmdevtranslate(1M), hpvminfo(1M), hpvmmigrate(1M), hpvmmodify(1M), hpvmnet(1M),
hpvmpubapi(3), hpvmremove(1M), hpvmresources(5), hpvmsar(1M), hpvmsg_move(1M),
hpvmsg_package(1M), hpvmstart(1M), hpvmstatus(1M), hpvmstop(1M), hpvmupgrade(1M),
p2vassist(1M)
On the Integrity VM guest:
105
hpvmcollect(1M), hpvmmgmt(1M), hpvmpubapi(3)
106
hpvmhostgdev Manpage