1
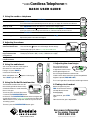
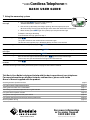
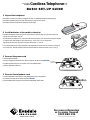
Uniden XDECT
TE-SSE35
Cordless Telephone
PAGE
1 of 4
Basic set- u p g u i d e
1 Unpack the telephone
Remove the cordless handset, charger base and all components from the packaging.
Remove the protective plastic from front of the charger and handset.
Remove the printed tag from underneath the charger.
2 Install batteries in the cordless handset
Remove the battery cover from the back of the handset by pressing on the notch and
sliding the cover down and off.
To connect the battery pack, insert the connector into the jack located inside the handset
as shown (the connector will only fit one way). Push until it clicks into place.
Tug gently on the wires to make sure the connection is secure.
Place the battery pack into the battery compartment and replace the cover by sliding up
and into place. Do not attempt to remove the batteries from the white plastic casing.
3 Connect the power cord
Find the power adapter.
Plug the adapter into your wall socket (standard 240V power)
and turn on power at the wall.
DESK
WALL
Turn the charger upside down and connect into the socket marked DC IN 9V.
AC adapter to
power socket
4 Connect the telephone cord
DESK
WALL
Find the telephone cord. Connect the telephone line by inserting one
end into the charger at the socket marked TEL LINE.
to wall
telephone
connection
Insert the other end into your standard wall telephone connection.
www.evadale.com.au
For more information
or to order, freecall
1300 883 194
©2012 Evadale Healthcare. All rights reserved.
Uniden XDECT
TE-SSE35
Cordless Telephone
PAGE
1 of 4
BASIC set- u p g u i d e
5 Charge the handset
Place the cordless handset into the charger cradle. A red charge light illuminates,
the display should activate and a battery icon will animate to indicate the handset is
charging.
Charge the handset for at least 15 hours before initial use.
If the handset
does not charge
Remove and replace the handset,
ensuring it is properly seated in the cradle
Check the power adapter connection.
Make sure power is switched on at the wall
6 Test the handset connection
Pick up the handset and press TALK.
You should hear a dial tone, and the handset display should say TALK.
Press TALK again to hang up.
If you cannot get a dial
tone or the handset
display says CHECK TEL
LINE
If there is a lot of
noise or static
Check the telephone line is properly inserted, both in base and wall socket
Try an alternative telephone wall socket
If you continue to experience difficulty, contact your local telephone
provider
See page 29 of the Owner’s Manual for tips on avoiding interference
When you hear a dial tone, make a quick test call.
Press TALK to hang up.
7 Setting the day and time
Setting the date and time on the any handset will set it on all handsets/bases.
Remove the handset from the cradle.
Press MENU/OK to open the menu screen.
Use Volume buttons to move the selector bar to DAte & TIME.
Press MENU/OK again to confirm your selection.
Use telephone keypad to select the date and time. Use Volume buttons
to select AM or PM, and press MENU/OK to confirm your selection.
This returns you to the Main menu.
As an example of using the telephone keypad (to enter the date, hour and minutes:
to enter 27 February 2013 - 5:35pm, press on keypad ‘2’, then ‘7’, then ‘0’ and ‘2’
(for February), then ‘1’ and ‘3’ (for the year), then ‘0’, then ‘5’, then ‘3’ then ‘5’ then
(to select AM or PM) and MENU/OK.
Press END/CLEAR to exit the menu screen.
www.evadale.com.au
For more information
or to order, freecall
1300 883 194
©2012 Evadale Healthcare. All rights reserved.
Uniden XDECT
TE-SSE35
Cordless Telephone
PAGE
3 of 4
Basic user guide
1 Using the cordless telephone
Make a call
Dial the number, then press TALK/FLASH
Answer a call
Press TALK/FLASH
To set the handset to automatically answer on pick-up, see page 12 of the Owner’s Manual
Hang up a call
Press END/CLEAR or return the cordless handset to the charger cradle
Put a call on hold
Press MENU and use the
buttons to select Hold/Transfer press Menu to select
If you leave a call on hold for longer than 2 min 50 sec, it will automatically be disconnected.
Return to a call on hold
Press TALK/FLASH
Lock the keypad
Remove the handset from the cradle. Press and hold
Repeat this process to unlock the keypad
*
(for at least 2 seconds)
2 Adjusting the volume
To adjust the ringer
volume of the handset
Remove the handset from the cradle.
Press the Volume buttons to scroll through volume settings
The handset display will show Off, Low, Medium or High
To adjust the
ringer volume of the
charger base
On the charger, press the Volume + or - buttons to scroll through volume settings
To adjust the
earpiece volume
When the phone is in use, press the Volume buttons
The display will show 0 (Off), 1 (Low), 2 (Medium) or 3 (High)
4 Adjusting the visual ringer
3 Using the audio boost
You can increase volume in the earpiece
for normal calls and intercom calls.
While audio boost is on, “ “ appears in the display.
Press BOOST again to turn off.
Ringer
BOOST
During a call, press BOOST to
increase the audio volume.
The visual ringer switch is
located on the side of the
charger base. Use this switch
to change the brightness of
the visual ringer on both base and handset.
High
Low
Off
Visual Ringer
Slide the switch so the centre lines up with the preferred
brightness option (High, Low or Off).
The visual ringer does not affect the audio ringer volume.
5 Using the Do Not Disturb function
The Do Not Disturb function turns off
the audio ringers for the base and any
connected handsets. It does not affect
the visual ringers.
6 Finding a lost handset
To activate, press and hold (for at least
2 seconds) the DO NOT DISTURB button
on the base. The DO NOT DISTURB button on the base glows red
and the display shows DO NOT DISTURB on handset. While DO
NOT DISTURB is active, the phone automatically turns on the
answering system.
To stop paging
On the charger base, press
FIND. All connected handsets
will beep for one minute.
From the base, press FIND
again.
From the handset, press any button.
To cancel, press the DO NOT DISTURB button again.
www.evadale.com.au
For more information
or to order, freecall
1300 883 194
©2012 Evadale Healthcare. All rights reserved.
Uniden XDECT
TE-SSE35
Cordless Telephone
PAGE
4 of 4
Basic user guide
7 Using the answering system
From the charger
Record your own
message
Press and hold GREET until you hear the system say
1
“RECORD GREETING” (about 2 seconds)
2
Wait until the system beeps, then begin speaking. Your message may be up to
30 seconds long. The message counter light counts down from 30 to show available time
3
When finished, press GREET again The system plays back your new message
To keep this message, do nothing
To re-record the message, go back to step 1
Play a message
Press
The system announces the number of new and old messages
The first new message then plays, followed by the day and time it was received
Restart message
While the message is playing, press
Replay previous
messages
To return to an earlier message, press
Delete a message
While the message is playing, press
Play old messages
Once all new messages have been played, press
REPEAT
REPEAT repeatedly until you hear the message you want to replay
DELETE
again to access old messages
Please note, once you have Deleted a message it can not be retrieved
Exit the answering
machine
Press
To use the answering machine from your handset, please see page 25 of the Owner’s Manual
This Basic User Guide is designed to help with the basic operation of your telephone.
For more information on all other features and functions, please refer to the
Owner’s Manual supplied with the product.
Attaching the belt clip to the handset
page 9
Using your numeric keypad to enter words
page 14
Storing phone numbers in the ‘Phonebook’
page 17
Transferring calls between telephones or using the intercom
page 21
Using the ‘Text-To-Speech’ function
Page 19
Using the answering machine from your handset
page 25
Using the answering machine while you are away from home
page 28
General problem solving
page 29
www.evadale.com.au
For more information
or to order, freecall
1300 883 194
©2012 Evadale Healthcare. All rights reserved.