1
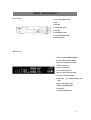
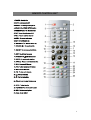
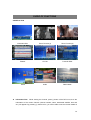
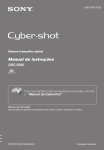
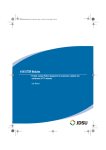
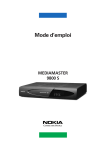
User Manual
Botech BC-9700 SERIES
Digital Satellite Receiver
BC 9700
BC 9700 X
BC 9700 USB
BC 9700 XUSB
Table of Contents
■ SAFETY PRECAUTION
3
■ GLOSSARY
4
■ CONTENTS
5
■ MAIN FEATURES
5
■ FRONT / REAR PANELS
6
- Front panel figure
- Rear panel figure
■ REMOTE CONTROL UNIT
7
■ SET TOP BOX CONNECTION
8
■ GUIDE of FUNCTIONS
10
■ OPERATION of MAIN MENU
13
I. Edit Channels
13
- TV/Radio channel edit
II. Installation
14
- Auto search, Satellite setup, Edit SAT/TP, DiSEqC motorized setting
III. System Setting
20
- OSD control, A/V output setting, Local time setting,
Set on/off timer, Password setting, Management-factory setting,
Data transfer, Version
IV. USB PVR
23
V. Network
25
■ CONNECTION DIAGRAM(DISH)
27
■ SPECIFICATION
29
2
SAFETY PRECAUTION
PLEASE READ THE FOLLOWING SAFETY INSTRUCTIONS CAREFULLY.:
MAIN POWER SUPPLY:
~AC 95-250V, 50/60Hz, Max 30W, SMPS
OVER-LOADING:
Do not overload wall outlets, extension cords or adapters as these can result in fire or electric
shock.
LIQUIDS:
Keep liquids away from the STB due to risk of electric shock and malfunctioning of the STB.
SMALL OBJECTS:
Coins or other small objects must be kept away from the STB as they can fall through the
ventilation slots of the STB and cause serious damage.
CLEANING THE STB:
Disconnect the STB from the wall socket before cleaning it. Use a dry cloth, lightly dampened (no
solvents) to clean the exterior of the STB.
VENTILATION:
Do not block the decoder's ventilation slots. Ensure that a free air flow is maintained around the
STB. NEVER stand the STB on soft furnishings or on carpet. Do not use or store the STB where it
is exposed to direct sunlight or near a heater. NEVER stack other electronic equipment on top of
the STB.
CONNECTION TO THE SATELLITE DISH LNB:
Disconnect the STB from the main power before connecting the cable from the satellite dish.
Failure to do so can damage the LNB.
SERVICING:
Do not attempt to service this product by yourself as this will void your guarantee. Refer all
servicing to qualified service agents.
3
GLOSSARY
■ GLOSSARY
l
STB- Set Top Box
l
TP – Transponder
l
RCU – Remote Control Unit
l
Ethernet (10/100base-T)
Network connection used in the STB to access the Internet:
4
Please check and ensure that the following
items are included within this product.
CONTENTS
l
SET TOP BOX
l
REMOTE CONTROL UNIT
l
POWER CABLE
l
BATTERIES for RCU (size AAA)
l
USER'S MANUAL
MAIN FEATURES
·
Ethernet Communication Port
·
4000 TV & 1500 Radio Channels
·
32MB SDRAM & 2MB Flash
·
13 Multi Picture-In-Picture (PIP)
·
USB 2.0 OTG
·
MPEG2 & DVB-S Compliant
·
Optical Digital Audio Output
·
0/12V
·
Powerful EPG (Electronic Program Guide): Now/Next & 7 Days Program Guide
·
DiSEqC 1.0, DiSEqC 1.2 & USALS Compatible
·
OSD Teletext L1.5 (DVB ETS 200 706 / VBI Insertion / Arabic Teletext )
·
Video Zoom on Screen
·
Software & Data Upgrade via RS-232 (STB-STB, PC-STB)
·
Games
·
8 Favorite Groups
·
Multi-Event Timer
·
15 Languages Supported: Albanian, Arabic, Bulgarian, English, French, German, Italian,
( For 9700 X and 9700 XUSB models )
( For 9700 USB and 9700 XUSB models )
Macedonian, Persian, Romanian, Russian, Serbian, Spanish, Swedish, Turkish
·
Fully compliant to DVB standards
·
S/W Upgrade via USB H/D or USB memory stcik
5
FRONT / REAR PANELS
■ Front Panel
1. Power ON / Standby mode
2. Menu
3. Exit button
4. . Volume▼/▲ button
5. OK button
6. Channel ▼/▲ button
7. Front numeric display (LED)
8. Remote IR sensor
■ Rear Panel
1. LNB : Connects to satellite dish/antenna
2 RS-232 : Software download/upload
3. Audio L/R : Left & Right audio output
4. VIDEO : Video output
5. 0/12V : 0 / 12volt output
6. TV : Scart connector for TV
7. ANT. IN : TV RF antenna connection
8. TV OUT : TV RF feed connection
9. Main Power : ~AC 95-250V, 50/60Hz, Max
30W
10. Main Power Switch : On/Off
11. S/PDIF : Digital Audio Output
12. USB PORT
13. RJ45: LAN Port (Ethernet)
6
REMOTE CONTROL UNIT
1. POWER : Standby / On
2. MUTE : Audio mute On/Off
3. SIGNAL : To view signal strength bar
4. COLOR : PAL/ NTSC/ AUTO Selection
5. NUMERIC Keys (1~0) : Numeric input
6. FAV : To see Favorite channel list
7. RCL : Press to recall last channel
8. MENU : To access main manu
9. SAT : To view Satellite list
10. CHANNEL
11. VOLUME
/
/
: Channel Down / Up
: Volume Down/Up
12. OK/LIST : To view channel list (Enter)
13. EXIT : To exit from the menus
14. TV/RADIO : TV Radio mode select
15. AUDIO : For audio mode selection
16. INFO key : Press to view Information Box
17. EPG : To access EPG menu
18. TTX : To view teletext on TV Screen
19. MP3 : To view MP3 data
20. PIG : To view multi channels
21.
: For fast rewinding
22.
: For fast forwarding
23.
PLAY/ List : To view PVR list / play
24. STOP : To stop function
25. TS(TIMESHIFT) : For timeshift function
26. REC : To view recording box
27. Zoom : Zoom IN/OUT
7
SET TOP BOX CONNECTION
■ CONNECTIONS
A. Turn off the main power supply of the STB before connecting or disconnecting
the LNB. Connect the TV's RF antenna connector to the ANT IN socket of the STB.
B. RF Connection:
a. Connect the RF cable from the TV OUT socket of the STB to the RF IN
socket on the VCR.
b. Connect another RF cable from the RF OUT socket of the VCR to the RF
IN socket of the TV.
C. Connect the coaxial cable from the LNB into the LNB socket of the STB.
D. To connect to another STB, use the LOOP socket of the STB.
E. Use the VCR / TV Scart socket to connect to the scart socket of a TV / VCR.
F. Use the AUDIO L, R / VIDEO socket to connect to the Line socket of the TV / VCR.
G. Use the 0/12 Volt socket to connect it with the 0/12 volt switch.
H. RS232 socket can be used to download and upgrade the software of the STB.
İ.
Connect the main power plug of the STB to the mains wall socket. (~AC 95-250V
50/60Hz, Max 30 watts)
J.
Connect the S/PDIF output with the input connector of a device which is capable of
receiving an optical digital Audio input.
K. Connect the ETHERNET port of the STB to a HUB or xDSL Modem. A Direct LAN
cable is required to connect to a HUB or a Modem.
8
NOTICE : If you are not a very skilled user, it is important that you carefully read this operating
manual to get used to some of the essential technical settings required.
First, press the POWER button to turn on the STB from the Standby mode.
Information Box will appear for a short time and disappear.
Then, the
By pressing the ⓘ button, the Info
Box will remain on the screen.
The display time of the Info Box is adjustable under the - System preference / OSD control / Info
Box time out menu. If the current channel has EPG (Electronic Program Guide) information
with it, press the GUIDE button to see not only the current channel's, but also the other
channels' EPG as well.
l
Press the MENU button on the RCU to make the Main menu appear.
l
Go to the LNB setting menu under the Installation menu and press OK button.
l
Plug LAN cable (Direct) for network applications
l
The default PIN code is 0000
l
Choose the right parameters for Satellite name, LNB frequency, 0/12V, 22KHz and
DiSEqC 1.0 according to your LNB and satellite settings.
If the desired satellite name
and LNB frequency is not found in the given list, ask your local dealer for further
information.
l
When all the parameters are correctly chosen, you will be able to see the green level of
the signal quality from the incoming LNB signal.
l
Then, choose the Channel search mode in the same OSD page and press OK button.
l
And select the Search mode as you desire by using the ◀ / ▶ keys.
l
Then, choose the Start searching mode and press OK button.
l
The complete searching procedure will take a while. When the searching process is
done (100%), press the OK button to Confirm and Save the new channel list.
l
For further guide of operations, please refer to the following of this User's manual.
9
GUIDE OF FUNCTIONS
■ USEFUL TIPS
l
Information Box
Zoom Function(1)
Zoom Function(2)
Teletext
CH List
Powerful EPG
Game
Audio
Radio Mode
Information Box: While viewing the channel, press ⓘ button of the RCU once, then the
information of the current channel (channel number, name, associated satellite, time and
etc.) will appear. By pressing ⓘ button twice, you will be able to see the further details of
10
the program information and its running time. When you press this button for the third time,
you will see the Encryption type of current channel.
l
Zoom function : Press the Green color key to open the menu. You are able to zoom in the
normal size of screen up to x2.
l
Volume control :
Use this volume down▼/ up▲ keys to control the audio Volume level.
l
Teletext & Subtitle : Press the teletext key to view the teletext and subtitle information
provided.
l
Channel move by numeric key : While viewing the channel, use the numeric buttons to
move directly to your next desired channel. For example, just press 1 2 0 then the channel
120 will be displayed.
l
Pause : Press PAUSE button to pause the current channel screen
l
Channel list access (by OK/list button) :
channel
list and use ▼/▲ keys to choose the channel, then press OK button to view that
selected channel
·
Press OK/LIST Button to view the all TV/Radio
in the PIG screen.
VARIOUS SORTING functions in channel list menu : In this menu, use the ▲/▼ and
◀/▶ keys to move & select the desired channel, and then press OK key to view the live
channel in PIG screen. To see the list of channels in various sorting, use the color keys in
the bottom of the RCU as follows;
-
RED for satellite / GREEN for CAS types / YELLOW for Alphabet / BLUE for All
channels sorted list In the each chosen list above, use ▲/▼ keys to select and
view the sorted lists as desired.
-
Sorting for combination of two or more condition is possible. For example,
choosing a Hotbird by using RED key and choosing a Conax by GREEN key then
choosing Alphabet P through Yellow key will give you the complete list of channel
names starting with letter P, encrypted with Conax receiving from the satellite
Hotbird.
11
·
Audio selection menu (by AUDIO key) :
You can choose the audio language of the
channel, by pressing AUDIO key of the RCU when a current program supports the various
soundtrack.
First, you can choose the STEREO, LEFT and RIGHT by using ◀/▶ keys.
And use ▼/▲ keys to select the desired audio track.
·
Radio channel mode (TV/Radio key) :
Use this TV/Radio button to toggle between the
TV and Radio channel mode.
·
Multi-PIG: 13 sub-pictures would be shown when press “Blue” button of RCU.
·
EPG (Electronic Program Guide) access by GUIDE key :
current
To see the information of
showing TV/Radio services as well as the next program schedules, press GUIDE
button of the RCU. If any EPG is available on that program, you will see the details such as
description, start/end time and schedules etc. To see the extended information of that
program, press ⓘ button of the RCU.
EPG supports 7-day schedules and
reserved watching on EPG.
Note) If prefer to cancel the reserved
event, please go to “SET ON/OFF
Timer” MENU.
12
OPERATION OF MAIN MENU
I. CHANNEL ORGANIZE
A. TV / Radio channel edit
In this menu you can edit the TV/Radio channels in various ways. To edit the Radio channels,
press TV/Radio button to change to Radio CH edit mode. Use ◀/▶ keys to select the desired
edit mode and press OK button.
* While editing the channels, press RED key of the RCU to view the selected channel in
the PIG screen.
l
RENAME : Select the channel you want to rename and press OK key, then the KEY
PAD window will appear. Use the given keys from the pad to rename the new CH
name. Press the BLUE key of the RCU to delete, and press RED key to Save & Quit
when you are done with renaming.
l
LOCK : Select the channel you want to be locked and press OK button to LOCK.
you press OK button twice the selected channel will be UNLOCKED.
If
Use EXIT key to
get out from the menu when you are done.
* When you select the LOCKED channel while viewing, you will be asked for a password in
order to access the channel. So, use this feature to KEEP THE CERTAIN CHANNELS
AWAY FROM YOUR CHILDRENS VIEW.
l
SKIP : Select the channel you want to be skipped and press OK button to skip. If you
press OK button twice the selected channel will be UN-skipped again. Use the EXIT
key to get out from the menu when you are done.
13
l
DELETE : Select the channels which you want to be deleted and press OK key.
And
you will see the delete marking' indicated next to the channel names. The selected
channels will be deleted when you exit the channel edit menu.
l
Deleting is different from skipping function as it removes the channel
completely and permanently from the memory of the STB. The ONLY way of
recovering the deleted channels are performing a new CH Search.
l
MOVE : Select the channel you want to be moved with OK key, and use ▲/▼ keys to
relocate them.
l
SORT : By pressing OK key, the list of sorting types will appear. Select the desired
one and press OK to perform it.
l
FAVORITES : Use the RED key to name the Favorite group name as you wish, then
press the GREEN button to add or delete the channels from that favorite group. The
YELLOW button is provided for deleting the selected
group.
II. INSTALLATION
A. Channel search
l
Search Mode : Press ◀/▶ keys or OK key to view and select the desired search mode
One satellite : Will search only one selected satellite.
Multi satellites : Will search more than two selected satellites by one searching
procedure.
One transponder : Will search only one selected transponder.
Multi transponders : Will search more than two selected TPs within the same satellite.
PID search : Will search a certain channel with known Video, Audio, PCR PIDs.
l
Satellite Name : Press OK button to display the complete list of satellites and choose
the one which you want to perform the search.
If the desired satellite name is not in
the list, press the RED button to move to the LNB setting menu then ADD a new
satellite name.
Refer to LNB setting menu for further details.
14
l
LNB Frequency : Press OK button to see the frequency list given and select the
proper frequency according to the current LNB being used for the selected satellite.
You can also enter the frequency by using the numeric keys of RCU.
l
DiSEqC 1.0 selection : Press OK key to display the list and choose the proper
selection for your DiSEqC switch.
l
Transponder : Press OK button to view the transponders list of the selected satellite
then again use OK button to select the desired one. If the desired TP frequency is not
shown in the given list, then press GREEN button to go to SAT/TP Edit menu and
edit a new TP frequency. Refer to SAT/TP Edit menu for further details.
l
Network Search : Some of the new transponders being broadcasted in the satellite
could be missing in the given TP list. In this case, there is a good chance that the
information of those new transponders are being sent through
the given TP. So, if you set the Network Search to 'ON' status and search that TP,
then you will be able to catch the channels in those new transponders.
l
FTA/Scrambled : Select 'FTA Only' to search the Free To Air channels only. Otherwise,
select 'ALL' to perform the search for all the encrypted + FTA channels.
l
Start Searching : If all of the above parameters are set correctly, you will be able to
see both of the Signal (RED bar) and Quality (Green bar) level at the bottom of the
menu. Now, press OK button(Blue key) to start searching.
15
B. LNB Setting
In this menu, you are asked to set the proper conditions for LNB and other switches
such as DiSEqC, 0/12V, and 22KHz tone. Especially if you want to perform a multisatellite search, it is required that you complete the settings for corresponding
satellites in this menu.
l
Satellite Name : Select a satellite which you want to set the conditions for. And
if want to add a new satellite name, select the 'APPEND' from the bottom of the
given satellite list then press BLUE button of the RCU to name this new satellite.
l
LNB Frequency : Select a desired LNB frequency from the list given, or add a
new one by numeric key of RCU.
l
0 / 12 Volt control : Select 'ON', if you are using a 0/12V switch for selected
satellite. Otherwise choose 'OFF'.
l
13 / 18 Volt control : Select 'AUTO', then this voltage control will apply
automatically for the selected satellite.
l
22KHz Tone Control : Select 'AUTO', then this tone control will apply
automatically for the selected satellite.
l
DiSEqC 1.0 Selection : Press OK key to display the list and choose the proper
selection for your DiSEqC switch.
l
Transponder : Select the desired transponder from the given TP list.
If the
desired TP frequency is not shown in the given list, then press GREEN button to
go to SAT/TP Edit menu and edit a new TP frequency.
Refer to SAT/TP Edit menu for further details.
*If all of the above parameters are set correctly, you will be able to see both of
the Signal (RED bar) and Quality (Green bar) level at the bottom of the menu.
Notice :
A minimum level of stable signal Quality is required to be able to
search and view the channels.
16
Use the RED / GREEN / YELLOW / BLUE keys of the RCU to directly access the
followings from this menu ;
RED key : Channel search menu
GREEN key : SAT/TP Edit menu
YELLOW key : DiSEqC Positioner menu
BLUE key : Save or Add Satellite
C. SAT/TP Edit
In this menu, you can delete the existing satellites and you can also add/delete the
transponders. (If you want to ADD new satellites, Go to the LNB setting menu).
17
l
Satellite Name : Select a satellite which includes the transponders you wish to
edit (Add/Delete).
l
Transponder : Select a transponder which you want to edit, and you will be able
to edit its Frequency, Symbol Rate and a Polarization.
l
If you want to ADD a new TP for the selected satellite, choose the 'NEW TP' from
the end of the given transponder list. Input the correct frequency, symbol rate and
polarization then press the BLUE key of the RCU to add this new TP.
l
Frequency : Input the desired new TP frequency by using the numeric buttons of
RCU.
l
Symbol Rate : Input the desired new Symbol rate by using the numeric buttons of
RCU.
l
Polarization : Select either the Vertical or Horizontal polarity for selected
transponder above.
After setting all the above parameters, press the BLUE key of the RCU to
SAVE the current edited TP.
l
Deleting Satellite : First, press OK button to open the Delete Satellite window.
Then use ▲/▼ & ◀/▶ keys to move and press OK to select the satellites which
you want to delete.
After selecting satellites, press RED button of the RCU to delete the
satellites.
l
Deleting TPs : Also, press OK button to open the Delete Transponder window.
Then use ▲/▼ & ◀/▶ keys to move and press OK to select the TPs which you
want to be deleted.
After selecting transponders, press RED button of the RCU to delete the
transponders.
18
D. DiSEqC Positioner
■ DiSEqC Motor
If you have a DiSEqC 1.2 motorized system, you can use this DiSEqC 1.2 positioner functions.
l
Satellite Name : A selection of this satellite names will be used to identify a motor
antenna position.
l
Mode : Choose 'DiSEqC Motor' to use this motorized system.
l
Transponder Frequency : This selected frequency will be used to catch the strong
level of signal.
l
Command Mode : Choose between the User and Installer modes.
User : This mode is used to fine-tune the position of the motor
antenna for better signal reception
Installer : This mode is used to search for the position of a
selected satellite manually.
l
Movement
In User mode : The movement will be adjustable by fine tuning.
In Installer mode : The movement will be adjustable by East / West going command.
l
Motor Control : Go to - To select motor control
l
Store Position : To store a new position, or Overwrite a position
19
■ USALS
In order to use this USALS function, you need to have the Rotor installed to your Dish
l
mount
Select the desired satellite which you wish to preform the search, then the Sat
l
Longitude will be automatically changed.
l
Now, just put in the numeric data for your Longitude and Latitude of your Dish location.
l
And wait for a short time, until the Dish automatically finds the desired satellite.
l
Once you find the 1 satellite position, the others will also follow automatically.
To use this USALS function, please refer to your local installer or distributor of our STB.
( You can also visit - www.stab-italia.com for your reference ).
III. SYSTEM SETTING
A. OSD Control
In this menu, you can set the preferences regarding the On Screen Display of your choice ;
·
Menu language : Select the language which you want the OSD to be displayed in.
·
Transparency : Higher the OSD transparency, you will be able to see the live picture
more clearly on the back screen.
·
Info Box & Volume Bar Time out :
20
B. A/V Output Setting
Choose the TV type between PAL/NTSC/AUTO and if you have the TV supporting RGB, select
RGB mode to get the best picture quality.
Also, if you have a TV which supports the 16:9
format, choose the Letter Box. AUX mode is provided for a case when you connect the other
IRD to a VCR scart of this STB, choose the IRD to view the video of the other IRD connected.
Finally, choose required RF settings.
The default is set for RF channel number 38.
C. Local Time setting
Select the GMT Usage as you desire.
If you set the GMT Usage 'ON', this means you will get
the time reference from the broadcasted stream of the satellite. Also, set the proper GMT time
offset as you require. When you don't want to use the GMT time as a reference clock, use the
Manual time by setting the Hour and Minute according to your local time.
D. Set on/off Timer
In this menu, you can set 8 event timers for selected channels.
Choose the event number first,
and select the status for Usage of the timer.
On/Off Mode means whether you will turn On or Off the STB with the timer. Input the
parameters of desired channel and the Time which you want the timer to start operate.
* Reference time for a Timer operation is either the GMT time or a Manual time set, depends
on a GMT usage status.
21
E. Parental control
In this menu you can set the Locking status of several menus which will prohibit the accessing
of those menus from the unwanted person (ex. Your children).
And you can also set the
desired age rating for channel accessing here.
If you wish to change the password, input the current PIN then new PIN, and verify to complete.
F. Memory Management
·
Factory Setting
Factory setting is required after a certain upgrade of the STB's software.
In this
case, you will be notified by your local installer or distributor in advance. And
Performing a factory setting will DELETE ALL THE CHANNEL related data, so
DO NOT perform this factory setting if you are not asked to do so.
IV. USB PVR (FOR 9700 USB & 9700 XUSB)
Before connecting USB H/D to STB, please format H/D on FAT 32.
A. Recording
a. Recording: Press [REC] button while watching screen to display the recording box. Then, you
can check the status and process time of recording at the left side of screen.
b. Stop Recording: Press [STOP] button to quit the recording. Then, the recording information
bar will disappear.
22
B. Playback
a. PLAY / LIST : Press [PLAY / LIST] button to display the PVR LIST. Select the recorded
channel at the list to
b. Forward / Backward: Press [ forward / backward] button for moving playback position. With
pressing again and again, you can go forward or backward as you like.
c. Pause : Press [Pause] button to stop playing.
d. Stop : Press [Stop] button to stop playback function. Then it will go back to the LIVE video
watch.
e. You can see the information of selected channel at the left top side
C. Timeshift
a. Timeshift On: Press [TS] button while watching LIVE to use timeshift function. It stores
current channel for max. 4 GB. The duration time differs from 1 and half hour to two and half
hour according to stream bit rate.
b. Timeshift Off: To stop the Timeshift function, press [STOP] button.
D. MP3
a. MP3 LIST : Press [MP3] button to display the MP3 data downloaded from PC in the separate
MP3 screen. If you cannot see the list, you should download MP3 files according to 'c' below.
Move the MP3 files using [▲▼ ] button and to play the selected file, press [OK] button. Then,
the list of selected MP3 files will be displayed at the left-bottom side.
b. MP3 Play List: Press [◀◀ ] [ ▶▶ ] to move MP3 file in the MP3 Play List. Select MP3 files you
23
want to listen and press [
] button to play the selected files. If you press [MP3] button again, a
small screen which only shows the title of a song will appear. If you want to listen to other music,
repeat the above process.
c. MP3 Data Download From PC: Connect USB H/D to PC and copy MP3 files of PC into USB
H/D.
24
V. NETWORK (FOR 9700 X & 9700 XUSB)
·
Network Address Setting
For network applications, the STB should be set network addresses. Please follow the
steps for setting network address;
Step 1. Connect Ethernet(i.e., LAN cable) to the STB
Step 2. Enter the Network Address Setting menu of Main MENU
Step 3. Set the IP address of STB either Static or DHCP
Before setting to Network Address, the STB should be connected the Ethernet
network with ADSL router (or HUB). If not connected, and enter the Network MENU, it
shows a message of being not connected as below;
If LAN cable connected, Network
Address Setting would be available
as above figure, and press “OK” for
entering it. There would be set the
network IP address through either
Static or DHCP method as below;
Static Method – Not recommended (Use for Professional usage)
In this method, a user directly inserts the IP address of STB. Thus, select the Static,
and all terms required network address would be highlighted;
This Static mode also purposes for
TEST or Manufacturing of STB.
Not recommended.
25
DHCP Method – Recommended (Use for generic network applications)
In this method, a user obtains the IP address of STB from DHCP server (i.e., ADSL
router or HUB which has a IP sharing function). Thus, select the DHCP and some of
terms required network address would be not highlighted as below. Press OK for
obtaining IP address.
This DHCP mode is a factory default mode when factory reset of STB.
MENU for DHCP
Finding IP address
Note) On DHCP mode, IP address would be automatically obtained every time power is
off and on.
26
CONNECTION DIAGRAM(DISH)
1) One Dish
2) 2 dishes
5) 8 dishes and DiSEqC switches
27
SPECIFICATION
I.
STB Specifications
Specification
Description
Power
~AC 95 - 250V SMPS
Input Frequency
950~2150 MHz
Data Transfer
RS-232C, Male type, 115Kbps
SCART
2 SCART for TV / VCR
A/V Out
Video, Audio (left / right)
LNB Power
13 / 18 volt (500mA Max)
Modulation & FEC Type
QPSK / Multiple convolution coding
Digital Audio
S/PDIF Output (OPTION)
DiSEqC support
DiSEqC 1/2/3/4 & Compatible
Tone Switching
22KHz tone
RF
UHF CH 21~69 with PAL I/G/K
Modulator
Video Spec.
MPEG-2 / DVB Compliant
Video Compression
MP@ML in MPEG-2
Network
RJ-45 connector for Ethernet Interface
USB PVR
USB 2.0, OTG
II. Main processor & Memories
Specification
Description
Main CPU
32bits RISC CPU @133MHz
Flash Memory
2MB
SDRAM
32MB
Network IC
W3150A+
III. Tuner & QPSK Channel
Specification
Description
Input frequency range
950~2150 MHz
Channel capacity
4000 TV and 1500 Radio Channels
Tuning system
PLL digital synthesis channels
Tuning step
500KHz Max
Modulation
QPSK (DVB Compliant)
28
Inner FEC
FEC Rates : 1/2, 2/3, 3/4, 5/6, 7/8
(DVB specification)
Outer FEC
Input Symbol Rate
Input Symbol Rate
2 ~ 45M symbols/sec
IF Bandwidth
27MHz
Connector Type
F type (IEC 169-24 female)
IV. MEPG Audio
Specification
Description
Operation mode
Stereo and Left/Right (Mono)
Sampling Rates
32, 44.1 and 48KHz
Resolution
16 bit digital to analogue Converters
V. MPEG Video
Specification
Description
Video spec.
Meets ETR 154 amended in ALM-95-021
TV System
PAL I/G/K
Video decoding
ISO / IEC 13818-2, MP@ML
Resolution - PAL
720 pixels x 576 lines x 25 frames /sec
Resolution - NTSC
720 pixels x 480 lines x 30 frames / sec
VI. RF Modulator
Specification
Description
Connection
IEC coaxial female 9.5mm (IEC 168-2)
Features
Input RF bypass supported
Channel range
CCIR UHF E21 - 69 adjustable
Pre-set channel
Channel 38
VII. Data Input & Output
Specification
Description
Serial Interface
9-pin D-sub Type Male RS-232
Max. 115Kbps supported
Ethernet Interface(삭제)
RJ-45
10base-T supported
29
VIII.Power Supply
Specification
Description
Input Voltage
~AC 95 - 250V, 50/60Hz
Type
SMPS
Power Consumption
Max. 30 Watt
Standby Power
10 Watt
Power protection
Internal fuse
IX. Others
Specification
Description
Physical figure (W x H x D)
340 x 60 x 252mm
Weight (net)
Approx. 2.5 Kg
Operation Temp.
0℃ ~ 45℃
30