1
Slush Machine
BMDSD01 BMTSD05
Contents
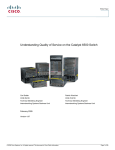
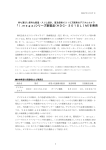
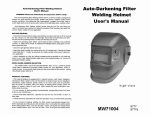
1 . Exterior layout
BMDSD01
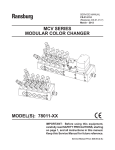
BMTSD05
2. Setup
Installation
Operation
Cleaning and maintenance
3. How to Operate
4. Troubleshooting
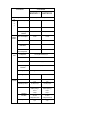
5. General Specifications
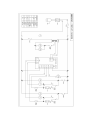
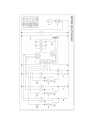
6. Circuit Diagram
7. Parts List
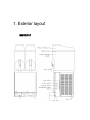
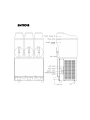
1. Exterior layout
BMDSD01
BMTSD05
2. Set Up
Installation Instructions
Transportation and unpacking
1. Do not slant the machine over 45°
2. Unpack the product with care to ensure no damage.
3. Do not move the machine while it is full.
Location
1. This machine is designed for indoor use only.
2. Locate on a flat, solid and level surface.
3. Do not install.
a. in direct sunlight or adjacent to heat sources such as stove tops or ovens.
b. where the machine is subject to excessive moisture.
c. where the machine may come in contact with gas, oil or electrical leakage.
4. The machine can be leveled by screw adjusting the rubber legs if necessary.
Electrical Requirements
1. The machine is designed for use with 220volts { ± 10%).
2. Do not use this machine with a double adaptor or extension cord.
3. Where multiple machines are on a single circuit ensure the total power
requirement does not exceed the circuit capacity.
4. Ensure the machine is properly earthed.
Operating Instructions
1. The operator must maintain the machine and location in hygienic conditions to ensure the safety of
the product.
2. The machine requires periodic disassembly, cleaning, sanitizing and reassembly as set out in this
manual to ensure safe operation.
3.
The manufacturer accepts no responsibility for any matters ansing from the failure of the operator
to comply with the procedures set out in this manual.
Ensure Safe Electrical Connection
Do not use with adaptors or extension cords. Do not used frayed or damaged cords or plugs
Take Care When Spraying
Use of flammable cleaners or solvents may lead to fire.
Do Not Store Flammable Materials
Avoid potential fire risk by keeping flammable materials away from the machine
Do Not Sprinkle Water
Excess water or moisture may lead to electrical hazards. Do not spray water into or onto the
machine
Long Term Storage
If the machine is turned off for an extended period the following procedure should be observed.
1. Remove and discard all unused product
2. Disassemble the machine clean, sanitize and reassemble as per the instructions
3. Allow to air dry
Cleaning and Maintenance
To maintain high degree of food quality this machine
should be cleaned and sanitized
1. Turn the Freeze/refrigerate switch to the off position.
2. Draw off the remaining product.
3. Fill the machine with clean warm water
4. After two or three minutes draw off the water and discard
5. Turn the agitator switch to the off position
6. Turn off the main power switch and remove the plug from the power source.
7. Remove the bowl covers and wipe clean with warm detergent water. DO NOT IMMERSE.
8. Remove the bowl by gently lifting the front and pulling. Once the bowl is free slide it off the agitator.
9. Slide the agitator off the cooling cylinder
10. Remove the large ~0" ring at the back of the bowl and soft seal on the drive shaft
11. With mild detergent and warm water wipe all the machine surfaces.
12. Remove the tap assembly on the bowl by pulling out the locking pin
13. Remove the "O" ring and seal from the draw valve.
14. Wash all parts in warm detergent water Rinse and allow to air dry.
Reassembly
1. Lubricate the "O" ring and seal on the draw valve.
2. Insert the draw valve assembly into the bowl and hold in place with the tap handle and
secure the tap handle with the locking pin
3. Lubricate the inside of the soft seal and slide it into position on the drive shaft.
4. Position the large "O" ring on the back of the cooling cylinder.
5. Lightly lubricate the silver bush located in the front of the bowl.
6. Lightly lubricate the outside of the silicone seal on the drive shaft.
7. Slide the agitator onto the cooling cylinder
8. Slide the bowl over the agitator and align it with the large "0" ring at the back of the cooling cylinder.
9 Align the agitator with the silver bushing in the front of the bowl by lifting the agitator while sliding the
bowl into position.
10. Ensure the bowl is set in position with the slot in the front sides of the bowl's base locked over the
machine edge.
11. Fill the machine with sanitizing solution and am without refrigeration for five minutes
12. Drain and rinse the machine.
13. The machine is now ready for use
For Perfect Operation Please Check The
Following
1. The machine is installed indoors.
2. The machine has 30cm of clear space on all sides for good ventilation.
3. The location is free of gas, water and excessive heat situations.
4. The power supply is correctly matched to the machine.
Install On a Flat, Level, Solid Surface
Damaging vibration and excessive noise can result from a poor surface
location
Avoid Vibration
The machine can be leveled using the control screw on the front left side
Locate With Good Ventilation Away From Heat
Install Away From Moisture
Keep Away from Smoke or Gas
Keep The Surrounding Temperature Above 15 C
Avoid cold locations
3. How to operate
Once the bowl has been cleaned, fill the tank with the desired product (4.51, 1.2gallons).
Do not overfill the tank. Note that when filling, shush occupies more volume than the liquid
(approximately 1 gallon of slush). Be sure to consider product ratio (not exceeding 1 gallons total
mix for slush) before mixing or pouring product into tank. In order to keep your machine in good
working condition, keep your machine full.
If using natural products as a base (coffee, lemon juice, orange juice, etc.), it is required that 5 to
7 oz. of sugar per gallon be added. Follow the dilution instructions on the bottle. In general the
mix ratio of the product shouldn't be less than 12.
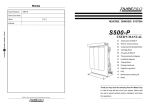
To Start the agitator, press main power and agitator switches to on position,
Figure 8. Note: Depending on the version of your machine, the control panel may
look differently then figure 8, please also refer to switch symbols. Note that your
machine is equipped with a time delay relay that provides for a three minute delay
from the time of the initial start. This is to prevent the compressor from short
cycling.
Figure 8
1. For liquid, press the cooler switch to bottom position. For slush, press the cooler
switch to up position.
Note:The switch is a three position switch and order to have the machine off, the switch needs
to be in the middle position.
2. If machine is being used as a liquid cooler, the switch at liquid position, up, is
provided with an inside thermostat for controlling the liquid temperature.
To illuminate the transparency on top of the unit and the product in the bowl press the display light
switch to up position.
Normal Operation (Day) For Slush Production
Power switch on
Light switch on
Agitator switch on
Freeze / Cooling switch press Freeze
Standby Operation (Night)
Power switch on
Light switch off
Agitator switch on
Freeze / Cooling switch press Cooling
Adjusting Product Texture
This machine is factory set to provide perfect product. However the variety of
conditions and variation in products means that sometimes adjustments to
the product texture are necessary. To adjust the degree of ice forming turn
the screw knob on the top of the motor housing at the rear of the bowl an
indicator slot is on the rear of the machine Allow thirty minutes for the change
to take eftect before further adjustment.
Adjusting Standby Product Temperature
This machine is set to hold the product at 2-6 during standby In the event of this needing to be adjusted a
lecoxuoaa should be consumed.
Product Selection and Use
Once the machine has been installed and sanitized it is ready
for use.
Product Selection
1. This machine is designed for use with products containing 13% – 15% sugar. It is the sugar
content which stops the product from freezing solid in the bowl While products lower sugar
content may run well in the machine they are more likely to cause freeze up of the machine and
consequential damage to the unit. Such damage is not covered by warranty. Only use products
with a 13-15% sugar content.
2. Never mix the product in the bowl. The product should be pre mixed and added as a complete
product
3. Handle the product with care and observe hygiene procedures to ensure the safely of the
product. Many products required refrigeration only after they are diluted. Ensure you know the
requirements of the product you choose.
4. Maintain the product at or above the minimum level marked on the bowl. Allowing the product to
fall below this level not only can cause damage to the machine but will increase the power costs
of the machine
4.Troubleshooting
Trouble
The machine has no power
Cause
Remedy
No power from the outlet The fuse Check the power supply
has blown Circuit breaker is off
Reset the circuit breaker
Replace the fuse
The agitator stops
The product has frozen the agitator Turn off and defrost Try again.
to the barrel
Product may have too low sugar
content
The machine will not dispense
Product level is too low
Refill to at least minimum level
product
Product is too frozen
Adjust texture control screw on rear
of machine
The machine will not freeze the
Sugar content is too high
product
Display light does not work
Replace the product with mix at
correct sweetness.
Lamp not plugged in
Plug the lead into the socket in the
top of the machine
Blown lamp
Change the lamp
Division
Contents
BMDSD01
Apparatus
B
0
d
y
Super slush & Cold juice
Dimensions (d w h)
400 x 400 x 800
630 x 400 x 800
Cabinet
Stainless steel
Stainless steel
Foaming with woo re-tan
Foaming with woo re-tan
Elec. Consumption
1100W
1350W
Operating Current
5.0A
6.1A
Gear Motor
2EA
3EA
Fan Motor for
82CE-3016
82CE-3016
Insulating
Material
Electric
Characteristics
BMTSD05
the Compressor
Freezing
Unit
Compressor
The complete closed-up type
Condensor
Pin-tube from
Evaporator
The tube-type pice
The Cooling
Controller
The capillary tube
Freezing Capacity
Freezing
Capacity
295g/Low Pressure 25-28 PSI
Freezing Catalyer
R404a
R404a
Material Container
Waters 30˚C /6000CC
10˚C
Waters 30˚C /6000CC
10˚C
Operating Control
On,Off by torque
On,Off by torque
Attachments
Operating
Condition
Option
Eaten grease 1
Eaten grease 1
Rubber packing 2
Rubber packing 3
Fuse 1
Fuse 1
Lamp2
Lamp 3
Surrounding Temp
Surrounding Temp
33~35˚C
30~35˚C
Voltage:220V,60Hz
Voltage 220V,60Hz
Table Dispenser for paper Table Dispenser for paper
cups
cups