1
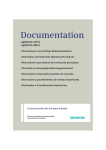
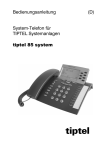
optiPoint 410 S
optiPoint 420 S
Informationen und
wichtige Bedienprozeduren
Information and
Important Operating Procedures
Bedienelemente – Operating Features
Bedienelemente – Operating Features
optiPoint 410 advance S + optiPoint display module
1
2
12
3
4
8
13
14
5
7
8
9
10
optiPoint 410 economy/economy plus/standard S
1
11
3
4
5
7
8
9
10
optiPoint 410 entry S
1
5
3
7
9
10
2
Bedienelemente – Operating Features
optiPoint 420 advance S + optiPoint self labelling key module
1
2
6
4
5
7
8
9
10
optiPoint 420 economy/economy plus/standard S
1
11
6
4
5
7
8
9
10
Erklärungen zum Bedienfeld siehe Æ 4
Description of the control panel see Æ 4
3
Bedienelemente – Operating Features
Welche Bedienelemente stehen mir zur Verfügung?
Siehe Seite 2 und 3:
1 Hörer
2 Grafik-Display (z. B. 4 Zeilen mit je 24 Zeichen)
3 Funktionstasten
4 Mikrofon zum Freisprechen (nur optiPoint standard/advance)
5 Lampen
6 Funktionstasten mit automatischer Tastenbeschriftung
7 Wähltastatur
8 Tasten zum Blättern/Bestätigen von Funktionen
9 Tasten für Telefoneinstellungen
10 Lautsprecher zum Lauthören und für Ruftöne
11 Display 2 Zeilen mit je 24 Zeichen
12 Beleuchtetes, kippbares Grafik-Display mit Touch-Screen Funktionalität
13 Taste zum Öffnen/Schließen des Kontextmenüs
14 Sprachwahl-Taste
Which operating features are available?
See page 2 and 3:
1 Handset
2 Graphic display (e.g. 4 lines with 24 characters)
3 Function keys
4 Microphone for speakerphone mode (only optiPoint standard/advance)
5 LEDs
6 Function keys with automatic key labelling
7 Keypad
8 Keys for scrolling and confirming functions
9 Keys for telephone settings
10 Speaker for open listening and ring tones
11 Display, 2 lines with 24 characters
12 Backlight, tilt-able graphics display with touch screen functionality
13 Key to open/close the context menu
14 Speech dialling key
4
Das optiPoint 410/420 S anschließen Connect the optiPoint 410/420 S
Das optiPoint 410/420 S anschließen
Connect the optiPoint 410/420 S
Beispiel: optiPoint 410/420 advance S
Example: optiPoint 410/420 advance S
3
4
5
8
6
7
5
Das optiPoint 410/420 S anschließen Connect the optiPoint 410/420 S
Welche Anschlussmöglichkeiten stehen mir zur Verfügung?
Siehe Seite 4:
1
LAN-Schnittstelle zur Kommunikationsplattform
2
LAN-Schnittstelle zum PC
3
Steckernetzteil
4
Kopfhörer*
5
Hörer
6
USB-Schnittstelle
7
optiPoint Adapter*
8
optiPoint Beistellmodule (z. B. optiPoint display module)*
*optional
Which capabilities of connecting are available?
See page 4:
1
LAN Interface to Communication Platform
2
LAN Interface to PC
3
Plug-in Power Supply Unit
4
Headset*
5
Handset
6
USB Interface
7
optiPoint adapter*
8
optiPoint sidecar module (e. g. optiPoint display module)*
*optional
6
Informationen zum Telefon
Wichtige Hinweise
Betreiben Sie das Telefon nicht in explosionsgefährdeter Umgebung!
Benutzen Sie nur Siemens Original-Zubehör! Das Benutzen von anderem Zubehör ist gefährlich und führt zum Erlöschen der Garantie
und der CE-Kennzeichnung.
Öffnen Sie niemals das Telefon! Bei Problemen wenden Sie sich an
das zuständige Fachpersonal.
Die Informationen in diesem Dokument enthalten allgemeine Beschreibungen
der technischen Möglichkeiten, welche im Einzelfall nicht immer vorliegen müssen.Die gewünschten Leistungsmerkmale sind daher im Einzelfall bei Vertragsabschluss festzulegen.
Das Telefon soll nicht mit färbenden oder aggressiven Flüssigkeiten, wie z. B.
Tee, Kaffee, Säften oder Erfrischungsgetränken in Berührung kommen.
Telefon pflegen
•
•
•
Reinigen Sie das Telefon mit einem feuchten Tuch oder einem Antistatiktuch.
Kein trockenes Tuch verwenden!
Bei starker Verschmutzung reinigen Sie das Telefon mit verdünntem, tensidhaltigen Neutralreiniger, z. B. Spülmittel. Entfernen Sie den Reiniger anschließend restlos mit einem feuchten Tuch (nur Wasser).
Verwenden Sie keine alkoholhaltigen oder kunststoffangreifenden Reinigungsmittel, auch kein Scheuerpulver!
Hinweise zum Aufstellen
•
•
•
•
•
Das Telefon ist für den Betrieb in geschützten Räumen mit einem Temperaturbereich von 5 °C bis 40 °C ausgelegt.
Um eine gute Freisprechqualität zu gewährleisten, achten Sie darauf den Bereich vor dem Mikrophon frei zu halten (vorne rechts). Die optimale Distanz
beträgt ca. 50 cm.
Das Aufstellen in einem Raum mit hoher Staubentwicklung kann die Lebensdauer des Gerätes beeinträchtigen.
Setzen Sie das Gerät nicht direkter Sonneneinstrahlung oder anderen Hitzequellen aus. Dies kann zu Beschädigungen elektrischer Bauteile oder des Gehäuses führen.
Stellen Sie das Telefon nicht in Bädern oder Duschräumen auf.
7
English
Deutsch
Informationen zum Telefon
Informationen zum Telefon
Kennzeichen
Die Konformität des Gerätes zu der EU-Richtlinie 1999/5/EG wird
durch das CE-Kennzeichen bestätigt.
Dieses Gerät wurde unter einem zertifizierten Umweltmanagementsystem (ISO 14001) hergestellt. Dieser Prozess stellt die Minimierung des Primärrohstoff- und des Energieverbrauchs sowie der
Abfallmenge sicher.
Alle Elektro- und Elektronikgeräte sind getrennt vom allgemeinen
Hausmüll über dafür staatlich vorgesehene Stellen zu entsorgen.
Die sachgemäße Entsorgung und die getrennte Sammlung von Altgeräten dient der Vorbeugung von potentiellen Umwelt- und Gesundheitsschäden. Sie sind eine Voraussetzung für die Wiederverwendung und das Recycling gebrauchter Elektro- und
Elektronikgeräte.
Ausführliche Informationen zur Entsorgung Ihrer Altgeräte erhalten
Sie bei Ihrer Kommune, Ihrem Müllentsorgungsdienst, dem Fachhändler bei dem Sie das Produkt erworben haben oder Ihrem Vertriebsansprechpartner.
Diese Aussagen sind nur gültig für Geräte, die in den Ländern der
Europäischen Union installiert und verkauft werden und die der Europäischen Richtlinie 2002/96/EC unterliegen. In Ländern außerhalb
der Europäischen Union können davon abweichende Bestimmungen für die Entsorgung von Elektro- und Elektronikgeräten gelten.
Produktdaten
Die Bezeichnungsdaten des Telefons finden Sie auf dem Typenschild an der
Rückseite des Geräts; darauf ist die genaue Produktbezeichnung und Seriennummer angegeben. Diese Daten müssen Sie bei Kontakt mit unserer ServiceAbteilung stets angegeben, wenn Probleme oder Störungen auftreten.
8
Informationen zum Telefon
410 eco plus
410 standard
410 advance
420 economy
420 eco plus
420 standard
420 advance
8
12
12
12
19
12
12
12
18
Automatische Beschriftung
-
-
-
-
-
9
9
9
9
Vollduplex Freisprechfunktion
-
-
-
9
9
-
-
9
9
Displaybeleuchtung
-
-
-
9
9
-
-
9
9
Headset verbunden über...
• integrierte Schnittstelle
• Adapter
-
-
9
-
9
9
9
9
-
9
-
9
9
9
9
USB-Schnittstelle
-
-
-
-
9
-
-
-
9
Schnittstelle für Beistellgeräte
-
-
-
9
9
-
-
9
9
Adaptersteckplätze
0
0
0
2
1
0
0
2
1
10/100 Mbit/s Mini-Switch
-
-
9
9
9
-
9
9
9
Deutsch
410 economy
Funktionstasten
optiPoint
English
410 entry
Welche Eigenschaften und Anschlussmöglichkeiten hat mein optiPoint?
An welcher Kommunikationsplattform ist mein optiPoint angeschlossen?
Fragen Sie Ihre Systembetreuung, die Organisationseinheit oder die Person, die
für die Betreuung/Administrierung Ihrer Kommunikationsplattform und für Rückfragen zum Thema „Telefonie“ zuständig ist.
Wieso ist eine Funktion nicht verfügbar?
Dies kann folgende Ursachen haben:
• Die Funktion ist für Sie und Ihr Telefon nicht eingerichtet
• Ihre Kommunikationsplattform verfügt nicht über diese Funktion
bitte wenden Sie sich an Ihre Systembetreuung
Wo bekomme ich die ausführliche Bedienungsanleitung?
Im Internet http://www.siemens.de/hipath unter „Downloads“
Æ „Bedienungsanleitungen“
.
Sie müssen nur Ihren Telefontyp wissen und an welcher Kommunikationsplattform Ihr Telefon angeschlossen ist.
9
Informationen zum Telefon
Wie beschrifte ich die Tasten meines optiPoint?
Am optiPoint 420 S:
• Im Normalfall wird automatische die passende Beschriftung angezeigt.
• Zum Ändern der automatischen Tastenbeschriftung lesen Sie bitte die Informationen in der ausführlichen Bedienungsanleitung.
Am optiPoint 410 S:
• Per Hand auf den mitgelieferten Beschriftungsstreifen.
• Mit Computer via Internet:
Unter http://www.siemens.de/hipath Æ „Downloads“ Æ „Software“ finden
Sie das „Online Key Labelling Tool“ samt Bedienerführung.
Legen Sie den beschrifteten Streifen in das entsprechende
Tastenfeld an Ihrem optiPoint und darüber die transparente
Abdeckfolie - matte Seite oben.
Welches Zubehör gibt es für mein Telefon?
Eine Übersicht von Beistellgeräten, Adaptern und Zubehör
Ihres optiPoint-Telefon finden Sie auf Æ Seite 19.
Hall-Effekt
Es kann vorkommen, dass die Stimme beim Telefonieren stark hallend klingt.
Dies ist jedoch kein Konstruktionsfehler Ihres Geräts, sondern wird meist durch
die vom Gesprächspartner verwendeten Einrichtungen verursacht. So kann es
beispielsweise bei der Telefonkonferenz daran liegen, dass Mikrofone und Lautsprecher neu ausgerichtet werden müssen.
Benutzerkennwort
Sie können die Benutzereinstellungen durch ein eigenes Kennwort im Menü
Einrichtung unter Lokale Funktionen und Benutzer-Passwort schützen.
10
Wichtige Bedienprozeduren
Deutsch
Wichtige Bedienprozeduren
n
t
s
o
= Hörer abheben
= Taste drücken
= Hörer auflegen
= leuchtende Taste drücken
= Gespräch führen
= blinkende Taste drücken
English
optiPoint 410/420 economy/economy plus/standard/advance S
= Ruf-Nr. eingeben
Auswahlmöglichkeit wird am Display angezeigt.
Mit der Taste : bestätigen.
Wählen?
=
Anruf umlenken?
Auswahlmöglichkeit suchen. Dazu die Tasten < >
= drücken, bis Auswahlmöglichkeit im Display angezeigt
wird. Dann mit der Taste : bestätigen.
Im Ruhezustand
Anruf über Hörer annehmen Anruf weiterleiten
w Telefon läutet
w Telefon läutet
n
Gleichzeitig:
Nummer eingeben?
Lautsprecher
o Zielrufnr. eingeben
w Telefon läutet
n
Wählen?
oder
Aus Anruferliste wählen
Wahl wiederholen
entgangene Anrufe
Wahlwiederholung
1234 Max Müller?
Wählen?
+t
Hörerlautstärke ändern
s
u v Lautstärke anpassen
speichern
Anruf entgegennehmen?
u v ggf. Rufnr. auswählen
s
Anruf weiterleiten?
Anruf über Freisprechen
annehmen
Lautsprecher
Auf Freisprechen umschalten
Rufnr. auf Taste speichern
05=Einrichtung?
2=0192837465?
4=Funktionstasten?
Wählen?
1=Erste Tastenebene?
n
Gewünschte Taste drücken
n
Ruftonlautstärke ändern
02=Zielwahl
Anruf abweisen
w Telefon läutet
Zielnr. programmieren?
w Telefon läutet
u v Lautstärke anpassen
Anruf zurückweisen?
speichern
o Zielrufnr. eingeben
Ziel programmieren
11
Wichtige Bedienprozeduren
Während eines Gespräches
Mit gespeicherter
Nummer wählen
Taste mit Rufnr. drücken
Konferenz* einleiten
s (1. Teilnehmer)
Rückfrage/Übergeben?
Wahl?
n
o Rufnr. 2. Teilnr. eingeben
Wählen?
s (2. Teilnehmer)
Lokale Konf. einber.?
Rückfrage
s (1. + 2. Teilnehmer)
s (1. Teilnehmer)
(* nicht bei economy)
Konferenz* bei
Anklopfen einleiten
s (1. Teilnehmer)
w Sie hören den Anklopfton
Anruf entgegennehmen?
s (2. Teilnehmer)
Lokale Konf. einber.?
s (1. + 2. Teilnehmer)
(* nicht bei economy)
Rückfrage/Übergeben?
Wahl?
o Rufnr. 2. Teilnr. eingeben
Wählen?
s (2. Teilnehmer)
Trennen und zurück?
s (1. Teilnehmer)
Anklopfen annehmen
s (1. Teilnehmer)
w Sie hören den Anklopfton
Anruf entgegennehmen?
s (2. Teilnehmer)
Trennen und zurück?
s (1. Teilnehmer)
Gespräch nach
Rückfrage übergeben
s (1. Teilnehmer)
Rückfrage/Übergeben?
Nummer eingeben?
o Rufnr. 2. Teilnr. eingeben
Wählen?
s (2. Teilnehmer)
Gespräch weiterleiten
s
Rückfrage/Übergeben?
Wahl?
o Zielrufnr. eingeben
Wählen
t
o Zielrufnr. eingeben
Anruf bei Anklopfen
weiterleiten
Übergabe durchführen?
t
s (1. Teilnehmer)
w Sie hören den Anklopfton
Anruf weiterleiten?
Nummer eingeben?
o Zielrufnr. eingeben
Wählen
s (1. Teilnehmer)
12
Wichtige Bedienprozeduren
Deutsch
optiPoint 410 entry S
Lauthören aus
„Rufton aus“ ein
n + o Ruf-Nr.
Lautsprecher
Rufton aus
oder
s
LED leuchtet
Stummschalten ein
„Rufton aus“ aus
Wahl wiederholen
s
Rufton aus
n
Stumm
LED erlischt
Stummschalten aus
Anruf bei „Rufton aus“
Stumm
Taste Rufton aus blinkt
s
n
English
Anrufen
o Ruf-Nr.+ n
Wahlwiederholung
Die zuletzt gewählte Rufnummer wird gewählt.
Anruf annehmen
w Telefon läutet
n
oder
Bestätigen
oder
Lautsprecher
und
n
LED Rufton aus leuchtet
Mit Zielwahltaste wählen
n
Anrufschutz einschalten
Nummer/Name
Anrufschutz
ggf.
LED leuchtet.
Ebene
Nummer/Name
Anrufschutz ausschalten
s
Anrufschutz
LED erlischt
Gespräch beenden
Hörerlautstärke
ändern
t
n
Telefon gesperrt
oder
u v Lautstärke anpassen
LED leuchtet.
Telefonsperre aus
Lauthören ein
Ruftonlautstärke
ändern
s
w Telefon läutet
o Passwort. eingeben
u v Lautstärke anpassen
Bestätigen
Telefonsperre ein
Abbrechen
Lautsprecher
Telefon gesperrt
13
Wichtige Bedienprozeduren
14
Wichtige Prozeduren mit optiPoint display module
= Menü öffnen
= Gespräch halten
= Abheben oder Wählen
= Gespräch wieder aufnehmen
= Weiterleiten oder Übergeben
= Auflegen oder Abweisen
= Displaytaste drücken
= Rufeinblendung erweitern
Anruf annehmen
Anrufansicht
English
Nur mit optiPoint 410/420 standard/advance S. Zum Auswählen der Bedienelemente auf dem
Display können Sie den mitgelieferten Bedienstift oder auch ähnliche Gegenstände verwenden.
Zweitanruf annehmen
Anrufansicht
Mon 03/03/03 12:34
Bernd Schmidt
987654321
Mon 03/03/03 12:34
Bernd Schmidt
987654321
00:24
Ankomm. Anruf
Gaby Meier
Rückfrage/Übergabe
Auf das Abheben Symbol drücken,
um den Anruf anzunehmen.
Auf das Abheben Symbol drücken,
um den Zweitanruf anzunehmen.
Anrufansicht
Anruf weiterleiten
o
Auf das Weiterleiten Symbol drücken, um den Anruf weiterzuleiten.
Weiterleitungsziel eingeben.
Mon 03/03/03 12:34
Gaby Meier
123456789
00:24
Weiterleiten.
Bernd Schmidt
987654321
Anruf abweisen
Auf das Auflegen Symbol drücken,
um den Anruf abzuweisen. Der Anrufer erhält einen entsprechenden Hinweis. Das Telefon kehrt in den Ruhezustand zurück.
Gehalten
00:24
Makeln
Konferenz
Übergabe
15
Deutsch
Wichtige Prozeduren mit optiPoint display module
Wichtige Prozeduren mit optiPoint display module
Gespräch ins Halten legen
Wählen nach Belegung der Leitung
n
Anrufansicht
Mon 03/03/03 12:34
Anrufansicht
Mon 05/03/03 12:34
Bernd Schmidt
987654321
Gehalten
Hörer abheben.
Bitte wählen
00:24
123
Rückfrage/Übergabe
Auf das Halten Symbol drücken, um
das Gespräch zu halten.
Auf das Wiederaufnahme Symbol
drücken, um das Gespräch wieder aufzunehmen
Gespräch übergeben
Kontakte
o
:
Rufnummer eingeben
Taste Bestätigen drücken. Der Teilnehmer wird gerufen.
Wählen vor Belegung der Leitung
Auf das Übergabe Symbol drücken,
um das Gespräch zu übergeben.
o
Rufnummer eingeben
Anrufansicht
Anrufansicht
Mon 05/03/03 12:34
Mon 03/03/03 12:34
Bernd Schmidt
987654321
Gehalten
Entf./123
12345678
00:24
Überg. v. Meldung...
Entf./123
1234567
Kontakte
Übergabe
o
Abbrechen
Zielrufnummer eingeben.
Auf Übergabe drücken. Sie bekommen einen Hinweis, für die erfolgreiche Übergabe.
Auf das Abheben Symbol drücken.
Die Rufnummer wird gewählt.
16
Wichtige Prozeduren mit optiPoint display module
Teilnehmer verbinden
Anrufansicht
Deutsch
Rückfrage
Anrufansicht
Mon 03/03/03 12:34
Mon 05/03/03 12:34
00:24
English
Gaby Meier
123456789
Bernd Schmidt
987654321
00:24
Bernd Schmidt
987654321
Gehalten
00:24
Konferenz Übergabe durchführen
Rückfrage/Übergabe
Auf Rückfrage/Übergabe drücken.
Das aktuelle Gespräch wechselt in
den Status Gehalten.
Auf Übergabe durchführen während
eines Rückfragegesprächs drücken.
Anrufansicht
Anrufansicht
Mon 05/03/03 12:34
Mon 05/03/03 12:34
Gaby Meier
123456789
Entf./123
123456789
Bernd Schmidt
987654321
Bernd Schmidt
987654321
Gehalten
00:24
00:24
Übergabe erfolgt
00:24
OK
Kontakte
o
Rufnummer eingeben
Auf das Abheben Symbol drücken.
Der zweite Teilnehmer wird gerufen.
Auf OK drücken, um den Vorgang sofort abzuschließen oder warten Sie bis
das Ruhe-Display erscheint.
17
Wichtige Prozeduren mit optiPoint display module
Makeln
Wahlwiederholung letzte Nummer
Anrufansicht
Anrufansicht
Mon 03/03/03 12:34
Mon 05/03/03 12:34
Gaby Meier
123456789
Bitte wählen
Gehalten
123
00:24
Bernd Schmidt
987654321
Anruflisten
00:24
Wahlwiederholung
Makeln
Konferenz
Übergabe
Menü öffnen
Auf Makeln drücken, um zum anderen Teilnehmer zu wechseln.
Kontakte
n
Hörer abheben.
Menü öffnen
Auf Wahlwiederholung drücken, um
die zuletzt gewählte Rufnummer zu
wiederholen.
Lokale Konferenz
Auf Konferenz drücken. Sie sind
gleichzeitig mit den beiden anderen
Teilnehmern verbunden
Anrufschutz einschalten
Anrufansicht
Mon 03/03/03 12:34
Anrufansicht
Mon 05/03/03 12:34
+44 123456 78910
Gaby Meier
123456789
Anruflisten
Wahlwiederholung
Übernahme Gruppe
Anrufe umleiten
Anrufschutz
00:24
Bernd Schmidt
987654321
00:24
Konferenz
Ende Konf.
Übergabe
Rufton Ein
Einrichtung
Kontakte
Menü im Ruhezustand öffnen.
Auf Anrufschutz drücken. Ein Anrufer
bekommt das Besetzt-Zeichen.
Um den Anrufschutz aufzuheben, auf
Displaytaste Anrufschutz Aus drücken.
18
Mit folgenden Produkten passen Sie Ihr Telefon Ihren individuellen Bedürfnissen
an.
optiPoint Beistellgeräte:
Mit den Beistellgeräten erhalten Sie die Möglichkeit, noch komfortabler, effizienter oder sicherer zu telefonieren. Die Beistellgeräte im Einzelnen:
optiPoint display module, optiPoint self labelling key module,
optiPoint key module.
optiPoint Adapter:
Erweitern Sie die Funktionen Ihres Telefons durch zwei Adapter, mit denen Sie
z. B. ein Headset, einen Lautsprecher oder einen externen Rekorder anschließen
können.
Unterstützt werden optiPoint acoustic adapter und optiPoint recorder adapter.
Headset (Hör-Sprechgarnitur):
Telefonieren Sie freihändig mit einem Headset.
Bei der Schnurlosvariante im DECT-Standard können Sie z. B. ohne Zugriff auf
das Telefon, komfortabel Anrufe annehmen.
Beistellmikrofon/Aktive Lautsprecherbox:
Für schwierige akustische Verhältnisse beim Freisprechen/Lauthören und eine
größere Bewegungsfreiheit beim Telefonieren. Mit der Stummschalt-Taste können Sie das Mikrofon abschalten.
Der Anschluss erfolgt über den optiPoint acoustic adapter.
optiPoint Conference Kit:
Das optiPoint Conference Kit verbessert die Freisprechqualität bei Telefonkonferenzen. In der Maximalkonfiguration können bis zu 2 Konferenz-Lautsprecherboxen und 8 Konferenz-Mikrofone zur optimalen akustischen Raumabdeckung angeschlossen werden.
Der Anschluss erfolgt über den optiPoint acoustic adapter.
Zweithörer:
Zum besseren Hören bei Umweltgeräuschen.
Der Anschluss erfolgt über den optiPoint recorder adapter.
Ausführliche Informationen zu den genannten und weiteren Produkten
und zur Verfügbarkeit an Ihrem Telefon finden Sie im Datenblatt zu Ihrem
optiPoint-Telefon und in den Zubehör-Datenblättern im Internet unter
http://www.siemens.de/hipath Æ „Downloads“ Æ „Datenblätter“.
Eine Übersicht der Anschlussmöglichkeiten an Ihrem Telefon finden Sie
auf Æ Seite 9.
19
English
Beistellgeräte, Adapter, Zubehör
Deutsch
Beistellgeräte, Adapter, Zubehör
Telephone Information
Telephone Information
Important Notes
Do not operate the telephone in environments where there is a
danger of explosions.
Use only original Siemens accessories. Using other accessories
may be dangerous, and will invalidate the warranty and the CE
mark.
Never open the telephone or a key module. If you encounter any
problems, contact System Support.
The information in this document contains general descriptions of the technical
possibilities which may not always be available in individual cases. The respective characteristics must therefore be individually defined in the terms of the
contract.
Never allow the telephone to come into contact with staining or corrosive liquids, such as coffee, tea, juice, or soft drinks.
Never allow the telephone to come into contact with staining or corrosive liquids, such as coffee, tea, juice or soft drinks.
Telephone Maintenance
•
•
•
20
Always use a damp or antistatic cloth to clean the telephone. Never use a dry
cloth.
If the telephone is very dirty, clean it with a diluted neutral cleaner containing
some form of surfactant, such as a dish detergent. Afterwards, remove all
traces of the cleaner with a damp cloth (using water only).
Never use cleaners containing alcohol, cleaners that corrode plastic, or abrasive powders.
Telephone Information
Deutsch
Note! (for U.S.A and Canada only)
English
This equipment has been tested and found to comply with the limits
for a Class B digital device, pursuant to Part 15 of the FCC Rules.
These limits are designed to provide reasonable protection against
harmful interference when the equipment is operated in a residential installation. This equipment generates, uses, and can radiate radio frequency energy and, if not installed and used in accordance
with the instructions, may cause harmful interference to radio communications. However, there is no guarantee that interference will
not occur in a particular installation. If this equipment does cause
harmful interference to radio or television reception, which can be
determined by turning the equipment off and on, the user is encouraged to try to correct the interference by one or more of the following measures:
• Reorient or relocate the receiving antenna.
• Increase the separation between the equipment and receiver.
• Connect the equipment into an outlet on a circuit different from
that to which the receiver is connected.
• Consult the dealer or an experienced radio/TV technician for
help.
This product is a UL Listed Accessory, I.T.E., in U.S.A. and Canada.
This equipment also complies with the Part 68 of the FCC Rules and
the Industrie Canada CS-03.
Location of the Telephone
•
•
•
•
•
The telephone should be operated in a controlled environment with an ambient temperature between 5 °C and 40 °C (41 °F and 104 °F).
To ensure good handsfree talking quality, the area in front of the microphone
(front right) should be kept clear. The optimum handsfree distance is 20 in.
Do not install the telephone in a room where large quantities of dust accumulate; this can considerably reduce the service life of the telephone.
Do not expose the telephone to direct sunlight or any other source of heat,
as this is liable to damage the electronic equipment and the plastic casing.
Do not operate the telephone in damp environments such as bathrooms.
21
Telephone Information
Marks
The device conforms to the EU guideline 1999/5/EG, as attested by
the CE mark.
This device has been manufactured in accordance under a certified
environmental management system (ISO 14001). This process ensures that energy consumption and the use of primary raw materials are kept to a minimum, thus reducing waste production.
All electrical and electronic products should be disposed of separately from the municipal waste stream via designated collection facilities appointed by the government or the local authorities.
The correct disposal and separate collection of your old appliance
will help prevent potential negative consequences for the environment and human health. It is a precondition for reuse and recycling
of used electrical and electronic equipment.
For more detailed information about disposal of your old appliance,
please contact your city office, waste disposal service, the shop
where you purchased the product or your sales representative.
The statements quoted above are only fully valid for equipment
which is installed and sold in the countries of the European Union
and is covered by the directive 2002/96/EC. Countries outside the
European Union may have other regulations regarding the disposal
of electrical and electronic equipment.
Product Identification
The identification details of your telephone (i.e. the exact product designation
and the serial number) are shown on the nameplate on the rear of the base unit.
Please have this information ready whenever you call our service department because of trouble with or defects on the unit itself.
22
Telephone Information
410 eco plus
410 standard
410 advance
420 economy
420 eco plus
420 standard
420 advance
8
12
12
12
19
12
12
12
18
Self Labeling Key (SLK)
-
-
-
-
-
9
9
9
9
Full-duplex speakerphone feature
-
-
-
9
9
-
-
9
9
Illuminated display
-
-
-
9
9
-
-
9
9
Headset connected via ...
• built-in interface
• adapter
-
-
9
-
9
9
9
9
-
9
-
9
9
9
9
USB interface
-
-
-
-
9
-
-
-
9
Interface for add-on equipment
-
-
-
9
9
-
-
9
9
Option bays
0
0
0
2
1
0
0
2
1
10/100 Mbit/s mini switch
-
-
9
9
9
-
9
9
9
What communication platform is my optiPoint 410/420 connected to?
Ask your system administrator or whomever is responsible for supporting/administering your communication platform or for dealing with queries relating to
your telephone system.
Why is a function not available?
This may be due to one of the following reasons:
• the function has not been configured for your telephone
• your communication platform does not support this function
please contact your system administrator.
Where can I get the accompanying operating instructions?
On the Internet at http://www.siemens.com/hipath, under "Downloads"
Æ "User Guides".
All you need to know is your telephone model and the communication platform to which your telephone is connected.
The chapter "Basic operating instructions" contains general information on
how to use your telephone.
23
Deutsch
410 economy
Function keys
optiPoint
English
410 entry
What are the properties and connection possibilties of my optiPoint ?
Telephone Information
How do I label the keys on my optiPoint?
Regarding optiPoint 420 S:
• Normally, the appropriate labels will automatically be displayed.
• To modify the self labelling keys, please refer to the information in the comprehensive user manual.
Regarding optiPoint 410 S:
• Manually with the label strips supplied.
• Via the Internet:
You will find the "Online Key Labelling Tool" along with the user interface under http://www.siemens.com/hipath Æ "Downloads" Æ "Software".
Place the labeled strips on the corresponding keypad on
your optiPoint, and place the transparent cover (matt side
up) on top.
What accessories are there for my telephone?
For an overview of key modules, adapters and accessories for your optiPoint telephone, see Æ page 33.
Echo Effect
In some cases, your voice may echo during a call. This is not due to any design
defect or other fault with your IP telephone. It is usually caused by the equipment used by the other party. For example, if the echo occurs during a teleconference, it may well be that the loudspeakers and microphones need to be repositioned.
User Password
You can protect the user settings with a password (path: Setup, Local functions, User password).
24
Important Operating Procedures
Deutsch
Important Operating Procedures
optiPoint 410/420 economy/economy plus/standard/advance S
= Lift the handset
= Press the key
t
= Replace the handset
= Press the illuminated key
s
= Conduct a call
= Press the flashing key
o
= Enter a telephone number
English
n
The option appears on the screen.
Press the : key to confirm your selection.
Dial?
=
Deflect call?
Search for an option.
= Press the < > keys, until the option appears on the
screen. Then press the : key to confirm your selection
Operation in Idle State
Answering Call by Handset Deflect Incoming Call
Switching to Handsfree Mode
w Telephone is ringing
s
n
w Telephone is ringing
Deflect call?
Simultaneously:
Please dial #?
Loudspeaker
Answering Call by
Handsfree Mode
o Enter target number
w Telephone is ringing
n
Loudspeaker
Dial?
or
Dial by Missed Calls List
Repeat Dialing
Missed Calls
Repeat dialing
1234 Tom Miller?
Dial?
Change Handset Volume
s
u v vary the volume
save
Answer call?
u v select call no. (if appl.)
+t
Program Dest. Key
05=Setup?
2=0192837465?
4=Function keys?
Dial?
1=Non shiftes keys?
n
Press required key
n
Change Ringer Volume
02=Selected dialing
Refuse call
w Telephone is ringing
Program destination #?
w Telephone is ringing
u v vary the volume
Refuse call?
save
o enter destination call no.
Program destination
25
Important Operating Procedures
Operation during a Call
Introduce a Conference*
Dial by
Destination Key
s (1st party)
Press programmed key
Consult/Transfer?
Dial?
o enter no. of the 2nd party
n
Dial?
s (2nd party)
Create local Conf.?
Consultation
s (1st + 2nd party)
s (1st party)
(* not used with economy)
Consult/Transfer?
Please dial #?
o enter no. of the 2nd party
Answering a
Call Waiting
s (1st party)
w you hear the CW-tone
Dial?
s (2nd party)
Disconnect and return?
s (1st party)
Answer call?
s (2nd party)
Disconnect and return?
s (1st party)
Answer call?
s (2nd party)
Create local Conf.?
s (1st + 2nd party)
(* not used with economy)
Transfer Conversation
after Consultation
s (1st party)
Consult/Transfer?
Dial?
o enter no. of the 2nd party
Dial?
s (2nd party)
Complete transfer?
Deflecting a
Call Waiting
Consult/Transfer?
Dial?
o enter destination call no.
Dial?
s (1st party)
w you hear the CW-tone
Deflect call?
t
Dial?
o enter destination call no.
Simultaneously:
Loudspeaker
s (1st party)
w you hear the CW-tone
t
Transfer Conversation
s
Introduce a Conference*
while Call Waiting
+t
Dial?
s (1st party)
26
Important Operating Procedures
Deactivate Speaker
"Ringer off" on
n + o Number
Loudspeaker
Ringer off
or
s
LED goes on
Mute on
"Ringer off" off
Redialing
s
Ringer off
n
Mute
LED goes off
Mute off
Answer a Call while
„Ringer off“ is on
English
Calling
Deutsch
optiPoint 410 entry S
o Number.+ n
Redial
Dial last no. called
Mute
Answering a Call
w Telephone is ringing
n
or
Cornfirm
oder
Loudspeaker
und
n
s
LED Ringer off flashes
n
Dial by Destination Key
n
"Do not Disturb" on
Number/Name
Do not Disturb
or
LED goes on
Shift
Number/Name
"Do not Disturb" off
s
Do not Disturb
LED goes off
Ending a Call
Change Handset
Volume
t
n
Phone Locked
or
u v vary the volume
LED goes on
Change Ringer Volume
Phone lock off
Phone lock on
Quit
Activate Speaker
w Telephone is ringing
s
u v vary the volume
Loudspeaker
Phone Locked
o Enter password
Confirmed
27
28
Important Procedures with optiPoint display module
= Open the menu
= Put a call on hold
= Answer a call or start dialing
= Retrieve a call
= Deflect or transfer
= Disconnect or decline
= Press display key
=Expand the intrusion bar
Pick up a call
English
Used with optiPoint 410/420 standard/advance S. A plastic stylus was delivered along with your
optiPoint display module. You can select functions on the display by pressing the tip of the stylus
lightly on the display surface or move graphics content such as scroll bars.
Pick up a waiting Call
Call Control
Call Control
Mon 03/03/03 11:34AM
Bill Smith
987654321
Mon 03/03/03 11:34AM
Bill Smith
987654321
00:24
Incoming Call
Jane Brown
Consult/Transfer
Click the off hook icon to the answer
call.
Click the off hook icon to answer the
waiting call.
Call Control
Deflect Incoming Call
o
Click the Deflect icon to deflect the
call.
Enter target number.
Mon 03/03/03 11:34AM
Jane Brown
123456789
00:24
Click on Deflect to start.
Decline a call
Click the on hook icon to decline the
call. The caller will receive information
that the call has been unsuccessful..
The display returns to the idle menu.
Bill Smith
987654321
On Hold
00:24
Alternate
Conference
Complete
29
Deutsch
Important Procedures with optiPoint display module
Important Procedures with optiPoint display module
Putting a call on Hold
Dialing with Handset On-hook
n
Call Control
Mon 03/03/03 11:34AM
Call Control
Mon 03/03/03 11:34AM
Bill Smith
987654321
On Hold
Lift the handset
< Please Dial>
00:24
123
Consult/Transfer
Click the Hold icon to place the call on
hold.
Click the Retrieve icon to reconnect
the call.
Transfering a Call
Contacts
o
:
Enter the number.
Press the tick key to start dialing.
Dialing with Handset On-hook
Click the Transfer icon to transfer the
call.
Call Control
o
Enter the number.
Call Control
Mon 03/03/03 11:34AM
Mon 03/03/03 11:34AM
Bill Smith
987654321
On Hold
Del/123
12345678
00:24
Blind-transfer this call to
Del/123
1234567
Contacts
Transfer
o
Cancel
Enter target number.
Click on Transfer. The display informs
you when the transfer is complete.
Click the off-hook icon to dial the
number.
30
Important Procedures with optiPoint display module
Joining a Consultation
Call Control
Deutsch
Consultation
Call Control
Mon 03/03/03 11:34AM
Mon 03/03/03 11:34AM
00:24
English
Jane Brown
123456789
Bill Smith
987654321
00:24
Bill Smith
987654321
On Hold
Conference
Consult/Transfer
Complete transfer
Click on Complete transfer – during a
consulatation.
Click on Consult/Transfer. to dial the
second party. The active call changes
to On Hold.
Call Control
Call Control
Mon 03/03/03 11:34AM
Mon 03/03/03 11:34AM
Jane Brown
123456789
Del/123
123456789
On Hold
00:24
Bill Smith
987654321
Bill Smith
987654321
00:24
Joining... done
00:24
Contacts
o
00:24
Enter no. of the 2nd party
Click the off hook icon to dial the
number.
OK
Click on OK to finish immediately or
wait until the idle screen returns to the
display.
31
Important Procedures with optiPoint display module
Alternate
Redial Last Number
Call Control
Call Control
Mon 03/03/03 11:34AM
Mon 03/03/03 11:34AM
Jane Brown
123456789
On Hold
< Please Dial>
123
00:24
Bill Smith
987654321
Call Log
00:24
Redial Last No.
Alternate
Confer-
Complete
Open the menu.
Click on Alternate to switch to the
other party. The active call changes to
On Hold.
Contacts
n
Lift the handset
Open the menu.
Click on Redial Last No. to dial the
last dialed number.
Do not disturb
Local Conference
Click on Conference. Local conference is enabled and you are connected with two parties to a conference.
Call Control
Mon 03/03/03 11:34AM
+44 123456 78910
Call Control
Mon 03/03/03 11:34AM
Jane Brown
123456789
Call Log
Redial Last No.
Group Pickup
Forward Calls
Do Not Disturb
00:24
Ringer on
Setup
Bill Smith
987654321
Contacts
00:24
Conference
End Conf.
Open the menu in idle mode.
Click on Do not disturb to enable Do
Not Disturb.
Complete
Click on Display key DND Off to disable Do Not Disturb.
32
You can adapt your telephone to suit your individual requirements with the following products.
optiPoint add-on equipment:
The add-on equipment makes telephoning more convenient, efficient and safer.
The following equipment is available:
optiPoint display module, optiPoint self labelling key module,
optiPoint key module.
optiPoint adapter:
Extend your telephone’s functions with two adapters which allow you to connect, for example, a headset, a loudspeaker or an external recorder.
Supported are optiPoint acoustic adapter and optiPoint recorder adapter.
Headset:
A headset can be used for handsfree talking.
The DECT-standard cordless version, for example, offers the convenient option
of answering calls without having to reach for the telephone.
Desk microphone/Active loudspeaker:
These accessories are ideal for handsfree talking and open listening because
they allow you greater freedom of movement while you make your telephone
call. You can switch off the microphone using the mute key
Connection is via the optiPoint acoustic adapter.
optiPoint Conference Kit:
The optiPoint conference kit improves handsfree talking quality during telephone conferences. A maximum of two conference loudspeakers and eight conference microphones can be used for optimal room coverage.
Connection is via the optiPoint acoustic adapter.
Second handset:
For improved listening in the event of background noise.
Connection is via the optiPoint recorder adapter.
Detailed information on these and other products and availability with your
telephone can be found in your optiPoint-telephone data sheet and in the
accessories datasheets in the Internet under
http://www.siemens.com/hipath Æ "Downloads" Æ "Data sheets".
An overview of the connectivity options for your telephone can be found
on Æ page 23.
33
English
Add-on equipment, adapters, accessories
Deutsch
Add-on equipment, adapters, accessories
www.siemens.com/hipath
Die Informationen in diesem Dokument enthalten allgemeine Beschreibungen der technischen Möglichkeiten, welche im Einzelfall nicht immer vorliegen müssen.Die gewünschten Leistungsmerkmale sind
daher im Einzelfall bei Vertragsabschluss festzulegen.
The information in this document contains general descriptions of the
technical possibilities which may not always be available in individual
cases. The respective characteristics must therefore be individually defined in the terms of the contract.
© Siemens AG 2005
Siemens Communicationss
Hofmannstr. 51 • D-81359 Munich
Ref. No.: A31003-A2056-D505-1-7419
Subject to availability. Right of modification reserved.
Printed in the Federal Republic of Germany.
05.08.05