1
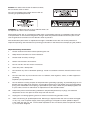
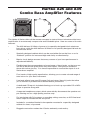
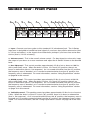
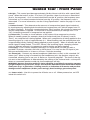
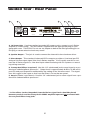
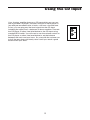
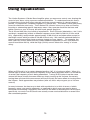
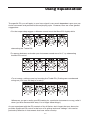
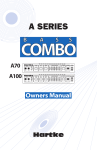
A SERIES
B
A
S
S
COMBO
A25
BASS
7
0
A35
+6
+12
+12
-15
BASS
-3
6
7
8
9
1
0
INPUT
10
VOLUME
+6
-12
+12
+15
100Hz
-12
+12
+15
0
10
POWER
LIMITER
5
-12
+12
+15
CD
5
6
3
4
7
+9 2
5K
9
1
10
4
+6
-15
8
BRIGHT
+3
-6
9
0
10
PHONES
A35
6
3
7
8 2
1
A25
7
8K
+9 -9
830Hz
0
0
-3
+6
-15
9
1
TREBLE
+3
-6
+9 -9
3
8 2
+15
PHONES
6
4
7
5K
0
-3
+3
-6
-9
-15
+12
-15
MID
0
5
4
3
2
3
+9 2
830Hz
CD
5
6
4
+6
-12
+15
LIMITER
5
+3
-6
+9 -9
-12
+15
-3
+6
100Hz
VOLUME
BRIGHT
0
+3
-6
+9 -9
-15
10
-3
+3
-6
-9
-12
9
1
TREBLE
0
-3
6
8
INPUT
MID
0
5
4
3
2
8
9
1
0
10
8K
Hartke
POWER
Caution: To reduce the hazard of electrical shock,
do not remove cover or back.
No user serviceable parts inside. Please refer all
servicing to qualified personnel.
WARNING: To reduce the risk of fire or electric shock, do
not expose this unit to rain or moisture.
The lightning flash with an arrowhead symbol within an equilateral triangle, is intended to alert the user
to the presence of uninsulated "dangerous voltage" within the products enclosure that may be of sufficient magnitude to constitute a risk of electric shock to persons.
The exclamation point within an equilateral triangle is intended to alert the user to the presence of
important operating and maintenance (servicing) instructions in the literature accompanying the product.
Important Safety Instructions
1.
Please read all instructions before operating the unit.
2.
Keep these instructions for future reference.
3.
Please heed all safety warnings.
4.
Follow manufacturers instructions.
5.
Do not use this unit near water or moisture.
6.
Clean only with a damp cloth.
7.
Do not block any of the ventilation openings. Install in accordance with the manufacturers instructions.
8.
Do not install near any heat sources such as radiators, heat registers, stoves, or other apparatus
(including
amplifiers) that produce heat.
9.
Do not defeat the safety purpose of the polarized or grounding-type plug. A polarized plug has two
blades with one wider than the other. A grounding type plug has two blades and a third grounding
prong. The wide blade or third prong is provided for your safety. When the provided plug does not
fit your outlet, consult an electrician for replacement of the obsolete outlet.
10.
Protect the power cord from being walked on and pinched particularly at plugs, convenience
receptacles and at the point at which they exit from the unit.
11.
Unplug this unit during lightning storms or when unused for long periods of time.
12.
Refer all servicing to qualified personnel. Servicing is required when the unit has been damaged
in any way, such as power supply cord or plug damage, or if liquid has been spilled or objects
have fallen into the unit, the unit has been exposed to rain or moisture, does not operate normally, or has been dropped.
Table of Contents
Introduction
2
A SERIES Combo Bass Amplifier Features
Guided Tour
Front Panel
Rear Panel
3
4-5
6
Setting Up and Using Your Hartke A Series Combo Bass Amplifier 7-8
Using the CD Input
9
Using Equalization
10 -11
Specifications
Copyright 2003, Samson Technologies Corp.
Printed September, 2003
Samson Technologies Corp.
575 Underhill Blvd.
P.O. Box 9031
Syosset, NY 11791-9031
Phone: 1-800-3-SAMSON (1-800-372-6766)
Fax: 516-364-3888
12
Introduction
We know you don’t like reading owners manuals, but you’ve just purchased one of the
finest bass amplifiers around, and we want to tell you about it! So, before you plug in and
start popping and slapping, we’d like to suggest you take just a few moments out to scan
these pages. We’ll make it as painless as possible, we promise—and, who knows, you
might just pick up a tip or two.
The A25 and A35 are powerful combo amplifiers, which include a matched 8-ohm aluminum bass speaker in a specially designed cabinet which can be used either flat on the
floor or on its “kickback” position for increased high end clarity on directionality. They’re
the perfect system for use in small venues such as club dates and for home recording studios. Plus, the CD input and dedicated headphone output makes them awesome practice
amps!
There are four different models in the A Series, and this manual covers the A25 and A 35.
The A25 is the most compact in the family; it's got a 25-watt amp and an 8" custom design
Hartke Aluminum Series speaker. The A35 has a 35-watt amp and a 10" custom design
Hartke Aluminum Series speaker. Whichever of these models you’ve purchased, you’re
assured of that great Hartke sound and robust construction.
In these pages, you’ll find a detailed description of the many features of your A Series
Combo Bass Amplifier, as well as a guided tour through its front and rear panels, step-bystep instructions for setting up and using the amp, additional information about equalization, plus full specifications. You’ll also find a warranty card enclosed—please don’t forget
to fill it out and mail it so that you can receive online technical support and so we can send
you updated information about this and other Hartke and Samson products in the future.
Also, be sure to check out our website (http://www.samsontech.com) for complete information about our full product line.
SPECIAL NOTE: Should your Hartke A Series Combo Bass Amplifier ever require servicing, a Return Authorization (RA) number is necessary. Without this number, the unit will
not be accepted. If purchased in the United States, please call Samson at 1-800-372-6766
for a Return Authorization number prior to shipping. Please retain the original packing
materials and, if possible, return the unit in its original carton and packing materials. If purchased outside the United States, please contact your local distributor for warranty information.
2
Hartke A25 and A35
Combo Bass Amplifier Features
The Hartke A Series offers all the newest concepts in state-of-the-art aluminum drive bass
amplification in an extremely compact size and affordable price. Here are some of its main
features:
•
The A25 delivers 25 Watts of power to its specially designed 8-inch aluminum
bass driver, while the A35 delivers 35 Watts to its specially designed 10-inch aluminum bass driver.
•
Specially designed cabinet which can be used either flat on the floor or on its
“kickback” position for increased high end clarity on directionality.
•
Bipolar circuit design ensures that every nuance of your bass performance is
reproduced faithfully.
•
Flexible input that accommodates a broad range of input levels, so that you can
use the A Series with pretty much any kind of bass, from passive models to
those with active circuitry. It is almost impossible to overload the input of an A
Series bass amplifier!
•
Four bands of high-quality equalization, allowing you to create a broad range of
tonal colors for your bass instrument.
•
Line-level effects loop send (Preamp Out) and return (Amp In) jacks that allow
you to connect to professional outboard effects processors.
•
A dedicated CD input is included allowing you to hook up a portable CD or MP3
player to practice along with.
•
A separate headphone output, which automatically disconnects the speaker output allowing use as a high-quality practice amp.
•
For interfacing with PA systems or recording mixing consoles, an XLR line-level
direct output is included on the rear panel.
•
Included is a matched Hartke 8-ohm speaker mounted in a specially designed
cabinet for clean, crisp sound.
•
Rugged construction makes the A Series eminently road-worthy.
3
Guided Tour - Front Panel
1
2
3
4
BASS
-3
6
7
8
2
9
1
0
INPUT
MID
10
VOLUME
-3
+3
-6
+6
TREBLE
-12
+12
+15
100Hz
-3
+6
+12
-15
+15
830Hz
3
4
7
+9 2
-12
+12
-15
+15
5K
0
10
8K
PHONES
A25
6
3
7
8 2
9
1
11
CD
5
6
4
+6
+9 -9
-12
LIMITER
5
+3
-6
10
9
8
BRIGHT
0
+3
-6
+9 -9
-9
-15
7
0
0
5
4
3
6
5
8
9
1
0
10
POWER
1. Input - Connect your bass guitar to this standard 1/4" unbalanced jack. The A Series
Input was is designed to handle low-level signals if your bass has passive electronics (that
is, if it has no battery), or the signals from hotter bass pickups if your bass has active electronics (that is, if it has a battery).
2. Volume control - This is the overall volume control. For best signal-to-noise ratio, keep
the output of your bass at or near maximum and adjust the A Series Volume to the desired
level.
3. Bass EQ control - This control provides approximately 15 db of cut or boost at 100 Hz,
with a peak (bell) curve. When the knob is at the 12 o’clock (“0”) position, there is no
boost or attenuation (that is, flat response). As it is turned clockwise from the “0” position,
the frequency area is boosted; as it is turned counterclockwise from the “0” position, the
frequency area is attenuated. For more information, see the “Using Equalization” section
on page10 in this manual.
4. Mid EQ control - This control provides approximately 15 db of cut or boost at 830 Hz,
with a peak (bell) curve. When the knob is at the 12 o’clock (“0”) position, there is no
boost or attenuation (that is, flat response). As it is turned clockwise from the “0” position,
the frequency area is boosted; as it is turned counterclockwise from the “0” position, the
frequency area is attenuated. For more information, see the “Using Equalization” section
on page 10 in this manual.
5. Treble EQ control - This peaking control provides approximately 15 db of cut or boost at
5 kHz. When the knob is at the 12 o’clock (“0”) position, there is no boost or attenuation
(that is, flat response). As it is turned clockwise from the “0” position, the frequency area is
boosted; as it is turned counterclockwise from the “0” position, the frequency area is attenuated. For more information, see the “Using Equalization” section on page 10 in this manual.
4
Guided Tour - Front Panel
6. Bright - This control provides approximately 20 db of boost at 8 kHz, with a peak (bell)
curve. When the knob is at the 12 o’clock (“0”) position, there is no boost or attenuation
(that is, flat response). As it is turned clockwise from the “0” position, the frequency area
is boosted; as it is turned counterclockwise from the “0” position, the frequency area is
attenuated. For more information, see the “Using Equalization” section on page 11 in this
manual.
7. Limiter Control - This determines the amount of compression (peak signal reduction)
by simultaneously adjusting both threshold and compression ratio (which ranges from 2:1
to infinity [limiting]). At the fully counterclockwise “Zero” position, the circuitry is bypassed
and no compression is applied. As the knob is raised clockwise (at settings from “1” to
“10”), increasing amounts of compression are applied.
8. Limiter LED - Provides a visual indicator of the status of the compression circuitry.
When lit steadily green (for example, when the Limiter knob [see #7 above] is set to
“Zero”), no compression is being applied. When unlit, compression is being applied to the
incoming signal at a ratio of approximately 2:1. When flashing red, the compression ratio
is approaching infinity (limiting is being applied to peak signals). When lit steadily red, the
entire signal is being limited. This LED “follows” the incoming signal, changing continuously as different amounts of compression and/or limiting are being applied.
9. CD Input - Your A Series amplifier features a CD input which you can use with a
portable CD player, cassette, mini disk or MP3 player. You can use the CD input to jam
with pre-recorded tracks or to learn a riff from a favorite recording.
10. Phone jack - Connect any stereo headphone (600 ohms or less) to this standard 1/4"
stereo jack. When a plug is inserted into the headphone jack, the speaker output is disconnected, allowing you to use your A Series as a practice amplifier. The level of the signal sent to the headphones is determined by the setting of the Volume knob—at the point
where a connected speaker would clip, the headphones will clip.
WARNING: Because even the smallest A Series amplifier is capable of generating extremely high headphone signal levels, always start with the Volume knob at minimum and then
slowly turn it up. In particular, a clicking sound is an indication of distortion and possible
damage to the headphones (and/or your hearing!); don’t let things get to that point!
11. Power switch - Use this to power the A Series on or off. When powered on, an LED
inside this switch is lit.
5
Guided Tour - Rear Panel
A
C
B
SPEAKER
OUT
D
E
DIRECT OUT
EFFECTS LOOP
WARNING
DO NOT EXPOSE THIS EQUIPMENT
TO RAIN OR MOISTURE
AVIS
A25
RISQUE DE CHOC ELECTRONIQUE
NE PAS OUVRIR
CAUTION
FOR CONTINUED PROTECTION AGAINST RISK
OF FIRE, REPLACE ONLY WITH SAME TYPE FUSE
ATTENTION
UTILISER UN FUSIBLE DE
RECHANGE DE MÊME TYPE
25 WATT BASS AMPLIFIER
8 OHM
115 VAC 2A
230 VAC 1A
MADE IN CHINA
SERIAL
NUMBER
PREAMP
OUT
AMP IN
DESIGNED AND ENGINEERED IN THE UNITED STATES BY HARTKE
www.hartke.com
A. AC Power Inlet - Use the supplied grounded AC power cord to connect your A Series
amplifier to mains power. This cord comes supplied with the appropriate plug for your
geographic area. CAUTION: Do not use an adapter to defeat the third grounding pin on
this plug or severe electric shock may result!
B. Speaker Output – The jack is used to connect the internal 8-ohm aluminum driver.
C. Direct Output- This standard, balanced XLR connector provides a Line-level pre-EQ
and pre-Volume output signal from the A Series amplifier. You’ll usually use this to connect the A Series signal to a Line-level input when interfacing with PA systems or recording mixing consoles.
D. Preamp Out (Effects Loop Send)- Use this 1/4" unbalanced jack to send signal to a professional outboard effects processor.* Output level is approximately 0 dB to +4 dB and is
post-EQ and post-Shape but unaffected by the setting of the Volume control. The signal
from this output is the same as that from the Direct Out on the rear panel.
E. Amp In (Effects Loop Return)- Use this 1/4" unbalanced jack to return signal from a professional outboard effects processor.*
* In-line effects (such as footpedals) intended for low signal levels should be placed
between your bass and the front panel A SERIES amplifier Input and not connected with
the rear panel Effects Loop jacks.
6
Setting Up and Using Your Hartke A
SERIES Combo Bass Amplifier
Setting up your Hartke Systems A Series Combo Bass Amplifier is a simple
procedure which takes only a few minutes:
1. Remove all packing materials (save them in case of need for future service)
and decide where the amplifier is to be physically placed. You may decide to
use the “kickback” position for additional directionality and high frequency clarity. To avoid potential overheating problems, make sure that the rear panel is
unobstructed and that there is good ventilation around the entire unit.
2. Before you plug-in the power cable, be sure the Power switch is in
the off position. Connect the supplied power cable to the AC inlet
located on the rear panel. Then, plug-in the 3-pin AC plug into any
grounded AC socket. Don’t turn the A Series on just yet, though.
3. Use a standard music instrument cable to connect your bass to
the Input jack on the front panel. The A series Input has been
designed to handle the signal from most any bass guitar. So,
whether your bass has passive electronics (that is, if it has no battery), or
active electronics (that is, if it has a battery), plug right in.
4. On the front panel of the A Series, turn the Volume and Limiter control to
their minimum (fully counterclockwise) position, set all four EQ controls to
their “0” position.
5. Press the front panel Power switch in order to turn on your A Series amp;
the LED in the switch will light up.
6. Set the output of your bass to maximum and then, while playing, slowly
turn the A Series Volume control up until the desired level is achieved. It’s
nearly impossible to overload the A
Series amplifier, so if you hear distortion even at low Volume settings,
check for a faulty cable (if it’s good,
simply back off the output of your
bass).
7. Adjust the four equalization controls to taste. (When you get a great
setting that complements your instrument and playing style, it’s a good
idea to write it down for future use.)
8. Now try out the A 25 / A35 limiter circuitry. Activate it by turning the
Limiter knob clockwise from its “Zero” position. As you turn the knob clockwise, the input signal from your bass becomes more and more severely
compressed—you’ll hear peak signals (such as string slaps and pulls)
begin to sound increasingly “squashed,” relative to the lower-level signals
produced by standard playing. The result will be a decreased dynamic
range but an overall leveling of signal throughout the full pitch range of your
instrument. In the A25 and A35, the Limiter LED will light steadily green
7
Setting Up and Using Your Hartke A
SERIES Combo Bass Amplifier
when no compression is being applied, will go out whenever small amounts of compression are being applied and
will flash or light steadily red when limiting (severe compression) is being applied.
9. Test the headphone output by turning the Volume control to its minimum (fully counterclockwise) position and
then connect a standard stereo headphone to the frontpanel Phones jack. While playing your bass, slowly turn
the Volume control up—you should hear sound from the
headphones and none from the connected speaker. We
recommend the use of large size headphones (those with
large transducers) for optimum bass reproduction.
10. If you need to connect the A Series to a PA system or
a recording mixing console, connect a cable between the
rear-panel Direct Out output and a Line-level input on the
mixer. (See C on page 6 in this manual for more information on the use of the A Series Direct Out).
11. If you’re using a professional external signal processor
that has Line-level inputs and outputs, turn your A Series
amp off momentarily and then connect a standard audio
cable between the rear panel Preamp Out jack and your
effects processor input and another standard audio cable
between the Amp In jack and your effects processor output
(if required, multiple effects processors can be daisychained together, output to input). Then turn the A Series
amp back on and play your bass while adjusting the controls of your effects processor(s). For best results, set both
the input and output gain of the connected effects processor(s) to 0 dB (unity gain), so that there is no increase or
decrease in level whether the effects are switched in or
out.
If you encounter difficulty with any aspect of setting up or
using your Hartke A Series Bass Combo Amplifier, you can
call Samson Technical Support (1-800-372-6766) between
9 AM and 5 PM EST, or contact your local distributor.
8
Using the CD Input
Your A series amplifier features a CD input which you can use
with a portable CD player, cassette, mini disk or MP3 player to
jam with pre-recorded tracks or learn a riff from a favorite tune.
In fact, you can plug any line level signal into the CD input
including the signal from a keyboard or drum machine. Connect
the CD player or other Line level device to the CD Input using
standard RCA cable. You will want to use the volume control on
the CD player or other Line level device to set the balance
between the track and your bass. So, start with the volume control all the way down and slowly raise it until you reach a good
balance with your bass.
9
Using Equalization
The Hartke Systems A Series Bass Amplifier gives you enormous control over shaping the
sound of your bass, using a process called equalization. To understand how this works,
it’s important to know that every naturally occurring sound consists of a broad range of
pitches, or frequencies, combined together in a unique way. This blend is what gives every
sound its distinctive tonal color. The A Series EQ controls allow you to alter a sound by
boosting or attenuating specific frequency areas—they operate much like the bass and
treble controls on your hi-fi amp, but with much greater precision.
The A 25 and A35 offer four bands of equalization. Each EQ knob (labeled Bass, Mid, Treble
and Bright, respectively) affects a different frequency area (100 Hz, 830 Hz, 5 kHz and 8
kHz, respectively) and provides approximately 15 db of boost and attenuation except for
the Bright control which provides 0 -20 dB of Boost only. We carefully selected these frequency areas because they have maximum impact on bass signals. For example, the
Bass (100 Hz) control affects the very lowest audible frequencies (in fact, most humans
cannot hear below 20 Hz), while the High (5 kHz) control affects the “twang” of a bass
string.
BASS
MID
0
-3
TREBLE
0
+3
-6
-3
+6
-9
-6
+12
-15
+15
100Hz
-3
+6
+9 -9
-12
5
+3
-6
-12
+12
+15
3
7
+9 2
-12
+12
-15
830Hz
6
4
+6
+9 -9
-15
BRIGHT
0
+3
+15
5K
8
9
1
0
10
8K
When an EQ knob is in its center detented position (“0”), it is having no effect. When it is
moved right of center, the particular frequency area is being boosted; when it is moved left
of center, the frequency area is being attenuated. Turning all EQ controls up the same
amount will have virtually the same effect as simply turning up the Volume; conversely,
turning them all down the same amount will have virtually the same effect as turning down
the Volume. Both approaches are pointless (after all, that’s why we gave you a Volume
control!)
In many instances, the best way to deal with equalization is to think in terms of which
frequency areas you need to attenuate, as opposed to which ones you need to boost.
Be aware that boosting a frequency area also has the effect of boosting the overall signal;
specifically, too much Low EQ boost can actually cause overload distortion or even harm
the connected speaker.
10
Using Equalization
The specific EQ you will apply to your bass signal is very much dependent upon your particular instrument and personal taste and playing style. However, here are a few general
suggestions:
• For that super-deep reggae or Motown sound, boost the Bass EQ slightly while
attenuating the Treble EQ.
•To remove boxiness and make your instrument sound more “hi-fi,” try attenuating
the Mid EQ control.
•For a twangy, cutting sound, try boosting the Treble EQ. (Putting new roundwound
strings on your bass will help a lot also!)
•Whenever you get a really good EQ setting for a particular instrument or song, write it
down (you’d be amazed how easy it is to forget these things!).
As you experiment with the EQ controls of the A Series, don’t forget that your bass also
provides significant EQ control in the form of its pickup and tonal settings—this can be
particularly effective in instruments that have active circuitry.
11
Specifications
1. Rated Output Power (@ 1 kHz, 4 ohm, 1% THD)
A25
A35
25 w
35 w
2. Rated Input Level (@ 1 kHz)
Input 1
Input 2
-20 dBu
-10 dBu
3. Total Harmonic Distortion (@ 1 dB below rated output, 1 kHz typical)
A25
A35
0.2%
0.3%
4. Signal To Noise Ratio (re: 1 Wrms @ 1 kHz)
A25
A35
67 dB
60 dB
5. Dynamic Range (re: Rated output @ 1 kHz)
A25
A35
80 dB
75 dB
6. Signal Gain
Input 1 to Direct Out / Preamp Out
Input 1 to Speaker Out
Input 2 to Direct Out / Preamp Out
Input 2 to Speaker Out
7. Equalizer
Bass (100 Hz)
Mid (830 Hz)
Treble (5 kHz)
Bright (8 kHz)
+24 dB (A25), +24 dB (A35)
+48 dB (A25), +55 dB (A35)
+14 dB (A25), +14 dB (A35)
+38 dB (A25), +45 dB (A35)
±15 dB
±15 dB
±15 dB
0 -20 dB
200 mW (typical) @ 600 ohms
8. Headphone Output
9. Fuse Type
3AG slo-blo (US & Japan), 50T time delay (UK & European)
10. Fuse Rating
US & Japan
UK & European
1.0A (A25), 1.6A (A35)
T500M (A25), T1ALM (A35)
11. Weight
A25
A35
12. Dimensions
A25
A35
26 lbs. (11.8 kg)
30 lbs. (13.6 kg)
15” (377 mm) L x 13” (341 mm) W x 12” (308 mm)D
17” (421 mm) L x 15” (381 mm) W x 13” (320 mm)D
12
Hartke is distributed world-wide by SamsonTechnologies
Samson Technologies Corp.
575 Underhill Blvd.
P.O. Box 9031
Syosset, NY 11791-9031
Phone: 1-800-3-SAMSON (1-800-372-6766)
Fax: 516-364-3888
www.hartke.com
www.samsontech.com