1
MD7251 Series
Expandable Cordless Telephone System
5.8 GHz Digital
Users Guide
'PSQSPEVDUSFMBUFERVFTUJPOTQMFBTFSFGFSUPUIF8BSSBOUZTFDUJPO
1MFBTF SFUBJO ZPVS PSJHJOBM EBUFE TBMFT SFDFJQU GPS ZPVSSFDPSET 'PSXBSSBOUZTFSWICE OFYOUR
.PUPSPMB 1SPEVDUZPV XJMM OFFE UP QSPWJEF B DPQZ PG ZPVS EBUFE TBMFTSFDFJQU TO CONFIRM
XBSSBOUZ TUBUVT
$PQZSJHIU ª .PUPSPMB*OD
"MM SJHIUT SFT FSWFE/P QBSU PG UIJT QVCMJDBUJPO NBZ CFSFQSPEVDFE JO BOZ GPSN OR BY
BOZ NFBOT PS VTFE UPNBLFBOZ EFSJWBUJWF XPSL TVDI BT USBOTMBUJPOUSBOTGPSNBUJPO
PS BEBQUBUJPO
XJUIPVU XSJUUFO QFSNJTTJPOGSPN.PUPSPMB *OD
.PUPSPMB SFTFSWFT UIF SJHIU UP SFWJTF UIJT QVCMJDBUJPO BOEUPNBLF DIBOHFT JO DONTENT
GSPN UJNF UP UJNF XJUIPVUPCMJHBUJPO PO UIF QBSU PG .PUPSPMB UP QSPWJEF
PG TVDI SFWJTJPOPSDIBOHF.PUPSPMBQSPWJEFT UIJTHVJEFXJUIPVUXBSSBOUZPG BOZKIND
FJUIFS JNQMJFE PSFYQSFTTFEJODMVEJOH CVU OPU MJNJUFE UP UIF JNQMJFEXBSSBOUJFTOF
GPSBQBSUJDVMBSQVSQPTF .PUPSPMBNBZ NBLFJNQSPWFNFOUS
NFSDIBOUBCJMJUZBOE
PSDIBOHFT JO UIF QSPEVDUT
EFTDSJCFE JO UIJT NBOVBM BUBOZUJNF
.05030-" UIF 4UZMJ[FE . -PHP BOE 1IPOF8SBQ BSFSFHJTUFSFE JO UIF 64 1BUFOU
BOE 5SBEFNBSL 0G F "MMPUIFSQSPEVDU PS TFSWJDF OBNFT BSF UIF QSPQFSUZ PG THEIR
SFTQFDUJWF PXOFST
Table of Contents
General Instructions ............... ............................................................................................................... iv-v
Handset Overview .......................................................................................................................... 1
Base Unit Overview ........................................................................................................................ 2
User Guide
Charger Overview........................................................................................................................... 2
Getting Started ...................................................................................................................................... 3
Battery Safety Instructions ........................................................................................................... 3
Installing the Battery...................................................................................................................... 4
Charging the Handset Battery....................................................................................................... 5
Installing the Base Unit ....................................................................................................... .................. 6
Basic Operations.................................................................................................................................... 8
Handset Indicators......................................................................................................................... 8
Base Unit LEDs .............................................................................................................................. 8
Making a Call ................................................................................................................................. 9
Answering Calls............................................................................................................................. 9
Ending a Call.................................................................................................................................. 9
i
Speakerphone Operation .............................................................................................................. 9
Adjust Handset Volume ................................................................................................................ 10
Redial Function ............................................................................................................................. 10
Mute Function .................................................................................................................. ............ 10
Setting the Date and Time ............................................................................................................ 11
Locate a Misplaced Handset......................................................................................................... 11
Ringer Volume .................................................................................................................. ............ 13
Ringer Tone .................................................................................................................... .............. 13
Setting the Intercom Tone ............................................................................................................ 14
Naming Your Handset................................................................................................................... 14
Key Tone....................................................................................................................... ................ 14
User Guide
Display Language............................................................................................................... ........... 12
Customizing Your Handset ....................................................................................................... .......... 13
Setting the Auto Answer Feature.................................................................................................. 15
Customizing Your Base Unit ..................................................................................................... .......... 16
Dialing Method ................................................................................................................. ............ 16
Deregister Handset....................................................................................................................... 16
Phonebook Operations........................................................................................................................ 17
Storing a New Entry............................................................................................................ .......... 17
ii
Reviewing/Dialing from the Phonebook ........................................................................................ 19
Editing a Phonebook Entry............................................................................................................ 19
Delete a Single Phonebook Entry.................................................................................................. 20
Caller ID/Call Waiting Caller ID...................................................................................................... 20
Reviewing Caller ID Records ........................................................................................................ 21
Storing a Caller ID Entry in the Phonebook ................................................................................... 22
User Guide
Dialing from the Caller ID Log....................................................................................................... 23
Deleting a Caller ID Record........................................................................................................... 23
Special Features............................................................................................................... .................... 24
Placing an Intercom Call................................................................................................................ 24
Access a Call Waiting Line .......................................................................................... ................ 24
Holding and transferring calls(PABX)............................................................................................. 24
Call Transfer.................................................................................................................. ................ 25
Registering a New Handset .......................................................................................................... 25
In case of difficulity .........................................................................................................................26
Warranty............................................................................................................................................... 28
iii
General Instructions
1.
2.
3.
5.
6.
7.
8.
9.
User Guide
4.
Avoid exposure of this telephone to moisture or liquid.
To prevent electric shock, do not open the handset or base cabinet.
Avoid metallic contact (e.g. metal clips, keys) between the battery
contacts and charging conductors.
There is a slight chance that the telephone could be damaged by an electrical
storm. It is recommended that users unplug the phone from the mains supply
and telephone socket during a storm.
Do not use the handset in an explosive hazard area such as where there is gas
leaking.
Follow the local regulations regarding the disposal of your packing materials,
exhausted batteries and used phone. Wherever possible, recycle those
materials.
We advise that this phone should not be used near intensive care medical
equipment or by persons with pacemakers.
Clean with a dry, soft, lint-free cloth. Never use cleaning agents, particularly
aggressive solvents.
Because the phone works by sending radio signals between base station and
handset, wearers of hearing aids may experience interference in the form of a
humming noise.
iv
User Guide
v
10. Your phone can interfere with electrical equipment such as answering
machines,TV and radio sets, clock radios and computers if placed too close. It
is recommended that you position the base unit at least one metre from such
appliances.
11. This telephone complies with applicable safety requirements for exposure to
radio waves (EMR).The mean power of this telephone does not exceed 20mW
limit at which point testing is required.
12. The earpiece of the handset may attract small metal objects such as staples and
pins. Care should be taken when placing the handset near these items.
13. This telephone is not designed for making emergency telephone calls when
the mains power fails. Always have a corded phone available to be able to
make and receive calls to emergency services if the mains power fails.
14. Do not use your telephone during an electrical storm thunderstorm as it is
possible to get an electric shock. Refer to information contained in the White
pages directory.
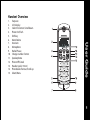
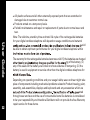
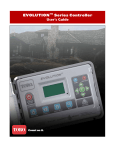
Handset Overview
Earpiece
LCD display
Caller ID shortcut/Scroll down
Phone On/Flash
Shift key
Mute/Delete
Intercom
Microphone
R edial/Pause
Change number format
Speakerphone
Phone Off/Cancel
Headset jack (2. 5 mm)
Phonebook shortcut /Scroll up
Select/Menu
User Guide
1.
2.
3.
4.
5.
6.
7.
8.
9.
10.
11.
12.
13.
14.
15.
1
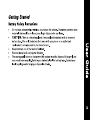
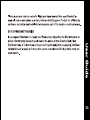
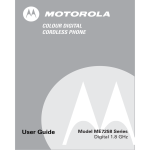
Base Unit Overview
1.
2.
3.
4.
User Guide
2
Handset cradle
Page button
In use /Voicemail LED
Charging /Page LED
Charger Overview
1.
2.
Handset cradle
Charge LED
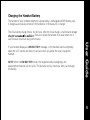
Charging the Handset Battery
The handset of your cordless telephone is powered by a rechargeable NiMH battery pack.
It charges automatically whenever the handset is in the base unit or charger.
The initial battery charge time is 10–12 hours. After the initial charge, a maintenance charge
. Be sure to place the handset in its base when not in
use to ensure maximum daily performance.
NOTE: When in LOW BATTERY mode, the keypad sounds, backlighting, and
speakerphone features will not work. The features are fully functional after you recharge
the battery.
User Guide
If your handset displays a LOW BATTERY message, or the handset seems completely
dead (the LCD is blank and does not activate when you press the keys), charge the
handset.
5
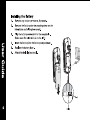
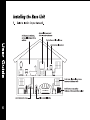
6
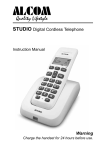
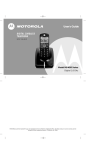
2.
Connect the base stand to the base unit by aligning the slots on each and pushing
upward until the pieces click into place.
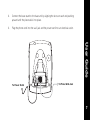
3.
Plug the phone cord into the wall jack and the power cord into an electrical outlet.
User Guide
~
To Power Outlet
To Phone Wall Jack
~
7
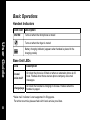
Basic Operations
Handset Indicators
Icon/Text
Description
MUTED
Turns on when the microphone is muted
User Guide
Turns on when the ringer is muted
Battery charging indicator (appears when handset is placed in the
charging cradle)
Base Unit LEDs
LED
Description
in use/
voice mail*
On when the phone is off-hook or when an extension phone is offhook. Flashes when there are new phone company voice mail
messages.
charge/page
On when the handset is charging in its base. Flashes when the
handset is paged.
*Voice mail indicator is not supported in Singapore.
For other countries please check with local service providers.
8
Making a Call
Press the ON/FLASH key on the handset (or the
When you hear the dial tone, dial the number.
key to use the speakerphone feature).
-OR-
Answering Calls
Press ON/FLASH , or
.
If you subscribe to call waiting, press the ON/FLASH key to answer the second call. Press
ON/FLASH
Ending a Call
Press the OFF/CANCEL key, or place the handset in the base unit, to end the call.
User Guide
Enter the phone number, and then press ON/FLASH . The phone number appears on the
display before it is dialed. Use the MUTE/DELETE key to make corrections. Press the
OFF/CANCEL key to delete the entire number.
Speakerphone Operation
Each handset has a built-in speakerphone. This feature allows you to have hands-free
conversations. To switch between the speakerphone and the handset during a call, press
the
key.
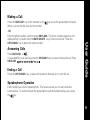
9
Adjust Handset Volume
While on a call, press the cid
comfortable level.
or
pbk keys to adjust the listening volume to a
Redial Function
1.
User Guide
10
2.
3.
Press the REDIAL/PAUSE key to display the last telephone number dialed from the
handset (up to 22 digits).
Use the scroll keys to view the last 20 numbers dialed. A double beep will sound when
you reach the beginning or the end of the redial list.
Press the ON/FLASH or
key to dial the highlighted number. Press the
OFF/CANCEL key to exit the redial review list without dialing a number.
NOTE: If the redial memory is empty and REDIAL/PAUSE is pressed, a double beep will
sound.
Mute Function
NOTE: The mute feature is only available during a call.
1. Press the MUTE/DELETE key. MUTED appears on the display.
2. Press the MUTE/DELETE key again to return to normal two-way conversation.
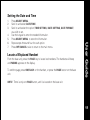
Setting the Date and Time
1.
2.
3.
Locate a Misplaced Handset
From the base unit, press the PAGE key to locate lost handsets. The handsets will beep
and PAGING appears on the display.
To end the page, press ON/FLASH on the handset, or press the PAGE button on the base
unit.
User Guide
4.
5.
6.
7.
Press SELECT/MENU .
Scroll to and select DATE/TIME .
Scroll to and select the option (TIME SETTING , DATE SETTING, DATE FORMAT)
you wish to set.
Use the keypad to enter the needed information.
Press SELECT/MENU to store the information.
Repeat steps three and four for each option.
Press OFF/CANCEL twice to return to the main menu.
NOTE: There is only one PAGE button, and it is located on the base unit.
11
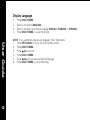
Display Language
1.
2.
3.
4.
User Guide
12
Press SELECT/MENU .
Scroll to and select LANGUAGE .
Scroll to and select your desired language (ENGLISH , FRANCAIS, or ESPANOL ).
Press SELECT/MENU to save the setting.
NOTE: If you accidentally change your language, follow these steps:
1. Press OFF/CANCEL until you are at the standby screen.
2. Press SELECT/MENU .
pbk one time.
3. Press
4. Press SELECT/MENU .
5. Press
pbk until you see your desired language.
6. Press SELECT/MENU to save the setting.
Customizing Your Handset
Ringer Volume
1.
2.
3.
5.
Ringer Tone
1.
2.
3.
4.
5.
Press SELECT/MENU .
Scroll to and select HANDSET SETUP .
Scroll to and select RINGER TONE .
Use the scroll keys to view and play samples of each available ringer tone.
Press SELECT/MENU
User Guide
4.
Press SELECT/MENU .
Scroll to and select HANDSET SETUP .
Scroll to and select RINGER VOLUME . A sample of the set ring tone plays at the
current volume setting. The bars on the display indicate the volume level.
Use the up and down scroll keys to increase or decrease the volume setting. The ring
tone plays and the volume bar increases or decreases as you adjust the setting. At the
lowest setting, the display shows the ringer off icon
.
Press SELECT/MENU to save the setting.
13
Setting the Intercom Tone
1.
2.
3.
4.
5.
User Guide
Naming Your Handset
1.
2.
3.
4.
5.
Press SELECT/MENU .
Scroll to and select HANDSET SETUP .
Scroll to and select NAME HANDSET .
Use the keypad to enter the new name of your handset at the ENTER NAME:
prompt.
Press SELECT/MENU to store the name.
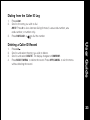
Key Tone
1.
2.
3.
4.
14
Press SELECT/MENU .
Scroll to and select HANDSET SETUP .
Scroll to and select INTERCOM TONE .
Use the scroll keys to view and play samples of each available intercom tone.
Press SELECT/MENU
Press SELECT/MENU .
Scroll to and select HANDSET SETUP .
Scroll to and select KEY TONE.
Select ON or OFF using the scroll keys. OK appears on the disp
new setting.
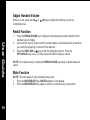
Setting the Auto Answer Feature
The Auto Answer Feature setting allows your handsets to answer an incoming call (external
or intercom) when the handset is removed from the charging cradle.
1. Press SELECT/MENU .
2. Scroll to and select HANDSET SETUP .
3. Scroll to and select AUTO ANSWER .
4. Use the scroll keys to turn the feature ON or OFF. OK appears on the display,
User Guide
15
Customizing Your Base Unit
Dialing Method
User Guide
16
1.
2.
3.
4.
5.
Press SELECT/MENU .
Scroll to and select BASE SETUP .
Scroll to and select DIAL TYPE.
Scroll to TONE or PULSE .
Press SELECT/MENU to save the setting.
Deregister Handset
1.
2.
3.
4.
5.
Press SELECT/MENU .
Scroll to and select BASE SETUP .
Scroll to and select DEREGISTER HANDSET .
Scroll to and select the handset you wish to deregister. On the display, CONFIRM?
appears.
Press SELECT/MENU
OK appears
on the display.
Phonebook Operations
Your handset stores up to 40 numbers withnames ; each memory location holds up to 22
digits for the number and 14 characters for the name.
Storing a New Entry
2.
3.
4.
5.
6.
Scroll to and select NEW ENTRY .
Enter the telephone number at theENTER NUMBER prompt. Use the MUTE/DELETE
key to erase characters to the left of the cursor.
Press SELECT/MENU to save the number.
Enter the name for the new contact at the ENTER NAME prompt. Use the
MUTE/DELETE key to erase characters to the left of the cursor. Use the scroll keys to
move the cursor to the left or right.
OK
Press SELECT/MENU
appears on the display.
User Guide
1. Press
pbk.
- OR Press SELECT/MENU. Scroll to and select PHONEBOOK.
17
NOTES:
•
If the phonebook is full, the handset will display PHONEBOOK FULL .
•
While entering numbers, press and hold the PAUSE key to add pauses if necessary.
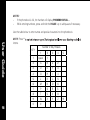
Use the table below to enter names and special characters into the phonebook.
User Guide
18
NOTE: Press *
letters.
Number of Key Presses
KEY
1
2
space
1
2
A
3
D
4
3
4
B
C
2
E
F
3
G
H
I
4
5
J
K
L
5
6
M
N
O
6
7
P
Q
R
S
8
T
U
V
8
9
W
X
Y
Z
0
0
1
5
7
9
Reviewing/Dialing from the Phonebook
When not on a call, press
mode.
pbk, and the handset jumps directly into phonebook review
Use the up and down scroll keys to search th
character of the name and continue navigating.
Press ON/FLASH or
to dial the number.
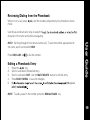
Editing a Phonebook Entry
1.
2.
3.
4.
5.
Press the
pbk key.
Scroll to and select the desired entry.
Scroll to and select EDIT. Use the MUTE/DELETE button to edit the entry.
Press SELECT/MENU to save the changes.
OK appears
User Guide
NOTE: Scrolling through the list shows names only. To see the number associated with
the name, scroll to and select VIEW.
NOTE: To add a pause in the number, press the REDIAL/PAUSE key.
19
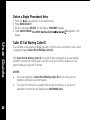
Delete a Single Phonebook Entry
1. Press the pbk key and scroll to the desired entry.
2. Press MENU/SELECT .
3. Scroll to and select DELETE. On the display, CONFIRM? appears.
4. Press SELECT/MENU
OK appears on the
display.
User Guide
20
Caller ID/Call Waiting Caller ID
Your handset is also capable of displaying calle r ID information in conjunction with a caller
waiting alert signal (Caller ID/Call Waiting Caller ID).
With Caller ID/Call Waiting Caller ID , the caller ID data is displayed so you can decide
whether to answer the incoming call or continue with your current conversation. Your
system holds up to 40 caller ID entries.
NOTES:
x
You must subscribe to Caller ID/Call Waiting Caller ID service with your local
telephone company to use the features.
x
If no caller ID information is available from the phone company, or you do not
subscribe to the service, the display showsINCOMING CALL.
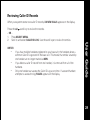
Reviewing Caller ID Records
When your system stores new caller ID records, XX NEW CALLS appears on the display.
scroll key to review the records.
Press the cid
- OR 1. Press SELECT/MENU .
2. Scroll to and select CALLER ID LOG. Use the scroll keys to review the entries.
.
.
.
If you have multiple handsets registered to your base unit, the handsets share a
common Caller ID Log stored in the base unit. This means that entries viewed by
one handset are no longer marked as NEW .
If you delete a caller ID record from one handset, it is removed from all of the
handsets.
Only one handset can access the Caller ID Log at one time. If a second handset
attempts to access the log, FAILED appears on the display.
User Guide
NOTES:
21
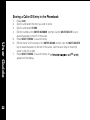
Storing a Caller ID Entry in the Phonebook
1.
2.
3.
4.
User Guide
22
5.
6.
7.
Press cid .
Scroll to and select the entry you wish to store.
Scroll to and select STORE.
Edit the number at the ENTER NUMBER prompt. Use the MUTE/DELETE key to
erase characters to the left of the cursor.
Press SELECT/MENU to save the entry.
Edit the name for the contact at the ENTER NAME prompt. Use the MUTE/DELETE
key to erase characters to the left of the cursor. Use the scroll keys to move the
cursor to the left or right.
Press SELECT/MENU to save the entry. A c
OK
appears on the display.
Dialing from the Caller ID Log
1.
2.
3.
Press cid .
Scroll to the entry you wish to dial.
NOTE: Press # to view alternate dialing formats (1+area code+number, area
code+number, or number only).
Press ON/FLASH or
to dial the number.
1.
2.
3.
4.
Press cid .
Scroll to and select the entry you wish to delete.
Scroll to and select DELETE . The display changes to CONFIRM?.
Press SELECT/MENU to delete the record. Press OFF/CANCEL to exit the menu
without deleting the record.
User Guide
Deleting a Caller ID Record
23
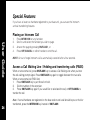
Special Features
If you have at least two handsets registered to your base unit, you can use the intercom
and call transferring features.
Placing an Intercom Call
User Guide
24
1.
2.
3.
4.
Press INTERCOM on any handset.
Scroll to and select the handset you wish to page.
Answer the page by pressing ON/FLASH , or
.
Press OFF/CANCEL on either handset to end the call.
NOTE: An out of range intercom call is automatically canceled after a few seconds.
Access a Call Waiting Line / Holding and transferring calls (PABX)
When on an external call, press ON/FLASH key to access a Call Waiting Line when you hear
the call waiting prompt signal. Press ON/FLASH key again to toggle between the two calls.
When on an external call (PABX line)
1.
Press ON/FLASH key to put the call on hold.
2.
Dial the number of the extension.
3.
Press ON/FLASH key again if you would like to take back the call, or OFF/CANCEL to
transfer the call.
Note : If serval handsets are registered on the base station and a call should be put on hold or
transferred, press the INTERCOM key instead of ON/FLASH.
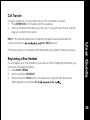
Call Transfer
During an outside call, you can transfer the call from one handset to another.
1. Press INTERCOM on the handset with the outside call.
2. Scroll to and select the handset you wish to call. You can announce the call, and then
hang up to complete the transfer.
If the returned call is not answered within 60 seconds, the outside call ends automatically.
Registering a New Handset
You can register up to four handsets to your base unit. Before registering the handset, you
must install and charge the battery.
1. Press SELECT/MENU .
2. Scroll to and select REGISTER .
3. Press and hold the PAGE button on the base unit for approximately 20 seconds.
When registration is complete OK
User Guide
NOTE: If the second handset does not respond after approximately 30 seconds, the
outside call returns to
CALL BACK appears.
25
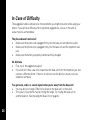
In Case of Difficulty
The suggestions below should solve most problems you might encounter while using your
phone. If you still have difficulty after trying these suggestions, visit us on the web at
www.motorola.com/cordless.
The phone doesn't work at all
x
Make sure the power cord is plugged firmly into the base unit and electrical outlet.
x
Make sure the phone cord is plugged firmly into the base unit and the telephone wall
jack.
x
Make sure the battery is properly inserted and fully charged.
No dial tone
x
First, try all the suggestions above.
x
If you still don't hear a dial tone, disconnect the base unit from the telephone jack and
connect a different phone. If there is no dial tone on that phone, contact your local
telephone company.
You get noise, static, or a weak signal when you're away from the base unit
x
You may be out of range. Either move closer to the base unit, or relocate it.
x
The layout of your home may be limiting the range. Try moving the base unit to
another position. (See Installing the Base Unit on page 6.)
26
You get noise, static, or a weak signal even when you're near the base unit
x
Household appliances plugged into the same circuit as the base unit can sometimes
cause interference. Try moving the appliance or the base unit to another outlet.
The handset does not ring when you receive a call
x
Make sure you have the ringer activated. (See Ringer Tone and Ringer Volume
sections.)
x
Make sure the telephone line cord is plugged firmly into the base unit and the
telephone wall jack.
x
Make sure the power cord is plugged into the base unit and an electrical outlet.
x
Move closer to the base unit.
You hear other calls while using your phone
x
Disconnect your base unit from the telephone jack, and plug in a different telephone.
If you still hear other calls, contact your local telephone company.
Common Troubleshooting Steps for Your Cordless Phone
If the handset or base unit does not seem to be responding normally, then try putting the
handset in its base. If it does not seem to respond, do the following (in the order listed):
1. Disconnect the power to the base.
2. Disconnect the handset battery.
3. Wait a few minutes.
4. Connect power to the base unit.
5. Re-install the battery.
6. Wait approximately 60 seconds for the handset to re-establish its link with the base.
27
WARRANTY INFORMATION
MOTOROLA DOES NOT WARRANT ITS CORDLESS TELEPHONE PRODUCTS
("PRODUCT(S)") TO YOU, THE END-USER. A LIMITED WARRANTY FOR THIS PRODUCT
IS PROVIDED TO YOU BY MOTOROLA'S DISTRIBUTOR ("DISTRIBUTOR") PURSUANT
TO DOCUMENTATION INCLUDED WITH THIS PRODUCT. PLEASE CONTACT THE
DISTRIBUTOR IF YOU EXPERIENCE PROBLEMS WITH THIS PRODUCT.
User Guide
28
TO THE FULLEST EXTENT PERMITTED UNDER APPLICABLE LAW (A) MOTOROLA
HEREBY DISCLAIMS ALL WARRANTIES OF ANY KIND RELATING TO THE PRODUCT
THAT BIND THE MANUFACTURER, WHETHER EXPRESS, IMPLIED OR STATUTORY,
INCLUDING BUT NOT LIMITED TO IMPLIED WARRANTIES OF MERCHANTABILITY,
FITNESS FOR A PARTICULAR PURPOSE, OR ANY WARRANTY AGAINST
INFRINGEMENT PROVIDED UNDER ANY LAW, AND (B) IN NO EVENT SHALL
MOTOROLA BE LIABLE TO YOU OR ANY OTHER PARTY FOR ANY DIRECT, INDIRECT,
GENERAL, SPECIAL, INCIDENTAL, CONSEQUENTIAL, EXEMPLARY OR OTHER
DAMAGES ARISING OUT OF THE USE OR INABILITY TO USE THE PRODUCT
(INCLUDING, WITHOUT LIMITATION, DAMAGES FOR LOSS OF BUSINESS PROFITS,
BUSINESS INTERRUPTION, LOSS OF INFORMATION OR ANY OTHER PECUNIARY
LOSS), OR FROM ANY BREACH OF WARRANTY, EVEN IF MOTOROLA HAS BEEN
ADVISED OF THE POSSIBILITY OF SUCH DAMAGES. MOTOROLA SHALL NOT BE
BOUND BY PRODUCT RELATED STATEMENTS NOT DIRECTLY MADE BY MOTOROLA
NOR ANY WARRANTY OBLIBATIONS APPLICABLE TO THE DISTRIBUTOR.
Alcom Electronics Pte Ltd.(Distributor)
12
For details, please contact :
Alcom Electronics Pte Ltd
37 Kallang Pudding Road, #05-08, BLK-B Tong Lee Building, SINGAPORE 349315
PH:(65) 68412668 FAX:(65) 68412628 E-MAIL: [email protected]
www.alcomonline.com
User Guide
; or failing this, to reimburse the price of the Product but reduced to
take into account the use you have had of the Prodcut since it was delivered.
29
You must ensure that all and any repairs or servicing is handled at all times by a
Distributor's Service Centre in accordance with the Distributor's Service requirements.
In some cases, you may be requested to provide additional information concerning
the maintenance of the Products by Distributor's Service Centres only, therefore it is
important to keep a record of any previous repairs, and make them available if questions
arise concerning maintenance.
CONDITIONS
User Guide
This warranty will not apply if the type or serial numbers on the Product has been
altered, deleted, duplicated, removed, or made illegible. Distributor reserves the right
to refuse free-of-charge warranty service if the requested documentation can not be
presented or if the information is incomplete, illegible or incompatible with the factory
records. Repair
replacement of parts or boards with functionally equivalent, reconditioned or new
parts or boards. Replaced parts, accessories, batteries, or boards are warranted for
the balance of the original warranty time period. The Warranty Term will not be
extended. All original accessories, batteries, parts, and digital cordless telephone that
have been replaced shall become the property of Distributor.
Distributor does not warrant the installation, maintenance or service of the products,
accessories, batteries or parts.
30
Distributor will not be responsible in any way for problems or damage caused by any
ancillary equipment not furnished by Distributor which is attached to or used in
connection with the Products.
31
All plastic surfaces and all other externally exposed parts that are scratched or
damaged due to customer normal use.
Products rented on a temporary basis.
Periodic maintenance and repair or replacement of parts due to normal wear and
tear.
User Guide
32
Note: The talk-time, stand-by time and total life cycle of the rechargeable batteries
for your digital cordless telephone will depend on usage conditions and network
ould
be able to obtain optimum performance for your digital cordless telephone within
The warranty for the rechargeable batteries becomes void if (i) the batteries are charged
ng of the battery, (ii)
any of the seals on the battery are broken or show evidence of tampering, (iii) the
battery is used in equipment or service other than the digital cordless telephone for
Depending on operating conditions and your usage habits, wear and tear might take
place of components including mechanical problems related to Product housing, paint,
assembly, sub-assemblies, displays and keyboards and any accessories which are
rated
through wear and tear and the use of consumable items like batteries is considered
to be your responsibility and therefore Distributor will not provide the free Warranty
repair service for these items.
33
MOTOROLA and the Stylized M Logo are registered in the US Patent & Trademark Office. All other product or service names are the
property of their respective owners. © Motorola, Inc. 2006.