1
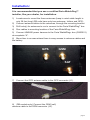
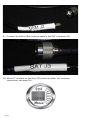
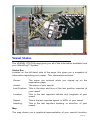
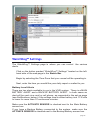
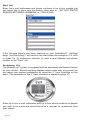
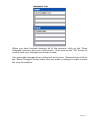
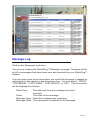
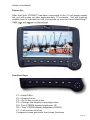
Index Welcome Aboard ................................................................ page 1 Parts List .................................................................... page 2 Installation .................................................................. page 3 Let’s Get Started ................................................................. page 7 Device Activation ........................................................ page 8 Serial Number ................................................... page 8 Your Information ................................................ page 8 Your Vessel Information .................................... page 8 Payment Information ......................................... page 9 Disclaimer ......................................................... page 9 Faria WatchDog™ VMS Tacking on-line ............................. page 11 www.vmstracking.com ................................................ page 11 Vessel Status .............................................................. page 13 Status Bar ......................................................... page 13 Map ................................................................... page 13 Alert Status ....................................................... page 13 WatchDog™ Settings ................................................. page 15 Battery Level Alerts ........................................... page 15 Assistance ........................................................ page 16 Setting up your Notification and Alert List .................. page 17 e-mail and Phone lists ....................................... page 17 Notifications ...................................................... page 17 Alert List ............................................................ page 18 Assistance List .................................................. page 18 Message Log .............................................................. page 21 Position History .......................................................... page 23 WatchDog™ Maps ...................................................... page 26 2-inch User Interface ........................................................... page 27 Installation .................................................................. page 28 Operation .................................................................... page 28 Assistance Button ...................................................... page 28 Diagnostics ................................................................. page 30 Faria V TERM™ ................................................................... page 33 Installation .................................................................. page 34 Power-up .................................................................... page 35 Functions Keys ........................................................... page 35 Keyboard (if available) ................................................ page 36 e-mail Operation ......................................................... page 37 Writing and Sending an e-mail .......................... page 37 Reading e-mail .................................................. page 38 Address Book .................................................... page 38 Displaying Settings ..................................................... page 38 Faria WatchDog Warranty ................................................... page 41 Safety Notice - The Faria WatchDog™ VMS system is only an aid to the operation of a boat. The performance of the system can be affected by many factors including but not limited to equipment failure, environmental conditions, improper installation, handling and/or use. This device should not be used for any navigational or safety purpose. FCC Notice – Your Faria WatchDog™ system complies with Parts 15 and 80 of the FCC Rules. Operation is subject to the condition that this device does not cause harmful interference. Changes or modifications to this equipment not expressly approved in writing by the Faria WatchDog Inc. could violate compliance with FCC rules and void the operator’s authority to operate this equipment. An FCC Ship’s Radio License and Operator’s License are not required for use of your WatchDog™ system. Welcome Aboard Congratulations on the purchase of your Faria WatchDog™ 750VMS system. This owner’s manual contains very important information on the installation, operation and maintenance of your telematics system. To get the best results in operation and performance please take a few minutes to read this manual and familiarize yourself with your Faria WatchDog™ system. Repairs and/or Technical Service – Repairs and adjustments to your system require specialized service procedures and tools available only to qualified service technicians. There are no user service parts or adjustments. The operator of this system should never remove the covers or attempt to service this equipment. For technical support or repairs please contact: Faria WatchDog™ Inc. P.O. Box 486 385 Norwich-New London Turnpike Uncasville, CT 0 6382 Telephone: 877-888-5569 e-mail: [email protected] page 1 Notice - The Faria WatchDog™ system is only an aid to operation of a boat. The performance of the system and the system performance specifications can be affected by many factors including but not limited to equipment failure, environmental conditions, improper installation, handling and/or use. This device should not be used for any navigational or safety purpose. The Faria Watchdog is used at your sole risk and in no event shall Faria WatchDog, Inc. be liable for any costs, losses, liabilities, damages, expense or claims of any nature incurred or sustained in respect of this device or its use. You further indemnify and hold harmless Faria Watchdog, Inc. from any liability or loss resulting from use of the device. PARTS LIST PART # page 2 DESCRIPTION QTY. AN0007 GPS Antenna 1 AN0008 GSM Antenna (Cell) 1 AN0009 Iridium Antenna (Satellite) 1 BK0126 Antenna Bracket (SB unit has 2) 3 DM0100 2” Operator Interface 1 GWD012 Faria WatchDog™ 750VMS System 1 HN0606 Power Harness 1 HN0609 GPS Antenna Cable 1 HN0610 Iridium Antenna (Satellite) Cable 1 HN0611 GSM Antenna Cable (DB model only) 1 IS0239 Faria WatchDog™ 750VMS Instruction Manual 1 SC0140 Screw, #12 X 4 SS 2 SC0141 Screw, #1/4 X 1, SS 9 SC0142 Screw, #12 X ¾, SS 3 CN0023 Watertight In Line Fuse Holder 2 Installation: It is recommended that you use a certified Faria WatchDog™ installer, like your dealer, for installation. 1) Locate area to mount the three antennas (keep in mind cable length is only 28 feet long) (SB units have only two antennas, Iridium and GPS) 2) Connect antenna cables to the antennas, through the mounting bracket. 3) Drill hole(s) for antennas to run to connect to the Faria WatchDog™ box. 4) Run cables to mounting location of the Faria WatchDog™ box. 5) Connect HN0606 power harness to the Faria WatchDog™ box (GWD012) at receptacle “A”. 6) Mount box in an area where there is easy access to antenna cables and the battery. GPS GSM SAT 7) Connect the GPS antenna cable to the GPS connector (J1). 8) (DB models only) Connect the GSM (cell) antenna cable to the GSM connector (J2). page 3 9) Connect the Iridium (Sat) antenna cable to the SAT connector (J3). 10) Mount 2” interface so that the LCD screen is visible. (for mounting instructions, see page 28) page 4 HN0606 11) Connect four-pin connector from the 2” User Interface to the four-pin connector from the power harness. 12) Connect the purple and the red wire directly to the positive battery terminal. *If run of wire to battery terminal is greater than 72” you must install a 5A in line fuse provided in your kit 13) Connect the black wire to a good vessel ground (battery negative). 14) If you have a back-up battery connect red/white to positive battery terminal. 15) Connect black to vessel ground or back up battery negative. Go to the “User Interface” section for a description of screens displayed on the User Interface, page 30. Log on to www.vmstracking.com to log in. Use the Registration button to register your Faria Watchdog product. (see “Let’s get started”, see page 7) If you have any questions or need technical support call 877.888.5569 or e- mail us at [email protected]. page 5 page 6 Let’s get started. Your Dealer should have already performed the installation and Registration for you. The Faria WatchDog™ Dealer network has been put into place to make using the Faria WatchDog™ VMS unit as easy as possible. If your Dealer has already installed and registered your VMS system then please skip this section. Congratulations you are ready to start using your Faria WatchDog™ VMS system. Continue to page 11. If you preferred to do the installation yourself don’t worry the Faria WatchDog VMS system is designed to be easily configured. (see page 3 for installation instructions.) To begin, log on to w ww.vmstracking.com and complete the registration form for your Faria WatchDog™ system. Be sure to have the following information before starting the registration process: 1. Faria WatchDog™ Serial Number (located on the label of your control box) 2. Valid Credit Card ( Visa, Master Card, Amex) Remember to Complete all required fields (indicated with an * ) page 7 Device Activation (Fill out all fields in this section.) Serial Number: Enter your WatchDog™ Serial Number. This number is located on a label on the WatchDog™ control box. E-mail Address: This will be the address that your monthly statement will be sent to, as well as your website log-in name. Verify E-mail Address: Password: Enter a password, must have at least 6 characters. Verify Password: Your Information (Fill out all fields in this section.) Be sure to check if you want WatchDog™ to contact you on the listed mobile phone number or e-mail address. You can always change this information later. Your Vessel Information This information is important. Your vessel name and document numbers are the primary way that we identify users of the Faria WatchDog™. Enter your vessel’s U.S. Coast Guard Vessel Documentation number or Vessel State Registration number. You do not need both numbers. Be sure to identify the region you are fishing in. If you fish in multiple regions contact your local NOAA fisheries Dept. for the correct region to enter. page 8 Payment Information This is the information that Faria WatchDog Inc. will use to collect payment for monthly monitoring services based on the VMS plan you selected. Enter your Credit Card Information (This is a secure sight. We will not sell your information or share it with others.) Name Your name must be entered as it appears on the front of your credit card. Credit Card Do not use “-“ between numbers when entering credit card numbers. Use the “Register” button to complete your registration. Be sure to read the disclaimer before using the register button. Disclaimer: By sending this Agreement, I certify that I am authorized to execute this Agreement either as the registered vehicle owner or the owner’s agent. I understand and agree that I will be responsible for and will guarantee payment for the WatchDog™ annual service an that an early termination fee of $ 240 prorated over the length of the service agreement applies to subscriptions in the following states: AL, FL, GA, K Y, L A, MS, NC, SC, TN, NY and parts of IN and NJ. A non-prorated $150 early termination fee applies in all other areas. Once your credit card information and your WatchDog™ serial number have been verified you will receive a notification via e-mail that your account has been set up and you can log in and begin using your new Faria WatchDog™ system. Important The Faria WatchDog™ system is only an aid to operation of a boat. The performance of the system and the system performance specifications can be affected by many factors including but not limited to equipment failure, environmental conditions, improper installation, handling and/ or use. This device should not be used for any navigational or safety purpose. The Faria WatchDog™ is used at your sole risk and in no event shall Faria WatchDog, Inc. be liable for any costs, losses, liabilities, damages, expense or claims of any nature incurred or sustained in respect of this device or its use. You further indemnify and hold harmless Faria WatchDog, Inc. from any liability or loss resulting from use of the device. page 9 page 10 Faria WatchDog™ VMS Tracking on-‐line Go to w ww.vmstracking.com and log in. Use the e-mail address and password you supplied when registering your WatchDog VMS purchase prior to installation. e-mail: password: Now that you have successfully logged onto your vessel’s web page, you can begin to navigate through all of the features of the WatchDog™ system. When you finish with this section you will have: 1. Set-up your lists of persons to be notified in the event assistance is required from your vessel, who will be notified of a low battery condition, and who you would like to get your vessel’s daily report. 2. Become familiar with all of the options available to you within your web page. page 11 The first thing you will see after logging into the www.vmstracking.com web site using your User log-in and password, will be the “ Vessel Status Page.” This page will give you a summary of all the information available to you through the WatchDog™ VMS system. page 12 Vessel Status The VESSEL STATUS page gives you all of the information available from your WatchDog™ System. Status Bar Located on the left-hand side of the page, this gives you a snapshot of information regarding your vessel. This information includes, Owner: The name you entered when you signed up on the registration page. Vessel: The name of your vessel Last Position: This is the date and time of the last position reported of your vessel. Location: This is the last reported latitude and longitude of your vessel. Speed: This is the last reported speed, in MPH, of your vessel. Heading: This is the last reported heading, or direction, of your vessel. Map The map shows you a graphical representation of your vessel’s location. page 13 You can change the view from Map to Satellite or a combination of both (Hybrid). Alert Status The boxes on the bottom of the page, under the map, show your Main Battery Voltage, Backup Battery Voltage (if activated), and your Assistance Notification. The smaller boxes indicate if the sensors are Active, Inactive, in Alert Mode or OK. page 14 WatchDog™ Settings The WatchDog™ Settings page is where you can control the various alerts. Click on the button marked “ WatchDog™ Settings” located on the left- hand side of the web page in the Status Bar. Begin by selecting the Time Zone that your vessel will be operating in. Next, enter the time you would like your daily report e-mailed to you. Battery Level Alerts There are t wo alerts available to you in the VMS system. There is a MAIN BATTERY ALERT and a BACKUP BATTERY ALERT. In both cases an alert will be sent via e-mail or cell phone, as requested in the set-up page (see Notifications, below), if the voltage level in either battery is at 11.6 volts or lower for more than 10 continuous minutes. Make sure the ACTIVATE SENSOR is checked next to the Main Battery sensor box. If you have a Backup Battery connected to the system, make sure the ACTIVATE SENSOR is checked next to the Backup Battery sensor box. page 15 When completed click on the “Save Changes” button at the bottom of the page. Click on the “OK” button. Assistance Choose between Activate Sensor and Deactivate Sensor. If you desire to use this safety feature be sure to select Activate Sensor. Should anything happen while under way, any person on the vessel can request assistance by using the 2” User Interface on the dash. Should you need assistance from your boat, you can have up to four e-mail addresses and up to four phone numbers of people contacted from our call center. 24-hours a day, 7-days a week, Faria WatchDog™ is there when you need us the most. Enter the e-mail addresses and phone numbers in the Notifications and Alert lists found in the next chapter. For more information about Assistance go to page 28. page 16 Setting up your Notifi cation and Alert Lists E-mail and Phone Lists Click on the “Update E-mail and Phone Lists” button located in the information bar on the left hand side of the web page. In this section you can enter the e-mail addresses and phone numbers of the people you wish to be notified for a Daily Report, Low Battery Alert, or Assistance request. Notification Enter the e-mail addresses of up to four people that you would like to have your vessel’s daily report sent to. The Daily Report will give you current voltage of the main battery and (if installed) the backup battery. It will also give you the position of your vessel at the time of your daily report. page 17 Alert List Enter the e-mail addresses and phone numbers of up to four people that you would like to have your low battery alert sent to. (DO NOT ENTER DASHES BETWEEN NUMBERS i.e. 1234567890) If the Activate Sensor has been checked on your WatchDog™ Settings page, the WatchDog™ will send out an alert when the voltage is 11.6 volts or lower, for 10 continuous minutes, to each e-mail address and phone number in the ”Alert” list. Assistance List The WatchDog™ system is equipped with an assistance notification feature for your vessel. Should anything happen while under way, any person on the vessel can request assistance by using the 2” User Interface on the dash. (The operation of the 2” User Interface is explained page 27) Enter up to four e-mail addresses and up to four phone numbers of people you wish to be contacted should there be a request for assistance from your vessel. page 18 When you have finished entering all of the contacts, click on the “Save Changes” button to save your information. Then click on the “OK” button to confirm that your changes have been saved. You can make changes to any of the lists at any time. Remember to click on the “Save Changes” button each time you make a change in order to save the new information. page 19 page 20 Message Log Click on the Message Log button. You are now viewing the WatchDog™ Message Log page. This page will list all of the messages that have been sent and received by your WatchDog™ System. You may select how much information you would like the page to display by selecting from the options in the drop down box. You may select “TODAY,” “YESTERDAY,” “LAST WEEK,” “LAST MONTH” or “ALL.” The information will be displayed as follows: Date/Time: The date and time the message was sent/ received State: The state of the message Message Type: What the message was regarding Message Data: The information contained in the message page 21 Sample of a message in WatchDog™ In the example above the WatchDog™ system is reporting that it received a message on April 5, 2007 at 01:04:00 PM indicating a Normal report. You will see similar messages in the Message Log indicating any information that is either sent or received by your WatchDog™ system. page 2 2 Position History Click on the Position History button. This screen will give you access to the exact latitude and longitude of your vessel as reported by the Faria WatchDog™ system. As with the MESSAGE LOG you can select the amount of information you wish to have displayed on this page by selecting from the options in the drop down box. You may select “TODAY,” “ YESTERDAY,” “LAST WEEK,” “LAST MONTH” or “ALL.” The information will be displayed as follows: Date/Time: The date and time of your vessel’s last GPS position Latitude: The latitude of your vessel’s last reported GPS position Longitude: The longitude of your vessel’s last reported GPS position Speed: Indicating the speed of your vessel at the time of the position report Heading: Indicates direction of your vessel at time of the report page 23 In the example above, the vessel position was reported on April 5, 2007 at 01:04:00 PM at a speed of 0 mph with heading north. You can also see the Lat/Lon position at which the GPS position was reported. If you click on either, the L ATITUDE or the LONGITUDE you will be taken to a map that will show your vessel’s exact location at the time the report was recorded. page 24 WatchDog™ Maps There are three different maps for you to choose from with the Faria WatchDog™ system. Map Satellite Hybrid The default settings is “Map”. The WatchDog™ uses the map to initially show the position of your vessel. You may select a different view by using the tabs in the upper right of the map. If a satellite photo is available, you can view your vessel’s position on the satellite photo by clicking on the “Satellite” tab. If you would like to view your vessel’s position with streets information click the tab marked “Hybrid” On each of the maps you can use the Zoom tool bar to zoom in or out of any map. Or you may click on the map to drag the view to other areas. The page 26 map will reposition itself. There you have it. You have now successfully navigated through all of the many options available to you through your new WatchDog™ system! page 26 2-‐inch User Interface The Faria WatchDog™ 750VMS system comes with a 2-inch user interface display. The 2-inch User Interface displays the status of communications to the MTU (Mobile Transmitter Unit). The MTU (WatchDog™ black box) uses GPS and at least one communication channel (either GSM or Iridium) to send vessel status and position. The User Interface also allows the operator of the vessel a quick way to seek assistance in the event of an emergency. page 27 Installation Operation When powered-up, your interface display will beep and the LCD display will light up. When your WatchDog™ 750 VMS is running, the 2-inch User Interface will show one of the following messages: 1) ‘Wait’ with Red LED’s off. This is a boot up message on the 2-inch User Interface that indicates that the unit is trying to communicate with the WatchDog™. 2) ‘Comm’ with Red LED’s off. This indicates that the WatchDog™ is running, has a GPS fix and has at least one communication channel open (GSM and/or Iridium). 3) ‘No Comm’ with Red LED’s on continuously: This indicates that the WatchDog™ is running, but either cannot get a GPS fix, cannot communicate (via GSM or Iridium), or both GPS and the communication links are down. Assistance Button The WatchDog™ system is equipped with an Assistance Notification function. Any person on the vessel can request assistance by using the 2-inch User Interface. Once requested, an assistance alert will be sent to those people listed on the notification page by e-mail and phone (see Setting up your Notification and Alert Lists, page 17). Pressing and holding the “H” button for 5 seconds will put the WatchDog™ into the ASSISTANCE MODE. In this mode, someone on the vessel has requested assistance. The screen will display “HELP SEND” indicating that the WatchDog™ system has requested assistance. page 28 Press and hold for 5 seconds. Once the request has been sent, the screen will change to “HELP SENT.” This is to indicate that the WatchDog™ system has sent out a request for assistance. The WatchDog™ has been triggered to send out an e-mail or a phone call to those people who are listed on the “Alert List” in the WatchDog™ settings page. Once the e-mails and phone calls have been made the interface screen will change to “HELP RECV.” WARNING: “HELP RECV” DOES NOT INDICATE THAT THE PEOPLE THAT YOU HAVE LISTED ON YOUR SETTINGS PAGE HAVE BEEN NOTIFIED. page 29 “HELP RECV” only indicates that the e-mails have been sent and the phone calls have been made. It does not indicate that connection has been made with any individual. In the case of emergency contact the United States Coast Guard on channel 16 on your VHF radio. Pressing the “S” button will disable the audio alarm without cancelling the Assistance Notification. The red LED’s will continue to flash. Pressing and holding the “H” button for 5 seconds will take the system out of the ASSISTANCE REQUEST mode and return to the Normal Mode. Diagnostics Press to enter the “Status” mode. Press the “S” button to enter the STATUS MODE. Pressing the “MODE” button will cycle through five status displays. The displays are as follows: (DB model only) GSM Signal strength, from 0 (no signal) to 5 (best signal) Sat Availability, 0 (not available) or 5 (best signal) page 3 0 GPS PDOP x 100 (a PDOP of 1.23 will read 0123), 9999 (no GPS), lower numbers represent a better connection. Main battery voltage x100 (a main battery voltage of 12.34 will read 1234) page 31 Backup Battery voltage x 100 (a voltage of 10.0 will read 1000) Press to enter the “Status” mode. Press the “S” button to exit the “Status Mode” and return to “Normal Mode” page 32 Faria VTERM™ The Faria WatchDog™ VMS750 can also be equipped with a touch screen monitor, Faria V Term, that is capable of sending all of the necessary catch reports as well as e-mail from your vessel anywhere in the world. The catch reports are pre loaded and are accessible with a touch of the screen. The Faria V TERM™ is a Windows® CE based system that allows you e-mail access and catch reporting while at sea or at the dock (without attachments!). The Faria V TERM™ also has t wo USB ports which allow you to add a keyboard and a mouse. The Faria VTERM™ is a rugged, graphic commercial vehicle/vessel computer running Windows® CE 5.0. It features a rugged polycarbonate housing designed to withstand everyday use in the commercial vehicle/ marine environment. The unit is sealed to both NMEA-12/13 and IP-44 standards and is intended for in-cabin (or in a water resistant Electronics Box) use primarily to provide a degree of protection against circulating dust; falling dirt; and spraying, splashing and seepage of sea water and non- corrosive liquids. page 3 3 Installation Connect the 6 -pin connector from the V TERM™ to the 6 -pin connector on the HN0607. Connect the red wire directly to the battery. Note: It is recommended that you install a 5A in line fuse if the length of wire needed to connect to the battery is longer than 72” (a water tight fuse page 3 4 holder is included). Power-Up: After the Faria V TERM™ has been connected to the 12 volt power supply the unit will power up after approximately 10 seconds. You will hear an audible tone to indicate the unit is powered up and the Faria WatchDog™ VMS logo will appear on the screen. Function Keys F1 = Help/FAQs F2 = Display forms F3 = Go to the e-mail in box F4 = Change the display to day/night view F5= Turn V TERM display brightness UP F6 = Turn V TERM display brightness DOWN F7 = Left mouse click key Compass mouse performs the mouse functions. page 3 5 Keyboard (If Available): Plug the USB connector from any USB keyboard into either of the t wo USB ports on the V TERM™. One is located on the front of the unit on the bottom left hand side. The other is on the back of the unit. (If you have a separate mouse and keyboard you will need to use both USB ports) The on-screen keyboard pops up for use when composing e-mails. You can make the keyboard larger or hide the keyboard if you do not wish to use it by clicking on the icon in the bottom right hand corner of the Faria VTERM™ screen. page 3 6 E-mail Operation Double click on the “IN BOX” icon using either the touch screen or the keyboard/mouse or press F3. The e-mail will open and the screen will show your in box. IMPORTANT- For the initial start-up, click once on the double envelope icon at the top of the screen. (This is only necessary for the initial power up. You will not need to do this again) You are now ready to send and receive e-mail. Writing and Sending an e-mail: 1.Click on the first icon that shows a letter and an envelope at the top of the screen, or click on COMPOSE and then NEW MESSAGE. 2. Using the on-screen keyboard or your USB keyboard enter the e-mail address of the person you would like to send an e-mail. ( You may also click on the address book icon and select a recipient that has been entered into the address book.) 3. Click on the Subject Line and enter the subject of your e-mail 4. Click on the body of the e-mail and begin typing your e-mail. 5. To send your e-mail click on the SEND icon (sealed envelope) or click on FILE and then click on SEND. page 37 Reading e-mail: When an e-mail has been sent to your vessel a message box will appear in the center of the Faria V TERM™ indicating that you have a new message. From the in box simply double click on the new message. Address book: You have the capability of storing multiple e-mail addresses in your VTERM™. From the In box main screen: 1. Click on the ADDRESS BOOK icon. 2. Click on NEW 3. Enter the name of the person 4. Enter the e-mail address of the person 5. Click on OK *In Windows® CE in order to minimize the windows you click on the tool bar (with the name of the window you want to minimize) at the bottom of the screen. Display Settings: You have the ability to change the intensity of the backlighting as well as the “sleep” mode for the Faria V TERM™. 1. Click on the START button 2. Click on SETTINGS 3. Click on CONTROL PANEL 4. Double click on the DISPLAY icon 5. Click on the BACKLIGHT tab page 3 8 In this window you can control the lighting intensity by clicking on the slide bar and increasing or decreasing the lighting intensity. You can also control the amount of time the backlighting will stay at your selected intensity or Dim the backlighting to a pre-set intensity when not in use. 1. If you want this feature click on the box next to DIM DISPLAY BACK- LIGHTING. 2. Select one of the programmed intervals on the drop down menu or select CUSTOM for a custom setting and enter the time you like. You can also control when the Faria V TERM™ will go into a “Sleep” mode. This feature is used to conserve power if the unit will not be in use for some time. 1. If you want this feature click on the box next to POWER OFF DISPLAY 2. Select one of the programmed intervals on the drop down menu or select CUSTOM for a custom setting. Once you have made all of your adjustments click on the OK button in the top right hand corner of the window. The Function keys on the Faria V TERM™, F4 (Change display to Night/ Day), F5 (Turn display brightness Up), F6 (Turn display brightness down) can also be used to adjust the lighting intensity of the Faria V TERM™. page 3 9 Faria is the registered trade marke of the Thomas G. Faria Corporation. Faria VTERM, WatchDog 750VMS and Faria WatchDog are trademarks of Faria WatchDog Inc. Microsoft and the Windows logo are registered trademarks of Microsoft Corporation. All brand names and trademarks are the property of their respective owners.