1
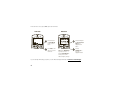
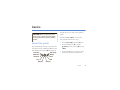
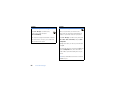
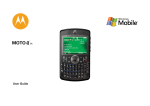
MOTO
User’s Guide
TM
9h
HELLOMOTO
Technology promised to make things easier... but then it gave you more to do—phone calls, e-mails, music, photos,
videos, the Internet, and more. It’s time to take back control. It’s time to meet the MOTO Q™ 9h.
My Phone, My Way Use photos for your wallpaper, use your songs for your ringtones, use new programs that
you load onto your phone... you get the idea.
Anytime Entertainment Load video and music files to make a media library that goes anywhere.
Working Remotely Check e-mail and edit Microsoft® Office documents anywhere in the world.
Help & QuickStart Tour On-phone help is available anytime. Just press Start > System Tools > Help and Quickstart.
For more: www.motorola.ca/Q9hsupport
1
Introducing your new MOTO Q™ 9h wireless phone! Here’s a quick anatomy lesson.
Navigation Key
Navigate menus.
Center Key
Select highlighted
items.
Left Soft Key
Web Browser Key
Call/Answer Key
Make & answer
calls.
Home Key
Hold to open a
quick list of options.
Calendar Key
2
Right Soft Key
Side Select Key
Select highlighted
items.
Messaging Key
Back Keys
Speakerphone/Voice
Recognition Key
Power/End Key
Turn on & off, hang
up, exit menus.
Camera Key
Multimedia Key
Alt Key
Contacts Key
Side Scroll Keys
Microphone
Enter Key
Caps Key
Camera Lens
2.0 MEGAPIXELS
8X DIGITAL ZOOM
Camera Flash
Storage Card Slot
Insert MicroSD
memory card
Storage Card Slot
Battery Door Release
Micro USB Port
Charge and connect
phone accessories
Speakers
To avoid damaging your phone, carry it in an approved holster or case rather than a pocket, purse, or bag.
3
From the home screen, press Start to open the main menu.
Home Screen
Menu Screen
12:00 PM
12/31/08
Profile: Normal
1
Start
Contacts
2
Press and release
the Power Key O
to turn on your
phone.
Press Start (the left
soft key) to open the
main menu.
More
3
Press the Navigation
Key up, down, left, or
right (S) to
highlight a menu
feature.
4
Press the
Center Key s to
select the
highlighted feature.
Menu
Tip: Press the Back Key D
to go back one menu.
Press the Power Key O to
exit any menu or view
without saving any changes.
If you need help while using your phone, see the Motorola Support Web site at www.motorola.ca/Q9hsupport.
4
Motorola, Inc.
Consumer Advocacy Office
1307 East Algonquin Road
Schaumburg, IL 60196
www.hellomoto.com
1-800-331-6456 (United States)
1-888-390-6456 (TTY/TDD United States for hearing impaired)
1-800-461-4575 (Canada)
Certain mobile phone features are dependent on the capabilities
and settings of your service provider’s network. Additionally,
certain features may not be activated by your service provider,
and/or the provider’s network settings may limit the feature’s
functionality. Always contact your service provider about feature
availability and functionality. All features, functionality, and other
product specifications, as well as the information contained in this
user’s guide are based upon the latest available information and
are believed to be accurate at the time of printing. Motorola
reserves the right to change or modify any information or
specifications without notice or obligation.
MOTOROLA and the Stylized M Logo are registered in the US
Patent & Trademark Office. All other product or service names are
the property of their respective owners.
© Motorola, Inc. 2007.
Software Copyright Notice
The Motorola products described in this manual may include
copyrighted Motorola and third-party software stored in
semiconductor memories or other media. Laws in the United
States and other countries preserve for Motorola and third-party
software providers certain exclusive rights for copyrighted
software, such as the exclusive rights to distribute or reproduce
the copyrighted software. Accordingly, any copyrighted software
contained in the Motorola products may not be modified,
reverse-engineered, distributed, or reproduced in any manner to
the extent allowed by law. Furthermore, the purchase of the
Motorola products shall not be deemed to grant either directly or
by implication, estoppel, or otherwise, any license under the
copyrights, patents, or patent applications of Motorola or any
third-party software provider, except for the normal, non-exclusive,
royalty-free license to use that arises by operation of law in the
sale of a product.
Manual Number: 6809507A84-A
5
contents
basics . . . . . . . . . . . . . . . . . . . . 7
emergency calls . . . . . . . . . 18
handsfree . . . . . . . . . . . . . . 44
about this guide . . . . . . . . . . 7
international calls. . . . . . . . . 18
calendar . . . . . . . . . . . . . . . . 45
display. . . . . . . . . . . . . . . . . . 8
speed dial . . . . . . . . . . . . . . 18
calculator . . . . . . . . . . . . . . . 46
customize. . . . . . . . . . . . . . . . 11
voicemail . . . . . . . . . . . . . . . 20
security . . . . . . . . . . . . . . . . 47
profiles . . . . . . . . . . . . . . . . 11
three-way calling . . . . . . . . . 20
phone information . . . . . . . . 47
time & date . . . . . . . . . . . . . 12
e-mail & messages . . . . . . . . 21
fun & games . . . . . . . . . . . . 47
home screen. . . . . . . . . . . . 13
messaging quick reference . 21
index . . . . . . . . . . . . . . . . . . . . 49
backlight . . . . . . . . . . . . . . . 14
global address look up. . . . . 26
answer options . . . . . . . . . . 14
connections . . . . . . . . . . . . . . 27
third-party applications . . . . 14
Bluetooth® wireless . . . . . . 27
task manager . . . . . . . . . . . 15
synchronize . . . . . . . . . . . . . 30
calls. . . . . . . . . . . . . . . . . . . . . 16
modem-link . . . . . . . . . . . . . 33
turn off a call alert . . . . . . . . 16
other features. . . . . . . . . . . . . 39
recent calls . . . . . . . . . . . . . 16
advanced calling . . . . . . . . . 39
redial . . . . . . . . . . . . . . . . . . 17
contacts . . . . . . . . . . . . . . . 40
view missed calls . . . . . . . . 17
personalizing . . . . . . . . . . . . 42
caller ID. . . . . . . . . . . . . . . . 17
call times . . . . . . . . . . . . . . . 44
6
contents
basics
This guide shows how to locate a menu feature as
CAUTION: Before using the phone for
the first time, read the Important Safety
and Legal Information guide included in
the box.
about this guide
follows:
Find it: Press Start > Call History > (received call)
This means that, from the home screen:
1
Press the left soft key to open the Start menu.
2
Press the navigation key S to scroll to
Press the left and right soft keys to open menus and
Å Call History. Press the center key s to select
select options. Use the navigation key S to scroll to
Call History.
items, and press the center key s to select them.
Left Soft Key
Web Browser
Call/Answer
Home
Navigation
Right Soft Key
Message
Power
3
Press the navigation key to scroll to a received
call. Press the center key to select the call.
Back
Center Key
basics
7
Tip: You can press the side scroll keys to scroll up
and down, and press the side select key to select
items (see page 1 for side key locations).
display
The home screen appears when you turn on the
phone. To dial a number from the home screen, press
number keys and N.
symbols
This means a feature is
Note: Your home screen may look different than this
network/subscription dependent and may
one.
not be available in all areas. Contact your
service provider for more information.
This means a feature requires an optional
12:00 PM
12/31/08
Profile: Normal
accessory.
Start
Contacts
Soft key labels show the current soft key functions.
For soft key locations, see page 1.
8
basics
Press the navigation key S up, down, left, or right to
Status indicators can appear at the top of the home
scroll to basic menu items or text in the home screen.
screen:
1. Voicemail
Press X to return to the home screen.
Left Soft
Key
Navigation
Center Key
Right Soft
Key
Browser
Back
Alt
Enter
Calendar
Caps
Contacts
Voice
Recognition
Space
Multimedia Camera
2. Message 3. Bluetooth 4. Call
Forward
12:00 PM
12/31/08
Profile: Normal
Start
5. Roam 6. Active
Line
1
Contacts
7. Profile
8. Battery 9. Signal
Level
Strength
Voicemail Indicator – Shows when you
have new voicemail.
2
Message Indicator – Shows C when
you receive a new e-mail or text message.
basics
9
3
4
5
Bluetooth® Indicator – Shows E when
appears when the ring style profile is Normal, Outdoor,
Bluetooth power is on.
or Automatic.
Call Forward Indicator – Shows D when call
Note: A % appears when the speakerphone is
forwarding is on.
on.
Roam Indicator – Shows G when your
battery charge level. Recharge the battery when
your phone shows one or two bars.
9
) roaming GPRS
show the strength of the network
\ EDGE
B HSDPA
connection. You can’t make or receive calls when
Active Line Indicator – For multi-line SIM
cards, this indicates whether line H or I is
active.
Profile Indicator – Shows when your ring style is
set to Silent (Q) or Vibrate (<). No indicator
10
Signal Strength Indicator – Vertical bars
f home GPRS
k 3G
7
Battery Level Indicator – Vertical bars show the
outside your home network. Other indicators can
include:
6
8
phone is seeking or using a network
basics
no vertical bars appear. Arrow indicators above
the signal strength indicator signify data transfer
to the phone.
customize
profiles
Note: The Automatic profile is the same as Normal, except
Each profile uses a different set of sounds, ring styles,
stored in your Calendar.
that it automatically switches to Vibrate during any event
earpiece volume settings, or vibrations for incoming
calls and other events. For example, the Outdoor profile
volume is much louder than the Normal profile.
Vibrate
Silent
Outdoor
Find it: On the home screen, scroll and select Profile:
> profile style name
Here are the profiles you can choose:
Normal
To choose your profile:
Automatic
change ring tones
You can change the ring tones for incoming calls and
other events.
Indicators can appear at the top of your home screen
for the Silent (Q) and Vibrate (<) profiles. A % means
the speakerphone is on.
Find it: Press Start > System Tools > Settings > Sounds
Note: Changes made to the alert settings will have no
effect when using the Silent profile.
customize
11
1
Scroll and highlight the sound you want to
change, then press the navigation key S right or
left to change it.
2
Press the Done key to save the sound setting.
Note: If you download a sound file for a ring tone,
it does not automatically save in the Sounds
location. To move your sound file, press Start
time & date
Your service provider usually sets the time and date on
your phone. To change it manually:
Find it: Press Start > System Tools > Settings > Clock & Alarm
> Date and Time
1
In Time Zone, use the navigation key S to select
your time zone.
> File Manager > My Documents. Highlight the sound file
you want to copy to the Sound location, press
Note: Update your time zone when you travel, to
Menu > File > Copy to and select Application Data > Sounds.
make sure your phone’s calendar events appear at
If the sound file is not located in the My
the right time.
Documents folder, go to the folder where the
sound file is stored and copy it to the Sounds
2
In Date, edit the month, day, or year.
folder.
3
In Time, edit the hour, minute, and second.
4
Press Done to save the clock and date settings.
You can specify the date and time style by changing
the regional settings. Press Start > System Tools > Settings
> Regional Settings.
12
customize
home screen
Set a photo or picture as a wallpaper (background)
image or change your layout and color scheme on your
change background image
Want to copy an image from your PC to your phone to
use as a background image?
home screen.
Note: Your PC must have must have
Find it: Press Start > System Tools > Settings > Home Screen
Microsoft Windows® Mobile Device Center (on a PC
running Windows Vista) or you must install
Microsoft ActiveSync on your PC as described on
options
page 72.
Home Screen
Select a layout for the home screen.
Layout
Color Scheme
Select a color scheme for the display.
Background
Select a picture for your wallpaper
Image
image, or Default for default wallpaper.
Time out
Select the time interval before the
display returns to the home screen, or
Never.
1
Connect the phone to your PC.
2
On your PC, copy the image file you want. The file
format must be .gif, .jpg, or .bmp.
3
In ActiveSync on your PC, select Explore and
double-click My Windows® Mobile device.
4
Double click My Documents, then double click
My Pictures and paste the image into that folder.
Note: If you download a picture file for a
wallpaper, it might not automatically save in the
My Pictures folder. To move your picture file, press
customize
13
Start > File Manager > My Documents. Highlight the picture
file you want to copy to the My Pictures location,
press Menu > File > Copy to and select My Documents
answer options
To use any key to answer an incoming call, press
> My Pictures. If the picture file is not located in the
Start > System Tools > Settings > Phone > Call Options > Any key
My Documents folder, go to the folder where the
answer.
picture file is stored and copy it to the My Pictures
folder.
third-party applications
backlight
Third-party applications, or add-on programs, can
Your phone automatically adjusts the display
software. These products can typically be downloaded
brightness when you move between bright and dark
and installed immediately. Compatible commercial and
environments. To save battery life, your backlight turns
free applications are available on the Internet. For
off when you’re not using your phone. The backlight
more information, see the downloads catalog on the
turns back on when you press a key. To set how long
Motorola Support Web site at:
your phone waits before the backlight turns off:
Find it: Press Start > System Tools > Settings
include e-mail, security, mobile office, and productivity
www.motorola.com/consumer/support, or see your
service provider’s Web site.
> Power Management > Backlight time out on battery or Backlight time
Note: Applications written for previously released
out on AC
devices or older versions of Windows Mobile may not
function reliably on this phone. Contact the application
14
customize
provider to check compatibility before installing the
application on this phone.
task manager
Want to see what programs are running (active) on
your phone? Use the Task Manager to see the
programs, or stop a specific program from running.
Find it: On the home screen, press Start > System Tools
> Task Manager
Tip: Need to stop running program? In Task Manager,
select the program and press Menu > Kill.
Note: If you want to completely remove a program
from your phone, from the home screen, press
Start > System Tools > Settings > Remove Programs.
customize
15
calls
To make and answer calls, see your Quick Start Guide.
•
To see call details (like time and date), press
the center key s.
turn off a call alert
•
You can use the side scroll keys to turn off the ringer
before answering the call.
recent calls
Your phone keeps a list of incoming and outgoing
calls, even for calls that didn’t connect. The most
To see Menu Options, press Menu from the Call History
view. This menu includes:
options
Find Contact
Find this phone number in your Contacts.
Send Text
Send a text message to this phone
Message
number.
E-mail
Send an e-mail message to this
recent calls are listed first. The oldest calls are deleted
contact.
as new calls are added.
Find it: Press Start > Call History
Highlight a call, then:
•
16
To call the number, press N.
calls
View Timers
View the call times for this call and all
calls.
Delete/ Delete
List
Delete this call from the Call History.
When the call goes through, your phone rings or
options
vibrates one time, shows Redial Successful, and connects
Save to
Save this number to a contact.
the call.
Send MMS
Send a message to this number.
view missed calls
Filter
Filter all calls in the Call History list.
Contacts
For example, if you filter the list for all
Missed Calls, it will only show the
incoming phone calls that you did not
answer.
redial
1
Press N from the home screen to see the calls
list.
2
Highlight the entry you want to call, then press
N.
If you hear a busy signal and you see Call Failed,
Your phone keeps a record of your unanswered calls.
1
Press Start > Call History.
2
Press Menu > Filter > Missed Calls.
caller ID
Calling line identification (caller ID) shows the
phone number for an incoming call on your
home screen.
Your phone shows the caller’s name and picture when
they’re stored in your contacts, or Incoming Call when
caller ID information isn’t available.
Number Busy, press N to redial the number.
calls
17
You can set your phone to play a distinctive ringer ID
for specific entries stored in your contacts (see
page 40).
international calls
If your phone service includes international
dialing, press and hold 0 to insert your local
emergency calls
international access code (indicated by +). Then, press
Your service provider programs one or more
number.
the keypad keys to dial the country code and phone
emergency phone numbers, such as 911 or 112, that
you can call under any circumstances, even when your
phone and keypad are locked.
Note: Emergency numbers vary by country. Your
phone’s preprogrammed emergency number(s) may
not work in all locations, and sometimes an
emergency call cannot be placed due to network,
environmental, or interference issues.
1
Press the keypad keys to dial the emergency
number.
2
Press N to call the emergency number.
speed dial
You can use speed dialing in two ways: quick access
for up to 98 phone numbers and shortcuts to features
found in the Start menu including e-mail, calendar, and
Bluetooth® Manager.
To access speed dial entries, press and hold the
single-digit speed dial number for one second. If the
speed dial is two digits, press the first digit, then
press and hold the second digit. The phone dials the
phone number, opens a new e-mail message, or goes
to the Web page.
18
calls
phone numbers
menu shortcuts
You can set the speed dial to call the entries in your
You can set a shortcut to open an application on your
phone’s contact list:
phone:
1
Press Start > Contacts.
1
Press Start.
2
Scroll to the desired contact and press the
2
Scroll to the icon of the application you want a
center key s.
3
Select the phone number or e-mail address for
shortcut for and press Menu > Add Speed Dial.
3
which to create the speed dial.
In the Keypad Assignment, select the shortcut number
to use.
4
Press Menu > Add to Speed Dial.
4
5
In the Keypad Assignment, select the speed dial
Note: To delete a shortcut, press Start > Speed Dial, scroll
number to use.
Note: Speed dial 1 is reserved for calling your
voicemail.
6
Press Done.
to the shortcut, then press > Menu > Delete. Your service
provider might add a Voicemail shortcut you cannot
delete.
Press Done.
To delete a speed dial entry, press Start > Speed dial,
scroll to the entry, then press Menu > Delete.
calls
19
voicemail
three-way calling
Note: Your service provider may include additional
While connected to a call:
information about using this feature.
1
Your network stores the voicemail messages
you receive.
Menu > Hold.
2
Enter the number of the other person you wish to
connect to a three-way call and press N.
When you receive a voicemail message, your phone
shows the voicemail message indicator w.
Place your current call on hold by pressing
3
Once you are connected to the other phone, you
To check voicemail messages:
can press Swap to switch between the calls, or
Press and hold 1.
press Menu > Conference to combine them.
Note: You can’t store a pause (p) or wait (w) character
in your voicemail number. If you want to store a
voicemail number with these characters, create a
If you receive a second call while you are already on a
call:
•
To answer the second call and put the first call
on hold, press Answer. Then, you can press Swap
contact for your voicemail number and use the contact
to switch between the calls, or press Menu
to call your voicemail.
> Conference to combine them.
•
To send the second call to your voicemail,
press Ignore.
20
calls
e-mail & messages
To set up e-mail on your MOTO Q™ 9h, refer to
your Quick Start Guide. If you have problems
setting up email or synchronizing, please visit
messaging quick
reference
www.motorola.ca/Q9hsupport or call the Motorola
Note: Some features might not work if you set
Customer Support Center at 1-800-657-7576 (United
up your e-mail account manually (without the
States and Canada) or 1-888-390-6456 (TTY/TDD
e-mail setup wizard).
United States for hearing impaired).
features
send text message
Press Start > Messaging > Text Messages, then
press Menu > New
e-mail & messages
21
features
features
create and add an e-mail signature
view attachment
Press Start > Messaging > (e-mail account), then press
While viewing the message, use the
Menu > Tools > Options > Signatures
center key s to select the attachment.
Scroll to the account for which you are creating the
Note: You can view attachments only for file types
signature. Select Use signature with this account. Select the
that are supported by the phone.
Signature box, enter your signature, and press Done.
read old messages
Tip: To insert a signature in every message you
Press Start > Messaging > (e-mail account)
send, select Include when replying and forwarding. Otherwise,
a signature is inserted only in new messages.
read new messages
To quickly view new messages, select the
message notification area on the home screen.
22
e-mail & messages
Icons next to each message show if it is
unread J, read H, urgent K, or has an
attachment R.
features
features
reply, reply all or forward messages
download message objects
From your Inbox or an open message, press
If an e-mail message includes an
Menu > Reply, Reply All, or Forward
attachment, when you open the message,
Tip: If you are replying to an e-mail in the e-mail
account, you will send less data if you do not edit
the original message. This may reduce data transfer
costs based on your rate plan.
the name of the attachment will appear highlighted.
To download the attachment, select the highlighted
attachment name. The attachment is downloaded
the next time you synchronize or connect to your
e-mail server.
Note: If there are multiple attachments in the
message, only the selected attachments are
downloaded.
insert a media object in an e-mail
To add a picture, voice note, or file in an e-mail
message, in the composing message area press
Menu > Insert > Picture, Voice Note or File.
e-mail & messages
23
features
features
download complete e-mail messages
mark a folder for synchronization
Press Start > Messaging > (e-mail account).
When you synchronize your e-mail account
Scroll to the message and press
with your PC, the same Inbox folders that are in
Menu > Download Message.
Outlook on your PC are created on your phone.
The complete message is retrieved the next time
Press Start > Messaging > (e-mail account), then press
you synchronize or connect to your e-mail server
Menu > Folders > Menu > Show all Folders, and press Menu
and send and receive e-mail.
> Manage Folders
Highlight each folder you want to synchronize and
press Sync.
Once all folders have been selected, press Done. This
opens the Manage Folders view, where the marked
folders will be synchronized during the next sync
session.
Note: Only e-mail folders stored on the server are
available for sync.
24
e-mail & messages
features
features
view status of sent e-mail
call a phone number in e-mail
Press Start > Messaging > (e-mail account) Menu > Folders
Highlight a phone number in a message and
> Outbox
press N.
Messages in the Outbox have not been sent. To send
a message, scroll to it and press Menu > Send/Receive.
receive e-mail
If your phone is set up to automatically
move e-mail to personal folder
After you’re done reading the e-mail, press Menu
> Move > (folder).
delete a mail account
check for new messages, your phone will show e
Press Start > Messaging, scroll to the e-mail account,
when a new message arrives.
then press Menu > Delete.
Press R to open the inbox.
Note: You cannot delete your Text Messages, MMS, or
delete e-mail
From the Inbox or an open e-mail message, press
Menu > Delete.
manually send and receive e-mail
Press Start > Messaging > (e-mail account), then
Exchange server e-mail accounts.
empty deleted items folder
Press Start > Messaging > (e-mail account), press Menu
> Folders, scroll to Deleted items, then press Menu
> Delete All.
press Menu > Send/Receive.
e-mail & messages
25
global address look
up
4
Scroll through the list of entries that appears.
When you locate your contact, press N to make
a call.
From your phone, you can search the global address
Note: Although the entire GAL cannot be stored
list (GAL) stored on your company's Exchange Server.
on your phone, once the contact is found, you can
This means that you can find a contact’s phone
add the single contact to your contact list.
number or e-mail without having to store the
information directly to your phone.
Tip: You can also choose to send a message, SMS or
e-mail to a contact found using GAL. In a new
Note: GAL information can only be viewed during a
message or e-mail, press Menu > Company Directory. When
data transfer session; the entire GAL cannot be stored
you locate the contact to send a message, highlight
for viewing offline.
and select it. The e-mail information is populated into
GAL Lookup can be found from Contacts and
Cmpany Directory. Cmpany Directory is found in Messaging, Phone,
Calendar and Speed Dial.Here’s how to use GAL to search
for a contact:
1
Press Start > Contacts.
2
In the contact list, press Menu > Company Directory.
3
Enter search criteria and press Search.
26
e-mail & messages
the To: field.
connections
Bluetooth® wireless
Your phone supports Bluetooth wireless pairing (also
called linking or bonding). You can pair your phone
with a Bluetooth headset or car kit, or pair your phone
with a computer to exchange and synchronize files.
Note: The use of wireless devices and their
accessories may be prohibited or restricted in certain
areas. Always obey the laws and regulations on the
use of these products.
turn Bluetooth power on or off
If Bluetooth Power is On, your phone can automatically
pair with the handsfree device you have used before.
Just turn on the device or move it near the phone.
To turn Bluetooth on: Press Start > Bluetooth > Bluetooth
Manager > Settings then toggle Status to Bluetooth ON.
The Bluetooth indicator O appears in the home
screen.
Note: To extend battery life, use the previous
procedure to set Bluetooth Power to OFF when not in
use. Your phone will not pair with devices until you set
Bluetooth Power back to ON and pair your phone with the
devices again.
pair with a headset or handsfree
device
Before you try to pair your phone with a device,
make sure your phone’s Bluetooth power is on and
the device is on and ready in pairing or bonding mode
connections
27
(see the device user’s guide). You can pair your phone
with multiple devices, but only use it with one headset
device at a time.
Your phone lists the devices it finds within range.
1
Press Start > Bluetooth > Bluetooth Manager > Hands-free.
2
Put the device (handsfree headset, stereo
headset, keyboard, etc.) in pairing mode.
3
send objects to another device
You can use Bluetooth pairing to send e-mail,
contacts, tasks, calendar items, audio, ring
tones, pictures, video, and voice notes from your
phone to a computer or other device.
1
Press Start > Bluetooth > BT Send Object.
2
Select the object type and object you want to
send.
Press Add. The phone prompts you to verify your
Tip: To select an item, press the center key s.
device is ready. Press Search.
4
Select the device from the list.
3
Press Send.
5
If prompted, enter the device passkey (such as
4
Select the name of the device to send the file.
5
To cancel sending an item, press Menu > Cancel.
0000) and press the Accept key.
When the devices are paired, an icon appears on the
home screen in the Bluetooth Task Tray.
use your phone as a PC remote
Tip: For specific information about the
You can use Bluetooth wireless and your phone
Bluetooth device you are using with your phone, refer
as a remote control for your computer. For
to the instructions that came with it.
example, want to watch a video on your computer and
28
connections
use your phone as a remote control? Use PC Remote
7
to control when the video plays, stops, or pauses.
In the next window, make sure that
“Show all devices” is chosen in the pull-down
menu. Your computer should find your
1
On your computer, turn Bluetooth power on.
2
On your phone, press Start > Bluetooth > BT PC Remote.
Bluetooth devices to see this phone” is checked.
If necessary, press Yes to turn on
Select your phone, and select Next.
Bluetooth power.
“SmartPhone.” Make sure the box “Allow other
8
If prompted, enter the device passkey (such as
3
Press Add.
4
On your computer, right-click on the
When PC Remote is connected, your phone display
Bluetooth indicator O in the system tray in the
shows a key map that tells you what your keys control
lower right corner of your display. Select
on the PC. To determine which program on your
Bluetooth Setup Wizard.
computer to control, on your phone, press Menu and
In the wizard, indicate that you know the service
select a program.
5
0000) and press the Accept key.
you want to use, and you want to find a
Bluetooth device that provides the service. Select
Next.
6
In the next window, choose Human Interface
Device or PC Remote and select Next.
connections
29
advanced Bluetooth features
features
features
send object to device
make phone visible to other device
Send an object to another device:
Allow a Bluetooth device to discover your
Press Start > Bluetooth > BT Send Object
phone:
edit device properties / change device
Press Start > Bluetooth > Bluetooth Manager > Settings, and
name
check Allow other Bluetooth devices to see this phone
Edit the properties of a recognized device:
connect to recognized device
Press Start > Bluetooth > Bluetooth Manager > Hands-free
Connect to a recognized handsfree device:
> device name, then press Menu > Properties > Nickname
Press Start > Bluetooth > Bluetooth Manager > Hands-free
Tip: To change the Bluetooth name of your phone,
> device name
press Start > Bluetooth > Bluetooth Manager > Settings and
drop pairing with device
enter the name in My Bluetooth name.
Press Start > Bluetooth > Bluetooth Manager
> Hands-free > device name > Disconnect
synchronize
You can synchronize the information on your phone in
two ways, over the air (OTA) or using a cable and your
computer.
30
connections
sync over the air
To sync your phone over the air (OTA) you must sync it
directly with your company’s Microsoft® Information
Server or Microsoft® Exchange Server (running the
appropriate version software). For more information
about this set-up, see the Motorola support Web site
at: www.hellomoto.com.
desktop computer. ActiveSync compares your phone’s
contact information, calendar appointments, e-mail
messages, and media files to those on your computer
and then updates to the most recent information.
installing and setting up ActiveSync
To synchronize information on your phone with a PC,
you must use Windows® Mobile Device Center (on a
You can also contact your system administrator to set
PC running Windows Vista) or install
up this synchronization.
Microsoft ActiveSync (on a PC running Windows XP™
Note: If you are out of network coverage, and your
or earlier).
phone tries to sync 3 times without finding a network,
Note: Synchronization software is included on the
you will receive a notification. For more information,
Getting Started disc packed with your phone. Before
select View Status. Synchronization will resume when
installing the software, verify that your computer and
there is network coverage.
operating system meet the minimum requirements
stated on the CD-ROM sleeve or
sync with a computer
Microsoft Windows® Mobile Web site
You can use Microsoft® ActiveSync version 4.5 or
(http://www.microsoft.com/windowsmobile). This Web
above, or Windows® Mobile Device Center to
site also lets you download the latest software for
synchronize information between your phone and
ActiveSync.
connections
31
1
2
Install Microsoft ActiveSync (for Windows® XP™
Note: Once synchronization completes, you can
or earlier) or Windows Mobile Device Center (for
disconnect your phone from your PC, and you may
Windows Vista) on your PC.
need to restart your PC.
After setup completes, connect your phone to the
sync with a cable connection
PC. The phone drivers install on your computer
and then the Sync Setup Wizard automatically
starts.
3
Once Microsoft®
ActiveSync or
Windows® Mobile
Follow the instructions on the screen to complete
Device Center is
the wizard.
installed on your PC,
The wizard prompts you for the Exchange
Server’s name, your user name, your password,
you can connect it to
your phone and sync.
and the domain name. If you don’t have this
1
Turn on the phone.
information, contact the server’s system
2
Connect your phone to your PC using a
administrator.
When you finish the wizard, ActiveSync starts to
synchronize automatically with your phone.
USB cable.
Note: For more detailed information, see “Connecting
a mobile device to a PC” in ActiveSync Help on your
PC, the Microsoft Web Site for ActiveSync or the
Motorola support Web site at www.hellomoto.com.
32
connections
sync with a Bluetooth® connection
6
Windows® Mobile Device Center is installed on your
Select Menu > Connect via Bluetooth. Ensure that the
phone and PC are within close range.
Once Microsoft® ActiveSync or
7
If this is the first time you have connected to this
PC, you can connect it to your phone and sync with a
PC using Bluetooth wireless, you must complete
Bluetooth connection.
the Bluetooth wizard on the phone and set up a
Note: In order to use this feature, your PC must be
Bluetooth partnership with the PC before
equipped with Bluetooth wireless or a
synchronizing.
Bluetooth PC adaptor accessory.
8
Select Sync.
1
9
When finished, select Menu > Disconnect Bluetooth.
Follow the instructions in ActiveSync Help for
configuring Bluetooth connections on your PC to
support ActiveSync.
2
Turn on the phone.
3
On your phone, verify that Bluetooth wireless is
turned on (Press Start > Bluetooth > Bluetooth Manager
> Settings > Status > Bluetooth On).
10 To conserve battery power on your phone, turn off
Bluetooth power (see page 27).
modem-link
You can use your phone as a modem to dial in
to a network. To do this, you need a
4
Press Start > System Tools > Settings > Connections
Bluetooth® wireless or USB cable connection.
> USB Device Type > ActiveSync Serial, and press Done.
5
Press Start > ActiveSync.
connections
33
You can use your phone as a modem to dial in to a
Note: You must have a computer that has
network. To do this, you need:
Bluetooth capabilities for modem-link to work with
•
a Bluetooth® wireless or USB cable
connection.
•
Bluetooth wireless.
1
your phone, you must first turn on
Multiple Network Access Identifier (MNAI)
Bluetooth wireless. To do this on your phone,
software installed on your phone.
•
press Start > Bluetooth > Bluetooth Manager > Settings then
Multiple Network Access Identifier (MNAI)
toggle Status to Bluetooth ON. See Bluetooth wireless
service enabled on your phone account. Call
on page 27 for more information.
your phone service provider for more
information.
2
Note: Not all computers have the same
your phone’s e-mail, Web browsing,
procedure to locate the Bluetooth window and
Microsoft® ActiveSync, and text messaging services
setup of dial-up networking. Please refer to your
are suspended until you deactivate the modem-link.
modem-link with
Bluetooth® wireless
To use Bluetooth wireless to modem-link to a
network:
connections
On your computer, launch the Bluetooth devices
applet from the task bar.
Note: When you activate your phone as a modem-link,
34
To make sure other Bluetooth devices can find
computer operating help system for more
information.
3
On your computer, right-click the Bluetooth icon
in the Windows® task bar, select the
Quick Connect menu, Dial-up Networking and
•
then Find devices.
4
behind the battery in the phone)
The computer finds your phone and shows the
•
dial up networking window. Make sure the box
“Allow other Bluetooth devices to see this phone”
is checked.
Now you can use your phone as a modem to connect
On your computer:
1
Place the provided Getting Started Disc into the
CD Drive on your computer. Your computer
automatically launches the Getting Started Disc.
modem-link with a cable
Note: If you do not have the Getting Started Disc,
or want the latest version of the device and
Note: Do not connect your data cable to your phone
computer drivers, go to
and computer until the following steps tell you to do
www.motorola.ca/Q9hsupport.
so.
2
In the Getting Started Disc application, go to the
Additional Tools screen and select the Dial-Up
modem-link to a network, first you must install
Networking Software.
networking drivers onto your computer.
Before starting the set up:
Contact your service provided for your
account user name
to a service provider or network.
To use a USB cable with your phone to connect with
Note your phone’s ESN number (located
3
Follow the prompts as directed to install the
drivers onto your computer.
connections
35
On your phone:
6
Now, you need to enable modem-link on your phone
and install phone drivers:
4
7
On your phone, press Start > System Tools > Settings
with the Port number where it’s attached.
8
Highlight your modem and click on Properties.
your PC.
9
Select OK on all of the setup screens.
The driver is installed on your computer and ready
10 Select the Advanced tab, and enter extra
Using the USB data cable, connect the phone to
for setting up a network connection.
On your computer:
After you set up your computer and phone, you can
establish a new network connection on your
computer:
Note: This procedure might not work on all
computers. Please refer to your computer operating
help system for more information.
36
Select the Modems tab. Your modem should
appear as Smartphone Wireless USB Modem
> Connections > USB Device Type > Modem, and press Done.
5
Select Start > Settings > Control Panel
> Phone and Modem Options.
connections
initialization commands required by your service
provider. For details, contact your service
provider.
11 Select OK on all of the setup screens.
12 Select Start > Settings > Control Panel
> New Connection > New Connection Wizard.
13 Select Next.
14 Follow the prompts to connect to the Internet
•
using a modem:
•
•
and password, default Internet connection.
Select Next.
Network Connection Type: Connect to the Internet
and select Next
•
Internet Connection: Connect using a dial-up modem
check Make this the default Internet connection.
•
device on your computer. Select the devices
firewall for this connection.
•
•
Connection Name: Leave this blank and select
Next
•
Number to Dial: *99# and select Next
•
Connection Availability: Anyone's Use and select
Open the newly created Dial-Up Connection
and go to Properties.
Port where it’s attached.
•
Check Add a shortcut to this connection to
my desktop.
to use on this connection.” Select the
Smartphone Wireless USB Modem with the
If Microsoft® Windows® firewall is not
enabled, do not check Turn on Internet connection
and select Next
You may see “You have more than one dial-up
If you do not plan to use your phone as the
default Internet connection, then do not
Getting Ready: Set up My Connection Manually and
select Next
•
Remove the checkmarks for account name
•
On the General tab, click on Configure button
under the modem name. Remove the
checkmarks on Enable HW flow control,
Enable modem error control, and Enable
Next
connections
37
•
modem compression. Select OK. On the
access the Internet. To deactivate these settings,
General tab, verify that phone number is *99#
open your Web browser and select Menu > Tools
> Internet Options > Connections > Settings > Proxy Server, then
Select the Security tab, select Require
deselect Use a proxy server for this connection).
secured password from the drop-down menu
and check Show terminal window under
Interactive logon and scripting.
disconnect modem-link
To disconnect modem-link, you’ll need to perform
•
On the Networking tab, select
PPP: Windows 95/98/NT4/2000, Internet
from the Type of dial-up server I am calling
drop-down menu.
•
On the Networking tab, checkmark only
steps on your computer and your phone. On your
computer:
1
Go to task bar and right-click on the Network
Connection icon.
2
Select Disconnect.
Internet Protocol (TCP/IP) connection.
Your computer disconnects the modem-link.
•
Select OK.
•
Click on Dial. A black screen should appear.
mode for USB connections, press Start > System Tools
The dial-up connection is now established.
> Settings > Connections > USB Device Type > ActiveSync.
On your phone, to return your phone to ActiveSync
•
38
Select Done.
Note: Once you are no longer using modem link, you
Note: You might need to deactivate your
may need to reactivate your computer’s proxy
computer proxy server settings to let modem-link
settings. Please check with your Internet provider.
connections
other features
Note: To open the main menu from your home
features
screen, press Start. To scroll through the pages of
voice dial
menu options, press the navigation key S down. To
select a menu option, press the center key s.
To voice dial, press and hold h in your home
screen. When prompted, say “Call,” followed by a
advanced calling
number or contact name.
TTY calls
features
Set up your phone for use with an optional
call forwarding
TTY device:
Set up or cancel call forwarding:
Press Start > System Tools > Settings > Phone Accessibility > TTY
Press Start > System Tools > Settings > Phone > Call Forwarding
Note: A teletypewriter (TTY) is a communication
device used by people who are hard of hearing or
Note: If you choose No Reply, you can set how many
have a speech impairment. TTY does not work from
seconds your phone waits before it forwards a call.
mobile phone to mobile phone.
other features—advanced calling
39
features
features
call a phone number in a message
set ringer ID for a contact
E-mail or text messages can contain phone
Note: You cannot store a ringer ID for
numbers that have an underline, like a Web site
SIM Contacts.
hyperlink. To dial one of these numbers, scroll to it
and press N.
contacts
To store and call contacts, see your Quick Start Guide.
features
search for contact
Enter the first few letters of the contact's name.
The phone searches through the contact list and
shows the name.
edit contact
Press Start > Contacts, scroll to a contact, then press
Menu > Edit
40
other features—contacts
To easily identify who is calling you by the ring tone,
you can assign a custom ring tone to each contact.
Press Start > Contacts, scroll to a contact, then press
Menu > Edit > Custom Ring Tone
features
features
set picture ID for contact
set category for contact
Note: You cannot store a picture ID for
Note: You cannot store a category for
SIM Contacts.
SIM Contacts.
Assign a photo or picture to appear when you
Press Start > Contacts, scroll to a contact, then press
receive a call from an entry:
Menu > Edit > Categories
Press Start > Contacts, scroll to a contact, then press
Menu > Edit > Picture
set category view
Press Start > Contacts, then press Menu > Filter
Select a picture, or select Camera to take a new
picture for the contact.
Tip: Want to remove a picture ID? Press Start
> Contacts, scroll to a contact, press Menu > Edit, then
press Menu > Remove Picture
other features—contacts
41
personalizing
features
ring volume
features
language
Set menu language:
Press Start > System Tools > Settings > Regional Settings
Note: You must turn your phone off and on again for
the changes to take effect.
Press Start > System Tools > Settings > Profiles
Highlight the desired profile, then press Menu > Edit
Under Ring Volume, press the navigation key S left or
right to adjust the volume for that profile.
Shortcut: In the home screen, press and hold the
back key on the right side of the phone (see page 2)
Tip: While you enter text (such as in a text
to show the ring volume, then press the
message), your phone suggests words. To change
side scroll keys to adjust it.
the language for these suggestions, press Menu
> Languages in the text entry screen.
accessibility
You can set system font size, multipress timeout,
confirmation timeout, and in-call alerts:
Press Start > System Tools > Settings > Accessibility
42
other features—personalizing
Tip: You can eliminate the ringer volume instantly
when an incoming call comes in--just use the
side scroll keys to turn the ringer off.
features
features
sounds
master reset
To change the default sounds for ring tone,
To return your phone to original settings: Press Start
reminders, new messages, alarm clock, or keypad
> System Tools > Master Reset
controls:
Press Start > System Tools > Settings > Sounds
The default master reset code is 000000 (6 zeroes).
Master reset does not reset the unlock code,
Note: Changes made to the alert settings will have
security code, and lifetime timer.
no effect when using the Silent profile.
master clear
alarm
Press Start > System Tools > Settings > Clock & Alarm > Alarm
Tip: Need to change or set the alarm alert style?
Press Start > System Tools > Settings > Sounds > Alarm Clock.
owner information
It’s a good idea to enter and check your owner
information. It lets someone return the phone to
Caution: Master clear erases all information you
have entered (including contacts and calendar
events) and content you have downloaded
(including photos and sounds) stored in your
phone’s memory. After you erase the information,
you can’t recover it.
Press Start > System Tools > Master Clear
you if you lose it:
Press Start > System Tools > Settings > Owner Information
other features—personalizing
43
call times
Network connection time is the elapsed time from
features
reset call timers
the moment you connect to your service provider's
To reset all call timers to zero (0), except for the
network to the moment you end the call by
Lifetime calls timer:
pressing O. This time includes busy signals and
ringing.
Press Start > Call History, then press Menu > View Timers,
then press Menu > Reset Timers
The amount of network connection time you track
on your resettable timer may not equal the
handsfree
amount of time for which you are billed by your
service provider. For billing information, contact
your service provider.
Note: The use of wireless phones while driving may
cause distraction. Discontinue a call if you can’t
concentrate on driving. Additionally, the use of
features
see call timers
Show call timers:
Press Start > Call History, then press Menu > View Timers
44
other features—call times
wireless devices and their accessories may be
prohibited or restricted in certain areas. Always obey
the laws and regulations on the use of these products.
features
speakerphone
Activate a connected external speakerphone
during a call:
Press h or press Menu > Speakerphone On.
Note: With a Bluetooth® headset press Menu
calendar
features
add new calendar event
Press Start > Calendar, then press Menu > New Appointment
Note: To schedule an all-day event, select the
All day event check box under End time. All-day events do
not occupy blocks of time in the calendar; instead,
they appear in banners at the top of the calendar.
> Handsfree Off and then press Menu > Speakerphone On.
other features—calendar
45
features
features
view calendar event
respond to a meeting request
Press Start > Calendar to open the calendar for today.
You can receive and respond to meeting requests
•
To see days before or after today, press the
navigation key S left or right.
•
To quickly see a specific date, press
Menu > Go to Date.
•
To see your whole week’s events,
press Week View.
Shortcut: Today’s events appear on your home
screen. To see event details, scroll to it and press
the center key s.
on your phone in a similar manner as you do in
Outlook on your PC.
Press Start > Messaging > (e-mail account)
> meeting request
Press Accept or Menu > Decline or Tentative
calculator
features
calculator
calendar event reminder
Press Start > Office Tools > Calculator
The default reminder time for tasks and calendar
items is 15 minutes. To change this default:
Press Start > Calendar, then press Menu > Tools > Options
> Set Reminders
46
other features—calculator
security
features
memory & storage
features
manage certificates
Enable or disable Internet access
certificates stored on your phone:
Press Start > System Tools > Settings > Security > Certificates
To see the total, used, and available memory on
your phone and storage card:
Press Start > System Tools > Memory Manager
fun & games
Certificates are used to verify the identity and
security of Web sites when you download files or
features
share information.
access pictures
phone information
features
software version
To view your phone software version:
Press Start > Pictures & Videos
access sounds
Manage ring tones and music that you have
downloaded or composed:
Press Start > Windows Media
access video clips
Press Start > System Tools > Settings > About
Press Start > Pictures & Videos
other features—security
47
features
features
play games on your phone
manage media files
Press Start > Games
To view, copy, delete, rename, or move files and
start Web browser
folders on your phone or storage card:
Press Start > Opera
Press Start > File Manager
close Web browser
In the browser, press Menu > Exit
download objects from Web page
To download a picture, sound, or phone
theme from a Web page: Highlight the file, press
the center key s, then press Save.
To download a picture or other object from a Web
page: Highlight the item, press Menu, and choose an
option such as Save image.
48
other features—fun & games
index
A
battery life, extending 14, 27
certificate management 47
accessibility 42
Bluetooth indicator 10
conference calls 20
accessories 8, 44
Bluetooth remote 28
contacts 18, 40
accessory connector port 2, 3
Bluetooth wireless 27
copy files 28
ActiveSync 31
bonding (See Bluetooth wireless)
alarm 43
alert
set 11
turn off 16
animation 47
answer a call 14
attachments 22
D
C
date, 12
calculator 46
delete program 15
calendar 45, 46
dialed calls 16
call
display 8, 14
answer 14
download e-mail messages 24
forwarding 39
download message objects 23
call timers 44
B
caller ID 17, 41
E
background 13
camera key 2, 3
e-mail 21, 22
backlight 14
car kit 44
attachment 22
battery indicator 10
center key 2, 3
signature 22
index
49
emergency number 18
I
message 21, 22, 23
end key 2, 3
Incoming Call message 17
message indicator 9, 10
international access code 18
message reminders 43
ISP 21
messages 21
F
file manager 48
e-mail 21
filter 17
L
forward 23
language 42
missed call 17
forward calls 39
linking (See Bluetooth wireless)
Missed Calls message 17
Low Battery message 10
modem 33
G
text 21
multimedia message 21, 22, 23
games 48
M
global access look up 26
make call 40
H
music 47
manage files 48
N
master clear 43
navigation key 2, 3
handsfree 44
master reset 43
networking 33
headset 44
media player 43, 47
headset jack 2, 3
menu icons 9
home screen 8, 13
menu indicator 8
object exchange 28
hyperlink
menu key 2, 3
open
phone number 40
menu shortcuts 19
O
program 7
open program 7
50
index
optional accessory 8
reminders 43
speakerphone 44
optional feature 8
remote control 28
speed dial 18
over the air (OTA) 31
remove program 15
Start menu 7
owner information 43
reply 23
sync (cable) 32
return a call 17
synch (Bluetooth) 33
P
ring style indicator 10
synchronize 30
pairing (See Bluetooth wireless)
ring style, setting 11
synchronizing with computer 31
PC remote 28
ring tone 47
personalize 42
ringer ID 18, 40
T
photo 47
ringer volume 42
task manager 15
picture 47
roam indicator 10
text message 21, 22, 23
third party applications 14
picture ID 17, 41
power key 2, 3
S
three way calling 20
profile 11
send key 2, 3
time, setting 12
program
shortcuts 19
timers 16, 44
side scroll keys 2, 3
TTY calls 39
open 7
side select key 2, 3
R
signal strength indicator 10
V
received calls 16
signature 22
video 47
recent calls 16
soft keys 2, 3, 8
voice key 2, 3
redial 17
sounds 43, 47
voicemail 20
index
51
voicemail message indicator 20
volume 42
volume keys 2, 3
W
wallpaper 13
Web 48
U.S. patent Re. 34,976
52
index
www.motorola.com
6809507A84-A