1
magicolor 2490MF
Facsimile User’s
Guide
®
4556-9598-02A
1800799-001C
EDNord - Istedgade 37A - 9000 Aalborg - telefon 9633 3500
Thank You
Thank you for purchasing a magicolor 2490MF. You have made an excellent
choice. This User’s Guide describes operating procedures and precautions
for the use of the Fax functions. Be sure to read this User’s Guide before
starting any machine operations.
In order to ensure correct use of the Fax functions, read this User’s Guide,
and then store it where it can immediately be referred to when necessary.
Trademarks
KONICA MINOLTA and the KONICA MINOLTA logo are trademarks or registered trademarks of KONICA MINOLTA HOLDINGS, INC.
magicolor and PageScope are trademarks or registered trademarks of
KONICA MINOLTA BUSINESS TECHNOLOGIES, INC.
All other trademarks and registered trademarks are the property of their
respective owners.
Copyright Notice
Copyright © 2006 KONICA MINOLTA BUSINESS TECHNOLOGIES, INC.,
Marunouchi Center Building, 1-6-1 Marunouchi, Chiyoda-ku, Tokyo, 1000005, Japan. All Rights Reserved. This document may not be copied, in
whole or part, nor transferred to any other media or language, without written
permission of KONICA MINOLTA BUSINESS TECHNOLOGIES, INC.
Manual Notice
KONICA MINOLTA BUSINESS TECHNOLOGIES, INC. reserves the right to
make changes to this guide and to the equipment described herein without
notice. Considerable effort has been made to ensure that this guide is free of
inaccuracies and omissions. However, KONICA MINOLTA BUSINESS
TECHNOLOGIES, INC. makes no warranty of any kind including, but not limited to, any implied warranties of merchantability and fitness for a particular
purpose with regard to this guide. KONICA MINOLTA BUSINESS TECHNOLOGIES, INC. assumes no responsibility for, or liability for, errors contained in
this guide or for incidental, special, or consequential damages arising out of
the furnishing of this guide, or the use of this guide in operating the equipment, or in connection with the performance of the equipment when so operated.
EDNord - Istedgade 37A - 9000 Aalborg - telefon 9633 3500
Contents
1
Introduction ....................................................................................................... 1
Machine Parts 2
Front View 2
Rear View 3
2
Control Panel and Configuration Menu .......................................................... 5
About the Control Panel 6
Fax Mode Screen 10
About the Fax Mode Screen 10
About the Function Mode Screen 10
Entering Fax Mode 11
Symbol list 11
Configuration Menu Overview 12
Configuration Menu 17
MACHINE SETTING 18
FAX REGISTRATION 19
TX SETTING 20
RX SETTING 21
COMM. SETTING 23
REPORTING 24
Contents
EDNord - Istedgade 37A - 9000 Aalborg - telefon 9633 3500
i
USER SETTING 25
Specifying Settings in Configuration Menu 26
General Procedure for Specifying Settings in Configuration Menu 26
Memory Reception 27
Setting Up the Memory RX Mode 27
Turning Off the Memory RX Mode 28
3
Sending Faxes .................................................................................................29
Basic Fax Operation 30
Sending a Fax Using the ADF 30
Sending a Fax Using the Original Glass 32
Improving Resolution 34
Specifying a Recipient 34
Directly Entering a Fax Number 35
Using a One-Touch Dial Key 35
Using the Speed Dial Function 36
Using the List Function of the Phone Book 36
Using the Search Function of the Phone Book 37
Using the Redial Function 38
Specifiying Multiple Recipients 38
Sending a Fax to Multiple Recipients (Broadcast Transmission) 38
Sending a Fax at a Specified Time (Timer Transmission) 40
Sending a Fax Manually 41
Sending a Fax Manually After Using the Telephone 41
Sending a Fax Manually Using the On Hook Key 41
Canceling (Deleting) a Document Queued in Memory for Transmission 42
About the Fax Header 43
4
Receiving Faxes ..............................................................................................45
Receiving Faxes Automatically 46
Receiving Faxes Manually 46
Printing Received Faxes 47
What Is the Guaranteed Imageable (Printable) Area? 47
Adding the Sender’s Information When Printing Faxes 48
5
Registering Recipients ....................................................................................49
About the FAX REGISTRATION Function 50
One-Touch Dialing 50
Programming a One-Touch Dial Key 50
Changing/Deleting One-Touch Dial Information 52
Speed Dialing 53
Programming a Speed Dial Number 53
Changing/Deleting Speed Dial Information 54
Group Dialing 55
Programming Group Dialing 55
Changing/Deleting Group Dialing Information 56
ii
Contents
EDNord - Istedgade 37A - 9000 Aalborg - telefon 9633 3500
6
Confirmation Mode ......................................................................................... 59
About the Machine’s Counters 60
Checking the Counter for Fax Printing 60
Checking the Counter for Total Scans 60
Checking the Transmission/Reception Result From the Message Window 61
About the Reports and Lists 61
Printing the Reports and Lists 61
TX RESULT REPORT 61
RX RESULT REPORT 62
ACTIVITY REPORT 62
MEMORY DATA LIST 63
MEMORY IMAGE PRINT 63
ONE TOUCH LIST 63
SPEED DIAL LIST 63
GROUP DIAL LIST 64
7
Troubleshooting .............................................................................................. 65
Problems When Sending Faxes 66
Problems When Receiving Faxes 67
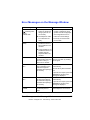
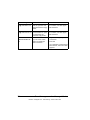
Error Messages on the Message Window 69
8
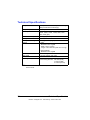
Appendix .......................................................................................................... 71
Technical Specifications 72
Entering Text 73
Key Operation 73
Entering Fax Numbers 73
Entering Names 74
Entering Email Addresses 74
Changing Input Mode 75
Inputting Example 75
Correcting Text And Input Precautions 76
Contents
EDNord - Istedgade 37A - 9000 Aalborg - telefon 9633 3500
iii
iv
Contents
EDNord - Istedgade 37A - 9000 Aalborg - telefon 9633 3500
Introduction
EDNord - Istedgade 37A - 9000 Aalborg - telefon 9633 3500
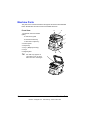
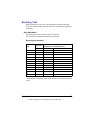
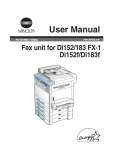
Machine Parts
The parts of the machine referred to throughout this manual are illustrated
below. Please take some time to become familiar with them.
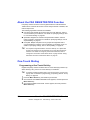
Front View
1a
1b
1–Automatic document feeder
(ADF)
1c
1a–Document guide
1b–Document feed tray
2
1c–Document output tray
2–Control panel
3
3–Output tray
4–Tray 1 (Multipurpose tray)
5–Tray 2
6–Original glass
"
2
The ADF may appear as
“document cover” in some
status and error messages.
5
4
6
Machine Parts
EDNord - Istedgade 37A - 9000 Aalborg - telefon 9633 3500
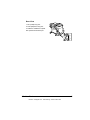
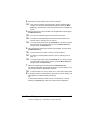
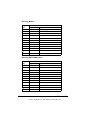
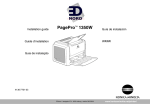
Rear View
1–TEL (telephone) jack
2–LINE (telephone line) jack
3–10Base-T/100Base-TX (IEEE
802.3) Ethernet interface port
1
2
3
Machine Parts
EDNord - Istedgade 37A - 9000 Aalborg - telefon 9633 3500
3
4
Machine Parts
EDNord - Istedgade 37A - 9000 Aalborg - telefon 9633 3500
Control Panel and
Configuration
Menu
EDNord - Istedgade 37A - 9000 Aalborg - telefon 9633 3500
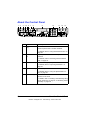
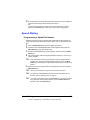
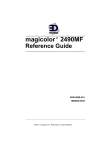
About the Control Panel
1 2
3 4 5 6
25
7
8
24
9
10
23 22 21 2019 18 17
11
16
No.
Part Name
Description
1
Redial/Pause
key
Recalls the last number dialed.
12
13
15
14
Inserts a pause when a number is dialed.
For details, refer to “Using the Redial Function” on
page 38.
2
Auto RX indicator
Lights up when the automatic reception function is
selected.
For details, refer to “Receiving Faxes Automatically” on page 46.
3
Resolution key
Adjusts the image quality of the fax documents.
For details, refer to “Improving Resolution” on
page 34.
4
Speed Dial key
Recalls a speed dial number.
For details, refer to “Using the Speed Dial Function” on page 36.
5
On hook key
Sends and receives transmissions with the
receiver on the hook.
For details, refer to “Sending a Fax Manually Using
the On Hook Key” on page 41 or “Receiving Faxes
Manually” on page 46.
6
About the Control Panel
EDNord - Istedgade 37A - 9000 Aalborg - telefon 9633 3500
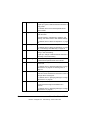
6
Function key
Enters Function mode and displays the first menu
that is available.
For details, refer to “Sending a Fax to Multiple
Recipients (Broadcast Transmission)” on page 38,
“Sending a Fax at a Specified Time (Timer Transmission)” on page 40, or “Canceling (Deleting) a
Document Queued in Memory for Transmission”
on page 42.
7
Error indicator
Flashes in orange when an error has occurred.
For details, refer to “Error Messages on the Message Window” on page 69.
8
Display key
Used to view the transmission results, the counters
or the amount of toner remaining, or to print
reports and lists.
For details, refer to “Confirmation Mode” on page
59.
9
Message window Displays settings and messages.
For details, refer to “Fax Mode Screen” on page
10.
10
Keypad
Used to enter numbers such as fax numbers and
letters such as names.
For details on dialing a destination, refer to “Specifying a Recipient” on page 34. For details on entering text, refer to “Entering Text” on page 73.
11
Fax key
Enters Fax mode.
Lights up in green to indicate that the machine is in
Fax mode.
For details, refer to “Fax Mode Screen” on page
10.
12
Scan key
Enters Scan mode.
Lights up in green to indicate that the machine is in
Scan mode.
For details, refer to the Printer/Copier/Scanner
User’s Guide.
About the Control Panel
EDNord - Istedgade 37A - 9000 Aalborg - telefon 9633 3500
7
13
Copy key
Enters Copy mode.
Lights up in green to indicate that the machine is in
Copy mode.
For details, refer to the Printer/Copier/Scanner
User’s Guide.
14
Stop/Reset key
Stops an operation at any time.
Exits the menu.
Cancels scanning, transmission, reception, and
printing, and returns them to their default settings.
For details, refer to “Basic Fax Operation” on page
30.
15
Start key
Starts a fax transmission or reception.
For details, refer to “Basic Fax Operation” on page
30 or “Receiving Faxes Manually” on page 46.
16
Start indicator
Lights up in green to indicate that the machine is
ready to start transmitting.
Lights up in orange to indicate that the machine is
not ready to start transmitting.
17
TC Change key
Press when replacing the toner. For details, refer
to the Printer/Copier/Scanner User’s Guide.
18
Cancel/C key
Cancels the setting or returns to the previous
menu level.
For details, refer to “Specifying Settings in Configuration Menu” on page 26 or “Entering Text” on
page 73.
19
)
Moves right through the available menu choices.
Sets the current character and moves the cursor to
the right when entering text.
For details, refer to “Specifying Settings in Configuration Menu” on page 26.
20
+
Moves up in the menu structure.
Scrolls upward through the available menu
choices.
For details, refer to “Specifying Settings in Configuration Menu” on page 26.
8
About the Control Panel
EDNord - Istedgade 37A - 9000 Aalborg - telefon 9633 3500
21
,
Moves down in the menu structure.
Scrolls downward through the available menu
choices.
For details, refer to “Specifying Settings in Configuration Menu” on page 26.
22
Menu Select key Enters the menu structure.
Moves down in the menu structure.
Selects the displayed menu choice.
For details, refer to “Specifying Settings in Configuration Menu” on page 26.
23
*
Moves left through the available menu choices.
Sets the current character and moves the cursor to
the left when entering text.
For details, refer to “Specifying Settings in Configuration Menu” on page 26.
24
Copy operations Provides copy operations.
key
For details, refer to the Printer/Copier/Scanner
User’s Guide.
" If a copy operations key is pressed in Fax
mode, the machine enters Copy mode. For
details, refer to the Printer/Copier/Scanner
User's Guide.
25
One-touch dial
keys
Registers and recalls one-touch dial numbers.
For details, refer to “Using a One-Touch Dial Key”
on page 35 or “One-Touch Dialing” on page 50.
About the Control Panel
EDNord - Istedgade 37A - 9000 Aalborg - telefon 9633 3500
9
Fax Mode Screen
About the Fax Mode Screen
Press the Fax key to display the Fax mode screen.
The following appear in the Fax mode screen.
Position
Part Name
Description
Upper
Mode or function Indicates the currently selected mode or funcname
tion settings.
Displays the current menu, function or settings.
Error messages are displayed when errors
occur.
The current time and remaining amount of
memory is displayed during standby.
Lower
Messages
Displays messages such as operating instructions.
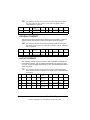
About the Function Mode Screen
Press the Function key to display the Function mode screen.
The following appear in the Function mode screen.
Position
Part Name
Description
Upper
Function name
BROADCAST
A fax can be sent to multiple recipients in a single
transmission. For details, refer to “Sending a Fax
to Multiple Recipients (Broadcast Transmission)”
on page 38.
TIMER TX
A document can be scanned and stored in the
memory to be sent at a specified time. For details,
refer to “Sending a Fax at a Specified Time (Timer
Transmission)” on page 40.
CANCEL RESERV.
Of the documents stored in the memory and waiting to be sent, a specific document can be
selected and delete. For details, refer to “Canceling (Deleting) a Document Queued in Memory for
Transmission” on page 42.
Lower
10
Messages
Displays messages such as operating instructions.
Fax Mode Screen
EDNord - Istedgade 37A - 9000 Aalborg - telefon 9633 3500
Entering Fax Mode
Before using a Fax function, make sure that the Fax key is lit in green. Otherwise, press it to enter Fax mode.
Pressing the Speed Dial key, Redial/Pause key or a one-touch dial key
switches the machine to Fax mode when it is in any mode other than Fax
mode.
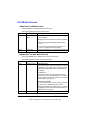
Symbol list
Symbol
Description
Dialing
A fax number is being dialed.
Ringing
The machine is being called.
Sending
The document is being sent.
Receiving
A document is being received.
Number of
scanned document pages
The number of scanned document pages appears
beside the icon.
Tone
If pulse dialing is being used, push-button tones
are sent.
Pause
A pause is inserted.
In standby for
timer transmission
A document is queued for timer transmission.
In standby for
memory reception
A document is queued for memory reception.
Fax Mode Screen
EDNord - Istedgade 37A - 9000 Aalborg - telefon 9633 3500
11
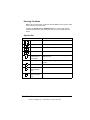
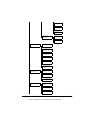
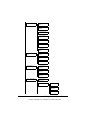
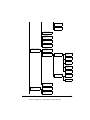
Configuration Menu Overview
The magicolor 2490MF configuration menu accessible from the control panel
is structured as shown below.
"
Menu
Select
Press the Menu Select key to enter the configuration menu.
MACHINE SETTING
1.AUTO PANEL
RESET
2.ENERGY
SAVE MODE
3.LCD CONTRAST
4.LANGUAGE
5.LAMP OFF
TIME
6.BUZZER
VOLUME
7.INITIAL
MODE
8.TONER
EMPTY STOP
9.AUTO CONTINUE
10.CALIBRATION
PAPER SOURCE
SETUP
1.TRAY1
PAPER
PLAIN
PAPER
TRANSPARENCY
LABELS
LETTERHEAD
ENVELOPE
12
Configuration Menu Overview
EDNord - Istedgade 37A - 9000 Aalborg - telefon 9633 3500
POSTCARD
THICK
STOCK
GLOSSY
2.TRAY2
PAPER
A4
LETTER
COPY SETTING
1.MODE
2.DENSITY
LEVEL (A)
3.DENSITY
LEVEL (M)
4.COLLATE
5.QUALITY
6.PAPER PRIORITY
FAX REGISTRATION
1.ONE-TOUCH
DIAL
2.SPEED DIAL
3.GROUP DIAL
TX SETTING
1.SCAN DENSITY
2.RESOLUTION
3.HEADER
Configuration Menu Overview
EDNord - Istedgade 37A - 9000 Aalborg - telefon 9633 3500
13
RX SETTING
1.MEMORY RX
MODE
2.NO. of
RINGS
3.REDUCTION
RX
4.RX PRINT
5.RX MODE
6.FOOTER
7.SELECT
TRAY
COMM. SETTING
1.TEL LINE
TYPE
2.LINE MONITOR
3.PSTN/PBX
REPORTING
1.ACTIVITY
REPORT
2.TX RESULT
REPORT
3.RX RESULT
REPORT
USER SETTING
1.FAX PTT
SETTING
2.DATE&TIME
SET HOUR
SET
MINUTE
SET YEAR
14
Configuration Menu Overview
EDNord - Istedgade 37A - 9000 Aalborg - telefon 9633 3500
SET MONTH
SET DAY
3.DATE FORMAT
4.PRESET
ZOOM
5.USER FAX
NO.
6.USER NAME
DIRECT PRINT
1.IMAGE
QUALITY
2.PAPER SIZE
TRAY1
PLAIN
PAPER
LABELS
POSTCARD
THICK
STOCK
GLOSSY
TRAY2
LETTER
A4
3.N-UP LAYOUT
NETWORK SETTING
1.IP ADDRESS
2.SUBNET
MASK
Configuration Menu Overview
EDNord - Istedgade 37A - 9000 Aalborg - telefon 9633 3500
15
3.GATEWAY
4.DNS CONFIG.
E-MAIL SETTING
1.SENDER
NAME
2.E-MAIL
ADDRESS
3.SMTP
SERVER
4.SMTP PORT
NO.
5.SMTP TIMEOUT
6.TEXT
INSERT
7.DEFAULT
SUBJECT
SCANNER SETTING
1.RESOLUTION
2.IMAGE FORMAT
3.CODING
METHOD
16
Configuration Menu Overview
EDNord - Istedgade 37A - 9000 Aalborg - telefon 9633 3500
Configuration Menu
The machine settings can be changed according to the desired normal operations.
"
"
"
All factory default values are shown in bold.
For details on specifying settings on the configuration menu, refer to
“Specifying Settings in Configuration Menu” on page 26.
For details on specifying settings for options in the Paper Source
Setup, Copy Setting and Direct Print menus and for some options in
the Machine Setting menu, refer to the Printer/Copier/Scanner User’s
Guide.
Configuration Menu
EDNord - Istedgade 37A - 9000 Aalborg - telefon 9633 3500
17
MACHINE SETTING
1.AUTO PANEL
RESET
2.ENERGY SAVE
MODE
3.LCD CONTRAST
4.LANGUAGE
5.LAMP OFF
TIME
6.BUZZER VOLUME
For details on specifying settings, refer to the Printer/
Copier/Scanner User’s Guide.
Settings
HIGH / LOW / OFF
Select the volume of alarms and the beep that sounds
when a key is pressed.
7.INITIAL
Settings
COPY / FAX
MODE
Select the mode that the machine starts up in or returns
to after the automatic reset.
8.TONER EMPTY Settings
ON / ON(FAX) / OFF
STOP
Select whether or not printing stops when the toner has
run out.
If a fax is received while printing is stopped, the received
fax is saved in the memory and automatically printed
after the error is corrected.
ON: All printing stops when the machine has
detected that the toner has run out.
ON (FAX): Only fax printing stops when the
machine has detected that the toner has run out,
and a message appears in the message window.
9.AUTO CONTINUE
10.CALIBRATION
18
OFF: Printing does not stop when the machine has
detected that the toner has run out, and a message
appears in the message window.
Settings
ON / OFF
Select whether or not to perform image stabilization. If
ON is selected, image stabilization is started.
For details on specifying settings, refer to the Printer/
Copier/Scanner User’s Guide.
Configuration Menu
EDNord - Istedgade 37A - 9000 Aalborg - telefon 9633 3500
FAX REGISTRATION
1.ONE-TOUCH
DIAL
2.SPEED DIAL
Program one-touch dial keys with fax numbers, allowing
the recipient to be specified easily and accurately without the need to manually enter the number using the
keypad.
A maximum of nine one-touch dial keys can be programmed. This dialing method is convenient for programming numbers that faxes are frequently sent to.
For details on specifying one-touch dial keys, refer to
“One-Touch Dialing” on page 50.
Program speed dial numbers with fax numbers, allowing
the recipient to be specified easily and accurately without the need to manually enter the number using the
keypad.
A maximum of 100 fax numbers can be programmed.
3.GROUP DIAL
For details on specifying speed dial numbers, refer to
“Speed Dialing” on page 53.
Program a single one-touch dial key with a maximum of
50 different fax numbers as one group. Programming a
one-touch dial key with a group of fax numbers is convenient when documents are frequently sent to a set group
of multiple recipients.
For details on specifying group dialing, refer to “Group
Dialing” on page 55.
Configuration Menu
EDNord - Istedgade 37A - 9000 Aalborg - telefon 9633 3500
19
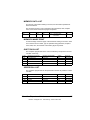
TX SETTING
1.SCAN DENSITY
2.RESOLUTION
Settings
LIGHT
DARK
Specify the density for scanning a document.
Settings
STD / FINE / S/F / H/T
Select the default scanning resolution (image quality).
STD: For documents containing normal text (such
as handwriting) (Standard)
FINE: For documents containing small text
S/F: For documents such as newspapers or those
containing detailed illustrations (Super Fine)
H/T : For documents with shades, such as photos
(Half Tone)
If H/T was selected, a screen appears, allowing
you to select a detailed setting (STD, FINE or S/F).
3.HEADER
To change the resolution from the default setting before
transmission, press the Resolution key.
Settings
ON / OFF
Select whether or not the transmission information (date
sent, sender’s name, fax number, etc.) is printed on sent
faxes.
" On models for the USA, Canada and Korea, OFF
cannot be selected.
20
Configuration Menu
EDNord - Istedgade 37A - 9000 Aalborg - telefon 9633 3500
RX SETTING
1.MEMORY RX
MODE
Settings
ON / OFF
Select whether to allow (ON) memory reception or not
(OFF). In cases when confidential faxes are being
received, the received document can be stored in the
memory and printed at a specified time or when memory
reception is turned off (this function is set to OFF).
A password can be set to specify the starting time or
ending time of memory reception, or to cancel the function. The set starting time and ending time are valid
every day until memory reception is turned off.
2.NO. of
RINGS
3.REDUCTION
RX
For details on specifying settings, refer to “Setting Up the
Memory RX Mode” on page 27.
Settings
1-16 (Default : Depends on the sales
region)
Enter the number of rings between 1 and 16 until the call
is answered.
Settings
ON / OFF / CUT
Select whether documents longer than the paper are
printed reduced, split, or discarded.
ON: The document is printed at a reduced size.
OFF: The document is printed at full size and split
onto multiple pages.
4.RX PRINT
CUT: The document is printed, but any part that
does not fit within the page is erased. However,
when sending a document more than 24 mm (1
inch) longer than the paper, the document is split.
Settings
MEMORY RX / PRINT RX
Select whether the fax is printed only after all document
pages have been received or printing begins as soon as
the first page of the document is received.
MEMORY RX: Printing begins after all pages have
been received.
PRINT RX: Printing begins after the first page has
been received.
Configuration Menu
EDNord - Istedgade 37A - 9000 Aalborg - telefon 9633 3500
21
5.RX MODE
Settings
AUTO RX / MANUAL RX
Select whether the reception mode is set to automatic
reception or manual reception.
AUTO RX: Automatically begins receiving the fax
after the set number of rings.
MANUAL RX: Does not automatically receive the
fax. Reception begins after making a connection
by picking up the telephone receiver or pressing
the On hook key, then pressing the Start key.
For details on manual reception, refer to “Receiving
Faxes Manually” on page 46.
6.FOOTER
Settings
ON / OFF
Select whether or not the reception information (date
received, number of pages, etc.) is printed at the bottom
of each received document.
7.SELECT TRAY Settings
TRAY1: DISABLE / ENABLE
TRAY2: DISABLE / ENABLE
Select which paper tray can be used to supply paper
when printing received documents or transmission
reports. A paper tray that cannot be used for supplying
paper can also be specified.
" If the tray2 is not installed, TRAY2 does not
appear.
22
Configuration Menu
EDNord - Istedgade 37A - 9000 Aalborg - telefon 9633 3500
COMM. SETTING
1.TEL LINE
TYPE
Settings
TONE / PULSE
Select the dialing system. If this function is not correctly
set to the type of dialing system used, faxes cannot be
sent.
Select the correct setting after checking which type of
dialing system is used by your telephone line.
" If the FAX
2.LINE MONITOR
PTT SETTING in the USER
SETTING menu is set to USA, the settings cannot
be changed.
Settings
HIGH / LOW / OFF
Select the volume of the monitoring sound of the transmission signal.
" Even when OFF is selected, the monitoring sound
3.PSTN/PBX
can be heard when the On hook key is pressed.
Settings
PSTN / PBX
Select whether the connected telephone wiring is a public switched telephone network (PSTN) or a private
branch exchange (PBX).
For a PBX system, the prefix number (outside line
access number (or extension number)) can be specified.
Configuration Menu
EDNord - Istedgade 37A - 9000 Aalborg - telefon 9633 3500
23
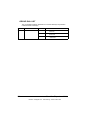
REPORTING
1.ACTIVITY
REPORT
2.TX RESULT
REPORT
Settings
ON / OFF
After every 60 transmissions/receptions, a report can be
printed to show the results of the transmissions/receptions. Select whether the report is printed automatically
when the 60th transmission/reception is reached.
Settings
ON / ON(ERROR) / OFF
Select whether the report showing the result of a transmission is printed automatically after the transmission is
finished.
ON: Prints the report after each transmission.
ON(ERROR): Prints the report after a transmission
only if an error occurred.
3.RX RESULT
REPORT
OFF: Does not print the report after each transmission, even if an error has occurred.
Settings
ON / ON(ERROR) / OFF
Select whether the report showing the result of a reception is printed automatically after the reception is finished.
ON: Prints the report after each reception.
ON(ERROR): Prints the report after a reception only
if an error occurred.
OFF: Does not print the report after each reception,
even if an error has occurred.
24
Configuration Menu
EDNord - Istedgade 37A - 9000 Aalborg - telefon 9633 3500
USER SETTING
1.FAX PTT
SETTING
2.DATE&TIME
Settings
USA / UK / ARGENTINA / AUSTRALIA
/ AUSTRIA / BELGIUM / BRAZIL /
CANADA / CHINA / CZECH / DENMARK
/ EUROPE / FINLAND / FRANCE /
GERMANY / GREECE / HONG KONG/
HUNGARY / IRELAND / ISRAEL /
ITALY / JAPAN / KOREA / MALAYSIA
/ MEXICO / NETHERLANDS / NEW
ZEALAND / NORWAY / PHILIPPINES /
POLAND / PORTUGAL / RUSSIA /
SAUDI ARABIA / SINGAPORE /
SLOVAKIA / SOUTH AFRICA / SPAIN
/ SWEDEN / SWITZERLAND / TAIWAN
/ TURKEY
Select the country where this machine is installed.
Settings
SET HOUR: 00-23
SET MINUTE: 00-59
SET YEAR: 00-99 (2000-2099)
SET MONTH: 01-12
SET DAY: 01-31
Enter the date and time for the machine using the keypad. If FAX PTT SETTING is set to USA or CANADA, the
time changes automatically for daylight saving time.
(Starts: First Sunday of April at 2 a.m.; Ends: Last Sunday in October at 2 a.m.)
3.DATE FORMAT Settings
MM/DD/YY / DD/MM/YY / YY/MM/DD
Select the display format for reports and lists.
4.PRESET ZOOM For details on specifying settings, refer to the Printer/
Copier/Scanner User’s Guide.
5.USER FAX
Enter your fax number. A maximum of 50 characters
NO.
(consisting of numbers, spaces, + and -) can be
entered.The specified number is printed in the header of
sent faxes.
6.USER NAME
Enter your name. A maximum of 20 characters can be
entered. The specified name is printed in the header of
sent faxes.
Configuration Menu
EDNord - Istedgade 37A - 9000 Aalborg - telefon 9633 3500
25
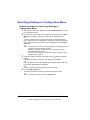
Specifying Settings in Configuration Menu
General Procedure for Specifying Settings in
Configuration Menu
1
2
With the Fax mode screen displayed, press the Menu Select key to enter
the configuration menu.
Check the name of the menu in the upper line, and then press the Menu
Select key to specify a setting for an option in the displayed menu.
OR
To select a different menu, press the + or , key to select the desired
menu. Refer to the menu configuration on page 12 to display the desired
menu. After the name of the desired menu is displayed, press the Menu
Select key.
"
3
4
To select a setting, press the * or ) key to move beside the desired
setting.
If ) appears in the list of settings, more settings are available.
OR
If + or , appears in the screen displaying the settings, press the + or ,
key until the desired setting is displayed.
OR
To enter a setting, use the keypad to type in the number.
Press the Menu Select key.
The setting is applied, and the Fax mode screen appears again.
"
26
The desired menu can also be displayed by pressing the key in the
keypad for the corresponding number.
Example: To display “Buzzer Volume”, press the 6 key in the
MACHINE SETTING screen.
For the number assigned to each menu option, refer to the menu
configuration on page 12.
To cancel the settings, press the Cancel/C key.
Specifying Settings in Configuration Menu
EDNord - Istedgade 37A - 9000 Aalborg - telefon 9633 3500
Memory Reception
In cases when confidential faxes are being received, the received document
can be stored in the memory and printed at a specified time or when memory
reception is turned off.
Memory reception can be used with the following settings.
Start/end time settings: Not set
“MEMORY RX MODE” is normally set to “ON”. To print a fax saved in the
memory, set “MEMORY RX MODE” to “OFF”.
Start/end time settings: Set
Memory reception mode begins and ends at the specified time.
Example 1: When “ON TIME” is set to 18:00 and “OFF TIME” is set to
8:00
The machine is in memory reception mode from 18:00 to 8:00 and in
normal reception mode, where faxes are printed after being received,
from 8:00 to 18:00.
Example 2: When “ON TIME” is set to 12:00 and “OFF TIME” is set to
12:00 (the start time and end time are the same)
“MEMORY RX MODE” is normally set to “ON”; however, faxes saved
in the memory are printed at 12:00.
Setting Up the Memory RX Mode
1
2
3
4
5
With the Fax mode screen displayed, press the Menu Select key to enter
Menu mode.
Press the + or , key to display the RX SETTING screen, and then press
the Menu Select key.
Check that the MEMORY RX MODE screen appears, and then press the
Menu Select key.
Using the * and ) keys, select “ON”, and then press the Menu Select
key.
The ON TIME screen appears.
Specify the time when memory reception mode begins, and then press
the Menu Select key.
The OFF TIME screen appears.
"
To specify no start time, press the Menu Select key without specifying
a time.
Specifying Settings in Configuration Menu
EDNord - Istedgade 37A - 9000 Aalborg - telefon 9633 3500
27
6
Specify the time when memory reception mode ends, and then press the
Menu Select key.
The PASSWORD screen appears.
"
7
If no start time was specified in step 5, press the Menu Select key
without specifying an end time.
Enter the password, and then press the Menu/Select key.
Memory reception mode is set.
"
"
The password is required for turning off memory reception mode or
changing the start/end times. Enter a four-digit number.
To specify no password, press the Menu Select key without specifying
a password.
Turning Off the Memory RX Mode
1
2
3
4
With the Fax mode screen displayed, press the Menu Select key to enter
Menu mode.
Press the + or , key to display the RX SETTING screen, and then press
the Menu Select key.
Check that the MEMORY RX MODE screen appears, and then press the
Menu Select key.
Using the * and ) keys, select “OFF”, and then press the Menu Select
key.
The PASSWORD screen appears.
"
5
If no password was specified, memory reception mode is canceled.
Enter the password, and then press the Menu/Select key.
Memory reception mode is canceled.
"
28
If faxes are saved in the memory, printing of the faxes begins.
Specifying Settings in Configuration Menu
EDNord - Istedgade 37A - 9000 Aalborg - telefon 9633 3500
Sending Faxes
EDNord - Istedgade 37A - 9000 Aalborg - telefon 9633 3500
Basic Fax Operation
This section contains basic information on sending faxes.
"
Only Statement(ST), Letter(LT), Legal(LG), A5, or A4 size documents
can be sent as a fax.
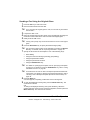
Sending a Fax Using the ADF
If the ADF is used, original documents containing multiple pages can be automatically scanned.
"
"
"
"
1
2
3
4
5
Do not load more than 50 sheets; otherwise a original document misfeed or damage to the document or machine may occur.
If the original document is not loaded correctly, it may not be fed in
straight, or an original document misfeed or damage to the document
may occur.
Do not open the ADF cover while documents loaded into the ADF are
being scanned.
Press the Fax key to enter Fax mode.
Make sure that there is no document on the original glass.
Put the document into the ADF
document feed tray face up.
Adjust the document guides to the document size.
Press the Resolution key to specify the desired image quality.
"
6
Do not load original documents that are bound together, for example,
with paper clips or staples.
The document image quality can be adjusted by pressing the Resolution key. For details, refer to “Improving Resolution” on page 34.
Specify the fax number of the recipient in one of the following ways:
– Direct dialing
– Using the one-touch dial key (including the group dial function)
30
Basic Fax Operation
EDNord - Istedgade 37A - 9000 Aalborg - telefon 9633 3500
– Using the Speed Dial function
– Using the Phone Book function
– Using the Redial/Pause key
"
"
7
For details on specifying the recipient, refer to “Specifying a Recipient”
on page 34. For details on using the Redial/Pause key, refer to “Using
the Redial Function” on page 38.
A transmission can also be sent to multiple recipients with the Broadcast function. For details on sending a broadcast transmission, refer to
“Sending a Fax to Multiple Recipients (Broadcast Transmission)” on
page 38.
Press the Start key.
The document is scanned, and then the fax is sent.
"
"
"
"
To stop the transmission, press the Stop/Reset key. A message
appears, requesting confirmation to cancel the setting. Select “Yes”,
and then press the Menu Select key.
If the fax could not be sent (for example, because the line was busy),
the automatic redial function will try sending the transmission again.
If the fax could not be sent with the automatic redial function, a TX
Result Report can be printed. For details, refer to “TX RESULT
REPORT” on page 61.
If you want to cancel a scanned document queued for transmission or
a fax waiting to be redialed, select “CANCEL RESERV.” from the
Function menu. For details, refer to “Canceling (Deleting) a Document
Queued in Memory for Transmission” on page 42.
Since a document with multiple pages is saved in the memory while it
is being sent, the document is scanned at high speed. A maximum of
512 pages can be stored in the memory. (If a high resolution is
selected while scanning detailed documents, 512 pages may not be
stored in the memory.) If the memory is nearly full, scanning of the
document is stopped and a message appears, allowing you to select
whether to start the transmission or cancel that transmission job. If the
selection is made to cancel the job, the pages of the document that
have been scanned for that job are deleted. If the selection is made to
begin the transmission, scanning of the document is stopped and
transmission begins. After the scanned pages have been sent, scanning of the document starts again.
Basic Fax Operation
EDNord - Istedgade 37A - 9000 Aalborg - telefon 9633 3500
31
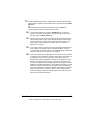
Sending a Fax Using the Original Glass
1
2
Press the Fax key to enter Fax mode.
Remove all documents from the ADF.
"
3
4
5
Lift open the ADF cover.
Place the original document face down on the original glass and align the
document on the scales above and to the left of the original glass.
Gently close the ADF cover.
"
6
"
"
9
32
The document image quality can be adjusted by pressing the Resolution key. For details, refer to “Improving Resolution” on page 34.
Specify the fax number of the recipient in one of the following ways:
–
–
–
–
–
8
Closing it too quickly may cause the document to move on the original
glass.
Press the Resolution key to specify the desired image quality.
"
7
If you are using the original glass to scan, do not load any documents
into the ADF.
Direct dialing
Using the one-touch dial keys (including group dialing)
Using the speed dial numbers
Using the phone book functions
Using the Redial/Pause key
For details on specifying the recipient, refer to “Specifying a Recipient”
on page 34. For details on using the Redial/Pause key, refer to “Using
the Redial Function” on page 38.
A transmission can also be sent to multiple recipients with the Broadcast function. For details on sending a broadcast transmission, refer to
“Sending a Fax to Multiple Recipients (Broadcast Transmission)” on
page 38.
Press the Start key.
A screen appears, requesting confirmation of the scanning area.
To scan the displayed scanning area, press the Menu Select key. The
document is scanned.
OR
To change the displayed scanning area, press the , key, select the
desired scanning area in the next screen that appears, and then press the
Menu Select key. The document is scanned.
Basic Fax Operation
EDNord - Istedgade 37A - 9000 Aalborg - telefon 9633 3500
10
To scan multiple pages from the original glass, check that the message
“NEXT PAGE?” appears, replace the document, and then press the Menu
Select key.
OR
When scanning of the document is finished, press the Start key.
The document is scanned, and then the fax is sent.
"
"
"
"
To stop the transmission, press the Stop/Reset key. A message
appears, requesting confirmation to cancel the setting. Select “Yes”,
and then press the Menu Select key.
If the fax could not be sent (for example, because the line was busy),
the automatic redial function will try sending the transmission again.
If the fax could not be sent with the automatic redial function, a TX
Result Report can be printed. For details, refer to “TX RESULT
REPORT” on page 61.
If you want to cancel a scanned document queued for transmission or
a fax waiting to be redialed, select “CANCEL RESERV.” from the
Function menu. For details, refer to “Canceling (Deleting) a Document
Queued in Memory for Transmission” on page 42.
Since a document with multiple pages is saved in the memory while it
is being sent, the document is scanned at high speed. A maximum of
512 pages can be stored in the memory. (If a high resolution is
selected while scanning detailed documents, 512 pages may not be
stored in the memory.) If the memory is nearly full, scanning of the
document is stopped and a message appears, allowing you to select
whether to start the transmission or cancel that transmission job. If the
selection is made to cancel the job, the pages of the document that
have been scanned for that job are deleted. If the selection is made to
begin the transmission, scanning of the document is stopped and
transmission begins. After the scanned pages have been sent, scanning of the document starts again.
Basic Fax Operation
EDNord - Istedgade 37A - 9000 Aalborg - telefon 9633 3500
33
Improving Resolution
The image quality of a document can be adjusted before it is sent as a fax.
1
2
Press the Resolution key.
Using the * and ) keys, select the fax resolution, and then press the
Menu Select key.
"
"
Select the resolution appropriate for the document.
- STD: For documents containing normal text (such as handwriting)
(Standard)
- FINE: For documents containing small text
- S/F: For documents such as newspapers or those containing
detailed illustrations (Super Fine)
- H/T: For documents with shades, such as photos (Half Tone)
If “H/T” was selected, a screen appears, allowing you to select a
detailed setting (“STD”, “FINE” or “S/F”).
The resolution returns to the default setting after the document is
scanned with a normal transmission or after transmission after manual
transmission. The default setting can be changed. This is useful for
specifying a frequently used resolution setting as the default. For
details, refer to “TX SETTING” on page 20.
Specifying a Recipient
The recipients can be specified in any of the following ways.
Direct dialing: Directly type in the fax number.
Using the one-touch dial key: Specify a recipient registered with a
one-touch dial key.
Using the Speed Dial function: Specify a recipient registered with a speed
dial.
Using the phone book functions: List or search for recipients registered as
one-touch dial keys or speed dial numbers, and then select a recipient.
Using the Redial/Pause key: Specify the number of the recipient dialed
last.
34
Improving Resolution
EDNord - Istedgade 37A - 9000 Aalborg - telefon 9633 3500
Directly Entering a Fax Number
1
Use the numeric keypad to type in the fax number for the recipient.
"
"
"
The keys that can be used to enter the fax number are: the number
keys (0 through 9), and #.
If the Redial/Pause key is pressed while entering the fax number, a
2.5-second pause is added. A pause appears as “P” in the message
window.
If the machine is connected to a PBX line and the prefix number (outside line access number) has been specified in the “COMM. SETTING” on page 23, enter “#” to dial the outside line access number
automatically.
To erase the entered number, hold down the Cancel/C key for about
one second, or press the Stop/Reset key.
Using a One-Touch Dial Key
If a recipient has been registered with a one-touch dial key, the recipient’s fax
number can be dialed simply by pressing the programmed one-touch dial key.
"
1
The recipient must have been registered with a one-touch dial key in
advance. For details, refer to “Programming a One-Touch Dial Key” on
page 50.
Press the desired one-touch dial key.
"
"
"
Press the one-touch dial key programmed with the group dial recipients to send a fax to multiple recipients.
If an incorrect recipient is selected, press the Cancel/C key.
If the one-touch dial key that is pressed is not registered with a fax
number, the message “NOT FAX NO.” appears. In addition, if the
one-touch dial key that is pressed is not registered with a recipient, the
message “NOT REGISTERED!” appears. Press a one-touch dial key
registered with a fax number.
Specifying a Recipient
EDNord - Istedgade 37A - 9000 Aalborg - telefon 9633 3500
35
Using the Speed Dial Function
If a recipient has been registered with a speed dial number, the recipient’s fax
number can be dialed simply by pressing a speed dial number key.
"
1
2
The recipient must have been registered with a speed dial in advance.
For details, refer to “Programming a Speed Dial Number” on page 53.
Press the Speed Dial key.
Use the keypad to enter the 3-digit speed dial number programmed with
the desired recipient.
The recipient’s name appears in the message window.
"
"
If an incorrect recipient is selected, press the Cancel/C key.
If the entered speed dial number is not registered with a fax number,
the message “NOT FAX NO.” appears. In addition, if the entered
speed dial number is not registered with a recipient, the message
“NOT REGISTERED!” appears. Enter a speed dial number registered
with a fax number.
Using the List Function of the Phone Book
If a recipient is registered with a one-touch dial key or a speed dial number,
the recipient can be found by using the List or Search function of the phone
book.
Follow the procedure described below to search using the List function of the
phone book.
1
2
3
4
Press the Speed Dial key twice.
Using the * and ) keys, select “LIST”, and then press the Menu Select
key.
The list of programmed one-touch dial keys and speed dial numbers is
displayed.
Using the + and , keys, select the desired recipient.
Press the Start key.
The document is scanned, and then the fax is sent.
"
36
To stop the transmission, press the Stop/Reset key. A message
appears, requesting confirmation to cancel the setting. Select “Yes”,
and then press the Menu Select key.
Specifying a Recipient
EDNord - Istedgade 37A - 9000 Aalborg - telefon 9633 3500
Using the Search Function of the Phone Book
If a recipient is registered with a one-touch dial key and a speed dial number,
the recipient can be found by using the List or Search function of the phone
book.
Follow the procedure described below to search using the Search function of
the phone book.
1
2
3
Press the Speed Dial key twice.
Using the * and ) keys, select “SEARCH”, and then press the Menu
Select key.
A screen appears, allowing you to enter the text to be searched for.
Using the keypad, enter the first few characters of the name programmed
for the desired recipient.
"
"
4
6
7
If there are no names programmed with one-touch dial keys or speed
dial numbers beginning with the entered text, “(0)” is displayed, and
then the screen allowing you to enter the search text appears.
To select a recipient from the displayed search results, skip to step 7.
OR
To narrow down the search results even further, press the Menu Select
key, and then enter more search text.
Press the Menu Select key.
Using the + and , keys, select the desired recipient.
"
8
Text up to 10 characters long can be entered.
Press the Menu Select key.
The number of names beginning with the text entered in step 3 is displayed.
"
5
Enter the name programmed in the one-touch dial key or the speed
dial number. For details on entering text, refer to “Entering Text” on
page 73.
If the desired recipient name does not appear in the search results,
press the Clear/C key twice to return to the screen allowing you to
enter the search text, and then try searching for different text.
Press the Start key.
The document is scanned, and then the fax is sent.
"
To stop the transmission, press the Stop/Reset key. A message
appears, requesting confirmation to cancel the setting. Select “Yes”,
and then press the Menu Select key.
Specifying a Recipient
EDNord - Istedgade 37A - 9000 Aalborg - telefon 9633 3500
37
Using the Redial Function
To send a fax to the last number dialed, press the Redial/Pause key to recall
the fax number.
1
Press the Redial/Pause key. Check that the desired fax number appears
in message window.
Specifiying Multiple Recipients
A fax can be sent to multiple recipients in a single transmission. There are
two methods for sending a fax to multiple recipients in a single transmission.
Using group dial function
Using Broadcast function
For details on specifying a recipient using group dialing, refer to “Using a
One-Touch Dial Key” on page 35.
For details on sending a broadcast fax transmission, refer to the following
section.
Sending a Fax to Multiple Recipients (Broadcast
Transmission)
The recipients can be specified by using the one-touch dial keys, the speed
dial numbers or group dialing, by selecting from the phone book, or by entering the fax number using the keypad.
"
"
1
2
38
With the transmission result report, you can check whether the fax
was sent to all recipients. For details on the transmission result report,
refer to “Checking the Transmission/Reception Result From the Message Window” and “About the Reports and Lists” on page 61.
Position the document to be faxed.
If necessary, change the “Resolution” setting.
"
3
A maximum of 125 recipients can be selected at one time. If recipients
are selected by using one-touch dial keys, a maximum of 9 recipients
can be specified. If recipients are selected by using speed dial numbers, a maximum of 100 recipients can be specified. A maximum of 16
recipients can be specified by entering the fax number using the keypad.
The document image quality can be adjusted by pressing the [Resolution] key. For details, refer to “Improving Resolution” on page 34.
Press the Function key.
Specifiying Multiple Recipients
EDNord - Istedgade 37A - 9000 Aalborg - telefon 9633 3500
4
5
Check that the BROADCAST screen appears, and then press the Menu
Select key.
Specify the fax number of the recipient. Repeat the appropriate operations
described below until all recipients have been specified.
– Direct dialing: Enter the fax number of the recipient directly using the
keypad. Press the Menu Select key, and then specify the next recipient.
– Using the one-touch dial keys (including group dialing): Press the
one-touch dial key programmed with the desired fax number. Press
the Menu Select key, and then specify the next recipient.
– Using the speed dial numbers: Press the Speed Dial key, and then
use the keypad to enter the 3-digit speed dial number programmed
with the desired fax number. Press the Menu Select key, and then
specify the next recipient.
– Using the phone book functions: Press the Speed Dial key twice, and
6
7
then select either “LIST” or “SEARCH” to select the desired fax number. (Refer to “Using the List Function of the Phone Book” on page
36.) Press the Menu Select key, and then specify the next recipient.
Press the Start key.
A message appears, allowing you to select whether or not to check the
recipients.
To check the recipients, press the Menu Select key.
The recipients specified in step 5 are displayed in the order that they were
selected.
"
8
9
10
If you do not want to check the recipients, skip to step 10.
Check the recipient, and then press the Menu Select key. The next recipient is displayed.
OR
Check the recipients, and then if you want to delete the displayed recipient, press the Cancel/C key.
After all recipients have been checked, “Fin.=START” appears in the message window.
Press the Start key to begin scanning and sending the fax.
"
"
To stop the transmission, press the Stop/Reset key. A message
appears, requesting confirmation to cancel the setting. Select “Yes”,
and then press the Menu Select key. If this is done, all selected recipients are cleared.
During transmission, the message “SET DOCUMENT.” appears; however, the document is sent to all specified recipients after being
scanned only once.
Specifiying Multiple Recipients
EDNord - Istedgade 37A - 9000 Aalborg - telefon 9633 3500
39
Sending a Fax at a Specified Time (Timer
Transmission)
A document can be scanned and stored in the memory to be sent at a specified time. This feature is convenient for sending faxes at discounted calling
times.
"
"
1
2
5
If necessary, change the “Resolution” setting.
Check that the TIMER TX screen appears, and then press the Menu
Select key.
Using the keypad, enter the desired transmission time, and then press the
Menu Select key.
If you want to correct the time, press the Cancel/C key, and then enter
the correct time.
Refer to “Specifying a Recipient” on page 34.
To send a fax to multiple recipients using broadcast transmission,
press the Function key, and then display the BROADCAST screen.
After all recipients have been entered, press the Start key to begin
scanning, and then the machine enters transmission standby mode.
For details on broadcast transmissions, refer to “Sending a Fax to
Multiple Recipients (Broadcast Transmission)” on page 38.
Press the Start key to begin scanning, and then the machine enters transmission standby mode.
"
40
The time is set in the 24-hour format.
Specify the fax number of the recipient.
"
"
7
The document image quality can be adjusted by pressing the [Resolution] key. For details, refer to “Improving Resolution” on page 34.
Press the Function key, then the , key.
"
"
6
Timer transmission can be combined with broadcast transmission.
Position the document to be faxed.
"
3
4
If the machine is not programmed with the current time, the fax cannot
be sent at the specified time. For details on specifying the time, refer
to “USER SETTING” on page 25.
If you want to cancel a timer transmission, select “CANCEL RESERV.”
from the FUNCTION menu. For details, refer to “Canceling (Deleting)
a Document Queued in Memory for Transmission” on page 42.
Sending a Fax at a Specified Time (Timer Transmission)
EDNord - Istedgade 37A - 9000 Aalborg - telefon 9633 3500
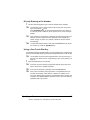
Sending a Fax Manually
Sending a Fax Manually After Using the Telephone
If the machine is connected to a telephone and the same line is used for both
phoning and faxing, the document can simply be sent after talking with the
recipient over the phone.
This is useful, for example, if you want to tell the recipient that you are sending a fax.
1
2
Load the document into the ADF.
If necessary, change the “Resolution” setting.
"
3
4
Pick up the telephone receiver and check that the dial tone can be heard.
Specify the fax number of the recipient by using the telephone to dial the
fax number.
OR
The fax number of the recipient can also specified using the keypad in the
control panel of this machine.
"
5
6
7
The document image quality can be adjusted by pressing the [Resolution] key. For details, refer to “Improving Resolution” on page 34.
If Pulse is selected as the telephone line type, press the
porarily change the line type to Tone.
key to tem-
After finishing talking on the phone, the recipient should press the necessary key to start receiving the fax.
Once the recipient’s fax machine is ready, a beep is sounded.
Press the Start key to begin scanning and sending the fax.
Replace the telephone receiver.
"
To stop the transmission, press the Stop/Reset key. A message
appears, requesting confirmation to cancel the setting. Select “Yes”,
and then press the Menu Select key.
Sending a Fax Manually Using the On Hook Key
1
2
Load the document into the ADF.
If necessary, change the “Resolution” setting.
"
3
The document image quality can be adjusted by pressing the [Resolution] key. For details, refer to “Improving Resolution” on page 34.
Press the On hook key.
Sending a Fax Manually
EDNord - Istedgade 37A - 9000 Aalborg - telefon 9633 3500
41
4
Specify the fax number of the recipient.
"
5
If Pulse is selected as the telephone line type, press the
porarily change the line type to Tone.
key to tem-
Press the Start key to begin scanning and sending the fax.
"
To stop the transmission, press the Stop/Reset key. A message
appears, requesting confirmation to cancel the setting. Select “Yes”,
and then press the Menu Select key.
Canceling (Deleting) a Document Queued in
Memory for Transmission
Of the documents stored in the memory and waiting to be sent, a specific
document can be selected and deleted.
1
2
Press the Function key, then the , key twice.
Check that the CANCEL RESERV. screen appears, and then press the
Menu Select key.
The details (specified transmission time and type of transmission) of the
jobs queued in the memory are displayed.
"
3
If no jobs have been queued in the memory, the message "NONE"
appears.
Using the + and , keys, select the job to be deleted.
"
The following types of job are displayed.
–
–
–
–
"
4
5
42
MEMORY: Normal transmission queued in the memory (fax)
B-CAST: Broadcast transmission (fax)
TIMER: Timer transmission (fax)
SCAN: Scan to email transmission
To check the recipient of the currently displayed transmission job,
press the ) key. After checking, press the Menu Select key to return
to the previous screen.
Press the Menu Select key to delete the displayed job.
To delete another queued job, repeat steps 2 and 4.
Canceling (Deleting) a Document Queued in Memory for
EDNord - Istedgade 37A - 9000 Aalborg - telefon 9633 3500
About the Fax Header
If transmission source information is set in Header setting to be printed, information such as the sender’s name, fax number, transmission date/time, session number and page number can be printed by the recipient.
The following items in the header.
Element
Description
Transmission date/time
Shows the date/time that the fax was sent. The
time is indicated in the 24-hour format.
Sender’s name
Shows the sender’s name.
Fax number
Shows the sender’s fax number.
Session number
Shows the session number used to manage the
sent fax.
Page number
Shows the page number.
Shown as page number/total number of pages.
"
"
For a transmission using the telephone or
the On hook key, the total number of pages
is not shown.
To print the fax header on the sent fax, specify the transmission
source information on the User Setting menu of the configuration
menu, and then use Header to select whether or not the transmission
source information is printed. For details, refer to “RX SETTING” on
page 21.
About the Fax Header
EDNord - Istedgade 37A - 9000 Aalborg - telefon 9633 3500
43
44
About the Fax Header
EDNord - Istedgade 37A - 9000 Aalborg - telefon 9633 3500
Receiving Faxes
EDNord - Istedgade 37A - 9000 Aalborg - telefon 9633 3500
Receiving Faxes Automatically
"
"
When the machine is turned off, faxes cannot be received. Therefore,
be sure to leave the machine turned on.
To print a received fax, change the paper type to PLAIN PAPER and
the paper size to A4, LEGAL, LETTER or OFICIO(Mexico only).
If the RX Mode parameter on the RX Setting menu is set to “Auto RX”, no
special operation is needed in order to receive the fax. Reception begins after
the specified number of rings.
"
"
"
If the RX Mode parameter on the RX Setting menu is set “Manual RX”,
the fax is not received automatically. For details, refer to “RX SETTING” on page 21.
If “Memory RX Mode” is set to “ON”, printing does not begin automatically after the fax is received. A received document is saved in the
memory and is printed at the time specified for “Memory RX Mode”. In
addition, if “Memory RX Mode” is set to “OFF”, the fax is printed. For
details on “Memory RX Mode” in the configuration menu, refer to “RX
SETTING” on page 21. For details on specifying the settings for
“Memory RX Mode”, refer to “Setting Up the Memory RX Mode” on
page 27.
This machine does not support polling reception.
Receiving Faxes Manually
"
"
When the machine is turned off, faxes cannot be received. Therefore,
be sure to leave the machine turned on.
To print a received fax, change the paper type to PLAIN PAPER and
the paper size to A4, LEGAL, LETTER or OFICIO(Mexico only).
If a telephone is connected to this machine and the same line is used for
phoning and faxing, the fax can be received after picking up the telephone
receiver.
1
After the telephone rings, pick up the receiver.
"
46
If the telephone receiver is not picked up, reception begins automatically, if the call is being received from a fax machine, after the number
of rings specified by “NO. of RINGS” on the RX SETTING menu. If the
call is being received from a telephone, the ringing will continue.
Receiving Faxes Automatically
EDNord - Istedgade 37A - 9000 Aalborg - telefon 9633 3500
"
"
2
If “RX MODE” on the RX SETTING menu is set to “Manual RX”, the
machine will continue ringing whether the call is being received from a
fax machine or a telephone.
If no telephone is connected to this machine, press the On hook key.
Press the Start key.
The machine starts receiving the fax.
"
"
3
After completing the telephone conversation, press the Start key to
begin receiving the fax.
If the telephone receiver is picked up and the call is being received
from a fax machine, press the Start key to begin receiving the fax.
Replace the telephone receiver.
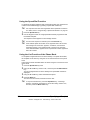
Printing Received Faxes
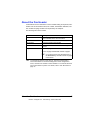
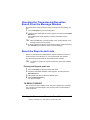
What Is the Guaranteed Imageable (Printable) Area?
The printable area on all media
sizes is up to 4 mm (0.157") from
the edges of the media.
"
a
a
a
The printable area of
received faxes differs
depending on the sender’s
scanning area.
Printable
Area
a
a=4 mm (0.157")
Printing Received Faxes
EDNord - Istedgade 37A - 9000 Aalborg - telefon 9633 3500
47
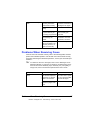
Adding the Sender’s Information When Printing Faxes
If “Footer” in the configuration menu is set to “ON”, information such as the
sender’s fax number, reception date/time, session number and page number
can be printed 4 mm (0.157") from the bottom edge of the fax that is received
and printed.
The following items in the footer.
Item
Description
This machine’s fax num- Shows the fax number specified for this machine
ber
from the User Setting menu in the configuration
menu.
Reception date/time
Shows the date/time that the fax was received.
The time is indicated in the 24-hour format.
Sender’s fax number
Shows the sender’s fax number.
Session number
Shows the session number used to manage the
received fax.
Page number
Shows the page number.
"
48
In order to print the footer, the Footer parameter on the RX Setting
menu of the configuration menu must be set “ON”. For details, refer to
“RX SETTING” on page 21.
Printing Received Faxes
EDNord - Istedgade 37A - 9000 Aalborg - telefon 9633 3500
Registering
Recipients
EDNord - Istedgade 37A - 9000 Aalborg - telefon 9633 3500
About the FAX REGISTRATION Function
Frequently used fax numbers can be registered with the FAX REGISTRATION function so that the fax number can be easily accessed. In addition, this
reduces input errors.
The following registration methods are available:
One-touch dial: Register fax numbers with one-touch dial keys. Press a
one-touch dial key to recall them. For details on specifying settings, refer
to “One-Touch Dialing” on page 50.
Speed dial: Register fax numbers with speed dial numbers, and then
press a keypad to recall them. For details on specifying settings, refer to
“Speed Dialing” on page 53.
Group dial: Multiple recipients can be grouped and registered with a
one-touch dial key. Press the one-touch dial key to recall the group. For
details on specifying settings, refer to “Group Dialing” on page 55.
"
If a recipient is registered with a one-touch dial key or a speed dial
number, the recipient can be searched for by using the phone book
functions. For details on using the phone book functions, refer to
“Using the List Function of the Phone Book” on page 36 and “Using
the Search Function of the Phone Book” on page 37.
One-Touch Dialing
Programming a One-Touch Dial Key
Register frequently used fax numbers with one-touch dial keys (maximum 9).
When sending a fax, press a one-touch dial key to recall them.
"
1
2
3
50
To register multiple recipients with a one-touch dial key, program it as
a group dial. For details on programming group dialing, refer to “Group
Dialing” on page 55.
Press the Menu Select key, then the , key three times.
Check that the FAX REGISTRATION screen appears, and then press the
Menu Select key.
Check that the ONE-TOUCH DIAL screen appears, and then press the
Menu Select key.
About the FAX REGISTRATION Function
EDNord - Istedgade 37A - 9000 Aalborg - telefon 9633 3500
4
Press the one-touch dial key that you want to program.
"
5
Enter the name of the one-touch dial to be programmed, and then press
the Menu Select key.
"
"
"
6
Text up to 20 characters long can be entered for the name.
For details on entering/editing text and the characters that can be
entered, refer to “Entering Text” on page 73.
To cancel programming, press the Cancel/C key. (To cancel programming while the name is being entered, press the Menu Select key,
and then press the Cancel/C key.)
Using the keypad, enter the fax number of the recipient, and then press
the Menu Select key.
"
"
"
7
If the one-touch dial key that is pressed is already registered with a
recipient, the message “REGISTERED!” appears. Press the Menu
Select key, and then press a one-touch dial key with no recipient registered.
The fax number can contain a maximum of 50 characters.
For details on entering/editing numbers, refer to “Entering Text” on
page 73.
To cancel programming, press the Cancel/C key. (To cancel programming while the number is being entered, press the Menu Select key,
and then press the Cancel/C key.)
Select the modem speed, and then press the Menu/Select key.
The entered information is programmed with the one-touch dial key, and
the message “SELECT REGIST.KEY” appears.
"
8
If a transmission error occurs, select 14.4 or 9.6 for the modem speed.
To program another one-touch dial key, press the one-touch dial key, and
then repeat the procedure starting from step 5.
OR
To finish the procedure and return to the Fax mode screen, continue
pressing the Cancel/C key until the Fax mode screen is displayed.
One-Touch Dialing
EDNord - Istedgade 37A - 9000 Aalborg - telefon 9633 3500
51
Changing/Deleting One-Touch Dial Information
The registered one-touch dial information can be corrected.
1
2
3
4
5
Press the Menu Select key, then the , key three times.
Check that the FAX REGISTRATION screen appears, and then press the
Menu Select key.
Check that the ONE-TOUCH DIAL screen appears, and then press the
Menu Select key.
Press the one-touch dial key that you want to change or delete.
Press the Cancel/C key.
"
"
6
To change group dialing, refer to “Changing/Deleting Group Dialing
Information” on page 56.
Using the * and ) keys, select either “EDIT” or “DELETE”, and then
press the Menu Select key.
"
"
"
7
If a one-touch dial key programmed with a group of fax numbers is
pressed, the message “GROUP” appears in the upper-right corner of
the screen. To delete the group, press the Cancel/C Key.
If “EDIT” was selected, the name is displayed. (Continue with step 7.)
If “DELETE” was selected, the settings programmed for the one-touch
dial key are deleted and the message “SELECT REGIST.KEY”
appears again.
If a one-touch dial number used in group dialing is deleted, it is also
deleted from the corresponding group dialing.
Change the name, fax number, modem speed as desired.
"
"
For details on changing the name, refer to “Entering Text” on page 73.
If you try to change the settings for a one-touch dial number used in
group dialing, a confirmation message appears, asking whether or not
to keep the changed one-touch dial number in the group dialing.
If the Menu Select key is pressed, the corresponding one-touch dial
number programmed in group dialing is kept.
8
52
If the Cancel/C key is pressed, the corresponding one-touch dial number programmed in group dialing is deleted.
When you are finished making changes, press the Menu Select key.
The message “SELECT REGIST. KEY” appears.
One-Touch Dialing
EDNord - Istedgade 37A - 9000 Aalborg - telefon 9633 3500
9
To change other one-touch dial information, press the one-touch dial key,
and then repeat the procedure starting from step 5.
OR
To finish the procedure and return to the Fax mode screen, continue
pressing the Cancel/C key until the Fax mode screen is displayed.
Speed Dialing
Programming a Speed Dial Number
Register frequently used fax numbers with speed dial numbers (maximum
100). Enter the speed dial number when sending a fax to recall the fax number.
1
2
3
4
Press the Menu Select key, then the , key three times.
Check that the FAX REGISTRATION screen appears, then press the
Menu Select key, and then press , key.
Check that the SPEED DIAL screen appears, and then press the Menu
Select key.
Using the keypad, enter the 3-digit speed dial number (ex. 011) that you
want to program.
"
5
If the speed dial number that is entered is already registered with a
recipient, the message “REGISTERED!” appears. Press the Menu
Select key, and then press a speed dial number with no recipient registered.
Enter the name of the speed dial to be programmed, and then press the
Menu Select key.
"
"
"
Text up to 20 characters long can be entered for the name.
For details on entering/editing text and the characters that can be
entered, refer to “Entering Text” on page 73.
To cancel programming, press the Cancel/C key. (To cancel programming while the name is being entered, press the Menu Select key,
and then press the Cancel/C key.)
Speed Dialing
EDNord - Istedgade 37A - 9000 Aalborg - telefon 9633 3500
53
6
Using the keypad, enter the fax number of the recipient and then press
the Menu Select key.
"
"
"
7
The fax number can contain a maximum of 50 characters.
For details on entering/editing numbers, refer to “Entering Text” on
page 73.
To cancel programming, press the Cancel/C key. (To cancel programming while the number is being entered, press the Menu Select key,
and then press the Cancel/C key.)
Select the modem speed, and then press the Menu/Select key.
The entered information is registered with the speed dial number, and
then the speed dial input screen appears.
"
8
If a transmission error occurs, select 14.4 or 9.6 for the modem speed.
To program another speed dial number, enter the speed dial number, and
then repeat the procedure starting from step 5.
OR
To finish the procedure and return to the Fax mode screen, continue
pressing the Cancel/C key until the Fax mode screen is displayed.
Changing/Deleting Speed Dial Information
The registered speed dial information can be corrected.
1
2
3
4
5
6
Press the Menu Select key, then the , key three times.
Check that the FAX REGISTRATION screen appears, then press the
Menu Select key, and then press the , key.
Check that the SPEED DIAL screen appears, and then press the Menu
Select key.
Using the keypad, enter the speed dial number that you want to change or
delete.
Press the Cancel /C key.
Using the * and ) keys, select either “EDIT” or “DELETE”, and then
press the Menu Select key.
"
"
"
54
If “EDIT” was selected, the name is displayed. (Continue with step 7.)
If “DELETE” was selected, the settings programmed for the speed dial
number are deleted and the speed dial input screen appears again.
If a speed dial number used in group dialing is deleted, it is also
deleted from the corresponding group dialing.
Speed Dialing
EDNord - Istedgade 37A - 9000 Aalborg - telefon 9633 3500
7
Change the name, fax number, modem speed as desired.
"
If you try to change the settings for a speed dial number used in group
dialing, a confirmation message appears, asking whether or not to
keep the changed speed dial number in the group dialing.
If the Menu Select key is pressed, the corresponding speed dial number programmed in group dialing is kept.
If the Cancel/C key is pressed, the corresponding speed dial number
programmed in group dialing is deleted.
"
8
9
For details on editing text, refer to “Entering Text” on page 73.
When you are finished making changes, press the Menu Select key.
The speed dial input screen appears.
To change another speed dial number, enter the speed dial number, and
then repeat the procedure starting from step 5.
OR
To finish the procedure and return to the Fax mode screen, continue
pressing the Cancel/C key until the Fax mode screen is displayed.
Group Dialing
Programming Group Dialing
Register multiple frequently used fax numbers (maximum 50) together with
one-touch dial keys and speed dial numbers. Press a one-touch dial key
when sending a fax to recall them.
1
2
3
4
Press the Menu Select key, then the , key three times.
Check that the FAX REGISTRATION screen appears, then press the
Menu Select key, and then press the , key twice.
Check that the GROUP DIAL screen appears, and then press the Menu
Select key.
Press the one-touch dial key that you want to program.
"
If the one-touch dial key that is pressed is already registered with a
recipient, the message “REGISTERED!” appears. Press the Menu
Select key, and then press a one-touch dial key with no recipient registered.
Group Dialing
EDNord - Istedgade 37A - 9000 Aalborg - telefon 9633 3500
55
5
Enter the name of the group, and then press the Menu Select key.
"
"
"
6
"
"
9
To cancel programming, press the Cancel/C key. (To cancel programming while the name is being entered, press the Menu Select key,
and then press the Cancel/C key.)
To specify a speed dial number, press the Speed Dial key, and then
enter the three-digit speed dial number.
If you want to cancel the current selection, press the Cancel/C key,
and then specify the correct recipient.
Press the Menu Select key, and then specify another recipient.
"
"
8
For details on entering/editing text and the characters that can be
entered, refer to “Entering Text” on page 73.
By using the one-touch dial keys or the speed dial numbers, specify the
recipients.
"
7
Text up to 20 characters long can be entered for the name.
Repeat steps 6 and 7 until all recipients have been specified.
A one-touch dial key programmed with a group can be specified as a
recipient when programming a one-touch dial key for group dialing. In
that case, all fax numbers programmed in the specified one-touch dial
key (group dial key) are added.
To cancel programming, press the Cancel/C until the message “FAX
REGISTRATION?” is displayed.
When you are finished specifying recipients, press the Start key.
The entered information is programmed with the one-touch dial key, and
the message “SELECT REGIST.KEY” appears.
To program other group dialing, press the one-touch dial key, and then
repeat the procedure starting from step 5.
OR
To finish the procedure and return to the Fax mode screen, continue
pressing the Cancel/C key until the Fax mode screen is displayed.
Changing/Deleting Group Dialing Information
The registered group dialing information can be corrected.
1
2
56
Press the Menu Select key, then the , key three times.
Check that the FAX REGISTRATION screen appears, then press the
Menu Select key, and then press the , key twice.
Group Dialing
EDNord - Istedgade 37A - 9000 Aalborg - telefon 9633 3500
3
4
5
6
Check that the GROUP DIAL screen appears, and then press the Menu
Select key.
Press the one-touch dial key that you want to change or delete.
Press the Cancel/C key.
Using the * and ) keys, select either “EDIT” or “DELETE”, and then
press the Menu Select key.
"
"
7
9
10
If “DELETE” was selected, the group dialing settings are deleted and
the message “SELECT REGIST.KEY” appears again.
If you want to change the name of the group, enter the new name, and
then press the Menu Select key.
"
8
If “EDIT” was selected, the group name is displayed. (Continue with
step 7.)
For details on editing text, refer to “Entering Text” on page 73.
To delete the displayed recipient, press the Cancel/C key.
OR
To keep the displayed recipient, press the Menu Select key.
When you are finished making changes, press the Start key.
The entered information is programmed with the one-touch dial key, and
the message “SELECT REGIST.KEY” appears.
To change other group dialing, press the one-touch dial key, and then
repeat the procedure starting from step 5.
OR
To finish the procedure and return to the Fax mode screen, continue
pressing the Cancel/C key until the Fax mode screen is displayed.
Group Dialing
EDNord - Istedgade 37A - 9000 Aalborg - telefon 9633 3500
57
58
Group Dialing
EDNord - Istedgade 37A - 9000 Aalborg - telefon 9633 3500
Confirmation
Mode
EDNord - Istedgade 37A - 9000 Aalborg - telefon 9633 3500
About the Machine’s Counters
The number of operations performed since this machine was installed can be
checked using the functions available when the Display key is pressed.
The following procedure describes how to check the fax/scanner-related
counters.
Checking the Counter for Fax Printing
This counter shows the total number of fax prints made since this machine
was installed.
1
2
3
4
Press the Display key, then the , key.
Check that the TOTAL PAGE screen appears, and then press the Menu
Select key.
Press the , key four times.
The FAX PRINT screen appears so that the counter can be checked.
Press the Menu Select key.
The TOTAL PAGE screen appears.
"
To return to the Fax mode screen, press the Cancel/C key.
Checking the Counter for Total Scans
This counter shows the total number of scans made, excluding copies, since
this machine was installed.
1
2
3
4
Press the Display key, then the , key.
Check that the TOTAL PAGE screen appears, and then press the Menu
Select key.
Press the , key five times.
The TOTAL SCAN screen appears so that the counter can be checked.
Press the Menu Select key.
The TOTAL PAGE screen appears.
"
60
To return to the Fax mode screen, press the Cancel/C key.
About the Machine’s Counters
EDNord - Istedgade 37A - 9000 Aalborg - telefon 9633 3500
Checking the Transmission/Reception
Result From the Message Window
The transmission result information can be checked from the message window.
1
2
Press the Display key, then the , key twice.
Check that the TX/RX RESULT screen appears, and then press the Menu
Select key.
The TX/RX Result screen appears so that the information can be
checked.
"
3
When the Start key is pressed, details of the report displayed on the
message window can be printed.
To finish checking and return to the Fax mode screen, continue pressing
the Cancel/C key until the Fax mode screen is displayed.
About the Reports and Lists
Reports on the status of fax transmissions and fax receptions and the contents of the one-touch dial keys, etc. can be printed with this machine.
The following reports and lists can be printed with this machine.
"
For details on printing the reports and the lists, refer to the following
section.
Printing the Reports and Lists
1
2
3
4
Press the Display key, then the , key three times.
Check that the PRINT REPORT screen appears, and then press the
Menu Select key.
Using the + and , keys, select the desired report.
Press the Menu Select key.
The report is printed.
TX RESULT REPORT
The document number, recipient name, date sent, starting time of transmission, number of document pages, time required, mode, and transmission
result are printed.
Checking the Transmission/Reception Result From the
EDNord - Istedgade 37A - 9000 Aalborg - telefon 9633 3500
61
"
The machine can also be set to print this report with each transmission, only when an error occurs, or not at all. For details, refer to
“REPORTING” on page 24.
SESSION
FUNCTION
NO.
DESTINATION
STATION
DATE
TIME
PAGE
DURATION
MODE
0001
TX
001
AAA NEWYORK
012345678
APR.19
18:00
010
00h02min21s G3
RESULT
NG
NG PAGE:1,3,5,7
RX RESULT REPORT
The document number, date received, starting time of reception, number of
pages received, time required, mode, and reception result are printed.
"
The machine can also be set to print this report with each reception,
only when an error occurs, or not at all. For details, refer to “REPORTING” on page 24.
SESSION
FUNCTION
NO.
0001
RX
001
DESTINATION
STATION
DATE
TIME
PAGE
DURATION
MODE
APR.19
18:00
001
00h02min21s ECM
RESULT
NG
098765432
0014:ERROR DURING RX
ACTIVITY REPORT
The operation number, document number, date of operation, starting time of
transmission/reception, type of operation (transmission or reception), recipient name, number of pages sent/received, mode, and transmission/reception
result are printed.
"
The machine can also be set to print this report automatically after
every 60 transmissions/receptions. For details, refer to “REPORTING”
on page 24.
NO.
SESSION
DATE
TIME
TX/RX
DESTINATION
STATION
PAGE
DURATION
MODE
01
0001
APR.19
16:32
TX---
AAA NEWYORK
012345678
006
00h01min16s ECM
OK
02
0002
APR.19
18:00
---RX
001
00h02min21s ECM
NG
0034
012
00h02min48s ECM
OK
001
00h00min56s ECM
OK
098765432
03
0003
APR.19
18:00
---RX
RESULT
098765432
04
62
0004
APR.19
19:12
TX---
HEAD OFFICE
024682468
About the Reports and Lists
EDNord - Istedgade 37A - 9000 Aalborg - telefon 9633 3500
MEMORY DATA LIST
This is a list of documents waiting to be sent, and documents specified for
timer transmission.
The document number, type of operation being performed, time, recipient
name, and number of document pages are printed.
SESSION
FUNCTION
TIME
NO.
DESTINATION STATION
PAGE
0001
TX
18:00
001
OT-01 AAA NEWYORK
012345678
012
MEMORY IMAGE PRINT
A reduced image of the first page of the document waiting to be sent in addition to the document number, type of operation being performed, recipient
name, date, time, and number of document pages are printed.
ONE TOUCH LIST
The recipients programmed in the one-touch dial keys are printed in numerical order of the keys.
OT-NO.
DESTINATION STATION
DESTINATION NUMBER
SPEED
SET DATE
OT-01
OT-02
AAA NEWYORK
012345678
33.6
JAN.20.2006
AAA TOKYO
098765432
33.6
JAN.20.2006
OT-03
HEAD OFFICE
024682468
33.6
FEB.12.2006
OT-04
NJ OFFICE
0P02345678
12.8
FEB.12.2006
SPEED DIAL LIST
The recipients programmed for the speed dial numbers are printed in numerical order.
SP-NO.
DESTINATION STATION
DESTINATION NUMBER
SPEED
SP-001
AMSTERDAM OFFICE
0P09876543
33.6
JAN.20.2006
SP-002
KOREA OFFICE
0P01357913
33.6
JAN.20.2006
SP-003
ABCDEF
024682468
33.6
FEB.12.2006
SP-004
POST OFFICE
0224466880
12.8
FEB.12.2006
About the Reports and Lists
EDNord - Istedgade 37A - 9000 Aalborg - telefon 9633 3500
SET DATE
63
GROUP DIAL LIST
The group dialing settings specified for one-touch dial keys are printed in
numerical order of the keys.
KEY-NO.
NAME
NO.
DESTINATION STATION
OT-01
GROUP-01
01
OT-02 AAA TOKYO
098765432
02
OT-04 NJ OFFICE
0P02345678
03
SP-001 AMSTERDAM OFFICE
0P09876543
64
About the Reports and Lists
EDNord - Istedgade 37A - 9000 Aalborg - telefon 9633 3500
Troubleshooting
EDNord - Istedgade 37A - 9000 Aalborg - telefon 9633 3500
Problems When Sending Faxes
If the fax cannot be sent correctly, refer to the following table, and then perform the indicated operation. If the fax still cannot be sent correctly, even after
performing the described operations, contact your technical representative.
"
For details on the error messages, refer to “Error Messages on the
Message Window” on page 69. For details on troubleshooting procedures for document misfeeds, paper misfeeds, poor print quality, or
empty consumables, refer to the Printer/Copier/Scanner User’s Guide.
Symptom
Cause
Solution
The document is not
scanned.
The document is too
thick, too thin or too
small.
Use the original glass to
send the fax.
The document is
scanned at an angle.
The document guides
are not adjusted to the
width of the document.
Slide the document
guides to fit the width of
the document.
The fax received by the The document is incorrecipient is blurry.
rectly positioned.
The original glass is
dirty.
Position the document
correctly.
Clean the original glass.
The text in the document Adjust the resolution
is written too faint.
There may be a problem Check the telephone
with the telephone con- line, and then try sendnection.
ing the fax again.
There may be a problem Make a copy to check
with the recipient’s fax that this machine is
machine.
operating correctly, and
then, if the copy was
printed correctly, have
the recipient check the
condition of their fax
machine.
The fax received by the
recipient is blank.
66
The document was sent Load the document to be
with the front side facing faxed facing up.
down (when the ADF is
used).
Problems When Sending Faxes
EDNord - Istedgade 37A - 9000 Aalborg - telefon 9633 3500
Transmission is not pos- The transmission proce- Check the transmission
sible.
dure may have been
procedure, and then try
sending the fax again.
performed incorrectly.
The fax number may be Check the fax number.
wrong.
The one-touch dial key Check that the keys
or speed dial may be
were correctly proincorrectly programmed. grammed.
The telephone line may Check the telephone line
be incorrectly conconnection. If it is disnected.
connected, connect it.
There may be a problem Contact the recipient.
with the recipient’s fax
machine (such as, no
paper or turned off).
Problems When Receiving Faxes
If the fax cannot be received correctly, refer to the following table, and then
perform the indicated operation. If the fax still cannot be received correctly,
even after performing the described operations, contact your technical representative.
"
For details on the error messages, refer to “Error Messages on the
Message Window” on page 69. For details on troubleshooting procedures for document misfeeds, paper misfeeds, poor print quality, or
empty toner, refer to the Printer/Copier/Scanner User’s Guide.
Symptom
Cause
Solution
The received fax is
blank.
There may be a problem with the telephone
connection or with the
caller’s fax machine.
Check that the machine
can make clean copies.
If it can, have the caller
send the fax again.
The caller may have
Contact the caller.
loaded the pages backward.
Problems When Receiving Faxes
EDNord - Istedgade 37A - 9000 Aalborg - telefon 9633 3500
67
Faxes cannot be
received automatically.
The machine is set to
Set the machine to autoreceive faxes manually. matic reception.
The memory is full.
Load paper if it is empty,
and then print the faxes
stored in the memory.
The telephone line is
incorrectly connected.
Check the telephone line
connection. If it is disconnected, connect it.
There may be a problem Make a copy to check
with the caller’s fax
that this machine is
machine.
operating correctly, and
then, if the copy was
printed correctly, have
the recipient check the
condition of their fax
machine.
68
Problems When Receiving Faxes
EDNord - Istedgade 37A - 9000 Aalborg - telefon 9633 3500
Error Messages on the Message Window
Error message
Cause
LINE PROBLEM
(Flashing alternately)
CHECK LINE
The telephone dialing Check the telephone dialing
system or telephone
system or telephone wiring
wiring system is not
system and use the appropriset correctly.
ate configuration menu to
make the correct settings.
The telephone cable
is not attached cor Correctly connect the telerectly.
phone cable.
Solution
*COMM.ERROR*
(####)
Communication is not Check the transmission results.
possible because of
some problem in the
machine.
Communication is not
possible because of a
problem with the
recipient/caller’s fax
machine.
*REDIAL ALL FAILED* All redial attempts failed Check the condition of the recipibecause either the recip- ent’s line, and then try sending
the fax again.
ient’s line is busy or
there was no answer.
*MEM.FULL/TX CAN- While sending a fax, the
CEL*
size of the data for the
scanned image has
exceeded the capacity of
the memory.
Retrieve all received faxes stored
in the memory.
Send the fax by direct transmission.
To print an error report, press the
Cancel/C key while an error
message is displayed.
*MEM.FULL/RX CAN- While receiving a fax,
CEL*
the size of the data for
the scanned image has
exceeded the capacity of
the memory.
HANG UP THE
PHONE
Retrieve all received faxes stored
in the memory.
To print an error report, press the
Cancel/C key while an error
message is displayed.
The receiver of the con- Replace the receiver of the connected telephone on the hook.
nected telephone is
lifted.
Error Messages on the Message Window
EDNord - Istedgade 37A - 9000 Aalborg - telefon 9633 3500
69
Error message
Cause
Solution
TEXT ×1.00
1
ä[A]ü #XXX Warn Fax
A fax error occurred
Press the Fax key to check the
while an operation was error condition, and take approbeing performed in Copy priate measures.
mode.
TEXT ×1.00
1 A fax transmission error Press the Fax key to check the
ä[A]ü #XXX Comm. Err occurred while an opera- error condition, and take approtion was being perpriate measures.
formed in Copy mode.
*PLEASE WAIT!*
ADMINISTERED BY
PC
70
This machine is access- Log off from PageScope Web
ing LSU or the Admin.
Connection.
Mode of PageScope
Exit LSU.
Web Connection.
If no operation is performed for
600 seconds, the main screen
appears.
Error Messages on the Message Window
EDNord - Istedgade 37A - 9000 Aalborg - telefon 9633 3500
Appendix
A
EDNord - Istedgade 37A - 9000 Aalborg - telefon 9633 3500
Technical Specifications
Compatible lines
PSTN (Public Switched Telephone Network),
PBX (Private Branch eXchange)
Compatibility
ECM/Super G3
Modem speed
33600, 31200, 28800, 26400, 24000, 21600,
19200, 16800, 14400, 12000, 9600, 7200,
4800, 2400 (bps)
Fax transmission speed
3 sec/page (at V.34)
Coding method
MH, MR, MMR, JBIG
Memory for receiving
4 MB (approx. 250 pages)
Original
ADF
Maximum size: Legalw
Width: 140 to 216 mm
Length: 148 to 500 mm (500 mm: Tx only)
Original Glass
Maximum size: Legalw
Paper size
Maximum Legalw
Edge erase
4 mm (top, bottom, left, right)
Scanning density
Main scanning direction: 8 dots
Sub-scanning direction: 3.85 dots (STD)
7.7 dots (FINE)
15.4 dots (S-Fine)
"
72
For details on other specifications, refer to the Printer/Copier/Scanner
User’s Guide.
Technical Specifications
EDNord - Istedgade 37A - 9000 Aalborg - telefon 9633 3500
Entering Text
When specifying the user name or programming the recipient name with
one-touch dial keys, letters, accented characters, numbers and symbols can
be entered.
Key Operation
Use the keypad to enter numbers, letters, and symbols.
List of characters available with each key of the keypad
Entering Fax Numbers
Keypad
Available
characters
Available characters
[1]
[1]
[A]
1
1
1
-1
2
2
2
2
3
3
3
3
4
4
4
4
5
5
5
5
6
6
6
6
7
7
7
7
8
8
8
8
9
9
9
9
0
0
(space)0
Key
0
(Registration of USER FAX NO.) *
*
#
#
+
* To display your fax number, select USER FAX NO. in the USER SETTING
menu.
Entering Text
EDNord - Istedgade 37A - 9000 Aalborg - telefon 9633 3500
73
Entering Names
Keypad
Available characters
Key
[1]
[A]
1
1
.,'?¿!¡"1-()@/:;_
2
2
ABC2abcÆÇàáâãäåæç
3
3
DEF3defÐèéêëð
4
4
GHI4ghiìíîï
5
5
JKL5jkl€£¢
6
6
MNO6mnoØŒñòóôõöøœº
7
7
PQRS7pqrsß$
8
8
TUV8tuvùúûü
9
9
WXYZ9wxyzÞýþ
0
0
(space)0
#
#
*+×÷=#%&<>[]{}\|µ^˜`~
Entering Email Addresses
74
Keypad
Available characters
Key
[1]
1
1
.@_-1
2
2
ABC2abc
3
3
DEF3def
4
4
GHI4ghi
5
5
JKL5jkl
6
6
MNO6mno
7
7
PQRS7pqrs
8
8
TUV8tuv
9
9
WXYZ9wxyz
0
0
(space)0
#
#
+&/*=!?()%[]^`´{}|~$
[A]
Entering Text
EDNord - Istedgade 37A - 9000 Aalborg - telefon 9633 3500
Changing Input Mode
Each press of the
ters.
key switches the input mode between numbers and let-
[1]: Numbers can be typed in.
[A]: Letters can be typed in.
Inputting Example
The procedure for entering text is described below, using “NJ Office” as an
example.
1
2
3
4
5
6
7
8
9
10
11
Press the
key to change the input mode so that letters can be entered.
Press the 6 key twice.
“N” is entered.
Press the 5 key once.
“J” is entered.
Press the 0 key once.
A space is entered.
Press the 6 key three times.
“O” is entered.
Press the 3 key seven times.
“f” is entered.
Press the ) key.
The cursor moves to the right.
Press the 3 key seven times.
“f” is entered.
Press the 4 key seven times.
“i” is entered.
Press the 2 key seven times.
“c” is entered.
Press the 3 key six times.
“e” is entered.
Entering Text
EDNord - Istedgade 37A - 9000 Aalborg - telefon 9633 3500
75
Correcting Text And Input Precautions
To erase all entered text, hold down the Cancel/C key.
To delete only part of the entered text, use the * and ) keys to move the
cursor (_) to the character that you want to delete, and then press the
Cancel/C key.
If multiple characters are assigned to a single key, “OK=)” appears at the
bottom of the screen.
If the same key is to be used to enter two characters in a row, press the )
key after selecting the first character. (Refer to the above inputting example.)
To enter a space, press the 0 key.
76
Entering Text
EDNord - Istedgade 37A - 9000 Aalborg - telefon 9633 3500
Index
A
E
ADF 2
Entering text 73
Correcting text 76
Input mode 75
Input precautions 76
Error messages 69
C
Canceling
Memory 42
Confirm 59
Control panel 2, 6
Counter
Total scans 60
Counters 60
Fax printing 60
D
Deleting
Memory 42
Dialing, direct 35
F
Fax mode screen 10
Footer 48
G
Group dial
Changing/Deleting 56
Programming 55
H
Header 43
Index
77
EDNord - Istedgade 37A - 9000 Aalborg - telefon 9633 3500
I
Imageable area 47
Input mode 75
Changing/Deleting 52
Programming 50
Specifying a recipient 35
P
K
Parts 2
Phone book
List 36
Search 37
Printable area 47
Key operation 73
Keypad 6
L
Lists 61
GROUP DIAL LIST 64
MEMORY DATA LIST 63
ONE TOUCH LIST 63
Printing 61
SPEED DIAL LIST 63
M
Manual
Reception 46
Transmission 41
Memory
Cancel/delete 42
Queue 42
Memory reception 27
Memory RX mode 27
Setting up 27
Turning off 28
Menu
COMM. SETTING 23
FAX REGISTRATION 19
MACHINE SETTING 18
Overview 12
REPORTING 24
RX SETTING 21
Specifying Settings 26
TX SETTING 20
USER SETTING 25
Multiple recipients
Broadcast 38
Group dial 35
O
One-touch dial key 6
R
Receiving faxes
Automatic reception 46
Manual reception 46
Memory reception 27
Printing 47
Reception result 61, 62
Recipients
Multiple recipients 38
Registering 49
Redial 38
Registering recipients 49
Group dial 55
One-touch dial 50
Speed dial 53
Reports 61
ACTIVITY REPORT 62
MEMORY IMAGE PRINT 63
Printing 61
RX RESULT REPORT 62
TX RESULT REPORT 61
Resolution
Improving fax resolution 34
S
Sending faxes
Basic fax operation 30
Manual transmission 41
Redial 38
Timer 40
Specifications 72
Specifying a recipient
Direct dialing 35
78
Index
EDNord - Istedgade 37A - 9000 Aalborg - telefon 9633 3500
One-touch dial key 35
Speed dial 36
Specifying recipient 34
List 36
Phone book 36, 37
Search 37
Speed dial
Changing/deleting 54
Programming 53
Specifying recipient 36
T
Timer transmission 40
Transmission result 61
Troubleshooting 65
Receiving faxes 67
Sending faxes 66
Index
79
EDNord - Istedgade 37A - 9000 Aalborg - telefon 9633 3500
80
Index
EDNord - Istedgade 37A - 9000 Aalborg - telefon 9633 3500