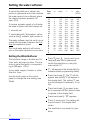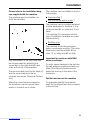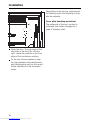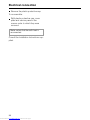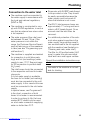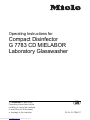
1
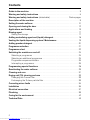
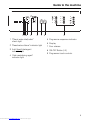
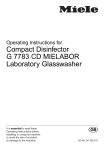
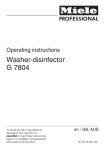
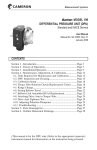
Operating Instructions for
Compact Disinfector
G 7783 CD MIELABOR
Laboratory Glasswasher
It is essential to read these
Operating Instructions before
installing or using the machine,
to avoid the risk of accident,
or damage to the machine.
Downloaded from www.Manualslib.com manuals search engine
Q
M.-Nr. 04 195 811
Contents
Contents
Guide to the machine. . . . . . . . . . . . . . . . . . . . . . . . . . . . . . . . . . . . . . . . . . . . . . . 3
Warning and safety instructions. . . . . . . . . . . . . . . . . . . . . . . . . . . . . . . . . . . . . . 5
Warning and safety instructions (detachable) . . . . . . . . . . . . . . . . . Centre pages
Description of the machine . . . . . . . . . . . . . . . . . . . . . . . . . . . . . . . . . . . . . . . . . . 9
Setting the water softener . . . . . . . . . . . . . . . . . . . . . . . . . . . . . . . . . . . . . . . . . . 10
Opening and closing the door . . . . . . . . . . . . . . . . . . . . . . . . . . . . . . . . . . . . . . 12
Applications and loading. . . . . . . . . . . . . . . . . . . . . . . . . . . . . . . . . . . . . . . . . . . 13
Rinsing agent . . . . . . . . . . . . . . . . . . . . . . . . . . . . . . . . . . . . . . . . . . . . . . . . . . . . 17
Setting the dosage . . . . . . . . . . . . . . . . . . . . . . . . . . . . . . . . . . . . . . . . . . . . . . 17
Adding neutralising agent and (liquid) detergent . . . . . . . . . . . . . . . . . . . . . . . 18
Venting the liquid dispensing system / Maintenance . . . . . . . . . . . . . . . . . . . . 19
Adding powder detergent . . . . . . . . . . . . . . . . . . . . . . . . . . . . . . . . . . . . . . . . . . 20
Programme selection. . . . . . . . . . . . . . . . . . . . . . . . . . . . . . . . . . . . . . . . . . . . . . 21
Programme chart . . . . . . . . . . . . . . . . . . . . . . . . . . . . . . . . . . . . . . . . . . . . . . . . . 22
Switching the machine on and off . . . . . . . . . . . . . . . . . . . . . . . . . . . . . . . . . . . 24
Selecting a programme . . . . . . . . . . . . . . . . . . . . . . . . . . . . . . . . . . . . . . . . . . 24
Selecting an additional programme . . . . . . . . . . . . . . . . . . . . . . . . . . . . . . . . . 24
Programme sequence indicator . . . . . . . . . . . . . . . . . . . . . . . . . . . . . . . . . . . . 26
Interrupting a programme. . . . . . . . . . . . . . . . . . . . . . . . . . . . . . . . . . . . . . . . . 26
Programming special functions . . . . . . . . . . . . . . . . . . . . . . . . . . . . . . . . . . . . . 28
Reactivating the water softener . . . . . . . . . . . . . . . . . . . . . . . . . . . . . . . . . . . . . 29
Cleaning and care . . . . . . . . . . . . . . . . . . . . . . . . . . . . . . . . . . . . . . . . . . . . . . . . 31
Drying unit (TA) cleaning and care . . . . . . . . . . . . . . . . . . . . . . . . . . . . . . . . . . . 33
Changing the Coarse Filter . . . . . . . . . . . . . . . . . . . . . . . . . . . . . . . . . . . . . . . . 33
Exchanging the S-class particle filter . . . . . . . . . . . . . . . . . . . . . . . . . . . . . . . . 33
Correcting minor faults . . . . . . . . . . . . . . . . . . . . . . . . . . . . . . . . . . . . . . . . . . . . 34
Installation . . . . . . . . . . . . . . . . . . . . . . . . . . . . . . . . . . . . . . . . . . . . . . . . . . . . . . 35
Electrical connection . . . . . . . . . . . . . . . . . . . . . . . . . . . . . . . . . . . . . . . . . . . . . . 37
Plumbing. . . . . . . . . . . . . . . . . . . . . . . . . . . . . . . . . . . . . . . . . . . . . . . . . . . . . . . . 39
Caring for the environment . . . . . . . . . . . . . . . . . . . . . . . . . . . . . . . . . . . . . . . . . 42
Technical Data . . . . . . . . . . . . . . . . . . . . . . . . . . . . . . . . . . . . . . . . . . . . . . . . . . . 43
2
Downloaded from www.Manualslib.com manuals search engine
Guide to the machine
Guide to the machine
°C
DOS
12 3 4
• min
••
•
•
•••
• DESIN •
5
I-O
A
B
6
7
1 "Check water inlet/outlet"
check light
2 "Reactivate softener" indicator light
3 Add (liquid) detergent
indicator light
4 "Add neutralising agent"
indicator light
•
•
•
•
C
D
E
F
8
•
•
•
•
T1
•
•
10’- 80’ •
•
T2
9
5 Programme sequence indicator
6 Display
7 Door release
8 ON-OFF Button (I-0)
9 Programme touch controls
3
Downloaded from www.Manualslib.com manuals search engine
Guide to the machine
Guide to the machine
10 11 12 13 14
15
16
10 Dispenser for neutralising agent
(DOS 10 - red) and liquid detergent
(DOS 60 - blue)
11 Drying unit (TA)
12 Safety fuse for TA Drying Unit
13 Time counter for TA Drying Unit
14 Temperature selector for TA Drying
Unit
4
Downloaded from www.Manualslib.com manuals search engine
17
18
19
20
15 Service panel
16 Dispenser for powder detergent
17 Dispenser for liquid rinsing agent
with dosage selector
18 Level indicator
19 Filter combination
20 Connection socket for salt
container (water softener)
Warning and safety instructions
Warning and safety instructions
This machine conforms to current
safety requirements. Inappropriate
use can however lead to personal
injury and damage to property.
Read the operating instructions
carefully before starting to use this
machine. This way you will avoid
the risk of accidents, and damage
to the machine.
Keep these instructions in a safe
place, and make them available to
future users.
Correct usage
This machine is designed for commercial use and for specialised applications only, as described in these
Operating Instructions. Using it for purposes other than those for which it was
designed would be unauthorised and
could cause harm.
The manufacturer cannot be held responsible for damage caused by improper use.
Please pay attention to the following
notes, to maintain safe procedures.
The electrical safety of this machine can only be guaranteed if
connected to a correctly installed earthing system on site. It is most important that this basic safety requirement is
met and complies with local and national regulations. It should be checked
by an expert if necessary.
The manufacturer cannot be held responsible for damage caused by missing or defective earthing, such as
electric shock.
A damaged machine is dangerous. Switch off at the mains immediately and call an authorised Miele
service dealer, or suitably competent
engineer.
Repair work may only be carried
out by an authorised, suitably competent person. Repairs by unqualified
persons could be dangerous.
Personnel operating the machine
should be trained regularly. Children and untrained personnel should not
be allowed access to the machine or
its controls.
The machine should be commissioned and then maintained only
by the Miele Service Department, an
authorised Miele Service Dealer or
other approved competent person.
Do not install the machine in an
area where a danger of explosion
may be present.
5
Downloaded from www.Manualslib.com manuals search engine
Warning and safety instructions
Warning and Safety instructions
Take care when handling liquids
such as detergents, wetting
agents, or neutralising agents. These
may contain irritant or corrosive ingredients, acids or alkalis. On no account
use any organic solvent, as there may
be the danger of an explosion occurring.
Follow the instructions and relevant
safety procedures carefully. Wear protective gloves and goggles.
Avoid inhalation of powder
cleaners. They can cause burning
in the mouth and throat if swallowed, or
inhibit breathing.
The water in the machine must not
be used as drinking water.
Do not sit or lean on the open door,
or rest objects on it. This could
cause the machine to tip and be damaged.
Be careful when sorting items with
sharp pointed ends and positioning them in the machine that you do not
hurt yourself or create danger for other
operators.
When using this machine in the
temperature ranges from 70 to
95°C be especially careful not to scald
or burn yourself. Baskets and inserts
must first cool down. Any water which
may remain in containers will be very
hot and must be emptied into the wash
cabinet.
After drying with the TA drying unit then
open the door to allow the items and inserts to cool down.
6
Downloaded from www.Manualslib.com manuals search engine
Do not touch the heating elements
during or directly after the end of a
programme, you could burn yourself.
Never use an ordinary or a high
pressure hose on or in the vicinity
of the machine.
Before any maintenance or repair
work is undertaken, the machine
must be disconnected from the mains
supply, by switching off at the mains
isolator, or withdrawing the mains fuse.
The following points should be observed to avoid damage to the machine and the loads being cleaned.
The standard of disinfection in the
Disinfection programmes must be
confirmed by the user as a routine matter. The process should be regularly
checked using chemical indicators,
and bacteriologically at intervals using
bio-indicators, with full documentation.
Proceed according to local health authority regulations.
Disinfection programmes must not
be interrupted, as this can have a
limiting effect on the disinfection result.
However, should an interruption be
necessary. the complete programme
must be repeated.
Only use cleaning agents formulated for special processes and approved by Miele for use with this machine. Use of unsuitable cleaning
agents could adversely affect the load
or the machine.
Warning and safety instructions
Warning and Safety instructions
For pre-treatment and / or cleaning
only use low-foaming detergents
and disinfecting agents which have
been approved by Miele. Foam can
have an adverse effect on the disinfection and cleaning process.
Where a chemical additive is recommended on technical application grounds (for example with a cleaning agent), this does not imply that the
manufacturer of the machine takes responsibility for the effect of the chemical on the material of the items being
cleaned. Please be aware that changes
in formulation, storage conditions etc,
which may not be publicised by the
chemical producer, can have a negative effect on the cleaning result.
When using cleaning agents and
specialised products it is essential
that the manufacturer’s instructions are
followed. Only use the product for the
application described by the manufacturer, to avoid any material damage or
the occurrence of strong chemical reactions such as oxyhydrogen.
The machine is designed only for
operation with water and additive
cleaning agents. Organic solvents
must not be used in the machine, as
there is the danger under certain circumstances of explosion. Although this
is not the case with all organic solvents, other problems could arise with
their use, for example damage to rubber and synthetic materials.
In critical applications where very
stringent requirements have to be
met, it is strongly recommended that all
the relevant factors for the process,
such as cleaning agent, quality of
water are discussed with the Miele Application Technology specialists.
If the cleaning result is subject to these
particularly stringent requirements (e.g.
chemical analysis, specialised processes), a regular quality control test
should be carried out by the user to ensure that required standards of cleanliness are being achieved.
Please follow the advice on installation in these instructions and the
separate Installation Instructions.
Empty any containers or utensils
before arranging them in the machine.
Do not allow any remains of acids
or solvents, or chloride solutions to
get into the wash cabinet. Similarly
avoid any materials with a corrosive effect.
The presence in compounds of any solvents should be minimal, (especially
those in hazard class A1).
Ensure that solutions or steam containing acid salts do not come into
contact with the steel outer casing of
the machine, to avoid any corrosion
damage.
7
Downloaded from www.Manualslib.com manuals search engine
Warning and safety instructions
Warning and Safety instructions
Accessories
Use special inserts in accordance
with the instructions provided.
The only accessories to be used
with the special commercial machine must be those supplied or approved by MIELE for the specific application. Consult your dealer or the Miele
Professional department for advice.
Disposal of an old machine
When disposing of an old machine
first make it unusable. Disconnect,
cut off the cable and any plug from the
cable. For environmental and safety
reasons ensure the machine is completely drained of any residue water
and cleaning agent. (Observe safety
regulations and wear safety goggles
and gloves). Make the door lock inoperative, so that children cannot accidentally shut themselves in. The simplest
way to do this is to remove the locking
pin (2 philips screws above the door).
Make appropriate arrangements for the
safe disposal of the machine. For tank
system machines ensure that any water
is emptied out of the tank.
In countries where there are areas
which may be subject to infestation by cockroaches or other vermin,
pay particular attention to keeping the
machine and its surroundings in a
clean condition at all times. Any damage which may be caused by cockroaches or other vermin will not be
covered by the machine guarantee.
8
Downloaded from www.Manualslib.com manuals search engine
The manufacturer cannot be held responsible for any damage caused
through non-observance of these
Warning and Safety instructions.
Description of the machine
Description of the machine
The G 7783 CD is a front-loading automatic machine for the efficient washing
- neutralising - rinsing - final rinsing of
laboratory glassware. It can be operated on normal water supply. There are
"AD" (aqua destillata) programmes with
final rinses using purified water (distilled, R.O., or de-ionised).
On completion of the automatic programme sequence, laboratory glassware is cleaned to the standard required for analysis.
The electronic control unit offers a
choice of temperatures for the cleaning
and final rinsing phases. A combination
often preferred is cleaning - T1 85° C
and final rinse T2 70 °C.
The effective areas are defined as follows:
A = Suitable for destruction of vegetative bacteria, including myco-bacteria
and fungus and fungal spores.
B = Suitable for inactivation of viruses
Including HBV and HIV).
The SPECIAL "B" programme operates
at 90°C with 10 minutes holding time.
This machine is fitted with a TA drying
unit and water softener as standard.
Available at extra cost:
– Machine lid
With the SPECIAL "B" programme the
machine can thermally disinfect at
90°C with relevant holding times.
"Instrument disinfection in automatic
machines" is to be found under subsection 3.2.4. of paragraph 10c of
BSeuchG, according to the German
Federal Health Authority, Berlin (BGA).
The disinfection parameters of between
90°C and 93°C held for 10 minutes
apply to the effective areas A + B. Reduction factor 7 (by reduction factor
~107).
9
Downloaded from www.Manualslib.com manuals search engine
Setting the water softener
Setting the water softener
To avoid the build-up of calcium deposits on glassware and in the machine
the water needs to be softened, where
the supply hardness exceeds 107
ppm, (6°d).
To ensure a steady supply of soft water
the water softener unit must always be:
1. correctly set
2. reactivated with "dishwasher" salt as
soon as the k indicator light comes on.
The water softener must be set to correspond with the water hardness the first
time the machine is used.
Your local water authority will advise
you on the water hardness in your area.
Time
unit
°d
mmol/
l
°f
°e
ppm
CaCO3
18
17
16
15
14
13
12
11
10
9
8
7
6
5
4
3
2
1
0
6
7
8
9
10
11
12
13
15
17
19
22
24
28
32
38
48
71
1.07
1.25
1.42
1.60
1.78
1.96
2.14
2.31
2.67
3.03
3.38
3.92
4.27
4.98
5.70
6.76
8.54
12.64
10.7
12.5
14.3
16.0
17.9
19.6
21.4
23.2
26.8
30.4
33.9
39.3
42.8
50.0
57.1
67.8
85.7
126.7
7.5
8.8
10,0
11.3
12.5
13.8
15.0
16.3
18.8
21.3
23.8
27.5
30.0
35.0
40.0
47.6
60.1
88.9
107
125
143
160
179
196
214
232
268
304
339
393
428
500
571
678
857
1267
Setting the WaterSoftener
The hardness range is divided into 18
"time" units ad a zero position. The machine is set at the factory, corresponding to 339 ppm, (19°d).
If your water supply is harder or softer
than this, then:
Use the touch pads on the control
panel to change the time setting (see
Table).
Press T1 and c touch pads simultaneously and, whilst depressed,
switch the machine on, using the
main switch "I-0".
"P..." will appear in the display field (to
indicate current programming status).
Press touch pad k. The "P" will disappear and setting "0" will appear in
the display field. This setting "0" can
now be changed if necessary. To do
this:
Press touch pad cas many times
as is necessary for the desired value
to appear in the display field.
Press touch padh. "SP" appears.
Press h once more. The setting will
now be stored. The display field
clears.
The machine is now ready for operation.
10
Downloaded from www.Manualslib.com manuals search engine
Setting the water softener
Setting the water softener
If the water hardness in your area is
permanently below 107 ppm (6°d):
Select setting "0". The control light
k will not come on and the water
softener does not need to be regenerated.
Reactivating the water softener, see
page 29.
11
Downloaded from www.Manualslib.com manuals search engine
Opening and closing the door
Opening and closing the door
To open the door a
Press the release catch as far as it
will go and, at the same time, grasp
the door grip and open the door.
The door should only be opened during operation for emergencies: e.g. if
articles are knocking together (see interrupting a programme).
To close the door
Lift the door upwards and push until
it clicks into position. Do not press
the release catch.
12
Downloaded from www.Manualslib.com manuals search engine
Applications and loading
Applications and loading
This laboratory glasswasher normally
requires a top and a bottom basket.
Depending on the type and shape of
the glassware, inserts can be supplied
and there is a range of other baskets
for special applications. The diversity of
the inserts is so great that it is not
possible to illustrate them all or give detailed instructions on their use here. As
an example there are inserts for direct
injection spraying of volumetric flasks,
butyrometers, pipettes etc.
General glassware used in laboratories, e.g. beakers, conical flasks, test
tubes, etc., can be arranged in fullsize, half or quarter inserts in top or bottom baskets. Your Miele laboratory
dealer will advise on specific requirements.
The following instructions relate only to
basic preparation and loading of glassware.
Loading the machine
Removing excess soils
Empty all glassware before loading
into the machine. Take any hygiene
measures necessary against infection.
Ensure that no acid or solvent
residues, especially hydrochloric
acid or chlorides get into the wash
cabinet.
Remove all agar residues from petri
dishes.
Remove blood clots and residues
from test tubes, etc.
Remove all stoppers, corks, labels,
sealing wax residues, etc.
Notes
Load the glassware so that water will
come into contact with all surfaces.
This ensures that they will be
properly cleaned.
Do not place items to be cleaned inside other pieces where they may be
concealed.
Hollow vessels such as beakers,
measuring cylinders, flasks, etc.
should be inverted and placed in the
correct inserts. A cover net can be
used to reduce the risk of movement
during the wash process.
Petri dishes and similar should be
placed in the correct insert with the
soiled side facing the centre.
Pipettes should be placed with the
mouthpiece facing upwards.
Deep based items should be placed
at enough of an angle for water to
run off them freely.
Tall, narrow, hollow pieces should be
placed in the centre of the basket to
ensure good coverage of water.
Do not cover the funnel in the middle
of the top basket. Mobile injector
units or baskets with an adapter
must engage correctly, (see below).
13
Downloaded from www.Manualslib.com manuals search engine
Applications and loading
Applications and loading
The spray arms must not be blocked
by items which are too tall for the
basket or which hang down. Rotate
the arms manually to test.
Important
Make sure that the spring adapter for
water connection engages correctly
when a basket, injector or mobile unit is
inserted into the machine. It must be 4 5 mm higher than the water connection
inlet in the roof of the cabinet.
If it is not, adjust the adapter accordingly.
E 380 "Intermiel"
Injector mobile unit (with TA connection)
For narrow necked glassware, complete with 15 nozzles 4x1 mm/160 mm
high, 18 nozzles 6x1 mm/220 mm high
with 33 "Mielava" clips.
Loosen the lock ring.
Push up the adapter (4-5 mm higher
than the water connection inlet) and
tighten the lock ring.
Select baskets and inserts which are
appropriate for the application.
Loading example:
O 175 Injector mobile unit
(with (TA) Drying unit connection)
(top basket) for direct injection of narrow necked glassware, 34 nozzles 4x1
mm/ 160 mm high with "Mielava" clips.
Please note:
powder detergent can only be placed
in the inner side of the door when using
the O 175 unit .
14
Downloaded from www.Manualslib.com manuals search engine
Applications and loading
Applications and loading the machine
O 188 top basket frame
can take various inserts.
E 109
Half insert, stainless steel, with 21 glass
beakers up to 250 cm3, round and
conical flasks etc.
U 174 bottom basket frame
can take various inserts.
E 106
Half insert, stainless steel, with 28
spring hooks at two heights for glassware, such as narrow necked bottles,
measuring cylinders, medicine bottles
etc.
15
Downloaded from www.Manualslib.com manuals search engine
Applications and loading
Applications and loading the machine
Adjusting the top basket
Adjustable top baskets can be used in
this machine, They can be adjusted up
or down by 2 cm from the middle position set on delivery.
The top basket will accommodate:
Vessels and glassware up to 19 cm
in height.
The bottom basket will accommodate:
Vessels and glasses up to 25 cm in
height.
Top basket Top basket
position
height (cm)
Top
Middle
Bottom
17
19
21
Bottom
basket
height (cm)
27
25
23
To adjust the top basket
Pull out the top basket until a resistance is felt, lift from the runners and
remove.
Unscrew the roller supports on both
sides of the basket with a 7 mm
spanner, reposition as required and
re-tighten.
16
Downloaded from www.Manualslib.com manuals search engine
Rinsing agent
Rinsing agent
A liquid storage container incorporated
in the door has a capacity of approximately 200 ml. The required amount of
appropriate liquid rinsing agent (e.g.
Mielclear, in those countries where
available), is dispensed automatically
from this container.
Adding Rinsing agent
Pour rinsing agent into the storage
container until the level indicator is
dark (see arrow in illustration). Use a
funnel if necessary.
Firmly tighten the screw cap. Clean
up any spillage.
Refilling with rinsing agent
The level indicator shows how much
rinsing agent is left in the container.
When there is no dark colouring visible
in the level indicator, the container
needs to be refilled.
Setting the dosage
Undo the screw cap.
The dosage adjuster in the opening
has settings from 1-6 (1-6 ml). It is set
to "3" (3 ml) at the factory.
Use a higher setting if spots are left
after drying.
If smearing appears, use a lower setting.
17
Downloaded from www.Manualslib.com manuals search engine
Adding neutralising agent and (liquid) detergent
Adding neutralising agent and (liquid) detergent
Adding neutralising agent
Adding detergents
To reduce the pH to neutral after alkaline
cleaning, special neutralising acids can
be used in programme stage 4.
Detergent can be added in either liquid
or powder form (for powder detergent,
see relevant section, p. 18)
Important "Special functions" must first
be used to set the programme to dispense neutralising agent in stage 4, instead of rinsing agent.
When the indicator light "DOS" on the
control panel lights up:
When the w indicator light on the control panel lights up:
Fill the container DOS 10 (red markings) with neutralising agent, or
change containers, and then:
Fill the container DOS 60 (blue markings) with liquid detergent, or
change containers, and then:
Place the siphon tube firmly in the
opening of the free-standing container (pay attention to colour coding).
Re-fill the container in good time, it
should never be allowed to empty completely.
Note: If adding an extra dose of detergent in the pre-wash of programmes E
and F (see "Programme chart"), only
powder detergent can be used.
Place the siphon tube firmly in the
opening of the free-standing container (pay attention to colour coding).
Re-fill the container in good time, it
should never be allowed to empty completely.
18
Downloaded from www.Manualslib.com manuals search engine
Venting the liquid dispensing system / Maintenance
Venting the liquid dispensing system / Maintenance
Each time the system is vented any liqVenting the liquid dispensing
uid which runs into the wash cabinet
system
must be washed out as follows:
Before using the machine for the first
Select programme "A" (Cold).
time, or if the container had not been
filled in time and allowed to empty, the
After this has run the dispensing sysdispensing system for liquid agents
tem is filled and ready for use.
(apart from rinsing agent) must be
vented.
Proceed as follows:
Press the I-0 (ON-Off) button.
A
B
Checking the dispensing
system
To maintain the performance of the dispensing system, it should be serviced
at regular intervals.
This work should only be carried out by
suitably qualified people or by a MIELE
Service Engineer.
Every 12-18 months
– Replace the dispensing hoses in
either the dispensing systems or the
DOS modules.
Switch "A":
Dispensing system for neutralising
agent.
Switch "B":
Dispensing system for detergent (if
using liquid detergent).
Use a pointed object to press in
switch "A" and/or "B" at the left hand
side end of the control panel for
three and a half minutes.
19
Downloaded from www.Manualslib.com manuals search engine
Adding powder detergent
Adding powder detergent
Only use specific detergents for
special cleaning applications. Do
not use domestic dishwasher detergents.
If not using liquid, fill dispenser in the
door with powder detergent before
each programme (See "Programme ’B’
and..." for exceptions).
Fill the dispenser with the appropriate amount.
Dosage: approximately 3 g/l, corresponding to approximately 30 g per
load.
Follow manufacturer’s instructions.
Close the dispenser lid.
Press the opening catch on the container flap forwards (see arrow). The
flap will spring open. (The flap will
be open at the end of a programme).
20
Downloaded from www.Manualslib.com manuals search engine
Adding detergent
Programme "B", and when using
O-175 or a pipette plate
Programme selection
The thermal disinfection programme
requires the use of a suitable mildly
alkaline or active chlorine-free
cleaner.
Under certain circumstances, i.e. special soiling, different combinations of
detergents and other additives may be
necessary. Consult your Miele laboratory dealer.
Add powder detergent directly to the
inside of the door or dispense liquid
detergent via DOS 60.
An additional dose of powder detergent
can be added to the inside of the door
where required in applications E and F
(see Programme chart).
When selecting a cleaning agent
please bear in mind the ecological effects, in particular the following considerations:
Take care when handling liquids
such as detergents, disinfecting
and neutralising agents. These may
contain acids, alkalis or disinfectants. Follow the relevant safety
procedures and the instructions on
the packaging carefully.
Wear protective gloves and
goggles if necessary.
Programme selection
Choose your programme according to
the type of glassware and the degree
of soiling.
The different programmes and their applications are described overleaf in the
"Programme chart".
How much alkalinity is needed to do
the required cleaning?
Is bleach required for disinfection or
stain removal?
Are tensides at all necessary for dispersal or emulsification?
21
Downloaded from www.Manualslib.com manuals search engine
Programme chart
Programme chart
Programme
When to use
Detergent
(when not using liquid
detergent)
follow
manufacturer’s
instructions
A = COLD
B = SPECIAL
C = MINI
For the quick removal of chemicals which
cause problems for washing technology or can
damage the machine.
Thermal disinfection to BGA standard.
Cleaing of particularly stubborn soil.
For lightly soiled items without AD rinsing.
D = STANDARD A wash programme with two AD rinses, where
the items are intended for analytical use.
E = UNIVERSAL Programme with two AD rinses for items,
F = INTENSIVEPLUS
intended for analytical use, which are more
heavily soiled with for example oil and grease
residues. (Connect the cold water inlet to hot
water if residues to be dispersed are oil
based).
For particularly encrusted residues (agar etc.).
30 grammes on to the right
hand side door interior
30 grammes in the powder
dispenser
30 grammes in the powder
dispenser
30 grammes in the powder
dispenser
(and also 30 grammes on
the right hand side door
interior if needed)
30 grammes in the powder
dispenser
(and also 30 grammes on
the right hand side door
interior if needed)
22
Downloaded from www.Manualslib.com manuals search engine
G 7783 CD
Warning and safety instructions
Warning and safety instructions
Instructions for the operator:
Remove these pages and ensure that they are fixed in a position clearly visible
to the system operator in direct proximity to the installation site.
Instruct and encourage operating personnel to heed the warning and safety instructions.
This machine conforms to current
safety requirements. Inappropriate
use can however lead to personal
injury and damage to property.
Read the operating instructions
carefully before starting to use this
machine. This way you will avoid
the risk of accidents, and damage
to the machine.
Keep these instructions in a safe
place, and make them available to
future users.
Correct usage
This machine is designed for commercial use and for specialised applications only, as described in these
Operating Instructions. Using it for purposes other than those for which it was
designed would be unauthorised and
could cause harm.
The manufacturer cannot be held responsible for damage caused by improper use.
Please pay attention to the following
notes, to maintain safe procedures.
The machine should be commissioned and then maintained only by
the Miele Service Department, an authorised Miele Service Dealer or other approved competent person.
Do not install the machine in an
area where a danger of explosion
may be present.
The electrical safety of this machine can only be guaranteed if
connected to a correctly installed earthing system on site. It is most important that this basic safety requirement is
met and complies with local and national regulations. It should be checked
by an expert if necessary.
The manufacturer cannot be held responsible for damage caused by missing or defective earthing, such as
electric shock.
A damaged machine is dangerous. Switch off at the mains immediately and call an authorised Miele
service dealer, or suitably competent
engineer.
Repair work may only be carried
out by an authorised, suitably competent person. Repairs by unqualified
persons could be dangerous.
Personnel operating the machine
should be trained regularly. Children and untrained personnel should not
be allowed access to the machine or
its controls.
1
Downloaded from www.Manualslib.com manuals search engine
Warning and safety instructions
Warning and Safety instructions
Take care when handling liquids
such as detergents, wetting
agents, or neutralising agents. These
may contain irritant or corrosive ingredients, acids or alkalis. On no account
use any organic solvent, as there may
be the danger of an explosion occurring.
Follow the instructions and relevant
safety procedures carefully. Wear protective gloves and goggles.
Avoid inhalation of powder
cleaners. They can cause burning
in the mouth and throat if swallowed, or
inhibit breathing.
The water in the machine must not
be used as drinking water.
Do not sit or lean on the open door,
or rest objects on it. This could
cause the machine to tip and be damaged.
Be careful when sorting items with
sharp pointed ends and positioning them in the machine that you do not
hurt yourself or create danger for other
operators.
When using this machine in the
temperature ranges from 70 to
95°C be especially careful not to scald
or burn yourself. Baskets and inserts
must first cool down. Any water which
may remain in containers will be very
hot and must be emptied into the wash
cabinet.
After drying with the TA drying unit then
open the door to allow the items and inserts to cool down.
2
Downloaded from www.Manualslib.com manuals search engine
Do not touch the heating elements
during or directly after the end of a
programme, you could burn yourself.
Never use an ordinary or a high
pressure hose on or in the vicinity
of the machine.
Before any maintenance or repair
work is undertaken, the machine
must be disconnected from the mains
supply, by switching off at the mains
isolator, or withdrawing the mains fuse.
The following points should be observed to avoid damage to the machine and the loads being cleaned.
The standard of disinfection in the
Disinfection programmes must be
confirmed by the user as a routine matter. The process should be regularly
checked using chemical indicators,
and bacteriologically at intervals using
bio-indicators, with full documentation.
Proceed according to local health authority regulations.
Disinfection programmes must not
be interrupted, as this can have a
limiting effect on the disinfection result.
However, should an interruption be
necessary. the complete programme
must be repeated.
Only use cleaning agents formulated for special processes and approved by Miele for use with this machine. Use of unsuitable cleaning
agents could adversely affect the load
or the machine.
Warning and safety instructions
Warning and Safety instructions
For pre-treatment and / or cleaning
only use low-foaming detergents
and disinfecting agents which have
been approved by Miele. Foam can
have an adverse effect on the disinfection and cleaning process.
Where a chemical additive is recommended on technical application grounds (for example with a cleaning agent), this does not imply that the
manufacturer of the machine takes responsibility for the effect of the chemical on the material of the items being
cleaned. Please be aware that changes
in formulation, storage conditions etc,
which may not be publicised by the
chemical producer, can have a negative effect on the cleaning result.
When using cleaning agents and
specialised products it is essential
that the manufacturer’s instructions are
followed. Only use the product for the
application described by the manufacturer, to avoid any material damage or
the occurrence of strong chemical reactions such as oxyhydrogen.
The machine is designed only for
operation with water and additive
cleaning agents. Organic solvents
must not be used in the machine, as
there is the danger under certain circumstances of explosion. Although this
is not the case with all organic solvents, other problems could arise with
their use, for example damage to rubber and synthetic materials.
In critical applications where very
stringent requirements have to be
met, it is strongly recommended that all
the relevant factors for the process,
such as cleaning agent, quality of
water are discussed with the Miele Application Technology specialists.
If the cleaning result is subject to
these particularly stringent requirements (e.g. chemical analysis, specialised processes), a regular quality
control test should be carried out by
the user to ensure that required standards of cleanliness are being achieved.
Please follow the advice on installation in these instructions and the
separate Installation Instructions.
Empty any containers or utensils
before arranging them in the machine.
Do not allow any remains of acids
or solvents, or chloride solutions to
get into the wash cabinet. Similarly
avoid any materials with a corrosive effect.
The presence in compounds of any solvents should be minimal, (especially
those in hazard class A1).
Ensure that solutions or steam containing acid salts do not come into
contact with the steel outer casing of
the machine, to avoid any corrosion
damage.
3
Downloaded from www.Manualslib.com manuals search engine
Warning and safety instructions
Warning and Safety instructions
Accessories
Use special inserts in accordance
with the instructions provided.
The only accessories to be used
with the special commercial machine must be those supplied or approved by MIELE for the specific application. Consult your dealer or the Miele
Professional department for advice.
Disposal of an old machine
When disposing of an old machine
first make it unusable. Disconnect,
cut off the cable and any plug from the
cable. For environmental and safety
reasons ensure the machine is completely drained of any residue water
and cleaning agent. (Observe safety
regulations and wear safety goggles
and gloves). Make the door lock inoperative, so that children cannot accidentally shut themselves in. The simplest
way to do this is to remove the locking
pin (2 philips screws above the door).
Make appropriate arrangements for the
safe disposal of the machine. For tank
system machines ensure that any water
is emptied out of the tank.
In countries where there are areas
which may be subject to infestation by cockroaches or other vermin,
pay particular attention to keeping the
machine and its surroundings in a
clean condition at all times. Any damage which may be caused by cockroaches or other vermin will not be
covered by the machine guarantee.
4
Downloaded from www.Manualslib.com manuals search engine
The manufacturer cannot be held responsible for any damage caused
through non-observance of these
Warning and Safety instructions.
Programme cycle
1.
2.
3.
4.
Prelimi- Prewash
Main
Interim
nary preII
wash &
rinse I
wash
possibly
and
thermal possibly
disinneutralfection isation*)
5.
Interim
rinse
II
Miscellaneous
6.
Interim
rinse
III
7.
Final
rinse
8.
Drying
phase
(extra
prog)
*) see
"Programming
special functions"
X
X
X
X
X
X
93°C
**)
X
X
X
70°C
AD
(X)
X
60°C
X
X
X
60°C
(X)
X
85°C
X
X
X
AD
(X)
X
85°C
X
X
X
AD
X
70°C
AD
X
70°C
AD
X
85°C
X
X
AD
X
AD
X
70°C
AD
**) Increase in
temp. holding time
see "Special
functions".
(X)
(X)
AD (Aqua destillata) = purified water, "H2O", (distilled, R.O., or de-ionised).
X = sections included in standard programmes
23
Downloaded from www.Manualslib.com manuals search engine
Switching the machine on and off
Switching the machine on and off
DOS
•
•
•
•
°C
min
••
•••
DESIN
•
I-O
1. Switching on
Press the I-0 button.
2. Selecting a programme
After switching on the machine the indicator lights next to the selectors will
light up to show the programmes available.
Press the programme selector for
the required programme. The wash
temperature of the programme selected will show up in the display
field.
Select additional programme
T1 / T2 "TEMPERATURE" and/or
c "DRYING"
(see "Selecting an additional programme").
Press the h "Start" touch pad.. The
display panel will now show the running time in ascending minutes for
the selected programme.
During the heat-up stage in "Washing/disinfecting" and "Final rinse" the
end temperature will be displayed in
the panel.
All other programmes are automatically
blocked and only the lights for the programme selected stay on.
24
Downloaded from www.Manualslib.com manuals search engine
A
B
•
•
•
•
C
D
E
F
•
•
•
•
T1
•
•
10’- 80’ •
•
T2
Programme Changes
Provided the "Start" touch pad has not
yet been pressed, a wrongly selected
programme may be changed as follows:
Press the appropriate touch pad to
select the required programme.
Press the h "Start" touch pad.
Otherwise "Interrupt programme"
(see page after next).
3. Selecting an additional programme
The following additional programmes
are available:
T1 TEMPERATURE FOR WASHING
T2 TEMPERATURE FOR FINAL RINSING
Immediately after the selection of a
washing programme the temperature
for washing and for final rinsing can be
altered through the additional programme "Temperature". Press on the
appropriate touch pad T1 or T2 for as
many times as necessary to change
the temperature step by step (40°C /
50°C / 60°C / 70°C / 85°C / 93°C). The
last temperature chosen will be stored
for the following wash/rinse cycles, and
will be shown in the display field.
Switching the machine on and off
Switching the machine on and off
c DRYING
The additional programme "DRYING"
can be selected for 10 minutes steps
up to a total of 80 minutes immediately
after the selection of a cleaning programme except for (except A "COLD").
Selecting the drying time
Press c as many times as necessary to change the drying time step
by step until the desired time is displayed (shown in the display field).
For example:
Press once - 10 mins
Press twice - 20 mins and so on.
The drying cycle will automatically
begin 10 minutes after the final rinse.
The drying time display will then count
down as time goes on.
Selecting the Drying Temperature
The drying temperature is set using the
temperature selector for the (TA) Drying
Unit.
To do this:
Take off the service panel (see "Electrical Connection").
Check the setting of the TA temperature selector. the temperature can be
freely set between 55°C and 95°C
and is electronically controlled.
– approx. 95°C (max. temperature) for
normal items (set ex-works),
– approx. 70°C
for items with parts made of rubber,
latex or plastics, with a specified temperature tolerance,
– approx. 55°C
for items which are particularly heatsensitive.
Please use the key supplied to switch
over.
Note:
If on completion of a programme subsequent drying is necessary:
Select the programme q DRAIN
(running time only approx. 1 minute)
with the additional programme c
DRYING (see above).
25
Downloaded from www.Manualslib.com manuals search engine
Switching the machine on and off
Switching on and off
k REACTIVATION
(see "Reactivating water softener").
q DRAIN,
if for example the programme has been
interrupted (n.b. observe preventive
measures to avoid infection):
– Press the I-0 button.
– Press the q programme touchpad.
– Press the "Start"-button h.
Programme sequence indicator
When a washing programme has been
selected, the indicator lights in the display will show the programme sequence.
I
Pre-wash
l
Wash/possibly disinfecting
m
Interim rinse
H
Final rinse
c
Drying (additional programme)
Switching off
Press the I-0 switch and let it spring
out.
The machine can now be opened and
unloaded.
Interrupting a programme
Once a programme is running it should
only be interrupted in extreme cases,
e.g.: when articles in the machine rattle
or bump against each other and have
to be rearranged.
The machine must then be switched
off, the water drained and the programme restarted:
Switch the machine on and off again
with the I-0 switch.
Select the "DRAIN" programme (Additional programmes)
DESIN Disinfection
(Only with the "B" SPECIAL programme maintaining parameters
90-93 °C - 10’, 90-93 °C - 25’,
85 °C - 10’, or 85 °C - 25’)
On completion, open the door and
replace the items securely and correctly. Take any hygiene measures
necessary against infection and
wear protective gloves where
necessary.
When part of a programme is complete, the corresponding indicator light
goes out.
Replenish the powder detergent dispenser in the door if necessary.
The programme is completed when no
indicator lights are left on (expect for
"DESIN" for the "B" SPECIAL programme) and when the "Start" h.light
goes out. The display panel will show
the total running time of the programme.
26
Downloaded from www.Manualslib.com manuals search engine
Close the door.
Reselect the programme.
Switching the machine on and off
Programming special functions
The following special functions can be
programmed where appropriate:
1. Setting water inlet to level plus
time control instead of timed inlet
(60 secs).
If the inlet water pressure is lower than
2.5 bar, too little water will flow into the
wash cabinet. By selecting level plus
time control flow, more water will flow
into the wash cabinet, if there is an inlet
water pressure between 1 and 2.5 bar.
The setting is adjusted separately for
cold, hot and AD-water.
Switch off the machine.
1a. Cold water connection
Press T1 and c at the same time,
hold them in and also swtich on the
machine with "I-0".
The current programme status "P..."
appears in the display.
Press F. "10" or "11" will appear in
the display.
"10" = Cold water connection time
control (60 secs)
"11" = Cold water connection level
plus time control
Press c to change from "10" to "11"
or vice versa.
Press h. "SP" appears.
Press h again. The change has
been recorded and the display field
clears.
1b. Hot water connection
Switch off the machine.
Press T1 and c at the same time,
hold them in and also switch on the
machine with "I-0".
The current programme status "P..."
appears in the display.
Press E. "20" or "21" will appear in
the display.
"20" = Hot water connection time
control (60 secs).
"21" = Hot water connection level plus
time control
Press c to change from "20" to "21"
or vice versa.
Press h. "SP" appears.
Press h again. The change has
been recorded and the display field
clears.
1c. AD water connection
Switch off the machine.
Press T1 and c at the same time,
hold them in and also switch on the
machine with "I-0". The current programme status "P..." appears in the
display.
Press D. "30" or "31" will appear in
the display.
"30" = AD water inflow time control
(60 secs)
"31" = AD water inflow level plus time
control.
Press c to change from "30" to "31"
or vice versa.
27
Downloaded from www.Manualslib.com manuals search engine
Programming special functions
Programming special functions
Press h. "SP" appears in the display.
Press h again. The change has
been recorded and the display field
clears.
2. Increasing the temperature holding from 10 to 25 minutes in the
"Wash" part of the programme, (only
in the "B" SPECIAL programme).
Switch off the machine.
Press T1 and c at the same time,
hold them in and also switch on the
machine with "I-0". The current programme status "P..." appears in the
display.
Press C. "40" or "41" will appear in
the display.
"40" = Temp. holding time 10 mins.
"41" = Temp. holding time 25 mins.
Press c to change from "40" to "41"
or vice versa..
Press h. "SP" appears in the display.
Press h again. The change has
been recorded and the display field
clears.
Note:
The temperature T1 must not exceed
85 °C, (see "Selecting additional programmes").
28
Downloaded from www.Manualslib.com manuals search engine
3. Adding neutralising agent in the "Interim rinse 1" part of the programme.
The machine is set at the factory for
rinsing agent to be dispensed in the
"Final rinse" part of the programme. If
neutralising agent is to be dispensed instead make the following adjustment:
Switch off the machine.
Press T1 and c at the same time,
hold them in and also switch on the
machine with "I-0". The current programme status "P..." appears in the
display.
Press B. "50" or "51" will appear in
the display.
"50" = Rinsing agent dosage
"51" = Neutralising agent dosage.
Press c to change from "50" to "51"
or vice versa..
Press h. "SP" appears in the display.
Press h again. The change has
been recorded and the display field
clears.
Reactivating the water softener
Reactivating the water softener
When the k indicator light on the left
hand side of the control panel comes
on during a programme the built-in
water softener is depleted and cannot
supply any more softened water. It
must therefore be reactivated with dishwasher salt as soon as the programme has finished.
If this cannot be done immediately, and
further batches have been washed,
then the reactivation process must be
carried out twice in succession.
Only use special course grained dishwasher salt (granule size approx. 1-4
mm), for reactivation, as other salts
may contain insoluble impurities or additives which can impair the functioning
of the softener.
Never fill the salt reservoir with dishwasher cleaning agent
this can lead to
– damage to the water softener and
– blockage of the salt container
filter insert, resulting in a build up
of pressure in the salt reservoir.
The irritant alkali solution could be a
hazard and personal injury could be
caused when the salt container is
removed.
Make sure that you have picked up
the right packet of dishwasher salt
before filling the salt container.
Filling the salt container
The salt container holds approx. 2 kg
salt.
Important
If the only reactivation salt available is
fine grain, please consult your Miele
service representative.
Reactivation salt with granules larger
than 4 mm cannot be used.
Unscrew the filter insert from the salt
container and remove.
Fill the salt container with granular
dishwasher salt and screw the filter
insert back in place.
29
Downloaded from www.Manualslib.com manuals search engine
Reactivating the water softener
Position the salt container as
follows:
Remove the bottom basket from the
machine.
Switch on the machine
Open the stopcocks if previously closed.
Close the door.
Press I-0.
Press the k touch pad.
Press the "Start" h touch pad.
The reactivation programme proceeds
automatically and finishes when the indicator light k at the left hand side of the
control panel and the "Start" indicator
light h have gone out.
Unscrew the plastic cap in the base
of the wash cabinet.
Then:
Switch off the machine.
Unscrew the salt container carefully,
so that any water pressure that has
built up can be released. Do not use
force. If you cannot uncrew the salt
container by hand, contact the Miele
Service department.
Screw the plastic lid back on the socket.
Reposition bottom basket.
Rinse the salt container and filter insert thoroughly.
Turn off the stopcocks if the machine
is not to be used again for some time.
Important
The water pressure (flow pressure at the
take off point) must be at least 2.5 bar. If
it less than this see "Programming special functions".
If the flow pressure is below 2.5 bar, or
if it fluctuates, the water softener cannot be reactivated in the normal way.
After reactivation, salt remains may still
be found in the salt container.
Place the salt container on the reactivation socket and screw firmly into
place.
30
Downloaded from www.Manualslib.com manuals search engine
To use up the salt remains and to wash
out the water softener, the "reactivate
softener" programme must be switched
on again.
Cleaning and care
Cleaning and care
Cleaning the filters in the
water cabinet
The filter combination in the base of the
cabinet should be inspected regularly
and cleaned if necessary.
Caution!
Watch out for glass splinters which
could cause injury.
Cleaning the coarse filter
To unscrew the micro-fine filter, take
hold of the two lugs, turn twice in an
anti-clockwise direction.
Press the 2 lugs together, remove
and clean the filter.
Put the clean filter back in position
and press until it clicks in place.
Cleaning the fine, flat and micro-fine
filters
Remove the coarse filter
Remove the fine filter (if fitted) from
between the flat and micro-fine filters.
Remove, together with the flat filter.
Clean the filters.
The filter combination is then replaced in the reverse order to which
it was removed.
The machine must not be used without
all the filters in place.
31
Downloaded from www.Manualslib.com manuals search engine
Cleaning and care
Cleaning and care
Cleaning the filters in the water
inlet
For the protection of the inlet valve(s),
filters are incorporated in the screw
connection of the water inlet hose. The
filters must be cleaned when dirty,
otherwise insufficient water flows into
the wash cabinet.
Turn off stopcocks.
Unscrew the water inlet hoses.
1
2
Clean large area filter (1) and fine filter
(2) or replace if necessary.
After reconnection, turn on the stopcock to test for leaks.
There is a further filter in front of the
water inlet valve which must only be
cleaned or replaced by a suitably qualified and competent person.
32
Downloaded from www.Manualslib.com manuals search engine
Drying unit (TA) cleaning and care
Drying unit (TA) cleaning and care
Changing the Coarse Filter
The coarse filter should be changed
when it is soiled or after approx. 100
operating hours, (see time counter on
the TA unit).
Change the coarse filter.
- The smooth side of the filter must
face the rear.
Grip the inlet grille to the right and
the left and pull up out of the retainers and then downwards and off.
Position the perforated plate at the
base and press into place at the top.
- The edge surround should face forward.
When putting back the inlet grille, it
should audibly click into place.
Exchanging the S-class particle
filter
If is advisable for this filter to be replaced after approx. 500 operating
hours (see the time counter on the TA
control unit).
This filter should only be changed by
an authorised Service Dealer or the
MIELE Service department.
The effective operating of the machine
can only be achieved if original "Miele"
S - class particle filters are used.
Take out the perforated plate.
33
Downloaded from www.Manualslib.com manuals search engine
Correcting minor faults
Correcting minor faults
With the aid of the following explanatory notes, minor faults can usually be
corrected without contacting the Miele
Service Department.
Any work on the electrical components
of the machine should only be carried
out by a suitably qualified and competent person.
Faults/Possible Causes
The machine does not start
– Check that the door is properly shut.
The water in the wash cabinet is not
heated; the programme sequence
lasts too long.
This machine has a resettable heater
limiter which will switch off the heaters
in the case of over-heating. This could
be caused for example, if large articles
obscure the heating elements or if the
filters in the wash cabinet are blocked.
Remove cause of fault.
Take off service panel (see under
"Electrical connection").
– Check the plug connection or isolator.
– Check the fuses.
A few minutes after switching on, the
indicator light p q flashes.
– The stopcocks are closed.
– The water inlet hose filters are dirty.
Switch off the machine.
Open the stopcocks or clean the filters (see "Cleaning and care").
Switch on the machine again and reselect the programme.
The wash cycle finishes too early
and the p q indicator light flashes
– The drain hose is kinked.
– The door was opened and closed
during the programme.
– There was an interruption to the
power supply.
Correct the fault
Pump away the water and start the
programme again (see procedure
under "Interrupting a programme").
34
Downloaded from www.Manualslib.com manuals search engine
Press in the re-set button (blue) on
the heater limiter.
If this switch trips repeatedly, your Service Dealer or the Miele Service Department must be contacted.
In the event of any faults which cannot
be remedied, please contact your Service Dealer or the Miele Service Department.
Installation
Installation
Please refer to the Installation diagram supplied with the machine.
The machine must be installed correctly and levelled.
The machine can be installed in the following ways:
Free-standing *)
Slot-in or at the end of a row: *)
The machine can be installed adjacent
to other equipment or furniture or in a
recess at least 90 cm wide and 70 cm
deep.
*) A machine lid is essential with this
type of installation (available as a special accessory).
Building uner:
The machine should be positioned
under a continuous worktop. The niche
dimensions must be at least 90 cm
wide, 70 cm deep and 82 cm high.
Any unevenness in the floor level can
be compensated by adjusting the
screw feet on the right and left hand
sides at the front of the machine.
The service panel must first be lifted off
and the cover plate must be unscrewed (see under "Electrical Connection").
When the screw feet are screwed in,
the disinfector can be moved backwards or forwards on its rollers.
Important for machines with DHK
steam condensor:
To avoid steam damage to the worktop
the self-adhesive protective sheet supplied (25 x 58 cm) should be stuck
under the worktop in the area of the
condensor.
Position and secure the machine
To guarantee stability the machine
must first be aligned and then screwed
to the worktop.
35
Downloaded from www.Manualslib.com manuals search engine
Installation
Installation
Depending on the various requirements
for building under, the following kit may
also be required:
Cover plate (worktop protection)
The underside of the work surface is
protected from steam damage by a
plate of stainless steel.
Open the door. Through each of the
two holes in the front rim, left and
right, screw the machine to the front
edge of the continuous worktop.
Do not use silicone sealant to seal
the gaps between the machine and
any neighbouring units as this would
hinder ventilation to the circulation
pump.
36
Downloaded from www.Manualslib.com manuals search engine
Electrical connection
Electrical connection
All electrical connection work must be
carried out by a qualified electrician in
compliance with local and national
regulations.
To remove service panel and cover plate
Connection should be made via a
suitable isolator, with an on-off switch
which should be easily accessible
for servicing.
For extra safety it is advisable to install a residual current device (RCD)
with a trip current of 30 mA (DIN
VDE 0664).
WARNING
THIS APPLIANCE MUST BE
EARTHED
For technical data see data plate or
wiring diagram supplied.
The machine must only be operated
with the voltage, frequency and fusing
shown on the data plate.
Holding the service panel at the top
right and bottom left hand corners,
pull up out of its retainers and lift out
at the bottom.
The machine is not convertible.
The wiring diagram is to be found behind the cover plate on the left hand
side, attached to the floor of the machine.
The data plate with test certification is
on the rear of the machine, and on the
cover plate (behind the service panel).
Isolate the machine from the power
supply.
Unscrew the cover plate.
Pull off earth lead if necessary.
37
Downloaded from www.Manualslib.com manuals search engine
Electrical connection
Electrical connection
Remove the plastic protective cap.
To re-assemble:
Refit plastic protective cap, cover
plate and service panel in the
reverse order to which they were
removed.
Make certain that the earth lead is
reconnected.
Consult the Installation Instructions supplied.
38
Downloaded from www.Manualslib.com manuals search engine
Plumbing
Plumbing
Connection to the water inlet
The machine must be connected to
the water supply in accordance with
the local and national regulations,
(NWC in GB).
The machine is constructed to comply with DVGW regulations, in such a
way that an external non return valve
is not required.
The water pressure (flow rate) must
be between 2.5 and 10 bar. If the
water pressure is not within this
range, the Customer Service Department will advise you of the measures
to take (see also "Programming special functions").
The machine is supplied as standard
for connection to cold (blue markings) and hot (red markings) water
supply to max. 70°C. See next page
for AD connection to purified water
(H20 pure).
The inlet hoses should be connected
to the respective cold and hot water
stopcocks.
If no hot water supply is available,
the hose for hot water (red marking)
must also be connected to the cold
water supply. In this case both hoses
must be connected to the cold water
supply.
In special cases, see Programme E
in the chart, connection of both
hoses to hot water is recommended.
In order to prolong its life, the hose
marked 90°C should only be used
on a hot water connection supplying
water no hotter than 70°C.
Stopcocks with 3/4 BSP male thread
to be provided on site. They should
be easily accessible because the
water supply must be turned off
when the machine is not in use.
The DN 10 inlet pressure hoses are
approximately 1.7 m long and terminate in a 3/4" female thread. On no
account must the inlet filters be
removed.
For additional protection of the solenoid valve against impurities in the
water supply, large surface area filters are enclosed in the kit supplied
with the machine (see illustration in
"Cleaning and care, water inlet").
The filter for AD purified water (H2O
pure) is made from chrome-nickel
steel and has a matt upper surface.
Consult the installation instructions supplied.
The water in the machine is not suitable for drinking.
39
Downloaded from www.Manualslib.com manuals search engine
Plumbing
Plumbing
AD connection to purified water,
pressurised, (1.5 - 10 bar)
The machine is delivered from the factory ready for connection to a pressurised system, 1.5 - 10 bar.
The AD pressure tested hose,
marked H2O pure, with 3/4" thread
must be connected to the on-site AD
stopcock for purified water.
Connection to purified water nonpressurised (0 - 1.5 bar)
For connection to a supply of 0 - 0.3
bar, or 0.3 - 1.5 bar the machine must
be converted, if not supplied converted
ex-works. An “ADP” booster pump
can only be fitted. This is only possible
when the machine has no DHK steam
condensor. As this work requires
specialised knowledge, it should only
be carried out by a Miele approved
engineer.
40
Downloaded from www.Manualslib.com manuals search engine
The outlet of the purified water container (non-pressurised) must be at
least at the height of the upper edge of
the machine. (see "Installation instructions").
Connect the non-pressurised AD
water hose to the purified water container
If the AD connection to purified
water is not being used (or if it
should not be used) then the machine must be converted by a Miele
trained or approved engineer.
Plumbing
Plumbing
Drainage
The drainage system is fitted with a
non-return valve which prevents dirty
water from flowing back into the machine via the drain hose.
The machine should preferably be
connected to a separate drainage
system on site. If no separate drainage system is available, seek professional advice.
Ventilation of the wash cabinet
at rear
For machines without DHK Steam condensor, the rear ventilation of the wash
cabinet should be connected to an onsite venting system.
Please refer to the Installation Instructions provided.
The machine is supplied with flexible
drain hoses with an internal diameter
of 22 mm and approx. 1.5 m long.
The drain hose must not be shortened.
Hose clamps for connection are supplied.
Longer drain hoses (up to 4 m) are
available if required. Contact the
Miele Service Department.
The drainage system must not exceed 4 metres and the drain pump
has a maximum delivery head of 1
metre.
41
Downloaded from www.Manualslib.com manuals search engine
Caring for the environment
Caring for the environment
Disposal of the packing
material
The transport and protective packing
has been selected from materials
which are environmentally friendly for
disposal and can normally be recycled.
Rather than just throwing these materials away, please ensure they are offered for recycling.
Disposal of your old machine
Old machines contain materials which
can be re-cycled. Please contact your
local authorities or scrap merchant
about potential recycling schemes, before disposing of the machine.
42
Downloaded from www.Manualslib.com manuals search engine
When disposing of an old machine
first make it unusable. Disconnect,
cut off the cable and any plug from
the cable. For environmental and
safety reasons ensure the machine
is completely drained of any
residue water and cleaning agent.
(Observe safety regulations and
wear safety goggles and gloves).
Make the door lock inoperative, so
that children cannot accidentally
shut themselves in. The simplest
way to do this is to remove the locking pin (2 screws above the door).
Make appropriate arrangements for
the safe disposal of the machine.
For tank system machines ensure
that any water is emptied out of the
tank.
Technical Data
Technical Data
Noise emission in dB (A)
Measurement of noise:
65
43
Downloaded from www.Manualslib.com manuals search engine
Alteration rights reserved / 001
This paper consists of cellulose which has been bleached without the use of chlorine.
Downloaded from www.Manualslib.com manuals search engine
3397