1
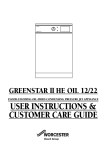
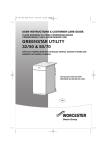
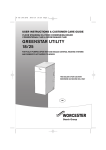
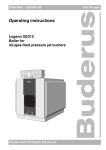
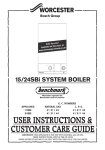
ur
Vote for yo ar’ at
ye
e
th
f
‘Installer o r- b osc h .c o .uk
e ste
rc
o
.w
w
w
w
DANESMOOR
SYSTEM BOILER
12-14, 15-19, 20-25
FLOOR-STANDING OIL-FIRED PRESSURE-JET BOILERS
USER INSTRUCTIONS &
CUSTOMER CARE GUIDE
EXCELLENCE COMES
AS STANDARD
Thank you for purchasing a Worcester Danesmoor oil-fired
central heating boiler.
Danesmoor oil boilers are made by Worcester and the strictest
quality control standards ever demanded are applied throughout
every stage of production.
Worcester, part of the Bosch
Group have led the field in innovative boiler design and performance for more than 40 years.
The result is that your new
Danesmoor boiler offers you the
very best of everything – quality,
efficiency, economical running
costs, proven reliability and value
for money.
What’s more, you also have the assurance of our no-nonsense
1 year parts and labour guarantee.
CONTENTS
Page No.
Operating Instructions
.................................... 3-9
Fault Finding Guide .... 11
Maintenance and Extended
Warranty Information .. 12
Service Centres ............ 13
Guarantee Details ........ 14
2
GENERAL
INFORMATION
To ensure you get the very best from your new Worcester
Danesmoor oil boiler, please read these notes and instructions
carefully.
ELECTRICAL CONNECTION
Fig. 1. Appliance Components
A mains cable should be connected to a
double pole isolator with a contact separation of
3 mm on all poles and supplying the appliance
and controls only.
The mains supply for your boiler is
230/240 volts AC-50Hz.
Your boiler must be earthed and protected
by a 5-amp fuse.
Manual
air vent
Pressure
relief
valve
OPEN-FLUED BOILERS
Pump
Expansion
vessel
Oil
isolating
valve
Pressure
gauge
Burner
Your installer will create airways (in walls
or doors) to ensure an adequate supply of fresh
air to the boiler for combustion. Do not block
these airways, and never hang clothes or other
combustible materials over the boiler or against
the flue pipe.
Never place anything on top of the boiler.
ROOM-SEALED BALANCED
FLUE BOILERS
Air for this type of boiler is supplied via the
balanced flue terminal, and no other air supply
is required, except for ventilation if the boiler is
installed in a cupboard or compartment.
3
ROUTINE MAINTENANCE
It is essential that your boiler is installed and serviced by a
competent heating engineer, and Worcester will be pleased to
arrange regular servicing and a comprehensive maintenance contract.
Alternatively, the Oil Firing Technical Association for the
petroleum industry (OFTEC) will gladly advise you of engineers
trained by and registered with OFTEC.
Servicing should be carried out at least once a year for boilers
which burn 28-second kerosene, and twice a year for boilers
which burn 35-second gas oil.
SERIAL NUMBER
Your boiler serial number and model number should always
be quoted in any contact with Worcester. This will help identify
spare parts and also avoid confusion and delays during any service
call-out. You will find these numbers on the serial number label
which is located on the front of the control facia on all models.
For access see section “Accessing your boiler controls.”
TECHNICAL INFORMATION
The Danesmoor range of oil-fired boilers can provide both
domestic hot water and full central heating, with outputs ranging
from 12kW to 70kW (40,000 to 239,000 Btu/h). Domestic hot
water must be supplied via a conventional indirect hot-water system, utilising an indirect double-feed cylinder.
The appliance is supplied without a circulating pump, but
there is provision to locate a pump within the boiler casing. For
further details please consult your installer.
4
CENTRAL HEATING
SYSTEM OPERATION
The Danesmoor system boiler is designed to be used on a
sealed central heating system.
During the first operation of the central heating system, check
that all the radiators are heated evenly. If the top of a radiator is at
a lower temperature than the bottom, vent it by releasing air
through the vent screw at the top of each radiator and re-pressure
the system as described below. Make sure your installer shows you
how to carry out this operation.
Should any leaks be found in the system or excessive venting
be required from any radiator, your installer should be contacted
to correct the system.
It is important that the minimum system pressure is maintained so as to ensure correct operation of the appliance.
The minimum pressure required for your appliance is indicated by the preset pointer located on the pressure gauge. The pressure gauge can be viewed by removing the cabinet front panel (See
Fig. 1).
If the pressure falls below the minimum level the system must
be re-pressurised using the method described by your installer.
Contact your installer if the system continues to lose pressure
as this may indicate a leak.
5
HOW TO START YOUR
BOILER
TO START YOUR BOILER (See Fig. 2).
(a) Switch on the electrical mains supply to the boiler.
(b) Ensure that any external controls connected to the boiler, such
as a room thermostat, are on a high setting.
(c) Set the user operating switch to heating and hot water or, if a
programmer is fitted, set it to the correct time of day and
position the selectors to ON. The power on lamp in the
control facia will light up
(d) Turn the thermostat control knob to the desired position (see
section Temperature Control).
(e) Your boiler will now commence a start sequence, in which a
pre-ignition period of approximately 15 seconds is followed by
a supply of atomised oil being introduced into the combustion
chamber. Ignition then occurs, followed by a post-ignition
period of approximately 20 seconds.
(f) Your boiler is now in a steady run condition and will remain
so until the water temperature reaches the temperature set on
the control thermostat. At this point the burner will stop and
the boiler will shut down. The sequence will continue until
the boiler is programmed – either manually or by an automatic
programmer – for a period of shutdown.
Fig. 2. Control Facia
Temperature Control Knob
Mains Power Indicator Light
Lockout Indicator Light
6
Optional Programmer Location
Manual Reset Overheat Thermostat Button
TEMPERATURE CONTROL
Fig. 3.
Low
Setting
TEMP
High
Setting
The temperature control knob gives you control
over the water temperature in your central heating
radiators, and you can adjust it to any position within the indicated range (as shown in Fig. 3).
Higher settings obviously mean hotter radiators
and rooms will reach the required temperature
quicker. The ideal setting varies from property to
property, and can only be established by trial and
error and experience: a setting of medium to high
should serve as a good initial guide.
PLEASE NOTE: The control knob must not be
set below the first indicating bar (55°C).
The control knob has a range of adjustment as indicated by the symbols.
SAFETY THERMOSTAT
HIGH LIMIT THERMOSTAT
Your boiler is fitted with a high limit cut out thermostat,
designed to protect the central heating system in the event of the
boiler running beyond a safe temperature level due to a control malfunction. This is indicated by excessive operating temperature and
the mains power indicator lamp going off. The thermostat will reset
itself when the boiler cools to a safe operating level.
MANUAL RESET OVERHEAT
THERMOSTAT
Sealed system installations require the use of an overheat thermostat which has to be reset by hand. Your boiler is fitted with this
thermostat as standard and may be reset by pressing the button
shown in Fig. 2. Access is gained by removing the case front panel. If
the thermostat persistently cuts out then your boiler requires attention and you should either call your installer or a service engineer.
7
LOCKOUT
A flame failure device is incorporated into the control system
of your boiler. So, should the flame fail for any reason, or should
ignition fail to initiate a satisfactory start, the boiler is automatically
locked out for safety. This lockout condition is indicated by a signal lamp located on the burner control box.
To cancel the burner lockout condition, remove the boiler
front cover and allow two minutes before pressing the illuminated
lockout reset button, which is mounted on the burner control box.
Provided the system is still calling for heat, the burner will then
operate and commence another start cycle.
Persistent lockout indicates a fault and an engineer should be
called, so do not attempt to repeatedly restart the boiler.
FUEL
Your Worcester Danesmoor pressure-jet boiler is set to burn
28-second kerosene fuel. Some appliances can be converted to
burn 35-second gas oil. If this conversion has been made your
installer will inform you.
PLEASE NOTE: Danesmoor room-sealed and conventional
low-level discharge appliances MUST NOT be used with 35-second gas oil.
8
OPERATING YOUR
PROGRAMMER CONTROLS
Full instructions on how to install and operate the optional
facia mounted programmer are included with the programmer kit.
If your boiler operates on gravity feed, the system will only
function correctly on heating if the programmer switches on the
hot water programme at the same time. To ensure that tis is always
the case, the programmer is supplied with a gravity system on the
rear of the unit; this must be set to G by your installer.
The programmer gives fully independant programmes for
central heating (CH) and hot water (HW) when the switch on the
rear of the unit is set to P and the boiler is installed with a fully
pumped system.
FAULTS & BREAKDOWNS
Many calls made to our Contact Centre reporting boiler faults
or breakdowns prove to be false alarms, as there is often a simple
explanation for the apparent malfunction.
So, to help you save time and money – not to mention frustration and inconvenience – a quick-reference fault finder is
included on page 11.
If, after checking through the points suggested, there is still a
fault you should call your our Contact Centre. Arrangements will
be made for an engineer to call as soon as possible.
9
CALL OUT CHARGES
All of Worcesters’ field service engineers are factory trained.
If you request a visit from an engineer and your boiler has
been installed within the last 24 months, no charge will be made
for parts and/or labour providing:
The appliance was commissioned correctly on installation and
a completed Guarantee Registration card returned to
Worcester.
An appliance fault is found and the appliance has been
installed within the past 24 months, provided that the first
annual service has been carried out on a boiler which is more
than 12 months old. Reasonable evidence of this must
be supplied on request.
A call-out charge will be made where:
The appliance has been installed for over 24 months
The appliance has been installed for more than 1 year but less
than 2 years and has not had a first annual service by an
approved company.
OR
Our Field Service Engineer finds no fault with the appliance
(see note).
OR
The cause of breakdown is misuse or with other parts of your
plumbing/heating system, or with equipment not supplied by
Worcester.
NOTE: Invoices for attendance and/or repair work carried out
on your Worcester Danesmoor boiler by any third party will not be
accepted.
10
FAULT FINDER
If your boiler is not operating, it is suggested that you go
through the following simple checks before either calling your
installer or the Worcester Contact Centre.
SYMPTOM
Red ‘Power On’
Indicator is not
illuminated.
POSSIBLE CAUSE
CHECK/REMEDY
There is no electricity supply to • Operating switch is on (See Fig. 2).
the boiler.
• Power supply is switched on.
Boiler overheat thermostat has
operated
• Check the fuse has not blown.
• If self resetting, allow time to reset.
• Press the reset button. (See section
‘Safety thermostat).
‘Power On’ Indicator
illuminated only.
There is no demand requiring
the boiler to operate.
• Check boiler thermostat is set on
medium to high.
• Check the user operating switch is set
correctly.
• Check the programmer is programmed
for hot water and/or central heating and
re-programme if necessary. (See programmer operating instructions).
• If the boiler is programmed for central
heating, check the room thermostat is
turned on.
‘Power On’ &
‘Lockout’ indicators
bothe illuminated
The boiler has attempted to
ignite, but has gone to lockout.
• Remove the appliance front cover and
depress the lockout reset button on the
burner. (See section ‘Lockout’).
• Check the level in your oil tank and
replenish if necessary.
11
MAINTAINING YOUR
BOILER’S EFFICIENCY &
PERFORMANCE
Your new Worcester Danesmoor oil-fired boiler represents a
long-term investment in a reliable, high quality product.
In order to realise its maximum working life, and to ensure it
continues to operate at peak efficiency and performance, it is
essential that your boiler receives regular, competent servicing and
annual maintenance checks beyond the initial 12 month guarantee
period.
Regular service contracts can be arranged with your installer however if you have difficulty making a satisfactory arrangement
simply call our Contact Centre on 08457 256206 for help.
If you would like to know more about Worcester’s extended
warranty options please tick the appropriate box on your
Guarantee Registration card.
12
CONTACT CENTRES
CONTACT NUMBERS:
UK Contact Centre
UK Contact Centre
Scotland only
Eire
Tel.
Fax.
Fax.
Tel:
08457 256 206
01905 757536
01506 441 687
01 494 0099
OPERATING HOURS:
Mon - Fri
Sat
Sun
7.00am to 8.00pm
8.00am to 5.00pm
9.00am to 12.00pm
Please contact our UK Contact Centre number where our friendly
operators will book your call with one of our team of nationwide
engineers.
NOTE:
Please refer to our website for our bank holiday hours.
www.worcester-bosch.co.uk
13
YOUR WORCESTER
DANESMOOR GUARANTEE
This appliance is guaranteed from the date of installation
subject to the following conditions & exceptions.
1. The appliance is guaranteed for a
period of 24 calendar months subject to the return of the guarantee
card within 30 days of installation
and the first 12 months service and
inspection having been carried out
to the satisfaction of BBT
Thermotechnology UK Ltd. Please
note that this service is not covered
under the terms & conditions of the
warranty and would therefore incur
a charge.
2. That during the period of this guarantee any components of the unit
which are Proved to be faulty or
defective in manufacture will be
exchanged or repaired Free of material charges and free of labour
charges if repaired directly by BBT
Thermotechnology UK Ltd. Invoices
for attendance and repair of this
appliance by third parties will not
be accepted for payment by BBT.
3. That the householder may be asked
to prove the date of installation and
that the appliance was correctly
commissioned. This information
must then be documented in the
Benchmark Gas Boiler
Commissioning Checklist.
4. That any product or part thereof
returned for servicing under the
guarantee must be accompanied by
a claim stating the model, serial
number and date of installation.
5. That BBT Thermotechnology UK Ltd
will not accept responsibility for
damage caused by faulty installation, neglect, misuse, accidental
damage or the non-observance of
the instructions contained in the
Installation and Users instructions
leaflets.
6. That the appliance has been used
only for normal domestic purposes,
for which it was designed.
7. That this guarantee applies only to
equipment purchased and used in
mainland Great Britain.
This guarantee is given in addition to all your normal statutory rights.
Worcester, Bosch Group is a trading name of BBT Thermotechnology UK Ltd.
14
GUARANTEE
REGISTRATION
You should complete and return the postpaid Guarantee
Registration Card within 30 days of purchase.
The card will register you as the owner of your new Worcester
Danesmoor boiler and, while this will not affect your statutory
rights in any way, it will assist us to maintain an effective and efficient customer service by establishing a reference and permanent
record for your boiler.
FOR YOUR OWN RECORD
MODEL
SERIAL NUMBER
(See identity label inside appliance casing)
TYPE/SIZE
DATE OF INSTALLATION
www.worcester-bosch.co.uk
Worcester, Bosch Group. Cotswold Way, Warndon, Worcester WR4 9SW.
Telephone: (01905) 754624. Fax: (01905) 753130.
Technical Service Helpline 08705 266241.
8 716 114 735a (11/07)