1
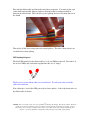
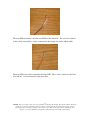
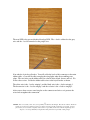
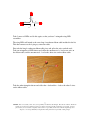
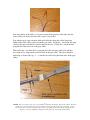
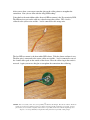
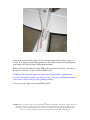
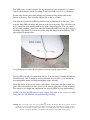
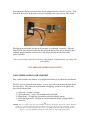
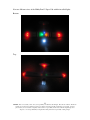
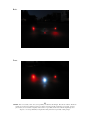
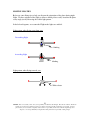
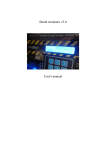
Super Cub R/C Plane LED Night Flying Light Kit
Hyperdyne Labs, © 2007-09
http://www.hyperdynelabs.com
Congratulations on purchasing the definitive night lighting kit for your R/C Super Cub or
other plane! Your kit is hand assembled in the USA, and we appreciate you supporting
our products.
This kit includes all lights (LEDs), cabling, and assembled processor board to finish your
light kit. This kit is controlled via the X-port jack on most HobbyZone™ and
Parkzone™ park flyers and has been extensively used on the Super Cub model. The light
board gets power from the port and allows you to change light modes via the X-port
button on your transmitter (Parkzone and Hobbyzone are ™ names of HorizonHobby).
Your package includes the following parts:
• Assembled processor board w/ X-port cable and 16-pin header
• 16-conductor rainbow ribbon cable w/ connector on one end
• 4-conductor long ribbon cable (for wing lights)
• 4-pin gray cable with mating 0.1” header (for wing lights)
• 8 red oval 5mm LEDs
• 1 blue oval 5mm LED
• 1 yellow cylindrical 5mm LED
• 1 green cylindrical 5mm LED
• 1 white LED cluster module
• 1 red 5mm LED
For the partially-assembled kit, you will need to complete the assembly of the lights.
Tools needed to complete installation:
•
•
•
•
•
Wire cutters/pliers
Exacto knife
Small soldering iron
Solder
Packing tape
1
NOTICE: There is no warranty on kits. It is your responsibility to install the board and lights. Kits cannot be returned. This kit can
consume a lot of current. Be careful if you plan to use a battery source that is capable of delivering a lot of current. Contact a
professional if you need assistance. Hyperdyne Labs assumes no responsibility for the misuse of this kit. Night flying can be
dangerous. User accepts all liability of using this kit in their plane and the responsibility of flying at night.
Here is a picture of the assembled processor board w/ X-port cable and LED ribbon cable
plugged into the board:
NOTE: All LEDs included in this package have positive and negative legs. The longer
leg is always the positive side of the LED, and the shorter leg is the negative side of the
LED.
_
+
CONNECTING THE LEDS TO THE MAIN RIBBON CABLE
For the semi-assembled kit version, you will need to solder all the LEDs to the ribbon
cable. The below instructions go over how to do this with minimal effort. If your LEDs
are already connected, you can skip down to the installation section.
2
NOTICE: There is no warranty on kits. It is your responsibility to install the board and lights. Kits cannot be returned. This kit can
consume a lot of current. Be careful if you plan to use a battery source that is capable of delivering a lot of current. Contact a
professional if you need assistance. Hyperdyne Labs assumes no responsibility for the misuse of this kit. Night flying can be
dangerous. User accepts all liability of using this kit in their plane and the responsibility of flying at night.
First take the ribbon cable and locate the end with no connector. You want to take your
exacto knife and carefully liberate each wire from the cable by cutting carefully in
between the cable sheath. This will allow you to pull/rip the wire away from the rest of
the sheath.
Then splice all the wires using some wire cutters/splicers. The wire is thin so don’t use
too much force when splicing.
LED hookup diagrams
The first LED installed on the ribbon cable is 2 red oval LEDs for the tail. First take 2 of
the oval red LEDs and solder them together like this (in a V-shape):
_
+
The first wires on the ribbon cable are red and brown. We will start at the end of the
cable and work down.
Now solder the + lead of the LED pair to the red wire and the – lead to the brown wire on
the ribbon cable as shown:
3
NOTICE: There is no warranty on kits. It is your responsibility to install the board and lights. Kits cannot be returned. This kit can
consume a lot of current. Be careful if you plan to use a battery source that is capable of delivering a lot of current. Contact a
professional if you need assistance. Hyperdyne Labs assumes no responsibility for the misuse of this kit. Night flying can be
dangerous. User accepts all liability of using this kit in their plane and the responsibility of flying at night.
The next LED to connect is the blue oval LED for the underside. The + lead is soldered
to the yellow wire and the – lead is connected to the orange wire on the ribbon cable.
The next LED is the yellow cylindrical fuselage LED. The + lead is soldered to the blue
wire and the – lead is connected to the green wire.
4
NOTICE: There is no warranty on kits. It is your responsibility to install the board and lights. Kits cannot be returned. This kit can
consume a lot of current. Be careful if you plan to use a battery source that is capable of delivering a lot of current. Contact a
professional if you need assistance. Hyperdyne Labs assumes no responsibility for the misuse of this kit. Night flying can be
dangerous. User accepts all liability of using this kit in their plane and the responsibility of flying at night.
The next LED is the green cylindrical fuselage LED. The + lead is soldered to the gray
wire and the – lead is connected to the purple wire.
Now take the 4-pin keyed header. You will solder the leads of this connector to the main
ribbon cable, so you will be able to unplug the wing lights when disassembling your
plane. The next wires on the ribbon cable are colored white, black, brown, and red. We
will use these wires. Solder the ribbon cable wires to the keyed header as shown.
The white wire is the - lead to wingtip 1 and the black wire is the + lead to wingtip 1.
The brown wire is the – lead to wingtip 2 and the red wire is the + lead to wingtip 2.
After you are done can use some hot glue on the connector and wires so it protects the
wires and strengthens the connection.
5
NOTICE: There is no warranty on kits. It is your responsibility to install the board and lights. Kits cannot be returned. This kit can
consume a lot of current. Be careful if you plan to use a battery source that is capable of delivering a lot of current. Contact a
professional if you need assistance. Hyperdyne Labs assumes no responsibility for the misuse of this kit. Night flying can be
dangerous. User accepts all liability of using this kit in their plane and the responsibility of flying at night.
Now you can take the gray extension cable and plug it into the mating header. It is keyed
so it will only go in one way.
You will see that the gray cable has one wire with a black line going down it. This black
mark should line up with the white wire on the main ribbon cable.
The next step involves the red wingtip LED clusters. Each wing is made up of 3 LEDs
connected in series. So each LED is connected together in a link + - + - + - Then the
outer + lead and the outer – lead left unconnected are soldered to the long wing ribbon
cable.
First take 3 of the oval red LEDs and solder them into this triangular series configuration
(remember the long lead is the + lead on the LEDs):
6
NOTICE: There is no warranty on kits. It is your responsibility to install the board and lights. Kits cannot be returned. This kit can
consume a lot of current. Be careful if you plan to use a battery source that is capable of delivering a lot of current. Contact a
professional if you need assistance. Hyperdyne Labs assumes no responsibility for the misuse of this kit. Night flying can be
dangerous. User accepts all liability of using this kit in their plane and the responsibility of flying at night.
+
_
_
+
+
_
Take 3 more red LEDs and do this again, so that you have 2 triangular wing LED
assemblies.
The wing LEDs will attach to the extra long 4-conductor ribbon cable included in the kit.
This then connects to the 4-pin gray extension cable.
First take the long 4-conductor ribbon cable piece and splice the wires on both ends.
Take one triangular red LED cluster and solder the unconnected + lead to one wire on
the ribbon cable, and the unconnected – lead to the other wire on the ribbon cable.
Take the other triangular cluster and solder the + lead and the – lead to the other 2 wires
on the ribbon cable.
7
NOTICE: There is no warranty on kits. It is your responsibility to install the board and lights. Kits cannot be returned. This kit can
consume a lot of current. Be careful if you plan to use a battery source that is capable of delivering a lot of current. Contact a
professional if you need assistance. Hyperdyne Labs assumes no responsibility for the misuse of this kit. Night flying can be
dangerous. User accepts all liability of using this kit in their plane and the responsibility of flying at night.
Note the polarity of the cables so you can connect them properly to the other end (the
colors of the wire above may not be the same as in your kit).
Now take the gray 4-pin extension cable and solder the other ends of the long wing
ribbon cable to the 4 leads on the end of the gray cable. Solder the – wire from one wing
cluster to the gray lead that has a black stripe on the wire. Solder the + wire from that
wing cluster to the next lead on the gray cable.
Then solder the - wire from the 2nd wing cluster to the next gray cable lead, and the +
wire from the 2nd wing cluster to the last lead on the gray cable. The wires should be
hooked up as shown (they go - + - +, with the first wire being the black wire on the gray
cable).
8
NOTICE: There is no warranty on kits. It is your responsibility to install the board and lights. Kits cannot be returned. This kit can
consume a lot of current. Be careful if you plan to use a battery source that is capable of delivering a lot of current. Contact a
professional if you need assistance. Hyperdyne Labs assumes no responsibility for the misuse of this kit. Night flying can be
dangerous. User accepts all liability of using this kit in their plane and the responsibility of flying at night.
After you are done, you can put some hot glue on the solder points to strengthen the
connection. Now you are done with the wing LED hookup!
Going back to the main ribbon cable, the next LED to connect is the X-port activity LED.
The ribbon wires next on the cable are colored orange then yellow. The + lead is
soldered to the yellow wire and the – lead is connected to the orange wire.
The last LED to connect is the front white LED cluster. Take the cluster and turn it over.
The blue wire is connected to the center solder area and the – lead is connected to any of
the 4 small solder pads on the outside of the cluster. Here the solder ring in the center is
not used. Again you can use hot glue to strengthen the connection after soldering.
9
NOTICE: There is no warranty on kits. It is your responsibility to install the board and lights. Kits cannot be returned. This kit can
consume a lot of current. Be careful if you plan to use a battery source that is capable of delivering a lot of current. Contact a
professional if you need assistance. Hyperdyne Labs assumes no responsibility for the misuse of this kit. Night flying can be
dangerous. User accepts all liability of using this kit in their plane and the responsibility of flying at night.
YOU ARE NOW DONE CONNECTING UP THE LIGHTS!
Here is a picture of the main ribbon cable with all the LEDs and connectors soldered to
their respective ribbon cable wires (in order starting from brown and red wires).
KIT INSTALLATION
You are now ready to install the lights and the processor board into your Super Cub or
other R/C plane.
You can run the tail lights through the body. It might be easier to unsolder the tail LEDs
and run the wire through a small hole in the tail section. Then resolder the LEDs and
tape them down in between the vertical stabilizer as shown:
10
NOTICE: There is no warranty on kits. It is your responsibility to install the board and lights. Kits cannot be returned. This kit can
consume a lot of current. Be careful if you plan to use a battery source that is capable of delivering a lot of current. Contact a
professional if you need assistance. Hyperdyne Labs assumes no responsibility for the misuse of this kit. Night flying can be
dangerous. User accepts all liability of using this kit in their plane and the responsibility of flying at night.
Next install the two fuselage lights. It doesn’t matter which side the yellow or green
resides on, it depends on your flying preference. We found it works well with the green
on the right side of the fuselage (looking from the front).
Punch a hole into the foam and run the LED to the outside of the fuselage. You can use
hot glue or foam safe CA glue to hold the LED in place.
NOTE: We have found the prime area to place the fuselage LEDs is right under the
window decals pointing slightly up towards the wing. This gives maximum illumination
on the wing as well as acting as a wing banking indicator.
Next is a pic of the right side fuselage LED installed.
11
NOTICE: There is no warranty on kits. It is your responsibility to install the board and lights. Kits cannot be returned. This kit can
consume a lot of current. Be careful if you plan to use a battery source that is capable of delivering a lot of current. Contact a
professional if you need assistance. Hyperdyne Labs assumes no responsibility for the misuse of this kit. Night flying can be
dangerous. User accepts all liability of using this kit in their plane and the responsibility of flying at night.
Do the same on the other side for the yellow LED
For the blue LED that goes on the underside of the fuselage, we found it easy to place it
where the bottom ACT sensor used to reside. We took out these sensors once we
mastered piloting the SC. If you still have your sensors installed, you can punch a hole in
the foam and run the LED to a spot of your liking.
12
NOTICE: There is no warranty on kits. It is your responsibility to install the board and lights. Kits cannot be returned. This kit can
consume a lot of current. Be careful if you plan to use a battery source that is capable of delivering a lot of current. Contact a
professional if you need assistance. Hyperdyne Labs assumes no responsibility for the misuse of this kit. Night flying can be
dangerous. User accepts all liability of using this kit in their plane and the responsibility of flying at night.
You can use a dab of hot glue to hold the LED in place. NOTE: Point the LED towards
the back of the plane and slightly down so you will be able to see it when the plane is
flying away from you.
The next LED is the X-port activity LED. We placed this where the upper ACT sensor
used to be:
13
NOTICE: There is no warranty on kits. It is your responsibility to install the board and lights. Kits cannot be returned. This kit can
consume a lot of current. Be careful if you plan to use a battery source that is capable of delivering a lot of current. Contact a
professional if you need assistance. Hyperdyne Labs assumes no responsibility for the misuse of this kit. Night flying can be
dangerous. User accepts all liability of using this kit in their plane and the responsibility of flying at night.
This LED comes on when you press the X-port button on your transmitter, so you have
some feedback that the circuit is working. It will also blink every 5 sec as a heartbeat.
For the wing clusters, take some packing tape and run the long ribbon cable on the
bottom of the wing. Tape down the ribbon cable as flat as possible.
You want the 2 parallel red LEDs to point forwards and backwards on the wing. You
want the other LED to bend up and point up to the top of the wing. This will allow you
to see your plane while banking with the top of the wing facing you. You can achieve
this by either punching a hole in the foam and running the LED to the top of the wing, or
install the wing cluster close to the end of the wing and simply bend the LED up. This
latter method is shown below:
Use packing tape to secure the wing clusters and cover up the exposed leads.
The last LED to install is the white front cluster. You can run the assembly through the
firewall into the cowl. It might be easier to unsolder the wires first so you can run the
wires through the motor wire holes through the engine firewall.
Install the cluster in the air vent on the cowl bottom. You can use hot glue to hold it in
place. The front cluster will allow you to see the front of your plane and aid in landing.
This cluster is very bright and compliments the wing tip LEDs for easy night landings!
NOTE: You want the LED cluster to point slightly downward so it is easier to see while
flying, and also will illuminate the ground during a landing.
14
NOTICE: There is no warranty on kits. It is your responsibility to install the board and lights. Kits cannot be returned. This kit can
consume a lot of current. Be careful if you plan to use a battery source that is capable of delivering a lot of current. Contact a
professional if you need assistance. Hyperdyne Labs assumes no responsibility for the misuse of this kit. Night flying can be
dangerous. User accepts all liability of using this kit in their plane and the responsibility of flying at night.
Next install the processor board and plug in the LED ribbon cable to the header on the
board. The ribbon cable should be facing away from the board if it is plugged in
correctly.
The processor board fits nicely up against the firewall inside the Cub. You can use
Velcro or double-sided tape to secure it onto the foam wall.
15
NOTICE: There is no warranty on kits. It is your responsibility to install the board and lights. Kits cannot be returned. This kit can
consume a lot of current. Be careful if you plan to use a battery source that is capable of delivering a lot of current. Contact a
professional if you need assistance. Hyperdyne Labs assumes no responsibility for the misuse of this kit. Night flying can be
dangerous. User accepts all liability of using this kit in their plane and the responsibility of flying at night.
Next unplug the X-port extension cable already plugged into the stock SC receiver. Now
take the X-port cable on the processor board and plug it into your receiver, like shown:
The light processor board also has an X-port male “passthrough” connector. Take the
Super Cub X-port extension cable that runs down the battery box (this is the cable that is
normally plugged into the stock receiver) and plug it into the male header on the
processor board.
Now you can still use other X-port devices (drop module, combat module, etc) along with
your light kit!
YOU ARE DONE WITH INSTALLATION!
USING THE FEATURES YOUR LIGHT KIT
This section describes the features of your light kit and how to use them after installation.
The kit is powered from the main battery, so once you connect the battery the light board
becomes active. The processor board controls all lighting, and there are 4 light modes
that you can choose from:
1)
2)
3)
4)
Off mode - no lights (default)
Taxi light mode - wings, tail, and blue underside blink
Flight mode - all lights on, tail and blue underside blink in unison
Extended flight mode - all lights on, tail and underside blink, wingtips blink at
faster rate.
16
NOTICE: There is no warranty on kits. It is your responsibility to install the board and lights. Kits cannot be returned. This kit can
consume a lot of current. Be careful if you plan to use a battery source that is capable of delivering a lot of current. Contact a
professional if you need assistance. Hyperdyne Labs assumes no responsibility for the misuse of this kit. Night flying can be
dangerous. User accepts all liability of using this kit in their plane and the responsibility of flying at night.
By default, the lights are off when the board is first powered on. In this mode, the lights
will go through a power on verification a couple seconds after the battery is connected.
Each light will blink to let you know that it is working ok. Each time you connect a
battery to the SC, you will only see this verification step if the “off mode” is selected.
Changing light modes using X-port:
To change light modes, simply press the X-port button down until you see the X-port
activity LED illuminate. Once it does you can let go of the X-port button. The kit will
cycle to the next LED mode (which is taxi mode if you were in off mode).
After 1 sec you will also see that the activity LED will blink the number of times equal to
how many presses you have done (you can actually key in several button presses to get to
other light modes quickly). After the last mode (Extended flight mode) is entered, the
next button press will cycle back to the beginning of the list (off mode).
For advanced setup, let’s say you are in the taxi light mode. If you wish to go to the off
mode immediately, you can press the x-port button 3 times in succession. About 1 sec
after the last button press and release, the x-port activity LED will respond with 3 blinks
and the lights will go off. Now you are in the off mode. So you can key in as many
button presses to get to the light mode you need without having to single step through
each one.
Glitch mitigation:
The light mode is also stored in the chip so when you change batteries, have a battery
glitch, or power is somehow removed – the light mode comes back to the saved setting
automatically. This allows you to make sure your plane stays lit in flight!
Failsafe mode:
For the Super Cub stock radio equipment, there is also a failsafe mode if the transmitter is
shut off or interfered. The kit will begin to blink all the lights on the plane when this
occurs. If you lose your plane and have to find it, this mode will allow you to find it after
some time. After 5 minutes of lost signal, the blinking rate becomes very long so to
conserve battery life in order to maximize the success of your rescue effort!
Locking in the light mode, using other X-port devices:
You can also “lock in” the light mode so subsequent button presses do not switch light
modes. If you are using another x-port device, this allows you to lock in the light mode
so they don’t react to the button presses meant for the other x-port device.
17
NOTICE: There is no warranty on kits. It is your responsibility to install the board and lights. Kits cannot be returned. This kit can
consume a lot of current. Be careful if you plan to use a battery source that is capable of delivering a lot of current. Contact a
professional if you need assistance. Hyperdyne Labs assumes no responsibility for the misuse of this kit. Night flying can be
dangerous. User accepts all liability of using this kit in their plane and the responsibility of flying at night.
To enter this mode, press and hold the X-port button on your radio for 10 seconds. The
plane will respond by blinking all its lights 5 times. Let go of the x-port button. The 5
blinks means the board will no longer accept x-port presses for changing light modes.
You can verify this by pressing the x-port button and seeing that the x-port activity LED
no longer lights up in response to button presses.
Now you can use a drop module, combat module, etc with the light kit. Imagine night
combat with a friend or night drop module contests!!
To unlock the light mode, press the x-port button again for 10 sec. The plane will
respond by blinking all its lights 3 times, telling you that it will now monitor the x-port
button to change light modes. Let go of the x-port button. You can verify the mode is
correct by pressing the x-port button and seeing the x-port activity LED illuminate.
It is not recommended to fly at night with a secondary x-port device and the light kit
unlocked. This can cause you to turn off the LEDs unexpectedly while using the x-port
Tx button. Flying your plane at night without navigation lights is extremely dangerous
and should be avoided.
The lock mode is also remembered by the chip when power is removed. This is also
beneficial if you experience power glitches or other issues during flight. The next time
you connect up a battery, the light board will automatically come up in its last stored light
mode and the saved lock mode.
NOTE: some PZ warbird ZX-10 electronics actually glitch and make the light kit think
the x-port button was pressed when it was not. This is not something that you want to
happen mid flight, as the kit could erroneously turn off the lights while you are flying.
To avoid this you can use the lock mode before flying the plane. By locking in the flight
light mode, any glitches by the stock radio equipment wont cause catastrophic changes to
your flight!
For safety reasons we recommend you lock the light mode before takeoff no matter
type of R/C plane. This gives you maximum protection against radio blackouts,
glitching, etc. The lights will always operate in the mode you set them prior to
takeoff as long as the battery source can deliver the necessary power.
18
NOTICE: There is no warranty on kits. It is your responsibility to install the board and lights. Kits cannot be returned. This kit can
consume a lot of current. Be careful if you plan to use a battery source that is capable of delivering a lot of current. Contact a
professional if you need assistance. Hyperdyne Labs assumes no responsibility for the misuse of this kit. Night flying can be
dangerous. User accepts all liability of using this kit in their plane and the responsibility of flying at night.
Next are different views of the HobbyZone™ Super Cub with the installed lights.
Bottom:
Top:
19
NOTICE: There is no warranty on kits. It is your responsibility to install the board and lights. Kits cannot be returned. This kit can
consume a lot of current. Be careful if you plan to use a battery source that is capable of delivering a lot of current. Contact a
professional if you need assistance. Hyperdyne Labs assumes no responsibility for the misuse of this kit. Night flying can be
dangerous. User accepts all liability of using this kit in their plane and the responsibility of flying at night.
Back:
Front:
20
NOTICE: There is no warranty on kits. It is your responsibility to install the board and lights. Kits cannot be returned. This kit can
consume a lot of current. Be careful if you plan to use a battery source that is capable of delivering a lot of current. Contact a
professional if you need assistance. Hyperdyne Labs assumes no responsibility for the misuse of this kit. Night flying can be
dangerous. User accepts all liability of using this kit in their plane and the responsibility of flying at night.
Right side midline:
Left side top:
21
NOTICE: There is no warranty on kits. It is your responsibility to install the board and lights. Kits cannot be returned. This kit can
consume a lot of current. Be careful if you plan to use a battery source that is capable of delivering a lot of current. Contact a
professional if you need assistance. Hyperdyne Labs assumes no responsibility for the misuse of this kit. Night flying can be
dangerous. User accepts all liability of using this kit in their plane and the responsibility of flying at night.
NIGHT FLYING TIPS
Below are some flying tips to help you discern the orientation of the plane during night
flight. We have engineered the lights to allow a skilled pilot to easily visualize the plane
at any angle just by observing the visible light pattern.
In the below diagrams, we assume the Flight mode lights are enabled.
Light pattern when flying away from you:
Descending flight
blinking
Ascending flight
blinking
Light pattern when flying towards you:
White cluster
22
NOTICE: There is no warranty on kits. It is your responsibility to install the board and lights. Kits cannot be returned. This kit can
consume a lot of current. Be careful if you plan to use a battery source that is capable of delivering a lot of current. Contact a
professional if you need assistance. Hyperdyne Labs assumes no responsibility for the misuse of this kit. Night flying can be
dangerous. User accepts all liability of using this kit in their plane and the responsibility of flying at night.
Light pattern when flying right to left:
Level flight or
banking away from
you
Direction of flight
Green fuselage indicator
Banking
towards you
Direction of flight
Light pattern when flying left to right:
Level flight or banking
away from you
Yellow fuselage indicator
Direction of flight
23
NOTICE: There is no warranty on kits. It is your responsibility to install the board and lights. Kits cannot be returned. This kit can
consume a lot of current. Be careful if you plan to use a battery source that is capable of delivering a lot of current. Contact a
professional if you need assistance. Hyperdyne Labs assumes no responsibility for the misuse of this kit. Night flying can be
dangerous. User accepts all liability of using this kit in their plane and the responsibility of flying at night.
Banking towards you
Direction of flight
With these beginning diagrams, you can see that the orientation of the plane is easily
discerned from the light patterns. For your first night flight, memorize which lights are
where and start by flying easy level laps around your flying area. This will give you the
necessary experience with decoding the plane orientation from just the light patterns.
Experienced night pilots can also perform advanced night flying, such as loops, inverted
flight, stalls, etc. by utilizing the light patterns. You will find in no time that night flying
is not only fun but very easy with the light kit!
BATTERY CONSIDERATIONS
With the stock 7-cell NiMh battery pack, the light module will not be as bright as
possible. Plus night flying on this battery can be tenuous as you don’t have extra thrust
needed to compensate for flying at night. We recommend for night flying that you step
up to a 8-cell NiMh pack or better yet a 9-cell NiMh pack. The 8-cell pack will fit in the
stock battery box with no additional modifications. The 9-cell pack will fit with some
minor mods, basically cutting the plastic rail on back of the battery box and cutting away
some of the foam so the 9th cell will fit through the battery box. The mods take no more
than 5 minutes to do. You can get these type of NiMh battery packs (with the stock minitamiya plug already installed) from places online like www.all-battery.com and
www.batteryspace.com.
Furthermore, if you want the best power you can step up to a 3S 11.1V li-poly pack with
the SC. A 1300mAH 3S pack will fit in the battery box as well. With this setup, make
sure you change the jumper on the stock receiver to switch the cutoff voltage so that is
compatible with li-po packs. The SC instruction manual goes over how to do this.
As always, test out your lights and plane before doing a night flight. Check full throttle
to make sure the lights stay on. If they dim that is ok, but if the wingtips begin to go off
then the battery does not have enough voltage (the wing LEDs will go off if the battery
voltage goes below 6V). When using a li-po battery pack, beware you will not have any
dimming of the LEDs, so it will be hard to tell when your pack is getting low. Li-po
packs hold their voltage curve very well. So the lights will look bright throughout your
24
NOTICE: There is no warranty on kits. It is your responsibility to install the board and lights. Kits cannot be returned. This kit can
consume a lot of current. Be careful if you plan to use a battery source that is capable of delivering a lot of current. Contact a
professional if you need assistance. Hyperdyne Labs assumes no responsibility for the misuse of this kit. Night flying can be
dangerous. User accepts all liability of using this kit in their plane and the responsibility of flying at night.
entire session, but that means that you cannot easily tell when the receiver battery cutoff
will happen. Time your flights appropriately as to not put your plane or people in
jeopardy due to low battery cutoffs during night flights!
POWER CONSUMPTION
The light board uses a variable amount of amperage based on the battery pack you use.
Listed below are typical values for current consumption based on different battery
voltage configurations:
Light board in flight mode:
Battery config
Batt voltage (V)
7-cell NiMh
8-cell NiMh
9-cell NiMh
11.1V 3S lipo
8.4
9.6
10.8
11.1
Average light board
current (A)
.200
.260
.340
.360
Average light board
power (W)
1.7
2.5
3.7
4.0
Average light board
current (A)
.150
.180
.230
.250
Average light board
power (W)
1.3
1.7
2.5
2.8
Light board in extended flight mode:
Battery config
Batt voltage (V)
7-cell NiMh
8-cell NiMh
9-cell NiMh
11.1V 3S lipo
8.4
9.6
10.8
11.1
Take these figures into account when choosing a battery for your system. Flight times
can vary between 6-15 minutes at night based on your battery capacity, wind speed, and
your flying habits.
Enjoy your light kit and please be a safe and responsible night pilot!!
25
NOTICE: There is no warranty on kits. It is your responsibility to install the board and lights. Kits cannot be returned. This kit can
consume a lot of current. Be careful if you plan to use a battery source that is capable of delivering a lot of current. Contact a
professional if you need assistance. Hyperdyne Labs assumes no responsibility for the misuse of this kit. Night flying can be
dangerous. User accepts all liability of using this kit in their plane and the responsibility of flying at night.