1
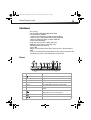
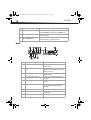
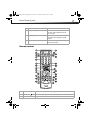
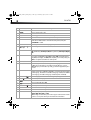
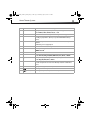
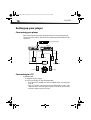
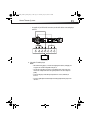
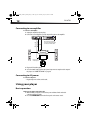
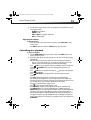
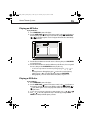
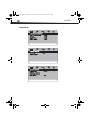
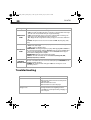
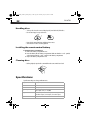
USER GUIDE
DX-HTIB_10-0823_MAN_ENG_V3.fm Page 1 Thursday, July 29, 2010 2:57 PM
Home Theater System
DX-HTIB
Us e r G u i d e
DX-HTIB_10-0823_MAN_ENG_V3.fm Page 2 Thursday, July 29, 2010 2:57 PM
DX-HTIB_10-0823_MAN_ENG_V3.fm Page 3 Thursday, July 29, 2010 2:57 PM
Home Theater System
Contents
Welcome . . . . . . . . . . . . . . . . . . . . . . . . . . . . . . . . . . . . . . . . . .3
Important safety instructions . . . . . . . . . . . . . . . . . . . . . . . . . . .3
Features . . . . . . . . . . . . . . . . . . . . . . . . . . . . . . . . . . . . . . . . . .5
Setting up your player . . . . . . . . . . . . . . . . . . . . . . . . . . . . . . .10
Using your player. . . . . . . . . . . . . . . . . . . . . . . . . . . . . . . . . . .12
Troubleshooting . . . . . . . . . . . . . . . . . . . . . . . . . . . . . . . . . . . .20
Maintaining . . . . . . . . . . . . . . . . . . . . . . . . . . . . . . . . . . . . . . .21
Specifications . . . . . . . . . . . . . . . . . . . . . . . . . . . . . . . . . . . . .22
Legal notices . . . . . . . . . . . . . . . . . . . . . . . . . . . . . . . . . . . . . .23
90-day limited warranty . . . . . . . . . . . . . . . . . . . . . . . . . . . . . .24
Manufactured under license from Dolby Laboratories. Dolby and the double-D symbol are trademarks of Dolby
Laboratories.
Welcome
Congratulations on your purchase of a high-quality Dynex product. Your DX-HTIB represents
the state of the art in home theater system design and is designed for reliable and
trouble-free performance.
Important safety instructions
1
2
3
4
5
6
7
Read these instructions.
Keep these instructions.
Heed all warnings.
Follow all instructions.
Do not use this apparatus near water.
Clean only with a dry cloth.
Do not block any ventilation openings. Install in accordance with the manufacturer's
instructions.
8 Do not use near any heat sources such as radiators, heat registers, stoves, or other
apparatus (including amplifiers) that produce heat.
DX-HTIB_10-0823_MAN_ENG_V3.fm Page 4 Thursday, July 29, 2010 2:57 PM
DX-HTIB
4
9 Protect the power cord from being walked on or pinched particularly at plugs,
convenience receptacles, and the point where they exit from the apparatus.
10 Only use attachments/accessories specified by the manufacturer.
11 Unplug this apparatus during lightning storms or when unused for long periods of
time.
12 Refer all servicing to qualified service personnel. Servicing is required when the
apparatus has been damaged in any way, such as power-supply cord or plug is
damaged, liquid has been spilled or objects have fallen into the apparatus, the
apparatus has been exposed to rain or moisture, does not operate normally, or has
been dropped.
13 To reduce the risk of fire or electric shock, do not expose this device to rain, moisture,
dripping, or splashing, and no objects filled with liquids, such as vases, shall be placed
on it.
14 The wall plug is the disconnecting device. The plug must remain readily operable.
15 Batteries should not be exposed to excessive heat such as sunshine, fire, or the like.
Caution: Danger of explosion if battery is incorrectly replaced. Replace only with the same or
equivalent type.
Discs
• Do not use irregularly shaped discs, such as heart-shaped or star-shaped discs,
because they may cause your player to malfunction.
• Do not stick paper, tape, or glue on a disc.
• Do not expose a disc to direct sunlight or heat sources.
• Do not touch the surface of a disc. Handle a disc by its edge.
• Clean a disc by wiping the disc from the center out with a cleaning cloth.
• Remove a disc from your player and store it in its case after playing.
• Some playback operations of discs may be intentionally limited by software producers.
Because your player plays discs according to the disc contents the software producers
designed, some playback features may not be available. Also refer to the instructions
supplied with the discs.
DX-HTIB_10-0823_MAN_ENG_V3.fm Page 5 Thursday, July 29, 2010 2:57 PM
Home Theater System
5
Features
•
•
•
•
•
•
•
•
•
•
•
•
Disc capacity: 1
DVD compatibility: DVD, DVD±R/RW, CD, MP3, WMA
Total System Power: 200 Watts
Front/Center/Surround speakers: 30 Watts per channel, 8 Ohms,
Frequency response: 100Hz-20kHz±3dB, Sensitivity: 82dB±3dB
Subwoofer: 50 Watts into 6 Ohms, Sensitivity: 82dB±3dB
Audio Decoding: Dolby Digital
Component video upconversion: 1080p, 1080i, 720p
HDMI video out upconversion: 1080p, 1080i, 720p
AM/FM Digital Tuner with 40 Presets
Inputs: 2 RCA
Outputs: (Front) Headphone, (Back) 1 RCA, 1 Composite Video, 1 Component Video, 1
HDMI
• Accessories included: Quick Setup Guide, RCA Stereo Cable, Composite Video Cable, AM
and FM Antennas, Remote control with batteries, and speaker wire
Front
#
1
Component
Standby/On button
Description
Press to turn your player on. Press again to go to standby.
2
Headphone jack
Plug a set of headphones into this jack for private listening.
3
USB port
Plug a USB device into this port.
4
5
Remote control sensor
Disc tray
Detects the signal from the remote control.
Place a DVD or CD disc in this tray to begin playback.
6
Display screen
Displays time or information about the radio station or disc
playing.
7
Eject/Stop button
Press to open/close the disc tray.
While playing a disc, press to stop playback.
8
(previous) button
Press to skip to the previous chapter or track.
9
(next) button
Press to skip to the next chapter or track.
DX-HTIB_10-0823_MAN_ENG_V3.fm Page 6 Thursday, July 29, 2010 2:57 PM
DX-HTIB
6
#
Component
Description
10
SOURCE button
Press repeatedly to cycle through the available sources,
including FM/AM Radio, Audio input, and CD/DVD modes.
11
Volume knob
Turn clockwise to increase the volume or counterclockwise to
decrease the volume.
12
PLAY/ENTER button
In DVD/CD mode, press to begin playback.
In menu mode, press to accept the selection.
Back
#
Component
Description
1
FM antenna connection
Connect an FM antenna here to improve FM
radio reception.
2
Component (Y, Pb/Cb, Pr/Cr) output
jacks
Connect a TV with component inputs to these
jacks. These cables normally have red, green,
and blue connectors.
3
Coaxial output jack
Connect a Dolby Digital amplifier with coaxial
input to this jack.
4
AUX 1 and 2 (audio) input jacks
Connect an external audio sound source to
these jacks.
5
Active SW output jack
Connect an amplifier with Subwoofer input to
this jack.
6
5.1 channel speaker output jacks
Connect the center, left front, right front, left
surround, and right surround speakers to
these jacks.
7
8
AC power supply cord
AM antenna connection
9
HDMI output jack
Plug this power cord into an AC power outlet.
Connect an AM antenna here to improve AM
radio reception.
Connect this jack to a TV with HDMI input.
DX-HTIB_10-0823_MAN_ENG_V3.fm Page 7 Thursday, July 29, 2010 2:57 PM
Home Theater System
#
7
Component
Description
10
Audio (L & R) output
Connect a TV with L/R audio inputs to these
jacks. These cables normally have red and
white connectors.
11
Video output jack
12
Optical output jack
Plug a composite A/V device, such as a TV, into
this jack. This cable normally has a yellow
connector.
Connect a Dolby Digital amplifier with digital
optical input to this jack.
Remote control
#
Button
Description
1
STANDBY/ON
Press to turn on your player. Press again to put your player in Standby mode.
2
USB
Press to select the USB source.
DX-HTIB_10-0823_MAN_ENG_V3.fm Page 8 Thursday, July 29, 2010 2:57 PM
DX-HTIB
8
#
Button
Description
3
4
CD/DVD
AM/FM
Press to select the CD/DVD source.
Press to select the radio source.
5
6
MO/ST
Numbers
Press to toggle between mono and stereo radio signals.
Press to enter channel numbers or the parental control password.
7
SEARCH
8
SETUP
In playback mode, press this button once and the TV screen will display a search
menu. Press a number button to enter the time/track you want, then press
PLAY/ENTER to confirm.
Press to open the DVD General Setup Page (menu).
9
, , , and
arrow keys
Press to navigate in the on-screen DVD menus.
10
DISPLAY
11
TONE
12
TUNE+/TUNE–
Press to cycle through information about the DVD/CD, including Single Elapsed,
TR (Track Remain), Total Elapsed, DR (Directory Remain), Title Elapsed, Display
off.
Press to cycle through the 5.1 speakers (5.1 CH output should be ON) to set the
tone. Choices include FL (front left), FR (front right), CEN (center), SL (surround
left), SR (surround right), and SUB (subwoofer). After you select the speaker, press
VOL+/– to adjust the bass/treble tone of the speaker.
Press to tune the radio up or down.
13
AUDIO
In DVD mode, press this button to change the audio language.
In CD mode, press this button to select Mono L, Mono R, Mix-mono, or Stereo.
Note: When you press this button repeatedly, you must wait approximately three
seconds.
14
SUBTITLE
15
PLAY/PAUSE
Press to turn on DVD sub-titles and select the subtitle language. Press this button
and the screen displays "SUBTITLE 01/XX XXXXX." "01" indicates the ordinal number
of this language, "XX" indicates total number of languages available, and "XXXXXX"
is the language. (The number of languages available depends on the DVD).
Press to begin playback of a CD or DVD. Press again to pause playback.
16
STOP
Press to stop CD or DVD playback.
17
(fast reverse)
Press to fast reverse a CD or DVD.
18
(fast forward)
Press to fast forward a CD or DVD.
19
OPEN/CLOSE
Press to open/close the disc tray.
20
21
AUX1
AUX2
Press to select AUX1 as the signal source.
Press to select AUX2 as the signal source.
22
RESOLUTION
Press repeatedly to cycle through the available resolution modes. Choices include
1080I, 1080P, 480I, 480P, or 720P.
Note: Setting a resolution that your TV cannot support could result in an unstable
picture or a loss of picture. Check your TV manual for more information.
DX-HTIB_10-0823_MAN_ENG_V3.fm Page 9 Thursday, July 29, 2010 2:57 PM
Home Theater System
#
Button
9
Description
23
ZOOM
In playback mode, press repeatedly to select the picture magnification. You can
select 2 times, 3 times, 4 times, 1/2, 1/3, or 1/4.
24
MEMORY
Press to save a radio station as a preset. See “Using the radio” on page 16.
25
DVD MENU
During DVD playback, press to go to the root menu on the DVD, then select an item
according to your preference. (This key is only valid on DVDs with multi-layer
menus.)
26
PLAY/ENTER
In menu mode, press to confirm selections in an on-screen menu or to open a
submenu.
In DVD mode, press to begin playback.
27
MUTE
Press to turn off the sound. Press again to turn on the sound.
28
SURROUND
Press to cycle through the available surround sound modes. Choices include
STEREO or 5.1 CH.
29
VOL+/VOL–
Press to increase or decrease the volume.
30
DSP
31
EQ
32
REPEAT A-B
Press repeatedly to cycle through the available preset sound modes. Choices
include Concert, Living room, Hall, Bathroom, Cave, Arena, or Church.
Press repeatedly to cycle through the available preset equalizer modes. Choices
include Pop, Jazz, Flat, Rock, or Classic.
In playback mode, press once to select a starting point to repeat, then press again
to set the end point. The selected section will be repeated. Press a third time to
cancel.
33
34
REPEAT
35
(next)
In playback mode, press to select a repeat mode.
Press to go to the next chapter on a DVD or the next track on a CD.
(previous)
Press to go to the previous chapter on a DVD or the previous track on a CD.
DX-HTIB_10-0823_MAN_ENG_V3.fm Page 10 Thursday, July 29, 2010 2:57 PM
DX-HTIB
10
Setting up your player
Connecting your player
Before connecting your player, refer to the picture below. Each connection must be solid.
Disconnect the power cables on all elements of the system until you have finished all of the
connections.
External DVD player
Player
Subwoofer
Center speaker
Left speaker
TV
Right speaker
Surround left
Surround right
Connecting to a TV
To connect to a TV:
1 Unplug the TV and your player.
2 Connect your TV using one of the following methods:
• Best - If your TV has an HDMI connection, use an HDMI cable to connect the player
to the TV.
• Better - If your TV has component connections (Y, Pb/Cb, Pr/Cr), use a three-cable
component cable to connect the player to the TV-set. You will also need to connect
the Audio (L & R) if you use this connection.
DX-HTIB_10-0823_MAN_ENG_V3.fm Page 11 Thursday, July 29, 2010 2:57 PM
Home Theater System
11
• Acceptable - If your TV has A/V connections, use the A/V cable to connect the player
to the TV.
Video Input Audio L Audio R
HDMI
Y
Pb/Cb
Pr/Cr
3 Plug in the TV and the player.
Notes:
• When a DVD is being played, we recommend changing the Resolution, TV Display, and
TV Type in order to make it compatible with your TV.
• You can connect the player to your TV in several different ways. Choose only one of
them because multiple connections can negatively influence the source and picture
quality.
• Do not turn the player on and off repeatedly. Allow three seconds (minimum) in
between.
• Do not use digital optical or coaxial outputs and analog output from the player at the
same time.
DX-HTIB_10-0823_MAN_ENG_V3.fm Page 12 Thursday, July 29, 2010 2:57 PM
DX-HTIB
12
Connecting to an amplifier
To connect to an amplifier:
Coaxial cable
Optical cable
Video cable
1 Unplug the amplifier and your player.
2 Connect the coaxial (digital or optical) output of the player to the amplifier.
Use either the digital
coaxial or digital optical
connection and cable.
Connect to
video input
3 Plug in the TV and the player.
4 Access the Audio Setup page from the System Setup menu to setup the audio output of
the player. See “AUDIO SETUP PAGE” on page 20.
Connecting to AC power
To connect to AC power:
• Plug the AC power cord into an AC outlet.
Using your player
Basic operation
Turning on your player and loading a disc:
1 Make sure that your player is connected to power and that all video and audio
connections have been made.
2 Press the STANDBY/ON button on the front panel or the remote control.
DX-HTIB_10-0823_MAN_ENG_V3.fm Page 13 Thursday, July 29, 2010 2:57 PM
Home Theater System
13
3 Press the button on the remote control corresponding to the sound/video source you
want. Options include:
• CD/DVD for disc playback
• AM/FM for radio
• AUX1 or AUX2 for an external sound source
• USB for a USB flash drive
Adjusting the volume
To adjust the volume:
• Rotate the volume control on the front of your player or press VOL+/VOL– on the
remote control.
• Press MUTE to mute the sound. Press MUTE again to restore the sound.
Controlling disc playback
To control disc playback:
1 Press the OPEN/CLOSE button on the remote control (or the EJECT button on your
player). The disc tray opens.
2 Place a disc, label side up, in the disc tray, then close the tray. The disc starts playing
automatically.
Note: Most DVDs and your player have region codes that help control illegal distribution of
DVDs. The region code for your player is 1. You can only play DVDs with a region code of 1
or ALL. The region code for a DVD is printed on the DVD or the DVD packaging.
• Press STOP once to stop playback. Your player remembers where you stopped. If
you press PLAY/PAUSE, your player starts playing at the point where you
stopped.
• Press STOP twice to stop playback. If you press , your player starts playing at
the beginning of the disc.
• Press PLAY/PAUSE to pause playback. Press this button again to resume
playback.
• Press
to fast-forward on the disc. Each time you press this button, the
fast-forward speed changes from 2- 4-8-16-32 times, then back to normal speed.
• Press
to fast-reverse on the disc. Each time you press this button, the fast-reverse
speed changes from 2- 4-8-16-32 times, then back to normal speed.
• Press to go to the next title, chapter, or track.
• Press
to go to the previous title, chapter, or track.
• Press REPEAT repeatedly to cycle through the repeat options of the DVD or CD.
• Press REPEAT A-B once to select the beginning point on a DVD to repeat. Press
REPEAT A-B again to select the end point on a DVD to repeat. The DVD automatically
repeats the selected portion of the DVD. Press again to resume normal playback.
• Press the number buttons to input the number of the track you want to listen to. For
two digit track numbers, press the first digit, then the second digit. For example, for
track 16, press 1, then press 6. For track 6, press 0, then press 6, or press 6, then press
PLAY/ENTER.
DX-HTIB_10-0823_MAN_ENG_V3.fm Page 14 Thursday, July 29, 2010 2:57 PM
DX-HTIB
14
Viewing disc information
To view disc information:
• During playback, press DISPLAY one or more times to view specific disc information.
The information available depends on the type of disc in the player. You can view:
• Title (or Single) Elapsed–Shows the elapsed playing time for the title.
• Track Remain–Shows the remaining playing time for the track.
• Total Elapsed–Shows the total elapsed playing time.
• Total Remain–Shows the total remaining playing time.
• Display Off–Turns off the information display.
Note: The information display automatically turns off if you do not press DISPLAY within
three seconds.
Opening the DVD main menu
To open the DVD menu:
• During playback, press MENU. If the DVD has a main menu, the menu opens.
Note: Contents of DVD main menus vary from DVD to DVD. Some DVDs only let you start
playback from the main menu.
Selecting a play mode or audio language
To select a play mode (CD) or an audio language (DVD):
1 During playback, press AUDIO. If a CD is playing, you can choose one of four play
modes, including Mono L, Mono R, Mix-mono, and Stereo. If a DVD is playing, the
audio display appears showing the current audio language and the total number of
audio languages available.
2 Press AUDIO one or more times to select the play mode or audio language you want.
Notes:
• The audio language display turns off if you do not press AUDIO within three seconds.
• Some DVDs only let you select an audio language from the DVD main menu.
Selecting a subtitle language
Some DVDs are recorded with subtitle languages that appear as text on the screen.
To select a subtitle language:
1 During playback, press SUBTITLE. The subtitle display appears showing the current
subtitle language and the total number of subtitle languages.
2 Press SUBTITLE one or more times to select a different subtitle language.
3 To turn off subtitles, press SUBTITLE until Subtitle Off appears.
Notes:
• The subtitle display turns off if you do not press SUBTITLE within three seconds.
• Some DVDs only let you select a subtitle language from the DVD main menu.
DX-HTIB_10-0823_MAN_ENG_V3.fm Page 15 Thursday, July 29, 2010 2:57 PM
Home Theater System
15
Playing an MP3 disc
To play an MP3 disc:
1 Press STANDBY/ON to turn on the player.
2 Press the OPEN/CLOSE button on the remote control (or the (eject) button on
the front panel) to open the disc tray. Insert an MP3 disc and press the OPEN/CLOSE
or (eject) button again to close it. Your player will read the disc automatically
and display the menu.
0 0: 00 00 : 00
0 01/0 12
\ L I LA_ _ \
MP3
MP3
MP3
MP3
01
02
03
04
3 Press the direction buttons to move the cursor to a directory, then press PLAY/ENTER
to enter the directory.
4 Press the direction buttons to enter the subdirectory or the file area, select a song with
the cursor, then press the PLAY/ENTER button to play the song.
• To select other songs under the current directory during playing, press or , , or
.
• To change directories during playing, press to move the icon to the directory
symbol, press or to select other directories, then press PLAY/ENTER.
• During playback, you can use Fast forward/rewind, Pause, Stop, and so on.
Playing a JPEG disc
To play a JPEG disc:
1 Press STANDBY/ON to turn on the player.
2 Press the OPEN/CLOSE button on the remote control (or the (eject) button on
front panel) to open the disc tray. Insert a JPEG disc and press the OPEN/CLOSE or
(eject) button again to close it. Your player will read the disc automatically and
display the menu.
3 To select other songs under the current directory during playback, press or , , or .
4 Press or to select the required directory. To view it keep pressing the PLAY/
ENTER button until you find the picture you want.
DX-HTIB_10-0823_MAN_ENG_V3.fm Page 16 Thursday, July 29, 2010 2:57 PM
DX-HTIB
16
• To view a specific picture, input its number using the number buttons or press
or .
• To repeat a picture, press the REPEAT button.
• While playing, press STOP or DVD MENU button to return to the main menu.
• You can also use the options such as Fast forward/rewind, Pause, and so on.
Notes:
• Your JPEG picture may be distorted at the edge of some TVs. This is caused by the TV
and not your player.
• Your player can play digital JPEG-file photo discs and also supports photos created by
Photoshop.
Using the radio
To use the radio:
1 Press STANDBY/ON to turn on the player.
2 Press AM/FM to switch the player to radio mode and toggle between the AM and FM
bands.
3 To select a station:
• Press TUNE+ or TUNE– to adjust the frequency up or down a step (FM changes in
0.2 MHz steps and AM in 10 KHz steps).
4 To save a radio station as a preset.
• Press the TUNE+/TUNE- button to tune to the desired frequency.
• Press the MEMORY button once.
• Press the Number buttons (0~9) to enter the station number that you want to
allocate.
Note: Press the 0 and 1 buttons for the Station 1, (or press 1, then press PLAY/ENTER ). Press
the 1 and 0 buttons for Station 10.
• Repeat the above steps to save up to 20 radio stations.
• When you manually tune to an FM station with a weak signal, press the MO/ST
button on the remote control to switch from stereo mode to mono mode to reduce
the background noise.
Note: Stereo is not available in AM mode.
5 To select a preset station:
• Press the PRESET+/PRESET- or Number buttons to select a stored radio station.
6 To select Mono or Stereo while in FM mode, press the MO/ST button.When you select
stereo, the display shows a stereo signal. If the signal is not strong enough, you cannot
select Stereo.
Note: To improve radio reception, move the antenna to find the strongest signal for each
station.
DX-HTIB_10-0823_MAN_ENG_V3.fm Page 17 Thursday, July 29, 2010 2:57 PM
Home Theater System
17
Listening to a USB device
You can listen to audio and view JPG files using the USB port on your player. Before operating,
switch to USB mode.
To listen to a USB device:
1 Connect the USB device to the receiver.
2 Press the USB button on the remote control.
3 While playing the files, press the DVD MENU button to display the file browser, then
select the file you want.
4 Press the PLAY/ENTER button to start playback.
Note: The method of playback for files saved on a USB is the same as for other discs. For more
information, see BASIC OPERATION.
5 To exit the USB mode, press the CD/DVD, AUX 1, AUX 2, or AM/FM button on the
remote control to switch to other modes. You can also press the SOURCE button on the
front panel to switch to other modes.
Notes:
• A USB extension cable should not exceed 19.7 inches (0.5 m).
• Depending on the amount of data and media speed, it may take longer for your player
to read the contents of a USB media device. In some cases, reading time may be as
long as 60 seconds. This is not a malfunction.
• Some files may not play or display depending on the content, even if they are in a
supported format.
Using the Setup menu
Your player has a Setup menu you can use to adjust settings for your player.
To use the Setup menu:
1
2
3
4
5
6
Press SETUP. The General Setup Page opens.
Press or to select the menu page you want, then press ENTER.
Press or to select an option, then press to open the sub-menu.
Press or select an option, then press PLAY/ENTER to confirm your selection.
Press to go to a previous menu.
Repeat Step 2 through Step 4 to select other menu pages.
DX-HTIB_10-0823_MAN_ENG_V3.fm Page 18 Thursday, July 29, 2010 2:57 PM
18
Setup menus
DX-HTIB
DX-HTIB_10-0823_MAN_ENG_V3.fm Page 19 Thursday, July 29, 2010 2:57 PM
Home Theater System
19
Setup menu pages
Page
GENERAL
SETUP PAGE
LANGUAGE
SETUP
Options
CLOSE CAPTION–Turn on DVD closed captions.
SCREEN SAVER–Turns on a screen saver that appears when the same image stays on the
screen for five minutes.
VERSION–Shows the model number of the player.
DEFAULT–Reset the player to the original factory default settings.
OSD LANGUAGE–Selects the language of the screen displays and setup menus. You can
choose English, French, or Spanish.
AUDIO (Language)–Selects the DVD language. When playing DVD discs, the player will
automatically play the default language of the disc. The following languages are available:
English, French, Spanish, German, Italian, Russian, Chinese, and Portuguese.
SUBTITLE (Language)–Turns on subtitles. The player will automatically play the default
subtitle language of the DVD. The following languages are available: English, French,
Spanish, German, Italian, Russian, Chinese,and Portuguese.
DISC MENU (Language)–Selects the menu language. The following languages are available:
English, French, Spanish, German, Italian, Russian, Chinese, and Portuguese.
DX-HTIB_10-0823_MAN_ENG_V3.fm Page 20 Thursday, July 29, 2010 2:57 PM
DX-HTIB
20
Page
Options
TV TYPE–Sets the aspect ratio of the video image. Choices include:
• 4:3PS –Select this option when the player is connected to a normal TV. Wide-screen images
are shown on the screen, but with some parts cropped automatically.
•
4:3LB–Select this when the player is connected to a normal TV. Wide-screen images are
VIDEO SETUP
shown on the screen, with a black band on the top and bottom.
PAGE
• 16:9– Displays the video image full-screen when your player is connected to a widescreen
TV.
Resolution–This option is used to choose the resolution for HDMI: 480i, 480p, 720p, 1080i,
1080p.
SURROUND–Sets the downmix output of your player. You can choose the following:
• Stereo–stereo audio output
• 5.1 CH–to set the 5.1 CH audio output
DIGITAL OUTPUT–Sets the digital output of your player. When playing DOLBY or MPEG discs,
AUDIO SETUP the coaxial and optical terminal outputs in SPDIF/RAW format. The connected amplifier must
be able to decode the Dolby Digital or MPEG. You can select SPDIF/PCM when the player is
PAGE
connected with a 2-CH digital stereo amplifier.
CHANNEL DELAY–Adjusts the channel delay for the speakers.
DSP Mode - Selects the reverb mode. Choices include Concert, Living room, Hall,
Bathroom, Cave, Arena, and Church.
PARENTAL–Blocks DVD playback based on ratings. The player has eight different age ratings
that can be selected. Move the cursor to select one of them, then press PLAY/ENTER. You are
PARENTAL
reminded to input the password.
CONTROL PAGE
PASSWORD–The original password of the player is 1389. You can change it to a new
password if you choose.
Troubleshooting
Problem
No sound or distorted sound.
Cannot fast-forward or fast-reverse
through a movie.
Solution
• Adjust the volume.
• Make sure that all cables are inserted correctly into the
appropriate jacks.
• Make sure that the disc is clean.
• Make sure that there is a disc in the player.
• You cannot fast-forward through opening credits and
warning information at the beginning of a movie.
• Some DVDs do not allow rapid scanning or skipping of
titles or chapters.
DX-HTIB_10-0823_MAN_ENG_V3.fm Page 21 Thursday, July 29, 2010 2:57 PM
Home Theater System
Problem
21
Solution
No picture on the TV
• Make sure that your player is connected correctly.
• Make sure that the TV is set to video mode and that the
input source is selected correctly.
• Make sure that the scanning mode on the player
matches the TV.
Picture is distorted.
• During fast-forwarding or fast-reversing, distortion is
normal.
• The DVD may be damaged. Try another DVD.
• Make sure that the battery is fresh.
• Make sure that nothing is blocking the IR sensor.
• Make sure that you point the remote directly at the IR
sensor and that you are within 10 feet of the IR sensor.
• Make sure that the disc is inserted with the label side
up.
• Make sure that the disc is compatible with your player.
Your player can play DVDs and audio CDs.
Remote control does not work.
Disc does not play.
Play starts, then stops immediately.
• Make sure that the region code for a DVD matches the
region code for your player. Your player’s region code is
1. The DVD’s region code is on the DVD or the DVD
packaging.
• Make sure that the disc is not dirty.
• If condensation has formed inside your player, let your
player dry out.
Maintaining
Cleaning your player
Clean the outside of your player with a clean cloth, slightly dampened with water.
Caution: Do not use liquid cleaners or aerosol cleaners because they may damage your
player.
DX-HTIB_10-0823_MAN_ENG_V3.fm Page 22 Thursday, July 29, 2010 2:57 PM
DX-HTIB
22
Handling discs
• To keep a disc clean, do not touch the play side (non-label side) of the disc.
• Do not attach paper or tape to the disc.
• Keep the disc away from direct sunlight or heat sources.
• Store the disc in a disc case after playback.
Installing the remote control battery
To install the remote control battery:
1 Remove the battery compartment cover.
2 Insert the battery into the battery compartment. Make sure that the + and – symbols
on the battery match the + and – symbols in the battery compartment.
3 Replace the battery compartment cover.
Cleaning discs
• Before playback, wipe the disc outwards from the center with clean cloth.
Specifications
Specifications subject to change without notice.
Compatible discs
DVD, CD, CD-R, MP3
Video format
MPEG2 for DVDs
Audio format
MPEG2, PCM, and stereo
Signal output
Video output: 1.0 V p-p
Audio output: Stereo, 1~2 V (RMS)
Outputs
(Front) Headphone, L/R audio output, Video output, 1 HDMI,
optical fiber output, coaxial output, 5.1 channel output.
Inputs
USB, AUX 1, 2
DX-HTIB_10-0823_MAN_ENG_V3.fm Page 23 Thursday, July 29, 2010 2:57 PM
Home Theater System
23
Power supply
~110V / 60 Hz
Max power
Frequency response
200 Watts
100 Hz to 20 KHz ±3dB
Audio S/N
Better than 80 dB, weight A
Operating temperature
Weight
41° to 95°F (5° to 35°C)
23.15 lbs (10.5 kg)
Dimensions
(W × D × H)
23.07 in. x 15.04 in. x 11.6 in.
(58.6 cm x 38.2 cm x 29.4 cm)
Legal notices
FCC Part 15
This device complies with Part 15 of the FCC Rules. Operation of this product is subject to the following two
conditions: (1) this device may not cause harmful interference, and (2) this device must accept any interference
received, including interference that may cause undesired operation.
This equipment has been tested and found to comply within the limits for a class B digital device, pursuant to Part
15 of the FCC Rules. These limits are designed to provide reasonable protection against harmful interference in a
residential installation. This equipment generates, uses, and can radiate radio frequency energy and, if not
installed and used in accordance with the instructions, may cause harmful interference to radio communications.
However, there is no guarantee that interference will not occur in a particular installation. If this equipment does
cause harmful interference to radio or television reception, which can be determined by turning the equipment
off and on, the user is encouraged to try to correct the interference by one or more of the following measures:
• Reorient or relocate the receiving antenna.
• Increase the separation between the equipment and receiver.
• Connect the equipment into an outlet on a circuit different from that to which the receiver is connected.
• Consult the dealer or an experienced radio/TV technician for help.
FCC warning
Changes or modifications not expressly approved by the party responsible for compliance with the FCC Rules
could void the user’s authority to operate this equipment.
Dolby License Notice and Trademark Acknowledgement
Manufactured under license from Dolby Laboratories. Dolby and the double-D symbol are trademarks of Dolby
Laboratories.
HDMI
HDMI, the HDMI logo, and High-Definition Multimedia Interface are trademarks or registered trademarks of HDMI
Licensing LCC.
DX-HTIB_10-0823_MAN_ENG_V3.fm Page 24 Thursday, July 29, 2010 2:57 PM
DX-HTIB
24
90-day limited warranty
Dynex Products (“Dynex”) warrants to you, the original purchaser of this new DX-HTIB (“Product”), that the
Product shall be free of defects in the original manufacture of the material or workmanship for a period of 90 days
from the date of your purchase of the Product (“Warranty Period”). This Product must be purchased from an
authorized dealer of Dynex brand products and packaged with this warranty statement. This warranty does not
cover refurbished Product. If you notify Dynex during the Warranty Period of a defect covered by this warranty
that requires service, terms of this warranty apply.
How long does the coverage last?
The Warranty Period lasts for 90 days from the date you purchased the Product. The purchase date is printed on
the receipt you received with the product.
What does this warranty cover?
During the Warranty Period, if the original manufacture of the material or workmanship of the Product is
determined to be defective by an authorized Dynex repair center or store personnel, Dynex will (at its sole option):
(1) repair the Product with new or rebuilt parts; or (2) replace the Product at no charge with new or rebuilt
comparable products or parts. Products and parts replaced under this warranty become the property of Dynex
and are not returned to you. If service of Products and parts are required after the Warranty Period expires, you
must pay all labor and parts charges. This warranty lasts as long as you own your Dynex Product during the
Warranty Period. Warranty coverage terminates if you sell or otherwise transfer the Product.
How to obtain warranty service?
If you purchased the Product at a retail store location, take your original receipt and the Product to the store you
purchased it from. Make sure that you place the Product in its original packaging or packaging that provides the
same amount of protection as the original packaging. If you purchased the Product from an online web site, mail
your original receipt and the Product to the address listed on the web site. Make sure that you put the Product in
its original packaging or packaging that provides the same amount of protection as the original packaging.
To obtain in-home warranty service for a television with a screen 25 inches or larger, call 1-888-BESTBUY. Call
agents will diagnose and correct the issue over the phone or will have an Dynex-approved repair person
dispatched to your home.
Where is the warranty valid?
This warranty is valid only to the original purchaser of the Product in the United States, Canada, and Mexico.
What does the warranty not cover?
This warranty does not cover:
• Customer instruction
• Installation
• Set up adjustments
• Cosmetic damage
• Damage due to acts of God, such as lightning strikes
• Accident
• Misuse
• Abuse
• Negligence
• Commercial use
• Modification of any part of the Product
• Plasma display panel damaged by static (non-moving) images applied for lengthy periods (burn-in).
DX-HTIB_10-0823_MAN_ENG_V3.fm Page 25 Thursday, July 29, 2010 2:57 PM
Home Theater System
25
This warranty also does not cover:
• Damage due to incorrect operation or maintenance
• Connection to an incorrect voltage supply
• Attempted repair by anyone other than a facility authorized by Dynex to service the Product
• Products sold as is or with all faults
• Consumables, such as fuses or batteries
• Products where the factory applied serial number has been altered or removed
REPAIR REPLACEMENT AS PROVIDED UNDER THIS WARRANTY IS YOUR EXCLUSIVE REMEDY. DYNEX SHALL NOT BE
LIABLE FOR ANY INCIDENTAL OR CONSEQUENTIAL DAMAGES FOR THE BREACH OF ANY EXPRESS OR IMPLIED
WARRANTY ON THIS PRODUCT, INCLUDING, BUT NOT LIMITED TO, LOST DATA, LOSS OF USE OF YOUR PRODUCT, LOST
BUSINESS OR LOST PROFITS. DYNEX PRODUCTS MAKES NO OTHER EXPRESS WARRANTIES WITH RESPECT TO THE
PRODUCT, ALL EXPRESS AND IMPLIED WARRANTIES FOR THE PRODUCT, INCLUDING, BUT NOT LIMITED TO, ANY
IMPLIED WARRANTIES OF AND CONDITIONS OF MERCHANTABILITY AND FITNESS FOR A PARTICULAR PURPOSE, ARE
LIMITED IN DURATION TO THE WARRANTY PERIOD SET FORTH ABOVE AND NO WARRANTIES, WHETHER EXPRESS OR
IMPLIED, WILL APPLY AFTER THE WARRANTY PERIOD. SOME STATES, PROVINCES AND JURISDICTIONS DO NOT
ALLOW LIMITATIONS ON HOW LONG AN IMPLIED WARRANTY LASTS, SO THE ABOVE LIMITATION MAY NOT APPLY TO
YOU. THIS WARRANTY GIVES YOU SPECIFIC LEGAL RIGHTS, AND YOU MAY ALSO HAVE OTHER RIGHTS, WHICH VARY
FROM STATE TO STATE OR PROVINCE TO PROVINCE.
Contact Dynex:
For customer service please call 1-800-305-2204
www.dynexproducts.com
Distributed by Best Buy Purchasing, LLC
7601 Penn Avenue South, Richfield, Minnesota, U.S.A. 55423-3645
© 2010 BBY Solutions, Inc.
All rights reserved. DYNEX is a trademark of BBY Solutions, Inc. Registered in some countries. All other products
and brand names are trademarks of their respective owners.
DX-HTIB_10-0823_MAN_ENG_V3.fm Page 28 Thursday, July 29, 2010 2:57 PM
www.dynexproducts.com (800) 305-2204
© 2010 BBY Solutions, Inc. All rights reserved.
DYNEX is a trademark of BBY Solutions, Inc. Registered in some countries.
All other products and brand names are trademarks of their respective owners.
Distributed by Best Buy Purchasing, LLC
7601 Penn Ave. South, Richfield, MN 55423 U.S.A.
10-0823
ENGLISH