1
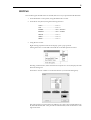
.
s
y
S
.
k
a
AKAI professional
Control & Network
Systems
ak.Sys TrackView DPS24 v1.21
INTRODUCTION
1
INTRODUCTION
ak.Sys TrackView DPS24 is a Windows-based software that provides computer interfacing
with the DPS24 via its onboard USB connection.
This provides a realtime graphic SVGA display of:
•TrackView, with track names, track status and scrolling waveforms for all 24 tracks
•Full Meter-bridge for all Inputs, Tracks, Groups, FX Sends and Returns and Aux Sends
•TimeCode / Bar-Beat-Clock counter display
•Project Info: Project Name, Sample Rate, Bit Depth and Frame Rate
•Disk space usage and USB RX/TX activity gauges
•Status indicators for Auto-Punch, Cycle, Preroll, Time Sync and Digital Sync functions
•In/Out markers times and named Auto Locate points
ak.Sys TrackView V1.21 also provides Remote Control of the following DPS24 functions:
•Transport Control and Auto-Locators from the PC's keyboard
•Name entry from the PC's keyboard
•Copy/Cut/Paste Editing from the PC's Mouse and/or Keyboard
ak.Sys TrackView V1.21 also supports the same functions as the AkSysServer utility:
•WAV/AIFF files Import/Export via USB
•Project Backup (Copy) via USB
•OS Update via USB
Computer Requirements:
Windows XP (or Windows 98)
Minimum specs :
350MHz processor, 128Mb RAM, 32Mb Graphics card.
Recommended specs :
1.0GHz processor, 256Mb RAM, 64Mb Graphics card.
Display resolution :
1024 x 768 (or 800 x 600 for 12-track display)
Note: ak.Sys TrackView V1.21 requires the DPS24 to run OS V1.60 or V2.00. If your DPS24 runs
an older OS version, you should first update the OS.
Note: ak.Sys TrackView V1.21 and AkSysServer cannot run at the same time.
2
Ak.Sys TRACK VIEW User Guide
INSTALLING AK.SYS TRACKVIEW
Before connecting your DPS24 to a USB port of you Personal Computer, you must first install
the ak.Sys TrackView components.
Assuming you have downloaded the software from our website, locate the file and unzip it.
After unzipping the file you will have an Application file called DPS24SETUP.
You might also have received this file already unzipped on a Data CD.
To install ak.Sys TrackView, simply double click on the file DPS24SETUP to launch the ak.Sys installer.
You can pretty much just follow the instructions given on-screen. The first will introduce you to
the process, the next will show the licence agreement - you should accept the terms to proceed.
Next you will be asked to enter your name and (optionally) your organisation.
The rest of the process will then install ak.Sys and you will receive a 'finish' prompt soon after.
The next thing to do is install the DPS24USB driver required for the DPS24 - without this,
ak.Sys TrackView and AkSysServer cannot work.
Using a good quality standard USB cable (A-B type), simply connect the DPS24's rear panel
USB connector to one of your PC's USB connectors.
Your Windows operating system should detect a new USB device and display a "New Hardware found" message. Windows XP should automaticaly launch the "Found New Hardware
Wizard" utility.
Simply select "Install the software automatically (Recommended)" and click Next - the 'wizard' will take care of the rest. Continue the process until the 'wizard' prompts you to 'finish'.
With everything installed and connected, launch ak.Sys TrackView V1.21 from the AkSys
DPS24 shortcut in the Windows Start Menu. You'll find it under All Programs> AKAI DPS24.
This procedure also installs the AkSysServer utility in the same location.
USING AK.SYS TRACK VIEW
3
USING AK.SYS TRACK VIEW
When you launch ak.Sys TrackView, you will see something like this window on your PC monitor:
Across the top of the window are the meters. Below them you can see the timecode display
as well as other information appropriate to the project. Down the left are track status indicators and of course, you can see the 24 tracks and the recorded cues with their waveforms. At
the bottom of the window, you see autolocate memories.
We shall look at each section of the display in detail.
NOTE: ak.Sys TrackView automatically detects the display resolution you're using. The window
shown above will be displayed at resolutions of 1024x768 and above.
In 800x600 resolution, a similar window will appear but with a slightly different layout.
You will only be able to view 12 tracks on screen at a time. In this case, a n arrow box above the track
numbers allows you to toggle the display between Tracks 1-12 and Tracks 13-24:
Tracks 1-12
Tracks 13-24
4
Ak.Sys TRACK VIEW User Guide
METERS
Across the top of the window you can see meters for the input channels and disk tracks:
When tracks are selected for record, the track numbers are highlighted in red as shown above.
You can also see the levels of the eight groups, the effects and aux send levels and also the
stereo effects return levels.
The meters use standard peak meter ballistics which have an instant attack and a decay time
of 20dB.second.
The meters have a peak hold function and the hold time can be set in the SETUP / PREFS
page (see the DPS24 Manual for details).
Each meter also has a Clip indicator. In addition, any time a channel goes "over", the entire
meter for that channel turns red.
NOTE: In 800x600 display resolution, not all of the meters are visible at once. Either INPUTS
1-12 or FX/AUX meters will be missing as shown below. You can switch between these views
to reveal the missing meters using the scroll arrows on either side of the screen at the bottom
of the meter display.
5
IN / OUT TIMES
Below the meters, you can see the IN / OUT times:
FUNCTION STATUS INDICATORS
Next, you can see the status of the Cycle, Preroll, Time Sync and Digital Sync functions:
Cycle
This represents the CYCLE function of the DPS24. The selection is made either
using the [F3] softkey in the MAIN/GRID screens of the DPS24 itself, or by
clicking on the Cycle "LED" indicator, or by pressing Ctrl + numpad 8 on the
PC's keyboard.
Preroll
This represents the PRE-ROLL key of the DPS24. The selection is made from
the DPS24's front panel, or by clicking on the Preroll "LED" indicator, or by
pressing Ctrl + P on the PC's keyboard.
Ext T/C
This represents the EXT SYNC key of the DPS24. The selection is made from
the DPS24's front panel, or by clicking on the Ext T/C "LED" indicator, or by
pressing Ctrl + T on the PC's keyboard.
Ext W/C This indicator shows whether the digital clock of the DPS24 is internal or external. The Ext W/C "LED" is off when the Digital Sync parameter in the SETUP
screen of the DPS24 is set to INTERNAL, and it illuminates when any external
clock source is selected (SPDIF, ADAT, WCLK).
TIMECODE DISPLAY
In the centre of the window, there is a large time display:
This time display can show either timecode or bars / beats / clocks.
The selection is made from the DPS24's front panel using the DISPLAY SELECT key, or by
clicking on the BBC "LED" indicator to the right of the timecode display , or by pressing Ctrl
+ D on the PC's keyboard.
When bars / beats / clocks is selected, the BBC "LED" illuminates.
Below that, when BBC is off, you can see whether the timecode display is ABSOLUTE or
RELATIVE.
This selection is made either using the [F1] softkey in the MAIN/GRID screens of the DPS24
itself, or by clicking on this field, or by pressing Ctrl + R on the PC's keyboard.
6
Ak.Sys TRACK VIEW User Guide
KEYBOARD MODE
Next to the Time display area, a keyboard icon indicates the status of the computer's keyboard.
The keyboard status can be toggled using the SCROLL LOCK key on the PC's keyboard:
When the keyboard icon is greyed out, the keyboard is used as its default
function for the PC.
When the icon is highlighted, all the keyboard commands are redirected to
the DPS24, emulating the functions of a PS2 keyboard directly connected to
the DPS24, thereby allowing text entry from PC keyboard and as well as keyboard shortcuts
(please refer to the DPS24's QWERTY mapping).
PROJECT INFO / GAUGES
To the right of the timecode display, you can see information about the current project, USB
activity, anddisk space usage:
In the Project Info box, you can see the project name, its sample rate, bit-depth and frame-rate.
To the right of the project info box, you can see the USB Rx/Tx activity gauges.
To the right of these, you can see how much time is free on disk and a disk space gauge (red).
Above the disk space gauge, another gauge shows the progress of the waveforms transfer
from the DPS24 to the computer for display.
NOTE: Waveforms can only be transferred when the transport of the DPS24 is in STOP.
In practice, you should wait until that gauge is full so that TrackView can display all the waveforms
for the current Project.
TIMELINE
Above the track display, you can see a scrolling timeline ruler (either timecode or BBC values):
You can zoom in on the track display by clicking on this area with the left button of the mouse.
You can zoom out (you see more of the project) by right-clicking on this area.
You can also use the cursor keys of the computer's keyboard to zoom in/out:
Shift + Right Cursor key :
Zoom In Timeline
Shift + Left Cursor key :
Zoom Out Timeline
Shift + Up Cursor key :
Magnify Waveforms
Shift + Down Cursor key : Decrease Waveforms
The zoom resolution of ak.Sys and the DPS24's own LCD are independent meaning that on one
display you could see an 'overview' of the project whilst on the other, you could see more detail.
7
TRACK STATUS / TRACK NAMES
Down the left of the window, you can see the track status "LEDs" for the 24 tracks:
Their functionality should be self-explanatory :
Red indicates ................................ Record status
Green indicates ............................ Edit status
Yellow indicates ............................ Play/Mute status
Their status (on/off) is set as usual from the DPS24's control surface, or you can use the
mouse to click on the "LED" indicators.
The Edit status can also be toggled using the PC's keyboard:
Press F1-F12 for Tracks 1-12
Press Shift + F1-F12 for Tracks 13-24
At the top of the Tracks, there is one more status indicator for the Auto-Punch function:
Auto Rec
This represents the AUTO key of the DPS24. The selection is made from
the DPS24's front panel, or by clicking on the Auto Rec "LED" indicator.
To the right of the track status indicators, you can view the track names.
The track names can be hidden or shown using the "T" key of the PC keyboard as a toggle.
8
Ak.Sys TRACK VIEW User Guide
TRACK DISPLAY
The bulk of the screen is dominated by the scrolling track display.
The conventions are as follows:
A blue cue indicates that the track is enabled for playback:
The black vertical lines denote an edit splice or punch-in/out
A grey cue indicates that the track is muted:
The IN / OUT region is shown in green in the autolocate bar below the track display.
Furthermore, if a track is selected for edit, the region is highlighted in green:
However, if the track is muted, it is shown in a paler green:
When tracks are selected for record and you are in the process of recording, the cue being
recorded is shown in red. When you stop recording, this is replaced with a normal blue
cue and the new waveforms will be displayed once the Waveform files are generated by
the DPS24.
EDIT TRACKS / REGION SELECT
Selecting the tracks and region for edit can be done in several ways using the mouse:
1
Click on the Edit select indicators to select a track for edit, leaving the in/out times unaltered.
2
Single-click on a cue to select it exclusively for edit - this will select only the chosen
track, leaving the In/Out times unaltered.
3
Ctrl-Click on a cue to add it to the tracks selected for edit (or to remove it if it is
already selected), leaving the In/Out times unaltered.
4
Double-click on a cue to select it exclusively for edit and to change the in/out times to
the bounds of the cue.
5
Ctrl-Double-click on a cue to add it to the tracks selected for edit and extend the in/
out times to the bounds of the cue if those bounds are before the current in time/after
the current out time. This will remove a track from the current selection if it's already
selected.
6
Click on the track display and drag the mouse _ this allows selection of multiple tracks
and sets the in/out points to the bounds of the selection rectangle.
These mechanisms can be used in any combination (ie.g. click & drag to select tracks
1-12 then Ctrl-click to add track 21 to the selection)
9
EDITING
Once an edit region and edit tracks are selected, there are 3 ways to perform the edit functions:
1
From the DPS24's control panel, using the EDIT mode as usual.
2
From the PC's keyboard, using the following shortcuts:
COPY .................................... Ctrl + C
CUT ....................................... Ctrl + X
ERASE ................................. Shift + DELETE
INSERT ................................ Shift + INSERT
PASTE .................................. Ctrl + V
UNDO ................................... Ctrl + Z
REDO ................................... Ctrl + Y
3
Using the PC's mouse.
Right-clicking anywhere in the Track display opens a pop-up menu.
Moving the mouse over the Edit command shows the Edit pull-down menu:
Selecting an edit function, either from the PC's keyboard or mouse, displays the edit
function's dialog box:
Press ESC to Cancel or Enter to execute the function (or click in the dialog box).
The right-click pop-up menu on the track display also offers options entitled Previous
In/Out and Next In/Out. This provides an internal undo/redo mechanism for edit
region selections.
10
Ak.Sys TRACK VIEW User Guide
AUTOLOCATE STRIP
At the bottom of the window, you can see autolocate points and the IN / OUT region:
As autolocate points are stored, their number and name appear in light blue in this area.
Double-clicking on these markers will locate the transport to the stored position (precisely).
Less precise location of the transport can be achieved by double-clicking in free space on the
locator bar.
The Autolocator functions can also be accessed via shortcuts from the PC's keyboard:
I ............ Stores the IN marker
O ............ Stores the OUT marker
G ........... Opens the Goto dialog box (Locate)
While in this dialog:
• Pressing HOME/END will locate to the project start or end.
• Pressing I or O will locate to In point/Out point.
• Pressing numpad +/- will locate to the next/previous cue.
NOTE: Next/previous cue operations don't close the dialog box to facilitate easy multiple use of the
function (e.g. to locate forward three cues)
Shift + G ..... Opens the Goto Time dialog box.
Numbers entered are shifted in from the right, overwriting the original value
progressively. This allows small modifications to be made (eg previous locate
at 1:00:00:01, locate to 1:00:00:23 only requires the user to type "23 ENTER").
: ; . keys will shift numbers entered up to the next separator and insert 00 or
01 depending on whether SMPTE or BBC mode is selected. This makes for
easy entry of, say 1:00:00:00 (user types "1 . . . RETURN").
DEL will zero the display. HOME will reset the overwrite mode.
The Locate entry box remembers the position of previous locate.
M ..... Opens the Memory dialog box (Store)
"New" adds a new Autolocator at the first available position.
You can also select an item in the list for modification and:
• Press the DELETE key to delete the selected Autolocator memory.
• Click Edit or click on the Name field to edit autolocator name.
• Click on the Position field to edit the autolocator position.
The Position entry box behaves the same as the Locate To Time position entry
box described above.
You can also use the TAB key to jump from one field to another.
NOTE: Changes are not committed until Store (or RETURN) is pressed, so many changes can be made in one pass.
11
TRANSPORT
To the left of the autolocate strip, the DPS24's transport status is shown (i.e. PLAY, STOP, JOG, etc.).
The DPS24's transport functions can also be controlled via keyboard shortcuts using the numeric keypad:
STOP
numpad 0
PLAY
numpad Enter Space bar also toggles PLAY/STOP
REC
numpad *
FAST FORWARD
numpad 9
REWIND
numpad 7
FORWARD SHUTTLE (x5)
numpad 6
REVERSE SHUTTLE (x5)
numpad 4
PLAY TO
numpad 1
PLAY FROM
numpad 3
PLAY OVER
numpad .
PLAY IN>OUT
numpad 2
LOOP IN>OUT
numpad 5
Only active while the DPS is in PLAY
Additionally, it is possible to nudge the NOW time forward or backwards by one pixel:
Move timeline forward one pixel
numpad +
Move timeline backwards one pixel
numpad -
CLOSING AK.SYS
To close ak.Sys, simply click on the button top left and select Exit:
You can also close ak.Sys from the keyboard with the standard Windows command: Alt + F4
As ak.Sys is simply a passive display and all the work is done inside the DPS24, there is no
FILE menu in ak.Sys or any need to save anything before closing.
12
Ak.Sys TRACK VIEW User Guide
HOST DRIVE PATHS
The last function of the right-click pop-up menu on the track display is HOST drive paths.
This dialog allows you to assign folders on your computer's drives to up to eight Host IDs.
Those folders will become available on the DPS24 as virtual USB HOST drives for the following
features:
•
WAV/AIFF Import/Export
•
Project Copy
•
OS Update
Please refer to the DPS24 Operator’s Manual for operation details.
This feature is the same as the AkSysServer utility and the Host drive paths are the same for
both applications.
The only difference is that, because it only handles the remote file access aspects of the DPS24
USB protocol, USB file transfers are faster with AkSysServer.
Note: ak.Sys TrackView V1.21 and AkSysServer cannot run at the same time.
13
SHORTCUTS
AK.SYS TRACKVIEW DPS24
VERSION 1.21
Printed in Japan