1
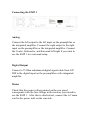
EMP - 1
Owner’s manual
Note !
This manual is under construction
Please download the latest version from
www.electrocompaniet.no/Manuals.html
Owner’s manual
EMP 1 Reference
Multi Player
Warning:
To avoid risk of fire or electric shock, do not expose this appliance to rain
or moisture.
Verify line voltage before use.
Do not remove cover. No user serviceable parts inside. Refer servicing to
qualified service personal.
The warranty is void if non-authorized personnel tamper with the product.
Use only authorized Electrocompaniet service center.
Design concept and audio philosophy:
Thank you for purchasing this fine audio equipment. First of
all we will give you a small introduction to the ideas behind the
EMP-1
Technically, a cd (or a DVD) is a simple construction, built up
with a lot of digital information, represented by only two states
- zero or one. The main work for the first section of the EMP-1
is to read this information. The EMP-1 have a buffer that reads
from the CD with a higher speed than necessary. If there is
some inconsistent information the system has time to read it
again, and correct the missing data. With this technique errors
introduced by the CD mechanics are removed. As long as the
first stage of the process has a perfect copy of the information
on the CD there is a basis for the next stage.
The next stage is to sample rate the information. This process
removes most of the jitter and also makes sure that all parts of
the DAC get the correct information., at correct time.
The last step is to convert the digital signal into an analog
signal. This is done in two stages. First the PCM signal is up
sampled to 192kHz. This signal is then up sampled again to an
312kHz if selected in the setup. After this the High Qualities
DAC converted the digital information to an analog signal.
After this process the signal passes trough the fully balanced,
symmetrical, state-of-the-art internal analog output stage ready to be connected to your system.
Unpacking the EMP 1
Immediately upon receipt of the EMP 1, inspect the carton for
possible damage during shipment.
The carton and packaging have been designed to provide the
safest possible protection for transport of this player.
Unpack the unit carefully. Save all packaging materials for
future shipment.
The contents of the carton
1 pcs Electrocompaniet EMP 1 – Universal Player
1 pcs AC mains cord.
1 pcs Inspection card.
1 pcs Remote control
2 pcs Batteries
The EMP 1 are designed to be used together with the new
ECT-2, the advanced RF remote controller, sold as a separate
product. However, if you do not have this unit we have
included a standard IR controller.
Set up procedure
Before connecting the EMP 1 to the mains, check that the main
voltage indicated on the rear panel corresponds to the line
voltage in the territory where you intend to use the unit.
How to avoid damages
Do not under any circumstances connect or disconnect
equipment when power is turned on.
How to avoid noise problems
The EMP 1 contains delicate circuits that are sensitive to
magnetic stray fields.
The unit should not be placed near main transformers, TV sets,
etc. Care should also be taken regarding placement of the
interconnect cables. Do not run interconnect cables in parallel
with main cords or speaker cables. Keep interconnect cables as
short as possible.
How to power up your system
You should always power up your system the following way:
1- Signal sources first.
2- Preamplifier
3- Power amplifier(s)
How to power down your system
When switching off your system:
1- Start with the Power amplifier(s)
2- The preamplifier
3- The signal sources.
Important notes
For optimal sonic performance, the EMP 1 should be burned in
for a minimum time of 72 hours. The easiest way to burn in
your EMP 1 is to put a disc in REPEAT mode with the rest of
your system turned off.
In daily operation, switch off the EMP 1 player by using the
STANDBY button on the remote. If the EMP 1 has been
switched off, allow two hours of warm-up to optimize sonic
performance.
Due to high class A operation in all Electrocompaniet designs,
it is normal for the EMP 1 to feel warm. Proper ventilation is
important. The EMP 1 should never be completely covered. A
good rule of thumb is to allow at least 3 – 5 cm of air sidewise
and 5 – 8 cm above the EMP 1. If placed into a cabinet make
sure you have proper ventilation.
Connecting the EMP 1
Analog
Connect the left output to the left input on the preamplifier or
the integrated amplifier. Connect the right output to the right
input on the preamplifier or the integrated amplifier. Connect
the Center, Subwoofer, and Surround left/right if you want to
use the EMP 1 in a surround setup.
Digital Output
Connect a 75 Ohm unbalanced digital signal cable from S/PDIF to the digital input on the preamplifier or the integrated
amplifier.
Mains
Check that the mains voltage printed on the rear panel
corresponds with the line voltage in the territory you intend to
use the EMP 1. After this is checked out, connect the AC main
cord to the power inlet on the rear side.
Front panel controls
The power on/off button is localized in the center of the front
panel. Generally, we recommend that you use the Standby
button located on the remote control.
When not using the EMP 1 for a long period, turn the main
switch off and disconnect the unit from the mains outlet.
The four navigator buttons on the right front panel have the
following functions:
Top button = play/pause
Right button = next
Left button = previous
Lower button = stop / eject – hold the button pressed to eject
the disc.
Using the ECT 2 remote control (sold separately)
Before you can use the ECT 2, you have to connect the ECT 2
to the EMP 1.
Follow these steps to connect the ECT 2:
1. Turn off the EMP 1
2. Press and hold the lower button on the front panel, and
turn on the EMP 1.
3. The display will show “Searching for remote”
4. Press and hold the Select and Device buttons on the
remote control for a couple of seconds.
5. The display on the EMP 1 will change to “Device
found”
6. Restart the EMP 1. I.e. turn off the EMP 1 and wait for
5 seconds before you turn on the EMP 1 again.
Controlling the EMP 1 with the ECT 2 remote control:
Press the Device button until the display on the ECT 2 shows
“Multiplayer”.
Use the joystick to control the EMP 1:
Joystick up = play/pause
Joystick right = next
Joystick left = previous
Joystick down = stop. Hold the joystick down for some second
eject the disc.
Please read the manual for the ECT-2 for more
information about controlling the EMP-1
Technical data
Output impedance
Output level
Noise floor
Frequency deviation
Channel separation
THD + N
IMD
Digital/Analog Conversion
Balanced, 0dBFs
20 - 20 kHz
20 - 20 kHz
20 - 20 kHz
100 ohm
4.5Vrms
< - 130 dB
< 0.05 dB
> 110 dB
< 0.002%
TBD
24 bit, 192 kHz
Compatible formats
CD, HDCD, SACD, DVD,
MP3, SVCD, VCD, WMA,
DIVX, Picture CD, JPEG
Dynamic Range
120 dB
Dimensions
WxDxH
483 x 410 x 75 mm
19 x 16.1 x 3 inches
14 kg
No load or signal
40 W
Weight
Power consumption
Audio Outputs
6 ch. balanced line
out (XLR)
Digital Outputs
75 ohm S/PDIF RCA
Specifications are subject to change without further notice.
If service is needed
Your dealer will have all relevant information regarding the
service center in your area and will ensure that your unit is
serviced with minimum delay.
If, for some reason, there are no service facilities available in
your country, please ship the unit to the following address:
ELECTROCOMPANIET AS,
BREIVIKVEIEN 7,
4120 TAU,
NORWAY
Switchboard: +47 51 74 10 33 Fax: +47 51 74 10 10 Service:
+47 51 74 10 23
E-mail: [email protected]
Web: www.electrocompaniet.no
Service department: [email protected]
The end-user is responsible for all shipping charges, insurance,
and re-importation and duty charges.
When shipping a product to the factory for service, always
include the following:
1. A sales slip or other proof of purchase if repair is claimed
under warranty.
2. A proforma invoice with value of goods, stating that the
amplifier is being returned to Norway for repair.
3. An accompanying letter describing faults, symptoms, or
problems with the unit.
4. Always ship the unit in its original carton and packaging
material to prevent damage in transit. Electrocompaniet will
not cover damages incurred in transit.