1
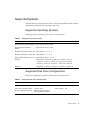
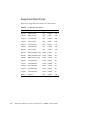
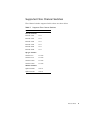
2730 Release Notes
for Software Version J200R05
P/N 83-00004282-15
Revision A
October 2007
Copyright Protected Material 2006-2007. All rights reserved.
R/Evolution, RAIDar, Simulcache, EcoStor, and AssuredSnap are trademarks or registered trademarks of Dot Hill Systems
Corp.
All SPARC trademarks are used under license and are trademarks or registered trademarks of SPARC International, Inc. in
the U.S. and in other countries. Products bearing SPARC trademarks are based upon an architecture developed by Sun
Microsystems, Inc. U.S. Government Rights—Commercial use. Government users are subject to the Sun Microsystems, Inc.
standard license agreement and applicable provisions of the FAR and its supplements.
Microsoft Windows is a registered trademark of Microsoft Inc.
All other trademarks and registered trademarks are proprietary to their respective owners.
The material in this document is for information only and is subject to change without notice. While reasonable efforts have
been made in the preparation of this document to assure its accuracy, changes in the product design can be made without
reservation and without notification to its users.
Contents
Firmware Versions
. . . . . . . . . . . . . . . . . . . . . . . . . . . . . . . . . . . . . . . . . . . . . . . . . . .6
What’s New in This Release
. . . . . . . . . . . . . . . . . . . . . . . . . . . . . . . . . . . . . . . . . . .6
Persistent IP Address
. . . . . . . . . . . . . . . . . . . . . . . . . . . . . . . . . . . . . . . . . . . . . .6
New Critical Events
. . . . . . . . . . . . . . . . . . . . . . . . . . . . . . . . . . . . . . . . . . . . . . .7
RAID 6 Support
. . . . . . . . . . . . . . . . . . . . . . . . . . . . . . . . . . . . . . . . . . . . . . . . . .7
Independent Cache Mode
. . . . . . . . . . . . . . . . . . . . . . . . . . . . . . . . . . . . . . . . . .7
Point-to-Point Topology
. . . . . . . . . . . . . . . . . . . . . . . . . . . . . . . . . . . . . . . . . . .7
SMI-S v.1.1
. . . . . . . . . . . . . . . . . . . . . . . . . . . . . . . . . . . . . . . . . . . . . . . . . . . . .7
AssuredCopy
. . . . . . . . . . . . . . . . . . . . . . . . . . . . . . . . . . . . . . . . . . . . . . . . . . . .7
PHY Status
Scheduler
. . . . . . . . . . . . . . . . . . . . . . . . . . . . . . . . . . . . . . . . . . . . . . . . . . . . .8
. . . . . . . . . . . . . . . . . . . . . . . . . . . . . . . . . . . . . . . . . . . . . . . . . . . . . . .8
What’s Changed in This Release
. . . . . . . . . . . . . . . . . . . . . . . . . . . . . . . . . . . . . . . .8
Changes in Firmware Update Procedures
Volume Names
. . . . . . . . . . . . . . . . . . . . . . . . . . . . . .8
. . . . . . . . . . . . . . . . . . . . . . . . . . . . . . . . . . . . . . . . . . . . . . . . . . .8
Parity Error Discovery
. . . . . . . . . . . . . . . . . . . . . . . . . . . . . . . . . . . . . . . . . . . . .8
License Management
. . . . . . . . . . . . . . . . . . . . . . . . . . . . . . . . . . . . . . . . . . . . . .9
Solaris MPxIO Volume Naming Structure
Updating RAID Controller Software
Recording IP Addresses
. . . . . . . . . . . . . . . . . . . . . . . . . . . . . .9
. . . . . . . . . . . . . . . . . . . . . . . . . . . . . . . . . . . . 10
. . . . . . . . . . . . . . . . . . . . . . . . . . . . . . . . . . . . . . . . . . . 10
Retrieving Firmware from the Customer Resource Center
Updating the Controllers Using RAIDar
Resetting the IP Addresses
Completing the Upgrade
. . . . . . . . . . . . . . . . 11
. . . . . . . . . . . . . . . . . . . . . . . . . . . . . . 12
. . . . . . . . . . . . . . . . . . . . . . . . . . . . . . . . . . . . . . . . 13
. . . . . . . . . . . . . . . . . . . . . . . . . . . . . . . . . . . . . . . . . . 16
3
Updating Expansion Enclosure Firmware
. . . . . . . . . . . . . . . . . . . . . . . . . . . . . . . . 17
Updating the Expansion Enclosure Using RAIDar
Related Documentation
Supported Systems
. . . . . . . . . . . . . . . . . . . . . . . . . . . . . . . . . . . . . . . . . . . . . . 18
. . . . . . . . . . . . . . . . . . . . . . . . . . . . . . . . . . . . . . . . . . . . . . . . . . 19
Supported Operating Systems
. . . . . . . . . . . . . . . . . . . . . . . . . . . . . . . . . . . . . . 19
Supported Disk Drive Configurations
Supported Disk Drives
. . . . . . . . . . . . . . . . . . . . . . . . . . . . . . . . 19
. . . . . . . . . . . . . . . . . . . . . . . . . . . . . . . . . . . . . . . . . . . 20
Supported Fibre Channel Switches
. . . . . . . . . . . . . . . . . . . . . . . . . . . . . . . . . . 21
Supported HBAs and Operating Systems
. . . . . . . . . . . . . . . . . . . . . . . . . . . . . 22
Supported SFPs
. . . . . . . . . . . . . . . . . . . . . . . . . . . . . . . . . . . . . . . . . . . . . . . . . 26
Solaris Patches
. . . . . . . . . . . . . . . . . . . . . . . . . . . . . . . . . . . . . . . . . . . . . . . . . 26
Downloading/Installing the Solaris Patch Cluster
Software and Firmware Configuration
Virtual Disk Size
Known Issues
. . . . . . . . . . . . . . . . . . . . . . . 26
. . . . . . . . . . . . . . . . . . . . . . . . . . . . . . . . . . . 27
. . . . . . . . . . . . . . . . . . . . . . . . . . . . . . . . . . . . . . . . . . . . . . . . 27
Snapshot Configuration
. . . . . . . . . . . . . . . . . . . . . . . . . . . . . . . . . . . . . . . . . . . 28
. . . . . . . . . . . . . . . . . . . . . . . . . . . . . . . . . . . . . . . . . . . . . . . . . . . . . . 29
Persistent IP Address
. . . . . . . . . . . . . . . . . . . . . . . . . . . . . . . . . . . . . . . . . . . . 29
Documentation Errata
. . . . . . . . . . . . . . . . . . . . . . . . . . . . . . . . . . . . . . . . . . . . 29
Known Bugs
4
. . . . . . . . . . . . . . . . . . . . . . 17
. . . . . . . . . . . . . . . . . . . . . . . . . . . . . . . . . . . . . . . . . . . . . . . . . . . 30
R/Evolution 2730 Release Notes for Software Version J200R05 • October 2007
Release Notes
This document contains late-breaking information about requirements that affect
installation and operation of the R/Evolution 2730 and R/Evolution 2730T (2730
Turbo) storage systems. It supplements the R/Evolution 2730 documentation set.
Note – In this document, unless otherwise stated, the term “R/Evolution 2730”
refers to both the R/Evolution 2730 and R/Evolution 2730T products. Apart from
the processor speed and performance increase associated with the R/Evolution
2730T, there are no functional differences between current versions of these two
products.
A R/Evolution 2730 storage system includes a 2730 Fibre Channel (FC) controller
enclosure and up to four SAS expansion enclosures.
Features of the R/Evolution 2730 storage system include:
■ 2 Gbit/sec and 4-Gbit/sec Fibre Channel data rates
■ 9-Tbyte base capacity scalable to 42 Tbyte
■ Low-latency cache mirroring with SimulCache
■ Built-in snapshot capability with AssuredSnap
■ Battery-free cache backup with EcoStor
■ Windows, Linux, and UNIX support (cluster-certified)
■ Redundant hot-swap components
■ Controller enclosure supports one or two RAID controller modules; expansion
enclosure supports one or two expansion I/O modules
■ RoHS-5 and WEEE compliance
Read these release notes before attempting to install, upgrade, or use a R/Evolution
2730 storage system.
5
Firmware Versions
These release notes describe the functionality of software package J200R05.
■ Management Controller (MC) firmware version W420R09
■ MC Loader version 12.013
■ Storage Controller (SC) firmware version J200R05
■ SC loader 15.010
■ Memory Controller FPGA version F300R19
■ Complex Programmable Logic Device (CPLD) version B110J27
■ Expander Controller (EC) firmware version I200B41
■ Power supply unit (PSU) firmware version T021
■ Expansion Enclosure Controller firmware version O200B28
Note – The expansion enclosure controller firmware is not automatically updated to
the version shown when the J200R05 software package is installed. Manually
upgrade all connected expansion enclosures to Expansion Enclosure Controller
firmware version O200B28.
What’s New in This Release
In addition to the fixed bugs found in previous releases, the J200R05 release
includes new functionality described in this section.
Persistent IP Address
In previous versions of the firmware, the IP address was stored in the flash memory
of the controller. If it was necessary to replace a controller, you would have to
update the IP address of the new controller. Beginning with the J200 release, the IP
address is persistent. The IP address is stored on the midplane. When the controller
is powered on, the firmware looks at the IP address in the midplane and stores this
address in the controllers’ flash memory. When you replace a controller with a new
controller, the new controller will have the same IP address as the replaced
controller.
6
R/Evolution 2730 Release Notes for Software Version J200R05 • October 2007
New Critical Events
In adding support for a new critical event that signals the 2730 shutting down due to
temperature problems, a new critical event type has been defined. The previous
event types were informational, warning, and error. Because of this change, SNMP
traps are now mapped to corresponding categories of informational, minor, major,
and critical. "Error" events are mapped to "major" severity traps. Informational and
minor traps are unchanged.
RAID 6 Support
An additional level of RAID is now supported. RAID 6 is the most fault tolerant of
the RAID levels. A virtual disk needs a minimum of four disk drives to support
RAID 6. If either one or two of the disk drives fail, the virtual disk can be
reconstructed without data loss.
Independent Cache Mode
Independent cache mode provides improved performance for sequential writes in
applications such as video streaming.
Point-to-Point Topology
In addition to loop topology, point-to-point topology is now supported. Point-topoint topology simplifies configuration for redundant host paths, and is supported
for switch attach configurations only.
SMI-S v.1.1
Storage Management Initiative Specification (SMI-S) v. 1.1 – added support for
LUN provisioning.
AssuredCopy
In addition to taking a snapshot of the data, volume copies are now supported.
Release Notes
7
PHY Status
Diagnostic information relating to SAS expander controller physical channels (PHY
lanes) has been enhanced to include additional status information. Also, the fault
isolation algorithm can now be enabled or disabled.
Scheduler
You can use the Scheduler feature to create tasks and define schedules at which the
system will automatically perform those tasks. Using the Scheduler, you can create
tasks to take a snapshot, reset a snapshot, or copy a volume. The schedule can be set
to run repeatedly, for example, the first Monday of every month.
What’s Changed in This Release
Changes in Firmware Update Procedures
This release incorporates changes to the update procedure from previous software
versions. Refer to “Updating RAID Controller Software” on page 10 for the new
instructions.
Volume Names
The number of characters in the volume name has been reduced from 20 to 17. If a
volume name has more than 17 characters in a previous version of the firmware, the
volume name will be truncated in J200. If you have volume names that are not
unique in the first 17 characters, rename the volumes before upgrading to J200.
Once J200 is loaded, when the controllers look at the volumes, you will get a
“Duplicate Volume Names” error.
Parity Error Discovery
The storage system logs all parity and media errors it finds, but no longer attempts
to correct those errors.
8
R/Evolution 2730 Release Notes for Software Version J200R05 • October 2007
License Management
Virtual Disk Service (VDS) and Volume Shadow Copy Service (VSS) hardware
providers are now enabled through a license certificate file.
Solaris MPxIO Volume Naming Structure
The Solaris MPxIO volume naming structure has changed in this release from the
structure used in release J11x.
■ J11x example: c1t600C0FF0000A491B36F061450A000000
■ J200 example: c1t600C0FF0000A491BA43EB84601000000d0
Release Notes
9
Updating RAID Controller Software
It is important that you install and configure your J200R05 software package file
carefully, following the instructions in this section.
Caution – Upgrading firmware from J110 or J111 to J200 is disruptive and must be
performed off-line, with all host I/O stopped. Completing the upgrade requires a
maintenance window of up to an hour.
Caution – This upgrade procedure can be used to upgrade from J110 to J200. If
you have firmware older than J110, you must first upgrade to J110 before upgrading
to J200.
Note – The terms software and firmware are used interchangeably in this document.
Recording IP Addresses
Caution – Upgrading firmware from J110 or J111 to J200 may reset the IP
addresses for the controllers’ Ethernet management ports.
Before you begin the upgrade procedure, record your network parameters.
1. Log in to RAIDar on controller A as a Manage user with the correct password.
2. Select Manage > General Config > LAN Configuration.
3. Record the following values for each controller:
■ Source for IP address
■ IP address
■ IP subnet mask
■ Gateway IP address
10
R/Evolution 2730 Release Notes for Software Version J200R05 • October 2007
4. If the IP address source is DHCP, change it to Manual to preserve the current IP
values.
a. Set Source For IP Address to Manual.
b. Click Change LAN Configuration.
When processing is complete, a message near the top of the page informs you
that your change was successful.
Retrieving Firmware from the Customer Resource
Center
1. Download the firmware from Dot Hill’s Customer Resource Center at
http://crc.dothill.com.
a. Using the menu on the left side of the web page, select R/Evolution Products >
R/Evolution 2730 > J200 Documents & Firmware.
A list of articles describing available documents and downloadable firmware is
displayed.
b. Click R/Evolution 2730 J200 Firmware.
c. Follow the instructions to download the neptunesw-J200R05-01.zip file.
2. Extract the neptunesw-J200R05-01.bin and O200B28.bin from the zip file to
a location that your management host can access, such as C:\ for Microsoft
Windows or /tmp for UNIX operating systems.
Release Notes
11
Updating the Controllers Using RAIDar
Caution – Do not attempt to upgrade both controllers at the same time. It is not
supported and will result in unpredictable failures and may yield unpredictable
results.
Note – Enable pop-ups on your browser for each controller. The upgrade process
will produce a pop-up window to show you the progress of downloading the code.
1. Stop all host I/O.
2. Log in to RAIDar on controller A as a Manage user with the correct password.
3. Disable the Partner Firmware Upgrade (PFU) feature.
a. Select Manage > General Config > System Configuration.
b. Set Partner Firmware Upgrade to Disabled.
c. Click Change System Configuration.
When processing is complete, a message near the top of the page informs you
that your change was successful.
4. Select Manage > Update Software > Controller Software.
5. Click Browse and locate neptunesw-J200R05-01.bin.
6. Click Load Software Package File.
When processing is complete, the page shows the version of each software
component that will be installed.
7. Click on Proceed With Code Update.
The update may take up to 10 minutes to complete.
To see the progress of the code load, refresh your browser frequently.
When you see the message “Storage Controller and Management Controller will
reboot in 60 seconds,” the code load has completed. However, the controllers will
not reboot.
Note – When the update is complete, controller B will kill controller A. This is
normal. The firmware versions between the two controllers are not compatible.
12
R/Evolution 2730 Release Notes for Software Version J200R05 • October 2007
8. Log in to RAIDar on controller B as a Manage user with the correct password.
The message area warns you that a code load is in progress. In this case, you can
ignore the warning.
9. Select Manage > Update Software > Controller Software
10. Click Browse and locate neptunesw-J200R05-01.bin.
11. Click Load Software Package File
When processing is complete, the page shows the version of each software
component that will be installed.
12. Click Proceed With Code Update.
The update may take up to 10 minutes to complete. When the process is complete, a
message tells you that you have been logged out because you have just loaded new
code.
13. Power off both controllers.
14. After 20 seconds, power on both controllers.
15. After two minutes, log in to RAIDar on controller A as a Manage user with the
correct password.
■
If the login page is not found, continue with “Resetting the IP Addresses”.
■
If the login page is displayed, continue with “Completing the Upgrade” on
page 16.
Resetting the IP Addresses
If you cannot remotely access the controller IP addresses, they might have changed.
Unless you know what the IP addresses are, you will not be able to log in remotely.
The command-line interface (CLI) embedded in each controller module enables you
to access the system using RS-232 communication and terminal emulation software.
Use the CLI commands described in the steps below to set the IP address for the
Ethernet management port on each controller module.
1. Refer to the list of network parameters that you recorded in Step 3 of “Recording IP
Addresses” on page 10. You need the IP address, subnet mask, and gateway IP
address for controller A and controller B.
2. Use the provided micro-DB9 serial cable to connect the management host to the
CLI port on controller A.
Release Notes
13
Your installation package contents included a micro-DB9-to-DB9 serial cable. If
necessary, use a DB9-to-DB25 adapter (not included) for connecting the serial cable
to a DB25 serial port on the host computer.
3. Start and configure a terminal emulator, such as HyperTerminal or VT-100, using
the display settings in Table 1 and the connection settings in Table 2.
Table 1
Parameter
Value
Terminal Emulation Mode
VT-100 or ANSI (for color support)
Font
Terminal
Translations
None
Columns
80
Table 2
14
Terminal Emulator Display Settings
Terminal Emulator Connection Settings
Parameter
Value
Connector
COM1 (typically)
Baud rate (bits/sec)
115,200
Data bits
8
Parity
None
Stop bits
1
Flow control
None
R/Evolution 2730 Release Notes for Software Version J200R05 • October 2007
4. In the terminal emulator, connect to controller A.
5. Press Enter to display the CLI prompt (#).
6. At the prompt, type the following command to list the current settings:
show network-parameters
7. At the prompt, type the following command to set the values you recorded for each
Ethernet management port, first for controller A and then for controller B:
set network-parameters ip address netmask netmask gateway gateway
controller a|b
where:
address is the IP address of the controller
■ netmask is the subnet mask
■ gateway is the IP address of the subnet router
■ a|b specifies the controller whose network parameters you are setting
■
For example:
# set network-parameters ip 192.168.0.10 netmask 255.255.255.0
gateway 192.168.0.1 controller a
# set network-parameters ip 192.168.0.11 netmask 255.255.255.0
gateway 192.168.0.1 controller b
8. Type the following command to verify the new IP addresses:
show network-parameters
9. In the host computer's command window, type the following command to verify
Ethernet connectivity, first for controller A and then for controller B:
ping IP-address
Release Notes
15
10. If you are not able to ping the controller, you need to restart the Management
Controllers.
a. Type the following command:
restart mc both
b. Confirm by typing Y.
c. Enter the ping command again.
11. Exit the emulator and disconnect from the CLI.
12. Log in to RAIDar on controller A as a Manage user with the correct password.
The login page is displayed. Continue with “Completing the Upgrade”.
Completing the Upgrade
1. Select Monitor > Advanced Settings > Controller Versions and verify that all
software components have been upgraded on both controllers.
2. Select Manage > General Config > LAN Configuration and verify that the LAN
information has not changed.
3. If you were using DHCP prior to the upgrade, reset Source For IP Address to
DHCP.
4. Enable the Partner Firmware Upgrade (PFU) feature.
a. Select Manage > General Config > System Configuration.
b. Set Partner Firmware Upgrade to Enable.
c. Click Change System Configuration.
When processing is complete, a message near the top of the page informs you
that your change was successful.
5. Resume host I/O.
16
R/Evolution 2730 Release Notes for Software Version J200R05 • October 2007
Updating Expansion Enclosure Firmware
If your RAID controllers are connected to expansion enclosures, after you have
upgraded the firmware for the RAID controllers as shown in the previous
instructions, update the expansion enclosure firmware for each connected expansion
controller. You must update the firmware on each expansion enclosure individually.
The upgrade process can take several minutes to complete.
Updating the Expansion Enclosure Using RAIDar
1. Stop host I/O if it is using virtual disks that are used by any of the drives in the
expansion enclosure(s).
2. Using a browser, log in to RAIDar on controller A as a Manage user with the
correct password.
3. Select Manage > Update Software > Enclosure Firmware > Update Firmware.
4. Select the type of enclosure to update.
5. Click Select Type And Continue.
6. Select the enclosure controller to update and click Continue.
7. Use Browse to select the file containing the O200B28.bin expansion enclosure
firmware file that you extracted from the downloaded neptunesw-J200R0501.zip file.
8. Click Load Device Firmware File.
The current version of expansion enclosure firmware and the version in the software
package are displayed.
9. Click Start Firmware Update.
A page shows the update progress of each enclosure and indicates when the
firmware update has completed successfully.
10. Confirm that all firmware versions are now up to date on the expansion enclosures
by selecting Manage > Update Software > Enclosure Firmware > Show Enclosures.
11. Resume host I/O.
Release Notes
17
Note – Though the panel title that shows the version information is entitled
“Displaying All Enclosure Processors,” it is actually only displaying information
about all expansion enclosure processors. Version information about RAID
controller enclosure processors is displayed when you select Manage > Update
Software > Controller Software.
Related Documentation
These release notes supplement the documents shown below.
.
Table 3
R/Evolution Storage System Documentation
Application
Title
Part Number
Site planning information
R/Evolution Storage System Site Planning Guide
83-00004283
Installing and configuring hardware
R/Evolution 2730 Getting Started Guide
83-00004284
Configuring and managing storage
R/Evolution 2000 Series Administrator’s Guide
83-00004289
Using the command-line interface
(CLI)
R/Evolution 2000 Series CLI Reference Manual
83-00004288
Troubleshooting
R/Evolution 2000 Series Troubleshooting Guide
83-00004287
Recommendations for maximizing
reliability, accessibility, and
serviceability
R/Evolution 2000 Series Best Practices Guide
83-00004286
18
R/Evolution 2730 Release Notes for Software Version J200R05 • October 2007
Supported Systems
The R/Evolution storage system has been verified as compatible with the software
and hardware identified in the following subsections.
Supported Operating Systems
Operating systems supported in this release are shown below.
Table 4
Supported Operating Systems
Operating System
Versions or Required Patches
Windows 2003 Standard Edition
With Service Pack 1 or R2
Windows 2003 Enterprise
Edition
With Service Pack 1 or R2
RedHat 4.0 Enterprise Linux AS
With update 1, 2, 3, or 4
RedHat 4.0 Enterprise Linux ES
With update 1, 2, 3, or 4
SUSE Linux Enterprise Server 9
With Service Pack 1, 2, or 3
Solaris 9
With patches 111847-08, 113046-01, 113049-01, 11309-13,
113040-11, 113041-11, 113042-14, 113043-12, 113044-05,
114476-07, 114477-03, 114478-07, 114878-10, 119914-08
Solaris 10
With patches 119130-31, 120222-14, 119470-10, 118833-24
Supported Disk Drive Configurations
Disk drive configurations supported in this release are shown below.
Table 5
Supported Disk Drive Configurations
Model
Number of Drives
Drive Type
Mixed Drive Types
Controller enclosure
12
SAS or SATA
Yes
Controller enclosure and up
to four expansion enclosures
56 active slots
with four inactive slots in
fourth expansion enclosure
SAS or SATA
Yes
Release Notes
19
Supported Disk Drives
Disk drives supported in this release are shown below.
20
Table 6
Supported Disk Drives
Supplier
Model
Type
Capacity
RPM
Fujitsu
MAX3147RC
SAS
146GB
15K
Fujitsu
MAX3073RC
SAS
73GB
15K
Seagate
ST3146854SS
SAS
146GB
15K
Seagate
ST373454SS
SAS
73GB
15K
Seagate
ST3300655SS
SAS
300GB
15K
Seagate
ST3146855SS
SAS
146GB
15K
Seagate
ST373455SS
SAS
73GB
15K
Hitachi
HDS725050KLA360
SATA
500GB
7K
Hitachi
HDT722525DLA380
SATA
250GB
7K
Hitachi
HDT25025VLA380
SATA
250GB
7K
Seagate
ST3500641NS
SATA
500GB
7K
Seagate
ST3250824NS
SATA
250GB
7K
Seagate
ST3750640NS
SATA
750GB
7K
Seagate
ST3500630NS
SATA
500GB
7K
Seagate
ST3250620NS
SATA
250GB
7K
Maxtor
8J300S0
SAS
300GB
10K
R/Evolution 2730 Release Notes for Software Version J200R05 • October 2007
Supported Fibre Channel Switches
Fibre Channel switches supported in this release are shown below.
Table 7
Supported Fibre Channel Switches
Switch
Firmware Version
Brocade Switches
Brocade 3250
5.3.0
Brocade 3850
5.3.0
Brocade 3900
5.3.0
Brocade 4100
5.3.0
Brocade 4900
5.3.0
Brocade 200E
5.3.0
QLogic Switches
SANbox 2-8
6.7.0.04
SANbox 2-16
6.7.0.04
SANbox 5200
6.7.0.04
SANbox 5600
6.7.0.04
McData Switches
Sphereon 4400
9.03.01
Sphereon 4700
9.03.01
Release Notes
21
Supported HBAs and Operating Systems
The following tables list supported Fibre Channel HBAs by operating system.
Microsoft Windows 2003 Operating System HBA Support
Fibre Channel HBAs you can use with Microsoft Windows 2003 are shown below.
Table 8
Microsoft Windows 2003-Supported HBAs
HBA
Driver
Emulex LP1050
1.30a9 Storport or later
Emulex LP10000
1.30a9 Storport or later
Emulex LP 11002
1.30a9 Storport or later
Emulex LP 101
1.30a9 Storport or later
Emulex LPe11002
1.30a9 Storport or later
Qlogic QLA2340
9.1.4.15 Storport or later
Qlogic QLA2342
9.1.4.15 Storport or later
Qlogic QLA2462
9.1.4.15 Storport or later
Qlogic QLE2462
9.1.4.15 Storport or later
Using the Microsoft Storport Driver
To use the Storport driver, you must first either install Windows Server 2003
Service Pack 2, or download the hotfix. Information on downloading the hotfix is
available at:
http://support.microsoft.com/kb/932755/en-us
As of July 20, 2006, the latest Windows 2003 hotfix is 932755. The executable
name is WindowsServer2003-KB932755-x86-ENU.exe for 32-bit. There is
also a 64-bit version x64, and an Itanium Processor version ia64. This Windows
2003 hotfix brings the storport.sys driver to 5.2.3790.2880.
22
R/Evolution 2730 Release Notes for Software Version J200R05 • October 2007
Solaris 10 Operating System HBA Support
Fibre Channel HBAs you can use with Solaris 10 are shown below.
Table 9
Solaris 10-Supported HBAs
HBA
Driver
Emulex LP 11002
Solaris 10 Update 1 or later includes the needed driver
Qlogic QLA2462
Solaris 10 Update 1 or later includes the needed driver
The Solaris 10 operating system includes fp and fcp drivers, which each have a
timeout setting. The default for fcp_offline_delay is 20 seconds. To avoid
certain filesystem warning messages when a cable is removed or a controller is
killed or shut down, you can change the timeout setting to 60 seconds by changing
this line on Solaris 9 hosts in /kernel/drv/fcp.conf:
fcp_offline_delay=60;
Note – One reboot of the host is necessary for this parameter to take effect.
In addition, Sun Microsystems has provided a patch for both x86 and SPARC
platform editions of the Solaris 10 operating system that fixes the
fcp_offline_delay parameter issue. These patches are required with Solaris 10
Update 1 or Solaris 10 Update 2:
■ Solaris 10 SPARC Platform Edition: 119130-32
■ Solaris 10 x86 Platform Edition: 119131-32
Note – Solaris 10 Update 3 includes the fcp_offline_delay parameter fix and
does not require the patch.
Fibre Channel HBAs you can use with Solaris 9 are shown below.
Table 10 Solaris 9-Supported HBAs
HBA
Driver
Emulex LP 11002
Sun SAN Foundation Suite 4.4.12 or later includes the needed
driver
Qlogic QLA2462
Sun SAN Foundation Suite 4.4.12 or later includes the needed
driver
Release Notes
23
The Solaris SAN Foundation Kit includes fp and fcp drivers, which each have a
timeout setting. The default for fcp_offline_delay is 20 seconds. To avoid
certain filesystem warning messages when a cable is removed or a controller is
killed or shut down, you can change the timeout setting to 60 seconds by changing
this line on Solaris 9 hosts in /kernel/drv/fcp.conf:
fcp_offline_delay=60;
Note – One reboot of the host is necessary for this parameter to take effect.
Red Hat Enterprise Linux HBA Support
Fibre Channel HBAs you can use with Red Hat Enterprise Linux 4.0 are shown
below.
Table 11 RedHat 4.0-Supported HBAs
HBA
Driver
Emulex LP 11002
8.0.16.32 or later
Emulex LPe11002
8.0.16.32 or later
Qlogic QLA2462
8.01.07 or later
Qlogic QLE2462
8.01.07 or later
SUSE Linux HBA Support
Fibre Channel HBAs you can use with SUSE Linux 9.0 are shown below.
Table 12 SUSE 9.0-Supported HBAs
24
HBA
Driver
Emulex LP 11002
8.0.16.32 or later
Emulex LPe11002
8.0.16.32 or later
Qlogic QLA2462
8.01.07
Qlogic QLE2462
8.01.07
R/Evolution 2730 Release Notes for Software Version J200R05 • October 2007
Recommended Settings for QLogic HBAs
Recommended settings for QLogic HBAs are shown below.
■ Topology: Auto
■ LinkSpeed: Auto
■ ExecutionSpeed: Divide 64 by the number of initiators
■ LinkDownTimeout: 60
■ PortDownRetryCount: 60
■ PortDownRetryDelay (Solaris only): 12
Recommended Settings for Emulex HBAs
To ensure reliability with all configurations, set the following values:
■ NodeTimeOut = 60
When an Emulex HBA is connected directly to a R/Evolution storage system, set
the following Emulex HBA parameters:
■ Topology: 0 (Loop only)
■ LinkSpeed: 4 Gbit/sec, if a 4-Gbit/sec HBA is used; otherwise, 2-Gbit/sec
■ EnableFDMI: Disabled
When an Emulex HBA is connected to a switch, set the following Emulex HBA
parameters:
■ Topology: Auto
■ LinkSpeed: Auto
■ EnableFDMI: Disabled
Some other Emulex HBA parameters vary, depending on the host operating system,
as shown in Table 13.
Table 13 OS-dependent Emulex HBA Parameters
Parameter
Windows 2003
Solaris 9 and
Solaris 10
RedHat Linux
SUSE Linux
LinkTimeOut
60
60
N/A
N/A
QueueDepth
Divide 128 by the
number of
initiators
Divide 128 by the
number of initiators
N/A
N/A
Release Notes
25
Table 13 OS-dependent Emulex HBA Parameters (Continued)
Parameter
Windows 2003
Solaris 9 and
Solaris 10
RedHat Linux
SUSE Linux
QueueTarget
Enabled
N/A
N/A
N/A
Extra I/O Timeout
N/A
0
N/A
N/A
lpfc-scsi-req-tmo
N/A
N/A
60
60
Supported SFPs
Table 14 lists supported RoHS-compliant SFPs for use with a Fibre Channel (FC)
controller enclosure.
Table 14 Supported 4-Gbit/sec SFPs
Vendor
Part Number
Avago Tech
AFBR-57R5APZ
Finisar
FTLF8524P2BNV
Intel
TXN31115D100000
TXN31115D200000
JDS
JSH-42S4AA1
Solaris Patches
Make sure the Solaris recommended patch cluster is installed on a Solaris host
before connecting to host to the RAID controller enclosure.
Downloading/Installing the Solaris Patch Cluster
1. Log in to the host that you want to connect to the storage system.
2. Go to:
http://www.sun.com/sunsolve
3. Under Support Resources, click Patches and Updates.
4. Under Recommended and Security Patches, click Recommended Patch Clusters.
5. Find your version of Solaris 9 or Solaris 10 in the Recommended Solaris patch
Clusters list, make sure the Readme checkbox is checked, and then click Go.
26
R/Evolution 2730 Release Notes for Software Version J200R05 • October 2007
6. Print or save the README file from the browser window.
7. Click the browser’s Back icon to return to the previous page.
8. Select the format you want in the row that begins Solaris 9, or Solaris 10 in the
Recommended Solaris Patch Clusters list, click either Download HTTP or
Download FTP, and then click Go.
9. In the File Download dialog box, click Save.
10. In the Save As dialog box, type a destination directory for the patch cluster, and
then click OK.
11. Follow the procedure in the Installation Instructions section in the README file to
install the patches.
Software and Firmware Configuration
Virtual Disk Size
The J200R05 release is designed to support up to a 32-Tbyte virtual disk. Actual
virtual disk size is determined by the drive size and the maximum number of drives
in a virtual disk as shown in Table 15.
For example, based on the current maximum drive size of 750 Gbyte, and a
maximum number of 30 data disks with 2 parity disk drives, you can build a virtual
disk on RAID 50 of 22.5 Tbyte.
Table 15 Maximum Number of Drives in a Virtual Disk
RAID Level
Maximum Drives
NRAID
1
0, 3, 5, 6
16
1
2
10
32
50
32
Release Notes
27
Snapshot Configuration
The basic snapshot license that comes with the R/Evolution 2730 provides a
maximum of 16 snapshots. An optional license can be purchased that expands this
capability to a maximum of 64 snapshots. When you purchase this license, you
receive a license key along with instructions for installing it. The instructions can be
found in a document called Obtaining and Installing the License Certificate File,
part number 83-00004343. This document is available in the R/Evolution 2000
Series Current Documentation section at http://crc.dothill.com.
Table 16 lists maximum snapshot parameters supported by the J200R05 software.
Actual supported parameters depend on purchased licenses and the options made
available by OEM partners.
Table 16 Snapshot Default and Maximum Values
Snapshot Parameter
Default Value
Snapshots, per system
16 default, 64 with purchase of optional
software license
Maximum number of master volumes, per controller
16
Maximum number of snap pools, per controller
16
Warning threshold (snap pool 75% full)
75%
Error threshold (snap pool 90% full)
90%
Critical threshold (snap pool 99% full)
99%
Warning Policy
Notify Only, not settable
Error policy
Delete Oldest
Critical policy
Delete All Snapshots
Note – If you have purchased and installed the optional software license to
maximize the number of available snapshots, the license key you install is based on
your enclosure’s chassis midplane serial number. If you subsequently replace the
enclosure or chassis FRU, your snapshot functionality will revert to the default
values. To regain the optional functionality you purchased, you will need to install a
new license. When you send in your defective enclosure or chassis FRU with a
Returned Merchandise Authorization (RMA), you will receive the information you
need to install the new license.
28
R/Evolution 2730 Release Notes for Software Version J200R05 • October 2007
Known Issues
The following sections describe known issues for this release.
Persistent IP Address
Beginning with the J200 release, the IP address is persistent. The IP address is
stored on the midplane. When the controller is powered on, the firmware looks at
the IP address in the midplane and stores this address in the controllers flash
memory. When you replace a controller with a new controller, the new controller
will have the same IP address as the old controller.
In previous versions of the firmware, the IP address was only stored in the flash
memory of the controller. If it was necessary to replace a controller, you would have
to update the IP address of the new controller.
This causes an incompatibility between previous versions of the firmware and the
J200 firmware. When you upgrade to J200, the firmware looks at the midplane for
the IP address. If there is an IP address, that address is written to the controller’s
Flash memory. If the location of the IP address on the midplane does not contain a
valid IP address, then the IP address in the controller’s Flash memory is used. This
might cause you to lose connectivity during the upgrade process. As described in
“Updating RAID Controller Software” on page 10, you must connect directly to the
storage system in order to change the IP address.
Documentation Errata
■
■
■
In the CLI Reference Manual and in CLI help, descriptions of the CLI commands
scrub vdisk and verify vdisk incorrectly state that these commands
correct errors that they find. In fact, the number of inconsistencies found is only
reported in the "Vdisk verification complete" event (event code 21) in the event
log. Such inconsistencies can indicate that a drive in the virtual disk is going bad.
Similarly, in the Administrator’s Guide, the topic “Verifying a Virtual Disk”
incorrectly states that the Verify utility corrects errors that it finds. In fact, the
number of inconsistencies found is only reported in the "Vdisk verification
complete" event (event code 21) in the event log. Such inconsistencies can
indicate that a drive in the virtual disk is going bad.
Similarly, in the glossary, the definition of verify should state that errors are only
reported, not corrected.
Release Notes
29
Known Bugs
Known bugs in the J200 release are described below:
■ 4620: If a controller module is moved into another enclosure, stale licensing
is presented in the WBI until a screen refresh is executed. The CLI is correct.
■ 4652: The CLI command set system name accepts 80 characters but only
79 are saved. For example:
# set system name
RNUKvp80rLAiOSoQOfG8i3aIoAKIWU905YDDH1YUPkxcSJVxMMdXvFue3CY3iOu7
saQlSqrOn4AuxfVT
Success: Command completed successfully
# show system
System Information
-----------------System Name
:
RNUKvp80rLAiOSoQOfG8i3aIoAKIWU905YDDH1YUPkxcSJVxMMdXvFue3CY3iOu7
saQlSqrOn4AuxfV <<------ missing 'T'
...
■
■
4761: The CLI command set host-port-interconnects enable had
to be performed twice before it took effect on a system with HIM 0 boards
installed. After the first attempt the command returns success but the command
never completed.
4828: When adding multiple drives as Global Spares using the set
global-spare disks command, the CLI only displays a success message
for the first drive in the list. For example:
# set global-spare disks 4-7
Success: Disk 4 configured as a Global Spare.
30
R/Evolution 2730 Release Notes for Software Version J200R05 • October 2007
■
4860: During online creation of a vdisk with a single volume spanning the
entire allowable size of the vdisk, the free-space column (Free) will display a
value of “B” when a show vdisk command is executed. For example:
# show vdisk
Name
Size
Free
Own RAID
Dsk Spr Chk Stat
Jobs
Serial#
------------------------------------------------------------------------------------------------------------RAID6.1
87.9GB
B
B
RAID6 6
0
64 CRIT
INIT 9%
00c0ff0a56710048c318cc4600000000
RAID6.2
87.9GB
B
B
RAID6 6
0
64 CRIT
INIT 8%
00c0ff0a56710048db18cc4600000000
RAID6.3
87.9GB
B
A
RAID6 6
0
64 CRIT
INIT 6%
00c0ff0a562700480d19cc4600000000
ID6.4
65.9GB
34.5GB
A
RAID6 5
0
64 CRIT
INIT 4%
00c0ff0a562700484519cc4600000000
■
4892: The system allows the same nickname for different host WWNs. When
using the set host-wwn-name host command only the first instance of
the nickname will be changed. For example:
# show host-wwn-names
Host-ID/WWN
Name
-------------------------------------------------210100E08B370A14 bar
210000E08B170A14 bar
-------------------------------------------------# set host-wwn-name host bar foo
Success: Command completed successfully
# show host-wwn-names
Host-ID/WWN
Name
-------------------------------------------------210000E08B170A14 foo
210100E08B370A14 bar
--------------------------------------------------
Workaround: Ensure the nickname is unique for each host WWN.
■
5028: When using the WBI to disable a PHY on expander A, the
corresponding PHY on expander B is also disabled, resulting in a failed disk
drive.
Release Notes
31
■
■
■
■
5030: Help for the Verify Virtual Disk page incorrectly says to click the
Verify & Update Virtual Disk Parity button, but the button's correct name is
Verify Virtual Disk Parity.
5035: Data corruption can occur upon a failover on SPARC Solaris 10 with
Emulex HBAs and a Qlogic 5600 switch. The cause is redriving write I/Os to a
switch port in which the WWNN of the target has changed due to the failover.
The GPN_ID responses to the Sun box (after RSCN from the switch) report a
new target (WWNN) as does the PLOGI response on re-login. However, the
writes that are driven down this port are to the old target which causes corruption
on all the LUNs. This occurs if the new target comes back up within the 4
GPN_ID retries that Solaris issues. If all four of these timeout, the host attempts
a switch discovery process (GA_NXT sequences) and reroutes the pending I/Os
correctly. A bug has been filed with Sun CR 6605700.
5040: While running the array at 35C ambient 50% humidity in an
environmental chamber, the show enclosure-status command indicates
Temp 01 as "Critical" at 51C. However, the show sensor-status
command reports the Upper-Ctlr A Temperature at 51C as a "Warning."
5049: show snap-pools will return incorrect data when “base 2” is
selected. Workaround: Ensure base 10 format is used when viewing snapshot
information. For example:
# set cli-parameters base 10
■
■
5051: When a controller is shut down via the WBI, the Host Port
Configuration page does not display the link speed option 4 GBit/Second.
Only the 2 GBit/Second option is displayed.
5065: Controllers became unresponsive after the following CLI command
was issued while running an automated test script:
# delete master-volume “mastervolume-10”
Workaround: Restart the controllers.
■
32
5088: Volume copy to a master volume which is larger than the snap pool
will result in a restart of the system (both controllers).
R/Evolution 2730 Release Notes for Software Version J200R05 • October 2007