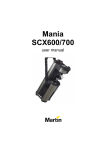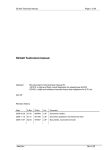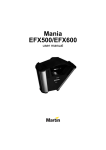
1
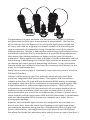
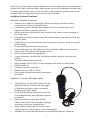
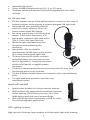
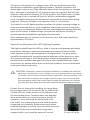
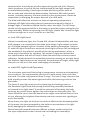
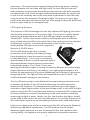
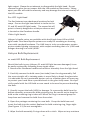
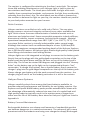
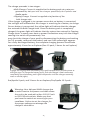
PRIMARY LIGHT SYSTEMS
HALCYON
DIVE SYSTEMS
Explorer/Eos/Apollo
Lighting Systems Manual
1
Halcyon HID & LED Primary Light Owner's Manual
Trademark Notice
Halcyon, BC Keel, Multifunction Compensator, ACB, DLR, Explorer Pro, and
Scout Light are registered trademarks of Halcyon Manufacturing, Inc.
Warnings, Cautions and Notes
Pay special attention to information provided in warnings, cautions, and
notes accompanied by these icons:
!
p
A WARNING indicates a procedure or situation that, if not avoided,
could result in serious injury or death to the user.
r
A CAUTION indicates any situation or technique that could cause
damage to the product, and could subsequently result in injury to
the user.
!
p
WARNING: This manual provides essential instructions for the
proper operation, inspection, and care of your new Halcyon lighting
product. Because Halcyon's lighting systems utilize patented technology, it is very important to take the time to read these instructions in order to understand and fully enjoy the features that are
unique to your specific model.
!
Copyright Notice
This owner's manual is copyrighted, all rights reserved. It may not, in
whole or in part, be copied, photocopied, reproduced, translated, or
reduced to any electronic medium or machine readable form without
prior consent in writing from Halcyon Manufacturing, Inc.
©2010 Halcyon Manufacturing, Inc.
2
Halcyon Explorer, Eos & Apollo Lighting Systems
Halcyon Lighting Overview
4
Primary Lighting Systems
5
21 w HID Light Head Operation
8
12w LED Light Head Operation
9
Bulb Replacement: 21 w HID
10
Canister & Lid
11
Halcyon Power Systems
12
Battery Charging
13
Battery Storage
15
Burn Testing
16
Transporting
17
Troubleshooting Your Halcyon Light
18
Halcyon NiMH Battery FAQ
22
HMI Instructions and Troubleshooting
24
Appendex 1: System Burn Times
25
Appendex 2: Halcyon Warranty Information
26
3
Congratulations on your purchase of a Halcyon primary light. At Halcyon
we appreciate the faith your choice places in our products. Like the rest
of the Halcyon line, the Explorer, Eos and Apollo lights were created out
of a very real need for a lighting instrument capable of withstanding the
rigorous demands of exploration diving. Formed by some of the world's
leading explorers, Halcyon is dedicated to establishing a link between active
underwater explorers and the manufacture of precision diving equipment.
Who better than leading explorers to design and test your life support
equipment? We've spent more than a decade of careful refinement and real
world testing in developing your Halcyon light, and we are proud to count
you among our select group of demanding customers. It is an instrument
that we would not hesitate to take from the storeroom shelf directly to the
water for an exploration dive.
Every Halcyon primary light is individually inspected and pressure tested to
300 feet/91 meters.
Halcyon's three primary light lines meet the needs of every level diver
and every imaginable dive environment. The Explorer HID line utilizes a
reliable and brilliant 21-watt HID light head with NiMH battery technology
and tougher-than-steel Delrin to produce an exploration grade system that
is the benchmark for underwater lighting instruments. The Eos LED line
incorporates a powerful LED light head with all the unique features of our
Explorer canister and battery pack to create a system that is as much at
home at the back of a cave as on a Caribbean reef. Halcyon's Apollo line of
video systems provides high-power HMI and HID illumination in combination
with our indestructible Delrin canisters to complete your video, film or
photographic package.
Explorer, Eos and Apollo light canisters are designed to be mounted on a
diver's waist belt, while the hands-free Goodman-style light head allows
you maximum dexterity during the dive. Manufactured from a single solid
piece of black Delrin, the tough Goodman-style head of our HID Explorer
line allows for hands-free operation while sitting cleanly on top of the diver's
4
hand. The nearly indestructible Aluminum Eos LED light head is coated with a
robust Mil-Spec hardcoat. Both light heads use a fully adjustable handle that
is hard-coated aluminum, can be sized for cold water dry gloves,and can be
ordered with an optional reserve mini-knife attached.
Lighting Systems Features
Halcyon Canister Features
•
•
•
•
•
•
•
•
•
•
•
•
•
•
•
•
Industry-first sealed, watertight, Delrin lid design isolates battery
compartment from cord/light head
Proprietary switch design with captured, silicon switch boot and
ergonomic Delrin switch protector
Machined from solid Delrin, our canisters are sized to ease stowing of
the long hose
Proprietary canister water trap and raised battery tray help protect the
battery pack
Solid battery to lid connection with corrosion resistant, solid-core, goldplated plugs
O-ring sealed electrical connections
Secure battery tray with Stainless Steel rods for additional protection
Strain-relief fittings on all Explorer cords
Nickel-plated brass sealing glands
Larger diameter, hands-free Goodman handle; easy to use with dry
gloves
Stainless Steel locking latches
Dual-voltage 110 or 220v, 4-amp charger with built-in cooling fan
NiMH batteries
Lifetime canister warranty
Depth rated to 300-ft / 90-m
One-piece canister maintains maximum
reliability
Explorer 21-watt HID Light head
•
•
•
•
•
The Halcyon 21-watt HID shares all the
quality features common to our range
of Explorer canisters with a uniquely
designed HID light head.
Locking bulb design eliminates the risk
of dislodged bulbs and sporadic ignition
problems.
High-temperature polymer (PEEK)
nearly eliminates risk of socket damage
common within the competition.
New, brighter bulb with a shorter stem
and protection sleeve reduce risk of breakage.
Includes the time-tested Goodman handle and Halcyon reflector.
5
•
•
•
Adjustable light beam
Choice of NiMH battery pack size (4.5, 9, or 13.5 amp)
Goodman handle with optional Exploration upgrade with mini-knife
available
Eos LED Light head
•
•
•
•
•
•
•
•
•
•
The Eos Explorer shares all the quality features common to our range of
Explorer canisters while enjoying a uniquely designed LED light head.
Advanced LED array provides powerful
output in a small, attractive form; full
power output equals 600 Lumen.
Lux rating at one meter is 10,700 at three
meters, 1,450 and at five meters, 530.
High-quality, aluminum light head with a
Type 3, Class 2 Mil-Spec hard coat.
Aluminum light head optimizes heat
dissipation while protecting LED
electronics.
High-quality LEDs are rated for
approximately 20,000 hours and protected
by a nearly indestructible light head.
The dual-intensity LED allows an option
to double battery run time (see run time
chart in Appendix 1). Simply flip the power
switch on/off quickly to toggle between
intensities.
The built-in thermal protection circuit prevents the LED array from
overheating when out of the water.
The Eos Goodman handle features an innovative bolt snap attachment
point.
The light head body provides a rear bolt snap
attachment option.
Apollo HID and HMI
•
•
•
Apollo series includes the Halcyon canister features.
HMI has been fully upgraded with hardcoat aluminum
ballast housing, Delrin battery canister, 24v 13.5ah
NiMh battery pack and nearly neutral design.
HMI and HID light heads specifically crafted for video,
film and photographic applications.
HID Lighting Systems
High Intensity Discharge lamps produce a brilliant white light while drawing
6
a fraction of the power of a halogen lamp. HID has quickly become the
standard for exploration-grade lighting systems. Halcyon's Explorer and
Apollo lights require very little attention beyond the care given to a halogen
light. Although it produces 5% of its output when first ignited, the HID light
requires a few seconds (usually 15-20) to produce full output. Also, if power
to the lamp is lost or turned off (such as with an underwater pluggable
cord), the light ballast must be allowed a brief period to reset before being
reignited. Halcyon HID lights only require a brief 5 - 10 seconds.
The ballast in an HID lighting system provides the proper starting voltage to
strike and maintain the arc, and it regulates the proper current to the lamp
once the arc is established. Ballasts are not interchangeable among different
types of HID lamps. A ballast design incorporates electronic circuitry to
provide specific lamp/ballast operating characteristics.
With adequate care as outlined in this manual, your HID lamp should last
approximately 750 hours.
Special Considerations for HID Lighting Systems
The light emitted from the HID arc tube is intense and appropriate safety
precautions relating to exposure protection are required. Metal halide
bulbs operate at very high temperatures and pressures. The glass lamps
should be handled with care giving special attention to the quartz arc tube.
The Halcyon HID light is a DC lamp; proper electrical wiring polarity must
be observed to prevent damage to the lamp. Only certified Halcyon repair
technicians are authorized to work on Halcyon products; non-certified work
voids your Halcyon warranty.
! CAUTION:
r
Ultraviolet, visible and infrared radiation is emitted from metal halide lamps. Possible skin or eye irritation can result from exposures exceeding
15 minutes. Do not stare at exposed lamp in operation. During operation, the
bulb should be enclosed in a housing to prevent injury. Do not remove bulb
from equipment until it has cooled. Never handle the bulb when it is operating. Keep your face away from the light head during ignition and operation.
Protect the arc tube when handling the lamp. Keep
the arc lamp clean. Do not touch the arc tube of the
21 watt HID, the inside surface of the reflector and
the connecting wires. Contamination can degrade
lamp performance or cause premature failures. If
necessary, clean the lamp by wiping with a lintfree towel. Any interaction with the bulb should be
conducted very carefully. Bulbs break easily when
handled improperly and are not covered by warranty.
While HID bulbs last considerably longer than
halogen bulbs, you should be aware of several
7
21 watt HID Bulb
characteristics that indicate a bulb is approaching the end of its lifespan.
Initial symptoms of end-of-life are characterized by low light output and/
or intermittent starting. Visual signs include blackening at the ends of
the arc tube and electrode tip deterioration. Note that HID bulbs contain
metals, including mercury, that are harmful to the environment. Please be
responsible in arranging for proper disposal of an HID bulb.
The bulb and ballast are sensitive to external operating temperature.
Although HID light technology doesn't generate heat equal to that of a
halogen light, it should be treated like any other dive light. The HID lamp
should only be operated while in the water, to provide proper cooling for the
lamp assembly. While transporting your HID light, please don't leave the light
in direct sunlight or in a car's interior on a hot day.
21 watt HID Light Head
Halcyon's workhorse light, the 21 watt HID, allows full adjustability and easy
bulb changes in a conventional test tube style design. Light output is similar
to a 100 watt halogen light at a fraction of the power consumption. Halcyon
21 watt HID lights include our exclusive ultra-bright reflector. We’ve designed
the parabola of the reflector specifically for diving applications, where a
sharp spot is beneficial for signaling. The surface is spun and polished to
our specifications and will not chip or flake like metal film vacuum-coated
reflectors. Combined with the extended protective cowling on our light head,
the Explorer lights throw out an intensely focused beam of bright, white light
that you can rely on in the most challenging of situations.
21 watt HID Light Head Operation
The one-piece machined Delrin slug is temperature resistant and completely
non-corrosive. The slug assembly consists of a bulb socket, bulb, test tube
and cord. The bulb slug contains three O-rings. The two O-rings closest to the
bulb actually provide the water-tight seal while the base ring cushions the
glass tube.
The focus of your light may be set by loosening the locking screw on
the Goodman Light head and moving the bulb slug assembly backward
or forward in the light head. To avoid the potential of breaking the bulb
covering, be careful not to tighten the screw down on the glass tube. The
focus should be set so that the beam forms a tight circle several feet in front
of you, allowing for brightest illumination and more convenient signaling to
one's dive buddy.
Never leave your light on while at the surface! Without the dissipating effect
of the water, the heat generated by the bulb can accumulate in the light
head, damaging the assembly's components.
Should the bulb assembly become difficult to focus, make certain that
the nylon adjustment screw is loose and not binding the assembly's
8
movement. Dirt may become trapped along the focusing barrel, creating
friction between the test tube and light head. To clean the dirt from the
bulb assembly, simply loosen the locking screw and push the bulb assembly
out toward the cord. Clean the light head and bulb assembly. Be careful not
to pull a stuck assembly out by the cord while underwater as the tube may
come free from the assembly, flooding the light. The groove on your light
head's bulb assembly will prevent the unit from being accidentally pulled out
from the light head by an entangled cord.
LED Lighting Systems
The promise of LED technology that can fully replace HID lighting just took a
step forward with Halcyon’s Eos primary light. The new Eos capably blends
numerous desirable features with a focused light output exceeding the
10-watt HID. The Eos also reduces battery consumption with an efficient
array of dual-intensity LEDs and a quick flip of the switch more than doubles
the battery’s run time. A machined aluminum head shields a nearly
indestructible LED light array with an expected
lifecycle of 20,000 hours.
The Eos LED primary light has a voltage
protection circuit to keep the battery voltage
from dropping to a level that may be harmful
to the battery pack. This circuit is activated at
approximately 9.8 volts and will cause the light to
alternate between normal intensity and notably
reduced light output. This “flicker” exists as a
warning to indicate the light is nearing its capacity. Because the reduced light
output decreases the draw on the battery, your light might continue in this
fashion for approximately 30 minutes (depending on the battery, light output,
temperature etc). The light will shut off completely as nears 9.4 volts. This
cutoff will prevent damage to your battery.
The Eos LED primary light is also fitted with a temperature protection circuit
to prevent the diodes in the LED from overheating; this will help ensure
maximum LED longevity. The temperature protection circuit will trigger a
reduction in light output similar to the low voltage cutoff. In this case, the light
reduces output by 50%. It will alternate between normal and 50% output until
the heat problem is resolved. Overheating can be most quickly resolved by
immersing the light in water. Ideally, the Eos, like all other dive lights, should
not be used at the surface for any extended period. It is unlikely that your Eos
LED should ever experience an overheating situation while used underwater.
Halcyon has taken great strides to ensure your Eos LED will operate flawlessly
without any additional adjustments. The LED module and the unique
aluminum light head work as a unit to provide the Eos with optimum heatsyncing ability; this together with proper alignment help ensure maximum
9
light output. Please do not attempt to disassemble the light head. Do not
remove the glass lens or tamper with the LED module or electronics. Taking
apart your Eos will void the warranty and may damage the internal circuitry of
the LED module.
Eos LED Light Head
The Eos features two attachment locations for bolt
snaps. One on the light head which is similar to the
21 and 50-watt HID light heads. The second tie-off
point is cleverly designed as a Halcyon chevron and
is located on the Goodman handle.
Video Light heads
Halcyon's Apollo series are available with dual/single lamp HID and HMI
light heads. Dual head Apollo systems are ready for mounting on housing
arms with standard hardware. The HMI lamp is truly an underwater motion
picture studio lighting instrument, with output exceeding that of a 1,000 watt
halogen burning at a solid 5,600K.
Halcyon Bulb Replacement
21 watt HID Bulb Replacement
Should the bulb in your Halcyon 21 watt HID light become damaged, it can
be easily replaced by following these simple steps:
1. Remove the Goodman handle and reflector assembly from the light head.
2. Carefully remove the bulb cover (test tube) from the slug assembly. Pull
the cover straight off; a twisting action is more likely to break the glass tube.
It is advisable to use a protective barrier such as a leather glove or heavy rag
to protect your hand from a possible break in the glass lamp cover. Be especially careful with the HID bulb as care needs to be used to prevent breaking
the bulb.
3. Visually inspect the bulb (HID) for damage. To remove the bulb from the
ballast assembly, unscrew the bulb retaining ring. Be careful not to drop the
bulb as the retaining ring is taken off. When the ring is removed grasp the
lamp base and remove the bulb from the socket.
4. Open the package containing the new bulb. Grasp the bulb base and
insert the bulb into the socket. Replace the bulb retaining ring, finger tight.
(See Figures 1-3) Do not overtighten.
5. Wipe the bulb assembly O-rings clean with a cloth. Wipe out any moisture
10
Figure 1
Figure 2
Figure 3
that might have accumulated in the lamp cover. Do not use any silicone on
the bulb slug o-rings.
6. After cleaning the bulb slug O-rings and the lamp cover, gently place the
glass cover over the bulb slug and push it into place. Make sure that the bulb
cover is seated all the way to the bottom O-ring on the slug assembly. Use a
protective barrier such as a leather glove or heavy rag to protect your hand
from a possible break in the glass bulb cover
7. Place the Goodman head assembly back onto the light head, focusing the
light to a tight beam and locking down the screw.
Explorer, Eos and Apollo Canister and Lid
Take the time to inspect the O-ring on the canister lid before every dive. The
O-ring should be free of grit or dirt and should not have any signs of damage.
Remove the O-ring from the lid and wipe it down with a clean cloth before
every dive. The lid O-ring does not require any lubrication. The O-ring groove
on the lid should also be cleaned of any dirt or debris.
Be careful not to damage the sealing surface on the lid or canister. During
transport, the lid should always be attached to the canister to prevent
accidentally nicking either surface. However, you should store your light for
extended periods of time with the lid off or the battery removed from the
canister. Over time, and especially after discharge, the rechargeable batteries
will off-gas potentially combustible gasses. While off-gassing has not proven
itself to be a common problem, you should be aware of the potential risk by
not allowing the canister to sit over time with discharged batteries sealed
inside.
Light Canister
The light canister must keep the battery dry and protected while you are
diving at depth. Halcyon lights use two locking latches to secure the lid
to the canister. When opening or closing your light, work both latches
simultaneously to avoid stressing any side of the lid unevenly.
11
The canister is configured for attaching to the diver's waist belt. The unique
three-fold webbing attachment on your Halcyon Light is held in place by
two stainless steel bands. The three-piece fold holds the light with more
stability than conventional methods, and prevents the light from accidentally
releasing from the diver's hip. The steel bands can be raised or lowered on
the canister to balance the light on your hip; the canister should rest parallel
to your body when mounted on your harness.
Delrin Canisters
Halcyon canisters are milled out of a solid rod of Delrin. The one-piece
design ensures a structural integrity not found in any other available dive
light. Delrin shares the same characteristics of industrial metals such as
aluminum and stainless steel. Some comparable properties include stiffness,
dimensional stability, impact resistance, and structural strength. Material
operational temperatures range from 180° F (82° C) to -100° F (-73° C). The
one-piece Delrin canister is virtually indestructible under normal usage.
Although the canister itself can withstand depths of over 3,000 feet/909
meters, the maximum recommended working depth of the Halcyon Explorer
line is 300 feet/90 meters. All Halcyon lights feature high quality nickel plated
brass fittings and stainless steel locking latches.
Halcyon lights use a lid-integrated set of plugs to connect to the battery pack.
Simply line up the plugs with the gold-edged receptacles on the top of the
battery pack and push down until the lid rests on top of the battery pack's
delrin cap. The lid can be rotated 180-degrees and plugged into the "dummy
holes" on the battery cap so the light can be transported without a "hot"
connection. To charge the Explorer, Eos or Apollo battery, firmly secure the
charger's plug into the gold-edged receptacles on the top of the battery pack.
Always charge your battery with the pack removed from the canister– the
charger plug will not fit on the battery pack when it is still in the canister.
Halcyon Power Systems
Halcyon carefully selects from among the finest batteries available, to
provide enhanced performance and reliability for our lighting systems. Our
Explorer and Apollo NiMH battery packs provide extended burn times with
the advantage of dramatically reduced size over that of a sealed lead acid.
High quality batteries typically result in the maintenance of longer burn
times over the life of the battery. Burn times for Halcyon's lights are listed in
Appendix A.
Battery Care and Maintenance
Rechargeable batteries can release small amounts of combustible gas that
can become dangerous in a sealed environment. The release of gas is more
prominent while the batteries are being over-charged or deeply discharged.
12
Lights that have been discharged and then left sitting in a sealed canister
over time should be opened prior to actuating the switch. While the risk of
gas ignition is limited, the risk should treated with respect.
Warning: To reduce the risk of gas accumulation, open the canister and
! allow the gas to vent before use. Venting the canister is especially
p
important if you have left the light closed over time or for transport
after a deep discharge. Always charge your battery with the pack
removed from the canister.
Charging the Battery
All of Halcyon's lights utilize the highest quality NiMH batteries, providing
years of consistent use. However, even the best batteries are only as good
as the manner in which they are maintained. Batteries should always be
charged as soon as possible after use and not left to sit for long periods in
a discharged state. While NiMH batteries do not experience the reduced
discharge effect known as "memory," they can be damaged if left at low
voltage levels. The charger provided with your light will charge the batteries
up to capacity and then turn off automatically provide a maintenance charge.
Batteries tend to slowly discharge if left over time, especially if exposed to
extremes of heat or cold. Your Halcyon charger is designed to top the battery
pack back to a full charge when left connected to the battery during storage.
Halcyon recommends that you always store your battery pack connected
to your battery charger if you plan to use your light within a few week's
time. If the battery is going to be left unused for several weeks or months,
you should charge it up, disconnect the battery and charger, and top off the
battery prior to the next use. If the battery is to be stored without use for a
long period, top it off with a recovery charge every six months.
Charging your Explorer, Eos or Apollo battery pack (NiMH Batteries)
Proper charging of your Explorer battery pack is essential to ensure a long
NiMH battery life. If the charger is not properly designed and matched to
the battery's voltage, chemistry and configuration, the result can be poor
performance of the battery due to insufficient charge, shortened battery
life due to overheating of the battery, and the chance of fire or explosion
of the battery from over-charging. Charger selection is so important to the
life of your Explorer battery pack that the use of any charger other than the
Halcyon NiMH charger will void your Halcyon warranty. The Halcyon Explorer
charger has been specially designed to charge the Explorer 4.5, 9 and 13.5
battery packs and should not be used with any other make or type of battery.
The Explorer charger cannot be used with Halcyon's previous models that
use lead acid battery packs.
13
The charge proceeds in two stages:
•Bulk Charge. Current is supplied to the battery pack at a rate programmed by Halcyon into the charger specifically for Explorer and
Apollo packs.
•Topping Charge. Current is supplied at a fraction of the
bulk charge rate.
If the charger is plugged in to a power source but no battery is connected,
the red light will indicate that the charger is searching for a battery to charge.
Once a battery is connected, the yellow light will indicate that the charger
has entered the Bulk Charge state. Once the battery pack is completely
charged, the green light will indicate that the system has entered its Topping
Charge state. In some cases heat or power fluctuations may trick the charger
causing it to switch off prematurely. You
may check the charge of your pack by disconnecting the battery and waiting
for 3-5 seconds, reconnect the battery and see if the yellow light appears.
For a fully discharged battery, the complete charging process should take
approximately 1 hour for an Explorer/Eos 4.5 pack, 2 hours for an Explorer/
Engage the lid plugs with the battery cap's gold receptacles to provide power to
the light (top). To charge the battery pack, push the charger's steel connectors
completely into the battery pack's gold receptacles until the charger assembly
rests on the lid (right).
Eos/Apollo 9 pack, and 3 hours for an Explorer/Eos/Apollo 13.5 pack.
Your Halcyon NiMH charger has ! Warning:
p
a switch next to the power cord that allows
the unit to be used with either 110-115 volt or 220-230 volt outlets. Make sure that
you have the switch set correctly for your conditions. Failure to set the charger for the proper voltage can damage the charger's electronics.
14
Recommended Storage Conditions
Store your Halcyon NiMH battery pack disconnected
from the light to eliminate loaded storage effects, which
in NiMH batteries can lead to increased self-discharge.
Any Nickel-Metal Hydride cell will off-gas hydrogen
when subjected to excessive overcharge or
overdischarge. Do not store your Explorer light for
extended periods of time with the battery pack in place
and the lid closed. Always open the lid of your light to
vent any ambient gasses after storage and before you
operate your light.
Battery Longevity
Your battery should provide you with years of trouble free performance.
The anticipated life of a battery is measured in the number of charge and
discharge cycles it can tolerate. The life of a battery will depend on many
factors, including the storage temperature, the discharge of the battery, and
the charging efficiency.
Please see the recommendations below to establish other ways of increasing
battery life.
1. Use only Halcyon replacement NiMH battery packs with your Halcyon
light. It is very important with NiMH systems that the charger be matched
with the battery.
2. Do not allow the batteries to discharge deeply (below about 9 volts).
3. Do not allow the batteries to sit in a discharged state.
4. Do not expose the batteries to extreme temperatures below -15° C (5°
F) or above 50° C (122° F). Batteries must be removed from canister for
charging.
To be sure that your battery is adequately charged reference the following
considerations:
1. Plug in the charger and verify that it is receiving power. Verify that the red
power light is on when you connect the charger to the battery pack on SLA
packs and the Yellow light is on for NiMH battery packs.
2. Allow the batteries to charge until the green "Charge Complete" light
activates on NiMH battery chargers. You may verify the charge by using
a voltmeter to gauge the battery voltage. However, this reading is only
reliable if the battery is under a load, such as when the light is activated.
To ensure that your charger is operating properly, place the light head in a
pot of water and connect the batteries to the lid, leaving the battery pack
out of the canister. Do not let the light burn for more than a minute out
of the water. While the light is discharging the batteries, use a voltmeter
to gauge the voltage drop. If the pack is not properly charged, the volt15
age should drop rapidly (within one minute). A properly charged pack
will slowly drop voltage from a high of around 14 to roughly 13 volts, and
should hold 13 volts for about an hour.
5. The charger will enter a "maintenance stage" when a full charge is
reached, so it is possible to leave the battery connected to the charger
for extended periods of time. If the battery is going to be left unused for
several weeks, charge the battery, disconnect the battery and charger for
the length of storage, and then top off the battery with a new charge prior
to the next use. If the battery is to be stored without use for a long period
it should be topped off with a recovery charge every six months.
Burn Testing
You should burn test your battery pack at least yearly in order to establish
the actual burn time of your light. Frequent divers, or those who often rely
on longer burn times, may choose to test their light more frequently. In order
to conduct an effective test you will need the following equipment:
•Battery pack
•Discharge method: either the light head itself or a discharge array
•Volt meter
•Timer, preferably with an alarm
•Reservoir of water
•Paper to record time and voltage
The following steps will allow you to accurately determine your battery's
burn time:
1. Make certain that the battery has been fully charged. For the best charge,
burn the battery for ten minutes and then bring it back to a full charge.
2. Place the light head into the water. Make sure that there is enough water
to prevent overheating. A one gallon basin or bucket is sufficient.
3. With the battery out of the canister, connect the light head to the battery.
4. Actuate the switch and measure the voltage. For NiMH battery packs, back
the lid away from the battery enough to allow you to insert the volt meter
probes tomake contact with the metal posts. Do not allow the probes to
touch each other while in contact with the battery terminals.
5. Record the time and voltage every ten minutes until the pack reaches 10
volts. It is recommended that the timer have an alarm to alert you when
an interval has ended. The alarm will prevent you from forgetting about
the battery and discharging it completely. A complete discharge is practically certain to damage the battery's cells.
6. Stay near the pack to monitor the voltage decay as the 10 volt limit is
approached. As the pack nears 10 volts, the voltage will drop more rapidly. Record the time when the battery reaches 10 volts. This time is the
amount of time that your light battery can provide a useful light beam.
16
7. Record the burn time and date on the battery. Don't forget to update this
information with each subsequent test of your battery.
8. Charge the battery immediately. Never discharge your battery below about
9 volts as it can damage the cells to experience deep discharge for any
prolonged period. Any time the battery is discharged it should be charged
as soon as possible. A quick recharge is especially important when the battery is deeply discharged.
Transporting Your Light
Your Halcyon light should be left unplugged during transport. You want to
eliminate the possibility of activating the light while the unit is out of the
water. The Explorer lid design has a travel plug configuration for connectors.
Be sure to reconnect the battery prior to getting into the water and to
disconnect the battery prior to travel.
Troubleshooting Your Halcyon HID Light
If you are experiencing problems with your HID light before the end of its
expected lifespan, take a second to inspect the bulb and ballast assembly:
Bulbs
•Inspect the bulb to make sure it is seated in the socket.
•Inspect for broken arc tube or outer lamp jacket.
•Check connection where glass meets the base.
•Make a visual inspection of the bulb for broken or loose components in
the lamp envelope.
•Inspect for arc tube end blackening.
•Inspect for deposits inside the outer glass envelope.
Ballast points-of-failure
•Attempt ignition a second time after properly resetting the ballast by
disconnecting, waiting 15 seconds, and then reconnecting the connectors attached to the lid.
•Are you using Halcyon replacement lamps? Your ballast will not work
with incorrect wattage lamps.
•Avoid possible overheating due to ambient temperature.
•Inspect ballast housing for mechanical damage.
Troubleshooting your Halcyon LED Light
Why is my LED flickering?
If the flickering begins underwater, it is possible that your battery needs to
be charged and the voltage protection circuit has been engaged. Charge
17
your battery as soon as possible. If you have been using your light on the
surface, it is possible it has over heated and engaged the temperature
protection circuit. Allow your light to cool before attempting to turn it on
again.
Halcyon Primary Light General Troubleshooting
What to do if your light does not work
1. Verify that the battery is properly connected, that all wire connections are
secure, and that the battery is not completely drained. Use a volt meter to
verify that the battery has at least some voltage. The battery should read
at least 12.5 volts. If you believe that your power pack has failed, test the
questionable light head with a different battery.
For HID Lighting:
2. Verify that the HID bulb is not damaged. If the bulb needs to be changed,
please refer to the manual section on changing the bulb. Remember to be
careful removing the lamp cover and to avoid touching the bulb with your
bare hands.
3. Verify that the HID bulb is seated properly in the socket. Occasionally the
HID bulb connection can be compromised if the light head is sufficiently
bumped or jarred during transport. To check the HID bulb seating, the
lamp cover must be removed. For a comprehensive discussion of this process please see the manual section on changing a bulb. In general, be sure
that the HID bulb is not touched directly and that you are careful removing
the lamp cover.
4. If you suspect the switch may be the problem, please contact Tech Services for assistance.
What to do with an HID light that works sporadically
If your HID light flickers or only works sporadically, it is very likely to be the
result of a poor connection. It is possible that this weak connection is at
the bulb and socket, or that wires leading to the battery are frayed. Please
consult the troubleshooting section entitled "What to do if your light does
not work" for more detail on correcting these problems.
A sporadic HID light is more likely the result of a poor connection in the cord.
Test for a poor connection or a kink in the cord by working the cord back
and forth, starting by the light head and working back toward the canister,
to see if the sporadic problem can be initiated. A kink in the cord is likely to
eventually break the wire connections within the cord.
18
If your HID or LED light is equipped with underwater pluggable connectors
(E/O connectors), it is possible that this connection has become
compromised. Over time, the female connection may widen out and not
clamp securely over the male connector. A rather inelegant but effective
method to rectify this problem is to gently tap the female connection with a
hammer, carefully tightening the female receptacle.
It is also possible that the switch has become damaged, perhaps with
corrosion, resulting in sporadic operation. If you detect corrosion in the
switch mechanism, the light should be returned to Halcyon and the switch
replaced.
What to do if your HID or LED light turns itself on
A light that begins burning with the switch in the off position must have
the switch replaced. This problem occasionally occurs in lights that have
been previously flooded. A light that turns itself on should be disconnected
immediately to prevent any damage from overheating.
Lights should always be disconnected while transported.
What to do if your burn time is less than expected
Check the condition of the battery pack to confirm that the reduced burn
time isn't the result of an error induced during charging. You can check a
battery pack's condition with the following steps:
1. Verify that the charger is plugged into a properly functioning outlet. Be
sure that this outlet is not controlled by a wall switch that may be shut off
inadvertently. Do not use an inverter to power your charger.
2. Verify that the power light (if available on your charger) is activated when
the charger is plugged into an active outlet.
3. Verify that the light indicating "charged" is activated at the end of your
charging cycle.
4. Verify that the charger is functioning by attempting to charge the battery a
second time. Unplug your battery pack from the charger and wait at least
7 seconds before reconnecting so that the charger can reset itself.
5. The battery must be charged completely and then placed under a load
with a volt meter, typically as part of a burn test. If the battery voltage
drops rapidly below approximately 12 volts, the battery is not charged.
The voltage should drop slowly to approximately 12 volts and then continue to drop slowly. Please refer to the manual section on burn testing your
battery prior to enacting these suggestions. If you are attempting to verify
the voltage drop, submerge the light head in water before activating.
6. Gauge the actual burn time with a battery test. Please consult the earlier
section in the manual for instructions on conducting a burn time test. If
the battery is charging properly but the test indicates a lower than ex19
pected discharge time, it is likely the symptom of an aging or inadequately
maintained battery. Please review the section on battery longevity for tips
on maximizing battery life.
What to do if your Halcyon primary light is leaking
This guide will provide instructions for identifying and repairing some
possible leaks in your Halcyon light. If your light continues to leak after
troubleshooting, contact Halcyon for instructions on returning your light for
repair. If any doubt exists about potential damage, please contact Halcyon for
consultation about possible repairs.
If the light has leaked into the lamp cover (test tube), the moisture will
To test the NiMH battery pack, your volt meter must have long enough probes to reach
the middle of the connector assembly.
Keep a close eye on the volt meter as the discharging battery approaches 10 volts.
You can damage your battery pack if the voltage drops below 9 volts, and the rate of
discharge will increase rapidly below 10 volts.
typically corrode the socket and continue to produce condensation. Any
light or light head that has leaked should be opened up and allowed to dry
completely. Please consult the manual section on replacing a bulb for more
information on removing the lamp cover. Be careful not to twist the lamp
cover while removing it and do not touch the bulb with bare hands.
Possible sites of water intrusion:
1. Typically, water leaks into the light as the result of dirty or damaged Orings. Check the O-rings in the area of the leak, either the canister or the
lamp cover. Replace the O-ring if it appears damaged. If it is dirty, clean
the O-ring and the O-ring groove with a clean cloth.
2. Canister O-rings should be cleaned prior to every dive by removing the
O-ring and cleaning the seating surface and O-ring thoroughly. Do not use
lubrication on the O-ring; the lubricant will attract sand and dirt, increasing the risk of leaking.
3. Bulb slug O-rings are highly unlikely to leak unless either the lamp cover
(test tube) or O-rings have been changed from the original factory installed set. Slight variations in the size of an O-ring can prevent the lamp
20
cover from sealing properly. Gently torque the lamp cover while it sits on
the bulb slug assembly; watch to see if either of the two sealing O-rings
break contact with the test tube.
If the O-rings break contact with the cover, the lamp cover or O-rings must
be replaced. There are occasionally slight variations in the size of lamp
covers (test tubes). Halcyon manages this problem by using components
that fall within exact specifications. Be cautious about purchasing nonstandard lamp covers from other manufacturers or suppliers.
4. Verify that there are no prominent nicks in either the lid or the top lip of
the canister.
Troubleshooting E/O Underwater Pluggable Connectors
Wetmates E/O cords are an available option that adds flexibility and
modularity to any Halcyon lighting system and are a standard feature of
Apollo video lights.
E/O cords offer great advantages in flexibility; however, they require
some minor attention to ensure reliable service. Over time the rubberized
connectors may loosen and weaken the connection. The problem is easily
solved by placing the connector on a hard surface and firmly tapping it with
a rubber mallet. This action will tighten the connector and prevent a sloppy
connection. Another problem that might occur is a slight oxidation on the
connector tip after several dives in salt water. A light sanding with extra fine
sand paper will remove any oxidation and ensure a good connection.
When used with a halogen bulb, an improper E/O connection will cause
the light to flicker. With an HID lamp, an improper connection will interrupt
current, resulting in a loss of light. The effect is the same as if you had
turned the light off with the switch: the ballast must reset itself and the
bulb cool before restriking. If your light should go off because of a loose E/O
connection, re-seat the connection, turn the switch to the off position, and
wait ten to twenty seconds before restriking the lamp.
Disconnecting the E/O cords by pulling at an angle instead of straight out can
also damage the connectors. Bent connectors cannot be reliably repaired.
Use of E/O cords in salt water requires extra consideration for maintenance.
Make sure to rinse and dry E/O connectors after each salt water dive,
as the connections will corrode and degrade performance over time.
Most professional photographers and explorers recommend scheduled
maintenance replacement after every two years if the connectors are
constantly exposed to salt water.
21
Explorer/Eos/Apollo NiMH Frequently Asked Questions
What are the number of charge/discharge cycles I can expect from NiMH
batteries?
Under normal conditions you can expect anywhere from 800 - 1000 charge/
discharge cycles from your NiMH batteries. Cycle life is dependent upon
usage conditions. Severe over-discharge of your NiMH can shorten the
lifespan of your pack. Over-discharge is difficult with the 21, 50 and 200
watt HID lights; these lights have a regulated ballast that will terminate light
output as the voltage reaches the lower part of the operational spectrum.
Using a 10 watt HID (which operates with an unregulated ballast), you should
shut down your light when the light begins to dim, but before you run the
pack to complete discharge (a minimum of 10 volts).
Do Halcyon NiMH batteries lose any capacity during their useful life?
All battery types lose some capacity over their life, but it is normally very
gradual. Our NiMH batteries are designed to have a much longer cycle life
and lower rate loss than older generation NiMH or lead acid batteries. You
can expect battery capacity to decrease 10 to15% after 300 - 400 cycles.
My battery pack fell off the bench and hit the deck of the dive boat. Now
that battery does not want to take a charge. Is it possible that by dropping it I damaged it somehow?
Yes, by dropping this battery you have probably caused some internal
damage. All batteries can be degraded by impact damage. If you do drop
your battery pack, we recommend replacement. Even if no damage is
apparent, the battery could later develop a short or a leak while in the
equipment and then cause even more damage, not to mention the possible
inconvenience of a light failure during a dive.
Do I have to use the Halcyon charger with my Explorer, Eos or Apollo
battery pack?
The Halcyon Explorer charger has been designed to ensure adequate return
of charge while minimizing overcharge. Effective control of overcharge
exposure, time and charge rate are all the most important factors in
prolonging the life of your NiMH battery pack. Use of any charger other than
the Halcyon Explorer/Eos/Apollo charger can damage your battery pack and
will void your warranty. Failure to use the proper Halcyon charger may also
result in overcharge and possible explosion.
22
What do I check if the lights won't come on when the charger is
plugged in?
If the charger lights do not turn on when the unit is plugged in, first check
to make sure that the cord to the power supply is firmly seated in the back
of the charger. Next, remove and inspect the fuse that is on the front of the
charger. Replace this 10A/250V fuse if it appears to be broken. Finally, if the
charger still does not turn on, return it to Halcyon or an authorized dealer so
that the internal surge protection fuse can be inspected for damage.
My light was accidentally turned on while in transit and the battery
has been fully discharged. Have I damaged my NiMH battery?
Maintaining a load on a NiMH battery past the point of full discharge may
eventually cause irreversible changes in the cell chemistry and promote lifelimiting phenomena such as creep leakage. If you have over-discharged your
NiMH battery pack, recondition the battery by taking it through at least three
complete discharge/charge cycles.
Can I disassemble my Explorer/Eos/Apollo battery pack or dry lid?
If you remove the protective Delrin caps, the plastic shrink-wrapping from
your NiMH battery pack, or disassemble the Halcyon dry lid, you will void
your Halcyon warranty. There are no user-serviceable parts within the pack;
if you think that your battery pack or lid might be damaged, please return
the light to your Halcyon dealer for inspection. The bolts that secure the dry
lid are sealed; breaking the seal will void your light's warranty.
Your Halcyon Explorer battery pack and dry lid are built to
! Warning:
p
exacting standards. There are no user servicable parts in either component; removing the pack's end cap or disassembling the lid can damage the system's wiring and result in a catastrophic failure.
Do I need to take any special precautions in shipping and handling my
Explorer battery?
Shipping and handling of NiMH batteries is straightforward. The following
suggestions ensure maximum performance, reliability and safety in working
with the cells:
•Provide proper packaging, considering the weight of the battery pack,
to avoid transit damage.
•Do not store cells or batteries under load or in a shorted condition.
•Avoid excessive handling of charged cells and batteries outside the
Explorer canister.
23
HALCYON HMI VIDEO LIGHT INSTRUCTIONS
Follow Halcyon's general lighting information for care, charging and maintenance of the HMI video lighting system.
SETUP: Assemble the HMI by placing the ballast housing on top of the battery
canister while aligning the banana plugs with the battery terminals. Ensure
that the battery canister O-ring is in place before locking the latches. Plug the
cord into the lid and screw down the locking retainers. Plug the other end of
the cord into the light head and screw down the locking retainers.
CHARGING: Set the voltage selector switch
on the back of the charger to the appropriate voltage. Plug the charger in to a
wall socket and turn the charger on. Plug
the charging plug into the battery. A fully
discharged battery will take approximately
3 hours to charge. A fully charged battery
will provide 1 hour of burn time on a single
200-watt. Use of HMI in extremely cold
conditions will impact the run time.
Please note that the Halcyon HMI video
light is a 24-volt system. Always use the
supplied 24-volt charger to charge the battery.
Use of an inverter is not recommended.
TROUBLESHOOTING the HMI
Light will not strike
• Ensure that the battery is connected
• Ensure that the cord is securely connected at both ends
• Ensure that the bulb is properly seated
Light performs intermittently
• Ensure that the cord is securely connected at both ends
• Ensure that the bulb is properly seated
• Ensure that the battery is fully charged
The light does not burn for the specified time
• Ensure that the battery is fully charged
• Ensure that the cord is securely connected at both ends
• Ensure that the bulb is properly seated
24
Appendix 1: Burn Times for Explorer, Eos, Apollo Lights
Light
System
Specifications
12watt
LED
21 watt
HID
4.5 amp
Battery Pack
2.6” (6.6cm) OD /
11.63”(29.5cm) L
Weight: 4 lb (1.8kg)
Buoyancy: -1.75 lb (-.8 kg)
Full Power:
5 hour
run time
Half Power:
10 hour
run time
2 hour
9 amp
Battery Pack
2.95” (7.5cm) OD /
11.63” (29.5cm) L
Weight: 5.76-lb. (2.6 kg)
Buoyancy: -2.8-lb. (-1.3 kg)
Full Power:
10 hour
run time
Half Power:
20 hour
run time
4 hour
13.5 amp
Battery Pack
3.68” (9.3cm) OD /
11.63” (29.5cm) L
Weight: 7.75-lb. (3.5 kg)
Buoyancy: -3.2 lb (-1.5 kg)
Full Power:
14 hour
run time
Half Power:
28 hour
run time
6 hours
Light
System
Apollo
13.5
Apollo
HMI
Specifications
Dual
21
watt
HID
Single
50 watt
HID
Dual 50
watt
HID
3.68” (9.3cm) OD/
11.63” (29.5cm) L
Weight: 7.75 lb (3.5 kg)
Buoyancy: -3.25lb (1.5 kg)
180
min
100
min
65
min
6” (15.25cm) OD/
25" (63.5cm) L
Weight: 27.5-lb. (12.5kg)
Buoyancy: -2.2-lb. (1kg)
Single
200
watt
HMI
60
min
25
Appendex 2: Halcyon Warranty Information
All warranty requests must be accompanied by proof of original purchase
from an Authorized Halcyon Dealer. Be sure to save your sales receipt, and
present it whenever returning your light for warranty service.
Should your Halcyon lighting system prove to be defective for any reason
(other than those listed in the limitations section below) it will be repaired
or replaced (at Halcyon’s discretion) free of charge excluding shipping and
handling charges. All correspondence concerning this warranty must be
accompanied by a copy of the original sales receipt. Repair or replacement
is Halcyon’s only responsibility and your only remedy under this warranty.
Halcyon warrants, to the original purchaser only, that the Halcyon
Primary or Video Lighting System will be free of defects in materials and/
or craftsmanship under normal diving use for one year from the date of
purchase, provided proper care is performed on all materials as described
within this manual, with the following exclusions:
A lifetime warranty to the original owner, applies to Halcyon Delrin and
UHMW canisters. A 90-day warranty, from the date of purchase, applies to
the original owner of the NiMH or Lead Acid battery, under normal diving
use, provided proper care is performed on all materials as described
within this manual.
ALL WARRANTIES, INCLUDING, BUT NOT LIMITED TO, IMPLIED
WARRANTIES OF MERCHANTABILITY AND FITNESS FOR A PARTICULAR
PURPOSE ARE LIMITED IN DURATION TO A PERIOD ENDING ONE YEAR
FROM THE DATE OF PURCHASE.
Some states in the U.S. and certain foreign countries do not allow
limitations on the duration of implied warranties, so this may not apply
to you. This warranty gives you specific legal rights. You may have rights
which vary from state to state and country to country.
HALCYON MANUFACTURING DISCLAIMS AND EXCLUDES ANY LIABILITY
FOR INCIDENTAL OR CONSEQUENTIAL DAMAGES. SOME STATES IN THE
U.S. AND CERTAIN FOREIGN COUNTRIES DO NOT ALLOW EXCLUSIONS
OR LIMITATIONS OF LIABILITY FOR INCIDENTAL OR CONSEQUENTIAL
DAMAGES, SO THIS MAY NOT APPLY TO YOU.
26
The following restrictions apply to this warranty:
1. This warranty extends to the charger and all light parts, with the
exception of the bulb.
2. This warranty does not extend to leaks, flooding, corrosion or any such
damage to any part of the light, unless due to a material or craftsmanship
defect.
3. This warranty does not extend to damages caused by improper use,
improper maintenance, neglect, unauthorized repairs, modifications,
accidents, fire, or casualty.
This warranty does not extend to products whose serial number has been
altered or intentionally defaced.
4. Cosmetic damage, such as scratches, fraying, and nicks are not covered
by this warranty.
5. This warranty does not extend to equipment used for rental,
commercial, governmental or military purposes.
6. This warranty covers products purchased in the United States.
For warranties that may apply elsewhere, please contact your local
representative.
7. Failure to meet any of the above requirements will render the warranty
null and void.
27
28