1
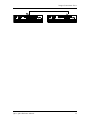
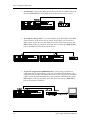
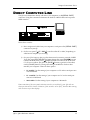
Setup & Connections: Part 1
PART 1
SETUP & CONNECTIONS
AC POWER
HOOKUP
Your QS7.1/QS8.1 is set to work with the voltage of the country to which it was
shipped (either 110 or 220V, 50 or 60 Hz) and comes equipped with the appropriate
power cable.
Hooking that cable up is simple.
•
Make sure your QS is turned off.
•
Plug the female (jack) end of the power cable into the QS’s power socket.
•
Plug the male (plug) end into a source of AC power. It’s good practice not to turn
the QS on until all other cables are hooked up.
The IEC-spec power cable included with your QS is designed to connect to an outlet with
three holes, the third of which — the round one — is the ground connection. This
connection is an important safety feature: it keeps the QS’s chassis at ground potential,
preventing accidental shocks.
Unfortunately, not all three-hole sockets are properly grounded. We recommend that
you use an AC line tester to check the ground connection on any socket you may use, just to
be on the safe side. If you find an ungrounded outlet, consult with a licensed electrician
about getting the problem fixed.
✪
Avoid using ungrounded outlets. Plugging the QS into an ungrounded outlet can be
hazardous. The same goes for “lifting” the unit off ground by using a three-to-two
plug adapter. Don’t do it!
✪
Alesis cannot be responsible for any problems that might be caused by using the
QS with improper AC wiring.
LINE CONDITIONERS AND PROTECTORS
The power coming through some AC lines contains voltage surges, spikes, or transients
that can stress your gear, causing failure or malfunctions. Although the QS is designed
to tolerate typical voltage variations, it isn’t invulnerable. So if the power in your area
is particularly bad (or if you are out playing live gigs) you will probably want to take
precautions. You have three basic options:
•
Line spike/surge protectors. These relatively inexpensive devices are designed
to protect against strong surges and spikes. They act somewhat like fuses and
will have to be either replaced or reset (depending on the unit) if they’ve been
hit by an extremely strong spike.
QS7.1/QS8.1 Reference Manual
9
Part 1: Setup & Connections
•
Line filters. These cost more than simple spike/surge protectors, but may be
worth it depending on your situation. Along with surge protection they offer
circuits that can remove some line noise — things like dimmer hash, transients
from other appliances, etc.
•
An Uninterruptible Power Supply (UPS). This is the most expensive way to go,
but it is also the best. Your typical UPS offers complete line protection/filtering
and throws in emergency battery power that will come on instantly if there is a
power outage. This will prevent anything in RAM-only memory from getting
lost, and enable you to take the time to shut down everything properly. That
last step is very important. You should always turn everything in your rig
p h y s i c a l l y off when the power goes out — otherwise you risk serious gear
and/or speaker damage from the current surge that takes place when power is
finally restored.
A UDIO
CONNECTIONS
The QS has two Main outputs and a stereo headphone output. These make for several
possible hookups:
•
Mono. To run in mono, connect a single mono cable from one of the QS’s [MAIN]
output jacks to either a mono amp or an individual mixer input. (You can use
either the [LEFT MAIN] or the [RIGHT MAIN] output jack.) Please note that
with this connection you will only be hearing one channel, so any Programs or
Mixes designed for stereo output will sound incomplete or diminished.
•
Stereo. To run in stereo, connect two mono cords (one each from the [LEFT] and
[RIGHT] output jacks) to either (A) a stereo amp system or (B) two separate
mixer inputs. For full effect, make sure that these inputs are panned hard left
and right.
•
Dual Stereo/Four Individual Outs. Connect two mono cords from the [LEFT] and
[RIGHT] MAIN OUTPUT jacks and two mono cords from the [LEFT] and [RIGHT]
AUX OUTPUT jacks to a dual stereo amplification system, or four mixer inputs.
•
Stereo Headphones. To listen over headphones, plug a set of high-quality
stereo headphones into the headphones [
] jack on the rear panel. The
volume for the headphone output is controlled by the front panel [VOLUME]
slider. Some headphones have a higher electrical resistance than others; if
the sound level seems too low even with the [VOLUME] slide up full, try a
different set.
LEVELS
To get the highest audio quality when performing or recording, set your QS’s [VOLUME]
slider all the way up. If the resulting signal is too loud (“hot”) for your mixer or
10
QS7.1/QS8.1 Reference Manual
Setup & Connections: Part 1
recording deck, lower the input level controls on those units until they are no longer
clipping.
AUDIO CABLES — SELECTION, ROUTING,
AND CARE
The audio connections between your QS and the rest of your studio are your music’s
lifeline, so make sure you use high-quality cables. These should be low-capacitance
shielded cables, with a stranded internal conductor and a low-resistance shield. Avoid
cables with solid internal conductors.
Quality cables cost more, but they are worth it. If you want to the lowest possible noise
and the best possible sound, there is no other way to go. As for what to do with them
when setting up, here are some basic mistakes to avoid:
•
Do not bundle audio cables with AC power cords. If you do, the audio cables
will pick up hum from the AC line.
QS7.1/QS8.1 Reference Manual
11
Part 1: Setup & Connections
•
Avoid running audio cables near such sources of electromagnetic interference as
transformers, monitors, computers, etc.
•
Don’t run cables where they can be stepped on. Stepping on a cable will
compress the insulation between the center conductor and shield, and over time
this will degrade performance and reliability.
•
Avoid twisting the cable or laying it out with sharp, right-angle turns.
•
Never unplug a cable by tugging on the cable itself. Even if it has a “strainrelief” plug, you are likely to damage the inside wiring and connections. The
best way to unplug a cable is to firmly grasp the body of the plug and then pull
it straight outward.
When connecting audio cables, or turning power on and off, make sure that ALL
devices in your system are turned off and ALL volume controls are turned down.
This is important. If you don’t do this, you can create loud bursts of sound that
might damage your speakers (or worse, your ears).
✪
MIDI
BASIC MIDI HOOKUP
MIDI is the standard data communication protocol for electronic musical instruments. If
you aren’t familiar with MIDI, see Part 5: MIDI and Part 10: Appendices to learn more
about how it works. Meanwhile, here’s all you need to know to get wired up.
The QS has three MIDI connectors:
•
MIDI IN. This port is for receiving MIDI information (notes, program changes,
etc.) from another source, such as another MIDI keyboard, an alternate
controller, or a computer.
•
MIDI OUT. This port is for sending MIDI information to another MIDI
keyboard, sound module, or computer.
•
MIDI THRU. This port is for passing on MIDI information received by the MIDI
IN port. In simple MIDI setups, the THRU port is used to connect additional
devices that will all be “listening” to the same source.
Here are four typical MIDI setups for your QS, and the appropriate cable connections
for each of them:
•
12
As Slave. To play your QS from any other MIDI device (keyboard, drum pad,
guitar or bass controller, sequencer, etc.), just run a standard 5-pin MIDI cable
from the control device’s MIDI OUT to the QS’s [MIDI IN] jack.
QS7.1/QS8.1 Reference Manual
Setup & Connections: Part 1
QS7.1/QS8.1 Reference Manual
13
Part 1: Setup & Connections
14
•
As Controller. To play other MIDI devices from your QS, run a MIDI cable from
the QS’s [MIDI OUT] jack to the MIDI IN of the device you want to control.
•
As a Link in a “daisy chain.” If you are using the QS in the middle of the MIDI
chain (example: as the second unit of a three device chain), you’ll need two
MIDI cables. Attach one from the MIDI OUT of the chain’s first device to the
[MIDI IN] jack of the QS; and then attach the other from the QS’s [MIDI THRU]
jack to the MIDI IN of the chain’s third device.
•
As part of a computer-based MIDI Network. If you are using a computer for
sequencing and/or programming, you’ll want to be able to play data into your
computer from your QS, and receive data back as well. This will take two MIDI
cables. Attach one from the MIDI OUT of the computer’s MIDI interface to the
[MIDI IN] jack of the QS; and then attach the other from the QS’s [MIDI OUT]
jack to the interface’s MIDI IN.
QS7.1/QS8.1 Reference Manual
Setup & Connections: Part 1
DIRECT C OMPUTER L INK
The QS can communicate directly with Mac or PC computers via its [SERIAL PORT]
connector. Using this connection eliminates the need for a MIDI cables and a separate
MIDI interface.
Here’s how it works:
1) Run a single serial cable from your computer’s serial port to the [SERIAL PORT]
connector on your QS.
2) Set the rear panel [ PC / MAC ] switch to either PC or MAC, depending on
what kind of computer you are using.
3) Set your QS to listen to data over this direct serial connection, instead of MIDI.
To do this, press [EDIT SELECT] to begin editing; then press [BANK ] to access
Global Edit Mode; then press [ PAGE] until the lower line of the LCD reads
I/O. (If you overshoot, just press the [PAGE ] button to get back.) Once there,
use the [VALUE] buttons to change the setting from MIDI to whatever best
matches your computer. There are three options:
•
PC 38.4Kbd. Use this setting if your computer is a PC and its serial port runs
at 38.4 kilobaud.
•
PC 31.25Kbd. Use this setting if your computer is a PC and its serial port
runs at 31.25 kilobaud.
•
MAC 1MHz. Use this setting if your computer is a Macintosh.
Please note that if the rear-panel selection switch is set to [MAC], your QS will not
show you the two PC choices. Likewise, if the switch is set to [PC], then the Mac setting
will not show up in the display.
QS7.1/QS8.1 Reference Manual
15
Part 1: Setup & Connections
IBM® PCS AND COMPATIBLES RUNNING
WINDOWS ®
If you want to link your QS directly with a PC or PC-Compatible, you’ll need special
serial driver software and cabling.
You’ve already got the driver software — it’s in the \ALESIS\ASDWIN directory on
the CD-ROM that came with your QS. (If you don’t have a CD-ROM drive in your
computer, call Alesis Product Support and ask them to send you the software on a 3-1/2
inch floppy disk. ) Complete installation instructions come with the driver software.
The procedure will vary depending on your version of Windows.
The special cable can be purchased through Alesis Product Support. It has a DIN8
connector on one end and either a DB9 or DB25 connector on the other end (depending on
the type of connector that is on your PC.) The DIN8-to-DB9 cable is part # 9-96-1290.
The DIN8-to-DB25 cable is part # 9-96-1291.
Be aware that many PCs have more than one serial port, and some have both types of
connector. Before you order a cable from us you will need to (A) identify the port you
wish to hook up to, and (B) make certain it is not already in use by the computer.
MACINTOSH™
You don’t need a special cable to make a direct connection between your QS and a Mac.
Any standard Mac DIN-8 cable will do.
You will, however, have to choose between using the MODEM or PRINTER serial port
on the Mac. Plug into whichever one you aren’t already using, and then make sure your
MIDI software’s port selection is set to match.
If both ports are already in use, you can either (A) temporarily disconnect your modem
or printer, or (B) buy a multiple serial port box that will let you hook everything up to
your Mac and switch among these serial devices as needed.
NOTE: If you want to use the printer port for your direct serial link, first make certain
that AppleTalk is disabled.
16
QS7.1/QS8.1 Reference Manual
Setup & Connections: Part 1
PEDAL AND FOOTSWITCH HOOKUP
The QS keyboard has three back-panel pedal jacks, marked [SUS PEDAL], [PEDAL 1]
and [PEDAL 2].
[SUS PEDAL] is designed to work with any standard momentary footswitch. It doesn’t
matter whether the footswitch is normally open or closed, so long as you plug it into the
jack before powering up your QS; the instrument will automatically sense the
footswitch’s polarity and calibrate itself accordingly.
[PEDAL 1] and [PEDAL 2]. are designed to work with a Roland EV-5 volume pedal (or
its equivalent).
The QS’s factory defaults assign sustain to the [SUS PEDAL] jack and overall
instrument volume to the [PEDAL 1] jack, but you can change these settings at any time
if you want to. There are lots of interesting possibilities to explore. A starter example:
using a footswitch to turn vibrato on in a program, and using a volume-type pedal to
control vibrato speed.
If your sustain footswitch responds backwards (i.e., notes sustain unless the footswitch
is pressed), then turn off your QS and make sure the footswitch plug is fully inserted
into the [SUS PEDAL] jack. When it is, turn the instrument’s power back on while
keeping your foot off the footswitch.
DIGITAL A UDIO /O PTICAL HOOKUP
The QS can output digital audio directly into an Alesis ADAT, ADAT-XT, or
ADAT-compatible multitrack digital recorder via fiber optic cable.
The QS’s [DIGITAL OUT] carries all four audio outputs of the QS (Main and Aux,
Left and Right) on a single fiber optic cable. Fiber optic cables of various lengths
are available from your Alesis dealer. The model OC cable is 5 meters long and is
the maximum length recommended.
Note: This will not plug directly into a tape deck which uses S/PDIF or AES/EBU
for its digital input! A digital audio format converter of some sort must be used.
To hook up the optical cable between the QS and an ADAT-XT:
❿ Remove the two pieces of clear plastic, tubular sleeving (if present) that
protect the tips of the optical cable plug.
❡ Insert one cable end into the QS [DIGITAL OUT] and the other end into the
ADAT-XT’s DIGITAL IN.
To test the cable and QS digital output, plug one cable end into the QS. The other
end should emit a soft red light (it is not dangerous to look directly at this light).
R ECORDING D IGITAL A UDIO
Once the fiber optic connection is made between the QS and ADAT-XT, the QS will
output audio on the first four channels of the digital bus (the bus is capable of
handling eight channels of digital audio). The MAIN [LEFT] and [RIGHT] outputs
QS7.1/QS8.1 Reference Manual
17
Part 1: Setup & Connections
are routed to channels 1 and 2, while the AUX [LEFT] and [RIGHT] outputs are routed
to channels 3 and 4. Note that the [VOLUME] slider does not control the level going
to the ADAT-XT. Volume control must happen via MIDI or a Pedal plugged into the
Pedal 1 jack.
When recording to ADAT-XT (or some other digital audio recorder), it must be set to
“slave” to the 48kHz clock embedded in the digital audio which the QS is sending.
This clock can be set to either 48kHz or 44.1kHz, as determined by the Clock
function (found in Global Edit Mode, Page 19). The Clock function has four settings:
Int 48kHz, Int 44.1k, Ext 48kHz and Ext 44.1k. The default setting
is Int 48kHz, which is suitable when the digital recorder is using the 48kHz
sample rate. However, if the recorder is using the 44.1kHz sample rate, the Clock
function should be set to Int 44.1k. This ensures that the QS will be in tune
with previously recorded material. See page 47 in Chapter 4: Basic Operations for
more information on the Clock parameter.
48 KHZ IN
If your ADAT system has an Alesis BRC Remote Controller, the QS’s digital clock
must be synchronized to the clock coming from the BRC. This requires that a
connection be made providing the clock signal to the QS and that the QS’s Clock
function be set to either one of its two external settings (Ext 48kHz or Ext
44.1k).
Connect a BNC-to-BNC cable (such as the Alesis BN cable) between the BRC’s 48
kHz CLOCK OUT and the QS’s [48 KHZ IN]. Set the Clock function to either Ext
48kHz if the BRC is set to 48kHz, or Ext 44.1k if the BRC is set to 44.1kHz
(“Pitched Down” to -147).
Tip: With this type of connection, the ADAT-XT tracks will remain in tune with
the QS even when the BRC’s pitch value is adjusted.
18
QS7.1/QS8.1 Reference Manual
Setup & Connections: Part 1
Note: When using ADAT-XTs without the BRC, it is not necessary to connect the 48
kHz Clock. If set up properly, the XTs will “slave” to the QS’s Digital Output.
QS7.1/QS8.1 Reference Manual
19