1
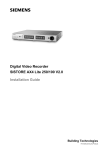
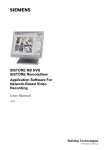
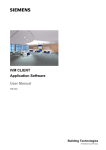
SISTORE AX
Hard Disk Kit (SATA)
Installation Instructions
Building Technologies
Fire Safety & Security Products
Liefermöglichkeiten und technische Änderungen vorbehalten.
Data and design subject to change without notice. / Supply subject to availability.
© 2009 Copyright by
Siemens Building Technologies
Wir behalten uns alle Rechte an diesem Dokument und an dem in ihm dargestellten Gegenstand vor. Der Empfänger erkennt diese Rechte
an und wird dieses Dokument nicht ohne unsere vorgängige schriftliche Ermächtigung ganz oder teilweise Dritten zugänglich machen oder
außerhalb des Zweckes verwenden, zu dem es ihm übergeben worden ist.
We reserve all rights in this document and in the subject thereof. By acceptance of the document the recipient acknowledges these rights
and undertakes not to publish the document nor the subject thereof in full or in part, nor to make them available to any third party without our
prior express written authorization, nor to use it for any purpose other than for which it was delivered to him.
Contacting us
If you have questions or suggestions regarding the product or this documentation,
please contact our Customer Support Center.
Intranet:
Customer Support Center
Internet:
Worldwide contacts
E-Mail:
[email protected]
Tel.:
+49 89 9221 8000
Copyright
Copyright 2007 © Siemens Fire & Security Products GmbH & Co. oHG.
All rights reserved.
Siemens Fire & Security Products GmbH & Co. oHG confers upon the purchaser
the right to use the software.
It is not permitted to reproduce this manual in whole or in part or translate it into
another language without our written consent.
Contents
1
Introduction .............................................................................................5
2
2.1
2.2
2.2.1
2.2.2
2.2.3
2.2.4
2.2.5
2.3
2.4
Safety .......................................................................................................6
Target readers...........................................................................................6
Work safety information ............................................................................6
General information...................................................................................6
Transport...................................................................................................6
Setup.........................................................................................................7
Installation .................................................................................................8
Service and maintenance .........................................................................8
Meaning of the written warning notices ....................................................9
Meanings of the hazard symbols ..............................................................9
3
Directives and standards .....................................................................10
4
4.1
4.2
4.3
4.4
Overview SISTORE AX devices ...........................................................11
SISTORE AX4 Lite V2.0 .........................................................................11
SISTORE AX8/AX16 250/100 V2.8 ........................................................11
SISTORE AX8/AX16 500/200 V3.6 ........................................................12
SISTORE AX HDD extension kit (SATA)................................................12
5
5.1
5.1.1
5.1.2
5.1.3
5.1.4
5.2
5.2.1
5.2.2
Technical check ....................................................................................13
Verification of primary HDD ....................................................................13
Config issues?.........................................................................................14
Normal booting?......................................................................................14
Message displayed? ...............................................................................14
Booting without HDD?.............................................................................14
Verification of secondary HDD................................................................15
Normal booting?......................................................................................15
Booting without HDD?.............................................................................15
6
6.1
6.2
Installation and replacement of hard disk drives ..............................16
Replacement of the primary HDD in SISTORE AX4 Lite V2.0 ...............16
Replacement of the primary HDD in SISTORE AX8/AX16 250/100
V2.8.........................................................................................................19
Installation of the extension HDD in SISTORE AX8/AX16 250/100
V2.8.........................................................................................................22
Replacement of the primary HDD in SISTORE AX8/AX16 500/200
V3.6.........................................................................................................25
Installation of the extension HDD in SISTORE AX8/AX16 500/200
V3.6.........................................................................................................28
Installation of the 1st additional hard disk...............................................29
Installation of the 2nd additional hard disk underneath the CD/DVD
drive ........................................................................................................31
6.3
6.4
6.5
6.5.1
6.5.2
7
7.1
7.2
Functional test.......................................................................................34
Preconditions ..........................................................................................34
Test procedures ......................................................................................34
8
8.1
8.1.1
8.1.2
8.1.3
8.2
Appendix................................................................................................35
Troubleshooting ......................................................................................35
SISTORE AX4 Lite V2.0 .........................................................................35
SISTORE AX8/AX16 250/100 V2.8 and SISTORE AX8/AX16
500/200 V3.6...........................................................................................35
SISTORE AX RAS ..................................................................................36
Packaging for returning the HDD ............................................................37
9
Disposal .................................................................................................38
3
Siemens Building Technologies
Fire Safety & Security Products
03.2009
Introduction
1
Introduction
This document describes the required procedures to
z extend SISTORE AX devices with one or two extension HDDs (Hard Disk
Drives)
z replace faulty HDDs
This document consists of the following chapters:
z Overview SISTORE AX devices
z Technical check
z Installation and replacement of SATA Hard Disk Drives for SISTORE AX models
fitted with SATA HDD technology
z Functional text
z Appendices
IMPORTANT
HDDs in SISTORE AX shall only be installed by qualified service personnel.
IMPORTANT
This document covers the fitting of SATA hard drives into SISTORE AX devices
based on SATA HDD technology. SATA HDDs are not compatible with previous
versions of SISTORE AX based on IDE (PATA) HDD technology. Please refer
to the SISTORE AX service concept for a compatibility matrix.
5
Siemens Building Technologies
Fire Safety & Security Products
03.2009
Safety
2
Safety
2.1
Target readers
The instructions in this document are designed for the following target readers:
Operational startup personnel
Qualification
Technical training for building or
electrical installations.
2.2
Work safety information
2.2.1
General information
Activity
Puts the product into operation
for the first time.
Condition of the equipment
The product is not yet installed
and configured.
z Read the general safety precautions before operating the device.
z Follow all warnings and instructions marked on the device.
z Keep this document for reference.
z Always pass this document on together with the product.
z Any national or local safety standards or laws that apply to the development,
design, installation, operation or disposal of a product must be adhered to in
addition to the instructions in the product documentation.
Liability claim
z Do not connect the device if it is damaged or any parts are missing.
z Do not make any changes or modifications to the device unless they are ex-
pressly mentioned in this manual and have been approved by the manufacturer.
Unauthorized changes will void the user's authority to operate the equipment.
z Use only spare parts and accessories approved by the manufacturer.
Burn hazard
Do not touch the housing of the device while it is in operation
Radio interference with other devices in the environment
z This is a Class A device. This equipment may cause radio interference in a
residential installation. In this case the user is encouraged to perform
appropriate measures to correct the interference.
2.2.2
Transport
Damage during transport
z Keep the packaging material for future transportation.
z Do not expose the device to mechanical vibrations or shocks.
z Do not carry two or more HDDs with one stacked on top of another.
z Do not let HDDs bump against each other.
z Do not leave the HDD in a vertical position without putting it in a container.
6
Siemens Building Technologies
Fire Safety & Security Products
03.2009
Safety
2.2.3
Setup
Damage due to unsuitable mounting location
z Observe the environmental requirements recommended by the manufacturer.
z Do not operate the device close to sources of powerful electromagnetic
radiation.
z Protect the device against moisture.
z Do not operate the device in excessively dusty places.
z Do not expose the device to mechanical vibrations or shocks.
z Put a shock-absorbing and antistatic material on the desk where the HDD is to
be handled (the antistatic material should be put on top of the shock-absorbing
material).
z Do not press on the top of the button of the drive.
Damage to the device due to lack of ventilation
z Do not block or cover the ventilation openings of the device.
Damage to the device due to overload
z Use only the shielded video interface cable recommended in this document to
ensure compliance with the limits for digital output devices.
Risk of failure of the main device
z Power cables to the main device are to be run separately and have a dedicated,
clearly labelled fuse.
Danger of electrical shock due to insufficient labelling
z Terminals carrying an external voltage supply must be labelled "DANGER –
external voltage".
Danger of electrical shock and damage to the device
z Electrical grounding must meet the customary local safety standards and
regulations.
z Handle the drive care fully by the edges. Do not touch the exposed printer circuit
board or any electronic components.
z Wear a wrist strap when handling HDD.
z Before handling the drive, discharge any static electricity from yourself and your
clothing.
z With one hand touch an unpainted metal surface, then touch the ESD bag with
the other hand. Remain in contact with the metal surface and the bag for a
minimum of 2 seconds.
Danger of electrical shock due to incorrect connection
z Make sure the device is permanently connected to the electricity supply; a
readily accessible disconnect device must be provided.
Liability claim
z For reasons of electromagnetic compatibility RS232, USB, audio in/out and
power supply cables must not exceed 3 meters length.
7
Siemens Building Technologies
Fire Safety & Security Products
03.2009
Safety
Damage to the device due to overvoltage
z Connect the device only to power sources with the specified voltage. Voltage
supply requirements can be found on the power supply unit/type label.
Dangerous situation due to false alarm
z Make sure to notify all relevant parties and authorities providing assistance
before testing the system.
z To avoid panic, always inform all those present before testing any alarm
devices.
Risk of failure due to incorrect installation
z Install the fault current circuit breaker for the unit separately from the fault
current circuit breaker for the building.
Danger of electrical shock when using uninsulated tools
z Use only insulated tools during initial startup and when performing maintenance
or repair while the device is running and observe the relevant safety precautions.
2.2.4
Installation
Cable damage due to mechanical load
z When connecting the cables, do not apply tensile force and make sure not to
bend or damage them.
Data loss after update
z Make sure to backup all data before updating the device
Mounting and tools
z Use a low-impact screwdriver
z Recommended plane level for mounting: 0.2 mm or less
z Spacing between system cabinets: 1.2 mm or more
2.2.5
Service and maintenance
Risk of electric shock during maintenance
z Always disconnect the power cable and other cables from the device before
performing maintenance.
Danger of electrical shock while cleaning the device
z Disconnect the device from the mains supply before cleaning it.
z Do not use liquid cleaners or sprays that contain alcohol, spirit or ammonia.
8
Siemens Building Technologies
Fire Safety & Security Products
03.2009
Safety
2.3
Meaning of the written warning notices
The severity of a hazard is indicated by the following written warning notices.
Signal word
IMPORTANT
2.4
Type of risk
Malfunctioning may result.
Meanings of the hazard symbols
The nature of the hazard is indicated by icons.
Warning of a hazard!
9
Siemens Building Technologies
Fire Safety & Security Products
03.2009
Directives and standards
3
Directives and standards
This product complies with the requirements of the following European directives.
The EU declaration of conformity is available to the responsible agencies at:
Siemens Building Technologies
Fire & Security Products GmbH & Co. oHG
76181 Karlsruhe
Germany
European Directive 2004/108/EC ”Electromagnetic Compatibility”
Compliance with the European Directive 2004/108/EC has been proven by testing
according to the following standards:
Emitted interference:
Interference resistance:
EN 55022 Class A
EN 61000-3-2
EN 61000-3-3
EN 50130-4
European Directive 2006/95/EEC ”Low-Voltage Directive”
Compliance with the European Directive 2006/95/EEC has been proven by testing
according to the following standard:
Safety:
EN 60950-1
10
Siemens Building Technologies
Fire Safety & Security Products
03.2009
Overview SISTORE AX devices
4
Overview SISTORE AX devices
This chapter shows the various SISTORE AX models including the scope of
delivery of devices ex factory and in the Replacement Pool.
4.1
SISTORE AX4 Lite V2.0
Product Name
SISTORE AX4 Lite
S/W
V2.0
Ordering number
S54569-C50-A13
Def. HDD
250 GB
Ext. HDD
-
Scope of delivery ex factory:
z Digital video recorder
z Power cord
z Multilingual User Manuals and multilingual RAS software on CD-ROM
z Multilingual Installation Guide
z Infrared remote control
NOTE
The remote control for SISTORE AX4 Lite V2.0 is not compatible with the SISTORE AX4 Lite V1.0
and vice versa.
Scope of delivery Replacement Pool:
z Digital video recorder
z Power cord
4.2
SISTORE AX8/AX16 250/100 V2.8
Product Name
SISTORE AX8
SISTORE AX16
S/W
V2.8
Ordering number
S54569-C71-B13
S54569-C91-B13
Def. HDD
250 GB
250 GB
Ext. HDD
2x250 GB or
2x500 GB
Scope of delivery ex factory:
z Digital video recorder
z Power cord
z Multilingual User Manuals and multilingual RAS software on CD-ROM
z Multilingual Installation Guide
z Rack-mount kit
z Assembly screws guide rails for adding hard disk drives
Scope of delivery Replacement Pool:
z Digital video recorder
z Power cord
11
Siemens Building Technologies
Fire Safety & Security Products
03.2009
Overview SISTORE AX devices
4.3
SISTORE AX8/AX16 500/200 V3.6
Product Name
SISTORE AX8
SISTORE AX16
S/W
V3.6
Ordering number
S54569-C70-B2
S54569-C90-B2
Stand. HDD
500 GB
500 GB
Ext. HDD
2x250 GB or
2x500 GB
Scope of delivery ex factory:
z Digital video recorder
z Power cord
z Multilingual User Manuals and multilingual RAS software on CD-ROM
z Multilingual Installation Guide
z Rack-mount kit
z Assembly screws guide rails
z Screws for fixing SCSI connector
z Infrared remote control
Scope of delivery Replacement Pool:
z Digital video recorder
z Power cord
4.4
SISTORE AX HDD extension kit (SATA)
Scope of delivery ex factory:
z Hard Disk Drive (SATA)
z Multilingual mounting instructions
z Bottom bracket and assembly screws
z Assembly screws and guide rails (for SISTORE AX8/AX16 250/100 and
SISTORE AX8/AX16 500/200)
z Cable ties (2x)
IMPORTANT
SATA HDD kits are not compatible with previous versions of SISTORE AX
based on IDE (PATA) HDDs. Likewise the IDE HDD kits cannot be fitted into
SISTORE AX models based on SATA HDD technology.
12
Siemens Building Technologies
Fire Safety & Security Products
03.2009
Technical check
5
Technical check
This chapter describes the procedures for the technical verification of defective
SISTORE AX devices. Please note that the procedures described below can only
give an indication of unit condition and the recommended action to be taken.
5.1
Verification of primary HDD
Faulty device
from customer
Chap.
3.1.1
Config?
send device back to customer
ok?
not ok?
Chap.
3.1.2
Normal
booting?
ok?
ok?
Functional Test
not ok?
not ok?
Chap.
3.1.3
Display of
message?
ok?
Replacement of
HDD
not ok?
Chap.
3.1.4
Booting
without
HDD?
ok?
not ok?
Dispatch the device
to supplier
13
Siemens Building Technologies
Fire Safety & Security Products
03.2009
Technical check
5.1.1
5.1.2
5.1.3
Config issues?
1.
Verify BNC (SVHS) / VGA switch settings (either switch on the rear of the
device or via Display button on the front of the device)
2.
Stop recording when HDD is full
3.
Configuration of recording schedule and events
4.
Covert camera and colour control settings
Normal booting?
1.
Verify System log
2.
Verify status of HDD in the Storage menu
3.
is it possible to enter the SMART menu from within the unit main menu?
Message displayed?
z Display of an HDD error code on the screen
The following list displays a list of relevant HDD error codes. In case one of
these error codes show on the screen the HDD needs to be replaced.
Code No.
Description
Cause
Solution
1
All installed HDDs are
defective.
SYS_INFO can not be read
Replace HDD and
perform Functional Test
2
All installed HDDs are
defective.
DISK_INFO can not be read
Replace HDD and
perform Functional Test
3
Creating database
failed.
Creating database failed due to
HDD failure, incompatible HDD,
etc.
Replace HDD and
perform Functional Test
5
HDD installed in
wrong DVR.
The HDD which was formatted
in one AX device was installed in
another AX device (e.g. HDD of
a 9-ch AX was installed in a 16ch DVR).
Replace HDD or insert
correct HDD for this
device.
Perform Functional Test.
6
More than two HDDs
are installed in the
DVR, and error codes
2 and 5 occur
simultaneously.
There are 2 HDDs installed. One
HDD has error code 2 problem
and another one has error code
5 problem.
Replace HDD or insert
correct HDD for this
device.
z “Disk Bad” alert in the OSD (Disk bad checks the amount of bad sectors on the
HDD).
z SMART alert in the OSD
z Message “There is no installed master HDD. Press OK button to shutdown.”
z Message “Setup not found”.
z Warning message (e.g. “WARNING: Immediately check storage”).
z Initializing message without proper booting and hang-up of the system.
5.1.4
Booting without HDD?
Remove the power supply cable of the HDD and verify if it is working properly.
14
Siemens Building Technologies
Fire Safety & Security Products
03.2009
Technical check
5.2
Verification of secondary HDD
Faulty device
from customer
Chap.
3.2.1
send device back to customer
ok?
Normal
booting?
Functional Test
not ok?
Chap.
3.2.2
Booting
without
HDD?
ok?
ok?
Replacement
of HDD
Dispatch device
to supplier
5.2.1
5.2.2
Normal booting?
1.
Verify System log
2.
Verify status of HDD in the Storage menu
3.
Is it possible to call the SMART menu?
Booting without HDD?
1.
Remove secondary HDD from the device and verify if the device is working
properly
15
Siemens Building Technologies
Fire Safety & Security Products
03.2009
Installation and replacement of hard disk drives
6
Installation and replacement of hard disk drives
This chapter describes the procedures to replace faulty HDDs and install
extensions HDDs in the SISTORE AX. Independent of the AX model, in either case
the HDD shall be replaced by the standard HDD model (currently Hitachi 250 GB).
6.1
Replacement of the primary HDD in SISTORE AX4 Lite V2.0
This chapter describes the installation of a HDD unit into the housing of a Digital
Video Recorder of type SISTORE AX4 Lite.
1. First shutdown the device and
disconnect from the power supply.
2. Remove the screws marked in the
picture on the side (2) and on the rear
of the SISTORE AX (3).
3. Lift up the housing cover at the rear of
the SISTORE AX, and lift it off.
16
Siemens Building Technologies
Fire Safety & Security Products
03.2009
Installation and replacement of hard disk drives
4. Remove the hard disk frame securing
screw and the connection cables, and
slide the frame out of its mounting.
5. After removing the screws, take out the
faulty HDD from the frame and fit
replacement hard disk unit into the
frame (the cable connection side points
towards the inside of the unit), and
secure using the four screws.
6. Connect the two cables – see arrows –
1 x power supply,
1 x data
to the hard disk unit.
7. Secure the hard disk frame including
the hard disk unit in the SISTORE using
the two screws.
NOTE
The Flat cable between front board and main board should be placed as it was. It needs to be placed
on the HDD bracket as displayed in the image.
17
Siemens Building Technologies
Fire Safety & Security Products
03.2009
Installation and replacement of hard disk drives
8.
Now close the SISTORE AX by re-installing the top cover. Secure the cover in
place by re-inserting and tightening the previously removed cover screws.
Î
You can now start up the SISTORE AX.
The new hard disk capacity will be
displayed in the OSD menu "Storage"
(either in the “Quick Setup” screen or in
the “System Information” screen).
(250 GB)
18
Siemens Building Technologies
Fire Safety & Security Products
03.2009
Installation and replacement of hard disk drives
6.2
Replacement of the primary HDD in
SISTORE AX8/AX16 250/100 V2.8
These instructions describe the replacement of the primary HDD unit in the
housing of a Digital Video Recorder of type SISTORE AX8 250/100. When
installing a HDD unit in AX16 250/100 proceed in the same manner.
1. First shutdown the device and
disconnect from the power supply.
2. Remove the screws marked in the
picture on the rear (3) and on both
sides of the SISTORE AX (8).
3. Lift up the housing cover at the rear of
the SISTORE AX, and lift it off.
4. Remove the hard disk frame with the
primary HDD by loosening the two
screws – see marking.
5. Push the frame forward and lift it off
from the housing.
6. Remove the cabling.
19
Siemens Building Technologies
Fire Safety & Security Products
03.2009
Installation and replacement of hard disk drives
7. Remove the primary HDD and fit the
replacement hard disk unit into the
frame, and secure using the four
screws.
IMPORTANT:
Ensure the copper grounding strap is reinstalled as shown.
8. Secure the hard disk frame including
the hard disk unit in the SISTORE using
the two screws.
9. Now close the SISTORE AX with the
cover, and secure this by inserting and
tightening the previously removed
screws.
You can now start up the SISTORE AX.
20
Siemens Building Technologies
Fire Safety & Security Products
03.2009
Installation and replacement of hard disk drives
The new hard disk capacity will be
displayed in the OSD menu "Storage
information". Before you can start
recording data, the use needs to be
defined and the hard disk to be formatted
(see SISTORE AX8/AX16 250/100 User
Manual).
21
Siemens Building Technologies
Fire Safety & Security Products
03.2009
Installation and replacement of hard disk drives
6.3
Installation of the extension HDD in
SISTORE AX8/AX16 250/100 V2.8
These instructions describe the installation of an extension HDD unit into the
housing of a Digital Video Recorder of type SISTORE AX8 250/100. When
installing a HDD unit in AX16 250/100 proceed in the same manner.
1. First shutdown the device and
disconnect from the power supply.
2. Remove the screws marked in the
picture on the rear (3) and on both
sides of the SISTORE AX (8).
3. Lift up the housing cover at the rear of
the SISTORE AX, and lift it off. The
empty locations for the hard disk units
are then visible.
4. In general, there are two possible
locations for the extension of this AX
model:
– above the Primary HDD
AND / OR
– above the DVD drive.
HDD extension kit and screws for the
installation of the HDD into the frame.
22
Siemens Building Technologies
Fire Safety & Security Products
03.2009
Installation and replacement of hard disk drives
If the extension HDD shall be installed
above the primary HDD:
5. Fit the hard disk unit into the frame, and
secure using the four supplied screws
(among accessories enclosed with the
SISTORE AX).
6. Ensure the copper grounding strap is
installed as per the master HDD. Refer
to photo.
7. Connect the two cables –
1 x power supply,
1 x data
to the hard disk unit.
23
Siemens Building Technologies
Fire Safety & Security Products
03.2009
Installation and replacement of hard disk drives
AX8/AX16 250/100 with extension HDD
above the primary HDD.
If the extension HDD shall be installed
above the DVD writer.
8. Fit the hard disk unit into the frame and
secure using the four supplied screws
(among accessories enclosed with the
SISTORE AX).
9. Connect the two cables –
1 x power supply (cable tie need to be
opened before),
1 x data
to the hard disk unit.
10. Now close the SISTORE AX with the
cover, and secure this by inserting and
tightening the previously removed
screws.
You can now start up the SISTORE AX.
The new hard disk capacity will be
displayed in the OSD menu "Storage
information". Before you can start
recording data, the use needs to be
defined and the hard disk to be formatted
(see SISTORE AX8/AX16 250/100 User
Manual).
24
Siemens Building Technologies
Fire Safety & Security Products
03.2009
Installation and replacement of hard disk drives
6.4
Replacement of the primary HDD in
SISTORE AX8/AX16 500/200 V3.6
These instructions describe the replacement of the primary HDD unit in the
housing of a Digital Video Recorder of type SISTORE AX16 500/200. When
installing a HDD unit in AX8 500/200 proceed in the same manner.
1. First shutdown the device and
disconnect from the power supply.
2. Remove the eleven screws on both
sides and at the rear of SISTORE AX.
See picture.
3. Lift up the housing cover at the rear of
the SISTORE AX, and lift it off. The
location for the hard disk unit is then
visible – see arrow.
4. Remove the HDD frame by loosening
the four screws inside the device; then
disconnect all cables from the hard disk
unit within the frame.
Note:
Be very careful when disconnecting the
data cables - they are not provided with
strain relief!
5. Remove the defect HDD and fit the
replacement hard disk unit into the
frame and secure it using the four
screws.
25
Siemens Building Technologies
Fire Safety & Security Products
03.2009
Installation and replacement of hard disk drives
6. Now connect the data line as well as
the power supply line to both hard
disks.
Note:
When inserting the frame make sure the
cables are not crushed or damaged.
7. Fasten the HDD frame within the device
using the four screws (as marked in the
picture).
8. Fasten the housing cover using the
previously removed screws.
9. Start up the device. Please refer to the
instruction manual for SISTORE AX.
26
Siemens Building Technologies
Fire Safety & Security Products
03.2009
Installation and replacement of hard disk drives
NOTE
In order for the additional hard disk unit to be addressed by the SISTORE AX application software, it must be
identified as an additional data disk in the „System“ configuration menu and be formatted
The new hard disk capacity will be
displayed in the OSD menu "Storage
information". Before you can start
recording data, the use needs to be
defined and the hard disk to be formatted
(see SISTORE AX8/AX16 500/200 User
Manual).
27
Siemens Building Technologies
Fire Safety & Security Products
03.2009
Installation and replacement of hard disk drives
6.5
Installation of the extension HDD in
SISTORE AX8/AX16 500/200 V3.6
These instructions describe the installation of a HDD unit into the housing of a
Digital Video Recorder of type SISTORE AX16 500/200. When installing a HDD
unit in AX8 500/200 proceed in the same manner.
1. First shutdown the device and
disconnect from the power supply.
2. Remove the eleven screws on both
sides and at the rear of SISTORE AX.
See picture.
3. Lift up the housing cover at the rear of
the SISTORE AX, and lift it off.
4. In general, there are two possible ways
of expanding SISTORE AX:
– By integrating an additional hard disk
in the frame of the primary HDD
AND / OR
– By installing the hard disk unit
underneath the CD/DVD drive.
NOTE
It is recommended to integrate the first additional hard disk into the frame of the primary HDD.
28
Siemens Building Technologies
Fire Safety & Security Products
03.2009
Installation and replacement of hard disk drives
6.5.1
Installation of the 1st additional hard disk
1. Remove the HDD frame by loosening
the four screws inside the device; then
disconnect all cables from the hard disk
unit within the HDD frame.
Note:
Be very careful when disconnecting the
data cables - they are not provided with
strain relief!
2. Fit the additional hard disk unit into the
cooling frame and secure it using the
four screws supplied with SISTORE
AX.
3. Now connect the data line as well as
the power supply line to both hard disks
(cable tie needs to be open).
Note:
When inserting the cooling frame make
sure the cables are not crushed or
damaged.
29
Siemens Building Technologies
Fire Safety & Security Products
03.2009
Installation and replacement of hard disk drives
4. Fasten the cooling frame and the
additional hard disk unit within the
device using the four screws supplied
(as marked in the picture).
5. Close cable tie.
6. Fasten the housing cover using the
previously removed screws.
7. Start up the device. Please refer to the
instruction manual for SISTORE AX.
NOTE
In order for the additional hard disk unit to be addressed by the SISTORE AX application software, it must be
identified as an additional data disk in the „System“ configuration menu and be formatted
The new hard disk capacity will be
displayed in the OSD menu "Storage
information". Before you can start
recording data, the use needs to be
defined and the hard disk to be formatted
(see SISTORE AX8/AX16 500/200 User
Manual). In case the device is operated in
the Recycle mode, first the Stop mode
needs to be configured before switched
back to the recycle mode.
30
Siemens Building Technologies
Fire Safety & Security Products
03.2009
Installation and replacement of hard disk drives
6.5.2
Installation of the 2nd additional hard disk underneath the CD/DVD drive
1. Remove the hard-disk frame including
the hard disk by loosening the four
screws inside the device; then
disconnect all cables from the hard disk
unit within the hard-disk frame.
2. Eight screws for securing the two guide
rails as well as the hard disk are
included in the delivery.
3. Attach the two guide rails to the hard
disk unit using the four screws provided
for this purpose.
31
Siemens Building Technologies
Fire Safety & Security Products
03.2009
Installation and replacement of hard disk drives
4. Attach the hard disk unit with the two
guide rails to the hard disk frame using
the four screws supplied for this
purpose.
5. Connect the power supply line and the
data line to the CD/DVD drive and to
the hard disk unit. Please pay attention
to the orientation of the data line.
Note:
It may be necessary to interchange the
power supply cables of the various
peripheral devices because of the
different cable lengths (you may have to
undo the cable tie).
Note:
When inserting the cooling frame make
sure the cables are not crushed or
damaged.
6. Fit the CD/DVD drive with the hard disk
unit and the guide rails into the device
and secure it using the four screws (see
marking).
7. Fasten the housing cover using the
previously removed screws.
8. Start up the device. Please refer to the
instruction manual for SISTORE AX.
9. Fix cable ties.
NOTE
In order for the additional hard disk unit to be addressed by the SISTORE AX application software, it must be
identified as an additional data disk in the “System“ configuration menu and be formatted.
32
Siemens Building Technologies
Fire Safety & Security Products
03.2009
Installation and replacement of hard disk drives
The new hard disk capacity will be
displayed in the OSD menu "Storage
information". Before you can start
recording data, the use needs to be
defined and the hard disk to be formatted
(see SISTORE AX8/AX16 500/200 User
Manual). In case the device is operated in
the Recycle mode, first the Stop mode
needs to be configured before switched
back to the recycle mode.
33
Siemens Building Technologies
Fire Safety & Security Products
03.2009
Functional test
7
Functional test
The Functional Test ensures the proper operation of the device. In case the
Functional Test is not successful even after inserting a new HDD, the devices shall
be sent to the Service Centre.
7.1
Preconditions
The following point need to be checked before starting the Functional Test:
z Connect the power supply (make sure that the power supply is stable)
z Recording for the Functional Test for minimum 2 hours
z If the firmware of the device needs to be upgraded, the Functional test shall be
performed after the firmware upgrade.
For the Functional Test, the device shall be configured as follows:
z Recording mode: “Overwrite” (“Recycle” in AX8/AX16 500/200))
z Recording rate: “25 ips”
z Image quality: “Very high”
z Panic recording: “On”
7.2
Test procedures
Perform the following tests in the normal operating mode.
Test#
Action
Test
1
Power on the device.
Verify booting of the device. LEDs
illuminated?
2
3
4
Connect all video input channels to video
signals.
Connect a monitor to the video outputs
(BNC and VGA).
Switch monitor to display the live image
of all cameras.
Switch on the Panic recording mode for
at least 2 hours.
Stop Panic recording mode and search
for recorded images in the Search menu.
Verify video input and video output signals.
Start recording.
Verify recorded video.
5
Access the “Storage” menu in the OSD.
Verify HDD parameters.
6
Access System Log.
Verify system log in regards to errors or
reboots of the system.
34
Siemens Building Technologies
Fire Safety & Security Products
03.2009
Appendix
8
Appendix
8.1
Troubleshooting
The following table offers solutions to some of the common problems you may
encounter. We suggest that you consult this chart before contacting the hotline.
8.1.1
SISTORE AX4 Lite V2.0
Problem
No power
No live video or green image
Live video very bright
DVR has stopped recording
Possible solution
z Check power cord connections.
z Confirm that there is power at the outlet.
z Check camera video cable and connections.
z Check monitors video cable and connections.
z Confirm that the camera has power.
z Check camera lens settings.
z Check CVBS (SVHS) / VGA switch settings.
z Check whether PAL and NTSC equipment is connected simultaneously after
booting.
z Check covert camera and colour control settings.
z If a cable is attached to the “Loop” connector, make certain it is connected to
a properly terminated device.
z If hard disk drive is full, you will either need to delete video or set the DVR to
the Overwrite Mode.
z Check storage menu whether HDD is detected
z Events (video loss, alarm-in, motion) are only notified if a recording is
configured together with the event.
DVR displays an error message z The DVR will automatically reset the time and date of the unit, according to
stating that the last recorded
the time and date of the last recorded image. If this is not the correct time and
image date and time is later
date, reset the time and date manually.
than the current date and time
If the correct time and date is earlier than the last recorded image, any video
setting of the DVR.
with a later time and date will be lost when resetting the correct time and date.
No event notification
8.1.2
SISTORE AX8/AX16 250/100 V2.8 and SISTORE AX8/AX16 500/200 V3.6
Problem
No power
Possible solution
z Check power cord connections.
z Confirm that there is power at the outlet.
No live video
z
z
z
z
z
z
Live video very bright
Check camera video cable and connections.
Check monitor video cable and connections.
Confirm that the camera has power.
Check camera lens settings.
Check CVBS (SVHS) / VGA switch settings.
Check whether PAL and NTSC equipment is connected simultaneously after
booting.
z Check covert camera and colour control settings.
z If a cable is attached to the “Loop” connector, make certain it is connected to
a properly terminated device.
REC LED is Lit but DVR is not
recording
z Unit will only record video based on the parameters such as schedule and
events defined during configuration. REC LED indicates the DVR is ready to
record.
DVR has stopped recording
z If hard disk drive is full, you will either need to delete video or set the DVR to
the Overwrite Mode.
z Check storage menu whether HDD is detected
No event notification
z Events (video loss, alarm-in, motion) are only notified if a recording is
configured together with the event.
The icon
displays, however,
the DVR is not recording
z When the DVR is in the Pre-Event recording mode, the yellow
and
and
display when there is no event, and the DVR is not recording. The red
display when any event occurs and the DVR starts recording.
35
Siemens Building Technologies
Fire Safety & Security Products
03.2009
Appendix
8.1.3
SISTORE AX RAS
NOTE
RAS version 3.6 is required for SISTORE AX with SATA HDDs.
Problem
No selection between Watch
and Search displayed
Possible solution
z Performance of PC not sufficient
No display of live images
z Performance of PC not sufficient
36
Siemens Building Technologies
Fire Safety & Security Products
03.2009
Appendix
8.2
Packaging for returning the HDD
When returning a faulty HDD, package it in the same manner as it was delivered to
protect the HDD unit from being damaged by shock, static electricity or humidity
during transport.
The hard drive must be placed inside of an anti-static electro-static discharge
(ESD) bag before being placed in the shipping box.
Packaging for Single Drives
z Plastic spacers: Use plastic spacers on each end of the hard drive. Position the
hard drive in the centre of the box to protect all four sides. (This packaging is
sometimes referred to as a GeoSprings Kit.)
z Foam rubber block: You may use a foam rubber block with special cutout
section for the hard drive. All four sides of the hard drive should be protected by
foam rubber.
Packaging for Multiple Drives
z Use a rubber block with special cut-out sections for returning multiple hard
drives. All four sides of each hard drive should be protected by foam rubber.
IMPORTANT
Use of padded shipping envelopes, bubble wrap or Styrofoam peanuts is not
considered acceptable packaging.
37
Siemens Building Technologies
Fire Safety & Security Products
03.2009
Disposal
9
Disposal
All electrical and electronic products should be disposed of separately from the
municipal waste stream via designated collection facilities appointed by the
government or the local authorities.
This crossed-out wheeled bin symbol on the product means the product is
covered by the European Directive 2002/96/EC.
The correct disposal and separate collection of your old appliance will help
prevent potential negative consequences for the environment and human health.
It is a precondition for reuse and recycling of used electrical and electronic
equipment. For more detailed information about disposal of your old appliance,
please contact your city office, waste disposal service or the shop where you
purchased the product.
38
Siemens Building Technologies
Fire Safety & Security Products
03.2009
Issued by
Siemens Building Technologies
Fire & Security Products GmbH & Co. oHG
D-76181 Karlsruhe
www.buildingtechnologies.siemens.com
Document no.
A6V10238452
Edition
09.03.2009
© 2009 Copyright by
Siemens Building Technologies
Data and design subject to change without notice.
Supply subject to availability.