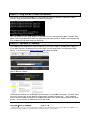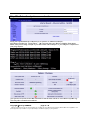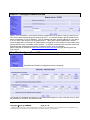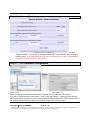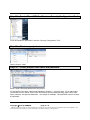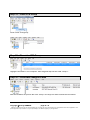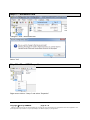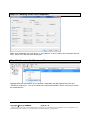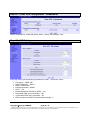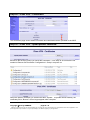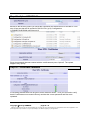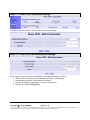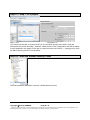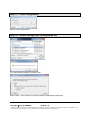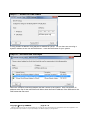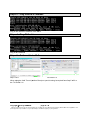
1
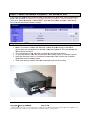
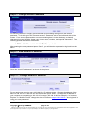
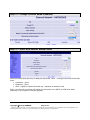
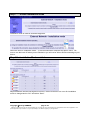
Simatic Tip SIMATIC TIPS Totally Integrated Automation Application Notes Group PLC Scalance Topic and Author Configuration of M875 with IPsec VPN Tunnel Bernd Krueger Overview This document covers how to configure the M875 for connection to a PLC using a VPN Tunnel using the Siemens SoftNet Client Software. It is assumed that the user is already proficient in the use of Siemens PLCs, Step 7 V5.5 and/or the TIA Portal software. As a cautionary note: Siemens takes no responsibility for any data overage or roaming charges for any services used with the M875 device. Always review your data plan before configuring and using this device so that you are aware of proper configuration for you usage plan. STEP by STEP Step 1 thru 26 – M875 Configuration Step 27– PLC Configuration Step 28 thru 75 – VPN Configuration Resetting the M875 to Factory Defaults To reset the M875, press the Reset button on the front of the unit with a paperclip. This will take a few minutes and the lights on the device will begin to flash. All configuration data, user data, certificates and log files are deleted. Step 1 – Acquire AT&T data plan If you have an existing Corporate AT&T account contact your designated person. If you do not already have a corporate AT&T account please contact your local Siemens person. As of the writing of this Application Note that person is: Ming Ng, email is [email protected] and he can put you in contact the correct AT&T representative. Sim cards can be ordered with or without Static IP addresses. Before you commit to a plan always check your coverage, for ATT you can go to www.att.com/coverage. You can also get coverage apps for your mobile phone for example www.mymobilecoverage.com. One more note ATT Wireless Hotspots will not work with the M875 due to their policy of blocking mobile to mobile communication. Copyright 2013 by SIEMENS page 1 / 34 SIMATIC customers have free use of the application tips. These tips are only a general approach to using SIMATIC with various applications. Your specific application may be different. It is your responsibility to use SIMATIC properly in your applications. Step 2 – Enterr PIN num mber if re equired – not norrmal in USA In the USA it is norm mally not re equired to en nter a PIN n number for a sim card, but if requirred follow steps 4 thru 6 below w. DO NOT T PUT THE SIM CARD IN THE M8 875 IF YOU REQUIRE A PIN. Then go o to “Externa al Network” “UMTS/EDGE”, enter tthe PIN num mber and sa ave. After ssaving Power O Off the M875 5 and contin nue to Step 3. Step 3 – Insertt SIM carrd B Before you insert i or rem move the SIIM card, turn n off the pow wer supply of the M875 5. Do not open D n the compa artment for tthe SIM card d during ope eration. This can dama age the S card an SIM nd the device. T The comparrtment for th he SIM card d is located on o the backk of the device. T To open the e drawer, pre ess the yellow button w with a sharp p object, for example a pencil. P Place the SIM card in th he tray so th hat the card d audibly loccks in place and so thatt its g goldplated ccontacts rem main visible.. T Then push tthe tray with h the SIM ca ard complettely back intto the housing Copyrigh ht 2013 by y SIEMENS page 2 / 34 4 SIMATIC customers c have frree use of the application tips. These e tips are only a ge eneral approach to o using SIMATIC w with various appliccations. Your specific application may be diff fferent. It is your re esponsibility to use e SIMATIC properrly in your applications. Step 4 – Configuration PC The configuration PC must be connected either directly to the first Ethernet port of the M875 or have access to the M875 via the local network. The network adapter of the configuration PC must have the following TCP/IP configuration: IP address: 192.168.1.x – x being any number other than 1. Subnet mask: 255.255.255.0 Step 5 – Connect using “Internet Explorer” or “Mozilla Firefox” Enter the M875’s IP address – the default is: https://192.168.1.1 In “Internet Explorer select the “Red X” Continue to this website. For Mozilla Firefox: Select “Add Exceptions” Either uncheck or leave checked “Permanently store this exception” and then press “Confirm Security Exception”. Copyright 2013 by SIEMENS page 3 / 34 SIMATIC customers have free use of the application tips. These tips are only a general approach to using SIMATIC with various applications. Your specific application may be different. It is your responsibility to use SIMATIC properly in your applications. Step 6 – Enter Login data Internet Explorer login screen – enter “admin” and “scalance” for first time login. Mozilla Firefox login screen – enter “admin” and “scalance” for first time login. Step 7 – Overview Screen at startup After logging into the system the “Overview” screen is shown. Copyright 2013 by SIEMENS page 4 / 34 SIMATIC customers have free use of the application tips. These tips are only a general approach to using SIMATIC with various applications. Your specific application may be different. It is your responsibility to use SIMATIC properly in your applications. Step 8 – Change Default Password For security reasons it is highly recommended to immediately change from the Default password. To do this go to the “Remote access” “Password” tab on the left hand side of the screen. For a secure password do not use something that is in the dictionary, at lease 8 characters long and include “Upper case, lower case, numbers, and special characters”. The following special characters are allowed: ! $ % & ' ( ) * + , . / : ; < = > ? @ [ \ ] ^ _ ` { | } After entering the new password press “Save”, you will then be requested to log back into the M875. Step 9 – View default IP address Go to the “Local IP addresses” as shown in the picture. Step 10 – Change default IP address For our project we need to use a 192.168.10.x IP address range. Change the address of the M875 to 192.168.10.1 and 255.255.255.0 and then press “Save”. Change the IP address of your computer to something in 192.168.10.x range (192.168.10.99 for example). In “Internet Explorer” or “Mozilla Firefox” change the site to connect to https://192.168.10.1 and log back in using your new password. Copyright 2013 by SIEMENS page 5 / 34 SIMATIC customers have free use of the application tips. These tips are only a general approach to using SIMATIC with various applications. Your specific application may be different. It is your responsibility to use SIMATIC properly in your applications. Step 11 – Overview Screen With the SIM card inserted you will see a screen similar to this. Step 12 – Set the system time Enter the correct date and time and Local timezone. An NTP server can be selected to automatically synchronize the date and time. Keep in mind that using the NTP synchronization will use data from your data plan. Press the “Save” button when finished. Copyright 2013 by SIEMENS page 6 / 34 SIMATIC customers have free use of the application tips. These tips are only a general approach to using SIMATIC with various applications. Your specific application may be different. It is your responsibility to use SIMATIC properly in your applications. Step 13 – Overview of the External Network settings Shown are the default “External Network – UMTS/EDGE” settings. Step 14 – Configure the External Network settings For our application enable “Allow roaming” and delete all the “List of moble wireless providers” and press “Save”. Make sure to check with your provider if you are charged extra for roaming. Only enable roaming if required for your application – 2G Partner connection. Copyright 2013 by SIEMENS page 7 / 34 SIMATIC customers have free use of the application tips. These tips are only a general approach to using SIMATIC with various applications. Your specific application may be different. It is your responsibility to use SIMATIC properly in your applications. Step 15 – Change Provider Mode to Manual Step 16 – Enter APN data for Manual mode Enter the correct APN data for your data plan and press “Save”. If using the Siemens Demo SIM enter: Username – guest Password – guest APN – i2gold or ccspbsc197.acfes.org – depends on the demo case Note: If you are using a Partner 2G signal you will need to use “UMTS or GSM” and “Allow Roaming” for your system to function properly. Copyright 2013 by SIEMENS page 8 / 34 SIMATIC customers have free use of the application tips. These tips are only a general approach to using SIMATIC with various applications. Your specific application may be different. It is your responsibility to use SIMATIC properly in your applications. Step 17 – Enable Installation mode Installation mode is used for antennae alignment. Select the time for Installation mode – 15 minutes should be adequate and press “Save”. Be sure to turn this back off when you are finished or you will not be able to finish connecting to your device. Step 18 – Installation Mode enabled Adjust antennae until the best signal is received. Either let the time out occur for Insatllation mode or change back to “No” and select “Save”. Copyright 2013 by SIEMENS page 9 / 34 SIMATIC customers have free use of the application tips. These tips are only a general approach to using SIMATIC with various applications. Your specific application may be different. It is your responsibility to use SIMATIC properly in your applications. Step 19 – Overview page after allignment After alignment, it may take a few minutes, but additional information should now be displayed in the Overview screen. Connected Since Assigned IP address – instead of 192.168.44.44 it would show the actual IP address of the SIM card or the dynamic IP address APN in use ID of the current wireless cell Step 20 – Security settings for ping To test the connection go to the “Security” “Advanced settings” and set the “External ICMP” to “Allow ping” and press “Save”. You should now be able to ping the IP address from the overview page from a computer connected to the internet. Note Increased costs due to extra data traffic By sending the ping packets, the data traffic on the UMTS/GPRS connection is increased. This may result in additional costs, depending on your user agreement with the mobile wireless provider. Copyright 2013 by SIEMENS page 10 / 34 SIMATIC customers have free use of the application tips. These tips are only a general approach to using SIMATIC with various applications. Your specific application may be different. It is your responsibility to use SIMATIC properly in your applications. Step 2 21 – Ping g the M87 75 from tthe Intern net Disconn nect your PC C from the M M875 or use e a different computer tthat has a co onnection to o the internet.. Ping the IP P address sshown in the e Overview page. You can n decide to leave Ping e enabled on the M875 or o for a more e secure sysstem “Disca ard” Ping. Make su ure you plug g the M875 back into yo our compute er when finished. Keep p in mind that leaving Ping ena abled will usse data from m your data plan. Step 2 22 – Dyna amic IP address a The Siem mens Demo o SIM has a fixed IP ad ddress, if yo ou have a fixxed IP addre ess skip to sstep 25. If you ge et a Dynamiic IP addresss from you provider yo ou will need to also use e a Dynamicc DNS Server. You need tto go to WW WW.dyndns..org and cre eate a profile e. Select “R Remote Acccess”. Purchasse the DynD DNS Pro and d register a DNS name e for your M8 875 connecction. The DNS name must use “dyndns.o org” as the e extension fo or example ““brkm875.dyndns.org”. The IP address used mu ust also refle ect the Dynamic IP add dress that w was shown o on the M875 5 “System O Overview” screen – do not use e the IP add dress shown n in this dem mo. Copyrigh ht 2013 by y SIEMENS page 11 / 3 34 SIMATIC customers c have frree use of the application tips. These e tips are only a ge eneral approach to o using SIMATIC w with various appliccations. Your specific application may be diff fferent. It is your re esponsibility to use e SIMATIC properrly in your applications. Step 2 23 – Ente er the dyn ndns serrver hostt name Enter yo our DynDNS S server hosst name for a dynamic IP address example : m875de emo.dyndns.org. Presss “Save”. Yo ou can now w ping your d device using g the Host name. n Make su ure you set Ping “Accep pt” if you ha ad turned it o off in step 21 2 or you willl get no ressponse to your ping request. The Sysstem Overview screen will w reflect th he “Externa al host name e” as “m875 5demo.dynd dns.org”. This may take a few w minutes to o show. Copyrigh ht 2013 by y SIEMENS page 12 / 3 34 SIMATIC customers c have frree use of the application tips. These e tips are only a ge eneral approach to o using SIMATIC w with various appliccations. Your specific application may be diff fferent. It is your re esponsibility to use e SIMATIC properrly in your applications. Step 24 – Configure Remote access Select “Yes” to enable HTTPS remote access, change the Port to 4443 in case you want to use Port 443 to allow restricted logon access to the PLC. You will also need to add a firewall rule to allow a connection “From IP address”. This IP address can be a specific address or if you leave it as “0.0.0.0/0” then anyone can try and access it. This is why a secure password is critical. I would suggest that you enter the IP address that is assigned to your location to keep others from gaining access or do not enable remote access. To test the connection the computer must have internet access, using Internet Explorer or Mozilla Firefox, enter for example https://192.168.44.44:4443 or https://m875demo.dyndns.org:4443 and you should get to the login screen. Step 25 – Configure Firewall Rules By default the Firewall is configured to block everything. The firewall is configured to accept only TCP data incomming to our PLC (192.168.10.2) on Port 80 (Webserver) and Port 102 (Simatic Data). Copyright 2013 by SIEMENS page 13 / 34 SIMATIC customers have free use of the application tips. These tips are only a general approach to using SIMATIC with various applications. Your specific application may be different. It is your responsibility to use SIMATIC properly in your applications. Step 26 – Volume Monitoring You can configure a text message to be sent warning of reaching a “maximum data usage per month”. This is only a message and will NOT stop the M875 from sending or receiving data. Your Data Plan Will Continue to Get Billed and you WILL be charged by the carrier for any data plan overage costs. Step 27 – PLC Hardware Configuration Step 7 V5.5 TIA Portal V11 Make sure the PLC configuration sets the IP address to an IP address in the range of 192.168.10.x and use router 192.168.10.1, then “Save and Comple”. Unplug your pc from the M875, plug the PC into the PLC and download the hardware configuration. Then disconnect the PC from the network and plug the PLC into the top Ethernet Port of the M875. Copyright 2013 by SIEMENS page 14 / 34 SIMATIC customers have free use of the application tips. These tips are only a general approach to using SIMATIC with various applications. Your specific application may be different. It is your responsibility to use SIMATIC properly in your applications. Step 28 – Create IPsec VPN Certificates - Security Configuration Tool From the Windows “Start Menu” start the “Security Configuration Tool” Step 29 – Start new project Select “Project” “New” Step 30 – Create project User name and password Enter a User name and password for the project. For this demo User name: admin and Password: siemens1 – all lower case. For a real project you should not use “admin” as the user and make a secure password using upper case, lower case, numbers, and special characters – see step 8 for example. The password must be at least 8 characters. Copyright 2013 by SIEMENS page 15 / 34 SIMATIC customers have free use of the application tips. These tips are only a general approach to using SIMATIC with various applications. Your specific application may be different. It is your responsibility to use SIMATIC properly in your applications. Step 31 – Configure the M875 IP address Enter the following: Product type – SOFTNET Configuration Module – SCALANCE M87x/MD74x Name of the module – m875demo IP address (ext) – your AT&T SIM card IP address. If a Dynamic address was assigned just enter any address or use the address from the overview screen in step 19 which is the dynamic address that is temporarily assigned. For our demo 192.168.44.44 subnet 255.255.255.0– not a real address. IPaddress (int) - 192.168.10.1 subnet 255.255.255.0 – this is the nework that the PLC will be connected. Press “OK” Copyright 2013 by SIEMENS page 16 / 34 SIMATIC customers have free use of the application tips. These tips are only a general approach to using SIMATIC with various applications. Your specific application may be different. It is your responsibility to use SIMATIC properly in your applications. Step 32 – Insert Module Insert next Module. Step 33 – Configure Softnet Security Client Module Enter the following: Product type – SOFTNET Configuration Module – SOFTNET Security Client Firmware release – V3 Name of the module - computer Press “OK” Copyright 2013 by SIEMENS page 17 / 34 SIMATIC customers have free use of the application tips. These tips are only a general approach to using SIMATIC with various applications. Your specific application may be different. It is your responsibility to use SIMATIC properly in your applications. Step 34 – Insert VPN Group Insert a new “VPN group” Step 35 – Move into VPN Group Highlight “m875demo” and “computer” then drag and drop into the VPN “Group 1” Step 36 – Certificate changes to blue After the modules are put into the VPN “Group1” the keys turn blue to show the VPN tunnel. Copyright 2013 by SIEMENS page 18 / 34 SIMATIC customers have free use of the application tips. These tips are only a general approach to using SIMATIC with various applications. Your specific application may be different. It is your responsibility to use SIMATIC properly in your applications. Step 37 – Advanced View Change to “View” “Advanced mode” Select “Yes” Step 38 – IPsec VPN Properties Right mouse click on “Group1” and select “Properties” Copyright 2013 by SIEMENS page 19 / 34 SIMATIC customers have free use of the application tips. These tips are only a general approach to using SIMATIC with various applications. Your specific application may be different. It is your responsibility to use SIMATIC properly in your applications. Step 39 – Modifiy IPsec VPN Properties Make sure “SA lifetime” for both “phase 1” and “phase 2” is set to 1440 or the connection will not work. Press “OK” and then save the project. Step 40 – Transfer Certificates to files Highlight both the “m875demo” and “computer” certificates and then right mouse click and “Transfer to module(s)”. You do not need to be online with the M875, this is used only to create the certificate files. Copyright 2013 by SIEMENS page 20 / 34 SIMATIC customers have free use of the application tips. These tips are only a general approach to using SIMATIC with various applications. Your specific application may be different. It is your responsibility to use SIMATIC properly in your applications. Step 41 – Select Ethernet Adapter Select the Ethernet adapter that you will use to download SCT configurations. This can always be changed later. This screen may not appear if you have already used the software. Step 42 – Start Certificate Transfer Press “Start” to create the certificate files – you will be asked where to store the files. Copyright 2013 by SIEMENS page 21 / 34 SIMATIC customers have free use of the application tips. These tips are only a general approach to using SIMATIC with various applications. Your specific application may be different. It is your responsibility to use SIMATIC properly in your applications. Step 43 – Set password Answer “Yes” For the demo – “siemens1” is used. Select “OK” Step 44 – Certificate configuration Files created The above Certificate files should have been created. Copyright 2013 by SIEMENS page 22 / 34 SIMATIC customers have free use of the application tips. These tips are only a general approach to using SIMATIC with various applications. Your specific application may be different. It is your responsibility to use SIMATIC properly in your applications. Step 45 – IPsec VPN configuration text file Open the text file that was created when the certificate was made for example “Configuration1.m875demo.txt”. It will contain the following information: IPSec VPN > Certificates Upload Remote Site Certificate: Configuration 1.Group1.computer.cer Upload PKCS12 File (.p12): Configuration [email protected] IPSec VPN > Connections > VPN Roadwarrior Mode - Edit Settings Authentication method: X.509 Remote Certificate Remote Certificate: Configuration 1.Group1.computer.cer Remote ID: U1BEF40D2@GD406 IPSec VPN > Connections > VPN Roadwarrior Mode - Edit IKE Phase 1 - ISAKMP SA ISAKMP-SA encryption: 3DES-168 ISKAMP-SA hash: SHA-1 ISKAMP-SA mode: Main Mode ISAKMP-SA lifetime (seconds): 86400 Phase 2 - IPSec SA IPSec-SA encryption: 3DES-168 IPSec-SA hash: SHA-1 IPSec-SA lifetime (seconds): 86400 NAT-T: On Activate Dead Peer Detection: Yes DPD-Delay (seconds): 150 DPD-timeout (seconds): 60 DPD-maximum failure: 5 Copyright 2013 by SIEMENS page 23 / 34 SIMATIC customers have free use of the application tips. These tips are only a general approach to using SIMATIC with various applications. Your specific application may be different. It is your responsibility to use SIMATIC properly in your applications. Step 46 – IPsec VPN Configuration - Roadwarrior Enable “Roadwarrior” mode and select “Save”. Select “IKE settings” “Edit”. Step 47 – IKE Settings From step 26 we get the following information to enter. Then press “Save”: Encryption – 3DES-168 Hash (checksum) – SHA-1 Mode – Main mode Lifetime(seconds) – 86400 NAT-T – On Enable Dead Peer Detection (DPD) – Yes Delay after DPD query (seconds) – 150 Timout after DPD query (seconds) – 60 DPD: maximum number of unsuccessful attempts - 5 Copyright 2013 by SIEMENS page 24 / 34 SIMATIC customers have free use of the application tips. These tips are only a general approach to using SIMATIC with various applications. Your specific application may be different. It is your responsibility to use SIMATIC properly in your applications. Step 48 – IPsec VPN – Certificates The certificates page shows status information and certificates can be uploaded to the M875 Step 56 – IPsec VPN – upoad partner certificate Browse to the directory where you saved the certificates. From step 43 we see that the file needed is Remote Site Certificate: Configuration 1.Group1.computer.cer Select the partner certificate you created and then “Upload”. It uploads almost instantly, the certificate pah in “Browse” will no longer appear when complete. Copyright 2013 by SIEMENS page 25 / 34 SIMATIC customers have free use of the application tips. These tips are only a general approach to using SIMATIC with various applications. Your specific application may be different. It is your responsibility to use SIMATIC properly in your applications. Step 49 – Upload PKCS12 file Browse to the directory where you saved the certificates and select the file for the M875. From step 43 we see that the file needed is PKCS12 File (.p12): Configuration [email protected] Enter the password that was created with the certificate and press “Upload”. The upload happens very quickly. Step 50 – Certificate validation If everything matches there will be green check marks as shown. If not you will need to verify that the certificates were created correctly and that the correct password and files were uploaded. Copyright 2013 by SIEMENS page 26 / 34 SIMATIC customers have free use of the application tips. These tips are only a general approach to using SIMATIC with various applications. Your specific application may be different. It is your responsibility to use SIMATIC properly in your applications. Step 51 – IPsec VPN Conections settings Go back to the “Connections” tab and “Edit” Connection Settings. Step 52 – IPsec VPN edit connections settings From step 43 we get the following information: enter the data and press “Save” IPSec VPN > Connections > VPN Roadwarrior Mode - Edit Settings Authentication method: X.509 Remote Certificate Remote Certificate: Configuration 1.Group1.computer.cer Remote ID: U1BEF40D2@GD406 Copyright 2013 by SIEMENS page 27 / 34 SIMATIC customers have free use of the application tips. These tips are only a general approach to using SIMATIC with various applications. Your specific application may be different. It is your responsibility to use SIMATIC properly in your applications. Step 53 – Step 7 V5.5 project Step 7 V5.5 TIA Portal V11 You should now be able to connect an S7 plc to your M875 and go online with it using the Softnet Security Client and Step 7 software. Make sure the PLC configuration sets the IP addrss to an IP address in the range of 192.168.10.x and use router 192.168.10.1. Unplug your pc from the M875 and plug the PLC into the M875. Step 54 – Start the Softnet Security Client From the Windows “Start Menu” start the “Softnet Security Client” Copyright 2013 by SIEMENS page 28 / 34 SIMATIC customers have free use of the application tips. These tips are only a general approach to using SIMATIC with various applications. Your specific application may be different. It is your responsibility to use SIMATIC properly in your applications. Step 55 – Load Configuration Select “Load Configuration” Step 56 – Select and open the Configuration file You may get this message, just select “OK” Select “Next” – this is shown if you have loaded a configuration previously. Copyright 2013 by SIEMENS page 29 / 34 SIMATIC customers have free use of the application tips. These tips are only a general approach to using SIMATIC with various applications. Your specific application may be different. It is your responsibility to use SIMATIC properly in your applications. Step 57 – Select the DNS-Name If using a static IP address verify that the IP address is correct. For our demo we are using a dynamic address so we use the DNS-Name: - enter the DNS name for your system. Step 58 – Describe the first topic Select the computer’s Ethernet adapter that will connect to the internet. Also note that the IP address at the top for the m875demo will either show the fixed IP address of the SIM card or the DNS name that was used. Copyright 2013 by SIEMENS page 30 / 34 SIMATIC customers have free use of the application tips. These tips are only a general approach to using SIMATIC with various applications. Your specific application may be different. It is your responsibility to use SIMATIC properly in your applications. Step 59 – Enter the Certificate Password Step 60 – Enable the Tunnel Step 61 – Tunnel Overview Step 62 – Tunnel status If the status is red, the connection has not yet been made. Green status – tunnel is connected. Copyright 2013 by SIEMENS page 31 / 34 SIMATIC customers have free use of the application tips. These tips are only a general approach to using SIMATIC with various applications. Your specific application may be different. It is your responsibility to use SIMATIC properly in your applications. Step 6 63 – Ping g Internall IP addre ess Ping of the t Internal IP address of the M87 75. Step 6 64 – Ping g PLC address Ping of PLC P addresss Step 6 65 – Online with the t PLC Step 7 V V5.5 TIA Portal V11 When ussing the VP PN Tunnel (S Softnet Client) no special routing iss required frrom Step7 V V5.5 or the TIA Portal V11. Copyrigh ht 2013 by y SIEMENS page 32 / 3 34 SIMATIC customers c have frree use of the application tips. These e tips are only a ge eneral approach to o using SIMATIC w with various appliccations. Your specific application may be diff fferent. It is your re esponsibility to use e SIMATIC properrly in your applications. Step 66 – Online with the PLC using the Webserver Startup page of PLC Webserver using the IP address of the plc – 192.168.10.2 entered into Internet Explorer or Firefox. Step 67 – Online with the PLC Webserver – Diagnostics Page Diagnostics page of PLC Webserver. Copyright 2013 by SIEMENS page 33 / 34 SIMATIC customers have free use of the application tips. These tips are only a general approach to using SIMATIC with various applications. Your specific application may be different. It is your responsibility to use SIMATIC properly in your applications. Related Information Additional Application Notes on M875: http://support.automation.siemens.com/WW/view/en/24960449 Hardware and Software Considerations Hardware Used: M875 – 6GK5875-0AA10-1AA2 Antenna - 6NH9860-1AA00 S7-300 ET200S PLC - 6ES7151-8AB01-0AB0 Software Used: Softnet Security Client V4 – 6GK1704-VW04-0AA0 o With Security Configuration Tool V3 – included with above Step 7 Professional 2010 – 6ES7810-5CC11-0YA5 TIA Portal Professional V11 - 6ES7822-1AA01-0YA5 General Notes The SIMATIC Application Tips are provided to give users of Siemens’ Simatic products some indication as to how, from the view of programming technique, certain tasks can be solved. These instructions do not purport to cover all details or variations in equipment, nor do they provide for every possible contingency. Use of the Simatic Application Tips is free. Siemens reserves the right to make changes in specifications shown herein or make improvements at any time without notice or obligation. It does not relieve the user of responsibility to use sound practices in application, installation, operation, and maintenance of the equipment purchased. Should a conflict arise between the general information contained in this publication, the contents of drawings or supplementary material, or both, the latter shall take precedence. Siemens is not liable, for whatever legal reason, for damages or personal injury resulting from the use of the application tips. All rights reserved. Any form of duplication or distribution, including excerpts, is only permitted with express authorization by SIEMENS. Copyright 2013 by SIEMENS page 34 / 34 SIMATIC customers have free use of the application tips. These tips are only a general approach to using SIMATIC with various applications. Your specific application may be different. It is your responsibility to use SIMATIC properly in your applications.