1
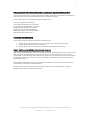
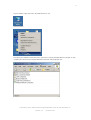
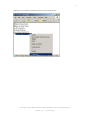
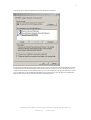
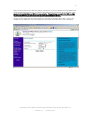
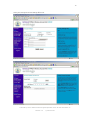
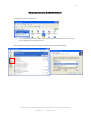
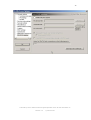
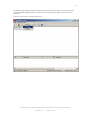
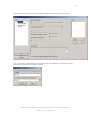
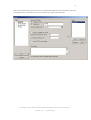
1
Canon WFT-E1 (A) Wireless File Transmitter
Network Support Guide
Windows XP - Infrastructure Wireless Mode Connection
Authored by Simon Adams Product Support Specialist Canon UK RCC December 05
Revision 1.2
© Canon 2006
2
Setting up the WFT-E1A on Windows XP Home or Professional – Infrastructure Wireless Mode
This document will take you through the process of setting up the WFT-E1A wireless file transmitter in
conjunction with a PC running Windows XP Home or Professional Edition.
In this example we have used the following test specifications:
Canon Eos 1DS Mk II Camera Body
Canon WFT-E1A Wireless File Transmitter
D-Link DWL-122 USB Wireless Transmitter
Netgear WG602 Wireless Access Point
Pentium III 1Ghz PC with 512MB Ram
Windows XP Home or Professional Edition
Filezilla FTP Server Version 0.9.11
Three Stages to Complete Setup
There are three stages to setting up the WFT-E1A with your PC.
1. Setting up your Wireless Network on your computer & your Wireless Access Point
2. Setting up your FTP Server on your computer
3. Setting up your WFT-E1A to talk to your Wireless Access Point and FTP Server
Stage 1 – Setting up your Wireless Network on your computer
Stage 1 will involve installing a wireless transmitter on your PC. Most transmitters come in the form of a
USB “dongle” that is inserted into a spare USB port on your PC. The “dongle” should come with a
manufacturer’s installation disk that installs the necessary drivers for the “dongle”. Once your “dongle”
has installed correctly you should see an entry in Window’s “My Network Places” called “Wireless
Network Connection”.
If you experience difficulties installing your wireless transmitter on your PC you should contact your
manufacturer for assistance with its installation.
We will start the network set up with the assumption that you have installed your PC’s wireless
transmitter (dongle) and it is working correctly.
Authored by Simon Adams Product Support Specialist Canon UK RCC December 05
Revision 1.2
© Canon 2006
3
On your desktop, right click on the “My Network Places” icon.
Select Properties
This opens your Network Connections pane. If you have a correctly installed Wireless “Dongle” on your
computer you should see the Wireless Network Connection entry displayed here
Authored by Simon Adams Product Support Specialist Canon UK RCC December 05
Revision 1.2
© Canon 2006
4
Right Click on your Wireless Network Connection and select Properties.
Authored by Simon Adams Product Support Specialist Canon UK RCC December 05
Revision 1.2
© Canon 2006
5
This brings up the Wireless Network Connection Properties dialog box
In the Wireless Network Connections dialog box you should see Client for Microsoft Networks, File and
Printer Sharing for Microsoft Networks and Internet Protocol (TCP/IP). If you your dialog box does not
contain all of the above, or has different entries, you should contact your PC support company to assist
you in installing the relevant Windows Networking Components from your XP Home or Professional
original disk, as these are an intrinsic part of the operating system.
Authored by Simon Adams Product Support Specialist Canon UK RCC December 05
Revision 1.2
© Canon 2006
6
We will need to create a static IP address for the computer on the network.
To do this, select the General tab, select Internet Protocol (TCP/IP) and click the Properties button.
You should now see the following screen. In this screen, select “Use the Following IP address, and
enter a unique IP address for the computer. In this example we have used 192.168.0.10 which will be
the IP address which identifies the PC to the network. The Subnet mask should be set to 255.255.255.0
as the only number range in the IP address that is going to alter is the last set of numbers. In the
Gateway address, enter the IP address of the wireless access point you are using. Leave the DNS entries
blank. Nothing needs changing under “Advanced” so leave that as is.
Click on OK to return to the Wireless Network Connection Properties screen.
Authored by Simon Adams Product Support Specialist Canon UK RCC December 05
Revision 1.2
© Canon 2006
7
You will now need to tell your network to connect in Infrastructure. Select the “Wireless Networks” tab,
and tick the “Use Windows to configure my wireless network settings” box. Next click Advanced
In the Advanced screen, select Access point (infrastructure) only as below and then select Close.
Authored by Simon Adams Product Support Specialist Canon UK RCC December 05
Revision 1.2
© Canon 2006
8
This will return you to the Wireless Network Connection Properties screen. Click on the “Advanced” tab
and under Windows Firewall click the Settings Button.
Authored by Simon Adams Product Support Specialist Canon UK RCC December 05
Revision 1.2
© Canon 2006
9
On the Windows Firewall screen, if you do not require a firewall to be active then select “Off”. If you do
require a firewall you will need to carry out the next step to allow the FTP port to be allowed through.
Authored by Simon Adams Product Support Specialist Canon UK RCC December 05
Revision 1.2
© Canon 2006
10
If you elect to switch on your firewall, click on the “Exceptions” tab. And click on the Add Port button
Authored by Simon Adams Product Support Specialist Canon UK RCC December 05
Revision 1.2
© Canon 2006
11
In the Add a Port screen, enter the name as FTP-TCP, and the port number as 21. Make sure TCP is
selected. This will open a TCP connection on port 21through the firewall to enable control
communication between the WFT-E1A and the FTP server. Click on OK.
Now we need to open port 21 for UDP data also, so click on the “Add Port” button again
Authored by Simon Adams Product Support Specialist Canon UK RCC December 05
Revision 1.2
© Canon 2006
12
In the Add a Port screen, enter the name as FTP-UDP, and the port number as 21. Make sure UDP is
selected. This will open a UDP connection on port 21through the firewall to enable data
communication between the WFT-E1A and the FTP server. Click on OK
Authored by Simon Adams Product Support Specialist Canon UK RCC December 05
Revision 1.2
© Canon 2006
13
You should now have FTP-TCP and FTP-UDP entries in your Firewall Exceptions; port 21 is now open
through your firewall. No settings on the Windows Firewall “Advanced” tab require any attention. Click
OK.
Authored by Simon Adams Product Support Specialist Canon UK RCC December 05
Revision 1.2
© Canon 2006
14
Click OK on the Wireless Network Connections Properties screen and close the Network Connections
window. You should now connect to your access point from your “dongle” and establish a connection
between the two. It should show as connected under the Wireless Network tab, after pressing the
Show Wireless Networks button.
Authored by Simon Adams Product Support Specialist Canon UK RCC December 05
Revision 1.2
© Canon 2006
15
Authored by Simon Adams Product Support Specialist Canon UK RCC December 05
Revision 1.2
© Canon 2006
16
You will now need to set up your Access point, we will be setting up a Netgear WG602 here, however
the settings should be similar on other makes of access point, however you may need a different IP
address to get to the access point’s administration screen, so refer to your access point’s manual for this.
The Netgear’s administration screen is located at 192.168.0.227, so we will open an internet explorer
window and type the IP address into the URL bar. You will need to login to your access point (consult
your access point’s manual for the username and password)
Firstly set the IP address of your Access Point. This will be the “Gateway” setting that you enter later.
Here we have left the Netgear default setting of 192.168.0.227. Disable DHCP and ensure the subnet
mask is set to 255.255.255.0 and the gateway address is set to 0.0.0.0. Set your Access Point Name
here too, although ensure it is in capital letters, as this will form your SSID which is case sensitive. If
incorrect case is used for the AP name and the SSID on either the AP or the WFT-E1A you will not be
able to communicate between the two
Authored by Simon Adams Product Support Specialist Canon UK RCC December 05
Revision 1.2
© Canon 2006
17
Next you will need to set your Wireless settings. Use Auto or 11g only, as we will be using infrastructure
mode, the SSID should be set here, for clarity we are setting this to the same as the access point name,
ensure it is in capital letters, as SSID’s are case sensitive. If incorrect case is used for the SSID on either
the AP or the WFT-E1A you will not be able to communicate between the two.
Set your country region and the channel frequency, and lastly set the data rate to “Best”. If this is not
available set it to 54Mbps as this is the fastest you can transmit in infrastructure mode. Click Apply.
Authored by Simon Adams Product Support Specialist Canon UK RCC December 05
Revision 1.2
© Canon 2006
18
Leave your security and access settings off for now.
Authored by Simon Adams Product Support Specialist Canon UK RCC December 05
Revision 1.2
© Canon 2006
19
Stage 2
Setting up your FTP server on Windows XP Professional Edition
(For XP Home Edition proceed to Stage 2A – Filezilla FTP Server Setup instead)
Authored by Simon Adams Product Support Specialist Canon UK RCC December 05
Revision 1.2
© Canon 2006
20
Setting up the FTP server on Windows XP Professional
Installing the ftp server – Windows XP
•
•
Select Add/Remove programs from control panel
You must be an administrator of the local machine for this to be possible. If not contact your
local IT department and ask them to do it.
Select add/remove windows components then Windows Components Wizard displays
Authored by Simon Adams Product Support Specialist Canon UK RCC December 05
Revision 1.2
© Canon 2006
21
•
Select the Internet Information Services option, and click Details…
•
Check the box for the ftp server, click OK
Authored by Simon Adams Product Support Specialist Canon UK RCC December 05
Revision 1.2
© Canon 2006
22
From control panel select Administrative Tools
Then select Internet Information Services
Right click and select properties on the Default FTP Site. If you wish you may rename this by right
clicking on it and selecting rename.
Authored by Simon Adams Product Support Specialist Canon UK RCC December 05
Revision 1.2
© Canon 2006
23
Under the FTP Site Tab enter a description for the FTP server. Here we have used the name canon.
Please note that this is case sensitive so input in lower case to avoid confusion.
In IP address, your computer’s IP address should be available for selection, select this from its drop
down menu. Ensure the port is set at port 21. Also ensure that “Enable Logging” is ticked to provide a
log should you need to troubleshoot your setup at a later date.
Authored by Simon Adams Product Support Specialist Canon UK RCC December 05
Revision 1.2
© Canon 2006
24
Under the Security Accounts tab, you should tick Allow Anonymous connections, and leave the
username as set by the Microsoft IIS FTP Server. This is usually in the format IUSR_ and then
immediately followed by the name of the computer the server is running on. Make sure that Allow only
anonymous connections and Allow IIS to control password are ticked.
Authored by Simon Adams Product Support Specialist Canon UK RCC December 05
Revision 1.2
© Canon 2006
25
Nothing is required on the messages tab, so proceed to the Home Directory page. The local path should
be set to C:\Inetpub\ftproot as this is the area IIS uses for the FTP storage, and will be where the
transmitted images are sent to. Ensure that Read / Write and Log Visits are all ticked.
When setting up the WFT-E1 (A) username and password settings in Stage 3, you should use the
username anonymous with no password set.
Authored by Simon Adams Product Support Specialist Canon UK RCC December 05
Revision 1.2
© Canon 2006
26
Stage 2A
Setting up your FTP server on Windows XP Home Edition
(For XP Professional Edition see Stage 2 – IIS FTP Server Setup instead)
Authored by Simon Adams Product Support Specialist Canon UK RCC December 05
Revision 1.2
© Canon 2006
27
Stage 2A – Setting up Filezilla FTP Server on your PC
Download and install Filezilla FTP Server from http://sourceforge.net/projects/filezilla/
This is a freeware application covered by the GNU General Public Licence, please read this to ensure you
comply with the license terms, however please note that this program is not provided by Canon and
Canon cannot be responsible for any losses howsoever arising from its use in any way. Customers use
this program at their own risk, and Canon cannot be held liable for any losses that result from the
settings that may be suggested in this guide.
Authored by Simon Adams Product Support Specialist Canon UK RCC December 05
Revision 1.2
© Canon 2006
28
Authored by Simon Adams Product Support Specialist Canon UK RCC December 05
Revision 1.2
© Canon 2006
29
Authored by Simon Adams Product Support Specialist Canon UK RCC December 05
Revision 1.2
© Canon 2006
30
Authored by Simon Adams Product Support Specialist Canon UK RCC December 05
Revision 1.2
© Canon 2006
31
Once you have Filezilla FTP Server installed, you’ll need to configure the properties of the server so that it
can communicate through the computer and to the outside world correctly. Click Edit, Settings to do this.
And copy the settings from the screenshots. The fields should be similar in other FTP server programs,
and the same setting should be used regardless of the FTP server program used. Timeout settings
should be set to 0 so no timeout takes place or the WFT-E1A will be logged out if idle.
Authored by Simon Adams Product Support Specialist Canon UK RCC December 05
Revision 1.2
© Canon 2006
32
Authored by Simon Adams Product Support Specialist Canon UK RCC December 05
Revision 1.2
© Canon 2006
33
Authored by Simon Adams Product Support Specialist Canon UK RCC December 05
Revision 1.2
© Canon 2006
34
Authored by Simon Adams Product Support Specialist Canon UK RCC December 05
Revision 1.2
© Canon 2006
35
Authored by Simon Adams Product Support Specialist Canon UK RCC December 05
Revision 1.2
© Canon 2006
36
Authored by Simon Adams Product Support Specialist Canon UK RCC December 05
Revision 1.2
© Canon 2006
37
Authored by Simon Adams Product Support Specialist Canon UK RCC December 05
Revision 1.2
© Canon 2006
38
Authored by Simon Adams Product Support Specialist Canon UK RCC December 05
Revision 1.2
© Canon 2006
39
Once all the server settings have been checked, then you will need to create a user for the FTP server.
This will ultimately identify the WFT-E1A to the server. Similar fields will appear in other FTP server
programs.
To do this, select “Users” from the “Edit” menu.
Authored by Simon Adams Product Support Specialist Canon UK RCC December 05
Revision 1.2
© Canon 2006
40
In the General section of the Users screen, click the add button to add a user to the FTP server
Type in a username, ensuring there are no spaces or other non alphanumeric characters. Here the
username we have selected is canonuk. Click OK
Authored by Simon Adams Product Support Specialist Canon UK RCC December 05
Revision 1.2
© Canon 2006
41
Back in the General section of the Users screen, tick the password box and enter a password, again only
using alphanumeric characters and no spaces. Here we are using the password pass.
Authored by Simon Adams Product Support Specialist Canon UK RCC December 05
Revision 1.2
© Canon 2006
42
Before the next step, create a folder on your C: driver called FTP. This is where your images will be
transferred to. This can be a folder anywhere on your hard drive but for ease of use we’ll stick to the C:
drive here. Make you don’t include any spaces or non alphanumeric characters in this folder name.
Select the Shared folders section of the Users menu. In the Shared folders click the Add button to add a
folder where the images will be transferred to.
The “Browse for Folder” window appears
Authored by Simon Adams Product Support Specialist Canon UK RCC December 05
Revision 1.2
© Canon 2006
43
Select the FTP folder we created on the C: drive earlier and click OK.
Now we have defined our destination folder, you must set the permissions of access for the WFT-E1A.
You must set full read and write permissions on the destination folder, failure to do so will result in the
WFT-E1A issuing an error and failing to transmit the picture.
Authored by Simon Adams Product Support Specialist Canon UK RCC December 05
Revision 1.2
© Canon 2006
44
Select the speed limit page and select “No Limit” on both download and upload.
Authored by Simon Adams Product Support Specialist Canon UK RCC December 05
Revision 1.2
© Canon 2006
45
The IP Filter page should be left blank. Click OK to return to the Server window
Authored by Simon Adams Product Support Specialist Canon UK RCC December 05
Revision 1.2
© Canon 2006
46
From the main server window click on the Server menu and make sure there is a tick next to Active. This
ensures that the server is active, running and ready to receive data from the WFT-E1A unit.
Ensure your server shows as running in the taskbar here shown as the FZ (Filezilla) logo.
Stage 2 is now complete, the computer is ready to receive pictures via your wireless network from the
WFT-E1A, and we can now move onto stage 3, setting up the WFT-E1A on the camera body itself.
Authored by Simon Adams Product Support Specialist Canon UK RCC December 05
Revision 1.2
© Canon 2006
47
Stage 3 – Setting up the WFT-E1A using the WFT-E1A Utility
Load the utility from the Canon WFT-E1A disc.
In the first tab TCP/IP, select “Use the following IP address” and enter an IP address here which will
identify the WFT-E1A to the network. Ensure this address is not used by any other network device. We
have used 192.168.0.50 here. The subnet mask should be set to 255.255.255.0 as only the last set of
numbers will change on the network.
As we are using an access point in infrastructure mode, we need to specify the access points IP address
as the Gateway. Enter your access points IP address in the gateway field. DNS servers are not required
so we have left this blank.
Authored by Simon Adams Product Support Specialist Canon UK RCC December 05
Revision 1.2
© Canon 2006
48
Select the FTP settings tab, here we will enter settings that match the FTP server settings we set up in
stages 1 & 2 within the Wireless Network Properties and Filezilla FTP server.
The target server address should be should match the address of the PC’s wireless transmitter (dongle)
in this case it is 192.168.0.10. The port number should match the port number we opened in the FTP
server, in this case Port 21 (which is in fact the industry standard port for FTP transfers).
The server name should be left blank, as the Target Server IP address identifies the FTP server, and as
the target folder is set from within the FTP server Filezilla itself, then you should specify / as the target
folder which means “Root folder” in FTP terms. Leave passive mode off, and overwrite same file on if
you want to
Use the login and password you set in Filezilla earlier, in this case we are using the username canonuk
and the password pass. Ensure that you use the exactly the same characters, and ensure they are the
same case, any mismatch in the username and password will result in the WFT-E1A issuing an error
and failing to transmit its images.
No proxy is required so leave this blank.
Authored by Simon Adams Product Support Specialist Canon UK RCC December 05
Revision 1.2
© Canon 2006
49
Now select the Wireless LAN settings tab.
In the SSID setting, you must enter the name of the SSID you set on your Access Point. Ensure the SSID
is in capital letters, as SSID’s are case sensitive. If incorrect case is used for the SSID on either the AP or
the WFT-E1A you will not be able to communicate between the two.
No encryption is used here for simplicities sake, however if you do input security keys, they must match
both in the Wireless Network Property Settings and the WFT-E1 exactly or communications will fail.
Finally save these settings to your CF card using a card reader / writer device connected to your PC,
ready to insert into the camera connected to the WFT-E1A
Authored by Simon Adams Product Support Specialist Canon UK RCC December 05
Revision 1.2
© Canon 2006
50
Lastly you will need to load the settings file into your camera. Insert the CF card containing the .NIF file
and load the settings into your camera as detailed on page 23-25 of the WFT-E1A manual.
The orange link light should blink a few times, disappear, then remain steady and the display should
show the connected speed as in the picture below.
After taking a picture you should see some activity in your FTP server as it receives the files
That’s it! Enjoy using the WFT-E1A!
Authored by Simon Adams Product Support Specialist Canon UK RCC December 05
Revision 1.2
© Canon 2006