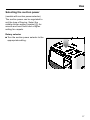
1
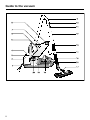
Operating Instructions
Vacuum Cleaner
S 246i - S 252i
To prevent accidents and
machine damage,
read these instructions
before installation or use.
UV
M.-Nr. 05 905 590
Contents
Contents
IMPORTANT SAFETY INSTRUCTIONS . . . . . . . . . . . . . . . . . . . . . . . . . . . 3
Caring for the environment . . . . . . . . . . . . . . . . . . . . . . . . . . . . . . . . . . . . . . . . . . 7
Disposal of the packing materials . . . . . . . . . . . . . . . . . . . . . . . . . . . . . . . . . . . . . . 7
Guide to the vacuum . . . . . . . . . . . . . . . . . . . . . . . . . . . . . . . . . . . . . . . . . . . . . . . 8
Before using the vacuum . . . . . . . . . . . . . . . . . . . . . . . . . . . . . . . . . . . . . . . . . . 10
Included accessories. . . . . . . . . . . . . . . . . . . . . . . . . . . . . . . . . . . . . . . . . . . . . . 13
Crevice nozzle . . . . . . . . . . . . . . . . . . . . . . . . . . . . . . . . . . . . . . . . . . . . . . . . . . . . 14
Upholstery tool. . . . . . . . . . . . . . . . . . . . . . . . . . . . . . . . . . . . . . . . . . . . . . . . . . . . 14
Use . . . . . . . . . . . . . . . . . . . . . . . . . . . . . . . . . . . . . . . . . . . . . . . . . . . . . . . . . . . . 15
Power cord. . . . . . . . . . . . . . . . . . . . . . . . . . . . . . . . . . . . . . . . . . . . . . . . . . . . . . . 15
Turning the vacuum on and off . . . . . . . . . . . . . . . . . . . . . . . . . . . . . . . . . . . . . . . 16
Selecting the suction power . . . . . . . . . . . . . . . . . . . . . . . . . . . . . . . . . . . . . . . . . 17
Opening the air inlet valve . . . . . . . . . . . . . . . . . . . . . . . . . . . . . . . . . . . . . . . . . . . 18
Transport and storage . . . . . . . . . . . . . . . . . . . . . . . . . . . . . . . . . . . . . . . . . . . . . . 19
Park-System . . . . . . . . . . . . . . . . . . . . . . . . . . . . . . . . . . . . . . . . . . . . . . . . . . . . . . 19
Suction level indicator . . . . . . . . . . . . . . . . . . . . . . . . . . . . . . . . . . . . . . . . . . . . . . 20
Vacuum care . . . . . . . . . . . . . . . . . . . . . . . . . . . . . . . . . . . . . . . . . . . . . . . . . . . . . 21
When to replace the dustbag and filters . . . . . . . . . . . . . . . . . . . . . . . . . . . . . . . . 21
Where to purchase new dustbags and filters . . . . . . . . . . . . . . . . . . . . . . . . . . . . 21
Changing the dustbag . . . . . . . . . . . . . . . . . . . . . . . . . . . . . . . . . . . . . . . . . . . . . . 22
Changing the filters . . . . . . . . . . . . . . . . . . . . . . . . . . . . . . . . . . . . . . . . . . . . . . . . 24
Changing the thread catcher. . . . . . . . . . . . . . . . . . . . . . . . . . . . . . . . . . . . . . . . . 25
Removing threads or hair wrapped around the roller . . . . . . . . . . . . . . . . . . . . . . 25
Vacuum cleaner and accessories . . . . . . . . . . . . . . . . . . . . . . . . . . . . . . . . . . . . . 26
Dust compartment . . . . . . . . . . . . . . . . . . . . . . . . . . . . . . . . . . . . . . . . . . . . . . . . . 26
Frequently asked questions . . . . . . . . . . . . . . . . . . . . . . . . . . . . . . . . . . . . . . . . 27
Technical Service . . . . . . . . . . . . . . . . . . . . . . . . . . . . . . . . . . . . . . . . . . . . . . . . . 28
Optional accessories . . . . . . . . . . . . . . . . . . . . . . . . . . . . . . . . . . . . . . . . . . . . . . 29
2
IMPORTANT SAFETY INSTRUCTIONS
When using an electrical appliance, basic precautions should always be followed,
including the following:
READ ALL INSTRUCTIONS BEFORE
USING THIS APPLIANCE
WARNINGTo reduce the risk of fire, electric
shock or injury:
Before using
Check the voltage rating of the
vacuum cleaner before connecting
the power cord to an electrical outlet.
Your power source should correspond
with the voltage rating plate located on
the underside of the vacuum. Use only
household AC outlets. Never use DC
power sources. If you are not sure of
your home’s voltage supply, consult a
qualified electrician. Connecting the
vacuum cleaner to a higher voltage
than indicated in these instructions may
result in damage to the vacuum cleaner
or injury.
To reduce the the risk of electric
shock, this appliance has a polarized plug (one blade is wider than the
other.) This plug will fit in a polarized
outlet only one way. If the plug does not
fit fully in the outlet, reverse the plug. If
it still does not fit, contact a qualified
electrician to install the proper outlet.
Do not alter the plug in any way.
A damaged vacuum cleaner can
be dangerous. Check the packaging, the vacuum cleaner and accessories for any signs of damage. Do not use
a damaged appliance.
Do not use with a damaged cord or
plug. If the appliance is not working as it should, has been dropped,
damaged, left outdoors or immersed in
water, bring it to a service center.
Use
Do not use on people or on
animals.
Do not use outdoors or on wet
surfaces. Only dry surfaces should
be vacuumed.
Only use the vacuum as described
in this manual. Use only Miele
recommended accessories.
The manufacturer cannot be held
responsible for damage caused by
non-compliance with these "Important
Safety Instructions". This appliance is
intended strictly for household use only.
This vacuum should not be used to
arrest or retain any hazardous
materials.
3
IMPORTANT SAFETY INSTRUCTIONS
Do not allow the vacuum cleaner to
be used as a toy. Close attention is
necessary when used by or near
children.
Do not pull or carry by the cord,
use the cord as a handle, close a
door on the cord, or pull the cord
around sharp edges or corners. Do not
run the appliance over the cord. Keep
the cord away from heated surfaces.
Do not unplug by pulling on the
cord. To unplug, grasp the plug,
not the cord.
Do not handle the plug or vacuum
with wet hands.
Keep hair, loose clothing, fingers
and all parts of the body away from
openings and moving parts.
Turn off all controls before unplugging.
Use extra care when cleaning on
stairs.
Floor attachments, accessories
and wands must not be used at
head level to avoid injury to eyes and
ears.
Do not use to pick up flammable or
combustible liquids, such as
gasoline, or use in areas where they
may be present.
Do not use the vacuum cleaner to
pick up liquids, as this could impair
the electrical safety of the vacuum
cleaner. Wait for freshly shampooed
carpets to dry.
4
Do not pick up anything that is
burning or smoking, such as
cigarettes, matches, or hot ashes.
Do not vacuum toner dust. Toner,
such as that used in printers and
photocopiers can conduct electricity.
Always turn off the vacuum before
connecting or disconnecting the
Electrobrush, Turbobrush or an
accessory.
Do not use without dustbag and
filters in place.
Do not turn on or attempt to operate the
vacuum cleaner unless a dustbag, dust
compartment filter and exhaust filter are
in place. Only use genuine Miele
double-layer dustbags and filters (see
“Vacuum care” for instructions on how
to insert the dustbag and filters.) If a
dustbag has not been inserted, the
dust compartment cover will not close.
Do not use force!
To aid the vacuum in dissipating
heat during extended operation
(longer than 1 hour), the power cord
should be unwound from the cable reel
at least two thirds of the way.
A temperature limiter automatically
switches off the vacuum cleaner if
it gets too hot, see “Frequently asked
questions.”
On the underside of the vacuum
hand piece is a metal insert
designed to absorb electrostatic
charge. Please make certain that your
hand remains around this metal insert.
IMPORTANT SAFETY INSTRUCTIONS
Accessory use
Maintenance and care
The Miele Electrobrush is a motor
driven accessory for use only with
Miele vacuum cleaners. It must not be
used with vacuum cleaners produced
by another manufacturer.
A damaged power cord must only
be replaced with a genuine Miele
cord by an authorized service agent.
When vacuuming with the Miele
Electrobrush or Turbobrush, do not
touch the rotating brush.
When using the vacuum with an
Electrobrush and current-carrying
hose:
The hose contains electrical wires. Do
not use if damaged, cut, or punctured.
Avoid picking up sharp objects.
The socket on the vacuum cleaner
(depending on model) must only
be used for the Miele Electrobrush
specified for use with this appliance.
Only use attachments specified by
Miele. Do not use the blower to
operate paint sprayers or similar devices that emit volatile or toxic vapors.
Monitor the dustbag change
indicator and inspect all filters
regularly. To ensure efficient suction,
clean or replace them when necessary
according to the operating instructions.
To guarantee safety, only use genuine
Miele dustbags, filters and accessories.
Miele vacuum cleaner bags are
disposable and are only to be used
once. Do not attempt to reuse.
Do not use the vacuum without an
accessory attached. The rim could
be damaged and injuries could result
from sharp edges.
Do not leave the vacuum plugged
in. Unplug from the outlet when not
in use and before servicing.
Do not put any object into openings. Do not use with any opening
blocked; keep free of dust, lint, hair,
and anything that may reduce air flow.
Clean only with a dry or slightly
damp cloth when disconnected
from the power supply. Never immerse
in water.
The suction hose and the telescopic wand contain electrical
wires. The plug connectors must not
come in contact with water. These items
may only be cleaned with a dry cloth,
no moisture must touch them. Danger
of electric shock.
This appliance is equipped with a
power cord reel. Hold plug when
rewinding onto cord reel. Do not allow
plug to whip when rewinding.
Do not attempt any repairs other
than those listed under “Vacuum
care.” Other repairs should be
performed by an authorized service
agent.
The manufacturer can not be held
responsible for any work performed by
an unauthorized servicer.
5
IMPORTANT SAFETY INSTRUCTIONS
Disposal of an old appliance
Before discarding an old vacuum
cleaner, please cut off the power cord
and render the plug useless. Ensure
the appliance presents no danger to
children while being stored for disposal.
SAVE THESE
INSTRUCTIONS
6
Caring for the environment
Disposal of the packing
materials
Disposing of the dustbag and
filters
The cardboard box and packing
materials protect the appliance during
shipping. They have been designed to
be biodegradable and recyclable.
Genuine Miele dustbags and filters are
made of environmentally friendly
materials. They can be thrown out with
the household trash provided the
vacuum has not been used on
restricted materials.
Ensure that any plastic wrappings,
bags etc. are disposed of safely and
kept out of the reach of children.
Danger of suffocation!
7
Guide to the vacuum
8
Guide to the vacuum
1
Power cord
2
Cord rewind switch
3
Suction power selector *
4
On-Off switch
5
Release button for accessories compartment
6
Dustbag change indicator
7
Elbow
8
Dust compartment lidrelease
9
Handpiece
10
Air inlet valve
11
Locking button
12
Telescopic wand *
13
Telescopic wand release button *
14
Fold-out wand bracket *
15
Carrying handle
16
Park-System
17
Floor brush
18
Dustbag
19
Dust compartment filter
(motor protection)
20
Exhaust filter
(SUPER air clean filter)
Features marked * are only available on select models.
9
Before using the vacuum
Attaching the suction hose
^ Insert the elbow into the suction
socket.
Removing the suction hose
^ Press the release buttons at the side
of the elbow and lift the hose from the
socket.
Connecting the suction hose
and the telescopic wand
^ Fit the handpiece of the suction hose
firmly into the wand. (Ensure that the
plug connectors line up). Turn the
handpiece and wand in opposite
directions until they lock with a click.
^ To release the hand piece from the
telescopic wand press the locking
button (see arrow) and pull apart.
10
Before using the vacuum
Inserting the telescopic tubes
(depending on model)
Both sections of the telescopic wand
have locating arrows.
^ When connecting the two tubes,
ensure that the two arrows point to
each other.
Adjusting the telescopic wand
(depending on model)
One part of the telescopic wand is
inside the other and can be adjusted to
your height for comfortable vacuum
cleaning.
^ Press the telescopic tube release
button (see arrow) to release the
tubes and adjust to the required
height.
Attaching the wand bracket
(depending on model)
^ Attach the wand bracket onto the
telescopic wand and fold it inwards.
When the wand bracket is folded out
the telescopic wand with suction hose
and floor brush can be attached to the
handle of the vacuum.
11
Before using the vacuum
Attaching the floor brush
^ Insert the telescopic wand into the
floor brush and turn in either direction
until it locks with a click.
^ To release the floor brush from the
telescopic wand, press the locking
button (see arrow) and pull the wand
out of the floor brush.
The floor brush is suitable for cleaning
carpets, rugs, and hard surfaces. For
flooring susceptible to scratches, use
one of the special Miele floor brushes
(see "Optional accessories").
Observe the cleaning instructions of
the floor manufacturer.
Adjusting the floor brush
Vacuum carpets and rugs with the
brush retracted:
^ Press the foot switch marked g.
Clean hard flooring with the brush
protruding:
^ Press the foot switch marked h.
12
Included accessories
The accessory tools for cleaning tough
to reach areas are located in the
accessory compartment.
– Crevice nozzle
– Upholstery tool
^ Press the release button to open the
accessories compartment lid.
^ Remove the accessory tool.
^ Close the lid.
13
Included accessories
The different tools can either be fitted to
the handpiece or to the telescopic
wand.
Crevice nozzle
For cleaning in folds, crevices or
corners.
Upholstery tool
For cleaning upholstery, mattresses,
cushions, curtains, covers, etc.
14
Use
Power cord
Unwinding
^ Hold the plug and unwind as much of
the cord as you need (maximum
length 21’ 4" [6.5 m]).
,If the vacuum is operated for
more than 30 minutes, atleast 14 feet
(4.3 m) of the power cord must be
unwound to prevent overheating.
Rewinding
^ Unplug the vacuum from the outlet.
^ Step on the rewind switch to automatically rewind the power cord.
Lightly hold the plug so that it does
not whip around when rewinding.
15
Use
Turning the vacuum on and off
To turn the vacuum cleaner on or off:
^ Step on the On-Off foot switch.
,To prevent static discharge, your
hand must touch the metal inlay on
the underside of the vacuum handpiece. Be certain to continuously
touch this inlay when vacuuming fine
dust, flour, or saw dust as these
materials are most likely to create
static discharge.
To further prevent static discharge,
pull the vacuum along by the hose
with one hand while holding the
handpiece in the other.
16
Use
Selecting the suction power
(models with suction power selector)
The suction power can be regulated to
suit the type of flooring. Select the
middle suction setting (symbol d) for
smooth and hard floors and a higher
setting for carpets.
Rotary selector
^ Turn the suction power selector to the
appropriate setting.
17
Use
Opening the air inlet valve
The air inlet valve can be opened for a
quick reduction of suction, e.g. when
moving from a carpet to an area rug.
^ Slide open the air inlet valve just
enough for the floor brush to move
easily.
18
Use
Transport and storage
(models with wand bracket)
For easier transport and storage, the
telescopic wand can be attached to the
vacuum handle.
^ Stand the vacuum cleaner vertically.
^ Unfold the wand bracket and hang it
on the handle of the vacuum.
The wand bracket can be turned to
hang off either side of the vacuum
handle.
Park-System
A Park-System has been designed for
conveniently parking the telescopic
wand during pauses.
^ Insert the clip of the floor brush into
the park bracket on the vacuum
handle.
19
Use
Suction level indicator
This indicates when the dustbag needs
to be changed.
^ Set the suction power selector ( if
present) to the highest setting and
make sure the air inlet valve is
closed.
^ Hold the wand, with the floorbrush
attached, off the floor. Turn on the
vacuum and check if the red marker
completely fills the indicator window.
^ If the red marker fills the window,
change the dust bag even if it is not
completely full.
Note:
The suction level indicator measures
the amount of air flow through the
dustbag.
Even if just a few ounces of cement,
plaster or brick dust are sucked up,
these fine particles will affect the
permeability of the dustbag causing the
red marker to indicate it is full even
though it is practically empty. The
dustbag should be changed as the
suction power is greatly reduced.
If the bag is bulging with wool or carpet
fluff, but the air flow is still high enough
not to activate the red marker to fill the
indicator window the dustbag should
be changed. Both of these extremes
can occur.
20
Vacuum care
When to replace the dustbag
and filters
Dustbag
Change the dustbag when the red
marker in the dustbag change indicator
fills the display.
Exhaust filter (SUPER air clean)
A "SUPER air clean filter" is included
with each box of Miele dustbags and
should be changed when starting a
new box of dustbags.
Where to purchase new
dustbags and filters
Replacement dustbags and filters may
be purchased from your Miele vacuum
dealer.
Only use genuine Miele F/J/M
dustbags.
“SUPER air clean” exhaust filters and
dust compartment filters are supplied
with every box of Miele dustbags.
Dust compartment filter
(motor protection)
The dust compartment filter should be
changed when starting a new box of
dustbags or if heavily soiled.
21
Vacuum care
,Always turn off and unplug the
vacuum cleaner before performing
maintenance or cleaning.
Changing the dustbag
^ Open the dust compartment lid by
pressing the release button and raising the lid until it clicks into place.
^ Grasp the card collar by the two
finger holes and pull it out from the
dustbag holder.
The dustbag has a flap which closes
automatically to prevent dust escaping
when the dustbag is removed.
It can be thrown out with the normal
household trash as long as it has only
been used for vacuuming household
dust.
22
Vacuum care
,Only use genuine Miele
dustbags and filters to ensure
optimum results and safety.
^ To insert a new dustbag push the
collar securely into the frame as far
as it will go.
Do not unfold the dustbag when you
take it out of the box. If it is unfolded or
not inserted properly the dust compartment lid will not close.
^ Close the dust compartment lid
firmly. It should click into place.
23
Vacuum care
Changing the filters
Exhaust filter (SUPER air clean)
The "SUPER air clean filter" is a fine
filter capable of trapping microscopic
dust particles.
^ Open the dust compartment lid.
^ Open the filter frame and remove the
used "SUPER air clean filter".
^ Insert the new "SUPER air clean
filter". It can be inserted either way
up.
^ Close the filter frame.
Dust compartment filter
^ Open the dust compartment lid.
^ Change the filter.
^ Close the dust compartment lid.
24
Vacuum care
Changing the thread catcher
The thread catcher pads on the bottom
of the rug and floor tool should be
checked occasionally. Replace the
pads if they appear worn.
^ Use a screwdriver as shown to
remove the thread catcher from the
slot.
^ Press the new thread catcher into the
slot.
New thread catcher pads may be
purchased from your Miele vacuum
dealer.
Removing threads or hair
wrapped around the roller
1. Unlock the axle lever.
2. Pull out the roller axle.
3. Take out the roller.
Remove all threads or hair and
reassemble in the reverse order.
25
Vacuum care
,Always turn off the vacuum and
unplug it from the outlet before
performing maintenance or a repair.
Vacuum cleaner and
accessories
The external surfaces of the vacuum
cleaner and of the accessories can be
cleaned with a slightly damp cloth or
with a cleaner suitable for plastic.
,Do not use abrasive, glass or all
purpose cleaners! They will damage
the surface.
Dust compartment
The dust compartment, if necessary,
can be cleaned using a dry cloth,
dusting brush or a second vacuum to
suck out any dust.
,Do not submerge the vacuum
cleaner in water! If moisture gets into
the vacuum there is a risk of an
electric shock.
26
Frequently asked questions
What if the vacuum cleaner turns off while vacuuming?
Possible fault
Fix
The vacuum has overheated. The
temperature limiter switched off the
vacuum automatically.
Turn off the vacuum at the On / Off
switch.
Check the telescopic wand and the
suction hose for blockages.
Replace the dustbag or filters if
necessary.
Unwind the full length of the power
cord.
Allow the vacuum to cool down for 30
minutes.
What if the suction of the vacuum is not strong enough?
Possible fault
Fix
The suction power selector is set too
low.
Increase the suction level.
The dustbag is full or clogged with
fine dust particles.
Replace the dustbag.
27
Technical Service
In the event of a fault which you can not
correct, please contact:
– Your Miele Dealer
or
– The Miele Technical Service
Department
USA 1-800-999-1360
[email protected]
CDN 1-800-565-6435
[email protected]
When contacting the Technical Service
Department, please quote your vacuum
model number. The model number can
be found on the silver data sticker
located on the underside of the
vacuum.
28
Optional accessories
Turbobrush
Recommended for cleaning crushed
pile on low nap rugs or carpets.
The turbobrush is mechanically driven
by the suction power of the vacuum. No
electrical connection or electrical hose
is necessary.
Hand Turbobrush
The hand Turbobrush is intended for
vacuuming upholstery, mattresses, car
seats, carpeted stairs, etc.
29
Optional accessories
Hard floor brush
For cleaning sturdy hard floors, e.g.
tiles and stone floors.
Parquet floor brush
The parquet floor brush has natural
bristles for vacuuming scratch-sensitive
hard floors, e. g. parquet and laminate.
Mattress tool
For vacuuming mattresses and
upholstery. Even deep crevices of a
mattress can be vacuumed easily.
30
Optional accessories
Radiator brush
For cleaning radiators, narrow shelves
or crevices.
^ Attach the radiator brush to the
crevice nozzle.
Dusting brush
For dusting delicate objects, woodwork
such as base boards and window sills.
The head of the dusting brush can be
swivelled for easier cleaning.
Universal brush
For dusting books, shelves, etc.
31
Optional accessories
MicroSet
Specially designed for cleaning small
objects and difficult to reach areas
(such as PC keyboards, stereo equipment, carved furniture, models etc.)
The MicroSet includes:
– micro hose with combi nozzle,
– micro dust brush,
– micro crevice nozzle,
– angled extension.
CarClean Set Plus
Specially designed for cleaning narrow
crevices, tight upholstery, loose floor
mats and tight spaces in a car.
The CarClean Set Plus includes:
– Hand Turbobrush
– Micro hose with combi nozzle
– Crevice tool
– a 10 foot (3 m) long suction hose
with holder
32
33
34
35
All rights reserved / 0103
This paper has been bleached without the use of chlorine.
M.-Nr. 05 905 590 / V00