1
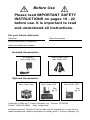
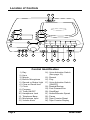
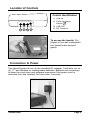
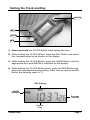
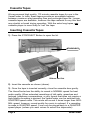
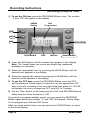
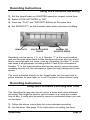
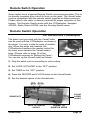
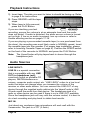
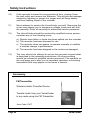
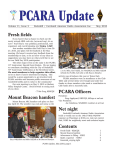
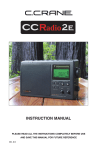
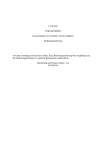
Dual Speed Recorder
INSTRUCTION MANUAL
PLEASE READ ALL THE INSTRUCTIONS COMPLETELY BEFORE USE
AND SAVE THIS MANUAL FOR FUTURE REFERENCE.
Before Use
Please read IMPORTANT SAFETY
INSTRUCTIONS on pages 19 - 22
before use. It is important to read
and understand all instructions.
For your future reference:
Serial No.
(found inside battery compartment)
Date of purchase
Name and address of dealer
Included Accessories:
AC Adapter
Item Code: VCA
Audio Patch Cord
Item Code: VPC
Optional Accessories:
(4) “C” Cell Batteries
Item Code: CAL
Phone Patch Cord
Item Code: VCP
FM Transmitter
Item Code: FMT
See
pg. 14
See
pg. 21
Copyright © 2004 by C. Crane Company, Inc., Fortuna, CA 95540
Phone: 1-800-522-8863 Web: ccrane.com
All rights reserved. No part of this booklet may be reproduced, in any form or
means whatsoever, without permission in writing from C. Crane Company, Inc.
Table of Contents
Location of Controls ..................................................... 4-5
Connection to Power ..................................................... 5-6
Battery Installation ........................................................... 6
Setting the Clock .............................................................. 7
Cassette Tapes .................................................................. 8
Inserting Cassette Tapes ................................................. 8
Recording Instructions
How to Record From a Radio ............................... 9
Recording Using the Timer ................................. 10
Tips and Notes .................................................... 11
Quick Check List for Recording ......................... 11
Recording a Four-Hour Radio Show ................. 12
Using Voice Activated Recording ...................... 13
Recording a Telephone Call ............................... 14
Remote Switch Operation
For use with the CCRadioplus ............................ 15
Playback Instructions ..................................................... 16
Audio Sources ................................................................ 16
Troubleshooting Guide ............................................. 17-18
Safety Instructions ..................................................... 19-22
Location of Controls
24
1
6
2
7
23
8
3
9
5
4
10
11
12
13
17
14
15
16
21
18
19
20
22
Control Identification
1)
2)
3)
4)
5)
6)
7)
8)
9)
10)
11)
12)
13)
Page 4
Day
Hour
Minute
Built-In Microphone
Record or Status Light
Clear or Recall time
Clock
Program
Timer ON/OFF
Headphone Jack
Telephone Beep
Microphone Input
Volume Knob
14) Voice Activation Switch
(See page 13)
15) Record
16) Play
17) Voice Activation Switch
(ON/OFF)
18) Rewind/Review
19) Fast Forward/Cue
20) Stop/Eject
21) Normal/Quarter Speed
22) Pause
23) Tape Counter Reset
24) Tape Counter Display
VersaCorder
Location of Controls
Control Identification
1
2
3
4
1) LINE IN
2) Timer Activation
Switch
3) LINE OUT
4) DC Power In
To access the handle: Put
fingers in the well underneath
the VersaCorder and pull
gently.
Connection to Power
The VersaCorder will run on the included AC adapter. It will also run on
(4) "C" size Alkaline or rechargeable batteries. Batteries are necessary
to keep the clock time and program memories if the power cord is
removed from the recorder for more than 3 minutes.
VersaCorder
Page 5
Battery Installation
1) Open the cover by pushing the ribbed tab down firmly and
pulling the cover off toward the back of the unit.
2) Insert the (4) “C” cell batteries into the compartment as indicated in
the drawing below. Be sure the negative (-) end is against the
spring. Refer to the drawing below to insure correct installation of
your batteries.
+
+
+
+
3) Gently slide the cover back on to close.
Page 6
VersaCorder
Setting the Clock and Day
CLOCK
DAY
HOUR
MIN
1) Press and hold the CLOCK Button while setting the time.
2) While holding the CLOCK Button, press the DAY Button and select
the corresponding day as shown on the display.
3) While holding the CLOCK Button, press the HOUR Button until the
appropriate hour and AM/PM is indicated on the display.
4) While holding the CLOCK Button down, press the MIN Button and
select the appropriate minute setting. Each time you press the MIN
Button the seconds reset to “0”.
DAY Settings
AM/PM
Indicator
Seconds
Counter
Current
Time
VersaCorder
Page 7
Cassette Tapes
We recommend high quality, 110 minute cassette tapes for use in the
VersaCorder. In tests, these tapes provide an acceptable balance
between maximum play/recording time and prolonged tape life. Longer
cassette tapes are available, however the tape material is very thin and
may stretch or break during operation. With the extra long tapes, any
cassette player is more likely to “eat” the tape.
Inserting Cassette Tapes
1) Press the STOP/EJECT Button to open the lid.
STOP/EJECT
Ribbon End Out
2) Insert the cassette as shown (above).
3) Once the tape is inserted correctly, close the cassette door gently.
The VersaCorder has the ability to record in NORMAL speed for best
audio quality. When extended recordings of talk radio, speeches and
lectures, telephone conversations, or any format that does not require a
high-fidelity recording is desired, the VersaCorder can be switched into
QUARTER speed mode. This mode will record 4 times longer than NORMAL speed, however, record quality for music is reduced. If a recording
is made in QUARTER speed, it can only be played back in a QUARTER
speed player (unless you want voices to sound like chipmunks).
Page 8
VersaCorder
Recording Instructions
How to Record From A Radio
The VersaCorder can be used with any radio that has a headphone jack
or LINE OUT. With the VersaCorder you can listen while recording.
1) Turn the radio volume up to a gentle listening level. If the volume of
the radio is set too loud, the playback sound may be distorted.
2) Put a tape in and select the speed you want to record at.
3) Plug the 1/8” stereo patch cord into your radio LINE OUT or
headphone jack and the LINE IN of the VersaCorder. You can use
the red plugs of the included patch cord.
4) Press the RECORD and PLAY Buttons at the same time. The red
light will flash.
Adjust the volume on the VersaCorder to the level you want or turn the
volume off if you wish.
Note: If the Timer Switch is ON, normal recording won’t work. Make
sure the Timer Switch is OFF.
VersaCorder
Page 9
Recording Instructions
Recording Using the Timer
1) To set the ON time, press the PROGRAM Button once. The number
“1” and “ON” will appear in the display.
AM/PM
Setting
DAY
Programmed
DAY
HOUR
MIN
PROGRAM
PROGRAM #
Hour
Minutes
Timer ON/OFF
2) Press the DAY Button until the desired day appears in the display.
Note: The VersaCorder can record any single day, weekends,
weekdays or everyday.
3) Select the appropriate hour by pressing the HOUR Button until the
desired hour appears in the display.
4) Select the appropriate minute by pressing the MIN Button until the
desired minute appears in the display.
5) To set the OFF time, press the PROGRAM Button once and OFF
will be displayed. Follow steps 2-4 above to set the appropriate OFF
time.If you are recording a four hour talk show that starts at 11:00 PM
on Monday, be sure to change the OFF time DAY to Tuesday.
6) Set the Timer Switch to ON and press the PLAY and RECORD Buttons.
Make sure the Voice Activation is “Off”.
If you wish to program another event, you can press the PROGRAM
Button again and event number “2” and “ON” will appear. Follow steps
2-4 to program your ON and OFF times.
After you have set the timer, you can press the CLOCK Button to return
to the clock display.
Page 10
VersaCorder
Recording Instructions
Tips and Notes
There are a total of (6) recording timers. Each one can be programmed
with a separate ON/OFF Time and Day.
To DELETE a programmed ON or OFF time, press the PROGRAM
Button repeatedly until the time you wish to delete is displayed. Next,
press the CLEAR/RECALL Button. Four dashes will appear to verify that
the ON or OFF time has been deleted. Pressing the CLEAR/RECALL
Button again will reinstate the deleted time.
The CLEAR/RECALL Button can be used to clear the event ON or OFF
time or if you press it again the previous time programmed in that event
will display.
Note: If you are recording a four hour talk show that starts at 11:00 PM
on Monday, be sure to change the end time DAY to Tuesday.
Quick Checklist for Timed Recording from a Radio
1. Has the tape been inserted correctly and rewound?
2. Have you reset the counter?
3. Is the Timer Switch on?
4. Are the RECORD & PLAY Buttons down?
5. Is it set to the correct speed?
6. Is your radio on and at an appropriate volume?
7. Is the VOICE ACTIVATED Switch turned off?
8. Is the PAUSE Button released?
Check ON and OFF times. Make sure they have the correct day time
and AM and PM. If you want silent recording verify that the volume is
turned down on the VersaCorder.
VersaCorder
Page 11
Special Recording Instructions
Recording A 4-Hour Radio Show On One Side
Of A 110-Minute Cassette Tape
The VersaCorder has a Six Event Timer that can be programmed to
come on and go off. This can be used to extend your tape time and
eliminate many commercials. To set up the VersaCorder for timed
recordings, press the program button to dial through the six timers.
Press the hour and minute buttons to set each timer. See page 10 for
instructions on setting the timer.
Most radio shows follow a regular schedule. Note the begin and end
times of the commercial breaks, so you can program the VersaCorder
correctly. For our example below, we have used a radio show which airs
its commercial breaks near the top of the hour and at the half hour.
Follow these steps to set all six timers:
Timer 1
On – Set Timer 1 to come on at 6 min. after the hour to begin
recording the show. (If the show starts at midnight, set the
timer for 12:06 AM.)
Off – Set Timer 1 to go off before the next commercial break, which
is at 30 min. after the hour (12:30 AM).
Timer 2
On – Set Timer 2 to come on at 34 min. after the hour (12:34 AM).
Off – Set Timer 2 to go off at 58 min. after the hour (12:58 AM)
before the next commercial break.
Timer 3
On – Set Timer 3 to come on 6 min. after the second hour (1:06).
Off – Set Timer 3 to go off at 30 min. after the second hour (1:30).
Timer 4
On – Set Timer 4 to come on at 34 min. after the second hour
(1:34).
Off – Set Timer 4 to go off at 58 min. after the second hour (1:58).
Timer 5
On – Set Timer 5 to come on at 6 min. after the third hour (2:06).
Off – Set Timer 5 to go off at 58 min. after the third hour (2:58).
Timer 6
On – Set Timer 6 to come on at 6 min. after the fourth hour (3:06).
Off – Set Timer 6 to go off at 58 min. after the fourth hour (3:58).
Page 12
VersaCorder
Recording Instructions
Using Voice Activated Recording
1) Set the VersaCorder on QUARTER speed for longest record time.
2) Switch VOICE ACTIVATED to “ON”.
3) Press the “PLAY” and “RECORD” Buttons at the same time.
4) Set SENSITIVITY so the recorder starts when someone is talking.
SENSITIVITY
VOICE ACTIVATED
ON/OFF
NORMAL OR
QUARTER SPEED
Sensitivity can be set on 1, 2, or 3. Number “1” is the most sensitive
and can be used when there is little background noise and you would
like to record people in a room, such as a meeting. Number “2” works
well when a single person is talking within 2 feet of the microphone.
Number “3” is the least sensitive and can be used to record someone
speaking directly into the microphone (good for high background noise
areas).
The voice activated feature on the VersaCorder can be used with a
police scanner, to save tape, or in a 911 center to record phone calls.
Recording Instructions
Using Voice Activated Recording with Timer
The VersaCorder may also be set up for a timed and voice activated
recording.This might be used to record noises in a room at a certain
time of day. It could also be used to record a conference when you cannot be there.
1) Follow the above instructions for voice activated recording.
2) Set the timer. See page 10 for instructions on setting the timer.
VersaCorder
Page 13
Recording Instructions
Recording A Telephone Call
You can purchase a telephone patch cord and phone line splitter from
your C. Crane dealer or C. Crane Company at 800-522-8863
(www.ccrane.com).
1) Connect the dual tip end of your patch cord to the
phone BEEP and MIC input on the front of the
VersaCorder.
2) Connect the phone line splitter to your phone wall jack.
3) Connect your existing phone line to the splitter.
4) Connect the phone plug end of the patch cord into the splitter.
5) Set the VersaCorder to QUARTER speed for maximum record time.
6) Switch VOICE ACTIVATED to “ON”.
7) Press the PLAY and RECORD Buttons at the same time.
8) Set SENSITIVITY to number “2” and test to be sure the recorder
starts when someone is talking.
On the bottom of the VersaCorder there is a switch that will allow you to
insert a BEEP into your conversations at regular intervals. This will help
advise both parties they are being recorded and may be required by
law. Set the switch to ON to activate.
BEEP ON/OFF
SWITCH
Note: It may be illegal to record a call without both parties knowledge and consent. Please check with your local law enforcement for
details and advice. For important information, see pages 21 and 22.
Accessory: Telephone Patch Cord, Item Code: VCP
Page 14
VersaCorder
Remote Switch Operation
Some radios have a special Remote Switch connection provided. This is
for directly recording from a built in timer on the radio. The VersaCorder
may be compatible with the remote switch supplied on these receivers.
Please refer to the radio or device’s manual for proper operation of this
feature. The Remote Switch works with the CCRadioplus, Sangean
ATS909, Radio Shack DX398, and the Grundig Satelit series.
Remote Switch Operation
For Use With the CCRadioplus
The patch cord provided with the VersaCorder
can be used with the CCRadioplus as shown in
the photo. It is color coded for ease of installation. When the plugs are inserted, the
CCRadioplus becomes the master control for
the timer and overrides the VersaCorder’s
timer. (Please refer to page 16 of the
CCRadioplus manual on Setting the Timer.)
You can set up the VersaCorder as follows:
1) Plug the patch cord in according to color coding.
2) Set VOICE ACTIVATED to the “OFF” position.
3) Set TIMER to the “OFF” position.
4) Press the RECORD and PLAY Buttons on the VersaCorder.
5) Set the desired speed of the VersaCorder.
REC
PLAY
COLOR
CODED
JACKS
SENSITIVITY
VOICE ACTIVATED
ON/OFF
VersaCorder
NORMAL OR
QUARTER SPEED
Page 15
Playback Instructions
1) Insert tape. The side you want to listen to should be facing up. Refer
to page 8 for instructions.
2) Press REWIND until the tape
stops.
3) When tape is fully rewound,
press the PLAY Button.
VOLUME
PLAY
REWIND
If you are checking your test
recording, ensure the volume is at an adequate level and the audio
does not distort. If audio is distorted, the audio source volume is turned
up too high. If low or no audio is present, turn up volume or refer to
trouble shooting section on pages 17-18.
If you are playing a pre-recorded cassette tape (i.e one purchased from
the store), the recording was most likely made in NORMAL speed. Insert
the cassette tape into the recorder (For proper tape installation, please
refer to Inserting Cassette Tapes on page 8). Position the SPEED switch
on the front of the recorder to NORMAL and press the PLAY Button.
Note:
The VersaCorder will play tapes back in stereo through the
headphone jack.
Audio Sources
LINE IN/OUT:
LINE IN is a special connection
that is compatible with any LINE
OUT (or headphone jack),
commonly found on portable CD
players, AM/FM/shortwave receivers, computer audio output, etc. “LINE LEVEL” refers to a low level
audio that does not change when you increase the volume of the
receiver or other audio device. You can connect the LINE OUT of any
device through the supplied audio cables into the VersaCorder’s LINE
IN and record the audio from that device. The headphone jack of a
radio or other device can be used if there is not a LINE OUT available.
Since the headphone jack will vary with the volume control, it is best to
do a test recording and play back to obtain best results.
MIC IN:
Just about any condenser-type microphone will work well with the
Versacorder. The jack is a 1/8" (3.5mm).
Page 16
VersaCorder
Troubleshooting Guide
Slow FF and REW speed or varying speed during record/playback:
This is a symptom of low batteries. Plugging in the AC Adapter should
cure the problem. It is recommended that you plug in the AC Adapter
when changing batteries to avoid losing clock and timer settings. If the
batteries are removed and the AC Adapter is not plugged in, all clock
and timer settings will be lost within three minutes.
I can’t record on my tape:
Cassette tapes have a “record protection” tab on the bottom of the cassette that can be removed to prevent the tape from being erased or
recorded over. If the tab is removed, you will not be able to record on
this tape. Removing the tab prohibits the REC button on the
VersaCorder from being pushed down.
I only get the room noise when trying to record:
Please read the instructions on LINE IN on page 9 & 16 before recording. Your low-level audio source must be plugged into the LINE IN jack
on the side of the VersaCorder before recording from an external audio
device. If nothing is plugged into the LINE IN jack, the internal microphone on the VersaCorder is activated and will record audio from your
room.
Audio on playback is distorted:
If audio is distorted on playback be sure the audio coming from your
receiver is at a low level. Distorted audio can also be caused by an old
tape or low batteries.
My recorder is not recording at the right time:
If your recorder does not record at the right time be sure the AM and
PM and DAY are correct. Also make sure you have set a different ON
and OFF Time. If you are recording a four hour talk show that starts at
11:00 PM on Monday be sure to change the OFF time DAY to Tuesday.
I keep getting a beep in my recordings:
Check the BEEP switch on the bottom of the VersaCorder and make
sure it is set to OFF.
VersaCorder
Page 17
Troubleshooting Guide
I have programmed the timer but it will not record:
1) Check to see that the TIMER switch is on, the REC and PLAY
buttons are pushed down, and the PROGRAM time is correctly set
for AM or PM. See page 10 for Recording Instructions.
2) Is the patch cord plugged in? Unless you have a CCRadioplus and
have programmed it to start the VersaCorder, do not plug the patch
port. See page 15 for
cord into the TIMER ACTIVATION SWITCH
Remote Switch Operation.
The VersaCorder is eating my tapes:
If the VersaCorder starts “eating” your tapes, please remember we recommend tapes no longer than 110 minutes for reliable service. Longer
tapes are more likely to wind around the tape mechanism and create a
problem. If a 110 minute tape continues to wind around the mechanism
then try a new tape or rewind and fast forward the tape before trying
again. If the recorder continues to jam up, even on new tapes, your unit
may need servicing or replacing.
I keep hearing a “clicking” noise on my tape:
Check to see if the counter is at 9999 and has not rolled over. Just push
the reset button on the counter to reset it to zero.
The VersaCorder’s audio is too low on playback, and I hear a hiss
in the background:
The recording was made with the source volume set too low. First,
make sure the VersaCorder is properly connected to the audio source.
Next, increase the volume on the audio source and re-record and test
the volume on the new recording. If the volume from the audio source is
set too low, you will record only tape hiss and setting the volume from
the audio source too high will cause the recorded sound to be distorted.
Can I use the phone patch cord and the radio patch cord at the
same time?
No. In order to record using the phone patch cord, you must disconnect
the radio patch cord from the LINE IN jack.
Maintenance:
It is a good idea to keep your VersaCorder and tapes as clean as possible. Tape recorders under daily heavy use, often last only about one
year. Dust and dirt is the biggest cause of wear.
Page 18
VersaCorder
Safety Instructions
READ BEFORE OPERATING EQUIPMENT
SAVE THESE INSTRUCTIONS
1)
Read and understand all safety and operating instructions before
the VersaCorder is operated.
2)
Retain Instructions: The safety and operating instructions should
be retained for future reference.
3)
Heed Warnings: All warnings on this appliance and all operating
instructions should be followed.
4)
Water and Moisture: The VersaCorder should not be used near
water. Do not use near a bathtub, washbowl, laundry tub, kitchen
sink, wet basement, swimming pool, etc. Risk of electric shock
may result.
5)
Unplug the VersaCorder from the AC Adapter before cleaning.
Only use a damp cloth for cleaning the exterior surfaces of the
recorder.
6)
Do not place the VersaCorder on an unstable cart, stand, bracket
or table. The recorder may fall, causing serious personal injury
and/or damage to the recorder may result.
7)
Heat: Never put the VersaCorder in direct sunlight in an unventilated area or behind glass such as a car’s interior. The recorder
should be kept away from heat sources such as radiators, heat
registers, stoves, or other appliances that produce heat.
8)
AC Adapter: The AC Adapter should be positioned so it is not
walked on, pinched, or have items placed on top of it. All power
and recording cables should be routed away from walkways or
areas of foot traffic to avoid being tripped on. Always unplug the
AC power adapter by gripping the adapter unit and pulling it out
of the wall socket. Never pull on the cord. Always operate the
VersaCorder using the correct supplied AC Adapter. Adapters that
are not correctly rated can damage the recorder. If you are not
sure of the correct AC Adapter, consult your dealer.
9)
Never insert objects of any kind into the VersaCorder through
openings. The objects may touch dangerous voltage points or
short out parts causing damage to the recorder.
VersaCorder
Page 19
Safety Instructions
10)
If the recorder is stored for long periods of time, unplug it from
the wall outlet and remove the batteries. This will prevent damage
caused by lightning or power line surges and will keep battery
acid from leaking inside of the recorder.
11)
Never attempt to service the VersaCorder yourself. Removing the
cover may expose you to dangerous voltage levels and will void
the warranty. Refer all servicing to authorized service personnel.
12)
The VersaCorder should be serviced by qualified service personnel when any of the following occur:
a) Objects have fallen or liquid has been spilled into the recorder.
b) The recorder has been exposed to rain.
c) The recorder does not appear to operate normally or exhibits
a marked change in performance.
d) The recorder has been dropped or the enclosure damaged.
13)
The user should not attempt to service this recorder beyond what
is described in the operating instructions. All other servicing
should be referred to qualified service personnel. The symbols on
the next page are to alert you to important operation or servicing
instructions that may appear in the owner’s manual.
Accessory
FM Transmitter
Wireless Audio Transfer Device
Transfer audio from your VersaCorder
to any radio using the FM Transmitter.
Item Code: FMT
Page 20
VersaCorder
Safety Instructions
READ THIS BEFORE
INSTALLATION
Each device that you connect to
the phone line draws power from
the phone line. We refer to this
power draw as the device’s
ringer equivalence number, or
REN. The REN is on the bottom
of your telephone cassette
recorder.
Warning: To reduce the risk
of fire or shock hazard, do
not expose this product to
rain or moisture.
CAUTION
RISK OF ELECTRIC
SHOCK.
DO NOT OPEN
If you are using more than one
device on the line, add up all the
RENs. If the total is more than
five, your phone might not ring
and your telephone cassette
recorder might not record. In
rural areas, a total REN of three
might impair ringer operation. If
ringer operation is impaired,
disconnect one of the devices
from the line.
CAUTION: TO REDUCE THE
RISK OF ELECTRIC SHOCK,
DO NOT REMOVE COVER OR
BACK. NO USER-SERVICEABLE PARTS INSIDE. REFER
SERVICING TO QUALIFIED
PERSONNEL
FCC STATEMENT
Your telephone cassette
recorder complies with Part 68
of FCC Rules. You must, upon
request, provide the FCC
registration number and the REN
to your phone company. Both
numbers are on the bottom of
your telephone cassette
recorder.
This symbol is intended to alert
you to the presence of uninsulated
dangerous voltage within the
product’s enclosure that might be
of sufficient magnitude to
constitute a risk of electric shock.
Do not open the product’s case.
Note: You must not connect
your telephone cassette recorder
to:
• coin-operated systems
• party-line systems
• most electronic key phone
systems
VersaCorder
This symbol is intended to inform
you that important operating and
maintenance instructions are
included in the literature
accompanying this product.
Page 21
Safety Instructions
Important: The law in some areas requires that all parties on the phone
line be able to hear a beep indicating the conversation is being recorded. If
you connect the telephone cassette recorder to your phone using the supplied dual-prong cord and handset adapter, all parties on the phone line
might not hear a beep during recording. We recommend you check the
laws in your area. If it is unlawful to record without a beep sounding, or if
you are unsure, connect the telephone cassette recorder as described in
“Connecting Directly to the Phone Line” to ensure the beep will sound.
Consumer Information And FCC Requirements
1. This equipment complies with Part 68 of the FCC rules. On the bottom
of this equipment is a label that contains, among other information, the
FCC registration number and Ringer Equivalence Number (REN) for this
equipment. If requested, provide information to your telephone company.
2. The REN is useful to determine the quantity of devices you may connect to your telephone and still have all of those devices ring when your
number is called. In most, but not all areas, the sum of the RENs of all
devices should not exceed five (5.0). To be certain of the number of
devices you may connect to your line, as determined by the REN, you
should call your local telephone company to determine the maximum
REN for your calling area.
3. If your VersaCorder causes harm to the telephone network, the telephone company may discontinue your service temporarily. If possible,
they will notify you in advance. But if advance notice isn’t practical, you
will be notified as soon as possible. You will be advised of your right to
file a complaint with the FCC.
4. Your telephone company may make changes in its facilities, equipment,
operations, or procedures that could affect the proper operation of your
equipment. If they do, you will be given advance notice so as to give
you an opportunity to maintain uninterrupted service.
5. If you experience trouble with the VersaCorder, please contact the
C. Crane Company at 1001 Main St. Fortuna, CA 95540 (800) 5228863, for repair/warranty information. The telephone company may ask
you to disconnect this equipment from the network until the problem has
been corrected or you are sure that the equipment is not malfunctioning.
6. There are no repairs that can be made by the customer to the
VersaCorder.
7. This equipment may not be used on coin service provided by the telephone. Connection to party lines is subject to state tariffs. (Contact your
state public utility commission or corporation commission for information).
Page 22
VersaCorder
About C. Crane Company Inc.
The C. Crane Company began soon after Bob and Sue Crane moved
from the San Francisco Bay Area to the beautiful and remote Redwood
Country of Northern California. As they settled into Fortuna, in the heart
of the Redwoods, and tried to tune in their favorite AM stations, Bob
and Sue were shocked. They either heard a lot of static or nothing at
all. Trying to find a solution, they soon discovered there were few products available to enhance poor AM radio.
Bob, being an all-around clever guy, found his own solution to weak AM
reception: the Select-A-Tenna! The Cranes were so impressed with this
simple antenna that they knew they had to get the word out. So, they
decided to create a company to market this wonderful antenna: the C.
Crane Company was born. As for the mysterious letter “C”, well, Bob
and Sue’s middle names both begin with the letter “C”, thus the name
C. Crane. They decided to advertise the antenna on the radio, and
before they knew it, the C. Crane Company was up and running.
That was over 25 years ago, and it all started on a kitchen table that
Bob built himself. This simple cherry wood table acted as the shipping
and receiving station, showroom table, and Bob’s office desk. Bob and
Sue were the first phone operators. This made them realize that their
customers expected to hear a real live person who is willing to listen to
their questions, and more importantly, able to respond to their inquiries
with knowledge and respect.
From the beginning, Bob and Sue Crane had a powerful idea about
what they expected from the company that carried their name. They
would only sell items they tested themselves and found to be of outstanding quality. They would always offer a 30-day money back satisfaction guarantee and be ready with the best customer service in the
industry. Even though the company has grown a lot during the last quarter century, these family-based ethics still guide the company in everything they do.
Since the first Select-A-Tenna, the C. Crane Company has become one
of the premier electronics companies in the nation. Exclusive items such
as the CCRadio, the best radio for long range AM reception, and the
Freeplay Plus Wind-up radio, continue to fulfill customer needs with top
quality items found nowhere else. The C. Crane Catalog, published only
three times a year, has expanded to include over three hundred high
quality, unique, and outstanding items. Customers can be assured that
the items included in the C. Crane Catalog are truly the best of the
breed. Even today, all of C. Crane’s products must pass exhaustive
testing in the quality control lab, at home, at work, and in people’s lives
before they are included in the C. Crane Catalog.
Model: VERSACORDER
THIS DEVICE COMPLIES WITH PART 15 OF THE FCC RULES.
OPERATION IS SUBJECT TO THE FOLLOWING TWO CONDITIONS.
1) THIS DEVICE MAY NOT CAUSE HARMFUL INTERFERENCE, AND
2) THIS DEVICE MUST ACCEPT ANY INTERFERENCE RECEIVED,
INCLUDING INTERFERENCE THAT MAY CAUSE UNDESIRED
OPERATION.
Notice: The changes or modifications not expressly approved by the party
responsible for compliance could void the user’s authority to
operate the equipment.
381C15SA