1
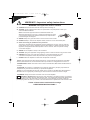
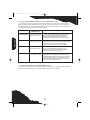
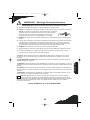
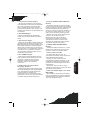
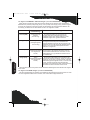
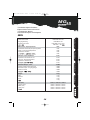
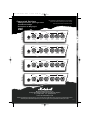
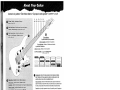
MG15 Hbk multi 230V
1/3/02
9:54 am
Page B
MG15
SERIES
MG15CD
MG15CDR
2 CHANNELS
CLEAN
OVERDRIVE
SERIES
EQ
SERIES
MG15DFX
SERIES
CD INPUT
BASS
CONTOUR
TREBLE
EMULATED
EMULATED
LINE OUT
2 CHANNELS
CLEAN
OVERDRIVE
EQ
CD INPUT
BASS
CONTOUR
TREBLE
2 CHANNELS
CLEAN
OVERDRIVE
EMULATED
EMULATED
SPRING
REVERB
LINE OUT
EQ
BASS
CONTOUR
TREBLE
CD INPUT
EMULATED
EMULATED
DIGITAL FX
LINE OUT
Owners Manual
MG15 Hbk multi 230V
1/3/02
9:55 am
Page 1
ENGLISH
From Jim Marshall
I would like to thank you personally for selecting
one of our new 15 Watt, MG combos – the
MG15CD, the MG15CDR or the MG15DFX.
As a musician myself I fully understand the
necessity of achieving the right tone and feel to help
inspire musicians to reach their full creative potential
– be they aspiring beginners or more skilled players.
With this in mind I set my experienced R&D team
the task of designing a new range of affordable MG
amplifiers that truly captured the essence of the
Marshall sound.
Utilising new technologies, some of which were developed for our critically acclaimed AVT range,
the new MG Series raises the standard for what can be expected from a value-for-money range of
guitar amplifiers and defines a new benchmark. For example, the power amp section of your MG15
combo boasts FDD (Frequency Dependant Damping) – a radical new feature that is exclusive to
Marshall Amplification and accurately mimics the way an all-valve amplifier interacts with a
loudspeaker. As a result of FDD, your new MG15 will give you a sound never before thought possible
in such an affordable, non-valve amp.
Two of these three units also feature built-in effects – the MG15CDR boasts a natural sounding
spring reverb, while the MG15DFX houses specially designed Digital Effects (DFX).
The DFX featured in the MG15DFX are custom voiced by our own in-house design team. Each one
of the four effects on offer (Reverb, Delay, Chorus and Flange) have been designed to give you the
true warmth and feel of analogue effects, but in a highly flexible digital format. Furthermore, a wide
range of variations for each effect are literally at your fingertips – merely tweaking the two digital
effects controls on the front panel will give rise to sounds that range from subtle to radical, while
always remaining both natural and musical.
Like all the amplifiers in my new MG range, the MG15 was completely designed and engineered in
the UK and the most rigorous quality control procedures ensure that it meets the standard of build
you have come to expect from all Marshall products.
Whether the MG15 is your first ever Marshall or is the latest addition to your arsenal of amps, the
tone, flexibility and feel of this compact, rugged combo will deliver the goods – from bedroom to
backstage!
I wish you every success with your new Marshall. Welcome to the family…
Yours Sincerely,
1
MG15 Hbk multi 230V
!
1/3/02
9:55 am
Page 2
WARNING! - Important safety instructions
WARNING: This apparatus must be earthed!
A. PLEASE read this instruction manual carefully before switching on.
B. ALWAYS use the supplied mains lead, if a replacement is required please contact your
authorised Marshall Dealer.
Note: Closed back equipment with non-detachable mains cord.
When the equipment is not in use or is being transported, the mains
cord should be gathered and retained under the top strap handle to
prevent damage. See diagram.
ENGLISH
C. NEVER attempt to by-pass the fuses or fit ones of the incorrect value.
D. DO NOT attempt to remove the amplifier chassis, there are no user serviceable parts.
E. Refer all servicing to qualified service personnel.
Servicing is required when the apparatus has been damaged in any way, such as when the
power supply cord or plug is damaged, liquid has been spilled or objects have fallen into the
apparatus, the apparatus has been exposed to rain or moisture, does not operate normally
or has been dropped.
F. NEVER use an amplifier in damp or wet conditions.
G. ALWAYS unplug this apparatus during lightning storms or when unused for long periods of time.
H. PROTECT the power cord from being walked on or pinched particularly at plugs,
convenience receptacles and at the point where they exit from the apparatus.
I.
DO NOT switch the amplifier on without the loudspeaker connected.
➲ Note: This equipment has been tested and found to comply with the requirements of the EMC
directive (Environments E1, E2 and E3 EN 55103-1/2) and the Low Voltage directive in the E.U.
➲ EUROPE ONLY - Note: The Peak Inrush current for the MG15CD, MG15CDR and MG15DFX
is
2.5 amps.
➲ CAUTION: Any changes or modifications not expressly approved by the party responsible for
compliance may void the users authority to operate the equipment.
➲ Note: It is recommended that all audio cables used to connect to the MG15CD, MG15CDR and
MG15DFX are of a high quality screened type. These should not exceed 10 metres in length.
➲ WARNING: Always ensure free movement of air around the amplifier!
USA ONLY - DO NOT defeat the purpose of the polarised or grounding type plug. A polarised
plug has two blades with one wider than the other. A grounding type plug has two blades and a
third grounding prong. The wide blade or the third prong are provided for your safety. When the
provided plug does not fit into your outlet, consult an electrician for replacement of the obsolete outlet.
Follow all instructions and heed all warnings
KEEP THESE INSTRUCTIONS !
2
MG15 Hbk multi 230V
1/3/02
9:55 am
Page 3
MG15CD Front Panel Features
Clean
Overdrive
EQ
MG15CD
SERIES
0
10
OD
0
10
0
10
0
10
0
10
0
10
CD IN &
EMULATED
EMULATED
LINE OUT HEADPHONES
SELECT
INPUT
VOLUME
ENGLISH
1
2
3
GAIN
VOLUME
BASS
CONTOUR
TREBLE
4
5
6
7
8
9
10
11
POWER
12
MG15CDR Front Panel Features
Clean
Overdrive
EQ
Reverb
MG15CDR
SERIES
0
10
OD
0
10
0
10
0
10
0
10
0
10
0
10
CD IN &
EMULATED
EMULATED
LINE OUT HEADPHONES
SELECT
INPUT
1
VOLUME
2
3
GAIN
VOLUME
BASS
CONTOUR
TREBLE
4
5
6
7
8
LEVEL
13
9
MG15DFX Front Panel Features
1
2
3
4
5
6
7
8
10
11
POWER
12
10
14
15
9 11
12
1. INPUT jack
3. OD (Overdrive) SELECT switch
Use a good quality (screened) guitar cable to
plug your guitar in here.
Depressing the Overdrive Select Switch will
engage the Overdrive Channel.
2. Clean VOLUME control
4. Overdrive GAIN control
When the OD Select switch is ‘out’, this
control adjusts the volume of the Clean
Channel. At low settings the sound will be very
clean with a bell-like ring. Turning this control
above half way will introduce a desirable,
bluesy distortion as the power amplifier is
driven into ‘crunch mode’.
Turning up the Overdrive Gain Control will
increase the amount of distortion generated in
the Overdrive channel. Low gain settings will
produce classic rock and blues tones. Crank
the Gain for fat and aggressive sounds that are
perfect for soloing or hard rock and nu-metal
riffing.
3
MG15 Hbk multi 230V
1/3/02
9:55 am
Page 4
5. Overdrive VOLUME control
11. EMULATED HEADPHONES jack
Amazingly enough, this control adjusts the
volume of the Overdrive channel! The louder
this channel is set, the ‘looser’ the amplifier will
sound and feel. This behaviour is exactly what
a good all-valve amplifier does and is a result
of our proprietary FDD circuitry.
Plug your headphones here for a killer
speaker emulated sound! Doing this mutes
your MG15’s internal speaker for ‘silent’
practice.
12. POWER Switch & LED
The power switch turns your amplifier on and
off. The LED will be lit when your amplifier is on
and will not be lit when the amplifier is switched
off.
6. EQ BASS control
This control affects the bass or bottom end of
your sound. Increasing the bass control will add
warmth to your clean and balls to your
overdrive tones.
7. EQ CONTOUR control
This highly effective tone control works by
radically modifying the mid-range (body). The
tone can range from traditional and woody
sounding (setting at 10), to balls-to-the-wall
(setting at midway), to aggressive, ‘scooped’
and modern (setting at 0)…and all points inbetween.
Please ensure the amplifier is switched off
and unplugged from the mains electricity
supply before being moved.
13. Reverb LEVEL control
(MG15CDR only)
Increasing the Reverb Level control will mix
more of the naturally voiced spring reverb
signal into your sound – as you’ll find, you can
go from subtle to surf at the mere twist of this
control!
8. EQ TREBLE control
This control affects the treble or top end of
your sound. Increasing the amount of treble will
give a glassy edge to your clean sounds and
increase the definition on low gain overdrive or
the amount of aggressive ‘fizz’ and ‘cut’ on high
gain tones.
9. FDD (Frequency Dependant
Damping) Switch
Marshall’s proprietary FDD circuit accurately
mimics the way an all-valve amplifier interacts
with the loudspeaker and adds a width and
depth to your sound which has been
unachievable in an affordable solid-state
amplifier…until now!
10. CD IN & EMULATED LINE OUT
jack
The MG15’s cleverly combine the Line Out
and CD Input functions. If you want to jam to
your favourite CD or tape, merely connect the
headphone output of your CD or tape player
here, adjust the CD / TAPE player’s volume to
match that of your guitar and ‘hey-presto’ –
you’ve got the perfect ‘play-along’ practice
system. Alternatively, you can use this socket
to connect the MG15 to your multi-track
recording machine and you’ll get a great
speaker emulated guitar sound direct to disk or
tape.
HELPFUL HINT: for ‘silent’ recording merely
plug an unconnected jack plug into the
headphone socket and you’ll disconnect the
MG15’s internal speaker.
4
ENGLISH
Note: Before connecting to the mains
electricity supply, always ensure that your
electricity supply is compatible with your
amplifier, as detailed on the rear panel.
MG15 Hbk multi 230V
1/3/02
9:55 am
Page 5
14. Digital FX PRESET / ADJUST control (MG15DFX only)
This control serves a dual purpose. Not only does it allow you to select one of the four types of
effects on offer (Reverb (RVB), Delay (DLY), Chorus (CHR) or Flange (FLG)), it also allows you to
change a parameter as you sweep it through each of the four effect segments. The parameter you
can adjust for each of the four effects is shown below:
ENGLISH
Effect
Parameter
(adjustment*)
Description
Reverb (RVB)
Reverb Decay Time
(from short to long)
A natural sounding Reverb that never sounds
harsh or grainy. Short Reverb times produce a
plate type effect while longer Reverb times
produce much larger sounding hall-type effects.
Delay (DLY)
Delay Time
(from short to long)
Short Delay Times will automatically have less
repeats for groovy surf tones. Increasing the Delay
Time automatically increases the number of
repeats for a much more atmospheric effect.
Chorus (CHR)
Speed
(from slow to fast)
At slow Speeds a mellow phase-like sweep
occurs. As the Speed is increased a more
traditional chorus effect is heard. At maximum
Speed, a psychedelic vibrato results.
Flange (FLG)
Speed
(from slow to fast)
At slow Speed settings the amount of
regeneration is automatically increased for huge
‘jet engine-like’ sweeps. As the speed is increased
the regeneration decreases to produce a lush,
natural sounding flange effect. When the Speed is
maxed out, a fast vibrato results.
*as you turn the control clockwise through the segment dedicated to that effect
15. Digital FX LEVEL control (MG15DFX only)
This controls how much of the chosen effect gets mixed in with your unaffected (dry) guitar tone.
Want to hear more of the DFX you’ve just dialled in? Then simply turn this up!
5
MG15 Hbk multi 230V
1/3/02
9:58 am
Page 26
MG15
MG
15
SERIES
Technical Specification
Especificaciones técnicas
Technische Daten
Caractéristiques techniques
Power Output
15W RMS into 8Ω
15W RMS sobre 8Ω
15W RMS an 8Ω
15W RMS sous 8 ohms
15W RMS / 8Ω
1MΩ
1MΩ
1MΩ
1MΩ
CD Input • Input impedance
3.3kΩ
Impedancia de entrada de CD
CD Input • Eingangsimpedanz
Impédance d'entrée CD
3.3kΩ
3.3kΩ
3.3kΩ
3.3kΩ
Emulated Output • Level
-10dBV
Nivel de salida de línea simulada
Emulated Output • Ausgangspegel
Niveau de sortie
-10dBV
-10dBV
-10dBV
-10dBV
7.2kg
Peso
Gewicht
Poids
7.2kg
7.2kg
7.2kg
7.2kg
Size (mm)
350mm x 350mm x 185mm
Tamaño (mm)
Maße (mm)
Taille (mm)
350mm x 350mm x 185mm
350mm x 350mm x 185mm
350mm x 350mm x 185mm
350mm x 350mm x 185mm
26
Techniques
Weight
Technische
1MΩ
Impedancia de entrada principal de guitarra
Guitar • Input Eingangsimpedanz
Impédance d'entrée
Técnicas
Main Guitar • Input Impedance
Technical
Potencia de salida
Ausgangsleistung
Puissance de sortie
MG15 Hbk multi 230V
1/3/02
9:54 am
Page A
Here follows four sample settings to act as starting
points from which to develop your own sounds.
Suggested Settings
Configuraciones que sugerimos
Soundvorschläge
Exemples de Réglages
Bright Clean
Clean
0
N.B. Volume should be adjusted to taste.
Overdrive
10
OD
0
10
0
EQ
10
0
10
0
10
0
10
SELECT
INPUT
VOLUME
GAIN
VOLUME
BASS
CONTOUR
TREBLE
Out
Warm Clean
Clean
0
Overdrive
10
OD
0
10
0
EQ
10
0
10
0
10
0
10
SELECT
INPUT
VOLUME
GAIN
VOLUME
BASS
CONTOUR
TREBLE
Blues / Crunch
Out
Clean
0
Overdrive
10
OD
0
10
0
EQ
10
0
10
0
10
0
10
SELECT
INPUT
VOLUME
GAIN
VOLUME
BASS
CONTOUR
TREBLE
In
Overdrive
EQ
Metal
Clean
0
10
OD
0
10
0
10
0
10
0
10
0
10
SELECT
INPUT
VOLUME
GAIN
VOLUME
BASS
CONTOUR
TREBLE
In
Marshall Amplification plc
Denbigh Road, Bletchley, Milton Keynes, MK1 1DQ, England
Tel : [01908] 375411 Fax : [01908] 376118
www.marshallamps.com
Whilst the information contained herein is correct at the time of publication, due to our policy of constant improvement
and development, Marshall Amplification plc reserve the right to alter specifications without prior notice.
230V
MG15 Hbk multi 230V
1/3/02
9:56 am
Page 11
Von Jim Marshall
Ich möchte Dir ganz persönlich für die Wahl eines
unser neuen 15 Watt Combos danken - den
MG15CD, MG15CDR oder den MG15DFX.
DEUTSCH
Da ich selbst Musiker bin, verstehe ich, wie wichtig es ist, den richtigen Sound zu finden. Ich möchte
Dir helfen, Dein Potential zu erkennen - ob Du nun Einsteiger bist, oder auch ein fortgeschrittener
Gitarrist. Mit diesem Gedanken gab ich unserem erfahrenen Team von technischen Entwicklern und
Sounddesignern die Aufgabe, eine neue Generation von Verstärkern zu bauen, die einerseits
bezahlbar sein sollen, andererseits aber auch den typischen Marshall Sound für Dich bereithalten.
Die neuesten Schaltungstechnologien nutzend (einige davon wurden für die beliebte AVT Serie
entwickelt) setzt die MG Serie einen neuen Standard für Preis- / Leistungsverhältnis bei
Gitarrenverstärkern. Die Endstufensektion der MG15 Modellreihe zum Beispiel arbeitet mit der FDD
(Frequency Dependant Damping) Technologie - die einzigartige "frequenzabhängige Dämpfung"
sorgt dafür, daß die für authentischen Gitarrensound so wichtige Ankoppelung des Lautsprechers der
eines Vollröhrenverstärkers ganz genau nachempfunden wird. Das Ergebnis ist eine Soundqualität,
die man sonst von einem Verstärker ohne Röhren nicht erwarten würde.
Ob dieser Amp nun Dein erster Marshall ist, oder die neueste Ergänzung Deines Amp-Arsenals der Ton und das Spielgefühl dieses kompakten, robusten Combos bringt nur das Beste hervor - zu
Hause oder beim Aufwärmen backstage!
Wie alle Verstärker in der neuen MG-Serie wurde auch die MG15 Reihe zu 100% in Großbritannien
entwickelt. Unsere strenge Qualitätskontrolle stellt darüber hinaus sicher, daß er Deine Erwartungen
an die Funktionalität und Zuverlässigkeit eines Marshall Produktes voll und ganz erfüllt.
Ich wünsche Dir viel Erfolg mit Deinem neuen Amp. Wilkommen in der Marshall Familie.
Dein,
11
MG15 Hbk multi 230V
!
1/3/02
9:56 am
Page 12
WARNUNG! - Wichtige Sicherheitshinweise
WARNUNG: Diese Gerät muß mit Schutzleiter betrieben werden!
A BITTE diese Bedienungsanleitung vor der Inbetriebnahme sorgfältig lesen.
B IMMER das mitgelieferte Netzkabel verwenden - bei Beschädigung bitte den Händler kontaktieren.
Hinweis für Geräte mit geschlossener Rückwand und fest montiertem
Netzkabel: Wenn das Gerät transportiert wird, sollte das Netzkabel
wie in der Zeichnung beschrieben aufgewickelt und unter den
Tragegriff geklemmt werden, um Beschädigung zu vermeiden.
C NIEMALS die Sicherungen überbrücken. Beim Ersetzen unbedingt auf korrekten Sicherungswert
achten!
D Jegliche Servicearbeiten am Gerät sind ausschließlich authorisiertem Servicepersonal vorbehalten
- das betrifft auch das Wechseln von Sicherungen. Reparaturen sind nur dann nötig, falls das
Netzkabel defekt ist, Flüssigkeit in das Gerät gelaufen ist oder Gegenstände hineingefallen sind,
es Feuchtigkeit ausgesetzt wurde oder nicht normal funktioniert bzw. gestürzt wurde.
E
NIEMALS einen Verstärker in feuchter oder nasser Umgebung betreiben.
F
Während Gewittern oder falls da Gerät länger nicht benutzt wird IMMER den Netzstecker ziehen!
G Schütze das Netzkabel vor Schäden durch Abknicken, Zerreissen und Einschnitten - das gilt
besonders für die Stecker und die Gehäusedurchführung.
➲ Hinweis: Dieses Gerät wurde nach den Richtlinien der EMC Prüfung (Anhänge E1, E2 und E3
EN 55103-1/2) und den Anweisungen für Niederspannungsgeräte der E.U getestet und hat diese
bestanden.
➲ NUR FÜR EUROPA - HINWEIS: Der maximale Einschaltstrom für den MG15CD, MG15CDR und
MG15DFX liegt bei 2.5 Ampère.
➲ HINWEIS: Es wird empfohlen daß alle Audiokabel, die zum Anschluß des MG15CD, MG15CDR &
MG15DFX dienen, von hoher Qualität und sauber abgeschirmt sind. Sie sollten zudem nicht länger als
10m sein.
➲ WARNUNG: Lüftungsgitter bzw. Kühlflächen des Gerätes dürfen nicht abgedeckt werden und ein
freier Luftzug um das Gerät ist bei Betrieb sicher zu stellen.
FÜR USA: Mißachte niemals den Sinn gepolter oder geerdeter Anschlüsse. Ein gepolter
Anschluß weist zwei Kontaktzungen unterschiedlicher Stärke auf. Ein geerdeter Anschluß hat
zwei Kontaktzungen und zusätzliche Kontakte für die Erdung.Diese dienen Deiner Sicherheit. Sollte der
Stecker nicht in die Anschlußbuchse passen, so kontaktiere einen Techniker um den veralteten
Anschluß auszutauschen.
DIESE HINWEISE GUT AUFBEWAHREN!
12
DEUTSCH
➲ VORSICHT: Jegliche Änderungen oder Modifikationen am Gerät, die nicht ausdrücklich von den für
die Befolgung der Vorschriften Verantwortlichen genehmigt wurde, untersagt die weitere Benutzung des
Gerätes.
MG15 Hbk multi 230V
1/3/02
9:56 am
Page 13
MG15CD Features auf der Frontplatte
Clean
Overdrive
EQ
MG15CD
SERIES
0
10
OD
0
10
0
10
0
10
0
10
0
10
CD IN &
EMULATED
EMULATED
LINE OUT HEADPHONES
SELECT
INPUT
VOLUME
1
2
3
GAIN
VOLUME
BASS
CONTOUR
TREBLE
4
5
6
7
8
9
10
11
POWER
12
MG15CDR Features auf der Frontplatte
Clean
Overdrive
EQ
Reverb
MG15CDR
SERIES
0
10
OD
0
10
0
10
0
10
0
10
0
10
0
10
CD IN &
EMULATED
EMULATED
LINE OUT HEADPHONES
SELECT
INPUT
1
VOLUME
2
3
GAIN
VOLUME
BASS
CONTOUR
TREBLE
4
5
6
7
8
LEVEL
13
9
11
12
10
DEUTSCH
MG15DFX Features auf der Frontplatte
10
POWER
1
2
3
4
5
6
7
1. Input Buchse
8
14
15
9 11
12
3. OD (Overdrive) SELECT
Wahlschalter
benutze nur hochwertige, abgeschirmte
Gitarrenkabel, um hier Deine Gitarre
anzuschließen.
Beim Drücken des OD Wahlschalters wird der
Overdrive Kanal aktiviert - also fertig machen
zum Losrocken!
2. Clean Volume Regler
Wenn der "OD" Wahlschalter deaktiviert ist,
wird hier die Lautstärke des Cleankanals
eingestellt. Bei kleineren Einstellungen wird der
Sound sehr sauber und verzerrungsfrei sein.
Beim Aufdrehen nimmt langsam die
Übersteuerung zu und es entsteht eine weiche,
bluesige Verzerrung, da die Endstufe in die
Sättigung geht.
13
4. Overdrive Gain Regler
Beim Aufdrehen des Overdrive Gain Reglers
wird der Verzerrungsgrad für diesen Kanal
eingestellt. Kleine Gaineinstellungen sind
optimal für klassischen Rock und Blues. Wenn
Du das gain weiter aufdrehst bekommst Du die
typischen Sounds für harten Rock und NuMetal.
MG15 Hbk multi 230V
1/3/02
9:56 am
Page 14
5. Overdrive Volumen Regler
Hier wird die Lautstärke für den Overdrive
Kanal eingestellt. Je lauter der Amp eingestellt
wird, umso dynamischer reagiert der Amp dieses Verhalten ist genau das, welches in
guter Röhrenverstärker an den Tag legt - und
resultiert nicht zuletzt aus der FDD Schaltung in
der Endstufe.
6. EQ BASS Regler
Dieses Poti beeinflußt den Bassbereich
Deines Sounds. Beim Aufdrehen wird dieser
betont.
7. EQ Contour Regler
Dieser besonders effektive Regler funktioniert
für beide Kanäle des Amps. Er verändert die
Mittenwidergabe des Verstärkers radikal, indem
beim Regeln zusätzlich auch die Bandbreite
dieses Filters verändert wird. Der Grundsound
des Amps kann so von traditionellen, knackigen
Charakteren bis zu aggressiven modernen
"scooped" Metal Sounds und allen Nuancen
dazwischen variiert werden.
8. EQ TREBLE Regler
9. FDD (Frequency Dependant
Damping) Schalter
Marshalls einzigartige FDD Schaltung bildet
die Klangentwicklung in einer Röhrenendstufe
nach. Bei aktiviertem Schalter passiert das
Zusammenspiel von Endstufe und
Lautsprecher etwa so, wie in einem kleinen
Röhrencombo, wodurch ein besonders warmer
und offener Klangcharakter erzeugt wird.
Der MG15 kombiniert die Line Out Funktion
mit der CD-Input Funktion. Wenn Du zu Deiner
Lieblings CD spielen möchtest, schließt Du hier
einfach den Kopfhörerausgang Deines CDPlayers an, stellst am Player die Lautstärke so
ein, daß sie zu deiner Gitarre passt - und ab
geht's mit dem perfekten Playalong-System...
Alternativ kannst Du diesen Anschluß auch
benutzen, um den MG15 an einen
Mehrspurrecorder oder ein Mischpult
anzuschließen. HINWEIS: Für "lautlose"
Aufnahmen benutzt Du am besten einen
Kopfhörer am Headphones Output, welcher
den Speaker des MG15 abschaltet.
11. EMULATED HEADPHONES
Buchse
Schließe hier Deinen Kopfhörer an - und Du
erhältst einen Kopfhörersound mit SpeakerEmulation - ideal zum "lautlosen" Üben.
12. Netzschalter mit LED
Der Netschalter dient zum Ein- und
Ausschalten des Gerätes, wobei die LED den
aktiven Betriebszustand anzeigt.
Hinweis: Vor dem Anschluß an eine
Netzsteckdose unbedingt überprüfen, ob die
vorhandene Netzspannung mit dem auf der
Rückseite des Gerätes aufgedrucktem Wert
übereinstimmt.
Stelle sicher, daß das Gerät vor einem
Transport ausgeschaltet und nicht mehr mit der
Netzsteckdose verbunden ist.
13. Reverb LEVEL Regler (nur beim
MG15CDR)
Beim Aufdrehen des Reverb Level Reglers
wird der Soundanteil des natürlich klingenden
Federhall-Effektes (und damit die "räumliche
Tiefe" des Klangbildes erhöht.
14
DEUTSCH
Bestimmt den Höhenanteil Deines Sounds.
Beim Aufdrehen werden Deine Cleansounds
"knackiger", angezerrte Sounds werden
definierter und bei Sounds mit viel Gain
entstehen "sägend" durchdringende
Solosounds.
10. CD IN & EMULATED LINE OUT
Buchse
MG15 Hbk multi 230V
1/3/02
9:56 am
Page 15
14. Digital FX PRESET / ADJUST Regler (nur beim MG15DFX)
Dieser Regler ermöglicht Dir zwei Dinge: Erstens wählst Du hier zwischen den verschiedenen
Effektarten aus (Reverb (RVB), Delay (DLY), Chorus (CHR) oder Flanger (FLG)), zweitens regelst
Du damit den wichtigsten Parameter (jeweils die Zeitvariable) des entsprechenden Effektes. Die
Auswirkung auf Deinen Sound beschreiben wir Dir in der folgenden Tabelle:
Effekt
Reverb (RVB)
Delay (DLY)
Parameter
- Veränderung*
Nachhall-Zeit des
Reverbs
(kurz bis lang)
Delayzeit
(Verzögerungszeit
DEUTSCH
kurz bis lang)
Beschreibung
Ein natürlicher Hallsound, der niemals rau,
sondern stets warm und weich klingt. Kurze
Hallzeiten klingen nach kleinen Räumen, große
Hallzeiten klingen nach größeren Räumen.
Kurze Delayzeiten haben kurz bis lang) für
knackige Surf-Sounds |auch automatisch eine
|kleinere Wiederholungsrate. Mit der Erhöhung der
Delayzeit wird auch die Anzahl der Wiederholungen
erhöht, um so besonders atmosphärische EchoEffekte zu ermöglichen.
Chorus (CHR)
Speed
(Modulationsgeschwindigkeit
von langsam bis
schnell)
Bei kleinen Einstellungen ist der Effekt weich und
phaser-ähnlich. Bei größerer Einstellung wird der
Chorus Effekt traditionell warm und weich, um bei
Maximalstellung in psychedelische Vibratosounds
zu überblenden.
Flange (FLG)
Speed
(Modulationsgeschwindigkeit
von langsam bis
schnell)
Bei langsamer Modulation wird automatisch das
langsam bis schnell) "Feedback" erhöht, so dass|die
typischen "Jet-Sounds" produziert werden. Wird die
Modulationsgeschwindigkeit erhöht, so wird für einen
vollen, natürlich klingenden Flanger-Effekt das
Feedback |zurückgenommen. Bei vollem Speed wird
der Effekt zu einem schnellen Vibrato-Sound.
*Diese Angabe bezieht sich jeweils auf das betreffende Effektsegment beim Drehen des Reglers
nach rechts.
15. Digital FX LEVEL Regler (nur beim MG15DFX)
Hier wird der Effektanteil im Verhältnis zum effektfreien Originalsignal zugemischt. Wenn Du mehr
von dem eingestellten Effekt hören möchtest, dann drehe diesen Regler einfach auf.
15
MG15 Hbk multi 230V
1/3/02
9:58 am
Page 26
MG15
MG
15
SERIES
Technical Specification
Especificaciones técnicas
Technische Daten
Caractéristiques techniques
Power Output
15W RMS into 8Ω
15W RMS sobre 8Ω
15W RMS an 8Ω
15W RMS sous 8 ohms
15W RMS / 8Ω
1MΩ
1MΩ
1MΩ
1MΩ
CD Input • Input impedance
3.3kΩ
Impedancia de entrada de CD
CD Input • Eingangsimpedanz
Impédance d'entrée CD
3.3kΩ
3.3kΩ
3.3kΩ
3.3kΩ
Emulated Output • Level
-10dBV
Nivel de salida de línea simulada
Emulated Output • Ausgangspegel
Niveau de sortie
-10dBV
-10dBV
-10dBV
-10dBV
7.2kg
Peso
Gewicht
Poids
7.2kg
7.2kg
7.2kg
7.2kg
Size (mm)
350mm x 350mm x 185mm
Tamaño (mm)
Maße (mm)
Taille (mm)
350mm x 350mm x 185mm
350mm x 350mm x 185mm
350mm x 350mm x 185mm
350mm x 350mm x 185mm
26
Techniques
Weight
Technische
1MΩ
Impedancia de entrada principal de guitarra
Guitar • Input Eingangsimpedanz
Impédance d'entrée
Técnicas
Main Guitar • Input Impedance
Technical
Potencia de salida
Ausgangsleistung
Puissance de sortie
MG15 Hbk multi 230V
1/3/02
9:54 am
Page A
Here follows four sample settings to act as starting
points from which to develop your own sounds.
Suggested Settings
Configuraciones que sugerimos
Soundvorschläge
Exemples de Réglages
Bright Clean
Clean
0
N.B. Volume should be adjusted to taste.
Overdrive
10
OD
0
10
0
EQ
10
0
10
0
10
0
10
SELECT
INPUT
VOLUME
GAIN
VOLUME
BASS
CONTOUR
TREBLE
Out
Warm Clean
Clean
0
Overdrive
10
OD
0
10
0
EQ
10
0
10
0
10
0
10
SELECT
INPUT
VOLUME
GAIN
VOLUME
BASS
CONTOUR
TREBLE
Blues / Crunch
Out
Clean
0
Overdrive
10
OD
0
10
0
EQ
10
0
10
0
10
0
10
SELECT
INPUT
VOLUME
GAIN
VOLUME
BASS
CONTOUR
TREBLE
In
Overdrive
EQ
Metal
Clean
0
10
OD
0
10
0
10
0
10
0
10
0
10
SELECT
INPUT
VOLUME
GAIN
VOLUME
BASS
CONTOUR
TREBLE
In
Marshall Amplification plc
Denbigh Road, Bletchley, Milton Keynes, MK1 1DQ, England
Tel : [01908] 375411 Fax : [01908] 376118
www.marshallamps.com
Whilst the information contained herein is correct at the time of publication, due to our policy of constant improvement
and development, Marshall Amplification plc reserve the right to alter specifications without prior notice.
230V
new instructions 9/29/04 2:44 PM Page 1
ENGLISH
FRANCAIS
ESPAÑOL
DEUTSCH
Méthode d’accordage
Afinación
Arbeitsweise für das Stimmen
The MT-1 Guitar and Bass Tuner is designed for use in a wide variety of
applications. It can be used with 6 and 7 string guitar, bass and with
acoustic instruments not fitted with a pick-up, thanks to the built-in
microphone and SOUND function. In addition to tuning to concert pitch
(A=440Hz), it supports flat tuning up to 5 semitones.
The following instructions describe the correct tuning procedure for its two
main modes, METER and SOUND.
Le Tuner MT-1 Basse et Guitare est conçu pour diverses applications. Il peut
être utilisé avec des guitares et basses à 6 et 7 cordes et avec des
instruments acoustiques sans capteurs grâce au micro incorporé et à la
fonction SOUND. En plus de s’accorder à la tonalité de concert (La=440Hz),
il permet l’accordage bémol jusqu’à 5 demi-tons.
Les instructions suivantes décrivent la procédure d’accordage appropriée
pour ses deux modes principaux METER (indicateur) et SOUND (son).
• Meter Mode.
• Mode Indicateur (Meter).
El afinador de guitarras y bajos MT-1 está diseñado para que lo puedas
utilizar en una gran variedad de aplicaciones. Puede emplearse con bajos y
guitarras de 6 y 7 cuerdas así como con instrumentos acústicos sin pastilla
gracias a su micrófono incorporado y a su función SOUND. Además de
afinar a tono de concierto (La (A)=440Hz), permite una afinación de hasta 5
semitonos más grave que la estándar.
Estas instrucciones describen los dos modos principales, METER y SOUND,
del procedimiento correcto de afinación.
Das MT-1 Gitarren- und Bass-Stimmgerät ist für die Verwendung bei einer
großen Vielfalt von Anwendungen bestimmt. Es kann für Gitarren mit 6 und
7 Saiten, Bass und für akustische Instrumente verwendet werden, die nicht
mit einem Spulenelement ausgestattet sind, da es mit einem eingebauten
Mikrophon und der SOUND-Funktion versehen ist. Zusätzlich zum
Kammerton (A=440Hz) unterstützt es auch die Versatzstimmung um bis zu 5
Halbtöne.
Die folgenden Anweisungen beschreiben die richtige Vorgehensweise für das
Stimmen in den beiden Hauptmodi METER und SOUND.
Meter Mode allows you to tune your instrument using the VU style meter.
1. If you are using an instrument which is fitted with a pick-up, such
as an electric guitar, connect the instrument to the INPUT jack of
the MT-1.
Alternatively, instruments without a pick-up, such as a standard
acoustic guitar, can be tuned using the MT-1’s built-in
microphone. In this case do not connect a lead to the INPUT.
When using the built-in microphone, it is essential that you place
your instrument as close to the tuner as possible.
2. To start tuning, press the power ON/OFF switch.
To conserve the batteries the tuner will automatically turn itself
off 3 minutes after the last ‘in tune’.
3. Next select the instrument you would like to tune using the
GUITAR / BASS button. The notes for each selection are shown
below.
GUITAR : 7B, 6E, 5A, 4D, 3G, 2B, 1E
BASS : LB, 4E, 3A, 2D, 1G, HC (LB: LOW B, HC: HIGH C).
4. Ensure the volume control is turned fully up on the guitar or bass. Play a
single note and the name of the nearest note will appear in the LCD
screen. Turn the tuning peg until the name of the string you are tuning
appears in the display.
5. Now the string must be fine tuned to exactly the correct pitch. The
string will be perfectly in tune when the correct string name appears in
the screen, the needle is in the middle of the meter and only the green
centre LED is illuminated.
Le mode indicateur vous permet d'accorder votre instrument à l'aide de
l'indicateur de style VU.
1. Si vous utilisez un instrument équipé d’un capteur, une guitare électrique
par exemple, connectez l’instrument à la prise INPUT (entrée) du MT-1.
Pour ce qui est des instruments sans capteurs, comme une guitare
acoustique standard, ils peuvent être accordés en utilisant le micro
incorporé du MT-1. Dans ce cas, ne connectez aucun fil à INPUT.
Lorsque vous utilisez le micro incorporé, placez votre instrument aussi
près que possible du tuner.
2. Pour commencer à accorder, appuyez sur l’interrupteur ON/OFF.
Pour préserver les batteries, le tuner s’éteint automatiquement 3 minutes
après le dernier accordage.
3. Sélectionnez le type d’instrument à accorder à l’aide du sélecteur GUITAR
/ BASS. Les notes pour chaque sélection sont indiquées ci-dessous.
GUITARE
: 7B, 6E, 5A, 4D, 3G, 2B, 1E
BASSE
: LB, 4E, 3A, 2D, 1G, HC (LB: Si bas, HC: Dos haut).
Remarque : A = La, B = Si, C = Do, D = Ré, E = Mi, F = Fa, G = Sol
4. Assurez-vous que le volume sur la guitare/basse est au maximum. Jouez
une seule note et le nom de la note s’en approchant le plus apparaîtra sur
l’affichage LCD. Tournez la cheville de tension jusqu’à ce que le nom de la
corde qui vous êtes en train d’accorder s’affiche.
5. A présent, la corde doit être accordée avec précision à la tonalité
appropriée. La corde sera parfaitement accordée une fois que le nom de
corde correspondant s’affichera, que l’aiguille se placera au milieu de
l’indicateur et que seule la LED verte centrale s’illuminera.
Tuning Procedure
AMPLIFICATION
MT-1 GUITAR & BASS TUNER
OWNER’S MANUAL • MANUEL D’UTILISATION
MANUAL DEL PROPIETARIO • BEDIENUNGSANLEITUNG
Marshall Amplification plc
Denbigh Road, Bletchley, Milton Keynes, MK1 1DQ, England.
Tel: +44 (0)1908 375411 Fax: +44 (0)1908 376118
Whilst the information contained herein is correct at the time of publication, due to our policy of
constant improvement and development, Marshall Amplification plc reserve the right to alter
specifications without prior notice.
Controls & functions / Commandes & fonctions
Controles y funciones / Regler & Funktionen /
9
3
10
•
▼
•
4 5 6
7
1
2
8
•
a
c
•
If the string is sharp (too high in pitch) then the needle will be to
the right of the centre of the meter and the right hand LED will be
lit. The string should be slowly loosened until the needle is in the
centre of the meter and only the green LED is illuminated.
•
If the pitch of the string is out of range a double needle will appear to
the left or right of the display.
•
Note: It is usually best to slowly raise the pitch of a string into tune
as opposed to lower it as, for mechanical reasons, it is more likely
to stay in tune this way.
b
d
1. [POWER] on/off switch • [POWER] interrupteur on/off • Interruptor de
encendido [POWER] • [POWERSTROM] An-/Aus-Schalter •
2. INPUT jack • prise INPUT • Conector INPUT • INPUT-Buchse • INPUT
3. Display:
a. Note name
b. Flat indicator
c. GUITAR/BASS indicator d. Meter
Affichage:
a. Nom de la note b. Indicateur bémol
c. Indicateur GUITAR/BASS d. aiguille
Pantalla:
a. Nombre de la nota b. Indicador Flat
c. Indicador GUITAR/BASS d. Medidor
Display:
a. Notenname b. Nullwertanzeige
c. Anzeige GUITAR/BASS d. Messskala
a.
b.
c. GUITAR/BASS
d.
4. [GUITAR/BASS] switch • Sélecteur [GUITAR/BASS] • Interruptor
[GUITAR/BASS] • Umschalter [GUITAR/BASS] • [GUITAR/BASS]
5. [FLAT] switch • Sélecteur bémol [FLAT] • Interruptor [FLAT] • [FLAT]
Taste • [FLAT]
6. [SOUND] switch • Sélecteur de son [SOUND] • Interruptor [SOUND] •
[SOUND] Taste • [SOUND]
7. Built-in microphone • Micro incorporé • Micrófono incorporado •
Eingebautes Mikrophon •
8. Speaker • Haut-parleur • Altavoz • Lautsprecher •
9. Tuning guide LEDs • DEL de guide d’accordage • LEDs de afinación •
Abstimm- LEDs •
10.Tilt slit
The slit located on the back of the MT-1 is used to tilt the tuner. Place a
card or similar object in the slit. (Do not use a valuable card.)
- Fente d’inclinaison
La fente située à l’arrière du MT-1 est utilisée pour incliner le tuner. Insérez
une carte ou un objet similaire dans la fente. (N’utilise pas une carte de valeur)
- Hendidura de inclinación
La hendidura de la parte trasera del MT-1 se emplea para inclinar el afinador.
Coloca una tarjeta o un objeto similar en la hendidura. (No uses una tarjeta
válida).
- Neigeschlitz
Der Schlitz an der Rückseite des MT-1 wird benutzt, um das Stimmgerät
neigen zu können. Stecken Sie eine Karte oder ein ähnliches Objekt in den
Schlitz. (Benutzen Sie keine wertvolle Karte.)
-
If the string is flat (too low in pitch) then the needle will be to the
left of centre of the meter and the left hand red LED will be lit.
The string should be slowly tightened until the needle is in the
centre of the meter and only the green LED is illuminated.
Si la corde est trop basse en tonalité, l’aiguille se place à gauche du
centre de l'indicateur et la LED rouge de gauche s'allume. Resserrez
légèrement la corde jusqu’à ce que l’aiguille se place au
centre et que la LED verte centrale s’allume.
Si la tonalité de la corde est trop aigue, l’aiguille se place à droite du
centre et la LED de droite s’allume. Desserrez légèrement la corde
jusqu’à ce que l’aiguille se place au milieu et que le LED verte seule
s’allume.
Si la tonalité de la corde est très éloignée de la tonalité correcte, une
double aiguille apparaît à droite ou à gauche de l’affichage.
Remarque: Il est recommandé de monter doucement la tonalité de la corde
pour l’accorder et non de la baisser, puisque pour des raisons mécaniques, il
est plus probable que la corde reste accordée en procédant ainsi.
• Mode Son (Sound).
• Sound Mode.
The Sound Mode of the MT-1 allows you to tune an instrument that does not
have a pick-up (such as a traditional acoustic guitar). The MT-1 can generate
a reference tone for each string so you can tune the instrument ‘by ear’ as
you compare the reference note generated with the pitch of the string to be
tuned.
1. Select the setting as described in 2 & 3 of Meter Mode.
2. Press the SOUND switch until the name of the string that you wish
to tune appears in the screen.
When set to GUITAR the pitch generated by the MT-1 will be one
octave higher than the actual pitch of your instrument. When in
BASS mode the pitch will be two octaves higher than that of your bass
guitar.
3. Play the single string corresponding to the note selected on the MT-1.
If the pitch of the string played is flat the string will need to be
slowly tightened, if the pitch of your instrument is sharp then the
corresponding string should be gently loosened.
• Flat tuning.
Flat tuning is accommodated up to 5 flats from standard pitch.
1. As previously described, first select in the display the name of the
string to be tuned.
2. Press the flat key to the number of semitones by which you wish to
detune.
will be displayed in the screen.
3. As previously discussed, tune the instrument string to the pitch
selected.
:
12 note equal tempered.
Weight
:
86g
Dimensions : 100mm x 61mm x 18mm
*Specifications and appearance are subject to change, without notice,
for improvement.
Installing the Batteries
Press the tabs on the side of the tuner and carefully remove the back as
shown in the accompanying diagram. Be careful to insert the batteries to
correct polarity as displayed on the battery cavity.
NOTE: If the unit malfunctions, turn the power off and then on. If this does
not resolve the problem remove and then reinstall the batteries.
• Meter-Modus.
Gracias al modo Meter puedes afinar tus instrumentos mediante un medidor
tipo VU.
1. Si usas un instrumento que cuente con una pastilla, por ejemplo una
guitarra eléctrica, conecta el instrumento al conector INPUT del MT-1.
En el caso de que el instrumento no disponga de pastilla, por ejemplo una
guitarra acústica, puedes afinarlo gracias al micrófono incorporado. En
este caso no conectes nada a INPUT.
Cuando uses el micrófono incorporado, es muy importante que acerques
lo máximo posible el instrumento al afinador.
2. Para comenzar la afinación, pulsa el interruptor de encendido.
Con el fin de ahorrar energía, este afinador se apaga automáticamente
después de 3 minutos sin afinar.
3. Selecciona ahora el instrumento que quieres afinar mediante el botón
GUITAR / BASS. A continuación indicamos las notas de cada selección.
GUITARRA : 7Si (7B), 6Mi (6E), 5La (5A), 4Re (4D), 3Sol (3G), 2Si (2B), 1Mi (1E)
BAJO
: Si bajo (LB), 4Mi (4E), 3La (3A), 2Re (2D), 1Sol (1G), Do alto (HC).
4. Asegúrate de que el volumen de la guitarra o el bajo esté al máximo. Al
tocar una sola nota aparecerá el nombre de la nota más parecida en la
pantalla LCD. Gira la clavija de la cuerda hasta que el nombre de la cuerda
que estés tocando aparezca en la pantalla.
5. La cuerda ya debe encontrarse completamente afinada en su tono. La
cuerda se encontrará perfectamente afinada cuando su nombre aparezca
en la pantalla, la aguja esté en medio del medidor y sólo esté encendido el
LED verde del centro.
• Si la cuerda suena grave (tono demasiado bajo) la aguja se encontrará
a la izquierda del medidor y el LED rojo de la izquierda se encenderá.
Deberás tensar lentamente la cuerda hasta que la aguja se sitúe en el
centro del medidor y sólo esté encendido el LED verde.
•
Si la cuerda suena agudo (tono demasiado alto) la aguja se encontrará
a la derecha del medidor y se encenderá el LED derecho. Deberás
aflojar lentamente la cuerda hasta que la aguja se sitúe en el centro
del medidor y sólo esté iluminado el LED verde.
•
Si el tono de la cuerda está fuera de rango aparecerá una aguja doble
a la izquierda o a la derecha de la pantalla.
Nota: Habitualmente es mejor aumentar lentamente el tono de una cuerda
para afinarla en vez de reducirlo, debido a que, por razones mecánicas,
permanecerá afinada mejor.
• Modo Sound.
Le Mode Son du MT-1 vous permet d’accorder un instrument qui n’a pas de
capteur (guitare acoustique traditionnelle par exemple). Le MT-1 peut
générer un ton de référence pour chaque corde. Vous pouvez alors accorder
l’instrument à l’oreille en comparant le ton de référence à celui de la corde à
accorder.
1. Sélectionnez le réglage comme indiqué en 2 & 3 du Mode Indicateur.
2. Appuyez sur l’interrupteur SOUND jusqu’à ce que le nom de la corde que
vous souhaitez accorder s’affiche.
Lorsque l’appareil est réglé sur GUITARE, la tonalité émise par le MT-1
sera d’une octave supérieure à la tonalité de votre instrument. En mode
BASSE, la tonalité sera deux octaves plus haute que la tonalité émise
réellement par la basse.
3. Jouez la corde correspondante à celle sélectionnée sur le MT-1.
Si la tonalité est basse, la corde devra être resserrée doucement, si la
tonalité est trop aigue, il faudra alors desserrez la corde en douceur.
Gracias al modo Sound del MT-1 puedes afinar un instrumento que no
disponga de pastilla (p. ej. una guitarra acústica tradicional). El MT-1 puede
generar un tono de referencia para cada cuerda de modo que puedas afinar
el instrumento ‘de oído’ comparando la nota de referencia generada con el
tono de la cuerda que deseas afinar.
1. Selecciona el parámetro como se indica en los pasos 2 y 3 del modo
Meter.
2. Pulsa el interruptor SOUND hasta que aparezca en la pantalla el nombre
de la cuerda que quieres afinar.
Cuando el ajuste está en GUITAR el tono que el MT-1 genera se
encontrará una octava por encima del tono real del instrumento. Si está
en modo BASS el tono estará dos octavas por encima de la de tu bajo.
3. Toca sólo la cuerda correspondiente a la nota seleccionada en el MT-1.
Si el tono de la cuerda tocada es grave tendrás que tensar lentamente la
cuerda, por el contrario si el tono del instrumento es agudo tendrás que
aflojarla suavemente.
•
• Afinación Flat.
Accordage bémol.
L’accordage bémol permet un accordage jusqu’à 5 bémols à partir de la
tonalité standard.
1. Comme décrit précédemment, sélectionnez d’abord le nom de la corde à
accorder sur l’affichage.
2. Appuyez sur le sélecteur bémol [FLAT] autant de fois que de demi-tons
souhaités pour abaisser la tonalité de la note sélectionnée.
s’affiche alors.
3. Comme commenté précédemment, accordez la corde de l’instrument à la
tonalité sélectionnée.
Specifications
Tuning
• Modo Meter.
Spécifications
Accord
:
12 notes à tempérament égal
Poids
:
86g
Dimensions : 100 mm x 61 mm x 18 mm
*Les spécifications et l’apparence du produit peuvent changer sans préavis
dans le but d'améliorer le produit.
Installation des piles
Appuyez sur les barres sur le côté du tuner et enlevez le couvercle avec
précaution comme illustré sur le schéma. Veillez à insérer correctement les
piles, en respectant la polarité indiquée sur les piles.
REMARQUE: Si l'unité fonctionne mal, éteignez l'appareil puis rallumez-le. Si
le problème persiste, retirez les piles et insérez-les de nouveau.
La afinación Flat permite una afinación hasta 5 semitonos más grave que el
tono normal.
1. Tal y como se ha indicado previamente, primero debes seleccionar en la
pantalla el nombre de la cuerda a afinar.
2. Pulsa la tecla flat hasta obtener el número de semitonos que desees de
desafinación. Se visualizará
en la pantalla.
3. Afina la cuerda del instrumento al tono seleccionado tal y como se ha
indicado anteriormente.
Especificaciones
Afinado
Peso
:
:
Der Meter-Modus ermöglicht es Ihnen, Ihr Instrument unter Verwendung der
VU-Skala zu stimmen.
1. Bei Verwendung eines Instrumentes mit Spulenelement, wie zum Beispiel
einer elektrischen Gitarre, müssen Sie das Instrument an die INPUTBuchse des MT-1 anschließen.
Alternativ können Instrumente ohne Spulenelement, wie eine StandardAkustikgitarre, unter Verwendung des eingebauten Mikrophons des MT-1
gestimmt werden. In diesem Fall dürfen Sie keine Leitung an die INPUTBuchse anschließen.
Wenn Sie das eingebaute Mikrophon verwenden, ist es wichtig, dass Sie
das Instrument so nahe wie möglich an das Stimmgerät halten.
2. Um mit dem Stimmvorgang zu beginnen, drücken Sie den Netzschalter
ON/OFF.
Um die Batterie zu schonen, schaltet sich das Stimmgerät 3 Minuten nach
dem letzten ‚richtig gestimmt’ automatisch aus.
3. Dann wählen Sie mit dem Schalter GUITAR / BASS das Instrument aus,
das Sie stimmen möchten. Die Noten für jede Auswahl sind folgende:
GUITAR : 7B, 6E, 5A, 4D, 3G, 2B, 1E
BASS : LB, 4E, 3A, 2D, 1G, HC (LB: TIEFES B, HC: HOHES C).
4. Stellen Sie sicher, dass der Lautstärkeregler an der Gitarre oder dem Bass
komplett aufgedreht ist. Spielen Sie jeweils Einzelnoten, und der Name der
Note, die sich in unmittelbarer Nähe der erkannten Frequenz befindet,
erscheint im LCD-Display. Drehen Sie den Stimmwirbel, bis der Name der
Saite, die Sie stimmen, im Display erscheint.
5. Nun muss die Saite genau auf die korrekte Frequenz fein gestimmt
werden. Die Saite ist dann perfekt gestimmt, wenn der richtige
Saitenname im Display erscheint, die Nadel sich in der Mitte der
Messskala befindet und nur das grüne LED leuchtet.
•
Wenn die Saite zu tief gestimmt ist (zu geringe Frequenz), schlägt die
Nadel zur linken Seite der Messskala aus und das linke rote LED
leuchtet. Die Saite sollte langsam gespannt werden, bis sich die Nadel
im Zentrum der Messskala befindet und nur das grüne LED leuchtet.
•
Wenn die Saite zu hoch gestimmt ist (zu hohe Frequenz), schlägt die
Nadel zur rechten Seite der Messskala aus und das rechte LED
leuchtet. Die Saite sollte langsam gelockert werden, bis sich die Nadel
im Zentrum der Messskala befindet und nur das grüne LED leuchtet.
•
Wenn die Frequenz einer Saite außerhalb des Messbereiches liegt,
erscheint eine doppelte Nadel links oder rechts des Displays.
Hinweis: Es ist normalerweise besser, die Frequenz einer Saite langsam
anzuheben, bis sie richtig gestimmt ist, als sie zu senken, da es aus
mechanischen Gründen so wahrscheinlicher ist, dass die Saite gestimmt
bleibt.
• Sound-Modus.
Der Sound-Modus des MT-1 ermöglicht es Ihnen, ein Instrument zu
stimmen, das kein Spulenelement hat (wie eine traditionelle Akustikgitarre).
Der MT-1 kann für jede Saite einen Referenzton erzeugen, so dass Sie das
Instrument ‘nach dem Gehör’ stimmen können, indem Sie die erzeugte
Referenznote mit der Frequenz der zu stimmenden Saite vergleichen.
1. Führen Sie die Schritte 2 & 3 des obigen Abschnittes Meter-Modus aus.
2. Drücken Sie die SOUND-Taste, bis der Name der Saite, die Sie stimmen
möchten, im Display erscheint.
Bei GUITAR ist die von MT-1 erzeugte Tonhöhe eine Oktave höher als die
tatsächliche Tonhöhe Ihres Instrumentes. Beim BASS-Modus ist die
Tonhöhe zwei Oktaven höher als die Ihrer Bassgitarre.
3. Spielen Sie die einzelne Saite entsprechend der am MT-1 ausgewählten
Note. Wenn die Tonhöhe der gespielten Saite zu niedrig ist, muss die Saite
langsam angezogen werden, wenn die Tonhöhe Ihres Instrumentes zu
hoch ist, dann sollte die entsprechende Saite leicht gelockert werden.
• „Flat“-Stimmung (Versatzstimmung).
Die Versatzstimmung kann für eine im Vergleich zur Standardstimmung um
bis zu 5 Halbtöne nach unten versetzte Stimmung verwendet werden.
1. Wählen Sie im Display zuerst, wie oben beschrieben, den Namen der zu
stimmenden Saite.
2. Drücken Sie die Flat-Taste so oft, bis die gewünschte Anzahl der
Halbtonschritte erreicht ist, um die Sie verstimmen möchten.
wird im Display angezeigt.
3. Stimmen Sie die Instrumentensaite gemäß der gewählten Tonhöhe, wie
oben beschrieben.
Technische Daten
Escala temperada de 12 notas.
86 g
Dimensiones : 100 mm x 61 mm x 18 mm
*Con el fin de mejorar el aparato, sus especificaciones y apariencia pueden
modificarse sin previo aviso.
Instalación de las pilas
Pulsa la pestaña que se encuentra en el lateral del afinador y retira la
cubierta tal y como se indica en el diagrama adjunto. Presta atención para
colocar las pilas con la polaridad correcta indicada en el hueco de las
mismas.
NOTA: Si la unidad funciona incorrectamente, apaga y vuelve a encender el
aparato. Si así no se resuelve el problema retira las pilas y vuélvelas a
instalar.
Stimmung
:
12 gleichschwebende Töne.
Gewicht
:
86g
Abmessungen: 100mm x 61mm x 18mm
*Änderungen, die dem technischen Fortschritt dienen, können jederzeit ohne
Vorankündigung vorgenommen werden.
Batterien einbauen
Drücken Sie auf die Klappen an der Seite des Stimmgerätes und entfernen
Sie vorsichtig die Rückwand, wie im beiliegenden Schaubild gezeigt. Legen
Sie die Batterien ein und achten Sie dabei auf die korrekte Polarität, wie im
Batterieraum angezeigt.
HINWEIS: Falls Fehlfunktionen auftreten, schalten Sie das Gerät aus und
dann wieder ein. Wenn das Problem dadurch nicht gelöst ist, nehmen Sie die
Batterien heraus und bauen Sie sie nochmals ein.
new instructions 9/29/04 2:44 PM Page 2
ENGLISH
DEUTSCH
SVENSKA
NEDERLANDS
WARNING!
ACHTUNG!
VARNING!
WAARSCHUWING!
IMPORTANT Precautions.
WICHTIGE Vorsichtsmaßnahmen.
VIKTIGT Föreskrifter.
BELANGRIJK Voorzorgen.
Refer all servicing to qualified service personnel. Servicing is required when
the apparatus has been damaged in any way, such as liquid has been spilled
or objects have fallen into the apparatus, the apparatus has been exposed to
rain or moisture, does not operate normally, or has been dropped.
Wenden Sie sich für alle Wartungen an qualifiziertes Service-Personal. Eine
Wartung ist erforderlich, wenn das Gerät auf irgendeine Weise beschädigt
wurde, wenn zum Beispiel Flüssigkeit auf dem Gerät verschüttet wurde oder
Gegenstände in das Gerät gefallen sind, das Gerät Regen oder Feuchtigkeit
ausgesetzt war, es nicht mehr richtig funktioniert oder fallen gelassen wurde.
Överlåt allt servicearbete till kvalificerad servicepersonal. Service krävs när
apparaten skadats på något sätt, exempelvis genom att vätska spillts eller att
föremål ramlat ned i den, apparaten har utsatts för regn eller fukt, inte
fungerar normalt eller tappats.
Vertrouw alle servicewerkzaamheden toe aan een gekwalificeerd technicus.
Service is vereist indien het apparaat op eender welke wijze werd
beschadigd, indien er bijvoorbeeld vloeistof werd gemorst, of er voorwerpen
in het apparaat vielen, als het apparaat werd blootgesteld aan regen of vocht,
niet normaal werkt, of viel.
STROMVERSORGUNG
STRÖMKÄLLA
VOEDING
Benutzen Sie für die Stromversorgung des Gerätes zwei AAATrockenbatterien (R03, LR03) (mitgeliefert). Ersetzen Sie diese, wenn nötig,
mit demselben Batterietyp. Stellen Sie sicher, dass das Gerät ausgeschaltet
ist, bevor Sie die Batterien auswechseln. Nehmen Sie die Batterien heraus,
wenn das Gerät für einen längeren Zeitraum nicht benutzt wird.
Apparaten drivs av två (medföljande) batterier typ torrcell, storlek AAA (R03,
LR03). Ersätt dessa vid behov med samma typ. Säkerställ att apparaten
stängs av innan batterierna byts. Avlägsna batterierna när apparaten inte ska
användas under en längre tid.
Gebruik om het apparaat twee AAA (R03, LR03) droge batterijen
(meegeleverd). Vervang ze zo nodig door hetzelfde type. Zorg er voor dat het
apparaat is uitgeschakeld. Haal de batterijen uit het apparaat als dat
gedurende langere tijd niet zal worden gebruikt.
ACHTUNG.
VARNING.
Setzen Sie das Gerät nicht Regen oder Feuchtigkeit aus. Setzen Sie das Gerät
nicht tropfender oder spritzender Flüssigkeit aus. Auf dem Gerät oder in der
Nähe des Gerätes sollten keine mit Flüssigkeit gefüllten Gegenstände
aufgestellt werden. Benutzen Sie dieses Gerät nicht in der Nähe von Wasser.
Utsätt inte apparaten för regn eller fukt. Utsätt inte apparaten för dropp eller
stänk. Inga vätskefyllda föremål ska placeras på eller nära apparaten. Använd
inte denna apparat i närheten av vatten.
Stel het apparaat niet bloot aan regen of vocht. Stel het niet bloot aan
druppelen of spatten. Er mogen geen voorwerpen gevuld met vloeistof op of
naast het apparaat worden geplaatst. Gebruik het apparaat niet in de buurt
van water.
Reinigen Sie das Gerät nur mit einem trockenen Tuch.
Rengör endast med torr trasa.
Alleen reinigen met een droge doek.
POWER SUPPLY
To power the apparatus, use two AAA size (R03, LR03) dry cell batteries
(supplied). Replace, when required, with the same type. Ensure the
apparatus is switched off before the batteries are replaced. Remove the
batteries when the apparatus is not going to be used for an extended period
of time.
WARNING.
Do not expose the apparatus to rain or moisture. Do not expose the
apparatus to dripping or splashing. No objects filled with liquids should be
placed on or near the apparatus. Do not use this apparatus near water.
Clean only with dry cloth.
Note: This equipment has been tested and found to comply with the
limits for a Class B digital device, pursuant to part 15 of the FCC
Rules. These limits are designed to provide reasonable protection
against harmful interference in a residential installation. This
equipment generates, uses, and can radiate radio frequency energy
and, if not installed and used in accordance with the instructions, may
cause harmful interference to radio communications. However, there
is no guarantee that interference will not occur in a particular
installation. If this equipment does cause harmful interference to
radio or television reception, which can be determined by turning the
equipment off and on, the user is encouraged to try to correct
the interference by one or more of the following measures:
• Reorient or relocate the receiving antenna.
• Increase the separation between the equipment and receiver.
• Connect the equipment into an outlet on a circuit different from that
to which the receiver is connected.
• Consult the dealer or an experienced radio/TV technician for help.
Changes or modifications not expressly approved by Marshall
Amplification plc could void the user’s authority to operate the
equipment.
Heed all warnings.
Follow all instructions.
Keep these instructions.
WAARSCHUWING.
Hinweis: Dieses Gerät wurde geprüft und für übereinstimmend mit den
Einschränkungen eines Digitalgerätes der Klasse B, gemäß Teil 15 der FCCBestimmungen, befunden. Diese Einschränkungen haben den Zweck, einen
hinreichenden Schutz gegen schädigende Interferenzen bei Installation des
Gerätes in einer Wohnumgebung zu liefern. Dieses Gerät erzeugt und
verwendet Hochfrequenzenergie und kann diese auch abstrahlen. Wenn
das Gerät nicht entsprechend den Anweisungen installiert und bedient wird,
kann der Funkverkehr empfindlich gestört werden. Es ist jedoch nicht
ausgeschlossen, dass bei einer bestimmten Installation Störungen
auftreten. Ob dieses Gerät den Radio- oder Fernsehempfang empfindlich
stört, kann durch Ein- und Ausschalten des Gerätes ermittelt werden.
Überdies werden die Benutzer angehalten, zu versuchen, die Störung durch
eine oder mehrere der folgenden Maßnahmen zu beheben:
• Empfangsantenne neu ausrichten oder an einem anderen Ort aufstellen.
• Den Abstand zwischen dem Gerät und dem Empfänger vergrößern.
• Das Gerät an eine Steckdose anschließen, deren Stromkreis nicht auch
den Empfänger mit Strom versorgt.
• Den Händler oder einen fachkundigen Radio/Fernsehtechniker um Hilfe
bitten.
Obs: Denna utrustning har testats och befunnits vara inom gällande
gränser för en klass B digital apparat, i enlighet med del 15 av FCCs
reglemente. Dessa gränser är designade för att ge rimligt skydd mot
skadliga störningar i en bostadsinstallation. Denna utrustning skapar,
använder och kan utstråla radiofrekvensenergi och kan, om inte installerad
i enlighet med instruktionerna, orsaka skadliga störningar av
radiokommunikationer. Dock föreligger ingen garanti för att störningar inte
kan uppstå med en given installation. Om denna utrustning orsakar
skadliga störningar av mottagning av radio eller television, vilka kan
fastställas genom att apparaten stängs av och slås på, uppmanas
användaren att försöka korrigera dessa störningar genom att vidta en eller
flera av följande åtgärder:
• Rikta om eller ändra på placeringen av mottagningsantennen.
• Öka avståndet mellan utrustningen och mottagaren.
• Anslut utrustningen till ett vägguttag i en annan strömkrets än den som
mottagaren är ansluten till.
• Be återförsäljaren eller en erfaren radio/TV-tekniker om hjälp.
Änderungen oder Modifizierungen, die von Marshall Amplification plc nicht
ausdrücklich genehmigt wurden, können die Befugnis des Benutzers zur
Inbetriebnahme des Gerätes ungültig machen.
Ändringar eller modifieringar som inte är uttryckligen godkända av Marshall
Amplification plc kan ogiltigförklara användarens behörighet att använda
denna utrustning.
Beachten Sie alle Warnhinweise.
Befolgen Sie alle Anweisungen.
Bewahren Sie diese Anweisungen auf.
Åtlyd alla varningar.
Följ alla instruktioner.
Spara dessa instruktioner.
European Product Only
Nur europäisches Produkt
FRANCAIS
Opmerking: deze uitrusting werd getest en voldoet aan de limieten voor een
digitaal apparaat van klasse B, volgens deel 15 van de FCC-regels. Deze
limieten werden vastgelegd om te zorgen voor een redelijke bescherming
tegen schadelijke storingen in een residentiële installatie. Deze uitrusting
genereert, gebruikt en kan hoogfrequent energie uitstralen, en kan, indien
niet gebruikt in overeenstemming met de instructies, storing veroorzaken
in de radiocommunicatie. Er is nochtans geen garantie dat er geen
storingen zullen optreden in een bepaalde installatie. Indien dit apparaat
storingen veroorzaakt in de radio- en televisieontvangst, wat kan worden
nagegaan door het apparaat in en uit te schakelen, wordt de gebruiker
aangemoedigd om de storing proberen te verhelpen met een of meer van
de volgende maatregelen:
• Richt de ontvangstantenne in een ander richting of verplaats ze.
• Vergroot de afstand tussen het apparaat en de ontvanger.
• Sluit het apparaat aan op een stopcontact dat gevoed wordt uit een ander
circuit dan dat waarop de ontvanger is aangesloten.
• Raadpleeg de dealer of een ervaren radio/TV technicus voor hulp.
Veranderingen of wijzigingen die niet expliciet zijn goedgekeurd door
Marshall Amplification plc kunnen de toestemming van de gebruiker om het
apparaat te gebruiken ongeldig maken.
Lees alle waarschuwingen.
Volg alle instructies.
Bewaar deze instructies.
Uitsluitend Europees product
Endast europeiska produkter
ITALIANO
AVERTISSEMENT!
ESPAÑOL
SUOMI
IMPORTANT Précautions.
¡ATENCIÓN!
AVVERTENZA!
VAROITUS!
Precauzioni IMPORTANTI.
Pour tout entretien adressez-vous au personnel d'entretien qualifié.
L’entretien est nécessaire lorsque l’appareil a été endommagé, de quelque
manière que se soit, par exemple si du liquide a été renversé ou si des
objets sont tombés dessus, si l'appareil a été exposé à la pluie ou l'humidité,
s’il ne fonctionne pas correctement, ou s'il est tombé.
ALIMENTATION
Pour alimenter l’appareil, utiliser deux piles sèches de taille AAA (R03,
LR03) (fournies). Remplacez-les dès que nécessaire par des piles
identiques. Assurez-vous que l’appareil est éteint avant de changer les piles.
Retirez les piles lorsque l’appareil ne va pas être utilisé pendant une période
prolongée de temps.
AVERTISSEMENT.
Ne pas exposer l'appareil à la pluie ou à l'humidité. Ne pas exposer l'appareil
à l’eau (sous forme de gouttes ou autre). Ne jamais poser de récipient rempli
de liquide sur ou à proximité de l’appareil. N’utilisez pas cet appareil près de
l’eau.
Nettoyer uniquement avec un chiffon sec.
Remarque : Cet équipement a été testé et est certifié conforme aux
limitations relatives aux appareils numériques de classe B, conformément
à la partie 15 des réglementations de la commission fédérale américaine
des communications (« FCC Rules ») Ces limitations ont pour objectif de
fournir une protection raisonnable contre les interférences nuisibles dans
une installation domestique. Cet équipement génère, utilise et peut émettre
une énergie fréquence radio et, s’il n’est pas installé et utilisé selon les
instructions, peut causer des interférences nuisibles avec les
communications radio. Toutefois, il n’existe aucune garantie que des
interférences ne se produiront pas dans une installation spécifique. Si cet
équipement cause des interférences nuisibles à réception d’émissions
radio ou télédiffusées, qui peuvent être établies en éteignant puis en
rallumant l’équipement, essayez de corriger ces interférences grâce à l’une
ou l’ensemble des mesures suivantes :
• Changez l’orientation de l’antenne de réception ou bien déplacez-la.
• Eloignez le récepteur de l’équipement.
• Connectez l’équipement à une prise sur un circuit différent de celui où le
récepteur est connecté.
• Contactez le vendeur ou demandez l’assistance d’un technicien TV/radio
compétent.
Des changements ou modifications non expressément approuvées par
Marshall Amplification plc peuvent annuler l’autorité de l’utilisateur à
opérer l’équipement.
Tenez compte de tous les avertissements.
Suivez toutes les instructions.
Conservez ces instructions.
Produit européen uniquement
Avisos IMPORTANTES.
Dirígete siempre a un taller técnico cualificado. El servicio técnico es
necesario cuando el aparato haya sufrido cualquier daño tal como: haya
caído líquido u otros objetos sobre el aparato, el aparato se haya expuesto a
la lluvia o excesiva humedad, no funcione correctamente o se haya caído.
ALIMENTACIÓN DE CORRIENTE
Para alimentar el aparato, utiliza pilas secas (R03, LR03) tamaño AAA
(incluidas). Sustitúyelas por pilas del mismo tipo cuando sea necesario.
Asegúrate de que el aparato se encuentre apagado antes de sustituirlas.
Saca las pilas si no vas a usar el aparato durante un periodo de tiempo
prolongado.
ATENCIÓN.
No expongas el aparato a la lluvia ni a la humedad excesiva. No dejes que le
salpiquen líquidos. No coloques objetos llenos de líquido sobre el aparato ni
cerca del mismo. No utilices este aparato cerca del agua.
Utiliza sólo un paño seco para limpiarlo.
Nota: Este equipo ha sido examinado y se ha comprobado que se haya
dentro de los límites de un aparato digital de Clase B, de acuerdo con el
apartado 15 de las reglas FCC.
Estos límites han sido establecidos para asegurar una protección razonable
contra interferencias perjudiciales en una instalación residencial. Este
equipo genera, utiliza y puede radiar energía de radiofrecuencia y, si no se
instala y utiliza de acuerdo con las instrucciones, puede producir
interferencias dañinas a las radiocomunicaciones. Sin embargo, no hay
garantía de que no se produzcan interferencias en ciertas instalaciones. Si
el equipo, de hecho, causa interferencias en la recepción de radio o
televisión, lo cual se puede determinar encendiendo y apagando el equipo,
se recomienda al usuario que intente corregir las interferencias por una o
varias de las siguientes medidas:
• Reorientar o recolocar la antena de recepción.
• Aumentar la separación entre el equipo y el receptor que acusa
interferencias.
• Conectar el equipo en un enchufe de red distinto al del receptor que
acusa interferencias.
• Consultar con el distribuidor o con un experto en instalaciones de
radio/TV.
Cualquier cambio o modificación que se efectúe sin aprobación de
Marshall Amplification plc puede impedir la utilización de este equipo.
Observa las precauciones.
Sigue las instrucciones.
Conserva estas instrucciones.
Sólo para Europa
TÄRKEITÄ TURVAOHJEITA
Anna valtuutetun huoltohenkilöstön huolehtia kaikista laitteen
huoltotehtävistä. Laitetta on huollettava, jos se on vaurioitunut jollakin
tavoin; laitteeseen on esim. läikkynyt nestettä tai siihen on pudonnut esineitä,
laite on joutunut alttiiksi sateelle tai kosteudelle, se ei toimi normaalisti tai se
on pudonnut.
VIRTALÄHDE
Käytä laitteen virtalähteenä kahta AAA-koon (R03, LR03) kuivaparistoa
(toimitetaan laitteen mukana). Vaihda paristot tarvittaessa samantyyppisiin
paristoihin. Varmista ennen paristojen vaihtamista, että laitteen virta on
kytketty pois päältä. Poista paristot, kun laitetta ei aiota käyttää pitkään
aikaan.
VAROITUS
Älä altista laitetta sateelle, kosteudelle, pisaroille tai roiskeille. Älä sijoita
laitteen päälle tai lähelle nestettä sisältäviä esineitä. Älä käytä laitetta veden
läheisyydessä.
Riferire tutti i servizi di manutenzione a personale dell’assistenza qualificato.
Il servizio di assistenza si rende necessario quando l’attrezzatura è stata
danneggiata in qualche modo, ad esempio è stato versato del liquido su di
essa o sono caduti degli oggetti al suo interno, l’apparecchiatura è stata
esposta alla pioggia o all’umidità, non funziona in modo normale o è caduta.
ALIMENTAZIONE
Per alimentare l’apparecchiatura, usare due batterie a secco (R03, LR03)
tipo AAA (fornite). Sostituire, quando occorra, con batterie dello stesso tipo.
Prima di sostituire le batterie, assicurarsi che l’apparecchiatura sia spenta.
Togliere le batterie quando non si ha intenzione di usare l’apparecchiatura
per un lungo periodo di temo.
AVVERTENZA.
Non esporre l’apparecchiatura alla pioggia o all’umidità. Non esporre
l’apparecchiatura a gocciolamenti o schizzi di liquidi. Non collocare alcun
oggetto contenente liquidi sopra o nei pressi dell’apparecchiatura. Non usare
la presente apparecchiatura vicino all’acqua.
Pulire esclusivamente con un panno asciutto.
Huomautus: Tämä laite on testattu, ja sen on todettu olevan FCC:n
sääntöjen osan 15 mukaisten luokan B digitaalisille laitteille asetettujen
rajoitusten mukainen. Nämä rajat on suunniteltu antamaan kohtuullinen
suoja haitallista häiriötä vastaan kotitalouskäytössä. Tämä laite tuottaa,
käyttää ja voi säteillä radiotaajuusenergiaa, ja jos sitä ei asenneta tai käytetä
näiden ohjeiden mukaisesti, se voi aiheuttaa haitallisia häiriöitä
radioviestinnälle. Emme kuitenkaan voi taata, että häiriöitä ei esiinny
tietyssä asennuksessa. Jos tämä laite aiheuttaa haitallisia häiriöitä radio- tai
TV-vastaanotolle, mikä voidaan määrittää kytkemällä laite päälle ja pois
päältä, voit korjata häiriöt jollakin seuraavista tavoista:
• muuta vastaanottoantennin asentoa tai paikkaa
• siirrä vastaanotin ja laite kauemmaksi toisistaan
• liitä laite ja vastaanotin eri virtapiireihin
• pyydä apua jälleenmyyjältä tai asiantuntevalta radio- tai TV-asentajalta.
Nota: questa apparecchiatura è stata collaudata ed è stato rilevato che
rispetta i limiti stabiliti per un dispositivo digitale di Classe B, in base alla
parte 15 delle Norme FCC. Tali limiti sono stati pensati per fornire una
protezione equa contro l’interferenza dannosa in un insediamento
residenziale. Questa apparecchiatura genera, usa e può irradiare energia di
radiofrequenza e, se non è installata ed usata secondo le istruzioni, può
provocare interferenze dannose alle comunicazioni radio. Tuttavia, non vi è
garanzia che le interferenze non si verifichino in un insediamento
particolare. Nel caso in cui questa apparecchiatura dovesse provocare
interferenze alla ricezione della radio o del televisore, la qual cosa può
essere stabilita spegnendo e riaccendendo l’apparecchiatura, si consiglia
vivamente all’utente di tentare di eliminare l’interferenza mediante uno o
più dei seguenti metodi:
• Riorientare o ricollocare l’antenna di ricezione.
• Aumentare lo spazio esistente tra l’apparecchiatura ed il ricevitore.
• Collegare l’apparecchiatura ad una presa su un circuito diverso da quello
a cui è collegato il ricevitore.
• Consultare il rivenditore o un tecnico radio/TV qualificato per ricevere dei
consigli.
Kaikki muutokset tai muokkaukset, joita Marshall Amplification plc ei ole
nimenomaisesti hyväksynyt, voivat mitätöidä käyttäjän oikeuden käyttää tätä
laitetta.
Le modifiche o le varianti non espressamente approvate da Marshall
Amplification plc potrebbero rendere nulla l’autorità dell’utente a mettere in
funzione l’apparecchiatura.
Huomioi kaikki varoitukset.
Noudata kaikkia ohjeita.
Säilytä nämä ohjeet.
Tener conto di tutte le avvertenze.
Seguire tutte le istruzioni.
Conservare le presenti istruzioni.
Laitteen saa puhdistaa ainoastaan kuivalla liinalla.
Ainoastaan eurooppalainen tuote
Solo prodotto europeo