1
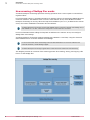
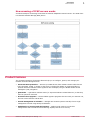
Product Guide
McAfee VirusScan Enterprise for Storage
1.1.0
For use with ePolicy Orchestrator 4.5.7, 4.6.x, 5.0.x Software
COPYRIGHT
Copyright © 2013 McAfee, Inc. Do not copy without permission.
TRADEMARK ATTRIBUTIONS
McAfee, the McAfee logo, McAfee Active Protection, McAfee DeepSAFE, ePolicy Orchestrator, McAfee ePO, McAfee EMM, Foundscore, Foundstone, Policy
Lab, McAfee QuickClean, Safe Eyes, McAfee SECURE, SecureOS, McAfee Shredder, SiteAdvisor, McAfee Stinger, McAfee Total Protection, TrustedSource,
VirusScan, WaveSecure are trademarks or registered trademarks of McAfee, Inc. or its subsidiaries in the United States and other countries. Other
names and brands may be claimed as the property of others.
Product and feature names and descriptions are subject to change without notice. Please visit mcafee.com for the most current products and features.
LICENSE INFORMATION
License Agreement
NOTICE TO ALL USERS: CAREFULLY READ THE APPROPRIATE LEGAL AGREEMENT CORRESPONDING TO THE LICENSE YOU PURCHASED, WHICH SETS
FORTH THE GENERAL TERMS AND CONDITIONS FOR THE USE OF THE LICENSED SOFTWARE. IF YOU DO NOT KNOW WHICH TYPE OF LICENSE YOU
HAVE ACQUIRED, PLEASE CONSULT THE SALES AND OTHER RELATED LICENSE GRANT OR PURCHASE ORDER DOCUMENTS THAT ACCOMPANY YOUR
SOFTWARE PACKAGING OR THAT YOU HAVE RECEIVED SEPARATELY AS PART OF THE PURCHASE (AS A BOOKLET, A FILE ON THE PRODUCT CD, OR A
FILE AVAILABLE ON THE WEBSITE FROM WHICH YOU DOWNLOADED THE SOFTWARE PACKAGE). IF YOU DO NOT AGREE TO ALL OF THE TERMS SET
FORTH IN THE AGREEMENT, DO NOT INSTALL THE SOFTWARE. IF APPLICABLE, YOU MAY RETURN THE PRODUCT TO MCAFEE OR THE PLACE OF
PURCHASE FOR A FULL REFUND.
2
McAfee VirusScan Enterprise for Storage 1.1.0
Product Guide
Contents
1
2
Preface
5
About this guide . . . . . . . . . . . . . . . . . . . . . . . . . . . . . . . . . .
Audience . . . . . . . . . . . . . . . . . . . . . . . . . . . . . . . . . .
Conventions . . . . . . . . . . . . . . . . . . . . . . . . . . . . . . . . .
Find product documentation . . . . . . . . . . . . . . . . . . . . . . . . . . . . . .
5
5
5
6
Introduction
7
How McAfee VirusScan Enterprise for Storage works . . . . . . . . . . . . . . . . . . . .
How scanning of NetApp filer works . . . . . . . . . . . . . . . . . . . . . . . .
How scanning of ICAP servers works . . . . . . . . . . . . . . . . . . . . . . .
Product features . . . . . . . . . . . . . . . . . . . . . . . . . . . . . . . . . .
7
8
9
9
Installation and deployment
11
System requirements . . . . . . . . . . . . . . . . . . . . . . . . . . . . . . . .
Recommendations for scanner count . . . . . . . . . . . . . . . . . . . . . . .
Recommendations for ICAP scanner . . . . . . . . . . . . . . . . . . . . . . .
Package contents . . . . . . . . . . . . . . . . . . . . . . . . . . . . . . . . . .
Install the software on a standalone system . . . . . . . . . . . . . . . . . . . . . . .
Install the software with the wizard . . . . . . . . . . . . . . . . . . . . . . .
Install the software from the command line . . . . . . . . . . . . . . . . . . . .
Deploy the software to a managed system . . . . . . . . . . . . . . . . . . . . . . .
Check in the software package . . . . . . . . . . . . . . . . . . . . . . . . .
Install the extension . . . . . . . . . . . . . . . . . . . . . . . . . . . . .
Deploy the software from ePolicy Orchestrator . . . . . . . . . . . . . . . . . . .
Upgrade the software . . . . . . . . . . . . . . . . . . . . . . . . . . . . . . . .
Upgrade the software on a standalone system . . . . . . . . . . . . . . . . . . .
Upgrade the software on a managed system . . . . . . . . . . . . . . . . . . . .
Configure the software on Windows Server 2008 and 2012 . . . . . . . . . . . . . . . . .
3
Configuration for standalone systems
Configure NetApp filers scan settings .
Configure the ICAP settings . . . . .
Static IP address for scanners . . . .
Configure the service dependency . .
View filers scan statistics . . . . . .
4
.
.
.
.
.
.
.
.
.
.
.
.
.
.
.
17
.
.
.
.
.
.
.
.
.
.
.
.
.
.
.
.
.
.
.
.
.
.
.
.
.
.
.
.
.
.
.
.
.
.
.
.
.
.
.
.
.
.
.
.
.
.
.
.
.
.
.
.
.
.
.
.
.
.
.
.
.
.
.
.
.
.
.
.
.
.
.
.
.
.
.
.
.
.
.
.
.
.
.
.
.
.
.
.
.
.
.
.
.
.
.
.
.
.
.
.
. . 17
.
19
.
19
. . 20
.
21
Manage the software from ePolicy Orchestrator
23
Manage policies . . . . . . . . . . . . . . . . . . . . . . . . . . . . . . . . . .
Create or modify policies . . . . . . . . . . . . . . . . . . . . . . . . . . .
Assign policies . . . . . . . . . . . . . . . . . . . . . . . . . . . . . . . .
Create a NetApp filer policy . . . . . . . . . . . . . . . . . . . . . . . . . . . . .
Create an ICAP server scan policy . . . . . . . . . . . . . . . . . . . . . . . . . . .
A
Frequently asked questions
McAfee VirusScan Enterprise for Storage 1.1.0
11
12
12
13
13
13
14
14
14
14
15
15
16
16
16
23
23
24
24
28
31
Product Guide
3
Contents
Index
4
McAfee VirusScan Enterprise for Storage 1.1.0
35
Product Guide
Preface
Contents
About this guide
Find product documentation
About this guide
This information describes the guide's target audience, the typographical conventions and icons used
in this guide, and how the guide is organized.
Audience
McAfee documentation is carefully researched and written for the target audience.
The information in this guide is intended primarily for:
•
Administrators — People who implement and enforce the company's security program.
•
Users — People who use the computer where the software is running and can access some or all of
its features.
Conventions
This guide uses these typographical conventions and icons.
Book title, term,
emphasis
Title of a book, chapter, or topic; a new term; emphasis.
Bold
Text that is strongly emphasized.
User input, code,
message
Commands and other text that the user types; a code sample; a displayed
message.
Interface text
Words from the product interface like options, menus, buttons, and dialog
boxes.
Hypertext blue
A link to a topic or to an external website.
Note: Additional information, like an alternate method of accessing an
option.
Tip: Suggestions and recommendations.
Important/Caution: Valuable advice to protect your computer system,
software installation, network, business, or data.
Warning: Critical advice to prevent bodily harm when using a hardware
product.
McAfee VirusScan Enterprise for Storage 1.1.0
Product Guide
5
Preface
Find product documentation
Find product documentation
McAfee provides the information you need during each phase of product implementation, from
installation to daily use and troubleshooting. After a product is released, information about the product
is entered into the McAfee online KnowledgeBase.
Task
1
Go to the McAfee Technical Support ServicePortal at http://mysupport.mcafee.com.
2
Under Self Service, access the type of information you need:
To access...
Do this...
User documentation
1 Click Product Documentation.
2 Select a product, then select a version.
3 Select a product document.
KnowledgeBase
• Click Search the KnowledgeBase for answers to your product questions.
• Click Browse the KnowledgeBase for articles listed by product and version.
6
McAfee VirusScan Enterprise for Storage 1.1.0
Product Guide
1
Introduction
®
®
McAfee VirusScan Enterprise for Storage detects and removes viruses, malware, and other
potentially unwanted software programs from your network-attached storage (NAS) devices.
®
®
VirusScan Enterprise for Storage is added to McAfee VirusScan Enterprise and expands its capability.
The software performs remote scanning on NAS devices such as NetApp filers and Internet Content
Adaptation Protocol (ICAP) storage appliances. It uses a powerful McAfee scanning engine - the engine
common to all our anti‑virus products.
For the list of supported filer vendors, see McAfee KnowledgeBase article KB74863.
You can use McAfee VirusScan Enterprise for Storage in two ways:
•
As a standalone product.
•
As a managed product, using McAfee ePolicy Orchestrator (McAfee ePO ) to install, manage, and
enforce policies, and to use queries and dashboards for tracking activity and detections.
®
®
™
Contents
How McAfee VirusScan Enterprise for Storage works
Product features
How McAfee VirusScan Enterprise for Storage works
You can deploy this high-performance scanning solution on one or more Windows server with
multi-filer and multi-scanner configuration.
VirusScan Enterprise for Storage supports two types of filers.
•
NetApp filers — Filers that work on RPC–based protocols.
•
ICAP — Filers that work on ICAP–based protocols.
VirusScan Enterprise for Storage scans files in real time when they are accessed, stored, or modified
on storage devices. For the ICAP protocol, the filer decides the appropriate action for infected files. For
filers such as NetApp filers that work on RPC–based protocols, the McAfee Anti-Virus Engine takes
appropriate actions.
For the list of supported filer vendors, see McAfee KnowledgeBase article KB74863.
McAfee VirusScan Enterprise for Storage 1.1.0
Product Guide
7
1
Introduction
How McAfee VirusScan Enterprise for Storage works
How scanning of NetApp filer works
VirusScan Enterprise for Storage performs scanning operation when a scan request is received from
registered filers.
For Cluster-Mode scanning, VirusScan Enterprise for Storage requires Clustered Data ONTAP Antivirus
Connector software. The software must run on the same scanner server, where McAfee VirusScan
Enterprise for Storage is running. When the loop-back IP address (127.0.0.1) is added to the scanner
server, the scanner establishes connection with the software.
VirusScan Enterprise for Storage requires Data ONTAP Antivirus Connector software from NetApp only if
Data ONTAP 8.2.1 or later version filers configured in Cluster-Mode are connected.
For more information about adding the loop-back IP address to the scanner server, see Configure
NetApp filers scan settings.
VirusScan Enterprise for Storage supports NetApp Data ONTAP 8.2.1 and later, using the Clustered
Data ONTAP Antivirus Connector software from NetApp.
For more information about downloading Clustered Data ONTAP Antivirus Connector software and
technical assistance, contact NetApp support.
VirusScan Enterprise for Storage supports both 7-Mode and Cluster-Mode filers simultaneously.
This diagram presents an overview of the scanning process when reading, writing, and copying a file
from or to the NetApp filer.
8
McAfee VirusScan Enterprise for Storage 1.1.0
Product Guide
Introduction
Product features
1
How scanning of ICAP servers works
VirusScan Enterprise for Storage scans Internet Content Adaptation Protocol servers. The ICAP client
is a Network Attached Storage (NAS) device.
Product features
The VirusScan Enterprise for Storage features help you to configure, protect, and manage your
network-connected storage devices.
•
On-Access Scan protection — Protects your NAS devices from malware threats while files are
being accessed, copied, or written to the server, including files hidden in compressed files. It
protects data from malware before signatures are developed, using the McAfee Global Threat
Intelligence (GTI) integration.
•
Quarantine — Quarantines malware items (or suspected malware-related behavior) so that they
can't be opened or executed.
•
Protection from spyware — Detects hidden spyware programs that can track your Internet use,
and can access business-critical data.
•
Central management of software — Manages and controls systems centrally from a single
management console using ePolicy Orchestrator.
•
Optimization of security and performance — Deploys multi-scanner to multi-filer
configurations that increase the load-balancing capacity and fail-over security.
McAfee VirusScan Enterprise for Storage 1.1.0
Product Guide
9
1
10
Introduction
Product features
•
Standard solution for multiple vendors — Protects multiple storage systems and devices, and
works on different storage environments and configurations.
•
Support for Clustered Data ONTAP 8.2.1 Cluster-Mode scanning — Supports scanning of
Clustered Data ONTAP 8.2.1 using Clustered Data ONTAP Antivirus Connector, a NetApp product.
This version supports Cluster-Mode and 7-Mode scanning that provide greater scalability than a
single scanning instance.
McAfee VirusScan Enterprise for Storage 1.1.0
Product Guide
2
Installation and deployment
Install VirusScan Enterprise for Storage on a standalone system, or deploy the software from ePolicy
Orchestrator to a managed system.
Contents
System requirements
Package contents
Install the software on a standalone system
Deploy the software to a managed system
Upgrade the software
Configure the software on Windows Server 2008 and 2012
System requirements
Make sure that your system meets these minimum requirements, and you have administrator rights.
Component
Requirements
Hardware
An Intel dual core processor or compatible architecture.
Memory
Minimum 4 GB RAM.
The RAM requirement depends on the number of concurrent scan requests
configured for McAfee VirusScan Enterprise for Storage.
Disk space
Minimum 70 MB to install the software.
Additional 5 GB for ICAP scanner files and temp files.
Operating system
McAfee VirusScan Enterprise for Storage can run on any of these Microsoft
Windows operating systems:
• Windows Server 2003 32-bit and
64-bit
• Windows Server 2008 R2 64-bit
• Windows Server 2003 R2 32-bit
and 64-bit
• Windows Server 2012 64-bit
• Windows Server 2008 32-bit and
64-bit
The minimum operating system requirement for Cluster-Mode scanning
(Clustered Data ONTAP Antivirus Connector) is Windows Server 2008.
Windows installer
Microsoft Windows Installer (MSI) version 3.1 and later.
Other software
VirusScan Enterprise 8.8.
McAfee VirusScan Enterprise for Storage 1.1.0
Product Guide
11
2
Installation and deployment
System requirements
Component
Requirements
ePolicy Orchestrator McAfee ePolicy Orchestrator 4.5.7–5.0.x.
McAfee Agent
McAfee Agent 4.6 patch 3 and later.
Recommendations for scanner count
Consider these recommendations for your test environment, then determine the requirements for your
production environment based on actual loads.
Physical scanner for NetApp filers
The best practice for scanner count for physical scanner is:
No. of physical scanners required = 2 X [Number of physical filers].
For example, if there are two physical filers, you need four physical scanners.
Virtual scanner with physical Network Interface Control (NIC)
If a virtual scanner replaces a physical scanner and it has a dedicated physical NIC in the hypervisor,
consider 1.5 X the number of physical scanner.
For example, for two physical filers, you can plan up to 6 virtual scanners with dedicated physical NICs
in the hypervisor.
Virtual scanner with virtual NIC
If a virtual scanner replaces a physical scanner and it has a virtual NIC in the hypervisor, consider 2 X
the number of physical scanners.
For example, if there are two physical filers, you can plan up to 8 virtual scanners with virtual NICs.
User authentication
For user account authentication for NetApp 7-Mode filers, see McAfee KnowledgeBase article KB67490.
Recommendations for ICAP scanner
Consider these recommendations for ICAP scanner configuration.
ICAP protocol does not require user account authentication. Make sure that the bind address is a
corporate-wide routed IP address. After installing McAfee VirusScan Enterprise for Storage, it should
not remain set to the default loop-back address 127.0.0.1. Otherwise, it might cause connection
issues periodically.
McAfee recommends that you always use a corporate-wide internally routed IP address of the
scanner's network adapter for the bind address.
Leaving the Accept scan requests from these ICAP clients field blank allows connections from any filer IP
address, which is recommended for testing and troubleshooting. If an exclusive list needs to be
established, you can configure it after the service request is completed.
If number of scan threads = 20 X [Number of connecting ICAP IP addresses], make sure that the
number of scan threads configured in that particular scanner's McAfee VirusScan Enterprise for
Storage ICAP settings matches that aggregate maximum potential number. You can determine the
aggregate maximum number of outgoing scan requests for all ICAP filers that are registered with a
particular scanner.
12
McAfee VirusScan Enterprise for Storage 1.1.0
Product Guide
Installation and deployment
Package contents
2
Package contents
The software package contains these files that are necessary for installation.
Package
Description
VSESTOR_<version>_LML_<build_number>.zip
Contains standalone installer and ePolicy
Orchestrator deployment package files.
VSESTOMD_<version>_extension_<build_number>.zip • Contains these policies:
• VirusScan Enterprise for Storage 1.1.0:
NetApp Filer Policy
• VirusScan Enterprise for Storage 1.1.0:
ICAP Policy
In addition to this package, you must make sure that the latest management and reporting extensions
for McAfee VirusScan Enterprise are installed.
Install the software on a standalone system
Install the software on a standalone system using the wizard or from the command line.
Tasks
•
Install the software with the wizard on page 13
Download the VSESTOR_<version>_LML_<build_number>.zip file from the McAfee site to
install the software on standalone system using the wizard.
•
Install the software from the command line on page 14
You can use the command line to install the software on a standalone system without user
intervention.
Install the software with the wizard
Download the VSESTOR_<version>_LML_<build_number>.zip file from the McAfee site to install the
software on standalone system using the wizard.
Before you begin
•
McAfee VirusScan Enterprise 8.8 or later must already be installed.
•
You must have administrator rights to install the software.
Task
1
Extract the .zip file to a temporary location on your system.
2
From the VSESTOR_<version>_LML_<build_number> folder, double-click setup.exe.
3
Follow the prompt to install the software.
To verify the installation, on the Windows taskbar, click Start | All Programs | McAfee | VirusScan Console.
On the VirusScan Console page, the Network Appliance Filer AV Scanner and ICAP AV Scanner modules are listed.
McAfee VirusScan Enterprise for Storage 1.1.0
Product Guide
13
2
Installation and deployment
Deploy the software to a managed system
Install the software from the command line
You can use the command line to install the software on a standalone system without user
intervention.
Before you begin
Make sure that a directory named temp is created in the C drive to save the log file.
Task
1
Log on to the system as an administrator.
2
Download VSESTOR_<version>_LML_<build_number>.zip to a temporary location on your system,
then double-click it to execute.
3
Change the working directory to the one where you saved the .zip file.
4
Type the following command, then press Enter.
setup.exe /v"/q /l*v c:\temp\vses_install_log.txt"
Deploy the software to a managed system
Deploy VirusScan Enterprise for Storage to a client system in your network using ePolicy Orchestrator.
Tasks
•
Check in the software package on page 14
You must check in the software package VSESTOR_<version>_LML_<build_number>.zip to
the McAfee ePO server before you can deploy it to your managed systems.
•
Install the extension on page 14
Install the extension on the McAfee ePO server.
•
Deploy the software from ePolicy Orchestrator on page 15
Use ePolicy Orchestrator to deploy the software to managed systems in your network.
Check in the software package
You must check in the software package VSESTOR_<version>_LML_<build_number>.zip to the
McAfee ePO server before you can deploy it to your managed systems.
Task
For option definitions, click ? in the interface.
1
Log on to the ePolicy Orchestrator server as an administrator.
2
Click Menu | Software | Master Repository, then click Action | Check In Package.
3
In the Package type, select Product or Update (ZIP), browse to the .zip file, then click Next.
4
In the Package Options step, select Current as the branch, then click Save.
Install the extension
Install the extension on the McAfee ePO server.
14
McAfee VirusScan Enterprise for Storage 1.1.0
Product Guide
Installation and deployment
Upgrade the software
2
Task
For option definitions, click ? in the interface.
1
Log on to the ePolicy Orchestrator server as an administrator.
2
Click Menu | Software | Extensions, then click Install Extension.
3
Browse to the VSESTOMD_<version>_extension_<build_number>.zip file, then click OK.
Deploy the software from ePolicy Orchestrator
Use ePolicy Orchestrator to deploy the software to managed systems in your network.
Task
For option definitions, click ? in the interface.
1
Log on to the ePolicy Orchestrator server as an administrator.
2
Click Menu | Systems | System Tree, then select the required group or systems.
3
Complete these steps according to your version of ePolicy Orchestrator.
Version 4.5.x
Version 4.6.0 - 5.0.x
1 On the Client Task tab, click New Task.
1 On the Assigned Client Tasks tab, click Actions | New
Client Task Assignment.
2 In the Client Task Builder screen, type a name
for the task.
3 Select Product Deployment as the task type,
then click Next.
4 Select Windows as a target platform.
5 In Products and components, select
VSESTOR_<version>_LML_<build_number>.zip, select
Install as the action, then click Next.
2 In the Client Task Assignment Builder screen, select
McAfee Agent as Product, select Product Deployment
as Task Type.
3 Click Create New Task.
4 Type a name for the task and any notes.
5 Select Windows as a target platform.
6 In Products and components, select
VSESTOR_<version>_LML_<build_number>.zip, select
Install as the action, then click Save.
7 Select the task and click Next.
For more information, see the product guide of your version of ePolicy Orchestrator.
Upgrade the software
VirusScan Enterprise for Storage supports upgrading the software and migrating your configuration
from previous versions.
Tasks
•
Upgrade the software on a standalone system on page 16
When a previous version of the software is found during the installation, the installation
program upgrades the software to the new version.
•
Upgrade the software on a managed system on page 16
When you upgrade the extension, the existing policies are migrated to the new version.
McAfee VirusScan Enterprise for Storage 1.1.0
Product Guide
15
2
Installation and deployment
Configure the software on Windows Server 2008 and 2012
Upgrade the software on a standalone system
When a previous version of the software is found during the installation, the installation program
upgrades the software to the new version.
You can upgrade the software from McAfee VirusScan Enterprise for Storage 1.0.2, 1.0.3 to McAfee
VirusScan Enterprise for Storage 1.1.0.
To upgrade from McAfee VirusScan Enterprise for Storage 1.0.0, first upgrade the VirusScan Enterprise
software to VirusScan Enterprise 8.8 or later, then install McAfee VirusScan Enterprise for Storage 1.1.0.
Task
1
Install the software using the wizard.
For more information, see Install the software on a standalone system.
2
Verify the version details from the registry key ..\Software\McAfee\VSES\szProductVer.
Upgrade the software on a managed system
When you upgrade the extension, the existing policies are migrated to the new version.
Task
For option definitions, click ? in the interface.
1
Check in and deploy the extension.
2
Make sure that the policies are migrated properly and the reports are upgraded to the new version.
The policies and reports created with the earlier version must appear after upgrading the software.
3
Deploy the product.
For more information, see Deploy the software to a managed system.
Configure the software on Windows Server 2008 and 2012
After installing the software on Windows Server 2008 and 2012, configure the Local Security Policy of your
managed and unmanaged systems to allow connections with 7-Mode filers.
This configuration is applicable to:
•
Managed and standalone systems
•
Connections with 7-Mode filers only. (not applicable to Cluster-Mode)
Task
1
Log on to the Windows server as an administrator.
2
Select Start | Control Panel | Administrative Tools, then click Local Security Policy to expand.
3
On Security Options, select Network Access Named Pipes that can be accessed anonymously, type NTAPVSRQ in the
text box, then click OK.
4
Select Network access: Let Everyone permissions apply to anonymous users, then click Enabled.
5
Restart the computer.
For more information on configuring Windows Server 2008 and 2012, see McAfee KnowledgeBase
article KB68524.
16
McAfee VirusScan Enterprise for Storage 1.1.0
Product Guide
3
Configuration for standalone systems
Configure VirusScan Enterprise for Storage to add NetApp filers and to scan the storage appliances
using the ICAP server.
Contents
Configure NetApp filers scan settings
Configure the ICAP settings
Static IP address for scanners
Configure the service dependency
View filers scan statistics
Configure NetApp filers scan settings
Configure the NetApp filer AV scanner options such as, add filers, define file types to scan or exclude,
and define actions for threat items. These configurations are applied to the NetApp filers that are
connected to McAfee VirusScan Enterprise for Storage.
Before you begin
Make sure that Clustered Data ONTAP Antivirus Connector software is installed and running
on the system to connect the scan server to the Cluster-Mode filer.
To verify this, on the Windows taskbar, click Start | Control Panel | Administrative Tools | Services,
then double-click ONTAP AV Connector. The status of the service appears as Running.
Task
1
Log on to the system as an administrator.
2
On the Windows taskbar, right-click the McAfee menulet
3
On the VirusScan Console, double-click Network Appliance Filer AV Scanner.
McAfee VirusScan Enterprise for Storage 1.1.0
, then select VirusScan Console.
Product Guide
17
3
Configuration for standalone systems
Configure NetApp filers scan settings
4
On the Network Appliance Filers tab, define these options:
•
Specify which filers this server protects
•
For Cluster-Mode — Click Add, type the loop-back IP address (127.0.0.1), then click OK.
•
For 7-Mode — Click Add, type the filer IP address, then click OK.
•
Settings Apply to all filers
•
Administrative Accounts
5
On the Scan Items tab, define the types of files, options, and heuristics for a scan.
6
On the Exclusions tab, define the files to be excluded from scanning.
7
On the Performance tab, define the scan time, AV Scan threads for a scan.
8
On the Actions tab, define the primary and secondary actions to take when a threat or unwanted
program is found.
9
On the Reports tab, define these options:
•
Enable activity login and accept the default location for the log file or specify a new location. — Enable the log
activity and define the log file location as required.
•
Limit the size of log file — Enable log file size limitation, then type a value in Maximum log file size (MB).
•
From the Log file format drop-down list, select an appropriate format.
10 Click OK to save the configuration.
You can view the filer connection status from the scan statistics page. For more information, see
View filers scan statistics.
18
McAfee VirusScan Enterprise for Storage 1.1.0
Product Guide
Configuration for standalone systems
Configure the ICAP settings
3
Configure the ICAP settings
Configure the server connection for scan requests, file types to scan or exclude, action for threat
items, and log settings.
Task
1
Log on to the system as an administrator.
2
On the Windows taskbar, right-click the McAfee menulet
3
On the VirusScan Console, right-click the ICAP AV Scanner, then select Properties.
4
On the Connections and Server tab, define these options:
5
6
7
8
9
, then click VirusScan Console.
•
Connection list — Specify the ICAP server configuration and the list of IP addresses for which
connections can be accepted.
•
Bind address — Type the IP address of the computer where McAfee VirusScan Enterprise for
Storage is installed.
•
Port number — Type the default port number as 1344.
On the Scan Items tab, define these options:
•
File types to scan
•
Options
•
Heuristics
On the Performance tab, define these options:
•
Scan time
•
AV Scan threads — Specifies the number of anti-virus scan threads. Default = 100 threads.
On the Actions tab, define the primary and secondary actions to take when a threat or unwanted
program is found:
•
When the threat is found
•
When an unwanted program is found section
On the Reports tab, define these options:
•
Enable activity login and accept the default location for the log file or specify a new location. — Enable the login
activity, and define the log file location as required.
•
Limit the size of log file — Enable log file size limitation, then type a value in Maximum log file size (MB).
•
From the Log file format drop-down list, select appropriate format.
•
What to log, in addition to scanning activity
Click OK to save the configuration.
Static IP address for scanners
Assigning static DHCP leases to all scanners prevents the scanner from inadvertently changing IP
addresses.
Static leases prevent a non-VirusScan Enterprise for Storage device from being assigned an IP address
that is intended for a scanner, which could cause duplicate address issues.
McAfee VirusScan Enterprise for Storage 1.1.0
Product Guide
19
3
Configuration for standalone systems
Configure the service dependency
Use the tracert command on each filer to examine the number of router hops between filers and
scanners. There should be 0 hops, with only bridges and switches between the filers and scanners.
Assigning static IP addresses prevents the scanner from inadvertently changing IP addresses.
For virtualized scanners, make sure that the virtualized networking environment (hypervisor internal
software switching/routing) configuration is correct and determines the configuration's current health.
Configure the service dependency
VirusScan Enterprise for Storage has the service dependency configured by default. However, you can
view or edit this settings as required. If any failure happens in the scanner count, these two services
must be set to restart.
Make sure that the filers are registered within VirusScan Enterprise for Storage by their static IP
address and not by their DNS name. It avoids DNS lookup time and DNS lookup failure due to DNS
server outages. Make sure that the service dependencies and recovery options are configured
properly.
Task
1
Log on to the system as an administrator.
2
On the Windows taskbar, right-click the McAfee menulet
3
On the VirusScan Console, right-click Access Protection, then click Disable.
4
From the Windows taskbar, select Start | Administrative Tools | Services.
a
Right-click McAfee VirusScan Enterprise for Storage, then click Stop.
b
Right-click McAfee VirusScan Enterprise for Storage Monitor, then click Stop.
5
Double-click McAfee VirusScan Enterprise for Storage.
6
On the Recovery tab, define these settings, then click OK.
a
From the First failure drop-down list, select Restart the Service.
b
From the Second failure drop-down list, select Restart the Service.
c
From the Subsequent failures drop-down list, select Restart the Service.
7
Double-click McAfee VirusScan Enterprise for Storage Monitor service.
8
On the Recovery tab, define these options, then click OK.
9
, then click VirusScan Console.
a
From the First failure drop-down list, select Restart the Service.
b
From the Second failure drop-down list, select Restart the Service.
c
From the Subsequent failures drop-down list, select Restart the Service.
At the command prompt, execute this command:
sc.exe config "McAfee VirusScan Enterprise for Storage" depend=mcshield
10 On the Services Administrative Tool, verify that the two VirusScan Enterprise for Storage services have
the correct recovery options dependency.
20
McAfee VirusScan Enterprise for Storage 1.1.0
Product Guide
Configuration for standalone systems
View filers scan statistics
3
11 Start the McAfee VirusScan Enterprise for Storage service and the McAfee VirusScan Enterprise for Storage Monitor
service.
12 On the VirusScan console, enable Access Protection.
View filers scan statistics
View the statistics for NetApp filer scanner threads, scanning statistics, performance statistics and
statistics update interval settings.
Task
1
Log on to the system as an administrator.
2
On the Windows taskbar, right-click the McAfee menulet
3
On the VirusScan Console:
, then click VirusScan Console.
a
To view statistics for Network Appliance Filer AV Scanner, right-click Network Appliance Filer AV Scanner, then
click statistics.
b
To view statistics for ICAP AV Scanner, right-click ICAP AV Scanner, then click statistics.
McAfee VirusScan Enterprise for Storage 1.1.0
Product Guide
21
3
Configuration for standalone systems
View filers scan statistics
22
McAfee VirusScan Enterprise for Storage 1.1.0
Product Guide
4
Manage the software from ePolicy
Orchestrator
Integrate and manage VirusScan Enterprise for Storage using ePolicy Orchestrator management
software.
Contents
Manage policies
Create a NetApp filer policy
Create an ICAP server scan policy
Manage policies
Policies for VirusScan Enterprise for Storage allow you to configure the features and feature
administration, and to log details on managed systems.
You can find these policies on the Policy Catalog page under Product:
•
ICAP Policies
•
NetApp Policies
Configure these policies, then assign them to groups of managed systems. For more information about
policies, see the product guide for your version of ePolicy Orchestrator.
Tasks
•
Create or modify policies on page 23
You can create and edit policies for a specific group in the System Tree.
•
Assign policies on page 24
After you create or modify policies, assign them to the systems that are managed by
ePolicy Orchestrator.
Create or modify policies
You can create and edit policies for a specific group in the System Tree.
Task
For option definitions, click ? in the interface.
1
Log on to the ePolicy Orchestrator server as an administrator.
2
From the Policy Catalog, select a product and category.
3
Perform these steps to create or modify a policy.
McAfee VirusScan Enterprise for Storage 1.1.0
Product Guide
23
4
Manage the software from ePolicy Orchestrator
Create a NetApp filer policy
To create a policy
To modify a policy
1 Click New Policy.
1 Click the policy you want to change.
2 Type a name for the policy, then click OK.
2 Configure the settings.
3 Configure the settings.
4
Click Save.
Assign policies
After you create or modify policies, assign them to the systems that are managed by ePolicy
Orchestrator.
Task
For option definitions, click ? in the interface.
1
Log on to the ePolicy Orchestrator server as an administrator.
2
From the System Tree, select a group or systems, then click the Assigned Policies tab.
3
Select a product from the Product list, select a policy, then click Edit Assignment.
4
Select the policy to assign, select appropriate inheritance options, then click Save.
Create a NetApp filer policy
Create NetApp filer policies to define parameters for scanning file types, and to manage the list of
NetApp filers connected to VirusScan Enterprise for Storage.
Task
For option definitions, click ? in the interface.
24
1
Log on to the ePolicy Orchestrator server as an administrator.
2
From the Policy Catalog, select VirusScan Enterprise for Storage 1.1.0 as the product, then select NetApp Policies
as the category.
3
Click New Policy, type a name for the policy, then click OK.
4
On the Filers tab of the policy page, configure the filers list that the scan server protects, and create
a user account with proper permissions such as, read, write, and backup for all filers:
McAfee VirusScan Enterprise for Storage 1.1.0
Product Guide
4
Manage the software from ePolicy Orchestrator
Create a NetApp filer policy
In...
Define...
Filers list
• Overwrite client filer list — Processes scan requests only for filers defined in the
policy.
• Filers — Use the plus and minus signs to add and remove filers.
These settings apply
to all filers
• Enable 'keep-alive' probes — To make sure that the filer and scanner-server are in
communication.
• Reset filer's clean file cache after each DAT or Engine update — Clears the cache of files
already scanned after the scanner-server sends a DAT or engine update. This
makes all files available for scanning with the latest DAT and engine files.
McAfee recommends that you enable these two options for all filers.
Administrator account Specify a user account with proper permissions (read, write, and backup) to all
common to all filers
filers. If this option is not selected, you must set up an individual account for
each locally installed VirusScan Enterprise for Storage connection.
5
On the Scan Items tab, define the type of files to scan for malware threats and to detect unwanted
programs:
In...
Define...
Scanning
• Enable Scanning — Enable or disable scanning.
File types to
scan
• All files — Scans all files regardless of the file extension.
• Default + specified file types — Scans files with the default list of extension and the
additional extension you specify. The default list is defined by the current DAT file.
• Include files with no extension — Scans files that do not contain an extension.
• Also scan for macros in all files — Scans for macro threats added in the files.
• Specified file types only — Scans the list of user-specified extensions. You can also
remove any extensions that you added previously.
If selected, you can type multiple file extensions separated by spaces in the text
box.
• Include files with no extension — Scans files that do not contain an extension.
Options
• Detect unwanted programs — Scans for unwanted programs installed on the server.
• Decode MIME encoded files — Decodes the MIME encoded files.
• Scan inside archives (e.g. .ZIP) and compressed executables — Scans compressed and archived
executable files for threats.
Heuristics
• Find unknown unwanted programs and Trojans — Scans for unwanted programs and trojans
on the server.
• Find unknown macro threats — Scans for unknown macro threats.
6
On the Exclusions tab, configure the files and folders to exclude from scanning:
McAfee VirusScan Enterprise for Storage 1.1.0
Product Guide
25
4
Manage the software from ePolicy Orchestrator
Create a NetApp filer policy
In...
Define...
What not to scan
Select the type of exclusion from the drop-down list, then specify the details for
the exclusion:
• Exclude by pattern — Type the pattern in the text box. Separate multiple entries
with a space. Select Include subfolders as needed.
• Exclude by file type — Type the file type in the text box. Separate multiple entries
with space.
• Exclude by file age — Select the access type (Modified, Created, or Accessed), then
specify a minimum age in days.
How to handle
client exclusions
7
• Overwrite client exclusions — Exclude the items specified in this policy. If this option
is not selected, the exclusion items defined in the local system is used.
On the Performance tab, configure the scanning duration options to improve the performance.
In...
Define...
Maximum scan time
(seconds)
• Maximum scan time (seconds) — Specifies the maximum scan time for files in
seconds. Default = 60 seconds. If a scan exceeds the time limit, the scan
stops and logs a message.
Number of anti-virus scan • Number of anti-virus scan threads — Specifies the number of anti-virus scan
threads
threads. Default = 100 threads.
8
26
On the Actions tab, define the primary and secondary actions to perform when a threat is detected:
McAfee VirusScan Enterprise for Storage 1.1.0
Product Guide
Manage the software from ePolicy Orchestrator
Create a NetApp filer policy
In...
4
Define...
When a threat Perform this action first — Select the first action that you want the scanner to take when a
is found
threat is detected.
• Clean Files Automatically — The scanner tries to remove the detected threat from the
file.
• Continue Scanning — A clean or delete action is not attempted on the threatened file.
The filer is notified of the threat and the action is logged.
• Delete Files Automatically — The scanner deletes files with potential threats as soon as it
detects them.
If the first action fails, then perform this action — Select the next action you want the scanner to
take if the first action fails.
• Continue Scanning — A clean or delete action is not attempted on the threatened file.
The filer is notified of the threat and logged.
• Delete Files Automatically — The scanner deletes files with potential threats as soon as it
detects them.
When an
unwanted
program is
found
Perform this action first — Select the first action that you want the scanner to take when
an unwanted program is detected.
• Clean Files Automatically — The scanner tries to remove the detected threat from the
file.
• Continue Scanning — A clean or delete action is not attempted on the infected file. The
filer is notified of the threat and logged.
• Delete Files Automatically — The scanner deletes files with potential threats as soon as it
detects them.
If the first action fails, then perform this action — Select the next action you want the scanner to
take if the first action fails.
• Continue Scanning — A clean or delete action is not attempted on the threatened file.
The filer is notified of the threat and logged.
• Delete Files Automatically — The scanner deletes files with potential threats as soon as it
detects them.
9
On the Reports tab, configure these log activities preferences:
In...
Define...
Activity log
• Enable activity logging — Enables the default log file location.
Log file
location
Accept the default location for the log file or specify a new location.
• The default log name is NetAppScanLog.txt.
• The default location is: <drive>:\Documents and Settings\All Users
\Application Data\McAfee\DesktopProtection\.
Log file size
Specify the size of the log file. Accept the default size (1 MB) or set a size from 1 MB
to 999 MB. If the data in the log file exceeds the file size you set, 20 percent of the
oldest entries are deleted and new data is appended to the file.
McAfee VirusScan Enterprise for Storage 1.1.0
Product Guide
27
4
Manage the software from ePolicy Orchestrator
Create an ICAP server scan policy
In...
Define...
Log file format
Select the format of the log file. Default = Unicode (UTF8).
• Unicode (UTF8) — Recommended if you are storing eastern text (every character is
one or two bytes), or sharing information within a multi-national organization.
• Unicode (UTF16) — Recommended if you are storing eastern text (every character is
one or two bytes), or sharing information within a multi-national organization.
• ANSI — Recommended if you are storing western text (every character is one
byte). We recommend using ANSI format.
What to log in
addition to
scanning
activity
• Session settings — Record the properties for each scanning session in the log file.
• Session summary — Record a summary of the scanning actions for each session in
the log file. Summary information includes the number of files scanned, the
number and type of detections, the number of files cleaned or deleted, and other
information.
• Failure to scan encrypted files — Record the name of encrypted files that the scanner
failed to scan.
10 Click Save.
Create an ICAP server scan policy
Create ICAP server scan policies to define the file types to be scanned, and to manage the list of ICAP
appliances connected to VirusScan Enterprise for Storage.
Task
For option definitions, click ? in the interface.
1
Log on to the ePolicy Orchestrator server as an administrator.
2
From the Policy Catalog, select VirusScan Enterprise for Storage 1.1.0 as the product, then select ICAP Policies
as the category.
3
Click New Policy, type a name for the policy, then click OK.
4
On the Connections and Server tab, configure IP addresses that can accept ICAP scan requests, the bind
address (the IP address of the computer where VirusScan Enterprise for Storage is installed), and
the port number:
In...
Define...
Connection list
Specify the ICAP server configuration and the list of IP addresses to accept
connections from
• Overwrite client filer list — Overrides the client list of IP addresses and accept ICAP
requests only from the listed IP address.
• Accept connections and scan requests from these IP addresses only — Defines the list of IP
addresses for which connections and scan requests can be accepted.
ICAP Server
Configuration
5
28
• Overwrite ICAP server configuration on each client — Overrides the server configuration
on each client.
On the Scan Items tab, configure the file types to scan, detect for unwanted programs:
McAfee VirusScan Enterprise for Storage 1.1.0
Product Guide
4
Manage the software from ePolicy Orchestrator
Create an ICAP server scan policy
In...
Define...
Scanning
• Enable Scanning — Enable or disable scanning.
File types to
scan
• All files — Scans all files.
• Default + specified file types — Scans default and specified files.
You can add more file types by typing the file extensions separated by spaces.
• Include files with no extension — Scans files that do not contain an extension.
• Also scan for macros in all files — Scans for macros added in the file.
• Specified file types only — Scans only files you specify.
You can add more file types by typing the file extensions separated by spaces.
• Include files with no extension — Scans files that do not contain an extension.
Options
• Detect unwanted programs — Scans for unwanted programs installed on the server.
• Decode MIME encoded files — Decodes the MIME encoded files.
• Scan inside archives (e.g. .ZIP) and compressed executables — Scans the compressed and
archived executable file for threats.
Heuristics
• Find unknown unwanted programs and Trojans — Scans for unwanted programs and Trojans
on the server.
• Find unknown macro threats — Scans for unknown macro threats.
6
On the Performance tab, configure the scanning duration options to improve performance.
In...
Define...
Maximum scan time (seconds)
• Maximum scan time (seconds) — Sets the maximum time in seconds for
scanning a file.
Number of anti-virus scan threads • Number of anti-virus scan threads — Sets the maximum number of scan
threads.
7
On the Actions tab, define the primary and secondary action to perform when a threat is detected:
In...
Define...
When a threat is
found
• In Perform this action first,
• Cleans File Automatically — Cleans the item that contains a threat then Continue
Scanning as secondary action.
• Continue Scanning — Continues scanning without taking any action when a
threat is found.
If the first action fails, then perform this action — Select the next action you want the
scanner to take if the first action fails. .
• Continue Scanning — Continue scanning when a threatened file is detected.
When an unwanted • In Perform this action first,
program is found
• Cleans File Automatically — Cleans the item that contains threat then Continue
Scanning as secondary action.
• Continue Scanning — Continues scanning without taking any action when a
threat is found.
McAfee VirusScan Enterprise for Storage 1.1.0
Product Guide
29
4
Manage the software from ePolicy Orchestrator
Create an ICAP server scan policy
8
On the Reports tab, configure these log activities preferences:
In...
Define...
Activity log
• Enable activity logging — Enables the default log file location.
• Log file location — Defines the log file location.
• Log file size —
Log file location
• Log file location — Defines the log file location.
Log file size
• Log file size — Sets the maximum size of the log file.
Log file format
• Log file format — Defines the log file format such as ANSI, Unicode UTF8, or
Unicode UTF16.
What to log in addition to
scanning activity
• Session settings — Logs the session details.
• Session summary — Logs the session summary.
• Failure to scan encrypted files — Logs the scan failure details for encrypted files.
9
30
Click Save.
McAfee VirusScan Enterprise for Storage 1.1.0
Product Guide
A
Frequently asked questions
Here are answers to frequently asked questions.
What are the file types that I should exclude from on-access scanning?
Exclude these common file types from on-access scanning. Add other files in the exclusion list
according to your environment.
Database files
•
.ldb
•
.pst.tmp
•
.mdb
•
.nsf
•
.pst
Archives or large files
•
.7z
•
.tar
•
.cab
•
.tgz
•
.iso
•
.vhd
•
.jar
•
.vmdk
•
.rar
•
.zip
Why is not VirusScan Enterprise for Storage designed to perform on-access scan for
database, large, or archived files?
When a system sends a scan file request to the filer, the filer has only 45 seconds of Common
Internet File System (CIFS) or Server Message Block (SMB) protocol timeout. This scanning
operation must be completed before this duration, otherwise the user is denied access to the
file.
There are three performance parameters for an on-access scan solution. Do not use the
time-sensitive on-access scanning solution, for:
•
Files that are already scanned by another product — Email local databases
(Example: .pst, .nsf) and email server or SQL Server databases (Example: .mdb, .mdf) use
large database files. These files should be scanned by email or database scanning software.
McAfee recommends that you configure specialized scanners to scan the database contents
upon creation.
•
Archived files — Scanning archived files such as .zip, .rar, or .7z requires the scan engine
to expand the archive folder and its contents before initiating the scanning.
McAfee recommends that you configure on-access scanning to scan the archive content when
it is expanded by the user, or schedule an on-demand scan to scan these files.
McAfee VirusScan Enterprise for Storage 1.1.0
Product Guide
31
A
Frequently asked questions
•
Large-size files — Files that are larger in size should be scanned using on-demand scanning
because it requires more system resources. This is evident in an ICAP on-access scanning
solution, where the entire file must be copied to the scanner before the scan is initiated.
McAfee recommends that you schedule an on-demand scan to scan these files.
Scanning these files with the on-access scanning solution increases the frequency of scan
timeout. If the filer is set to deny access to files that were not scanned, sometimes users are
denied access to files.
What are the dependencies that exist for VirusScan Enterprise for Storage and what are
the impacts?
VirusScan Enterprise for Storage uses the black-box approach to manage dependencies because
it is not a server or network management suite. If you encounter any dependency issues when
VirusScan Enterprise for Storage functions as expected, contact respective vendors, in addition
to McAfee support.
For more information on dependency stack, contact McAfee support.
Is NetApp scanning configuration complicated?
The NetApp ONTAP design involves these protocols with their dependencies:
•
Active Directory
•
NetBIOS over TCP/IP
•
CIFS/SMB
•
RPC
•
Named Pipes
These designs choices:
•
Confer certain benefits over other designs such as ICAP.
•
Require comprehensive prerequisites that must be met by the operating system and
VirusScan Enterprise for Storage product.
•
Require that the vendor scanner server meets the mandatory prerequisites for VirusScan
Enterprise for Storage and all NetApp mandatory prerequisites.
Why are read-only filer volumes not supported?
Any volume on a NetApp filer that has read-only permission (For example, SnapMirror volume
or, a Snapshot volume) should be excluded from VirusScan Enterprise for Storage on-access
scanning.
For more information, see McAfee KnowledgeBase article KB60568.
What is the importance of the scan thread configuration and how does it affect the scanner
count?
Consider a scenario where you have Y number of physical filers and Z number of discrete filer IP
addresses that send scan requests.
To deploy ICAP as 2 X Y scanners, you must configure each scanner's ICAP scan thread count as
20 X Z threads. **
** The value must be provided by the filer vendor based on how many outstanding scan
requests the filer’s operating system issues from the discrete filer IP address.
32
McAfee VirusScan Enterprise for Storage 1.1.0
Product Guide
Frequently asked questions
A
To deploy NetApp 2 X Y scanners, you must configure the NetApp scan thread count for each
scanner as (50 X (Z) threads. **
** The value must be provided by the filer vendor based on how many outstanding scan
requests the filer’s operating system issues from the discrete filer IP address.
VirusScan Enterprise for Storage can be configured with a maximum of 800 threads. One
scanner can handle scan requests from a maximum of 16 filers.
In the production environment, if 40 or more threads are used consistently, it represents stress.
If the Stats_ICAP.log threads used + Stats_NetApp.log threads used is > = 40 threads
consistently, you can add scanners until relief is observed and the thread count remains below
40.
If only ICAP or NetApp filers are scanned by the scanner, you need to consider only the Stats
_ICAP.log or Stats_NetApp.log respectively.
How do I run an on-demand scan on my filers that are not scanned by VirusScan Enterprise
for Storage on-access scanning?
McAfee recommends using a dedicated node for VirusScan Enterprise on-demand scan tasks. If
you schedule an on-demand scan task on a VirusScan Enterprise for Storage on-access scanner
node, the scanner consumes more resources, which is not recommended.
If a VirusScan Enterprise on-demand scan task requires more time to scan complicated files, it
can lead to resource contention between VirusScan Enterprise and VirusScan Enterprise for
Storage on-access scan. Also, VirusScan Enterprise on-demand tasks do not time out until the
scanning is completed.
You can use the Active Directory logon script batch file to start. This logon script at each boot
establishes drive mappings for the system user that runs an on-demand scan for archive and
large files. The batch file contains:
@echo off
net use w:
net use w:
net use x:
net use y:
net use z:
\\server\sharename1
\\server\sharename1
\\server\sharename2
\\server\sharename3
\\server\sharename4
Use one command for each map drive, where w, x, y, and z are drive letters and \\server
\sharename1‑4 are filer shares.
The drive mappings are displayed for all user accounts that log on to the node. For user sessions
other than System, the drive mappings are labeled as Disconnected network drive in
explorer.exe. This is because the user session running explorer.exe did not map the drives.
These drive mappings are still accessible to all user sessions with appropriate permissions to the
filer shares.
For more Frequently Asked Questions, see McAfee KnowledgeBase article KB78672.
McAfee VirusScan Enterprise for Storage 1.1.0
Product Guide
33
A
Frequently asked questions
34
McAfee VirusScan Enterprise for Storage 1.1.0
Product Guide
Index
A
about this guide 5
C
Clustered Data ONTAP Anti-virus Connector 8
command-line installation 14
configuration
ICAP settings 19
NetApp filers 17
windows Server 2008 16
windows Server 2012 16
conventions and icons used in this guide 5
D
installation (continued)
upgrading 15
using wizard 13
introduction 7
how ICAP server scanning works 9
how NetApp filer scanning works 8
M
malware
quarantine 9
managed systems
configuration 16
installation 14
McAfee ServicePortal, accessing 6
deployment, ePolicy Orchestrator 15
documentation
audience for this guide 5
product-specific, finding 6
typographical conventions and icons 5
E
extensions
installing the software 14
F
features 9
frequently asked questions 31
H
how ICAP server scanning works 9
how NetApp filer scanning works 8
how the software works 7
I
ICAP filers 9
ICAP server scanning
creating 28
installation
command line 14
extensions 14
on managed systems 14
on standalone systems 13
McAfee VirusScan Enterprise for Storage 1.1.0
N
NetApp filer policy
administrator account 24
define scanner threads 24
exclusions 24
NetApp filer scanning
creating 24
O
operating systems
requirements 11
P
packages
checking in 14
details 13
policies
assign 24
create 23
manage 23
modify 23
R
recommendations 12
requirements 11
Product Guide
35
Index
S
ServicePortal, finding product documentation 6
software
deployment 14
upgrade 16
software, upgrade 15
standalone systems
configuration 16
36
McAfee VirusScan Enterprise for Storage 1.1.0
standalone systems (continued)
installation 13
system requirements 11
T
Technical Support, finding product information 6
Product Guide
0-00