1
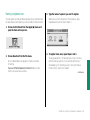
Part I
Getting Started
Part II
Learning
Macintosh
User’s Guide
for Macintosh PowerBook 145
Includes setup instructions and important health-related information
Part III
Reference
Part IV
Index
K Apple Computer, Inc.
This manual and the software described in it are copyrighted, with all rights reserved.
Under the copyright laws, this manual or the software may not be copied, in whole or
part, without written consent of Apple, except in the normal use of the software or to
make a backup copy of the software. The same proprietary and copyright notices must
be affixed to any permitted copies as were affixed to the original. This exception does
not allow copies to be made for others, whether or not sold, but all of the material purchased (with all backup copies) may be sold, given, or loaned to another person. Under
the law, copying includes translating into another language or format.
You may use the software on any computer owned by you, but extra copies cannot be
made for this purpose.
The Apple logo is a trademark of Apple Computer, Inc., registered in the U.S. and other
countries. Use of the “keyboard” Apple logo (Option-Shift-K) for commercial purposes
without the prior written consent of Apple may constitute trademark infringement and
unfair competition in violation of federal and state laws.
Adobe, Adobe Illustrator, and PostScript are trademarks of Adobe Systems
Incorporated, registered in the United States. Adobe Photoshop is a trademark of
Adobe Systems Incorporated.
AGFA is a registered trademark of Agfa-Gevaert, AG.
Classic is a registered trademark licensed to Apple Computer, Inc.
Exposure is a registered trademark of Preferred Publishers, Inc.
Helvetica and Times are registered trademarks of Linotype Company.
ITC Garamond is a registered trademark of International Typeface Corporation.
MacWrite is a registered trademark of Claris Corporation.
MS-DOS is a registered trademark of Microsoft Corporation.
QMS is a registered trademark and ColorScript is a trademark of QMS, Inc.
QuarkXPress is a registered trademark of Quark, Inc.
© Apple Computer, Inc., 1992
20525 Mariani Avenue
Cupertino, CA 95014-6299
(408) 996-1010
SelectSet is a trademark of Miles, Inc., Agfa Division.
Apple, the Apple logo, APDA, AppleLink, AppleShare, AppleTalk, ImageWriter,
LaserWriter, LocalTalk, Macintosh, ProDOS, and StyleWriter are trademarks of Apple
Computer, Inc., registered in the U.S. and other countries.
Simultaneously published in the United States and Canada.
Apple Desktop Bus, Balloon Help, Chicago, Finder, Disk First Aid, Monaco, PowerBook,
System 7, and TrueType are trademarks of Apple Computer, Inc.
AppleCare is a service mark of Apple Computer, Inc., registered in the U.S. and other
countries.
SuperPaint is a registered trademark of Aldus Corporation.
Tektronix is a registered trademark and Phaser is a trademark of Tektronix, Inc.
Mention of third-party products is for informational purposes only and constitutes neither an endorsement nor a recommendation. Apple assumes no responsibility with
regard to the performance or use of these products.
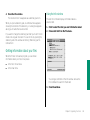
Contents
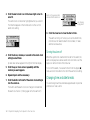
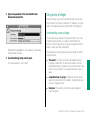
Preface How to Use This Book xiii
Learning the basics 10
Before you begin 10
Radio and television interference xv
Finding the tour 11
Starting the tour from the hard disk 11
n
Part I Getting Started With
Your Computer 1
Starting the tour from a floppy disk 15
Turning the Powerbook on and off 17
Off 17
Chapter 1 Setting Up Your Macintosh
PowerBook 1
Setting up the computer 2
Sleep 18
On 19
On/off summary 19
Step 1: Plug in the power adapter 2
When you turn on your computer 20
Step 2: Open the display 3
Restarting a computer that’s already on 21
Step 3: Turn on the computer 4
Restarting a computer that can’t be turned on normally 21
Trouble? 5
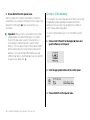
Installing system software 6
Continuing your work 7
What to do next 8
Your computer at a glance 9
Important care and safety instructions 23
± Warning 23
s Caution 24
S Important 25
Health concerns associated with computer use 26
Repetitive stress injuries 26
Arranging your work space and equipment 27
iii
n
Part II Learning Macintosh 31
Chapter 2 Working on the Desktop 31
Use the trackball 32
Chapter 3 Creating and Changing
a Document 51
Open a program 52
Create a document 53
Point 32
Save your work 53
Click 33
Switch programs 54
Press 34
Close a document 56
Drag 35
Choose a command 36
Giving orders to your computer 36
Open an icon 37
Look at the contents of a window 38
Two types of programs 57
Open a document 57
Change a document 58
Save your work so far 61
Taking a shortcut 62
Make a window the active window 38
Make more changes 62
Make a window larger or smaller 40
Quit a program 64
Move the hidden contents of a window into view 42
Opening and closing documents and programs 65
Close a window 44
Make a copy of a document 65
Move a window 45
Change the name of an icon 66
What’s on the desktop? 46
Using the keyboard 49
iv Contents
Use the Trash 67
Chapter 4 Working With Disks 69
n
Part III Macintosh Reference 87
Insert a floppy disk 70
Floppy disks and hard disks 71
Initialize a disk 72
Copy the contents of a disk 74
Taking care of floppy disks 75
Chapter 6 Setting Up Your Programs 87
Installing or updating system software 87
Before you install 88
Installing system software 88
Take a floppy disk out of its drive 76
Installing customized system software 90
Protect the contents of disk 77
Starting up with a floppy disk 91
On your own: Install your programs 78
Throw away extra System Folders 79
Installing your programs 92
Installing programs without a floppy disk drive 92
Checking for computer viruses 93
Chapter 5 Learning More About
Your Computer 81
Working with several programs at a time 94
Finding out what programs are open 94
Open the Battery desk accessory 82
Switching programs 94
Open the PowerBook control panel 82
Hiding and showing windows on the desktop 94
Use Balloon Help 83
Changing the amount of memory a program uses 95
Turn on Balloon Help 84
Turn off Balloon Help 84
Using the Scrapbook 96
Storing items in the Scrapbook 96
Use Part III of this book 85
Copying items from the Scrapbook 96
What next? 85
Deleting items from the Scrapbook 96
Contents v
Using a RAM disk 97
Creating a RAM disk 97
Chapter 8 Using Disks 113
Preparing a new disk for use 113
Erasing a RAM disk 98
Initializing a hard disk 113
Resizing or removing a RAM disk 98
Initializing a floppy disk 115
Making a RAM disk the startup disk 99
Erasing a floppy disk 116
Designating a startup disk 116
Chapter 7 Power Management 101
Monitoring the battery charge level 101
Scanning order for startup disks 117
Protecting the information on a disk 117
Using the battery desk accessory 101
Locking a floppy disk 117
Responding to low-power messages 102
Locking a file 118
Recharging the battery 103
Backing up your files 119
Recharging with the power adapter 103
If you can’t save files on a floppy disk 119
Recharging with a recharger 105
Ejecting a disk 120
Removing or replacing the battery 106
Maximizing battery life 108
Maximizing work time 109
Ways to conserve battery power 109
If you can’t eject a floppy disk 120
Caring for disks 121
Hard disk precautions 121
Testing and repairing disks 121
Adjusting the battery conservation settings 110
If a hard disk icon doesn’t appear 121
Using the battery conservation options 111
Using Disk First Aid 122
Testing a hard disk 124
vi Contents
Chapter 9 Organizing Your Files 125
Straightening up your files 125
Using folders to organize your files 126
Creating and naming folders 126
Filing documents when you save them 127
Making items easier to find 128
Chapter 10 Adapting Your Computer to
Your Own Use 139
Specifying which items you want opened at startup 140
Installing an item in the Apple menu 140
Installing files in the System Folder 140
Removing files from the System Folder 141
Creating an alias 128
Changing the items in the Label menu 142
Installing an item in the Apple menu 129
Setting the time and date 142
Moving an item to the desktop 129
Setting a time for the Alarm Clock to go off 143
Finding an item 130
Finding an item by name 130
Turning the alarm off 144
Changing time and date formats 144
Finding an item using other criteria 131
Changing the date format 145
Finding items that meet two criteria 133
Changing the time format 146
Ways to use the Find command 132
Changing number and currency formats 147
Creating a template or stationery 134
Adjusting the way the trackball or mouse works 148
Getting information about your files 135
Adjusting the way the keyboard works 149
Using the Info window 135
Making keyboard shortcuts easier to type 150
Using the View menu 136
Adjusting the keyboard for very slow typing 150
Assigning a label to a file 136
Adjusting the blinking of a menu item 151
Tips on transferring files 137
Adjusting the blinking of the insertion point 151
Changing the way the contents of windows appear 152
Changing an icon 153
Contents vii
Turning off the Empty Trash warning 154
Controlling background printing 175
Managing memory 155
Working with fonts 176
Checking memory use 155
Outline fonts and bitmap fonts 176
Making the most of your memory 155
Installing fonts 177
Adjusting the disk cache 156
Removing fonts 178
Using hard disk space as memory 157
Transferring fonts to a LaserWriter printer 178
Turning on 32-bit addressing 158
Finding out about available fonts 180
Setting the beep sound 159
Other ways to use the LaserWriter Font Utility 180
Installing a sound 160
Removing a sound 160
Recording sounds 161
Chapter 12 Using Your Computer
on a Network 183
Changing the background pattern 162
What networking offers 183
Magnifying the screen image 164
Setting up your computer on a network 184
Connecting to a network 185
Chapter 11 Printing 167
Before you print 167
Choosing a printer 167
Turning on AppleTalk 185
Naming your computer and its owner 186
Gaining access to files on shared disks 187
Selecting Page Setup options 170
Before you begin 187
Updating printer software on networked computers 171
Connecting to a shared disk 187
Printing your work 172
Disconnecting from a shared disk 189
Printing the contents of a window or the desktop 173
Connecting quickly to a shared disk 190
Solutions to common printing problems 174
Connecting automatically when you start up 190
viii Contents
Working with files and folders on other computers 191
Creating a new folder on another computer 191
Changing your password 191
Giving folder ownership to someone else 193
Sharing your own files 193
How file sharing works 193
Turning file sharing on 194
Turning on guest access 194
Selecting a folder or disk to share 195
Naming a registered user 197
Setting a registered user’s password 198
Naming a group of users 198
Seeing who’s in a group 199
Selecting a user or group to share a folder or disk 200
Preventing specific users or guests from accessing your
computer 201
Removing a user from a group 202
Removing a user or group from your list of registered
users 202
Giving away ownership of a folder or disk on your
computer 203
Turning file sharing off 203
Monitoring file-sharing activity 204
Disconnecting someone who is connected to
your computer 205
Gaining access to your computer from another computer 205
Changing your password 206
Using access privileges 207
Understanding access privileges 207
Setting access privileges to folders and disks 208
Access privilege strategies 209
Working with privileges others have set 211
Checking your access privileges 211
Linking programs 212
Linking to a program on another computer 212
Disconnecting a program link 213
Allowing other people to link to your programs 213
Chapter 13 Expanding Your Computer
System 217
Using SCSI devices 217
Installing software 218
Setting SCSI ID numbers 218
Checking that the SCSI chain is properly terminated 220
Connecting cables 221
Contents ix
Connecting a modem 222
Quick Reference Summary and Shortcuts 233
Connecting a printer 223
Shift-Click 233
Connecting a mouse or other ADB device 223
Working with icons 233
Using sound input and output devices 224
Selecting icons 233
Connecting a microphone 224
Opening an icon 234
Sound output devices 225
Moving, copying, and renaming an icon 234
Adding memory to your computer 225
Working with windows 234
Making a window the active window 234
Chapter 14 Travel, Storage, and Service 227
Moving a window and changing its size 234
Traveling with the PowerBook 227
Scrolling through the contents of a window 235
Storing the PowerBook 228
Opening higher-level folder windows 235
Short-term storage (up to 2 weeks) 228
Long-term storage (more than 2 weeks) 229
Service and support 229
If the PowerBook malfunctions or is damaged 229
How to get help 230
For more information about Macintosh computers 231
Macintosh user groups 231
Technical information 231
x Contents
Using the outline form in list views 236
Working with menus 236
Choosing an item from a menu 237
Choosing an item from a submenu 237
Keyboard shortcuts in the Finder and in directory
dialog boxes 238
Troubleshooting 239
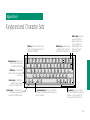
Appendix A Keyboard and Character Sets 253
The PowerBook 239
Using Caps Lock 254
Power 241
Typing special characters and symbols 254
The Screen 243
Memory 244
SCSI devices 244
Appendix B Exchanging Disks and Files with
MS-DOS Computers 257
Disk drives and disks 245
Initializing a disk in MS-DOS format 257
Modems 248
Converting files to and from MS-DOS format 269
Printers 248
Other file-conversion options 261
Networks 250
Application programs 251
Contents xi
Appendix C Map 263
Setting your location 263
Comparing locations 264
Finding a location 265
Adding or removing a location 266
Adding a location 266
Changing or removing a location 266
n
Part IV Index 271
xii Contents
Preface
How to Use This Book
Certain kinds of information are not included in this book.
n
This book has several parts.
n
n
n
n
Chapter 1 explains how to set up your computer and learn
how to use it.
Chapters 2–5 are a tutorial designed for people who have not
used a Macintosh computer before. If you are new to the
Macintosh, you should read this section of the book before
you start your own work.
Chapters 6–14 contain reference information that will help
you as you become more proficient with your computer.
You can turn to these chapters for information about a
particular topic.
n
n
Information about modems. If your computer has a built-in
modem, or if you purchase one later, you receive a separate
modem manual with instructions for its use.
Information about application programs. Your best source of
information about a particular program is the set of books and
disks that came with that program.
Technical specifications for your PowerBook model. These are
on a separate sheet in the box with your computer.
Turn now to Chapter 1 to set up your new PowerBook computer.
Welcome to Macintosh.
At the back of the book you’ll find a troubleshooting section
and an index.
xiii
xiv
Radio and television interference
Important
The equipment described in this manual generates, uses, and can radiate radiofrequency energy. If it is not installed and used properly—that is, in strict accordance
with Apple’s instructions—it may cause interference with radio and television reception.
This equipment has been tested and found to comply with the limits for a Class B digital
device in accordance with the specifications in Part 15 of FCC rules. These specifications
are designed to provide reasonable protection against such interference in a residential
installation. However, there is no guarantee that the interference will not occur in a
particular installation.
You can determine whether your computer system is causing interference by turning it
off. If the interference stops, it was probably caused by the computer or one of the
peripheral devices.
If your computer system does cause interference to radio or television reception, try to
correct the interference by using one or more of the following measures:
n Turn the television or radio antenna until the interference stops.
n Move the computer to one side or the other of the television or radio.
n Move the computer farther away from the television or radio.
n Plug the computer into an outlet that is on a different circuit from the television or
radio. (That is, make certain the computer and the television or radio are on circuits
controlled by different circuit breakers or fuses.)
If necessary, consult your authorized Apple dealer or an experienced radio/television
technician for additional suggestions. You may find helpful the following booklet,
prepared by the Federal Communications Commission: Interference Handbook (stock
number 004-000-00345-4). This booklet is available from the U.S. Government Printing
Office, Washington, DC 20402.
This equipment has been tested and found to comply with the limits for a Class B
digital device in accordance with the specifications in Part 15 of FCC rules. See
instructions if interference to radio or television reception is suspected.
DOC Class B Compliance This digital apparatus does not exceed the Class B limits
for radio noise emissions from digital apparatus set out in the radio interference
regulations of the Canadian Department of Communications.
Observation des normes—Classe B Le présent appareil numérique n’émet pas de
bruits radioélectriques dépassant les limites applicables aux appareils numériques de la
Classe B prescrites dans les règlements sur le brouillage radioélectrique édictés par le
Ministère des Communications du Canada.
S Important: Changes or modifications to this product not authorized by Apple
Computer, Inc., could void the FCC Certification and negate your authority to
operate the product.
This product was tested for FCC compliance under conditions that included the use
of shielded cables and connectors between system components. It is important that
you use shielded cables and connectors to reduce the possibility of causing
interference to radios, television sets, and other electronic devices. For Apple
peripheral devices, you can obtain the proper shielded cables from your authorized
Apple dealer. For non-Apple peripheral devices, contact the manufacturer or dealer
for assistance. S
xv
yyyyyyyyyyy
yyyyyyyyyyy
yyyyyyyyyyy
yyyyyyyyyyy
yyyyyyyyyyy
Chapter 1
Setting Up Your
Macintosh PowerBook
In this chapter
m Setting up your computer
m Installing system software
m Learning how to use your computer
m Turning the computer on and off
m Important care and safety instructions
m Being comfortable while you work
m New Macintosh users: If you have never used a Macintosh
computer before, read this entire chapter. It explains how
to set up your computer, learn how to use it, and turn it on
and off.
m New PowerBook users: If you have used other Macintosh
computers but are new to the PowerBook, follow the setup
instructions that begin on the next page and then go to the
section on turning the PowerBook on and off.
m Experienced PowerBook users: Skim this chapter for
information that applies to your computer.
s Important: No matter what your level of experience, please
read the safety information in this chapter before beginning
your own work. This information can help protect you and
your computer equipment from possible harm. s
1
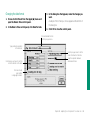
Setting up the computer
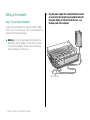
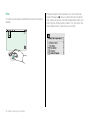
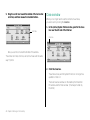
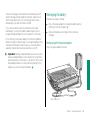
Step 1: Plug in the power adapter
m Plug the power adapter into a standard electrical outlet
or power strip. Then plug the power adapter cable into
the power adapter port (marked with the icon ¯) on
the back panel of the computer.
Plugging in the power adapter recharges the computer’s battery
while you work. You should plug it in now in case the battery has
drained during shipping and storage.
s Warning: Use only the power adapter that came with your
PowerBook computer. Adapters for other electronic devices
(including other portable computers) may look similar, but
they may damage your computer. s
Power adapter port
2 Chapter 1: Setting Up Your Macintosh PowerBook
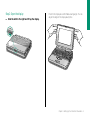
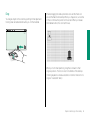
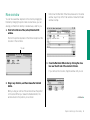
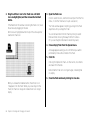
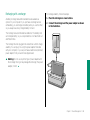
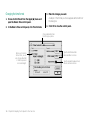
Step 2: Open the display
m Slide the latch to the right and lift up the display.
Position the display at a comfortable viewing angle. You can
adjust the angle of the display at any time.
Chapter 1: Setting Up Your Macintosh PowerBook 3
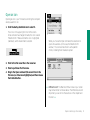
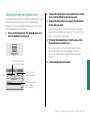
Step 3: Turn on the computer
m Open the door to the back panel of your computer.
m Press the power button to turn the computer on. The
power button has this icon: I
Power button
You hear a tone when you turn on the computer. It takes the
computer a moment to start up.
4 Chapter 1: Setting Up Your Macintosh PowerBook
m If you see a blinking question mark on your screen, you
need to install system software on the computer’s hard disk.
System software includes the programs the computer uses to
start itself up. Continue with the section “Installing System
Software.”
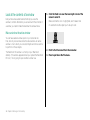
Trouble?
m The computer made a sound, but you can’t see anything on
the screen.
Adjust the brightness control (marked with the icon ¤) and
the contrast control (O) until an image appears and the
screen is easy to read.
Contrast control
m If you see the Macintosh desktop on your screen, the
computer is ready to use. You do not need to install system
software. Continue with the section “What to Do Next.”
Brightness control
m Nothing happened when you pressed the power button.
Make sure the power adapter is firmly connected to both
the computer and a power source. If the power adapter is
plugged into a power strip, make sure the power strip is
plugged in and turned on. Then try pressing the power
button again.
Chapter 1: Setting Up Your Macintosh PowerBook 5
Installing system software
System software is a set of programs that your computer uses to
start up and operate. To install system software on your hard disk,
follow these steps.
You do not need to install system software if you see the
Macintosh desktop on your screen when you turn on the
computer.
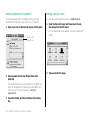
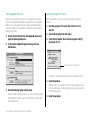
1. Find the Install disk provided with your computer.
Insert the disk into the floppy disk drive (metal end
first, label side up).
2. Press the Return key on your keyboard to continue.
The Easy Install dialog box appears. Easy Install puts the
system software that you’ll need right away onto your hard
disk.
3. Press the Return key again to start installing system
software.
Messages on your screen report how installation is
progressing.
4. When the computer prompts you, remove the Install
disk and insert the next disk the computer requests.
During installation, the computer automatically ejects a disk it
has finished with and requests the next disk it needs.
Insert metal end first.
5. Insert the remaining disks as the computer
prompts you.
6. When you see a message reporting that installation was
successful, press the Return key once more to quit the
Installer program.
If you see a message saying that installation was not
successful, you need to try again. Follow the instructions on
the screen.
After a few moments, you’ll see the Welcome box of the
Installer, the program that installs system software on your
hard disk.
6 Chapter 1: Setting Up Your Macintosh PowerBook
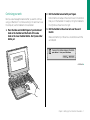
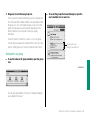
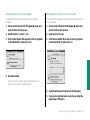
Continuing your work
Next you see a message that asks whether you want to continue
using your Macintosh. To continue working or to learn how to use
the computer, use the trackball to choose Restart.
1. Place the index and middle fingers of your dominant
hand on the trackball and the thumb of the same
hand on the lower trackball button. Don’t press either
button yet.
2. Roll the trackball around with your fingers.
Notice that the arrow (8) on the screen moves in the direction
that you roll the trackball. For example, rolling the trackball to
the right moves the arrow to the right.
3. Roll the trackball so the arrow rests over the word
Restart.
Make sure that the tip of the arrow is inside the box with the
word Restart.
continues .
Chapter 1: Setting Up Your Macintosh PowerBook 7
4. Press and release one of the trackball buttons.
Both buttons do the same thing.
The screen darkens, you hear a sound, and then after a
moment the Macintosh desktop appears on the screen.
What to do next
m If you have never used a Macintosh computer before,
continue with the section “Learning the Basics.”
m Otherwise, continue with the section “Turning the PowerBook
On and Off.” This section contains information that can help
you use your computer efficiently.
m Be sure to read the safety instructions and the section on
health concerns before beginning to use your PowerBook.
If nothing happens, try clicking the word Restart again. Make sure
that the tip of the arrow is inside the box with the word Restart.
8 Chapter 1: Setting Up Your Macintosh PowerBook
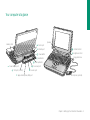
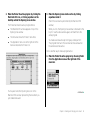
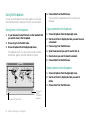
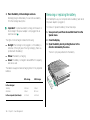
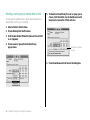
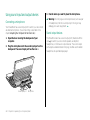
Your computer at a glance
Speaker
Elevation feet
[ Printer port
W Modem port
I Power button
P Reset button
O Contrast control
¤ Brightness control
Floppy disk drive
¥ Interrupt button
¯
Power adapter port
g SCSI port (HDI-30)
- Sound out port
≈ Sound in port
V Apple Desktop Bus (ADB) port
Microphone (optional)
Chapter 1: Setting Up Your Macintosh PowerBook 9
Learning the basics
Before you begin
The PowerBook comes with a tour and a tutorial to help you start
using your computer as quickly as possible.
Make sure your computer is turned on. If the screen is dark, try
the following steps in order until you see the Macintosh desktop
on your screen.
m The Macintosh Basics tour teaches the most basic skills you
need to master before you can use your computer.
m The tutorial section of this book (Chapters 2–5) reviews the
basic skills taught in the tour, and teaches a few additional
skills you’ll find helpful as you become more proficient.
Take the Macintosh Basics tour first.
1. Adjust the screen brightness and contrast controls.
If you see the Macintosh desktop, skip to “Finding the Tour.”
2. Press any key on the keyboard (except Caps Lock).
Pressing a key wakes the computer if it was in sleep (a powerconserving state described later in this chapter). If you see the
Macintosh desktop, skip to “Finding the Tour.”
3. Press the power button on the computer’s back panel.
Pressing the power button turns the computer on if it was off.
Continue with “Finding the Tour.”
10 Chapter 1: Setting Up Your Macintosh PowerBook
Finding the tour
Starting the tour from the hard disk
Your Macintosh Basics tour may be on a floppy disk, or it may be
on the computer’s hard disk.
1. Roll the trackball to move the arrow over the picture
labeled “Macintosh HD.”
m If the Macintosh desktop appeared on the screen when you
first turned on your computer, then the system software
and the Macintosh Basics tour were installed on your
computer’s hard disk at the factory. Continue with the section
“Starting the Tour From the Hard Disk.”
Make sure the tip of the arrow is over the picture, not over
the words “Macintosh HD.”
m If you needed to install system software when you set up your
computer (as described in the previous section of this
chapter), then the Macintosh Basics tour is on a floppy disk in
the box with your computer. Locate the disk and continue
with the section “Starting the Tour From a Floppy Disk.”
continues .
Chapter 1: Setting Up Your Macintosh PowerBook 11
2. Being careful not to roll the trackball, press the
trackball button twice in quick succession.
Now your screen should look like the picture following step 3.
If it doesn’t, try steps 1 and 2 again, paying special attention to
the following:
m Make sure the tip of the arrow is touching the picture, not
the words beneath it.
m Be sure to press the trackball button twice.
m Try pressing twice more quickly and be careful not to roll
the trackball while you press.
12 Chapter 1: Setting Up Your Macintosh PowerBook
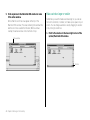
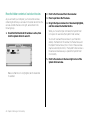
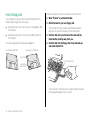
3. Roll the trackball to move the arrow over the picture of
the folder labeled “Macintosh Basics.”
Make sure the tip of the arrow is over the picture, not over
the words “Macintosh Basics.”
The items in the illustration below may not exactly match
those on your screen. The only item you need right now is the
Macintosh Basics folder.
4. Being careful not to roll the trackball, press the
trackball button twice in quick succession.
Now your screen should look like the following illustration:
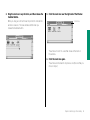
5. Roll the trackball to move the arrow over the picture of
the man labeled “Macintosh Basics.”
Make sure the tip of the arrow is over the picture of the man,
not over the words “Macintosh Basics.”
continues .
Chapter 1: Setting Up Your Macintosh PowerBook 13
6. Press the trackball button twice in quick succession.
Now your screen should look like the following picture:
7. Follow the instructions on the screen and work through
the tour.
When you finish the tour, continue with “Turning the PowerBook
On and Off ” and read the rest of this chapter for information that
can help you use your computer safely and efficiently. Then turn
to Chapter 2 and begin the tutorial.
If you don’t see this screen, try again, paying special attention
to the following:
m Make sure the tip of the arrow is touching the picture, not
the words beneath it.
m Be sure to press the trackball button twice.
m Try pressing twice more quickly and be careful not to roll
the trackball while you press.
14 Chapter 1: Setting Up Your Macintosh PowerBook
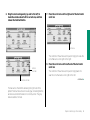
Starting the tour from a floppy disk
After a moment, your screen should look like this:
1. Insert the Macintosh Basics disk into the floppy disk
drive (metal end first, label side up).
Insert metal end first.
continues .
Chapter 1: Setting Up Your Macintosh PowerBook 15
2. Roll the trackball to move the arrow over the picture of
the man labeled “Macintosh Basics.”
Make sure the tip of the arrow is over the picture of the man,
not over the words “Macintosh Basics.”
If you don’t see this screen, try again, paying special attention
to the following:
m Make sure the tip of the arrow is touching the picture, not
the words beneath it.
m Be sure to press the trackball button twice.
m Try pressing twice more quickly and be careful not to roll
the trackball while you press.
4. Follow the instructions on the screen and work through
the tour.
3. Press the trackball button twice in quick succession.
Now your screen should look like the following picture:
16 Chapter 1: Setting Up Your Macintosh PowerBook
When you finish the tour, read the rest of this chapter for
information that can help you use your computer safely and
efficiently. Then turn to Chapter 2 and begin the tutorial.
Turning the PowerBook on and off
To turn the PowerBook off
Your Macintosh PowerBook can be in one of three power states:
off, sleep, or on.
m If the computer is on, choose the Shut Down command from
the Special menu. (The Macintosh Basics tour teaches how to
choose a menu command.)
Off
When the PowerBook is off, the computer is not using any power
or doing any work. The terms shut down and off both refer to this
state.
You should turn the computer off to
m attach other equipment to it
m replace its battery
m conserve power when you won’t be using it for several hours
m If the computer is in sleep, wake it by pressing any key on the
keyboard (except Caps Lock), and then choose Shut Down.
s Important: Don’t shut down with the power button on
the back panel of the computer unless a problem prevents
you from choosing Shut Down. You will lose any work you
did not save, and you may experience problems with your
hard disk. s
Chapter 1: Setting Up Your Macintosh PowerBook 17
Sleep
When the PowerBook is in sleep, it draws enough power to
maintain the information in its memory (including any open
programs and documents). The computer is on, but almost
completely inactive.
You should put the computer to sleep to conserve power when
you take a work break.
To put the PowerBook to sleep
m If the computer is on, choose the Sleep command from the
Special menu.
18 Chapter 1: Setting Up Your Macintosh PowerBook
m If the computer is off, you need to turn it on before you can
put it to sleep.
Automatic sleep
If you don’t use the computer for several minutes, it goes to sleep
automatically. This conserves battery power. You will notice that if
you spend several minutes reading without using the computer,
or if you take a break, the screen may be dark when you’re ready
to resume working.
To wake the computer, press any key on the keyboard (except
Caps Lock). The desktop reappears looking just the way it did
before the computer went to sleep.
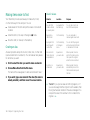
On
On/off summary
When the PowerBook is on, you can do your work.
And you want it to be
To turn the PowerBook on
If the
power
state is
Off
Sleep
On
m If the computer is off, press the power button (marked with
the icon I).
Off
—
—
Press power button
Sleep
Press any key
to wake, and then
choose Shut Down
—
Press any key except
Caps Lock (pressing
the power button
also works)
On
Choose Shut Down
Choose Sleep
—
See the chapter on power management for more information
about managing your computer’s power consumption.
Power button
m If the computer is in sleep, press any key on the keyboard
(except Caps Lock).
Chapter 1: Setting Up Your Macintosh PowerBook 19
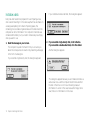
When you turn on your computer
When you turn on your PowerBook, the computer looks on the
hard disk inside the computer for the system software it uses to
start itself up. (A disk that contains the system software is called
a startup disk.) When the computer finds the system software, it
displays the icon shown and proceeds to start itself up.
Menu bar
Startup
disk icon
Trash icon
When the startup process is complete, the Macintosh desktop
appears on the screen. The desktop is a gray pattern with
m a menu bar across the top (containing the names and icons
of menus)
m an icon near the upper-right corner representing the startup
disk
m an icon near the lower-right corner representing the Trash
20 Chapter 1: Setting Up Your Macintosh PowerBook
When you “wake” your computer from sleep, it does not go
through the startup process because it is already on (at a
reduced power level). The Macintosh desktop reappears on the
screen immediately, looking just the way it did before the
computer went to sleep.
Restarting a computer that’s already on
You need to restart your computer—turn it off and back on again
immediately—when you want to make certain changes to your
control panels, use a newly installed system software file, or start
up the computer from a different disk.
m Choose Restart from the Special menu.
Restarting a computer that can’t
be turned on normally
If your system crashes (a rare event resulting from temporary
software problems), or if a computer with a properly installed and
charged battery does not respond when you try to turn it on, you
should be able to restart it using one of the methods described in
this section. Try them in the order given. All these methods will
cause you to lose any work you have not saved.
m Press and release the reset button.
You can press the button with a pen, a paper clip, or a similar
object.
Restarting the computer with the reset button does not affect
your RAM disk (if you created one) or its contents.
Interrupt button Reset button
When you choose Restart, the computer prompts you to save
your work, closes all open programs, and restarts itself.
Choosing Restart does not affect your RAM disk (if you
created one) or its contents.
You also need to restart if you see a “system error” message on
the screen (indicating a temporary software problem). In this
case, use the trackball to click the Restart button that appears.
continues .
Chapter 1: Setting Up Your Macintosh PowerBook 21
m Hold down the power button for 5 seconds.
When you let go, the computer turns itself off. Turning the
computer off with the power button erases the contents of a
RAM disk.
m Restart from a floppy disk.
1. Insert the Disk Tools disk into the floppy disk drive.
2. Press the power button.
If the computer turns on, there may be a problem with your
hard disk. You may be able to fix the problem yourself (using
the Disk First Aid program or another disk repair program;
see the chapter on disks in the reference section). Or you can
take the computer to your authorized Apple service provider.
22 Chapter 1: Setting Up Your Macintosh PowerBook
Important care and safety instructions
m Always handle batteries carefully.
For your own safety and that of your equipment, read and follow
all the instructions in this section. Keep these instructions
available for reference by you and others.
m Do not drop, puncture, disassemble, mutilate, or incinerate
the battery.
± Warning
m Electrical equipment may be hazardous if misused. Operation
of this product, or similar products, must always be
supervised by an adult. Do not allow children access to the
interior of any electrical product and do not permit them to
handle any cables.
m Recharge batteries only as described in this manual and only
in ventilated areas.
m Transport batteries either inside the computer or in the
protective case provided with each battery. Do not transport
unprotected batteries.
m Do not short-circuit the battery terminals (that is, do not
allow a metal object such as a paper clip or key chain to touch
the terminals). Doing so may cause an explosion or a fire.
m Do not use the computer in or near water.
m Do not use cables that are frayed or otherwise damaged. Hold
a cable by its connector (the plug, not the cord) when
connecting or disconnecting it.
Chapter 1: Setting Up Your Macintosh PowerBook 23
s Caution
m If you have a problem with your computer and nothing
presented in the manuals that came with the computer solves
the problem, take the computer to your authorized Apple
dealer or service provider. Attempting to repair the computer
yourself may void the limited warranty. Contact your
authorized Apple dealer or service provider for additional
information about this or any other warranty question.
m Do not attempt to open the computer’s case. There are no
user-serviceable parts inside. Take the computer to an
authorized Apple service provider if necessary.
m Do not drop or jar the computer.
24 Chapter 1: Setting Up Your Macintosh PowerBook
m Do not move the computer when you can hear its hard disk
spinning. When you put the computer to sleep, wait until the
screen is blank before moving the computer.
m Use only the power adapter supplied with your computer.
Adapters designed for other electronic devices may look
similar, but they may not work with your equipment and may
damage the computer.
m Never force a connector into a port. Make sure that the
connector matches the port and that it’s right side up. If the
connector and port do not join easily, they do not match.
m Do not use the computer in wet or dusty environments.
m Keep dirt and liquids away from the ports on the back panel,
the keyboard, and the trackball. If you spill any food or liquid
onto the computer, shut it down immediately and unplug it
before cleaning up the spill. Depending on what you spilled
and how much got into the computer, you may have to bring
the computer to an authorized Apple service provider for
cleaning.
m Do not touch the screen with any sharp or pointed objects.
m Use only the battery supplied with your computer. Batteries
designed for other portable computers may look similar, but
they may not work with your computer and may damage it.
m When recharging the battery, use only the power adapter
supplied with your computer. Adapters designed for other
electronic devices may not work with your equipment and
may damage the computer or the recharger.
s Important
m If the computer has been in a cold place for several hours, let
it warm up to room temperature before you use it.
m Use the computer only in environments where the
temperature range is between 50°F/10°C and 104°F/40°C.
m Do not expose the computer to very low (less than
–13°F/–25°C) or very high (more than 140°F/60°C)
temperatures.
m If necessary, clean the outside surfaces of your computer
equipment with a damp (not wet) cloth or paper towel.
m Clean the screen with soft, lint-free paper or cloth and a mild
glass cleaner. Do not spray the glass cleaner (or any other
liquid) directly onto the screen.
m Do not leave batteries in hot locations (such as the trunk of a
car).
Chapter 1: Setting Up Your Macintosh PowerBook 25
Health concerns associated with
computer use
Muscle soreness, eye fatigue, and other discomforts and injuries
sometimes associated with computer use can result from
performing any number of activities. Misuse of the same muscles
during multiple activities can create a problem that might not
otherwise exist. For example, if you engage in nonwork activities
that involve repetitive stress on the wrist—such as bicycling—and
also use your computer’s keyboard improperly, you may increase
your likelihood of developing wrist problems. Preventing health
problems requires careful attention to the way you use your body
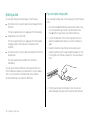
at all times.
The most common health effects associated with using a
computer are musculoskeletal discomfort and eye fatigue. Any
activity that involves sitting for long periods of time, including
using a computer, can make your muscles sore and stiff.
To prevent discomfort and fatigue:
m Arrange your work space so the furniture is properly adjusted
for you and doesn’t contribute to an awkward, inappropriate
working posture.
m Take frequent short breaks to give your muscles and eyes a
chance to rest and refresh.
26 Chapter 1: Setting Up Your Macintosh PowerBook
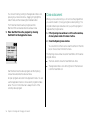
Repetitive stress injuries
Repetitive stress injuries (RSIs) can occur when a certain muscle
or tendon is repeatedly overused and forced into an unnatural
position. The exact causes of RSIs are not understood, but it is
thought that awkward posture, the amount of repetition, the
force used in the activity, and your physiology and lifestyle may all
contribute to their occurrence.
One RSI often discussed in connection with computer use is a
wrist problem called carpal tunnel syndrome, which may be
aggravated by improper use of computer keyboards. This nerve
disorder results from excessive pressure on the median nerve as it
passes through the wrist to the hand. The information on the next
few pages can help you recognize hand positions that may cause
discomfort.
Since the effects of repetitive movement associated with
computer use can be compounded by those of other work and
leisure activities to produce or aggravate physical problems,
proper use of your computer system must be considered just one
element of a healthy lifestyle. No one can guarantee that you
won’t have problems even when you follow the most expert
advice on using computer equipment. You should always check
with a qualified health specialist if muscle, joint, or eye problems
occur.
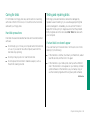
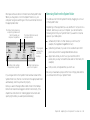
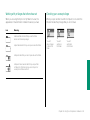
Arranging your work space and equipment
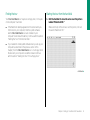
Keyboard and trackball
The suggestions in this section can help you work more
comfortably with your computer.
m When you use the keyboard and trackball, your shoulders
should be relaxed. Your upper arm and forearm should
form a right angle, with your wrist and hand in roughly a
straight line.
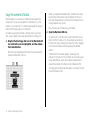
Chair
Whenever possible, use an adjustable chair that provides firm,
comfortable support.
m Adjust the height of the chair so your thighs are horizontal,
your feet flat on the floor, and the backs of your knees slightly
higher than the seat of your chair.
m The chair should support your lower back. Follow the
manufacturer’s instructions for adjusting the backrest.
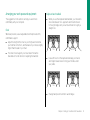
This
Not this
m Use a soft touch on the keyboard and keep your hands
and fingers relaxed. Avoid rolling your thumbs under
your palms.
This
Not this
m Change hand positions often to avoid fatigue.
Chapter 1: Setting Up Your Macintosh PowerBook 27
m If you prefer, you can adjust the angle of the keyboard by
rotating the elevation feet at both ends of the back panel until
they snap into position.
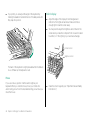
Built-in display
m Adjust the angle of the display to minimize glare and
reflections from lights and windows. Make sure there is
enough light to read the screen easily.
m You may need to adjust the brightness and contrast of the
screen when you take the computer from one work location
to another, or if the lighting in your work area changes.
Contrast control
Brightness control
The back of the keyboard is slightly elevated when the feet are
in use. Otherwise, the keyboard is level.
Mouse
If you use a mouse, position it at the same height as your
keyboard. When you slide the mouse, move your entire arm.
Avoid resting your arm on the desk and bending your wrist as you
move the mouse.
28 Chapter 1: Setting Up Your Macintosh PowerBook
m Clean the screen regularly (see “Important Care and Safety
Instructions”).
General suggestions
m Wherever you’re working, take a moment to think about
whether you feel comfortable, and change position if
necessary.
m Occasionally rest your eyes. From time to time focus your eyes
on a distant object, and blink often while you work.
m Some computer users may develop discomfort in their arms,
wrists, or hands if they do intensive work without breaks. If
you begin to develop chronic pain or discomfort in your arms,
wrists, or hands, consult your health specialist.
Chapter 1: Setting Up Your Macintosh PowerBook 29
yyyyyyyy
yyyyyyyy
yyyyyyyy
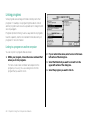
Chapter 2
Working on the Desktop
Before you begin
In this chapter
m set up your computer according to the instructions in
Chapter 1
Review basic trackball skills:
You should have already
m Moving the pointer
m gone through the Macintosh Basics tour supplied with your
computer
m Choosing a command
Make sure your computer is on.
m Opening an icon
m Looking at the contents of a window
And learn:
m How to close a window
m How to move a window
m What the icons on your desktop represent
31
Use the trackball
Point
Your computer has a two-button trackball. You use the ball itself to
control the movements of a pointer on the screen. The pointer
you’ll see most often is an arrow (8).
You point to an object on the screen by rolling the trackball so the
pointer is positioned over that object. When the pointer is an
arrow, the tip of the arrow must be exactly over the object.
You use the buttons to initiate actions that you want the computer
to perform. Both trackball buttons do the same thing. You can
always use whichever one you prefer.
Practice pointing to different objects on the Macintosh desktop,
such as the startup hard disk icon near the upper-right corner, the
Trash icon near the lower-right corner, and the Help menu icon
near the right end of the menu bar.
Much of the work you do on the Macintosh uses four trackball
actions: pointing, clicking, pressing, and dragging.
(If you want to return to the Macintosh Basics tour for more
practice with the trackball, see Chapter 1 for instructions.)
32 Chapter 2: Working on the Desktop
Practice clicking different objects on the Macintosh desktop, such
as the startup hard disk icon near the upper-right corner and the
Trash icon near the lower-right corner.
Click
You click an object on the screen by pressing and quickly releasing
a trackball button while the pointer is over that object.
When you click an icon, it becomes highlighted (the icon is
darkened). A highlighted icon is said to be selected. A selected
icon is the object of whatever action you choose next.
Chapter 2: Working on the Desktop 33
Press
You press by holding down a trackball button without moving the
trackball.
34 Chapter 2: Working on the Desktop
Practice pressing the menu names and icons in the menu bar—
start with the Apple (K) menu icon at the left side, through the
menu names, and across to the Help and Application menu icons
at the right side. Pressing a menu name or icon “pulls down” the
menu. Read the items in each menu you pull down.
Drag
You drag an object on the screen by pointing to that object and
holding down a trackball button while you roll the trackball.
Practice dragging the startup hard disk icon and the Trash icon
around the Macintosh desktop. When you drag an icon, an outline
of the icon follows the pointer on the screen. When you release
the trackball button, the icon itself moves.
When you’re finished practicing, drag the icons back to their
original positions. Then click once in the middle of the desktop.
(Clicking anywhere outside a selected icon returns that icon to its
original “unselected” state.)
Chapter 2: Working on the Desktop 35
Choose a command
Choosing a command involves using a combination of the
trackball actions you’ve reviewed.
1. Point to the Special menu title in the menu bar.
Giving orders to your computer
Telling the Macintosh to do something involves two steps:
1. selecting an object on the screen, and
2. Press to pull down the Special menu.
2. choosing the action you want to perform on that
object.
3. Drag to the first item in the menu (the Clean Up
Desktop command) so it becomes highlighted,
and then release the trackball button.
When you select an object, you’re telling the Macintosh to act
upon that object.
The objects you can select include an icon on the Macintosh
desktop, a sentence in a word-processing program, and a
picture in a graphics program—to give just three examples.
Most of the actions you can perform on the selected object
are listed in the menus at the top of the screen. The items, or
actions, in the menus are called commands. When you
choose a command, you are telling the computer to take
the action you’ve chosen on the selected object.
So—you tell your Macintosh what to do by using a very simple
“language” with only two kinds of words:
When you choose Clean Up Desktop, the hard disk icon and the
Trash return to their original positions (as long as they’re already
close).
n
nouns (the objects), and
n
verbs (the actions)
and with only one rule:
n
36 Chapter 2: Working on the Desktop
First the noun, then the verb (to this object, do that
action). In Macintosh terms: select an object, then choose
a command.
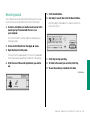
Open an icon
Opening an icon is your first exercise in telling the computer
what you want it to do.
1. Click the startup hard disk icon to select it.
The icon is in the upper-right corner of the screen.
Unless someone has changed its name, the icon is called
“Macintosh HD.” Make sure that the icon is highlighted
(darkened), which means that it’s selected.
When you choose the Open command, the selected icon
opens into a window (in this case, the Macintosh HD
window). The icon becomes filled in with a pattern
of dots, indicating that it has been opened.
2. Point to the File menu title in the menu bar.
3. Press to pull down the File menu.
4. Drag to the Open command (the second item in the
File menu) so it becomes highlighted, and then release
the trackball button.
v Different icons? The Macintosh HD window on your screen
may contain items not shown above. The differences are not
important; you can still do the exercises in this chapter and
the next. v
Chapter 2: Working on the Desktop 37
Look at the contents of a window
Every window has several features that help you view the
window’s contents. But before you can work with the contents of
a window, you need to make that window the active window.
1. Click the Trash icon near the lower-right corner of the
screen to select it.
Make sure that the icon is highlighted, which means that
it’s selected to be the object you’ll act upon next.
Make a window the active window
You can have several windows open on your screen at one
time, but only one window can be the active window. An active
window is one in which you can select objects and choose actions
to perform on those objects.
The Macintosh HD window is currently on your Macintosh
desktop. (The window appeared when you opened the Macintosh
HD icon.) You’re going to open another window now.
38 Chapter 2: Working on the Desktop
2. Point to the File menu title in the menu bar.
3. Press to pull down the File menu.
4. Drag to the Open command so it becomes highlighted,
and then release the trackball button.
When you choose the Open command, the Trash icon opens
into a window (the Trash window). The Trash icon becomes
filled in with a pattern of dots, indicating that it has been
opened.
Active window
You should now have two windows on your Macintosh
desktop: the Macintosh HD window and the Trash window.
The Trash window is the active window. An active window has
a series of solid lines at the top of the window.
continues .
Chapter 2: Working on the Desktop 39
5. Click anywhere in the Macintosh HD window to make
it the active window.
Notice that the solid lines now appear at the top of the
Macintosh HD window. (The area containing the window title
and the solid lines is called the title bar.) When windows
overlap, the active window is the one that’s on top.
Active window
Make a window larger or smaller
Sometimes you want to make a window larger, so you can see
more of its contents, or smaller, so it takes up less space on your
screen. You can change a window’s size by dragging its size box
or by clicking its zoom box.
1. Point to the size box in the lower-right corner of the
(active) Macintosh HD window.
Size box
40 Chapter 2: Working on the Desktop
2. Drag the size box in any direction, and then release the
trackball button.
3. Click the zoom box near the right end of the title bar.
While you drag, an outline follows the pointer to indicate the
window’s new size. The new size takes effect when you
release the trackball button.
Zoom box
The window “zooms” to a size that shows all the items in
the window.
4. Click the zoom box again.
The window zooms back to its previous size (the size that you
chose in step 2).
Chapter 2: Working on the Desktop 41
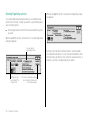
Move the hidden contents of a window into view
2. Point to the File menu title in the menu bar.
As you work with your computer, you’ll encounter windows
containing more than you can view on the screen at one time. You
can view contents that are out of sight, as described in the
following steps.
3. Press to pull down the File menu.
1. Check that the Macintosh HD window is active, then
click the System Folder to select it.
4. Drag to the Open command so it becomes highlighted,
and then release the trackball button.
When you choose the Open command, the System Folder
icon opens into a window (the System Folder window).
You should now have three windows on your Macintosh
desktop: the Macintosh HD window, the Trash window, and
the System Folder window. (One or more of these windows
may be covered by the others.) The System Folder window is
the active window because you opened the System Folder
most recently.
5. Point to the size box in the lower-right corner of the
System Folder window.
Make sure that the icon is highlighted, which means that
it’s selected.
42 Chapter 2: Working on the Desktop
6. Drag the size box diagonally (up and to the left) to
make the window about half its current size, and then
release the trackball button.
7. Press the scroll arrow at the right end of the horizontal
scroll bar.
Scroll arrow
The contents of the window scroll past, bringing into view the
icons that were out of sight on the right.
Vertical
scroll bar
Horizontal scroll bar
8. Press the scroll arrow at the left end of the horizontal
scroll bar.
The contents of the window scroll past, bringing back into
view the icons that were out of sight on the left.
continues .
The bars across the bottom and along the right side of the
System Folder window should now be gray, indicating that the
window has contents that are not currently visible. The gray
bars are called scroll bars.
Chapter 2: Working on the Desktop 43
9. Drag the scroll box toward the middle of the horizontal
scroll bar, and then release the trackball button.
Close a window
When you no longer need to see the contents of a window,
you can close it by clicking the close box.
Scroll box
1. In the (active) System Folder window, point to the close
box near the left end of the title bar.
Close box
Now you see the icons near the middle of the window.
The vertical scroll bar, scroll box, and scroll arrows work the same
way. Try them.
2. Click the close box.
The window closes, and the System Folder icon no longer has
a pattern of dots in it.
There are now two windows on the desktop: the Macintosh
HD window and the Trash window. (One may be hidden by
the other.)
44 Chapter 2: Working on the Desktop
Move a window
You can move a window anywhere on the screen by dragging its
title bar. By changing the position and size of windows, you can
arrange your Macintosh desktop in whatever way is best for you.
Notice how the Macintosh HD window, because it is the active
window, stays on top of the Trash window if and when the two
windows overlap.
1. Point to the title bar of the (active) Macintosh HD
window.
Position the pointer anywhere on the title bar except over the
close box or the zoom box.
Title bar
3. Close the Macintosh HD window by clicking the close
box near the left end of the window’s title bar.
If you can’t see the close box, drag the window until you can.
2. Drag in any direction, and then release the trackball
button.
When you drag, an outline of the window follows the pointer
on the screen. When you release the trackball button, the
window moves to the position you’ve chosen.
continues .
Chapter 2: Working on the Desktop 45
The window closes, and the Macintosh HD icon reappears in
its previous form.
The Trash window (the remaining window on the Macintosh
desktop) becomes the active window.
4. Close the Trash window by choosing Close Window
from the File menu.
What’s on the desktop?
Just as a desk’s large flat surface is its work space, the Macintosh
“desktop” is the work space on your computer. The desktop
metaphor gives you a familiar way of thinking about how to use
the Macintosh.
Aside from the field of gray that represents the “surface” of your
work space, the Macintosh desktop has icons, windows, and
menus.
n
Icons represent containers.
n
Windows let you view what’s inside the containers.
n
You choose Close Window by pointing to the File menu
title, pressing to pull down the menu, dragging to the Close
Window command, and, with the command highlighted,
releasing the trackball button.
Of course, you can also close the window by clicking its
close box.
46 Chapter 2: Working on the Desktop
Menus list actions that you can apply to selected containers
or their contents.
Icons represent containers
Icons can contain other icons, or they can contain information.
For example, the startup hard disk icon contains the System
Folder icon. The System Folder icon contains the programs (also
represented by icons) that in turn contain the information the
Macintosh needs to start itself up and work properly.
Different types of icons represent different types of containers.
Hard disks and floppy disks are like filing cabinets. You use disks
to store files—your programs and the documents you create
with them.
Folders are like folders in a file drawer. You use folders to
organize your files.
Programs are files containing instructions to the computer that
let you do certain types of work.
Shared disks are like filing cabinets containing office supplies or
information that you share with others in your work group. Your
Macintosh needs to be connected to a network before you can
use shared disks.
Chapter 2: Working on the Desktop 47
Documents are files containing words, pictures, numbers,
sounds—whatever you create with your programs.
Windows let you see what’s inside containers
Windows let you see what’s inside all these containers.
When you open a disk icon, the window that appears shows you
what’s on the disk. When you open the document icon
representing a memo, the window that appears shows you
the memo.
Changing the size of a window or viewing its contents does
not change the contents. The contents remain the same; only
your view changes.
Menus offer you choices
The Trash is a container for files that you no longer want.
48 Chapter 2: Working on the Desktop
Like the menus in a restaurant, Macintosh menus let you
choose. You choose among different actions that the computer
can perform on containers (icons), or on their contents (such as
words in a memo).
Using the keyboard
Arrow keys
You use the keyboard to type text and numbers, just as you
would on a typewriter. (For touch typists, your keyboard has
raised dots in the middle of the D key and the K key to help
position your fingers on the home row.)
All Macintosh keyboards have four arrow keys: Up Arrow, Down
Arrow, Left Arrow, and Right Arrow.
Many programs let you use the arrow keys as well as the
trackball to move the pointer on the screen.
Depending on the program you’re using, you can use special
keys on the keyboard to give commands to the computer and to
modify certain things that you do with the trackball. Macintosh
PowerBook computer keyboards have two types of special keys:
modifier keys and arrow keys.
shift
Modifier keys
ctrl
shift
option
All Macintosh keyboards have four modifier keys: Shift,
x (Command), Option, and Control.
Pressed by itself, a modifier key does nothing. You need to press
it in combination with another key (or while using the trackball).
The modifier key causes the other key or trackball to give a
different (“modified”) result.
Modifier keys
Arrow keys
You type a capital letter, for example, by pressing the Shift key
with a letter key. Most programs let you choose commands by
pressing the x key with certain letter keys.
Chapter 2: Working on the Desktop 49
50 Chapter 2: Working on the Desktop
Chapter 3
Creating and Changing
a Document
In this chapter
n
What “keyboard shortcuts” are and how to use them
n
How to quit a program
n
How to make a copy of a document
n
How to change the name of a document
n
How to use the Trash
n
How to open a program
n
How to use a program to create a document
Before you begin
n
Why it’s important to save your work, and how to save it
Make sure that your computer is on.
n
How to switch between programs
n
How programs and system software differ from each other
n
How to close a document
n
How to open a document
n
How to change a document
51
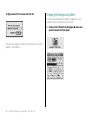
Open a program
Your computer comes with a simple word-processing program
called TeachText. You’re going to use this program to create a
document.
1. Open the Macintosh HD icon.
(Click the icon to select it, and then choose Open from the
File menu.)
The Macintosh HD window appears, showing you the
contents of your hard disk. The contents include the
TeachText program.
When you open the TeachText program, there is one dramatic
change on your desktop:
n
A window called “Untitled” appears.
There are also two subtle changes:
n
n
The menu bar shows the menu names for the TeachText
program.
The Application menu icon in the right corner of the menu
bar becomes the TeachText icon.
TeachText menus
TeachText icon
2. Open the TeachText icon.
If you can’t find the TeachText icon, use the scroll bars to bring
it into view.
To open the icon, click the icon to select it, and then choose
Open from the File menu.
The untitled window is empty because you haven’t put anything
in it. In the next few sections, you’re going to write a short
document, save it, and give it a name.
52 Chapter 3: Creating and Changing a Document
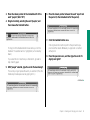
Create a document
Save your work
The untitled window is like a blank sheet of paper. In the
upper-left corner of the empty document is a blinking vertical
line (|). This line is called the insertion point, because it marks
the place where the text you type will be inserted.
Work that you do in a program exists only in the computer’s
memory until you save it onto a disk. Since work that exists only
in memory is lost when you shut down the computer, you need
to save your work so you can come back to it later. If you don’t
save your work, it disappears—like thoughts that are lost unless
you write them down.
As you type, use your computer keyboard as you would a
typewriter keyboard, except:
n
n
If you make a mistake, press the Delete key to backspace
over it.
1. Choose Save from the File menu.
Don’t press the Return key when you get to the end of a line.
Keep typing, and words will move to the next line
automatically.
Type the following text:
All people are born free and equal.
Endowed with reason and conscience, they
should act towards each other in a spirit
of togetherness.
You will be changing this text later in this chapter.
The box that appears (called a dialog box) lets you name the
document and save it on your hard disk.
continues .
Chapter 3: Creating and Changing a Document 53
2. Type “Opening Lines”.
Switch programs
You can have several programs open on your Macintosh desktop
at one time (how many depends on how much memory your
computer has and how much memory the programs use). But
only one program at a time can be the active program. The active
program is the one that’s “on top of ” other open programs—in
the same way that the active window is on top of other windows.
The Opening Lines window is now the active window, and
TeachText is the active program. But TeachText is not the only
program that’s open.
Because the word “Untitled” is selected (highlighted) when
the dialog box appears, all you have to do to name your
document is start typing. Whatever you type replaces the
selected text.
3. Click Save.
Since you turned on your computer, you’ve been working with
the Finder program. The Finder displays the Macintosh desktop.
The Finder is always open when your Macintosh is on, so right
now it is open but not active.
1. If the Opening Lines window covers most of your
screen, make the window smaller by dragging its size
box up and to the left, and then release the trackball
button.
After you resize the window, you should be able to see your
hard disk icon in the upper-right corner of the desktop.
The window is now titled “Opening Lines” and the document
has been stored on your hard disk.
54 Chapter 3: Creating and Changing a Document
2. Make the Finder the active program by clicking the
Macintosh HD icon, or clicking anywhere on the
desktop outside the Opening Lines window.
The Finder becomes the active program. Notice:
n
n
n
The Macintosh HD window appears on top of the
Opening Lines window.
The menu bar shows the Finder’s menu titles.
The Application menu icon at the right end of the
menu bar becomes the Finder icon.
3. Make the Opening Lines window active by clicking
anywhere inside it.
(Part of the window may be hidden by the Macintosh HD
window.)
When you click, the Opening Lines window comes back to the
top. It’s now the active window again, and TeachText is the
active program.
You make a window active by clicking any visible part of it.
The program that “owns” the window becomes active when
the window becomes active.
Here is another way to make a program active:
4. Make the Finder the active program by choosing Finder
from the Application menu at the right end of the
menu bar.
You may also notice the Opening Lines icon in the
Macintosh HD window, representing the document you
just created and saved.
continues .
Chapter 3: Creating and Changing a Document 55
You choose Finder by pointing to the Application menu icon,
pressing to pull down the menu, dragging to highlight the
name Finder, and then releasing the trackball button.
The Finder becomes the active program, and the
Macintosh HD window becomes the active window.
5. Make TeachText the active program by choosing
TeachText from the Application menu.
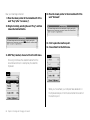
Close a document
When you close a document, you do not close the program that
you used to create it. (Closing a program is called quitting.) The
program remains open and active until you quit the program or
make another program active.
1. If the Opening Lines window is not the active window,
click anywhere inside it to make it active.
2. Close the Opening Lines window.
You can either click the close box near the left end of the title
bar, or choose Close from the File menu.
The Opening Lines window closes but TeachText is still the active
program. Notice:
n
n
TeachText becomes the active program, and the Opening
Lines window becomes the active window.
All open programs are listed in the Application menu. You can
use the Application menu to choose which program to make
active. The icon in the menu bar is always the icon of the
currently active program.
56 Chapter 3: Creating and Changing a Document
The menu bar still shows the TeachText menu titles.
The Application menu icon at the right end of the menu bar
is still the TeachText icon.
Two types of programs
Programs that you use to do your work on the computer are
called application programs, or applications, because they’re
ways of applying computer technology to the work that you do.
Word-processing programs, for example, are applications that
enable you to write memos, novels, or whatever you need to
write. And if your work involves creating illustrations,
designing buildings, composing music, or keeping track of
large amounts of data, there are application programs for
those kinds of work, too.
Because most Macintosh programs work in similar ways,
you can transfer much of what you learn in one application to
other applications.
Programs that the computer uses to do its work (in contrast to
your work) are called system software, or sometimes the
operating system.
Open a document
When you open a document, the program you used to create that
document becomes the active program.
1. If you closed the Macintosh HD window, open the
Macintosh HD icon now.
(Click the icon to select it, and then choose Open from the
File menu.)
The Macintosh HD window appears, showing you the
contents of your hard disk. The contents include the
TeachText program and the TeachText document you created
called Opening Lines.
The next step describes a different way to open an icon.
continues .
Between you and the system software is a program called the
Finder, which displays the Macintosh desktop. It’s called the
Finder because, like the viewfinder in a camera, it gives you a
view of all the objects— disks, programs, folders, and
documents—on your desktop.
You use the Finder to tell the system software what you want it
to do for you: which disks you want to use, which documents
and programs you want to open, and where you want files to be
stored.
Chapter 3: Creating and Changing a Document 57
2. Open the Opening Lines icon by double-clicking it.
Change a document
The Opening Lines window shows you the text you typed. In this
section you’ll make some changes to the text using techniques
that work in most Macintosh programs.
Keep two things in mind:
n
To double-click an icon, you click it twice in rapid succession
without moving the pointer. (Use the trackball to position the
pointer over the icon, and then click one of the trackball
buttons twice.) Double-clicking an icon has the same effect as
selecting the icon and then choosing the Open command.
When you open Opening Lines, TeachText becomes the active
program. Notice that:
n
the Opening Lines window appears
n
the menu bar shows the TeachText menu titles
n
the Application icon at the right end of the menu bar is the
TeachText icon
58 Chapter 3: Creating and Changing a Document
n
The insertion point—the blinking vertical line—marks the
place where text will appear.
A pointer called an I-beam (it looks like this: 9) replaces the
arrow pointer (8) when you’re working with text. You control
the I-beam pointer with the trackball in the same way that you
control the arrow pointer.
1. Locate the insertion point. It should be in the upperleft corner of the document.
2. Locate the I-beam pointer (9). If you don’t see it, roll
the trackball slightly. The pointer moves as the
trackball moves.
Now you’re ready to change the text.
3. Move the I-beam pointer to the immediate left of the
word “people” (after “All”).
6. Move the I-beam pointer between the word “equal” and
the period (to the immediate left of the period).
4. Drag horizontally, selecting the word “people”, and
then release the trackball button.
7. Click the trackball button once.
To drag, hold the trackball button down while you roll the
trackball. The selected word is highlighted (surrounded by
black).
If you select more or less than you intended to, go back to
step 3 and try again.
Clicking moves the insertion point to the spot where you
positioned the I-beam. Whatever you type next is inserted
at that point.
8. Press the space bar once, and then type the words “in
dignity and rights”.
5. With “people” selected, type the words “human beings”.
The words you type replace the word you selected. (Press the
Delete key to backspace over any typing errors.)
continues .
Chapter 3: Creating and Changing a Document 59
Now you’ll rearrange some text.
9. Move the I-beam pointer to the immediate left of the
word “they” (after “conscience,”).
12. Move the I-beam pointer to the immediate left of the
word “Endowed”.
10. Drag horizontally, selecting the word “they”, and then
release the trackball button.
13. Click to place the insertion point.
14. Choose Paste from the Edit menu.
11. With “they” selected, choose Cut from the Edit menu.
Choosing Cut removes the selected material from the
document and stores it in a temporary file called the
Clipboard.
When you choose Paste, your computer takes whatever’s in
the Clipboard and puts it into the document at the location of
the insertion point.
60 Chapter 3: Creating and Changing a Document
15. Press the space bar once, type “are”, and then press the
space bar once again.
Save your work so far
The changes you’ve made so far are not part of Opening Lines
until you save them. You save them by telling the computer to
record them in the Opening Lines document that’s stored on your
hard disk.
16. Move the I-beam pointer between the letters t and h in
the word “they”.
It’s important to remember that no change is “official” until
you save it onto a disk. Your work could be lost if power to
the computer were interrupted or if a problem caused the
computer to stop working properly.
Choose Save from the File menu.
Save regularly, and save often.
17. Click the trackball button to place the insertion point.
18. Press the Delete key once and then type a capital T.
Chapter 3: Creating and Changing a Document 61
Taking a shortcut
You can choose some menu commands by using the
keyboard instead of the trackball. A keyboard shortcut is a
combination of keys that you press at the same time to get
the same result as choosing a command from a menu. One of
the keys you press is always the x key or another modifier
key.
Make more changes
The changes you’ve made so far are now part of the document
that’s stored on your hard disk.
1. Move the I-beam pointer (9) between the letters E and
n in the word “Endowed”.
For example, instead of choosing Save from the File menu,
you can hold down the x (Command) key on the keyboard
while you press the S key. Pressing x-S is a keyboard shortcut
equivalent to choosing Save from the File menu.
You can see the available keyboard shortcuts by pressing a
menu title and looking at the commands in the menu. The
keyboard shortcuts are listed next to the commands.
2. Click once to place the insertion point.
3. Press the Delete key once and then type a lowercase e.
4. Move the I-beam pointer to the immediate right of the
comma after the word “conscience”.
62 Chapter 3: Creating and Changing a Document
5. Press the Delete key once, press the space bar once,
and then type “and”.
8. Move the I-beam pointer to the immediate right of the
“each other”. Do not drag. Do not click the trackball
button yet.
9. Hold down the Shift key on your keyboard and click to
select the words “each other”.
6. Move the I-beam pointer to the immediate left of “each
other”.
Holding down the Shift key while you click selects the text
between the insertion point and wherever you click.
10. With “each other” selected, type “one another”.
7. Click the trackball button once.
Clicking moves the insertion point to the place where you
positioned the I-beam.
continues .
Chapter 3: Creating and Changing a Document 63
11. Select the word “togetherness” by double-clicking it.
Quit a program
Quitting a program closes the program as well as any open
documents that were created using that program. (Simply closing
a document leaves the program open and active.)
1. Make sure that the Opening Lines window is active.
2. Quit the TeachText program.
To select a word by double-clicking it, position the I-beam
pointer over the word and then click twice in rapid
succession, without moving the pointer.
You can either choose Quit from the File menu, or press
the x key and the Q key together.
12. With “togetherness” selected, type “brotherhood”.
You may now have extra spaces or no spaces between words.
If so, position the I-beam pointer where you need to delete or
add a space, click to place the insertion point, and press the
Delete key or the Space bar as necessary.
13. Choose Save from the File menu.
If a message asks whether you want to save any changes, click
Save.
The Opening Lines document and the TeachText program are
closed, and the Finder becomes the active program.
64 Chapter 3: Creating and Changing a Document
Opening and closing documents and programs
Doing this
Also causes this
Opening a document
Opens the program that created
that document
Making a document
window active
Makes the program that “owns”
that document active
Closing a document
Simply closes that document; does
not close the program that created
that document (the program continues
to use memory)
Quitting a program
Prompts you to save your work,
then closes the program that created
the active document (memory becomes
available for other programs)
Make a copy of a document
You’ll often want to make a copy of a document so you can
preserve the original and modify the copy. To practice making a
copy of a document, you’ll use the “Opening Lines” document
you created.
1. If you closed the Macintosh HD window, open the
Macintosh HD icon now.
(Click the icon to select it, and then choose Open from the
File menu.)
The Macintosh HD window appears, showing you the
contents of your hard disk. The contents include the
TeachText program and the TeachText document you created
called Opening Lines.
2. Click the Opening Lines icon to select it.
continues .
Chapter 3: Creating and Changing a Document 65
3. Choose Duplicate from the File menu.
Change the name of an icon
You can change the name of any icon, using any characters except
a colon (:). If you change an icon’s name and then open it, you’ll
see that the name of its window has also changed.
1. Drag the “Opening Lines copy” icon away from the
original icon so that the two icons do not overlap.
2. Click the name (not the icon) “Opening Lines copy.”
Do this even if the icon is already selected.
When the name is selected, it is highlighted and a box appears
around it. Notice that when you point to the selected name,
the arrow pointer becomes an I-beam.
A new icon, labeled “Opening Lines copy”, appears in the hard
disk window. Notice that the icon is selected.
Other ways to make a copy of a file are outlined in the summary
chapter in the reference section of this book.
66 Chapter 3: Creating and Changing a Document
3. With the name selected, type “Article 1”.
Whatever you type replaces the selected text.
4. Press the Return key.
Pressing Return saves the new name.
Use the Trash
When you no longer need a file or a folder, you can throw it away
by dragging its icon to the Trash. Practice using the Trash by
throwing away the “Article 1” document, which you created when
you made a copy of the “Opening Lines” document.
1. If you closed the Macintosh HD window, open the
Macintosh HD icon now.
(Click the icon to select it, and then choose Open from the
File menu.)
Now you have two identical documents with different names.
You can revise one without changing the other.
The Macintosh HD window appears, showing you the
contents of your hard disk. The contents include the
TeachText program and two documents, one called Opening
Lines and the other called Article 1 (you may have to use the
window’s scroll bars to see them).
continues .
Chapter 3: Creating and Changing a Document 67
2. Drag the Article 1 icon to the Trash icon until both
icons are highlighted, and then release the trackball
button.
If the Macintosh HD window is blocking the Trash icon, move
the window by dragging its title bar.
Both icons are highlighted when the tip of the arrow pointer
reaches the Trash icon.
3. Open the Trash icon.
(Click to select the icon, and then choose Open from the File
menu, or click the Trash twice in quick succession.)
The Trash window appears. Anything you drag to the Trash
stays there until you empty the Trash.
You can retrieve items from the Trash by clicking to select
them and then choosing Put Away from the File menu.
(Or you can drag the items back to where they were.)
4. Choose Empty Trash from the Special menu.
A message appears asking you to confirm that you want to
permanently remove the contents of the Trash.
5. Click OK.
Clicking OK empties the Trash—in other words, its contents
are erased from the disk.
Notice that the Trash icon no longer bulges, indicating that
it is empty.
6. Close the Trash window by clicking its close box.
When you release the trackball button, the Article 1 icon
“disappears” into the Trash. When you put an object in the
Trash, the Trash icon bulges to indicate that it is no longer
empty.
68 Chapter 3: Creating and Changing a Document
Chapter 4
Working With Disks
Before you begin
In this chapter
You need a new floppy disk to follow the steps in this chapter.
You should be able to get floppy disks from wherever you got
your computer.
m What hard disks and floppy disks are for, and how they differ
Make sure that your computer is on.
m How to insert and remove a floppy disk
m How to prepare a disk for use
m How to copy the contents of a disk
m How to protect a floppy disk and its contents
m How to put programs onto your computer
69
Insert a floppy disk
Follow these steps to insert your new disk into the disk drive.
Your computer’s floppy disk drive can accommodate 3.5-inch
(89-millimeter) floppy disks of two types:
1. Write “Practice” on a blank disk label.
m high-density disks, which can hold up to 1.4 megabytes (MB)
of information
2. Attach the label to your new floppy disk.
The molding of the disk’s plastic case indicates where the
label goes. Do not affix the label over the metal shutter.
m double-sided disks, which can hold up to 800 kilobytes (K)
of information
3. Hold the disk with your thumb on the label and the
metal shutter pointing away from you.
(The next page explains kilobytes and megabytes.)
4. Push the disk into the floppy disk drive, label side up
and metal shutter first.
Double-sided (800K) disk
High-density (1.4 MB) disk
Second hole
Insert metal end first.
High-density
disk symbol
The next section, “Initialize a Disk,” explains what to do about
the message that appears on your screen.
70 Chapter 4: Working With Disks
Floppy disks and hard disks
10,000 pages
Both floppy disks and hard disks function like filing cabinets:
you use them to store information. You can store much more on
a hard disk than on a floppy disk, however, and the computer
can retrieve information from a hard disk much faster.
5,000 pages
Floppy disks and hard disks are represented by different icons.
300 pages
1 page
4K
The disk whose icon is closest to the upper-right corner of your
desktop is the startup disk, which contains the information the
Macintosh uses to operate.
Your hard disk is sealed into the hard disk drive inside your
computer. Floppy disks, in contrast, can be taken in and out of
floppy disk drives so you can easily transfer information from
one computer to another.
200 pages
800K
1.4 MB
Floppy disks
20 MB
40 MB
Hard disks
Even the smallest hard disks can hold the equivalent of a few
thousand pages of information. High-density floppy disks can
hold 1.4 megabytes (MB) of information—about 300 typewritten
pages. Double-sided floppy disks can hold 800 kilobytes (K) of
information—about 200 typewritten pages. (A megabyte is about
1,000 kilobytes.)
A floppy disk is made of thin, flexible material with a magnetic
coating. To protect it and make it easier to handle, the floppy
disk itself is enclosed in a rigid plastic case, which gives the
floppy disk its “non-floppy” character. Floppy disks are
sometimes called diskettes.
Chapter 4: Working With Disks 71
Initialize a disk
If you inserted a double-sided disk, this dialog box appears:
Every new disk needs to be prepared for use. Preparing a new
disk is called initializing it. In the same way that lines are drawn on
a newly paved parking lot to mark off parking spaces, the
initializing process creates organized areas on the disk where the
computer can store information. Your computer’s hard disk was
initialized at the factory, but you need to initialize any new floppy
disks you want to use.
1. Read the message on your screen.
The computer requests information from you or warns you
about the consequences of an action by presenting a message
in the form of a dialog box.
2. If you inserted a high-density disk, click Initialize.
If you inserted a double-sided disk, click Two-Sided.
Another dialog box appears:
If you inserted a high-density disk, this dialog box appears:
This dialog box appears because you can initialize old disks as
well as new ones—and the computer doesn’t know whether
the disk in the drive is old or new. Initializing erases all
information on a disk. In this case, because the floppy disk is
new, there is no information on it to erase.
72 Chapter 4: Working With Disks
3. Click Erase.
A third dialog box appears:
5. Click OK.
The computer takes about a minute to initialize the disk.
Messages appear on the screen to let you know how the
process is going.
When initialization is finished, the disk’s icon appears directly
below the Macintosh HD icon (the startup hard disk icon)
near the upper-right corner of the desktop.
4. Type “Practice”.
If you make any typing errors, press the Delete key to
backspace over them.
Chapter 4: Working With Disks 73
Copy the contents of a disk
Most programs you’ll use with your Macintosh are supplied on
floppy disks. You can use a program more efficiently if you first
install it on your hard disk. You install most programs by copying
them from the floppy disk to your hard disk.
To practice copying the contents of a floppy disk to your hard
disk, use your practice disk (even though there’s nothing on it).
1. Drag the Practice floppy disk icon to the Macintosh HD
icon until both icons are highlighted, and then release
the trackball button.
Both icons are highlighted when the tip of the arrow pointer
reaches the Macintosh HD icon.
When you release the trackball button, the Macintosh copies
the contents of the Practice disk onto Macintosh HD (your
hard disk). Because there is nothing on the Practice disk, the
copying happens very quickly.
Now, find the copy of Practice you just created.
2. Open the Macintosh HD icon.
To open the icon, click the icon to select it and then choose
Open from the File menu. ( You choose Open by pointing to
the File menu title, pressing to pull down the menu, dragging
to the Open command, and then releasing the trackball
button.)
The Macintosh HD window appears, showing you the
contents of the hard disk. The contents should include a new
folder called Practice, which the computer created when it
copied the contents of the Practice disk to Macintosh HD.
You may have to make the window larger or use the scroll bars
to see the Practice folder.
74 Chapter 4: Working With Disks
3. Open the Practice folder icon.
To open the icon, click the icon to select it and then choose
Open from the File menu.
The folder holds the contents of the floppy disk you’ve
copied. In this case, the folder is empty because there’s
nothing on the Practice disk.
Taking care of floppy disks
Follow the care instructions that came with your disks, and
remember three key points:
n
4. Close all the windows on the Macintosh desktop.
You close a window (when it’s the active window) by either
clicking its close box or choosing Close Window from the
File menu.
n
n
Keep floppy disks away from magnets. Because
information is stored on the disk in the form of magnetic
signals, a magnetic field can destroy that information.
Televisions and monitors, telephones, loudspeakers, and
certain kinds of lighting fixtures all contain magnets.
Protect disks from extremes of temperature and humidity.
Do not open the disk’s metal shutter. Touching the disk
inside the shutter could damage it.
Chapter 4: Working With Disks 75
Take a floppy disk out of its drive
2. Eject the floppy disk by choosing Put Away from the
File menu.
You take a floppy disk out of its drive when you no longer need to
get information from or store information on that disk.
1. Click the Practice floppy disk icon to select it.
Click the icon, not its name.
You choose Put Away by pointing to the File menu title,
pressing to pull down the menu, dragging to the Put Away
command, and releasing the trackball button.
Put Away returns the object you’ve selected to its original
place. In this case, it ejects the floppy disk from the disk drive
so you can put it away.
76 Chapter 4: Working With Disks
Protect the contents of a disk
3. Turn the disk over and lock it by sliding the tab so that
the square hole is open.
You can lock a floppy disk so its contents cannot be changed in
any way. When a disk is locked, you can look at the files it
contains, but you cannot modify the files on it, delete them, or
store any new files.
Use your practice disk to practice locking and unlocking a
floppy disk.
1. Hold the practice disk with your thumb on the label
and the metal shutter pointing away from you, as
though you were going to insert the disk into a drive.
2. Find the square hole in the near-left corner of the
floppy disk.
A moveable tab on the back side of the disk should be
blocking the hole, indicating that the disk is unlocked.
If you’re using a high-density disk, you’ll notice an additional
square hole, across the label from the first hole. This second
hole has no tab and is always open.
Locked
Unlocked
Use your thumbnail or a push pin to move the tab.
4. Unlock the disk by sliding the tab back so that the
square hole is blocked.
You are unlocking your practice disk now so you can use it to
store files in the next chapter.
Chapter 4: Working With Disks 77
On your own: Install your programs
If you have a floppy disk drive and disks containing programs that
you plan to use with your Macintosh, you can install the programs
on your hard disk now (or you can wait until later and continue
with the next chapter).
The general instructions in this section describe how to copy the
contents of a program disk to your hard disk.
s Important: Some programs need to be installed in a
particular way. If your programs came with specific
instructions, follow them instead of the instructions in this
section. s
1. Lock the program disk.
The program disk contains your master copy of the program.
Locking the disk protects its contents but doesn’t keep you
from copying the contents onto another disk.
2. Insert the program disk into your floppy disk drive.
78 Chapter 4: Working With Disks
3. Drag the program disk icon to the Macintosh HD icon
(your hard disk icon) until both icons are highlighted,
and then release the trackball button.
Both icons are highlighted when the tip of the arrow pointer
reaches the Macintosh HD icon.
When you release the trackball button, messages appear on
the screen to let you know that the computer is copying the
contents of the program disk onto your hard disk.
When copying is finished, the contents of the program disk
appear on your hard disk in a folder that has the same name
as the program disk.
4. Eject the program disk by selecting it and choosing Put
Away from the File menu.
5. Open the Macintosh HD icon.
The Macintosh HD window shows you the contents of your
hard disk. Among its contents is the program folder, which
contains the same items as the original disk.
6. Click the program folder to select it.
Throw away extra System Folders
7. Choose Open from the File menu.
Your startup disk must have only one System Folder on it.
Whenever you copy the contents of a program disk to your hard
disk, make sure that you have not copied an extra System Folder.
If you have, throw the extra System Folder away.
The folder window appears, showing you the contents of
the program folder. The folder has the same contents as the
program disk.
8. Look for a System Folder in the program folder.
Some program disks contain a System Folder so they can be
used as startup disks. (A startup disk, by definition, is a disk
that has a System Folder on it.) If the program disk you’ve
copied has a System Folder, you now have two System Folders
on your hard disk. For the computer to work properly, you
must throw away any extra System Folders.
1. Drag the extra System Folder from the program folder
to the Trash.
2. Choose Empty Trash from the Special menu.
A message alerts you that you’re about to throw away the
contents of the Trash (in this case, the extra System Folder).
3. Click OK to confirm that you want to throw away the
contents of the Trash.
4. Close the window by clicking its close box.
Chapter 4: Working With Disks 79
Chapter 5
Learning More
About Your Computer
In this chapter
m How to open the Battery desk accessory
Before you begin
Make sure that your computer is on.
This short chapter introduces you to the Battery desk accessory
and the PowerBook control panel, with which you can monitor
and control your computer’s power consumption.
This chapter also tells you where to find answers to other
questions you may have about your computer.
m How to open the PowerBook control panel
m How to use the Balloon Help system
m Where to look for information about your computer and
its software
81
Open the Battery desk accessory
Open the PowerBook control panel
The Battery desk accessory tells you approximately how much
power is left in the battery as you use the computer.
The PowerBook control panel lets you control the balance
between power consumption and system performance (it also lets
you control other PowerBook features).
To open the Battery desk accessory:
m Choose Battery from the Apple (K) menu.
To open the PowerBook control panel:
1. Choose Control Panels from the Apple (K) menu.
You can leave the Battery desk accessory open to keep track of
the battery charge while you work. The desk accessory works like
a fuel gauge (the solid bars indicate how much power is left).
For more information on how to use the Battery desk accessory,
go to the power management chapter in Part III of this book.
82 Chapter 5: Learning More About Your Computer
2. Open the PowerBook icon.
Use Balloon Help
Balloon Help explains icons, menus, commands, and other
objects on the Macintosh screen, using balloons similar to those
in comic strips. Each balloon points to the object it explains.
Many Macintosh programs also have Balloon Help.
(Click the icon once to select it, then choose Open from the
File menu. Or double-click the icon.)
The PowerBook control panel appears. You drag the Battery
Conservation slider to the left to improve performance (but
battery power is used up more quickly) or to the right to
conserve power (but the computer may work more slowly).
For more information on how to use the PowerBook control
panel, go to the power management chapter in Part III of this
book.
Turn on Balloon Help
1. Point to the Help icon near the right end of the
menu bar.
2. Press to pull down the Help menu.
3. Drag to highlight the Show Balloons command,
then release the trackball button.
When Balloon Help is turned on, balloons containing
explanatory text appear next to objects that you point to
on the screen.
continues .
Chapter 5: Learning More About Your Computer 83
4. To show a balloon describing your startup hard disk,
point to the hard disk icon.
A balloon appears next to the icon. Balloons do not affect how
you work with your computer. You still select icons, choose
commands, and so on.
Turn off Balloon Help
Balloons can block items on the screen as you work, so you may
wish to turn them off when you're finished reading.
m Choose Hide Balloons from the Help menu.
5. Click your hard disk icon to select it.
You can select the icon even with the balloon showing.
6. Point to the File menu.
A balloon appears next to the menu title.
7. Press to pull down the File menu.
The balloon disappears when you pull down the menu.
8. Slowly drag to highlight the Open command, and then
release the trackball button.
Notice that a balloon appears next to a command if you pause
briefly as you drag past it.
The hard disk window becomes the active window. To see
more balloons, you can point to different parts of the window
and to different icons in the window.
84 Chapter 5: Learning More About Your Computer
(Point to the Help icon in the menu bar, press to pull down
the Help menu, drag to highlight the Hide Balloons
command, and then release the trackball button.)
Use Part III of this book
What next?
Part III of this book, Macintosh Reference, contains all the
information you need to use your computer’s hardware and
system software. Unlike Parts I and II, which are meant to be read
from beginning to end, Part III is meant to be used like an
encyclopedia: you turn to it when you need to look up some
information, and read only that information.
Congratulations. If you’ve gone through the Macintosh Basics
tour and Parts I and II of this book, you’ve seen and practiced all
the basic skills you need to use your computer productively.
To help you find the information you need, this book has a
table of contents and an index. The back of the book also has
a summary of commonly used skills, and a troubleshooting
section.
At this point, you could
m check your battery’s charge and recharge it if necessary (see
the power management chapter for more information)
m start learning how to use your application programs
m turn to Part III and find out how to organize your files or how
to adapt your computer to your own use
m turn to any other topic in Part III that interests you
m take a break
Chapter 5: Learning More About Your Computer 85
Chapter 6
Setting Up Your Programs
If your Macintosh cannot find a startup disk, it displays this icon in
the middle of the screen:
In this chapter
m Installing or updating system software
m Installing your programs
m Working with several programs at a time
m Using the Scrapbook
m Using a RAM disk
Installing or updating system software
System software is the set of programs and other files that your
computer uses to start itself up, keep track of your files, and run
the application programs you use. When you turn on your
computer, it looks for a disk that contains the system software,
which is always in a folder called the System Folder. Any disk that
contains a System Folder with system software inside it is a startup
disk. The startup disk is usually the hard disk that’s inside your
computer, though another hard disk or a floppy disk can also be a
startup disk.
If you see this icon, you need to install system software on your
computer’s internal hard disk or you need to attach it to an
external hard disk that contains the system software.
v If your hard disk already has system software on it and you
see this icon: Your hard disk or system software may be
damaged, and you may need to reinstall the system software.
See the section on testing and repairing disks in the chapter
on disks. v
87
Before you install
Installing system software
You use the Installer program to install, reinstall, or update system
software on a startup disk.
If you have access to the system software on a network, open the
Installer program and then follow this procedure, beginning with
step 4. To install system software from another hard disk or a
desktop Macintosh, see the chapter on expanding your computer
system.
s Important: Before you install a new version of system
software, make a backup copy of your current System Folder
on another disk in case you need it later (to use a program
that is incompatible with the new system software,
for example). s
The Installer lets you update your system software without losing
special files (fonts, sounds, and so on) you may have installed.
Before you install, reinstall, or update system software:
m Your hard disk must be initialized, a process that prepares
the disk to store information. (All Apple computers have their
hard disks initialized at the factory.)
m You need the system software disks that came with your
computer or your system software upgrade kit, or you need
access to the system software over a network, or on another
hard disk.
88 Chapter 6: Setting Up Your Programs
Make sure the system software you’re using is the correct version
for your computer.
1. Shut down your computer.
2. Insert the Install disk into the floppy disk drive.
3. Turn on your computer.
The Installer program opens automatically.
4. Click OK.
5. Make sure that the hard disk named in the box is the
one you want to install system software on.
The Easy Install dialog box appears.
Parts of system software
to be installed
Click to install on a
different disk.
If it isn’t, click the Switch Disk button until the correct disk
name appears.
6. Click Install.
7. Follow the instructions that appear on the screen.
If you are installing from floppy disks, you see messages
asking you to insert different disks.
8. When you see a message reporting that the installation
was successful, click Quit.
If a message reports that installation was not successful, try
installing again. (Follow the instructions on the screen.)
9. Restart your Macintosh.
Make a backup copy of the System Folder on floppy disks (or on
another hard disk).
Disk on which system
software will be installed
Click to install
customized software.
Chapter 6: Setting Up Your Programs 89
Installing customized system software
Custom installation allows you to select a combination of system
files for your specific needs. You can also use custom installation
to install or update a single file, or to save space on your hard disk
by installing only the files you want.
To install from floppy disks, begin with step 1; to install over a
network, open the Installer program and begin with step 4.
Make sure the system software you’re using is compatible with
your computer.
1. Shut down your Macintosh.
2. Insert the Install disk into the floppy disk drive.
3. Turn on your Macintosh.
The Installer program opens automatically.
4. Click OK.
The Easy Install dialog box appears.
5. Make sure that the hard disk named in the box is the
one you want to install system software on.
If it isn’t, click the Switch Disk button until the correct disk
name appears.
90 Chapter 6: Setting Up Your Programs
6. Click the Customize button.
The custom installation dialog box appears. All available
components of the system software are listed.
7. Scroll through the list of items and hold down the Shift
key as you click the items you want to install.
If you want to conserve space on your hard disk, select the
“minimal software” option for your Macintosh.
s Important: Be sure to install the files that your Macintosh
uses to communicate with the printer, network, and other
equipment it is connected to. s
8. Click Install.
9. Follow the instructions that appear on the screen.
If you are installing from floppy disks, you may see messages
asking you to insert different disks.
10. When you see a message reporting that the installation
was successful, click Quit.
If a message reports that installation was not successful, try
installing again. (Follow the instructions on the screen.)
11. Restart your Macintosh.
Make a backup copy of the System Folder on floppy disks (or on
another hard disk).
s Warning: Your startup disk must have only one System
Folder. Multiple System Folders on a disk can cause
malfunctions and data loss. You can use the Find command
(in the Finder’s File menu) to see if there is more than one
System Folder on your hard disk. Drag any extra System
Folders to the Trash. s
Starting up with a floppy disk
If you’re unable to use your hard disk and you have a floppy disk
drive, you can start up your computer by inserting the Disk Tools
disk into the floppy disk drive and then turning on the computer.
This disk contains programs you can use to initialize, test, and
repair disks.
Chapter 6: Setting Up Your Programs 91
Installing your programs
Most application programs come on floppy disks, and you install
them by simply copying them from the floppy disks to your hard
disk. Some programs need to be installed in a particular way. If
your program came with specific instructions, follow them.
To use your programs most effectively:
m Put only one copy of each program on your hard disk. Having
more than one copy can lead to problems when you’re using
the program.
m Whenever you copy the contents of a program disk to your
hard disk, be careful not to copy an extra System Folder.
Always check to see what you’ve copied, and drag any extra
System Folders to the Trash.
m Keep the original program disk in a safe place. If the program
on your hard disk malfunctions, you can replace it with a fresh
copy from the original disk.
m If a program malfunctions consistently, and installing a fresh
copy does not correct the problem, find out from the software
manufacturer whether your version of the program is
compatible with the system software you’re using.
92 Chapter 6: Setting Up Your Programs
m Put frequently used programs (or aliases for those programs)
in the Apple menu so you can open the programs more
conveniently. See the chapter on adapting your computer to
your own use.
m If you want your computer to open a program automatically
each time it starts up, you can put the program (or its alias)
into the Startup Items folder. See the chapter on adapting
your computer to your own use.
Installing programs without a floppy disk drive
If you have access to a network, you can connect your computer
to the network and copy programs from a shared disk. See the
chapter on networks.
Remember that the software license agreement for a given
program may limit the number of copies you’re allowed to make.
Checking for computer viruses
Viruses—programs that damage files or erase disks—can be
introduced into your computer from a floppy disk, from a shared
disk on a network, or from an electronic bulletin board service.
Programs that detect and eliminate viruses are available from user
groups, bulletin boards, and dealers.
You should check for viruses frequently if you exchange disks
or data with other users. Some programs check for viruses
automatically.
m Check all disks—even those in new, unopened commercial
software packages—for viruses before using them or copying
anything from them to your hard disk.
m Since new viruses appear regularly, make sure you have the
latest version of your virus-detection software.
m To avoid compatibility problems, be sure to use only one
virus-detection program at a time.
m If your computer is on a network or if you use a modem,
check for viruses each time you copy information from
an outside source.
m If you give information to other computer users on disks
or send information electronically, make certain that there are
no viruses on your computer system before distributing the
information.
m Check your hard disk regularly with a virus-detection program
and correct any problems the program finds.
Chapter 6: Setting Up Your Programs 93
Working with several programs at a time
Switching programs
You can open as many programs and desk accessories as your
computer’s memory allows.
You can switch to another open program or desk accessory
by choosing its name from the Application menu.
All open programs are listed in the Application menu at the right
end of the menu bar. The name of the active program (the one
you’re using right now) has a checkmark next to it, and its icon
appears in the menu bar.
If a program’s icon is dimmed in the menu, that means its
windows are hidden. Choosing the program from the Application
menu displays its windows.
The Finder icon
Commands to hide or
display open windows
Open programs
Checkmark indicates
the active program
Finding out what programs are open
If you have several programs and windows open, you can find out
which program is active and what other programs are open by
pulling down the Application menu.
94 Chapter 6: Setting Up Your Programs
You can also switch to another program by clicking in a window
that belongs to an open program, or by double-clicking a program
icon (or the icon of a document that was created with the
program).
Hiding and showing windows on the desktop
You can hide all windows except those of the active program by
choosing the Hide Others command from the Application menu.
The other programs remain open even though the windows are
hidden. When you switch to another program, its windows are
displayed.
If you want to see all the open windows, choose Show All from
the Application menu.
Changing the amount of memory a program uses
Each program you open sets aside the amount of memory it
needs. (If you don’t have enough memory to open a program, you
need to quit one of the programs already open to free up some
memory.)
If you want to be able to open more programs, decrease the
minimum size. If you type a size smaller than “Suggested size,”
the program may work more slowly, show other performance
problems, or not work at all.
On occasion you may want to increase or decrease the amount of
memory a program uses. You increase the amount so you can
open more or larger documents in that program, and you
decrease the amount so you can open more programs at the same
time. You adjust the program’s memory size in its Info window.
1. Quit the program if it’s open, and then click the
program’s icon to select it.
2. Choose Get Info from the File menu.
The amount of memory the
program needs to open
3. Drag across the box containing the number you want to
change (either “Minimum size” or “Preferred size”).
“Preferred size” must always be larger than “Minimum size.”
4. Type the number of kilobytes (K) of memory that you
want the program to use.
If the program frequently runs out of memory, increase both
the preferred size and the minimum size.
The amount of memory the
program will use if enough
memory is available.
5. Close the Info window.
If you make the memory size smaller than suggested, you’ll
see a message asking you to confirm your decision. Click
Cancel to avoid problems with the program.
Chapter 6: Setting Up Your Programs 95
4. Choose Paste from the Edit menu.
Using the Scrapbook
You can use the Scrapbook to store text, graphics, sounds, and
other elements that you frequently include in your documents.
The new element is pasted ahead of the one previously
displayed.
Storing items in the Scrapbook:
Copying items from the Scrapbook:
1. In your document, select the text or other element that
you want to store in the Scrapbook.
1. Choose Scrapbook from the Apple (K) menu.
2. Choose Copy from the Edit menu.
2. Use the scroll bar to display the item you want to use in
a document.
3. Choose Scrapbook from the Apple (K) menu.
3. Choose Copy from the Edit menu.
The Scrapbook opens. You can use the scroll bar to see the
different text, graphic, and other elements it contains.
4. Open the document you want to use the item in.
5. Decide where you want to place the element.
6. Choose Paste from the Edit menu.
Deleting items from the Scrapbook:
1. Choose Scrapbook from the Apple (K) menu.
2. Use the scroll bar to display the item you want to
delete.
3. Choose Clear from the Edit menu.
The second of seven items
96 Chapter 6: Setting Up Your Programs
The type of
item of
information
displayed
Using a RAM disk
Creating a RAM disk
A RAM disk is a portion of your computer’s memory that you set
aside for use as a temporary storage device. Using a RAM disk
conserves power because the computer uses less energy to access
RAM than to access a hard disk or a floppy disk.
1. Choose Control Panels from the Apple (K) menu.
To use a RAM disk, you should have at least 4 MB of RAM in your
computer because memory assigned to a RAM disk is not available
for opening programs.
2. Open the Memory control panel.
The RAM disk portion of this control panel is at the bottom
of the window. If your computer has less than 3 MB of RAM,
this portion does not appear.
Choosing Sleep or restarting the computer does not affect a RAM
disk—but if your computer has a built-in floppy disk drive,
choosing Shut Down erases the contents of the RAM disk (but
does not remove the RAM disk itself ).
Remember a few precautions if you use a RAM disk:
m Before using a program on a RAM disk, test the program on
your hard disk or a floppy disk to make sure that it works
properly with your computer.
m Don’t store your only copy of a file on a RAM disk. Keep a
backup copy on your hard disk or a floppy disk.
3. Click the On button below the words “RAM disk.”
4. Drag the slider to choose the percentage of available
memory you want to use for your RAM disk.
Choose a size just large enough to accommodate the
programs and documents you want to put on the RAM disk.
Don’t choose a larger size than you need because memory set
aside for the RAM disk won’t be available for opening
programs.
The size of the RAM disk you select appears in the “RAM Disk
Size” box.
continues .
Chapter 6: Setting Up Your Programs 97
5. Choose Restart from the Special menu.
A RAM disk icon appears on the desktop when the computer
restarts.
6. Drag the items you want to the RAM disk icon.
Resizing or removing a RAM disk
1. Copy any programs or documents that you want to save
onto the internal hard disk or a floppy disk.
If you want to resize a RAM disk, you need to remove its
contents and then restore them.
Erasing a RAM disk
2. Drag everything in the RAM disk to the Trash.
There are two ways to erase the contents of a RAM disk. They do
not remove the RAM disk itself or make more memory available
for opening programs.
3. Choose Empty Trash from the Special menu.
m Select the RAM disk icon and choose Erase Disk from
the Special menu.
5. Open the Memory control panel.
m Drag everything on the RAM disk to the Trash and
choose Empty Trash from the Special menu.
4. Choose Control Panels from the Apple (K) menu.
6. Drag the slider to choose the percentage of available
memory you want to use for your RAM disk.
Drag the slider to 0% if you want to remove the RAM disk.
7. Choose Restart from the Special menu.
If you resized your RAM disk, a new RAM disk icon appears on
the desktop when the computer restarts. If you removed your
RAM disk, no icon appears.
8. If you resized the RAM disk, copy any items you want
back to it.
98 Chapter 6: Setting Up Your Programs
Making a RAM disk the startup disk
If you have 6 MB or more of memory, you can make a RAM disk
your startup disk.
1. Create a RAM disk.
2. Locate and open the Installer program on the Install
disk.
The RAM disk is now your startup disk. Be sure to keep a System
Folder on your hard disk as well, in case the contents of the RAM
disk are erased. Also, keep a copy of the RAM disk contents on
another disk. (Don’t keep two System Folders on a single disk.)
s Important: If your computer has a built-in floppy disk drive,
the contents of the RAM disk are erased when you choose
Shut Down, though the RAM disk itself is not removed. s
3. Install a minimal System Folder on the RAM disk.
See the instructions on installing customized system software
in this chapter.
4. Choose Control Panels from the Apple (K) menu.
5. Open the Startup Disk control panel.
6. Select the RAM disk as your startup disk.
7. Choose Restart from the Special menu.
Chapter 6: Setting Up Your Programs 99
Chapter 7
Power Management
In this chapter
m Checking the battery level
m Responding to low-power messages
Monitoring the battery charge level
Your computer’s main power source is a nickel-cadmium battery.
The battery provides power for up to 3 hours of work (the exact
time depends on how often you use the hard disk, how bright the
screen is, and other factors). Use the Battery desk accessory to
monitor the charge level of the battery so you can recharge it
when necessary.
m Recharging the battery
m Removing or replacing the battery
Using the Battery desk accessory
m Maximizing battery life
To open the Battery desk accessory, choose Battery from the
Apple (K) menu.
m Getting the most work time out of the battery
101
The Battery desk accessory appears.
Responding to low-power messages
When the battery charge drops to about 15%, the computer
displays a series of low-power messages. The work time remaining
after you see the first message will vary depending on how you
are using the computer. It’s a good idea to act promptly.
The line of rectangles is the battery gauge. Black rectangles
indicate the charge level. You can see the level decrease while the
battery is in use, and increase while the battery is recharging in
the computer.
When you click the lever to the right of the battery gauge, a Sleep
button appears.
What you should do
When you see a low-power message, do either of the following:
m Plug in the power adapter, or
m Save your work and put the computer to sleep.
What you should know
Lever
You may sometimes find it convenient to put the computer to
sleep by clicking this button, instead of choosing the Sleep
command.
102 Chapter 7: Power Management
The first low-power message indicates that it’s time to recharge
the battery. Right after this message appears, the screen
brightness dims automatically to save power.
If you continue to work without plugging in the power adapter,
the computer displays a second low-power message.
The second message is followed almost immediately by a third
and final message indicating that the computer is about to put
itself to sleep. When time is up, the computer goes to sleep
automatically to protect the contents of RAM.
If you continue working until the computer goes to sleep
automatically, you may not be able to wake it again until you
recharge the depleted battery in the computer for 15 minutes.
If you can’t plug in the power adapter, the contents of RAM are
retained in sleep for at least 2 days. If you leave the battery in the
computer and recharge it within 2 days, you should be able to
wake the computer and resume work where you left off.
Recharging the battery
There are two ways to recharge:
m Plug in the power adapter to recharge the battery without
removing it from the computer, or
m Remove the battery and recharge it in the (optional)
recharger.
Recharging with the power adapter
Plug in the power adapter as shown.
s Important: Recharge a depleted battery as soon as possible.
Leaving a depleted battery in the computer for longer than 2
weeks (especially in a hot location, such as the trunk of a car)
may damage the battery so that it can’t be recharged. If this
happens, you need to replace the battery. s
Power adapter port
Chapter 7: Power Management 103
s Warning: Use only the power adapter that came with your
computer. Adapters for other electronic devices (including
other portable computers) may look similar, but they may
damage your computer. s
A lightning bolt icon appears in the Battery desk accessory when
the power adapter is plugged in and the battery is recharging. The
lightning bolt icon disappears when recharging is about 85%
complete, though recharging continues. The icon appears even if
the power adapter is plugged into the computer only, so make
sure the adapter is plugged into both the computer and an
electrical outlet.
Lightning bolt icon
You can continue to use the computer while the battery is
recharging, but the battery will take longer to recharge if you do.
Battery recharging time while the computer is in use depends on
how often you use the hard disk, how bright the screen is,
whether you are using an external monitor, how deeply the
battery is depleted, and other factors.
If you are using several of your computer’s power-consuming
features (such as an external monitor and a program that requires
frequent hard disk access), and you are not using the features
designed to conserve power (such as processor cycling), the
battery may not recharge until you put the computer to sleep or
shut it down.
If you recharge a fully depleted battery with the computer shut
down, it takes about 2–3 hours to bring the battery to 80% of its
capacity. It takes several more hours to bring the battery charge to
100%.
While the computer is shut down and the power adapter is
plugged in, you can remove a charged battery from the computer
and replace it with a battery you want to charge. If you do this,
disconnect and then reconnect the power adapter after inserting
the second battery (otherwise the second battery will not
recharge).
104 Chapter 7: Power Management
Recharging with a recharger
To recharge a battery, follow these steps.
A battery recharger and additional batteries are available as
options for your computer. If you purchase a recharger and an
extra battery, you can charge one battery while you use the other,
so you always have a fully charged battery on hand.
1. Place the recharger on a level surface.
2. Connect the recharger and the power adapter as shown
in the illustration.
The recharger can accommodate two batteries. The battery slots
work independently, so you can put batteries in or take them out
at different times.
The recharger must be plugged into an electrical outlet to charge
a battery. You can plug it in using the power adapter that came
with your computer, or you can purchase an additional (identical)
power adapter from your authorized Apple dealer.
s Warning: Do not use any other type of power adapter with
the recharger. Doing so may damage the recharger, the power
adapter, or both. s
Chapter 7: Power Management 105
3. Place the battery in the recharger as shown.
Recharging begins immediately. You can remove a battery
from the recharger at any time.
s Important: To preserve a battery’s charge, don’t leave it in
the recharger if the power adapter is not plugged into an
electrical outlet. s
Removing or replacing the battery
Don’t attempt to use your computer without a battery (even when
the power adapter is plugged in).
To remove or replace the battery, follow these steps.
1. Save your work, and then choose Shut Down from the
Special menu.
The lights on the recharger indicate the following:
2. Close the display.
m No light: The recharger is not plugged in, or the battery is
defective. (If the light goes off during recharging, there is a
problem with the battery.)
3. Open the battery door by sliding the door in the
direction indicated by the arrow.
m Yellow: The battery is charging.
m Green: The battery is charged to at least 80% of its capacity,
and can be used.
The table shows approximate recharging times for fully depleted
batteries.
80% charge
100% charge
In the recharger:
1 battery
2 batteries
2.5 hours
5 hours
5 hours
10 hours
In the computer (shut down):
2–3 hours
6–8 hours
106 Chapter 7: Power Management
The door is physically attached to the battery.
4. Carefully pull the battery out of its compartment.
5. If you are inserting another battery, slide it into the
battery compartment.
Replacement batteries come with a door attached.
6. Close the battery door by pushing it back into place.
7. If you just inserted a new battery, it’s a good idea to
plug in the power adapter in case the battery is not
fully charged.
s Important: Nickel-cadmium batteries contain metals which
are hazardous when released to the environment. It is
inappropriate, and in some cases unlawful, to throw batteries
away with your household or business trash. Instead of
throwing away your spent batteries, dispose of them as
described here.
In the United States: Return spent batteries to your
authorized Apple service provider, who will make sure they
are included in Apple's battery recycling program.
Elsewhere: Many locations have government or Applesponsored collection and/or recycling programs for spent
batteries. Dispose of spent batteries in accordance with the
mandatory or voluntary battery collection schemes in your
location. Contact your authorized Apple service provider for
information about the recommended battery disposal
procedures in your area.. s
s Warning: Damaged nickel-cadmium batteries may leak
small amounts of potassium hydroxide. This substance can
cause severe burns to the skin and eyes. If you touch a
damaged battery, immediately wash your hands and any
other affected areas with water for at least five minutes.
Do not use soap. s
Chapter 7: Power Management 107
Maximizing battery life
To maximize battery life, discharge and then recharge the battery
completely once every 90 days. Just use the computer as you
normally would, but ignore the low-power messages that appear
on the screen. (Make sure to save your work, however.) When the
computer goes to sleep automatically, recharge the battery
completely before using that battery again. You can do this in
either of two ways:
m Leave the battery in the computer, plug in the power adapter,
and let the battery recharge overnight, or
m Remove the battery from the computer and recharge it in a
recharger for 5 hours (if you are recharging just one battery)
or 10 hours (if you are recharging two).
108 Chapter 7: Power Management
Your battery will last longer if you recharge it at or slightly below
room temperature.
With proper care you can expect your battery to last for at least
a year. If you notice that the battery no longer holds a charge for
as long as it should, you may need to replace it.
Maximizing work time
m Keep virtual memory turned off in the Memory control panel.
Your PowerBook’s battery can provide up to 3 hours of work time
before you need to recharge it. The actual work time available
depends on what equipment you’re using with your computer
and what steps you take to conserve power while you work.
m If your computer has 6 MB of memory or more, you can use a
RAM disk as your startup disk to minimize hard disk use.
Ways to conserve battery power
The more of these steps you take, the longer you can use your
battery before recharging it.
m Turn down the screen brightness whenever possible. At its
brightest level, the screen consumes about a third of the
power your computer is using.
m Quit any program that uses a modem unless you’re using the
program for telecommunication. As long as the program is
open, your modem is consuming power.
m If you’re working near an electrical outlet, plug in the power
adapter.
m If you aren’t using the computer, put it to sleep and plug in
the power adapter.
m Adjust the battery conservation settings in the PowerBook
control panel for maximum conservation: set the battery
conservation slider at Maximum Conservation; keep processor
cycling turned on. The rest of this section describes these
settings in detail.
Chapter 7: Power Management 109
Adjusting the battery conservation settings
3. Close the PowerBook control panel.
The Battery Conservation section of the PowerBook control panel
gives you several ways to regulate your computer’s power
consumption.
The easiest approach
You can think of the battery conservation setting as an automatic
sleep setting. If you don’t use the computer for several minutes
(how many depends on which setting you choose), it goes to
sleep without any action on your part. A computer in sleep has a
darkened screen and appears to be off, though it is still drawing
battery power at a low level.
Just use the Battery Conservation slider to choose the setting you
prefer.
To put the computer to sleep before the automatic sleep setting
takes effect, choose Sleep from the Special menu.
1. Choose Control Panels from the Apple (K) menu, and
open the PowerBook control panel.
To wake the computer from sleep, press any key (except Caps
Lock).
2. In the Battery Conservation box, drag the slider to the
setting you want.
Automatic sleep does not take effect under any of the following
circumstances:
m The AppleTalk software is turned on in the Chooser and the
power adapter is plugged in. (Automatic sleep does take effect
if the power adapter is not plugged in.)
m Your computer is connected to a shared disk on the network.
m Your computer’s printer or modem port is in use.
There are four settings along the scale. If you’re trying to
meet a deadline, Maximum Performance allows you to work
with the fewest interruptions. If you don’t have a power
adapter with you, Maximum Conservation gives you the
longest work time.
When you change the setting, the new setting takes effect
immediately.
110 Chapter 7: Power Management
More about automatic sleep
Using the battery conservation options
The Battery Conservation slider controls two different power
conservation features: system sleep and hard disk sleep.
The Battery Conservation section of the PowerBook control panel
includes a button labeled Options. Click this button to see more
options that affect your computer’s power consumption.
m System sleep is a state in which your computer uses only the
power it needs to maintain the contents of RAM. (The
contents of RAM include any open programs and documents,
and various control panel settings such as the clock time.)
m Hard disk sleep stops your computer’s internal hard disk from
spinning when it isn’t being used.
If system sleep is in effect, so is hard disk sleep.
The table indicates how the battery conservation settings
correspond to sleep times.
Minutes before sleep if you choose:
Performance
Conservation
System
Hard disk
15
15
8
4
4
2
1
0.5
Don’t sleep when plugged in
If the power adapter is plugged in, you can prevent automatic
sleep by clicking “Don’t sleep when plugged in.”
Chapter 7: Power Management 111
Processor cycling
4. Close the PowerBook control panel.
If the computer is not doing anything for a few seconds, it
reduces the power consumption of its microprocessor. The
microprocessor comes back up to speed instantaneously when
you resume work. This feature is called processor cycling.
To turn processor cycling back on, click “Allow cycling.”
You don’t need to do anything to use the processor cycling
feature. But if you notice that one of your programs performs very
slowly, you might want to turn off processor cycling while using
that program.
To turn off processor cycling, follow these steps.
1. Choose Control Panels from the Apple menu, and open
the PowerBook control panel.
2. Click the Options button.
3. Click “Don’t allow cycling.”
112 Chapter 7: Power Management
You may notice other effects of processor cycling. For example,
if you have open programs doing something in the background,
processor cycling may slow those programs down. You may also
notice that the Alarm Clock is updated irregularly or that the
wristwatch pointer appears more often. These changes do not
indicate a problem with your computer.
When you turn processor cycling off, the computer drains the
battery faster. The computer may also become very warm to the
touch, especially on the side beneath the keyboard. These
changes do not indicate a problem with your computer. However,
you should keep processor cycling turned on whenever possible.
s Important: To conserve battery power, turn processor
cycling off only when using programs that it interferes with.
Turn processor cycling back on again as soon as possible. s
Chapter 8
Using Disks
In this chapter
m Preparing a new disk for use
m Erasing a disk
m Choosing a startup disk
Preparing a new disk for use
Before you can use a new disk, you need to prepare it so the
computer knows where to store information on the disk. This
preparation is called initializing (or formatting) the disk.
The hard disk inside your computer is initialized at the factory,
but you need to initialize new 3.5-inch (89-millimeter) floppy
disks that you want to use in a floppy disk drive.
m Protecting the information on a disk
Initializing a hard disk
m If you can’t save files on a floppy disk
Occasionally a hard disk may become damaged in such a way that
you have to reinitialize it. (The key symptom of such damage is
that the hard disk’s icon does not appear on the desktop when
you start up the computer using another disk.) You lose all the
information on a damaged disk when you reinitialize it.
m Ejecting a disk
m Caring for disks
m Testing and repairing disks
If your hard disk’s icon does not appear on the desktop, first try
to repair it as described later in this chapter. If you can’t repair the
disk, use the Apple HD SC Setup program to reinitialize the disk.
The program is on the system software disk called Disk Tools.
113
1. Insert Disk Tools and turn on your computer.
2. Locate the Apple HD SC Setup icon and open it.
You cannot initialize the disk that you used to start up your
computer or the disk that contains the Apple HD SC Setup
program.
4. Click Initialize.
5. Click Init to initialize the hard disk.
6. If a message appears asking you to name the disk,
type a name and then click OK.
The name of the hard disk currently selected is shown as the
“volume name.” The SCSI ID number of the selected hard
disk is displayed above the Drive button. (The ID number of
an internal hard disk is 0.)
3. Click Drive until the disk you want to initialize appears.
The hard disk’s
SCSI ID number
The hard disk’s
name
114 Chapter 8: Using Disks
7. Click Quit when you see a message reporting that
initialization was successful.
If a message reports that initialization failed, try again.
If initialization fails a second time, take the disk to your
authorized Apple service provider for repair.
Initializing a floppy disk
Initializing a new floppy disk prepares the disk to store
information.
1. Insert a new floppy disk into your floppy disk drive.
If you inserted a high-density disk (1.4 MB), this message
appears:
2. If you inserted a high-density disk, click Initialize.
If you inserted a double-sided disk, click Two-Sided.
A message alerts you that you’re about to erase any
information that may be on the floppy disk. A new floppy disk
has no information on it.
3. Click Erase.
A third message asks you to name the disk.
If you inserted a double-sided (800K) disk, this message
appears:
4. Type a name for the disk.
If you don’t name the disk, the computer gives it the name
“Untitled.”
5. Click OK.
The computer takes about a minute to initialize the disk.
When initialization is finished, the icon of the floppy disk
appears on the desktop.
Chapter 8: Using Disks 115
Erasing a floppy disk
Designating a startup disk
Erasing a disk actually reinitializes it.
If you use more than one hard disk with your computer, you can
specify which hard disk you want the computer to use as the
startup disk. (A startup disk must have a System Folder on it that
contains the correct version of the system software.)
s Warning: When you erase a disk, you lose any information
that was on the disk. s
1. Click the icon of the disk you want to erase.
2. Choose Erase Disk from the Special menu.
A message appears.
3. Depending on the type of disk you’re erasing, click
Initialize or Two-Sided.
If you don’t specify a startup disk, your computer uses its internal
hard disk as the startup disk (if it has a System Folder).
1. Choose Control Panels from the Apple (K) menu.
2. Open the Startup Disk control panel.
3. Click the icon of the disk you want to use as the startup
disk.
The computer takes about a minute to erase the disk.
4. Close the Startup Disk control panel.
116 Chapter 8: Using Disks
Scanning order for startup disks
Protecting the information on a disk
When you turn on your computer, it looks for a startup disk
(a disk containing a System Folder) in the following sequence:
The information on a locked floppy disk or in a locked file can be
opened or copied but cannot be changed.
1. internal floppy disk drive (if any)
2. external floppy disk drive (if any)
Locking a floppy disk
3. disk (or RAM disk) selected in the Startup Disk control panel
m Slide the tab on the back side of the disk so that the square
hole is open.
4. internal hard disk
5. external hard disk (if there is more than one, it looks first at
the hard disk with the highest SCSI ID number)
Use your thumbnail, a push pin, or a similar object to move
the tab.
6. internal hard disk (the computer returns to this drive and
waits another few seconds)
If the computer does not find a startup disk, it displays a blinking
question mark in the middle of the screen.
To bypass the internal hard disk in the scanning sequence, press
x-Option-Shift-Delete while the computer starts up.
s Important: If you use an external hard disk, turn it on and
wait a few seconds before you turn on your Macintosh, or the
computer may not recognize the disk. s
Locked
Unlocked
To unlock the disk, slide the tab back so that it covers the
square hole.
Chapter 8: Using Disks 117
Locking a file
4. Close the Info window.
You use the Get Info command to lock a document or a program.
Locking a program may affect its operation.
To unlock the file, click the Locked box again (so the X
disappears).
1. Click the icon of the file you want to lock.
You can’t lock a folder, but you can lock items in a folder.
2. Choose Get Info from the File menu.
Locking an alias does not lock the original file. Locking an alias
merely protects it from being thrown away.
3. In the Info window, click the Locked box in the
lower-left corner.
118 Chapter 8: Using Disks
Backing up your files
If you can’t save files on a floppy disk
Making backup copies of important files is good protection
against possible damage to the originals.
If you can’t save files on a floppy disk, the disk may be locked, full,
or damaged, or the disk drive may not be working properly. Try
the following:
m You can back up files stored on your hard disk by copying
them onto floppy disks.
m You can back up an entire floppy disk by copying it to another
floppy disk, or to a hard disk.
m You can use a commercial backup program to copy new and
changed files from a hard disk to another hard disk, to a tape
drive, or to a series of floppy disks.
m If your computer is on a network, you can back up files by
copying them to a shared disk on the network.
m Make sure the tab on the back of the disk is in the unlocked
position (the square hole should be closed).
m If you see a message reporting that the disk is full, erase
unneeded files from that disk, or save on another disk.
m If you see a message that the disk is not initialized, and you
know that it has been initialized, eject the disk and carefully
insert it again. If the same message appears, the disk is
probably damaged. You may be able to recover its information
with Disk First Aid or another disk-recovery program. (See the
section on testing and repairing disks in this chapter.)
m Check the disk for obvious damage to the plastic case or the
sliding metal shutter.
m Insert a different disk and try saving again. If you can’t save on
the second disk, the disk drive may be damaged. Take the disk
drive to your authorized Apple service provider for repair.
Chapter 8: Using Disks 119
Ejecting a disk
If you can’t eject a floppy disk
You can eject a floppy disk by doing any of the following:
If you can’t eject a floppy disk in the usual way, try the following in
order:
m Click the disk icon to select it and choose Put Away from the
File menu.
The disk is ejected and its icon disappears from the desktop.
m Drag the disk icon to the Trash.
The disk is ejected and its icon disappears from the desktop.
(Dragging a disk to the Trash does not erase the disk’s
contents.)
m Click the disk icon to select it and choose Eject Disk from the
Special menu.
The disk is ejected and its dimmed icon remains on
the desktop.
1. Hold down the x and Shift keys and press the number 1 key
on your keyboard to eject a disk in an internal disk drive;
press x-Shift-2 to eject a disk in an external disk drive.
2. Turn off the Macintosh. If the disk isn’t ejected, then hold
down the trackball button while you turn the computer on
again.
3. Locate the small hole near the disk drive’s opening, and
carefully insert the end of a large straightened paper clip into
it. Push gently until the disk is ejected. Do not use excessive
force.
You can use the first two methods to remove a hard disk icon
from the Macintosh desktop (provided that it’s not your startup
disk), or to disconnect from a shared disk on the network.
All three methods also work with CD-ROM discs.
4. If nothing works, take the computer or disk drive to your
authorized Apple service provider to have the disk removed.
120 Chapter 8: Using Disks
Caring for disks
Testing and repairing disks
For information on floppy disk care, see the section on working
with disks in Part II of this book, or consult the instructions that
came with your floppy disks.
Both floppy disks and hard disks can become damaged by
repeated use and handling. If you see a message reporting that
a disk is damaged or unreadable, you can use Disk First Aid or
Apple HD SC Setup to try to diagnose and correct the problem.
Both programs are on the disk called Disk Tools that came with
your computer.
Hard disk precautions
Hard disk drives are delicate mechanisms and should be handled
with care.
If a hard disk icon doesn’t appear
m Do not bump, jar, or move your computer while the hard disk
is in use. If you need to move the computer, wait until the
hard disk stops spinning.
If you can’t start up from a hard disk or don’t see its icon on the
desktop, try the following:
m Do not spill any liquids on or near the hard disk.
m If the hard disk is internal, shut down your Macintosh, wait at
least 10 seconds, and then turn it on again.
m Do not expose the hard disk to hazardous vapors, such as
those from cleaning solvents.
m If the hard disk is your startup disk, start up with a different
disk. If the hard disk’s icon appears on your desktop, reinstall
system software on the hard disk (use your backup copy or
use the Installer program and the original system software).
continues .
Chapter 8: Using Disks 121
m If the hard disk is external, make sure it is turned on and its
cable is connected firmly; then restart the Macintosh.
m Check the ID numbers of all SCSI equipment connected to
your computer. Each device must have a unique ID number
(the computer itself has the ID number 7, and the internal
hard disk has the number 0). Also check that the chain of
devices is terminated properly. (See the chapter on enhancing
your computer system for information about setting SCSI ID
numbers and checking termination.)
122 Chapter 8: Using Disks
Using Disk First Aid
You can use the Disk First Aid program to test floppy disks
and hard disks that may have been damaged. Disk First Aid
also repairs some types of disk damage. Disk First Aid is on the
system software disk labeled Disk Tools.
1. Insert Disk Tools and start up your computer.
2. Open the Disk First Aid icon.
3. Click the Drive button until the name of the disk you
want to test appears. Click the Eject button if you want
to insert a different floppy disk.
4. Click Open.
5. Choose Repair Automatically from the Options menu.
6. Click the Start button to begin testing the disk.
7. When testing and repair are finished, choose Quit from
the File menu.
If you want to test another disk, choose Close from the File menu,
then select and open another disk (repeat steps 3–7).
If Disk First Aid cannot correct the problem:
m Try repairing the disk again. Sometimes repeating the process
corrects the problem.
m Use another disk repair or recovery program. Some disk
repair programs let you recover information from a damaged
disk.
m Consult a specialist for help.
m Once you have recovered all the information you can, erase
(reinitialize) the disk. If initialization doesn’t work, discard the
damaged floppy disk, or take the hard disk to your authorized
Apple service provider for repair.
Chapter 8: Using Disks 123
Testing a hard disk
4. Click Test.
You can test a hard disk with the Apple HD SC Setup program,
which is on the system software disk labeled Disk Tools.
5. When a message tells you that testing is complete, click
Quit.
1. Insert Disk Tools and start up your computer.
2. Open the Apple HD SC Setup icon.
3. Click the Drive button until the disk you want appears.
The hard disk’s
SCSI ID number
The hard disk’s
name
124 Chapter 8: Using Disks
If the test reveals a problem, you may be able to correct it
by using Disk First Aid or another disk repair program, or you
may have to reinitialize the disk. Consult a specialist
for assistance if necessary.
Chapter 9
Organizing Your Files
Straightening up your files
In this chapter
To accomplish this . . .
Do this . . .
m Straightening up your files
Straighten up all icons in
the active window
Choose the Clean Up command
from the Special menu
Straighten up selected
icons only
Hold down the Shift key
while choosing Clean Up
m Using folders to organize your files
m Filing documents when you save them
m Making items easier to find
m Finding an item
m Creating a template or stationery
m Getting information about your files
Arrange icons alphabetically Hold down the Option key
by name, or by the
while choosing Clean Up
list view displayed most
recently in that window
Line up icons near the right Click the desktop, then hold down the
edge of the desktop
Option key while choosing Clean Up
m Assigning a label to a file
m Tips on transferring files
You can also have icons arrange themselves in a staggered grid
when you choose Clean Up. See the chapter on adapting your
computer to your own use.
125
Using folders to organize your files
Creating and naming folders
Macintosh folders, like the paper folders in a file cabinet, can be
used to store and organize your work. You can place one folder
inside another to create a hierarchy of files.
You can create a new folder whenever the Finder is the active
program.
A new folder appears in the active window (or on the desktop
if no window is active). The name is already selected.
Hard disk
Budgets
1. Choose New Folder from the File menu.
Proposals
2. Type a name for the folder and press Return.
Feasibility
studies
Résumés
Issues
list
If this doesn’t work, click the folder’s name to select it, and
try again.
You move, copy, and remove folders in the same way that you do
other icons.
Comments
Draft 1
Draft 2
126 Chapter 9: Organizing Your Files
Draft 3
Many programs also let you create and name a new folder in the
dialog box that appears when you save a document.
Filing documents when you save them
The first time you save a document (or whenever you choose Save
As to create another version of that document), a directory dialog
box appears. A directory is the list of files and folders contained in
a folder or on a disk.
You use this box to name your document and indicate where
to store it. Directory dialog boxes vary slightly from program
to program, but all share certain features.
Use this pop-up menu to see the
directory of a higher-level folder
or disk.
This directory lists the
contents of the folder or
disk named above it.
Double-click a folder to see
its contents.
Type a name for your
document here.
The disk that contains the directory
that’s currently displayed.
Click to see the items on the Macintosh
desktop, including other disks.
Click to create a new folder in the
directory that’s currently displayed.
Click to save your document
in the directory that’s currently
displayed.
Chapter 9: Organizing Your Files
127
Making items easier to find
Uses for aliases
Your Macintosh provides several ways to make a file, folder,
or other item easy to find and open. You can
Alias for
Location
Purpose
Any item that
could be stored
in several places
Everywhere the
item belongs
You can get access to an
item from several places.
Apple Menu
Items folder
On the desktop
You can easily add or
remove Apple menu items.
Creating an alias
A program that
must stay with
certain files
On the desktop;
in the Apple
menu
You can start the program
without opening the folder
or disk where it is stored.
An alias represents and points to a file, folder, disk, or other item
(even a shared item on a network). You can make as many aliases
for an item as you want.
A document or
folder stored on
a separate disk
Anywhere on
your work disk
When opened, the alias
asks for the disk by name,
then opens the original
when the disk is inserted.
An item on a
shared disk
Anywhere on
your work disk
When opened, the alias
automatically connects to
the shared disk and opens
the item.
m create aliases for the item and put the aliases in convenient
locations
m install the item (or its alias) in the Apple (K) menu
m move the item (or its alias) to the desktop
1. Click to select the item you want to make an alias for.
2. Choose Make Alias from the File menu.
The name of the alias appears in italics and ends with “alias.”
3. If you wish, type a new name for the alias (the name is
already selected), and then move it to a new location.
v Trouble? If you open an alias and nothing happens, or if
you see a message that the original file isn’t available, then
the original has been deleted or the alias is damaged. You
can open the alias’s Info window to find out where the
original is. v
128 Chapter 9: Organizing Your Files
Locating the original of an alias
Installing an item in the Apple menu
An alias’s Info window shows the location of the original.
You can install any item in the Apple menu, and then open the
item by choosing it from the menu.
1. Select the alias whose original you want to find.
2. Choose Get Info from the File menu.
1. Open the System Folder icon and locate the Apple
Menu Items folder.
2. Drag the item you want to install (or its alias) into the
Apple Menu Items folder.
The item appears immediately in the Apple menu.
Location of the
original—includes
folder levels and
disk name (if the
original is on a
different disk)
3. Click the Find Original button.
You remove an item from the Apple menu by opening the Apple
Menu Items folder and dragging its icon out of the folder.
v Trouble? If the Apple menu does not contain the items
it should, make sure that the Apple Menu Items folder is
in the System Folder of your startup disk. If it is, open the
folder to check that all the items you want in the menu appear
there. v
Moving an item to the desktop
The window containing the original item opens. The icon is
selected. (If the original is on another disk, you’re asked to
insert the disk.)
You can make an item easy to find by dragging its icon to the
desktop. The icon stays there until you remove the disk on which
the item is stored.
If you deleted the original, or if it is on a shared disk that’s not
available, you’ll see a message that the original can’t be found.
Aliases are not deleted when the original is deleted (and vice
versa).
If you’ve placed an icon on the desktop, you can put it back in its
original location by selecting the item and choosing Put Away
from the File menu.
Chapter 9: Organizing Your Files
129
2. Type the name (or part of the name) of the item you
want to find.
Finding an item
When the Finder is the active program, you can use the Find
command in the File menu to find any item on any disk
connected to your computer. (The Find command cannot locate
items inside the System file. You need to open the System file to
see its contents.)
Finding an item by name
1. Choose Find from the File menu.
The dialog box that appears lets you find an item by name.
Capitalization does not have to match.
3. Click the Find button.
The first item that matches the name you typed is shown
highlighted in a Finder window. If an item is found on the
desktop, you see a message. If no item matches, you hear an
alert sound.
4. To see the next matching item, choose Find Again from
the File menu.
If no more items are found, you hear an alert sound.
Type the name (or
partial name) you
want to find.
Click to start a search.
Click to choose additional
search criteria.
If the dialog box you see has more items than shown here,
click the Fewer Choices button in the lower-left corner.
130 Chapter 9: Organizing Your Files
Finding an item using other criteria
The content of the middle pop-up menu and the text area
vary according to the item selected in the left pop-up menu.
You can use the Find command to find items by size, label, date,
or other characteristics.
3. Choose an item from the left pop-up menu.
1. Choose Find from the File menu.
4. Choose an item from the middle pop-up menu.
2. If you see a button labeled More Choices, click the
button.
5. Adjust the date, choose an item, or type text in the
upper-right area of the dialog box.
The dialog box that appears lets you select search
characteristics using pop-up menus.
Pop-up menus
of search
characteristics
Type text or set
a date here.
Click a number to select it;
click the up or down
arrow to change it.
Click to show search
results all at once (instead
of one at a time).
continues .
Click to display the
smaller dialog box
that searches for
names only.
Pop-up menu of
search locations
Click to start a
search.
Chapter 9: Organizing Your Files
131
6. Choose a search location from the pop-up menu
labeled Search.
8. Click the Find button when you’ve finished selecting
options.
The first matching item is shown highlighted in a Finder
window. To see the next matching item, choose Find Again
from the File menu. If the item is found on the desktop, a
message appears. If no item is found, you hear an alert sound.
When you display items all at once, they are shown
highlighted in an outline view.
Location for the search
7. If you want all items displayed at once, click the
checkbox labeled “all at once.”
A list view, Indentation means that an item
in outline
is located inside a folder.
form, shows
the contents
of folders.
132 Chapter 9: Organizing Your Files
Finding items that meet two criteria
Ways to use the Find command
You can locate items that meet two sets of criteria, such as all
items created before a certain date and larger than a certain size.
The Find command can help you locate files quickly, organize
documents, and develop an efficient system for backing up and
archiving your work.
1. Choose the first criterion.
2. Click the “all at once” box so that an X appears.
This characteristic
Can be used to locate
Name
1. Files whose names you can’t recall exactly
2. All items for which you use a standard name,
such as status reports or expense reports
Kind
1. All application programs
2. All aliases
Size
Large files, to make space available on a disk
5. Choose the second criterion.
Label
6. Choose “the selected items” in the pop-up menu
labeled Search.
All the files to which you added the same
label (such as “top secret”)
Lock
Locked files, to unlock them for editing
7. Click Find to begin the second stage of your search.
Modification date
All files changed since a certain date,
to back up new and changed files
Creation date
All files created before a certain date,
to archive or erase outdated material
3. Click the Find button.
The items found are shown highlighted in an outline view.
4. Choose the Find command again, before you click or
take any other action.
You choose Find immediately so that the items located in the
first stage of the search remain highlighted.
The items meeting both criteria are highlighted.
Chapter 9: Organizing Your Files
133
Creating a template or stationery
Most documents can be saved as or converted into a stationery
pad, which is a template form of the document. The template
retains its format and content, and you can use it repeatedly as a
master for similar documents with different content.
Many programs let you save a document as a stationery pad when
you choose Save or Save As. Click the stationery pad option to
save your document as a template.
Stationery pad icon
Regular
document icon
134 Chapter 9: Organizing Your Files
Click here to save the
document as a stationery
pad.
If the program you’re using does not offer a stationery pad
option, you can use a document’s Info window to create a
stationery pad.
1. Click the document icon to select it.
2. Choose Get Info from the File menu.
3. Click “Stationery pad” near the lower-right corner
so that an X appears in the checkbox.
4. Close the Info window.
The document icon now appears as a stationery pad icon.
When you open a stationery pad, an untitled window appears
showing the contents of the stationery, or a dialog box appears
asking you to name the new document.
Using the Info window
The Get Info command displays information about a
selected item.
1. Click to select the item you want information about.
2. Choose Get Info from the File menu.
If you want to change the stationery pad itself you must first turn
it back into a regular document. You can do this by opening the
stationery pad’s Info window and clicking “Stationery pad” to
remove the X.
Getting information about your files
When the Finder is the active program, you can obtain
information about your files in two places:
m in the file’s Info window
m in the View menu
You can type comments in the Info window and use the
Find command to search for them later.
3. Close the window.
Chapter 9: Organizing Your Files
135
Using the View menu
Assigning a label to a file
You can use the View menu to display the contents of a window
by icon or small icon, or you can list items according to various
characteristics such as name, size, or kind. (You can use the Views
control panel to change how files are listed and what information
is included in the list. See the chapter on adapting your computer
to your own use.)
You can assign a label to a file and then group related files
according to the label you have given them.
Windows are preset to show icons. You can also display items in a
list by choosing a command from the View menu. For example,
listing items by the date and time of their most recent
modification makes it easy to back up files you have changed
recently.
The type of list displayed is underlined.
When the contents of a window are displayed as a list, you can
click any column heading (such as Size or Last Modified) to
rearrange the list according to that characteristic.
136 Chapter 9: Organizing Your Files
To assign a label to an icon, click the icon to select it and then
choose the label you want from the Label menu. Choose By Label
from the View menu to regroup your files. The label is visible only
when the contents of a window are displayed as a list.
Tips on transferring files
You can transfer files from your computer’s internal hard disk in
the following ways:
m Over a network
You can connect your computer to a network and transfer files
over the network. For information, see the networking
chapter.
m Over telephone lines
If your computer is connected to a modem or has a modem
installed, you can transfer files over telephone lines using an
appropriate communications program. For more information,
see the chapter on expanding your computer system.
m On floppy disks
If your computer has a built-in floppy disk drive or is
connected to an external floppy disk drive, you can transfer
files from your computer’s internal hard disk to a floppy disk.
(If your computer does not have a built-in floppy disk drive,
see the chapter on expanding your computer system for
instructions on connecting a disk drive.)
m On another hard disk
If your computer is connected to another hard disk, you can
transfer files from your computer’s internal hard disk to
another hard disk. For instructions on connecting a hard disk,
see the chapter on expanding your computer system.
Chapter 9: Organizing Your Files
137
Chapter 10
Adapting Your Computer
to Your Own Use
m Adjusting the way the trackball or mouse works
m Adjusting the way the keyboard works
m Making keyboard shortcuts easier to type
m Adjusting the keyboard for very slow typing
In this chapter
m Specifying which items you want opened at startup
m Installing an item in the Apple menu
m Installing files in the System Folder
m Changing the labels in the Label menu
m Setting the time and date
m Setting a time for the Alarm Clock to go off
m Turning the alarm off
m Changing time and date formats
m Changing number and currency formats
m Adjusting the blinking of a menu item
m Adjusting the blinking of the insertion point
m Changing the way the contents of windows appear
m Changing an icon
m Turning off the Empty Trash warning
m Managing memory
m Setting the beep sound
m Installing a sound
m Removing a sound
m Recording sounds
m Changing the background pattern
m Magnifying the screen image
139
Specifying which items you want opened
at startup
To have a program or a document open automatically when
you start up your computer, drag its icon or its alias to the Startup
Items folder, which is inside the System Folder. Programs or
documents that you put in the Startup Items folder are opened
when you start up your computer. You can open as many files as
your computer’s memory allows.
If you no longer want a file to open automatically when you start
up your computer, remove the icon or alias from the Startup
Items folder.
Installing an item in the Apple menu
To have an item’s name appear in the Apple (K) menu, drag its
icon or its alias to the Apple Menu Items folder, which is inside
the System Folder.
You remove an item from the Apple menu by opening the Apple
Menu Items folder and dragging the item out of the folder.
140 Chapter 10: Adapting Your Computer to Your Own Use
Installing files in the System Folder
Certain files need to be installed in the System Folder so your
computer can use them as part of the system software. These files
include
m system extensions and control panels
m preferences for application programs
m software that controls printers, scanners, and other
equipment
m sounds
m fonts
Usually, you install these files by dragging their icons to the
System Folder icon (not the System Folder window). Sometimes
these files need to be installed by a program that comes with the
files. Check the instructions that came with the files for any
specific installation procedure.
Most special files are stored in folders inside the System Folder.
When you drag a file’s icon to the System Folder icon, your
computer recognizes which type of file it is and stores the file in
the appropriate folder.
This folder holds networking
and printing software and
files that extend your
computer’s capabilities.
The System file holds sounds,
and keyboard files.
Removing files from the System Folder
You remove a file from the System Folder by dragging its icon out
of the System Folder.
Depending on the equipment you use, whether or not you’re on a
network, and how you use your computer, you can remove the
following items from your System Folder if you want to conserve
space on your startup disk:
m software for printers or other devices you don’t use (for
example, the AppleTalk ImageWriter driver)
This program
manages the
Macintosh
desktop.
This folder holds settings
for application programs.
This file holds items you
put in the Scrapbook.
If you drag an item to the System Folder window instead of the
System Folder icon, the file is not stored in the appropriate folder
automatically, and it may not work properly.
m networking software, if you are not on a network (and don’t
plan to be) and don’t use AppleTalk Remote Access
m Apple menu items you don’t use (you need the control
panels, but you may not need the Calculator or the Puzzle, for
example)
m fonts, sounds, or keyboard files you don’t use
Be sure you have backup copies of the files on floppy disks before
you remove them from your System Folder.
Items you want in the Apple Menu Items folder or the Startup
Items folder need to be dragged to either folder directly. (This
chapter has instructions for installing Apple menu items and
specifying the items you want opened at startup.)
Chapter 10: Adapting Your Computer to Your Own Use 141
Changing the items in the Label menu
Setting the time and date
You can change the labels in the Label menu. You make these
changes in the Labels control panel.
Your computer has a clock that keeps track of the time and date (a
battery keeps it running when the computer is turned off ).
1. Choose Control Panels from the Apple (K) menu and
open the Labels control panel.
Many programs rely on the clock to automatically enter times and
dates in documents you create or print, and the Finder uses it to
keep track of when files are created or changed.
1. Choose Control Panels from the Apple (K) menu and
open the Date & Time control panel.
2. To change a label, drag across it to select it and then
type your new label.
142 Chapter 10: Adapting Your Computer to Your Own Use
Setting a time for the Alarm Clock to go off
You can set the Alarm Clock to alert you when it’s time for an
appointment or a meeting.
1. Choose Alarm Clock from the Apple (K) menu.
To set the date, click the month, date, or year to
select it, then click the up or down arrow (or type
the new number).
To set the time, click
the hours, minutes, or
seconds to select them,
then click the up or
down arrow (or type
the number).
2. Click the upward-pointing lever near the upper-right
corner to expand the Alarm Clock.
The lever points downward, and the Alarm Clock expands to
its full size.
You can also set the time and date using the General Controls
panel or the Alarm Clock.
continues .
Chapter 10: Adapting Your Computer to Your Own Use 143
3. Click the alarm clock icon in the lower-right corner to
select it.
Button in the upper position
indicates that the alarm is on.
The alarm clock icon becomes highlighted when you select it.
The time that appears in the middle section is the current
alarm clock setting.
Icon showing
ringing alarm
8. Click the close box to close the Alarm Clock.
The alarm will not go off unless you close the Alarm Clock,
click the lever to make the Alarm Clock smaller, or make
another window active.
Turning the alarm off
4. Click the hours, minutes, or seconds in the alarm clock
setting to select them.
Up and down arrows appear to the right of the time display.
5. Click the up or down arrows repeatedly until the
number you want appears.
6. Repeat steps 4 and 5 as necessary.
7. Click the button to the left of the alarm clock setting to
turn the alarm on.
The button and the alarm clock icon change to indicate that
the alarm is turned on. (Clicking again turns the alarm off.)
144 Chapter 10: Adapting Your Computer to Your Own Use
When the system clock reaches the time set for the alarm, the
alert sound plays twice and an alarm clock icon blinks over the
Apple icon at the left end of the menu bar.
To turn off the alarm, choose Alarm Clock from the Apple (K)
menu and click the button to the left of the alarm clock setting.
Changing time and date formats
You can change how times and dates appear based on personal
preference or local custom.
Changing the date format
1. Choose Control Panels from the Apple (K) menu and
open the Date & Time control panel.
2. In the Date & Time control panel, click Date Formats.
3. In the dialog box that appears, make the changes you
want.
A sample of the format you choose appears at the bottom of
the dialog box.
4. Click OK to close the control panel.
Choose standard formats
from this pop-up menu.
Type prefix and separators
in these boxes.
Use this pop-up menu to set the
order of elements in the date.
Use these pop-up menus to set the
order of elements in the date.
Type the separator between
date elements here.
Click here to add
a zero before
a single-digit number.
Chapter 10: Adapting Your Computer to Your Own Use 145
Changing the time format
1. Choose Control Panels from the Apple (K) menu and
open the Date & Time control panel.
2. In the Date & Time control panel, click Time Formats.
3. Make the changes you want.
A sample of the format you choose appears at the bottom of
the dialog box.
4. Click OK to close the control panel.
Choose standard formats
from this pop-up menu.
When you choose the
12-hour clock, you can
also choose either 0:00
or 12:00 to represent
noon and midnight.
146 Chapter 10: Adapting Your Computer to Your Own Use
Type the text that identifies
before and after noon here.
Type the separator between hours,
minutes, and seconds here.
Changing number and currency formats
2. Make the changes that you want.
You can choose among several formats for displaying numbers
and currency.
3. Close the control panel.
1. Choose Control Panels from the Apple (K) menu and
open the Numbers control panel.
Choose standard formats
from this pop-up menu.
Type the decimal separator
here or choose a separator
from the pop-up menu.
Type the thousands
separator here or
choose a separator from
the pop-up menu.
Type the currency symbol here.
To place the currency
symbol before or after the
number, click a button.
Chapter 10: Adapting Your Computer to Your Own Use 147
Adjusting the way the trackball or
mouse works
You can adjust two aspects of trackball or mouse operation in the
Mouse control panel: tracking, which is the relation between
trackball or mouse movement and pointer movement on the
screen, and double-clicking speed.
1. Choose Control Panels from the Apple (K) menu and
open the Mouse control panel.
2. Click the tracking speed you want.
The Very Slow option is useful for drawing or for a graphics
tablet because the pointer moves at a constant speed relative
to trackball or mouse movement.
3. Click the double-clicking speed you want.
Adjust the double-clicking speed if your computer often
interprets two clicks as a double click, or a double click as two
single clicks.
The space between arrows
corresponds to the time
between clicks.
Mouse button highlights twice
at the interval selected.
4. Close the control panel.
148 Chapter 10: Adapting Your Computer to Your Own Use
Adjusting the way the keyboard works
2. To adjust the rate at which a key repeats when it is held
down, click the button for the rate you want.
You can adjust the rate at which a character repeats when its key is
held down as well as the delay before the character begins
repeating. You can also change the keyboard layout if you have
additional keyboard layouts installed.
3. To adjust the delay before keys repeat, click the button
for the delay you want.
1. Choose Control Panels from the Apple (K) menu and
open the Keyboard control panel.
If the keys repeat when you don’t want them to, set a longer
delay before a character begins repeating. (If you click the Off
button, the keys don’t repeat at all.)
4. To change the keyboard layout, click the name of the
keyboard layout you want to use.
You may have a choice of more than one keyboard layout.
(Additional keyboard layouts are available from various
sources. You install them by dragging them to the System
Folder icon.)
Options for the speed at
which a character repeats
5. Close the Keyboard control panel.
Options for delay
before a key repeats
Options for keyboard
layout (if more than
one is installed)
Chapter 10: Adapting Your Computer to Your Own Use 149
Making keyboard shortcuts easier to type
Adjusting the keyboard for very slow typing
With the system software feature called Sticky Keys, you can type
keyboard shortcuts (such as x-S for the Save command) without
actually pressing the keys simultaneously.
The system software feature called Slow Keys lets you type very
slowly and ignores accidental keystrokes by delaying the
acceptance of the next keystroke.
m To turn Sticky Keys on or off, press the Shift key five
times without moving the mouse.
m To turn Slow Keys on or off, hold down the Return key
for about four seconds. A beep signals when the feature
has been turned on or off.
With Sticky Keys on, you can type a keyboard shortcut by first
pressing the modifier key (x, Option, Control, or Shift) and then
pressing the character key. An icon in the right end of the menu
bar (to the right of the Application menu icon) changes to
indicate whether Sticky Keys is on and whether a modifier key has
been pressed or locked.
Sticky Keys
is on.
A modifier
key has been
pressed.
A modifier key is locked
(pressing the key again
unlocks it).
You can have Sticky Keys beep when a modifier key is pressed.
You set this option in the Easy Access control panel. Choose
Control Panels from the Apple (K) menu and open Easy Access.
150 Chapter 10: Adapting Your Computer to Your Own Use
You can adjust how long you want Slow Keys to delay acceptance
of the next keystroke. You can also set Slow Keys to make an
audible click each time a keystroke is accepted. You make these
adjustments in the Easy Access control panel. Choose Control
Panels from the Apple (K) menu and open Easy Access.
Adjusting the blinking of a menu item
Adjusting the blinking of the insertion point
You can change the number of times a menu item blinks when it’s
chosen. You make this adjustment in the General Controls panel.
You can adjust how quickly the insertion point blinks (the
insertion point indicates where any text you type will appear). You
make this adjustment in the General Controls panel.
1. Choose Control Panels from the Apple (K) menu and
open the General Controls panel.
2. Click the button for the number of times you want the
menu item to blink.
1. Choose Control Panels from the Apple (K) menu and
open the General Controls panel.
2. Click the button for the blinking rate you want.
Clicking the Off button prevents a menu item from blinking.
The insertion point in the control panel blinks at the rate you
selected.
3. Close the control panel.
Chapter 10: Adapting Your Computer to Your Own Use 151
Changing the way the contents
of windows appear
Options for clean-up
of icons
Pop-up menu of fonts for icon
names and list views
Pop-up menu of font
sizes for icon names
and list views
You can change the way the contents of Finder windows are
displayed, and you can change the items in the View menu. You
make these changes in the Views control panel. Choose Control
Panels from the Apple (K) menu and open the Views control
panel.
Option to snap icons
to an invisible grid
whenever they are
moved
Checked items
appear in the
View menu.
Use the Views control panel to change
m the font and font size used in all views (press to open the
pop-up menu, then drag to choose a font or a size)
m the arrangement of icons or small icons
m the size of icons used in list views
m what information is included in list views, including folder
sizes and the amount of available space on disk
152 Chapter 10: Adapting Your Computer to Your Own Use
Options for the size
of icons displayed in
list views
Options for information
displayed in list views
See the summary and shortcuts section near the end of this book
for more information about using windows and list views.
Changing an icon
2. Copy the picture by choosing Copy from the Edit menu.
You can change an icon by creating or copying a picture you want
and then pasting it into an icon’s Info window.
3. Switch to the Finder, then click to select an icon you
want to change.
Some icons can’t be changed, including those for control panels
and other parts of the system software. Every icon fits inside a
small square.
4. Choose Get Info from the File menu.
1. Select the picture you want to use for the icon.
5. Click the icon at the upper-left corner of the Info
window to select it.
A box appears around the icon when it’s selected. If no box
appears when you click, the icon can’t be changed.
continues .
Chapter 10: Adapting Your Computer to Your Own Use 153
6. Choose Paste from the Edit menu.
The picture you copied replaces the selected icon in the Info
window. If the picture is bigger than the icon, it automatically
shrinks to fit.
Turning off the Empty Trash warning
When you choose Empty Trash from the Special menu, a message
warns you that you will not be able to recover the contents of the
Trash once it’s emptied. (The warning helps you avoid throwing
away items unintentionally.)
You can turn off this warning in the Trash’s Info box.
1. Click the Trash icon to select it.
2. Choose Get Info from the File menu.
7. Close the Info window.
3. Click the checkbox labeled “Warn before emptying” to
remove the X.
You can restore the original icon by clicking the picture in the
upper-left corner of the Info window and choosing Cut from the
Edit menu.
To turn the warning back on, click the checkbox so that an X
appears.
You can also override the warning by holding down the Option
key when you choose the Empty Trash command.
Until you choose Empty Trash, items in the Trash continue to
occupy space on your disk.
154 Chapter 10: Adapting Your Computer to Your Own Use
Managing memory
Making the most of your memory
Occasionally you may need to make adjustments in how your
Macintosh uses its random-access memory (RAM) in order to
work efficiently with large programs or with several programs at
once.
Remember the following tips on memory management:
Checking memory use
You can find out how much memory your computer has, how
much of it is available, and how much memory is being used by
each program you have open. You find this information by making
the Finder the active program and choosing About This Macintosh
from the Apple menu.
Total memory available
(including virtual memory)
The largest program
you can open now
m Closing a document window does not quit the program. The
program remains open and uses memory until you choose
Quit from the File menu. (The Application menu, at the right
end of the menu bar, shows which programs are open.)
m If you have opened and quit several programs, your
computer’s memory may be fragmented and you may not be
able to open a program that requires a lot of memory. To
solve this problem, you can restart your computer.
m If you’re not using network services (such as electronic mail
or a shared printer), you can make more memory available by
turning off AppleTalk in the Chooser and restarting your
computer.
m If you’re not sharing files over a network, you can make more
memory available by turning off file sharing. (See the chapter
on networking for more information.)
m Removing system extensions you don’t need makes memory
available (for example, you don’t need the AppleShare
extension if your computer will never be on a network and
you don't use AppleTalk Remote Access).
Open
programs
Memory
allocated for
each program
The bar indicates how much memory a
program reserves for its own use. The dark
portion is the amount it is actually using.
continues .
Chapter 10: Adapting Your Computer to Your Own Use 155
m Reducing the size of the disk cache makes more memory
available. (See the disk cache section in this chapter.)
m Reducing the amount of memory a program uses may allow
you to open more programs at once (see the chapter on
setting up your programs).
You set the size of the disk cache in the Memory control panel.
1. Choose Control Panels from the Apple (K) menu and
open the Memory control panel.
Adjusting the disk cache
The disk cache is memory set aside to help programs work more
quickly and efficiently. But the memory in the disk cache is not
available for opening programs or documents. If you often want
to open more programs than memory allows, you can set the disk
cache to a smaller size.
2. Click the up or down arrows next to the Cache Size
box.
Arrows adjust cache in
preset amounts.
3. Choose Restart from the Special menu.
156 Chapter 10: Adapting Your Computer to Your Own Use
Using hard disk space as memory
2. Click the On button to turn on virtual memory.
Your computer can use space on a hard disk to increase the
memory available for opening programs. The disk space, called
virtual memory, is not available for storing files.
3. Press the pop-up menu and drag to choose a hard disk
to use for virtual memory.
Your computer should contain enough built-in memory for your
regular needs—that is, for the programs you frequently have open
simultaneously. You can use virtual memory when you want to
open additional programs or work with extremely large
documents.
Virtual memory is most effective when you are using several small
programs simultaneously. It slows the computer’s performance if
you’re using one very large program.
You adjust the use of virtual memory in the Memory control
panel.
1. Choose Control Panels from the Apple (K) menu and
open the Memory control panel.
4. Click the up and down arrows to set the amount of disk
space to be used as virtual memory.
Pop-up menu of hard disks in use
Space available on the disk
Macintosh HD
Total memory (includes
virtual memory)
The preset amount is equal to the amount of RAM installed in
your computer. Choosing a larger amount of virtual memory is
likely to slow the computer’s performance, so it is
recommended that you accept the preset size.
continues .
Chapter 10: Adapting Your Computer to Your Own Use 157
5. Choose Restart from the Special menu.
Turning on 32-bit addressing
After you restart, your computer’s total memory includes the
virtual memory you set aside on the hard disk. Choose About This
Macintosh from the Apple (K) menu to see memory use
information.
Your computer can use very large amounts of memory (more than
8 megabytes) by taking advantage of a feature called 32-bit
addressing—the use of very long (32-digit) binary numbers to
control the way data is manipulated.
s Important: When you turn on virtual memory, the system
You can turn 32-bit addressing on or off in the Memory control
panel.
software creates a file named VM Storage in your System
Folder (if the startup disk is used for virtual memory) or
on the desktop (if another hard disk is used for virtual
memory). This file is large—the size of the computer’s RAM
and the selected amount of virtual memory combined. For
example, if your computer has 4 MB of RAM and you add
2 MB of virtual memory, the VM Storage file will occupy 6 MB
of space on your startup disk. s
1. Choose Control Panels from the Apple (K) menu and
open the Memory control panel.
2. Click the appropriate buttons in the control panel.
3. Choose Restart from the Special menu.
158 Chapter 10: Adapting Your Computer to Your Own Use
Setting the beep sound
3. Click the beep sound that you want your computer to
use.
Many programs have the computer make a sound when your
attention is required or when you’re attempting an action that the
computer cannot perform at that time.
You can choose the type of beep sound that you want your
computer to make. You can also set the sound’s volume.
1. Choose Control Panels from the Apple (K) menu.
2. Open the Sound control panel.
When you click a sound to select it, it’s played at the current
volume setting.
4. Drag the slider up or down to set the volume.
The Sound control panel appears. The beep that your
computer is currently using is already selected.
If you set the volume to zero, instead of hearing a beep, you’ll
see the menu bar flash.
5. Close the Sound control panel.
Chapter 10: Adapting Your Computer to Your Own Use 159
Installing a sound
Removing a sound
Your computer comes with several beep sounds. You can get
additional sounds from various sources.
You can remove sounds in the Sound control panel. Make sure
you have a backup copy of the sounds on floppy disk. (To copy a
sound, you can open the System file to see its icon.)
m To install a sound, you drag its icon to the System
Folder icon (not the System Folder window).
The sound is automatically installed in the System file, where
it belongs.
1. Choose Control Panels from the Apple (K) menu.
2. Open the Sound control panel.
3. Click to select the sound you want to remove.
4. Choose Cut from the Edit menu.
If you selected the wrong sound, you can choose Paste to
restore the sound.
5. Close the Sound control panel.
Once you add a sound to the System file, it is listed in the Sound
control panel.
160 Chapter 10: Adapting Your Computer to Your Own Use
You can also remove a sound by opening the System file and
dragging the sound’s icon out of the System file and out of the
System Folder.
Recording sounds
5. Click the Add button.
Your computer can use an external microphone, which you can
use to record a sound and add it to the Sound control panel.
6. Get ready to record, then click the Record button.
1. Connect a microphone or another audio source to the
sound input port (marked with the icon X) on
your computer .
Recording begins immediately. You have ten seconds to
record your sound.
For more information, see the chapter on expanding your
computer system.
2. Choose Control Panels from the Apple (K) menu.
3. Open the Sound control panel.
The Sound control panel appears. The icons of the available
sound input devices appear near the bottom of the window.
4. Click the icon of the sound input device you want to
use.
7. Click Stop to stop recording.
8. To listen to the sound you recorded, click Play.
9. To save the sound you recorded, click Save.
continues .
Chapter 10: Adapting Your Computer to Your Own Use 161
10. Type a name for the sound, and click OK.
Changing the background pattern
You can change the background pattern that appears on your
computer screen in the General Controls panel.
1. Choose Control Panels from the Apple (K) menu and
open the General Controls panel.
The new sound appears in the Sound control panel. Its icon also
appears in the System file.
162 Chapter 10: Adapting Your Computer to Your Own Use
You can choose from a variety of patterns provided, or you
can create your own design by editing one of the patterns
supplied.
5. To edit a pattern, click in the pattern editing area to the
left of the sample pattern.
Each dot in the square changes from white to black (or black
to white) when you click it. Your changes are displayed in the
sample pattern.
3. To see the patterns available, click either of the small
triangles above the sample pattern.
4. Click the sample pattern to see the new pattern on
your desktop.
continues .
Chapter 10: Adapting Your Computer to Your Own Use 163
6. When you’ve finished creating your new pattern, click
the sample pattern to display it on your desktop.
7. To save the new pattern, double-click the sample
pattern.
Magnifying the
screen image
If you don’t save the pattern, you lose it when you click one of
the small triangles to display another pattern.
8. Close the control panel.
164 Chapter 10: Adapting Your Computer to Your Own Use
The CloseView control panel lets you magnify
the image on your computer screen up to
sixteen times. It is supplied as part of your
system software.
CloseView is not automatically installed by
the Installer program when you install system
software.
To install CloseView:
1. Locate the CloseView control panel.
2. Drag the CloseView icon to the
System Folder icon (not the System
Folder window) on your startup disk.
3. Choose Restart from the Special
menu.
To turn CloseView on or off, press
x-Option-O.
To turn the magnification on or off, press
x–Option–X. (When CloseView is on and
the magnification is off, a rectangle on
the screen indicates which area will be
magnified. You can move the rectangle by
moving the pointer.)
To increase or decrease magnification, press
x–Option–Up Arrow or x–Option–Down
Arrow.
You can set additional options in the
CloseView control panel. Choose Control
Panels from the Apple (K) menu and open
the CloseView control panel.
continues .
Chapter 10: Adapting Your Computer to Your Own Use 165
Turns CloseView on
Turns
magnification
on or off
Keyboard
shortcuts
Arrows
change
magnification
power
Inverts
screen
image
Turns shortcuts
on or off
166 Chapter 10: Adapting Your Computer to Your Own Use
Chapter 11
Printing
In this chapter
m Before you print
m Printing your work
m Controlling background printing
m Working with fonts
Before you print
Before you can print, your computer must be connected to a
printer, either directly or over a network. See the information that
came with your printer for instructions on how to connect it, or
check with your network administrator.
Choosing a printer
Once your printer is connected, you must tell your computer
which printer to use by choosing that printer. You need to do this
even if only one printer is connected to your computer. You
choose a printer when you’re using it for the first time and
whenever you change printers.
You choose the printer in a program called the Chooser. How you
use the Chooser depends on whether your printer is connected
directly or over a network.
167
If your printer is connected directly to your computer
Make sure you’ve connected the printer according to the
instructions that came with it.
1. Choose Chooser from the Apple (K) menu.
2. Click the icon of your printer to select it.
If you have a Personal LaserWriter SC, you’re finished. Close
the Chooser now.
3. Click the icon of the port to which your printer is
connected.
If your printer is connected to the computer’s modem
port (marked with the icon W), you’re finished. Close the
Chooser now.
If your printer is connected to the computer’s printer
port (marked with the icon [), continue with step 4.
4. Click the Inactive button next to the word “AppleTalk.”
If Inactive wasn’t already selected, a message appears.
Click OK.
5. Close the Chooser window.
If your printer is connected over a network
Ask your network administrator or the person who set up your
computer to tell you
v If your printer’s icon does not appear in the Chooser:
The printer software is not in your System Folder. Close the
Chooser and install the software you need. If you have an
Apple printer, you can use the Installer to add the printer
software. If your printer is not an Apple printer, see the
information that came with it for instructions on installing its
software. v
168 Chapter 11: Printing
m which printer you can use
m which zone it’s in (if the network has zones)
m what its name is (every printer on a network has its own
name)
1. Choose Chooser from the Apple (K) menu.
3. Click the icon of the printer you want to use.
2. Click the Active button next to the word “AppleTalk.”
v If your printer’s icon does not appear in the Chooser:
The printer software is not in your System Folder. Close
the Chooser and install the software you need. If you have an
Apple printer, you can use the Installer to add the printer
software. If your printer is not an Apple printer, see the
information that came with it for instructions on installing
its software, or check with the network adminstrator. v
If Active wasn’t already selected, a message appears. Click OK.
Types of devices available
Names of individual printers
4. If the Chooser lists AppleTalk zones, click the zone
where the printer is located.
Zones are listed alphabetically. You can also type to select a
zone.
5. Click the name of the printer you want to use (even if
only one name appears).
6. If you want to continue using your computer while
your documents are being printed, click the On button
next to Background Printing.
Network zones (these appear only if
your computer is connected to a
network that has zones)
AppleTalk must be active
to use any network devices,
including network printers.
Background printing is not available with all printers. If it’s
not available, these buttons do not appear.
7. Close the Chooser.
Chapter 12: Printing 169
Selecting Page Setup options
You use the Page Setup dialog box when you’ve selected a new
printer in the Chooser, or when you want to use a different paper
size or printing options.
When an ImageWriter printer is selected, this Page Setup dialog
box appears:
m Choose Page Setup from the File menu and select the options
you want.
When a LaserWriter printer is selected, this or a similar Page Setup
dialog box appears:
Pop-up menu of
special paper sizes
Printed copy as a
percentage of the
original’s size
170 Chapter 11: Printing
Click to open a dialog box where
you can select enhancements
to the printed image.
Each type of printer offers different options. Some programs
provide additional options. You can choose Show Balloons from
the Help menu and then point to options to see descriptions, or
check your printer or program manual for details.
Updating printer software on networked computers
All computers that share printers on a network must have the
same version of the printer software. The printer restarts itself
each time a different version is used (which takes time and clears
any fonts from its temporary memory).
s Important: All computers on a network must have the same
printer software versions in the System Folder.
s
You or your network administrator should update the printer
software on all Macintosh computers on the network. You do not
have to update any files other than the printer software.
To update printer software, use the Installer program and the
accompanying Printer Update document (both files are on one of
the system software disks that came with your computer, or they
may be on a shared disk on the network).
1. Locate the Installer and Printer Update files, and then
open the Installer icon.
2. Click OK.
The Easy Install dialog box appears.
3. Make sure that the hard disk indicated is the
correct one.
Click the Switch Disk button until the correct disk name
appears.
4. If you want to install software for additional printers,
click the Customize button, and then select the names
of the printers you want to install software for.
continues .
Chapter 11: Printing 171
If you want to update the printer software that is already
installed on your disk, go to step 5.
When you click Customize, the custom installation dialog box
shows a list of printer software.
Printer software available
Printing your work
You can print a document while it’s open and its window is active;
you can also print documents while the Finder is active.
1. Make sure that the document you want to print is in
the active window.
If you’re printing in the Finder, select the documents you
want to print.
2. Choose Print from the File menu.
The printing options that appear depend on the selected
printer and the program in which the document was created.
Paper-feed
method
5. Click Install.
6. When you see a message reporting that installation was
successful, click Restart.
If a message reports that installation was not successful,
try again.
172 Chapter 11: Printing
Page range (clicking All prints the entire
document; entering page numbers in the
From and To boxes prints those pages only)
v Printing color or gray-scale documents: You can print color
or gray-scale documents on any color printer that can use the
LaserWriter printer software. If you print a color document on
a black-and-white printer, the document is produced as a
halftone (that is, it is composed of patterns of dots). v
Some programs offer additional printing options. See the
manuals that came with your programs for more information
on their printing features.
3. Click Print.
A status message appears. If background printing is turned on,
the message disappears after a few seconds, and you can do
other work while printing continues. Instructions on
controlling background printing are in this chapter.
Printing the contents of a window or the desktop
You can print a list of the contents of the active window when
you’re working in the Finder.
1. Make sure that the window whose contents you want to
print is active.
2. Choose Print Window from the File menu.
3. Select the options you want.
4. Click Print.
The window’s contents are printed, including items not visible
on the screen.
When no window is active, you can print the items on the desktop
by choosing Print Desktop from the File menu.
Chapter 11: Printing 173
Solutions to common printing problems
If nothing happens or if you see an error message when you try
to print, try the following:
m Make sure that the printer is turned on and warmed up.
m Check the cable connections to the printer.
m If your printer is an ImageWriter, make sure that the Select
light is on. (If not, press the Select button.)
m Make sure that the printer has paper and that the paper is
feeding properly.
m Make sure that a printer (and its name or port) is selected in
the Chooser.
m If you’re on a network, make sure that you are using the same
version of the printer software as everyone else.
m If an error message states that the printer could not print your
document, turn off the printer for at least 10 seconds. Then
turn it on again, wait for the printer to warm up, and try to
print again.
174 Chapter 11: Printing
If fonts printed on a laser printer look jagged or if lines or letters
are missing, your computer may not have enough memory
available to print your document properly, the font may not be
available in your printer, or the font substitution option may be
turned off in the Page Setup dialog box. Try the following:
m Make sure font substitution is turned on in the Page Setup
dialog box.
m With background printing turned on, quit the program you’re
using immediately after you choose the Print command.
m Transfer the fonts you need to your printer (see the section
on transferring fonts in this chapter).
m Make use of fewer fonts and sizes in your document.
Controlling background printing
You can use PrintMonitor to
If you are using a LaserWriter or StyleWriter printer and the
background printing option is turned on in the Chooser, you can
continue to work while your documents are printing.
m check the printing of your document
You don’t need to do anything once background printing is
turned on. But if you wish, you can control background printing
with PrintMonitor, a program that’s part of system software.
1. After you have started printing a document, choose
PrintMonitor from the Application menu.
A few moments after printing begins, PrintMonitor opens
automatically and its name appears in the Application menu.
Name of the
document being
printed and
printer in use
Documents to be
printed next (a
selected item can
be removed from
the list)
m cancel a document that’s printing or waiting to print
m set the date and time you want a document to print or
postpone printing indefinitely
m check the paper supply
PrintMonitor’s icon blinks at the right end of the menu
bar when the printer is out of paper. You can change this
alert signal with the Preferences command in the File
menu.
m check when to feed paper manually
PrintMonitor’s icon blinks at the right end of the menu
bar to signal that you must confirm manual printing. You
can change this alert signal with the Preferences
command in the File menu.
2. Select the options you want, and then close the
PrintMonitor window.
Click to set a
print time.
Click to stop printing the
current document.
Description and status of the
current printing job appear here.
Chapter 11: Printing 175
Working with fonts
A font is a collection of letters, numbers, and symbols in a
distinctive typographic design.
Several fonts come with your computer’s system software. They
are stored in the Fonts folder (inside the System Folder on your
startup disk). You can install additional fonts and remove fonts.
Additional fonts are supplied on one of the system software disks.
Fonts are also available from independent manufacturers, user
groups, and electronic bulletin board services.
Outline fonts and bitmap fonts
The Macintosh uses two types of fonts:
m outline fonts
m bitmap fonts
Both types of fonts are installed in your System file when you
install system software.
176 Chapter 11: Printing
Outline fonts (also called scalable or variable-size fonts) can
appear at any size, because each character is described as a
mathematical formula that adjusts according to the size you want.
RR
RR
R
RR
Your computer needs only a single outline font in a particular
typeface (such as Courier) to display or print that typeface in any
size. The outline fonts supplied with Macintosh system software
are called TrueType fonts.
Bitmap fonts (also called fixed-size fonts) appear only in certain
sizes, because each character is a grid of black-and-white dots
(called a bitmap), which is a rendering of the character’s shape in
a specific size.
Installing fonts
1. Quit all open programs.
2. Locate the font you want to install, and drag it to the
System Folder icon (not the System Folder window) on
your startup disk.
Fonts are supplied either as individual files (for individual
fonts) or in suitcases (for font families). To install an entire
font familiy, drag its suitcase to the System Folder. If you want
to install an individual font within a family, open the
appropriate suitcase to see the individual font files.
For the best type quality when using bitmap fonts, your computer
needs a separate bitmap font in each size you want to display or
print, such as 12-point Times or 9-point Monaco.
A message lets you know that the font will be stored in the
Fonts folder.
3. Click OK.
Chapter 11: Printing 177
Removing fonts
Transferring fonts to a LaserWriter printer
1. Quit all open programs.
If you’re using a LaserWriter printer equipped with PostScript and
you want to print with PostScript fonts that are not built into your
printer, you can transfer, or download, those fonts from your
System Folder to the printer. Downloading fonts saves printing
time if you plan to print several documents that use those fonts.
2. Open the System folder on your startup disk.
3. Locate the Fonts folder and open it.
The Fonts folder contains font files (for individual fonts) and
font suitcases (for font families). If you want to remove an
individual font within a family, open the appropriate suitcase
to see the individual font files.
4. Locate the font you want to remove, and drag it out of
the Fonts folder window and out of the System Folder
window.
5. Close the Fonts folder window and the System Folder
window.
178 Chapter 11: Printing
When you download a font, it’s stored in the printer’s memory or
on a hard disk attached to the printer. You can download as many
fonts as the printer’s memory and hard disk space allow.
You download fonts with the LaserWriter Font Utility, which is
supplied on one of the system software disks.
1. Locate and open the LaserWriter Font Utility icon.
2. Choose Download Fonts from the File menu.
3. If the font you want to download is not listed, click the
Add button to add fonts to the list.
4. In the directory dialog box, locate your font, click its
name, and then click Add.
Fonts available
for downloading
Click to remove
selected fonts
from the list.
Click to download
all listed fonts
to the printer.
Click to display a directory dialog box for
locating and selecting additional fonts.
Use the directory dialog box that appears to locate the fonts
you want.
5. When you’ve added all the fonts you want to download,
click Done.
The fonts you added are listed in the Font Utility dialog box.
6. Click Download to send all the fonts in the list to the
printer or its hard disk.
7. Click OK when downloading is finished.
8. Choose Quit from the File menu.
Chapter 11: Printing 179
Finding out about available fonts
Other ways to use the LaserWriter Font Utility
Many programs have a Font menu that lists the fonts installed in
your system, though some programs do not list them all. You can
open the Fonts folder, inside the System Folder, to see all the
fonts stored there. You can also see available fonts with the Key
Caps desk accessory in the Apple (K) menu.
You can also use the LaserWriter Font Utility program to
The LaserWriter Font Utility program (supplied with the system
software disks) provides three ways to see the fonts available for
printing on a LaserWriter: you can display a list of fonts on the
screen, print a font catalog, or print a set of font samples.
m initialize a hard disk attached to a printer
m control whether a start page is printed
m restart a printer
m send PostScript files to a printer
Initializing a hard disk attached to a printer
You can attach a hard disk to some printers. A hard disk allows
you to store more fonts. See the manual that came with your
printer for information about connecting a hard disk.
Displays a
list of all fonts
available to
the printer
1. Make sure the corret printer is selected in the Chooser.
2. Open the LaserWriter Font Utility icon.
Prints a list
of the fonts
available to
the printer
3. Choose Initialize Printer’s Disk from the File menu.
4. Click the Drive button until you see the name of the
hard disk you want to initialize.
Prints a sample of each font
available to the printer
5. Click Initialize.
Initializing erases any information that was on the hard disk.
180 Chapter 11: Printing
Restarting a LaserWriter printer
Turning the printer’s start page on or off
Restarting the printer clears its memory, removing the fonts
stored there.
The LaserWriter can print a start page each time it is turned on or
restarted.
1. Open the LaserWriter Font Utility icon.
1. Open the LaserWriter Font Utility icon.
2. Choose Restart Printer from the Utilities menu.
2. Choose Start Page Options from the Utilities menu.
3. Click Restart.
3. Click the On or Off button.
4. Click OK.
Chapter 11: Printing 181
Transferring a PostScript file to a LaserWriter
4. Type a name for the log, and then click Save.
You can use the LaserWriter Font Utility to send a file in PostScript
format to a LaserWriter printer.
The file is sent to the printer and a record of the PostScript
activity is saved in the log.
1. Open the LaserWriter Font Utility icon.
You can open the log to see the sequence of PostScript
commands when the file was sent.
2. Choose Download PostScript File from the Utilities
menu.
3. Click the name of the file you want to download to the
printer, and then click Open.
A dialog box asks you to save a file that will contain a record of
the PostScript activity.
The name of a log that
records PostScript activity
182 Chapter 11: Printing
Chapter 12
Using Your Computer
on a Network
What networking offers
When your computer is connected to a network, you can:
m Gain access to information on other computers.
In this chapter
m What networking offers
m Setting up your Macintosh on a network
m Gaining access to files on shared disks
m Working with files and folders on other computers
m Sharing your own files
m Using access privileges
m Allow others access to information on your own computer.
m Linking programs
183
You can designate specific folders and hard disks on your
computer as “shared files” that other people can gain access to.
m Print documents on network printers.
m Update files over the network automatically.
1.
…
2.
…
m Link your programs to programs on other computers.
You can automatically update documents created in programs that
use the Macintosh system software’s publish-and-subscribe
feature. (See the instructions that came with your programs for
information about publish-and-subscribe.)
Setting up your computer on a network
Before you can use your computer on a network, you need to
physically connect your computer to the network and install
networking software.
If a network administrator manages the network to which you’ll
be connecting your computer, ask that person for advice or help.
You can link your programs in order to share features between
those programs.
184 Chapter 12: Using Your Computer on a Network
Connecting to a network
Turning on AppleTalk
Your computer has built-in AppleTalk networking software. This
software directly supports the LocalTalk cables you need to
connect your computer to the network. (If your computer has the
appropriate port or expansion card, AppleTalk also supports
Ethernet and TokenRing cables.)
The first time you turn on your computer after you have
connected it to a network, you need to make sure that
AppleTalk is turned on.
1. Choose Shut Down from the Special menu.
1. Choose Chooser from the Apple (K) menu.
2. Click the Active button to turn on AppleTalk.
2. Connect the LocalTalk cable to the printer port ([) on
the back of your computer.
If your computer has a combined printer/modem port,
connect the LocalTalk cable to that port.
See your network administrator or the documentation that
came with your cables if you need more information.
Printer port
Icon
AppleTalk must be
active before you can
use a network.
continues .
Chapter 12: Using Your Computer on a Network 185
3. Close the Chooser.
When AppleTalk is active, Macintosh PowerBook computers go to
sleep automatically only when they run out of battery power, or
when the power adapter is plugged in and the PowerBook is not
connected to any shared disks on the network.
2. Type your name in the box labeled Owner Name and
press Tab.
Naming your computer and its owner
Before you use the network, you should give your computer a
name and name yourself as its owner.
1. Choose Control Panels from the Apple (K) menu and
open the Sharing Setup icon.
3. Type your password in the box labeled Owner Password
and press Tab.
Your password can be up to eight characters long. Remember
the capitalization you use. After you press Tab, your password
is replaced by bullets (•) so no one can read it.
4. Type a name for your computer in the box labeled
Macintosh Name.
v If you can’t find or can’t open the Sharing Setup icon: Check
whether the Sharing Setup icon is in the Control Panels folder
and the File Sharing and Network icons are in the Extensions
folder inside the System Folder. If not, or if you still have
problems, use the Installer to install the AppleTalk software.
See the chapter on setting up your programs for more
information. v
186 Chapter 12: Using Your Computer on a Network
This is the name others will see when they access your
computer on the network.
5. Close the Sharing Setup control panel.
Gaining access to files on shared disks
Connecting to a shared disk
You can retrieve and store information on other computers
connected to your network. For example, a colleague can
place some files for you on a shared disk called a file server—
a computer dedicated to storing shared files. Individually owned
computers on your network might also have shared disks.
1. Choose Chooser from the Apple (K) menu.
Before you begin
2. Make sure that AppleTalk is active.
3. Click the AppleShare icon in the upper-left section
of the Chooser window.
AppleShare icon
Before you store or retrieve information on the network, do the
following:
m Find out the name of the shared disk you want to access and
the name of the computer that it’s on.
m If your network has zones, find out the name of the zone that
computer is in.
m Find out if you are registered on the computer or if it allows
guest access.
A computer owner or network administrator can limit access
to files on a shared disk. Ask the owner or network
administrator what type of access you have to the files.
m If you’re a registered user, find out the name and password
you need to use.
Find out exactly how your name and password are spelled,
including capitalization.
File servers and other
computers with shared disks
continues .
Chapter 12: Using Your Computer on a Network 187
v If the AppleShare icon does not appear: Make sure that
AppleTalk is active in the Chooser. Make sure that the
AppleShare file is in the Extensions folder in your System
Folder, and restart your computer. If that doesn’t work, use
the Installer to install the AppleTalk software. v
7. Click Guest or Registered User.
Click here if
you are not
registered on
the computer
that you’re
connecting to.
4. If you see a box labeled “AppleTalk Zones”, click the
zone the computer is in.
Computers with shared disks are listed as file servers on the
network.
5. Click the name of the computer you want to use.
If the name you want isn’t listed, make sure you have selected
the correct zone (if your network has zones), and make sure
the other computer is turned on.
6. Click OK.
If you are a guest, click Guest and go to step 10. If the Guest
option is dimmed, guests do not have access to this computer.
8. If you are a registered user, make sure the name in the
box is correct.
Capitalization does not need to match.
9. Type your password.
Capitalization does need to match.
188 Chapter 12: Using Your Computer on a Network
10. Click OK.
Disconnecting from a shared disk
If your password is not accepted: Make sure that Caps Lock is
not on. Type your password again, taking care not to make
typing errors. If it’s still not accepted, ask the computer’s
owner for help.
11. Click the name of a shared disk to select it.
When you’re finished using a shared disk, close any open files
or programs on the shared disk and then disconnect in one of the
following ways:
m Select the shared disk icon and choose Put Away from the File
menu.
m Drag the shared disk icon to the Trash.
m Choose Shut Down from the Special menu. Shutting down
automatically disconnects from the shared disk.
Shared disks
and folders
Dimmed items are not available to you,
or you’re already connected to them.
12. Click OK.
The icon of the shared disk appears on your desktop.
13. Close the Chooser.
Chapter 12: Using Your Computer on a Network 189
Connecting quickly to a shared disk
Connecting automatically when you start up
By making an alias for a shared disk, you can connect to that disk
by simply opening the alias.
You can connect automatically to one or more shared disks
whenever you turn on your computer.
1. Connect to a shared disk.
1. Connect to the computer that has the shared disk you
want to open.
See the section on connecting to a shared disk in this chapter.
2. Select the shared disk icon.
3. Choose Make Alias from the File menu.
4. Put the alias in a convenient location and rename it if
you wish.
5. Next time you want to connect to the shared disk, open
the alias you created in step 3.
6. If you originally connected to the shared disk as a
registered user, a message appears. Type your password.
If you connected to the shared disk as a guest, this message
does not appear.
See the section on connecting to a shared disk in this chapter.
2. Click the checkbox next to the name of the shared disk.
Click one
of these
buttons to
indicate
whether
you want to
enter your
password
at startup.
The shared disk icon appears on your desktop.
If the shared disk is on a computer that is turned off, or if
there is a problem with the network, you’ll see a message.
190 Chapter 12: Using Your Computer on a Network
Click a box to connect
automatically when you start
up your computer.
3. If you’re connecting as a registered user, click the
button that indicates whether you want to save your
name only, or both your name and your password.
The icons of folders that you own on another disk have a
darkened tab.
For more security, click “Save My Name Only.” When you start
up your computer, you’ll need to enter your password to
connect to the shared disk.
4. Click OK.
5. Close the Chooser.
Working with files and folders
on other computers
Once you are connected to a shared disk, you can use the files
and folders on it as if they were on your own computer.
You may not be able to open some items on a shared disk if the
owner has restricted access to those items. For information on
how to check your access privileges, see “Working With Privileges
That Others Have Set” later in this chapter.
When you own a folder, you can determine who can use it and
in what way. See “Using Access Privileges” later in this chapter for
more information.
Changing your password
If you are a registered user, you may be able to change the
password you use to connect to a shared disk. ( Your network
administrator can restrict this capability.)
1. Connect to the computer that has the shared disk
you want.
2. Click the Set Password button.
Creating a new folder on another computer
You can create a new folder on a shared disk (as long as you have
the correct access privileges). If you are a registered user, you
become the owner of any folder that you create. If you are
connected as a guest, you share ownership of the folder with all
guests and registered users.
Chapter 12: Using Your Computer on a Network 191
3. Type your current password. Then press Tab and type a
new password.
A bullet (•) appears for each letter you type.
Click here to change
your password.
If a message tells you that you cannot change your password,
your network administrator has turned off this feature.
4. Click OK.
5. Click OK in the dialog box that appears.
6. Retype your new password and click OK.
Your new password is now in effect.
192 Chapter 12: Using Your Computer on a Network
Giving folder ownership to someone else
Sharing your own files
You can give away ownership of any folder you own. Once you do
so, however, the new owner can restrict your access to that folder.
Make sure you have copies of any files you may need before you
give ownership of a folder to someone else.
2. Click a folder that you own to select it.
You can share files stored on your computer with others on
the network. For example, members of your work group can
connect to your computer and open a file from their own
computers. (They do not have to be using System 7.) Or, if you
have both a desktop Macintosh and a PowerBook computer, you
can transfer files from one computer to the other without using
floppy disks.
3. Choose Sharing from the File menu.
You control what you share and with whom you share it:
4. Type the name of a registered user or group in the box
labeled Owner.
m You share only the items you specify.
1. Connect to a shared disk.
5. Close the Sharing window.
A message asks you to confirm that you want to change the
owner of the folder.
m You share only with the people you specify—one person,
a group of people, or everyone on the network.
m You can see everything on your own computer from another
computer on the network.
6. Click OK.
The user or group that you named assumes ownership
immediately.
How file sharing works
There are three steps to sharing a folder or disk:
1. turn on file sharing
2. select a folder or disk to share
3. decide whom to share it with
The folder or disk you share is not accessible to anyone but you
until you choose whom to share it with.
Chapter 12: Using Your Computer on a Network 193
Turning file sharing on
3. Close the Sharing Setup control panel.
1. Choose Control Panels from the Apple (K) menu and
open the Sharing Setup icon.
If you want to give everyone on the network access to the items
you share, continue with the next section, “Turning On Guest
Access.”
Turning on guest access
If you want all users connected to the network to have access to
your shared folders and disks, you need to turn on guest access.
Make sure the boxes in the Network Identity section of the
control panel are filled in.
1. Choose Control Panels from the Apple (K) menu and
open the Users & Groups control panel.
2. In the section labeled File Sharing, click the
Start button.
2. Open the <Guest> icon.
Click here to start file sharing.
194 Chapter 12: Using Your Computer on a Network
3. Click the box under File Sharing labeled “Allow guests
to connect” to place an X in it.
To allow guests to connect to
your computer, click here so
that an X appears in the box.
Selecting a folder or disk to share
You can share any folder, hard disk, or CD-ROM disc connected to
your computer. ( You cannot share floppy disks.) You can share up
to ten folders or disks at a time. (This number does not include
folders within the folders or disks you share.)
1. Make sure file sharing is turned on.
2. Select a folder or disk to share.
3. Choose Sharing from the File menu.
4. Close the window and click Save in the box that
appears.
You can still restrict access to any folder or disk you share, as
described in the section “Using Access Privileges,” later in this
chapter.
Continue with the next section to select a folder or disk to share.
4. Click the box labeled “Share this item and its contents”
to place an X in it.
Click here to share the
item you’ve selected.
For information about the other checkboxes in this window,
see “Using Access Privileges,” later in this chapter.
Chapter 12: Using Your Computer on a Network 195
5. Close the window and click Save in the dialog box.
At this point, only you have access to the item you shared and
the files inside it, unless you turned on guest access and some
or all of the boxes next to “Everyone” are checked.
If you haven’t turned on guest access, continue with the
section “Naming a Registered User” if you want to name the
specific people you want to share the item with. (Even if the
checkboxes next to Everyone are selected, you cannot give
access to everyone unless you’ve turned on guest access, as
described in the previous section.)
If you shared a folder, its icon appears with a darkened tab
and network cables:
s Important: Before you put programs inside shared folders
or disks, remember that copyright laws may prevent those
programs from being shared. Check the applicable licensing
agreements and follow their specifications. s
Taking back a shared folder or disk
Any shared folder or disk can be made private again.
1. Select the shared disk icon.
2. Choose Sharing from the File menu.
3. Click the box labeled “Share this item and its contents”
to remove the X.
If people are connected to your computer, you see a message
asking you to confirm your decision.
When people on the network are connected to your shared
folder, its icon appears with faces in the center:
196 Chapter 12: Using Your Computer on a Network
Naming a registered user
You can register as many as 100 people and groups combined, but
for best network performance you should name no more than 50.
3. Type the name of a person you want to register.
Make sure you notify the person of the name you type.
(Capitalization does not have to match.)
1. Choose Control Panels from the Apple (K) menu and
open the Users & Groups icon.
2. Choose New User from the File menu.
An icon labeled New User appears. Its name is selected
for editing.
If you can’t find the New User command: Make sure the
Users & Groups window is active.
4. To register more users, repeat steps 2 and 3.
To assign passwords or to name groups of users, continue
with the next two sections. If you want to start sharing
immediately, go to “Selecting a User or Group to Share a
Folder or Disk,” later in this chapter.
continues .
Chapter 12: Using Your Computer on a Network 197
Setting a registered user’s password
Naming a group of users
You can assign passwords for registered users to verify their
identities when they want to gain access to your computer.
You can name several registered users as a registered group.
1. Open a user icon in the Users & Groups control panel.
1. Open the Users & Groups control panel and choose
New Group from the File menu.
An icon labeled New Group appears. The name is selected for
editing.
Type the user’s
password here.
2. Type a name for the group.
2. Type a password in the User Password box, then
press Tab.
The password can be up to eight characters long. When you
press Tab, the password is replaced by bullets. Make sure to
inform the user of the exact password, including
capitalization.
3. Close the window, and then click Save in the dialog
box.
198 Chapter 12: Using Your Computer on a Network
3. Drag user icons to the new group icon.
The icons are not moved inside the group icon, as they would
be if it were a folder. Instead, member icons are created inside
the group icon. You don’t need to drag your own icon to the
group icon because you (as the owner) have access to the
entire contents of your computer (unless you specify
otherwise).
m To see all the groups that a user belongs to, open the
user’s member icon or user icon.
You don’t need to include the <Guest> icon in any group.
To allow this group access to a shared folder or disk, go to the
section “Selecting a User or Group to Share a Folder or Disk.”
The groups the user
belongs to are listed here.
Seeing who’s in a group
m To see the names of all group members, open the group
icon.
continues .
You can open any member icon to see or change the settings
you’ve made for that user.
Chapter 12: Using Your Computer on a Network 199
Selecting a user or group to share a folder or disk
You can give one registered user or group exclusive access to a
shared folder or disk on your computer.
5. To share the item with only the user or group you’ve
chosen, click the bottom row of checkboxes (next to
Everyone) to remove the X from each box.
1. Select a folder or disk to share.
2. Choose Sharing from the File menu.
3. Click the box labeled “Share this item and its contents”
so an X appears.
4. Choose a user or group from the User/Group
pop-up menu.
Remove the X marks in
this row.
6. Close the window and click Save in the dialog box.
200 Chapter 12: Using Your Computer on a Network
Preventing specific users or guests from accessing
your computer
2. To deny access to a specific user, open the user icon.
To prevent all network access to your computer, you can turn file
sharing and program linking off, as described elsewhere in this
chapter.
1. Choose Control Panels from the Apple (K) menu and
open the Users & Groups icon.
To deny access to guests, open the <Guest> icon.
continues .
Chapter 12: Using Your Computer on a Network 201
3. If an X appears in the “Allow to connect” checkbox,
click to remove the X (to deny access).
4. Close the window and click Save in the dialog box.
If you deny access to a user who is currently connected, he or
she is disconnected immediately. That user is no longer a
member of any group, and can connect only as a guest.
If you deny access to guests, any guests currently connected
are disconnected immediately. Only registered users and
groups that you’ve specified will have access to your
computer.
Removing a user from a group
1. In the Users & Groups control panel, open the
group icon.
2. Drag the member icon for that user to the Trash.
3. Choose Empty Trash from the Special menu.
Removing a user or group from your list of
registered users
You can remove a registered user or group at any time. When you
remove a user, he or she will no longer be a member of any
registered group.
1. Open the Users & Groups control panel.
2. Drag the user icon or group icon to the Trash.
3. Choose Empty Trash from the Special menu.
If the user is currently connected, he or she is disconnected
immediately.
You cannot throw away the <Guest> icon or the owner icon.
202 Chapter 12: Using Your Computer on a Network
Giving away ownership of a folder or disk on
your computer
You can give away ownership of a shared folder or disk on your
computer to a registered user or group.
Because you are the owner of your computer, the new owner of a
folder or disk on your computer cannot restrict your access to it.
However, the new owner can change the access privileges
that other people have to the item. If you give away ownership of
a folder or disk, make sure to remove any folders or documents
that you don’t want others to see or change.
1. Select a shared folder or disk.
2. Choose Sharing from the File menu.
3. Choose a name in the Owner pop-up menu.
If you select <Any User>, then anyone on the network can
change the access privileges or ownership of the item.
4. Close the window and click Save in the dialog box.
5. Click OK to confirm that you want to change
ownership.
Turning file sharing off
You can turn file sharing off at any time. When file sharing is off,
people on the network cannot access folders or disks on your
computer, and you cannot access your computer from another
computer on the network.
When you turn file sharing back on, the items you shared before
are available again automatically.
1. Choose Control Panels from the Apple (K) menu and
open the Sharing Setup icon.
continues .
Chapter 12: Using Your Computer on a Network 203
2. In the section labeled File Sharing, click the Stop
button.
A dialog box appears in which you can specify a delay before
file sharing is turned off. If you specify a delay, users who are
connected to your computer are warned to save their work
and disconnect.
3. Type the number of minutes you want to elapse before
file sharing is turned off.
To turn file sharing off immediately, type the number 0.
4. Click OK.
If someone is using files on your Macintosh when file sharing is
turned off, any changes he or she has not saved will be lost.
204 Chapter 12: Using Your Computer on a Network
Monitoring file-sharing activity
When file sharing is on, you can see who is connected to your
computer and what folders or disks you’ve shared.
m Choose Control Panels from the Apple (K) menu and
open the File Sharing Monitor icon.
Disconnecting someone who is connected to
your computer
You can disconnect users who are currently connected to your
computer in the File Sharing Monitor control panel.
1. Select the user or users you want to disconnect.
2. Click Disconnect.
3. Type the number of minutes that you want to elapse
before users are disconnected.
4. Click OK.
A message remains on the screen until the time is up. You can
switch to any program you already have open so you can
continue working.
5. When the designated amount of time has elapsed, close
the File Sharing Monitor.
Gaining access to your computer
from another computer
You can connect to your own computer from another computer
on the network and access everything on the disks attached to
your computer.
1. Make sure that file sharing is turned on.
2. Choose Control Panels from the Apple (K) menu and
open the Users & Groups icon.
If you specify a delay, users are warned to save their work and
disconnect. To disconnect a user immediately, type 0.
continues .
Chapter 12: Using Your Computer on a Network 205
3. Open the owner icon (the one with the bold outline).
4. Click the boxes labeled “Allow user to connect” and
“Allow user to see entire disk” to place an X in them.
5. Close the window and the Users & Groups
control panel.
6. Leave your computer turned on.
To gain access to your computer, connect to it as a registered
user. Type your owner name and password as they appear in the
Sharing Setup control panel of your computer. Then connect as
you normally would.
v If you are unable to connect to your computer: Make sure
that your computer is turned on, that your computer has file
sharing turned on, and that you have the correct access
privileges. Make sure that you type your password exactly as it
is entered in the Sharing Setup control panel, including
capitalization. v
Changing your password
When these boxes are checked, you can see and use
everything on your disks while you’re using another
computer.
To restrict your access, click a checkbox to remove the X.
206 Chapter 12: Using Your Computer on a Network
You can change the password you use to gain access to your own
computer from another computer.
1. Choose Control Panels from the Apple (K) menu and
open the Sharing Setup icon.
2. Type a new password in the box labeled Owner
Password and press Tab.
Using access privileges
Access privileges let you control what other people can do with
the information you share on a network. For example, you might
want to let people see a file but prevent them from changing it.
Understanding access privileges
You can set access privileges for any shared folders on your own
computer and any folders you create on another Macintosh.
Owners of other computers can set access privileges that restrict
what you can do with their shared disks.
Remember the capitalization. Your password is replaced by
bullets to keep it private.
3. Close the Sharing Setup control panel.
Your new password is now in effect.
Three categories of people can have access privileges to shared
disks and folders:
m The owner: The owner of a folder can change the access
privileges to that folder. You become the owner of a folder
automatically when you create it and you are the owner of any
folder on your computer. You can keep ownership or give it
away.
m A registered user or group: A registered user has special
access to shared disks over the network. A registered group is
a group of registered users.
m Everyone: This category includes the owner, registered
users, and guests.
Chapter 12: Using Your Computer on a Network 207
There are three types of access to shared items:
Setting access privileges to folders and disks
m See Folders: allows people to see, open, and copy folders.
You can set access privileges for shared items on your own
computer and for items that you own on other computers.
m See Files: allows people to see, open, and copy files.
m Make Changes: allows people to copy, delete, or change the
contents of a folder or disk, or to add items to a folder or disk.
The table indicates which privileges you need to see folders, see
files, or make changes to items in a shared folder or disk.
Action
See Folders
See Files
1. Select a folder or disk.
2. Choose Sharing from the File menu.
The dialog box you see may be slightly different from the one
pictured.
Make
Changes
Copy or move files to a folder
Copy a file from a folder
Copy a folder from a folder
Create a folder in a folder
Delete a file from a folder
Delete a folder from a folder
Open and use a file in a folder
Save changes to a file in a folder
m If you’ve selected a folder inside a shared folder, the
checkbox at the top is labeled “Same as enclosing folder.”
m If you’ve selected a folder on another computer, the
Owner and User/Group areas are text boxes, not
pop-up menus.
208 Chapter 12: Using Your Computer on a Network
m If you’ve selected a folder you do not own, all the
checkboxes and their labels are dimmed.
3. Choose a registered user or group to share the
item with.
Choose from the list of users and groups in the pop-up menu,
or type the name of a registered user or group in the box.
Access privilege strategies
Access privileges can be combined in several ways. A few common
and useful strategies are summarized here.
m Allow everyone on the network all access privileges.
As long as you’ve turned on guest access, everyone on the
network can open, read, and change the files and folders.
4. To set access privileges, click the appropriate checkbox.
m To set the same privileges for the folders within this folder
or disk, place an X in the box labeled “Make all currently
enclosed folders like this one.” If you’re working with an
item that contains a large number of folders, such as a CDROM disc, this action may take a few minutes to complete.
m To prevent the folder from being changed, place an X
in the box labeled “Can’t be moved, renamed, or deleted.”
If you check this box, no one—not even you—can change
the folder. (The folder can still be viewed and copied.)
m If you want the folder to have the same privileges that the
folder or disk enclosing it has, place an X in the checkbox
labeled “Same as enclosing folder.” This box only appears
for folders inside shared folders. When you move such a
folder to another folder, its access privileges change
automatically to reflect those of the enclosing folder.
5. When you’re finished setting access privileges, close
the Sharing dialog box and then click Save in the dialog
box.
Chapter 12: Using Your Computer on a Network 209
m Keep a folder or disk private. To keep a folder or disk on
your own computer private, do not share it. To keep your
folder on another computer private, use these settings.
m Allow access to one other person or group. This set of
privileges allows the owner of the item and one registered
user or group to use the item.
210 Chapter 12: Using Your Computer on a Network
m Keep a folder private but allow others to place files or
folders into it. People on the network can deposit files or
folders into this folder but only the owner can see, remove, or
change its contents. (This configuration is sometimes called a
drop box.)
m Set up a folder as a bulletin board. People can open and
read the files in this folder but cannot change them. Only the
owner can add files.
Working with privileges that others have set
Checking your access privileges
When you are using the By Icon or By Small Icon view, the
appearance of shared folders indicates the access you have.
When you open a folder on another computer, icons under the
title bar indicate the privileges that you do not have.
Icon
Meaning
A darkened tab indicates that you own the folder
and can set its access privileges.
A plain tab indicates that you can open and use the folder.
You can’t
make changes
to files in this
folder.
You can’t
see files in
this folder.
You can’t
see folders
in this folder.
A strap indicates that you cannot open and use the folder.
A strap with an arrow indicates that you can put files
or folders into the folder, but you cannot open it or
use any files or folders within it.
Chapter 12: Using Your Computer on a Network 211
Linking programs
Some programs can exchange information directly with other
programs. For example, one program might be able to instruct
another program to add a row to a spreadsheet or change the font
size of a paragraph.
Programs implement linking in various ways and not all programs
have this capability. See the documentation that came with your
programs for more information.
Linking to a program on another computer
You can only link to programs that are shared.
1. Within your program, choose the menu command that
allows you to link programs.
The menu location and command name depend on the
program you’re using. You use a dialog box to find the
program that you want to link to.
212 Chapter 12: Using Your Computer on a Network
2. If your network has zones, select a zone in the lowerleft section of the dialog box.
3. Select the Macintosh you want to connect to in the
upper-left section of the dialog box.
4. Select the program you want to link to.
5. Click OK.
In most cases, you need to identify yourself as a guest or a
registered user.
Disconnecting a program link
To disconnect a link to a program on another computer, quit the
program you used to create the link.
Allowing other people to link to your programs
You can allow people on the network to link to programs on your
computer.
m First you turn on program linking.
m Then you make a program available for linking by sharing it.
m Then you either allow guest access or allow specific people to
link.
m Finally, you open the program.
6. Click Guest or Registered User.
These steps are outlined in the following sections.
If you are a guest, click Guest and go to step 9. If the Guest
option is dimmed, guests do not have access to this computer.
7. If you are a registered user, make sure that the name is
correct.
8. Type your password.
9. Click OK.
The two programs are now linked.
Chapter 12: Using Your Computer on a Network 213
Turning program linking on
Selecting a program for linking
When you turn program linking on, your computer is visible to
others on the network whenever they attempt to link a program.
Before you turn program linking on, make sure that AppleTalk
is active and that you have named your Macintosh in the Sharing
Setup control panel.
Before a network user can link to your program, you need to
share it.
1. Choose Control Panels from the Apple (K) menu and
open the Sharing Setup icon.
2. In the section labeled Program Linking, click the
Start button.
1. Quit the program if it’s open, then click its icon to
select it.
2. Choose Sharing from the File menu.
3. Click the box labeled “Allow remote program linking”
to place an X in it.
Click here to share this program.
If the box is dimmed, the program does not support linking.
4. Close the window.
3. Close the Sharing Setup control panel.
Once program linking is turned on, you must select programs
to share before network users can link to them, as described
in the next section.
214 Chapter 12: Using Your Computer on a Network
At this point, no one but you can link to the program until you
turn on guest access or name registered users, as described in
the following sections.
5. Open the program.
Allowing guests to link to your programs
Naming specific users to link to your programs
You can let everyone on the network link to your shared
programs.
You can identify the registered users and groups you want to link
to your programs.
1. Choose Control Panels from the Apple (K) menu and
open the Users & Groups icon.
1. Choose Control Panels from the Apple (K) menu and
open the Users & Groups icon.
2. Double-click the <Guest> icon.
2. Open the icon of a user.
3. Click the box labeled “Allow guests to link to programs
on this Macintosh” to place an X in it.
3. Click the box labeled “Allow user to link to programs
on this Macintosh” to place an X in it.
4. Close the window.
Guest users can now link to any of the programs you’re
sharing, as long as the programs are open.
4. Close the window and click Save in the dialog box.
5. To give more registered users access to your programs,
repeat steps 2 through 4.
Chapter 12: Using Your Computer on a Network 215
216 Chapter 12: Using Your Computer on a Network
Chapter 13
Expanding Your
Computer System
In this chapter
m Using SCSI devices
m Connecting a modem
m Connecting a printer
Using SCSI devices
A SCSI device is any product—including hard disk drives, CD-ROM
drives, scanners, and printers—that communicates with Macintosh
computers by means of a standard electronic interface. (SCSI
stands for Small Computer System Interface.) You can attach up to
six SCSI devices to your computer by linking them together in a
chain that starts at your computer’s SCSI port.
The SCSI port on Macintosh PowerBook computers looks like
this:
m Connecting a mouse or other ADB device
m Using sound input and output devices
SCSI port
m Adding memory to your computer
SCSI port icon
217
To connect a SCSI device to the SCSI port on your PowerBook,
you need an Apple HDI-30 SCSI System Cable.
Setting up one or more SCSI devices for use with your PowerBook
involves the steps listed here.
m installing software
m setting SCSI ID numbers
m checking that the SCSI chain is properly terminated
Setting SCSI ID numbers
Each device in a SCSI chain must have a unique ID number
between 1 and 6 so the computer can identify it properly. The
information in this section can help you assign SCSI ID numbers
to the devices you want to use with your computer.
s Warning: Using two or more devices with the same SCSI ID
number can cause your equipment to malfunction. You could
lose information as a result. s
m connecting cables
These steps are described in the following sections.
Your computer has the SCSI ID number 7, and its internal hard
disk has the number 0.
Installing software
See the documentation that came with your SCSI devices for
information about ID numbers and how to change them.
Most SCSI devices come with software that allows your computer
to communicate with them. These programs are called drivers. (If
no drivers come with a device, then it doesn’t need any.) To install
a driver, follow the instructions that came with the device.
218 Chapter 13: Expanding Your Computer System
The ID numbers of Apple SCSI devices can be set as follows.
1. Make sure the SCSI device is turned off.
If the device is already part of a SCSI chain, make sure that all
devices in the chain are turned off, including the computer.
2. Locate the ID number indicator and switch (usually on
the back panel of the SCSI device).
ID number indicator
5
5
ID number switch
3. Check the ID numbers of all the devices you want to
connect.
If all the devices have unique ID numbers, you’ve finished this
part of the procedure. Continue with the next section,
“Checking That the SCSI Chain Is Properly Terminated.”
4. If you need to change a device’s ID number, choose an
available number between 1 and 6.
5. Insert the end of a straightened paper clip into the
small hole below the ID number indicator.
The small hole gives you access to the ID number switch.
6. Push the ID number switch repeatedly until the
number you want appears in the ID number indicator.
Chapter 13: Expanding Your Computer System 219
Checking that the SCSI chain is properly terminated
If you are attaching one SCSI device
To ensure accurate transmission of information, a chain of SCSI
devices must have a terminator at each end. Terminators are built
into some SCSI devices and can also be added externally.
Make sure that there is
m an external terminator between the HDI-30 system cable and
the SCSI device and
m an internal terminator in the SCSI device, or an external
terminator attached to the device.
If you are attaching more than one SCSI device
SCSI terminator
Make sure that there is
m an internal terminator in the first external device, or an
external terminator between the HDI-30 system cable and the
first device;
m Your PowerBook’s internal hard disk, which is always the first
device in the chain, has a small built-in terminator. However,
for reliable information transfer in a chain of SCSI devices, it
should be supplemented with an external terminator as
described in these instructions.
m no other terminator (internal or external) in the chain.
m External SCSI devices from Apple do not have built-in
terminators.
If you have too many devices with internal terminators, your
authorized Apple service provider can remove extra terminators.
m External SCSI devices from other vendors may have built-in
terminators; see the documentation that came with the
device.
Correct chain configurations are shown in the illustration on the
following page.
220 Chapter 13: Expanding Your Computer System
m an internal terminator in or an external terminator attached to
the last device; and
Connecting cables
s Warning: When making SCSI connections, always turn off
power to all devices in the chain. Failure to do so can cause
the loss of information and damage to your equipment. s
1. Shut down your PowerBook and all SCSI devices in the
chain.
2. To connect the first device, use an Apple HDI-30 SCSI
System Cable.
Attach the smaller end of the cable to your computer’s SCSI
port (marked with the icon g) and the larger end of the cable
to either SCSI port on the device.
Connecting one SCSI device
Terminator
HDI-30 cable
If this SCSI device has an internal
terminator, omit this external terminator.
Connecting more than one SCSI device
If this SCSI device has an internal
terminator, omit this external terminator.
HDI-30 cable
SCSI peripheral interface cables
3. To connect the next device, use a SCSI peripheral
interface cable.
Both cable connectors are the same. Attach one connector to
the available SCSI port on the first device, and the other
connector to either SCSI port on the next device.
4. Repeat step 3 for each additional device you want to
connect.
The illustration shows where to add cable terminators.
s Important: The total length of a SCSI chain should not
exceed 20 feet (6 meters). Apple SCSI cables are designed to
meet this restriction. If you are using SCSI cables from
another vendor, check the length of the chain. s
Once your SCSI devices are connected, always turn them on
before turning on your PowerBook. If you turn the computer on
first, it may not be able to start up, or it may not recognize the
SCSI devices.
Chapter 13: Expanding Your Computer System 221
Connecting a modem
7. Choose Control Panels from the Apple (K) menu.
Apple offers an optional, low-power, internal fax/data modem for
your computer. See the modem manual for information about this
modem and how to use it.
8. Open the PowerBook control panel.
9. Click the External Modem button.
You can also connect an external modem to the modem port on
the back panel of the computer.
To connect an external modem, follow these steps.
1. Make sure the computer is in sleep or shut down.
2. Connect the modem to a power source and to the
phone line.
See the documentation that came with the modem.
3. Make sure the modem is turned off.
4. Connect the modem cable to the modem port (marked
with the icon W).
5. Turn on the modem.
6. Wake or restart the computer.
If your computer does not have an internal modem, the external
modem is ready to use.
If your computer does have an internal modem, continue with
step 7.
222 Chapter 13: Expanding Your Computer System
10. Close the control panel.
The external modem is ready to use.
If you have both an internal and an external modem, remember to
select the modem you want to use in the PowerBook control
panel before opening your telecommunications program.
Connecting a printer
Connecting a mouse or other ADB device
The printer port on your computer can accept either a
direct cable connection (to a printer such as the StyleWriter)
or a network cable connection (to a printer such as the
LaserWriter IINTX). The printer port is marked with this icon: [.
Your computer has one Apple Desktop Bus (ADB) port, to which
you can connect optional low-power input devices (such as a
mouse) provided by Apple and other vendors. The ADB port has
this icon: √.
Some printers, including the Personal LaserWriter SC, are
connected through the SCSI port (marked with the icon g).
Make sure that any such devices you connect are designed for
portable computers. Standard ADB devices designed for desktop
Macintosh computers may drain your battery very quickly, in
some cases even if the power adapter is plugged in. Low-power
devices are marked with this icon: Á.
Follow the instructions that came with your printer to connect it
to your computer.
s Warning: The StyleWriter printer comes with its own power
adapter. This power adapter is not interchangeable with your
computer’s power adapter. Connecting the computer’s power
adapter to the printer will not damage your equipment, but
the printer will not work properly. Connecting the printer’s
power adapter to your computer will damage the adapter.
Use each power adapter only with the equipment for which it
was intended. ( You may want to label the adapters.) s
By connecting devices in a chain, you can attach up to three
devices to the ADB port. See the instructions that came with your
ADB device(s) for information about their power consumption,
and make sure that the total power drawn by all devices you’re
connecting does not exceed 200 mA.
Chapter 13: Expanding Your Computer System 223
Using sound input and output devices
3. Decide where you want to place the microphone.
Connecting a microphone
s Warning: Do not plug a sound output device (such as a pair
of headphones) into the sound input port. Doing so may
damage your audio equipment. s
Your PowerBook has a sound input port to which you can connect
an external microphone. (Sound recording is described in the
chapter Adapting Your Computer to Your Own Use.)
1. Open the door covering the back panel of your
computer.
2. Plug the microphone into the sound input port on the
back panel. The sound input port has the icon X.
Sound input port
Microphone
224 Chapter 13: Expanding Your Computer System
Sound output devices
The PowerBook also has a sound output port (marked with the
icon -) to which you can connect speakers, an amplifier,
headphones, or other audio output devices. The sound output
port accepts a standard stereo miniplug, like that used to attach
headphones to a portable tape player.
Adding memory to your computer
Your PowerBook computer comes with at least 4 MB of RAM.
By adding memory upgrade cards you can increase your
computer’s memory. You can find out how much memory your
computer has by choosing About This Macintosh from the
Finder’s Apple menu.
Apple provides memory upgrades through its authorized dealers.
Memory upgrades are also available from other vendors; ask your
dealer for more information.
Apple recommends that memory upgrades be installed by an
authorized Apple dealer.
Your PowerBook computer also supports virtual memory, a
feature that makes use of hard disk space to provide additional
RAM.
Chapter 13: Expanding Your Computer System 225
Chapter 14
Travel, Storage, and Service
In this chapter
m Traveling with the computer
m Storing the computer
m Getting service and support
m Getting more information about Macintosh computers
Traveling with the PowerBook
The safety instructions in the first part of this book also apply
when you are traveling. In addition, note these precautions:
m Do not transport your PowerBook while it is turned on.
Choose Sleep or Shut Down from the Special menu, and wait
until the hard disk stops spinning, before you move the
computer.
m Transport batteries either inside the computer or in the
protective case provided with each battery. Do not transport
unprotected batteries.
m Bring backup copies of your system software and other
important files on floppy disks, in case you need to reinstall
them.
m Do not check your computer as baggage. Carry it with you.
m Do not allow your computer or any hard disks or floppy disks
to pass through X-ray machines. Have security officials
manually inspect your computer and disks.
m Be prepared to show security officials that your computer is
working. Have a charged battery or a power adapter ready to
use.
227
m Some airlines may restrict or prohibit the use of computers in
flight. Check ahead to find out what restrictions, if any, apply.
Storing the PowerBook
m Take the necessary plug adapters if you’re traveling overseas.
( You may need to use them with the power adapter.) You do
not need a voltage transformer. The power adapter can handle
90 volts to 260 volts AC (48 to 62 Hz).
Short-term storage (up to 2 weeks)
Check the diagrams below to determine which plug adapters
you’ll need, or ask your travel agent.
1. Save your work on a hard disk or floppy disks.
2. Choose Battery from the Apple (K) menu and note the
charge level of the battery.
3. Choose Shut Down from the Special menu.
4. Close the display.
Outlet Type
Locations
United States, Canada, parts of Latin America,
Japan, Korea, the Philippines, Taiwan
Former Soviet Union, most of Europe, parts of
Latin America, the Middle East, parts of Africa,
Hong Kong, India, most of South Asia
Mexico, United Kingdom, Ireland, Malaysia,
Singapore, parts of Africa
China, Australia, New Zealand
228 Chapter 14: Travel, Storage, and Service
5. If the battery is not fully charged, or if you plan to
leave the computer in storage for more than a week,
plug in the power adapter.
If the battery is fully charged, you can store the computer
without its power adapter plugged in for up to a week.
6. Store the computer in a cool, dry place.
Storage temperatures should remain between 50°F/10°C and
104°F/40°C. Avoid leaving the computer where temperatures
may be extreme or unpredictable—in the trunk of a car, for
example.
Long-term storage (more than 2 weeks)
Service and support
1. Save your work on a hard disk or floppy disks.
2. Choose Shut Down from the Special menu.
3. Close the display.
4. Recharge the battery.
Plug in the power adapter or use the recharger.
5. If you recharged the battery in a recharger, put the
battery back into the computer.
If the PowerBook malfunctions or is damaged
If your computer is malfunctioning but does not appear to be
physically damaged, shut it down (and leave the power adapter
plugged in, if possible) until you can get help.
If you know or suspect that your computer is physically damaged,
disconnect the power adapter, remove the battery, and do not use
the computer until it can be repaired.
6. Store the computer in a cool, dry place.
Storage temperatures should remain between 50°F/10°C and
104°F/40°C. Avoid leaving the computer where temperatures
may be extreme or unpredictable—in the trunk of a car, for
example.
If you leave the battery in storage for more than 6 months,
you may not be able to recharge it.
Chapter 14: Travel, Storage, and Service 229
How to get help
To obtain service in the United States, you can contact either your
nearest authorized Apple dealer or Apple Computer directly. If
you are in North America, call 800-538-9696 to request the name
of an authorized dealer near you. If you are anywhere else, check
the local telephone directory.
To contact Apple directly, call 800-SOS-APPL (800-767-2775),
Monday through Friday, 8 A.M. to 5 P.M. (Pacific time) to speak to a
Technical Support Engineer. If your PowerBook requires service,
the Technical Suppport Engineer will arrange for your computer
to be picked up at your location, sent to Apple’s centralized repair
facility for repair, and returned to you at any location you specify
in the United States. Apple has established a centralized repair
facility to help you get the best performance from your system.
If you need answers to product questions or information about
product updates, your authorized Apple dealer can help you.
Apple’s technical support organization backs each dealer and
international technical support group with an AppleLink network,
a state-of-the-art on-line information service, to ensure prompt
and reliable assistance. Apple guarantees parts and warranty labor.
(Regulations in each country determine the length of warranty.
Some restrictions may apply, depending on the country of original
purchase.)
230 Chapter 14: Travel, Storage, and Service
If you cannot return to the authorized Apple dealer from whom
you purchased your system, go to the nearest service location. For
the location nearest you, write or call one of the following:
Apple Computer, Inc.
Customer Relations
20525 Mariani Avenue
Cupertino, CA 95014-6299
USA
(800) 538-9696
Apple Canada, Inc.
7495 Birchmount Road
Markham, Ontario, L3R 5G2
Canada
(800) 268-7796/7637
For locations in other countries, either call the Apple
headquarters in your country or write to the United States
address on this page.
Apple also offers service plans. One is the AppleCare Service
Agreement (available in the United States, Canada, and Australia
only), which extends full warranty coverage up to three years.
Your AppleCare contract will be honored at any participating
authorized Apple dealer within the country of purchase—an
added benefit if you relocate.
You can purchase AppleCare at any time, but you may want to
purchase it with your system, or at least before your warranty
expires, to avoid an inspection at your own expense.
Quick Reference
Summary and Shortcuts
m Double-click an object on screen by pointing to the
object and clicking twice in rapid succession, without
moving the trackball or mouse.
Double-clicking is a common shortcut for opening an icon or
the selected item in a directory dialog box.
Shift-click
m Hold down the Shift key while clicking.
Shift-clicking is a way to select more than one icon or item
in a list.
Working with icons
Selecting icons
To do this
Take these steps
Select an icon
Click the icon.
Deselect an icon
Click anywhere except the selected icon.
Select multiple icons
While holding down the Shift key, click
each icon.
Deselect an icon in a
group of selected icons
While holding down the Shift key, click
the icon.
Select multiple icons
that are near each other
1. Place the pointer at one corner of the
group of icons.
2. Drag diagonally to select the icons, then
release the trackball or mouse button.
Select contiguous icons
in a list
1. Place the pointer to the left of the top icon
or the bottom icon.
2. Drag up or down the list, releasing the
trackball or mouse button when the pointer is
left of the last icon.
Select text in an icon’s
name
Click the icon’s name (not the icon itself).
233
Opening an icon
Working with windows
You open an icon by selecting it and choosing Open from the File
menu or using the keyboard shortcut x-O or x–Down Arrow. Or
you can double-click the icon.
Making a window the active window
Moving, copying, and renaming an icon
To do this
Take these steps
You make a window active by clicking inside it. You can also make
a window active by clicking its icon (even though it’s dimmed)
and choosing Open from the File menu, or by double-clicking the
dimmed icon.
Move an icon
Drag the icon to where you want it.
Moving a window and changing its size
Copy an icon onto
another disk
Drag the icon to the icon of the other disk
(or to an icon or window that belongs to
that disk).
To do this
Copy an icon on the
same disk
Rename an icon
234 Quick Reference
1. Click the icon to select it.
2. Choose Duplicate from the File menu, or
press x-D.
3. If you wish, rename the icon and drag it to a
new location. You can also make a copy by
holding down the Option key while you drag
the icon to another folder or window.
1. Select the icon’s name by clicking the name
(not the icon).
2. Type a new name and press the Return key.
Take these steps
Move a window
Drag the window’s title bar (at the
top of the window) to the new
location.
Resize a window
Drag the size box (in the
lower-right corner).
Or click the zoom box (in the
upper-right corner).
Close a window
Click the close box (in the
upper-left corner).
Or choose Close from the File
menu. Or press x-W.
Scrolling through the contents of a window
Scroll box (shows
relative location in
window)
Opening higher-level folder windows
You can open a higher-level folder window (whose contents
include the active window) from a pop-up menu in the active
window’s title.
1. Hold down the x key as you press the active window’s
title.
A pop-up menu of the higher-level folders (and the disk)
appears.
2. Drag to choose a higher-level folder (or the disk), and
then release the trackball or mouse button.
The folder (or disk) window you chose appears as the active
window.
Scroll arrow (used
to view the content
beyond the
window’s borders)
Every window has two scroll bars, one for vertical
scrolling and one for horizontal scrolling. (A gray
scroll bar indicates more content beyond window’s
borders; a clear bar indicates all content is visible.)
m Click the up, down, left, or right scroll arrow.
m Click the vertical or horizontal scroll bar (when it’s
gray).
m Drag the vertical or horizontal scroll box along its
scroll bar.
Open pop-up menu with the
name of the active window
at the top (“Old reports”)
Active window
showing the
contents of the
folder named
“Old reports”
This folder contains the folder “Old reports.”
If you hold down the Option key as well as the x key, the old
window closes when the new window appears.
Quick Reference 235
Using the outline form in list views
Working with menus
Any list view you choose from the View menu (that is, any view
except the icon and small icon views) shows the contents of the
active window in outline form. You can see the contents of a
folder without opening the folder in its own window.
Macintosh menus come in two types: pull-down menus and
pop-up menus. The menus in the menu bar are pull-down menus.
Menu bar (you
pull down menus
from here)
Open folder (with contents
indented below)
Menu titles
The Application
menu, which
shows the
programs that
are currently
open
Open folder inside
another folder
(with contents
indented below)
A downward-pointing triangle indicates that the folder’s
contents are displayed; a right-pointing triangle
indicates that the folder’s contents are hidden.
Click the triangle next to a folder name to display or hide the
folder’s contents in the active window. If you double-click a folder,
it opens in its own window, and its outline view closes.
v Shortcuts: When a folder is selected in an outline view,
pressing x–Right Arrow displays its contents and
x–Left Arrow hides its contents. v
236 Quick Reference
The Help menu, which
you use to display
information about items
on the screen
Dimmed command
(not available)
Menu commands affect
whatever you’ve selected—
in this case, “Macintosh
HD.”
Pop-up menus often appear in dialog boxes that you use to set
options or preferences. You can recognize a pop-up menu by a
small solid triangle, pointing down, next to its name. The name
shows the current option or preference.
Pop-up menu (closed)
Pressing the triangle
displays the menu
(but does not allow
you to choose a
menu item).
Choosing an item from a menu
To choose a command from a menu, point to the menu name,
press to “pull down” or “pop up” the menu, drag to the item you
want to choose so that it’s highlighted, and then release the
mouse or trackball button.
Choosing an item from a submenu
Some menu items are submenus. A submenu name has a small
solid triangle next to it, pointing to the right. The submenu opens
when the submenu name is highlighted.
To choose an item in a submenu:
1. Point to the menu name and press to open the menu.
Pressing the menu title or the icon displays
the menu and selects the title (allowing you
to choose a menu item by dragging to it).
continues .
Quick Reference 237
2. Drag to the menu item so that the submenu appears.
3. Drag sideways to the submenu, drag to the submenu
item you want to choose so that it’s highlighted, and
then release the trackball or mouse button.
Keyboard shortcuts in the Finder and in
directory dialog boxes
Key
Action
Up, Down, Left,
or Right Arrow key
Selects the next item in the direction of the
arrow
Tab key
Selects the next item alphabetically (except in a
directory dialog box and the Chooser)
Character
key (a, b, c . . .)
Selects the first item whose name begins with
that character (or the character following
closest to it in the alphabet)
x–Down Arrow
Opens the selected icon
x–Option–Down Arrow Opens the selected icon and closes the current
folder
x–Up Arrow
Opens the folder that contains the current folder
x–Option–Up Arrow
Opens the folder that contains the current
folder and closes the current folder
Return or Enter
In the Finder: Selects the selected icon’s name
for editing or saves the edited name
In a dialog box: the same as clicking the button
with the bold outline around it
238 Quick Reference
Troubleshooting
The PowerBook
This section describes possible causes and solutions for some
common problems you may have with your Macintosh
PowerBook or associated equipment provided by Apple.
The computer won’t start.
This section is not comprehensive. Check the appropriate
reference section for additional help on specific topics.
Also check the documentation that came with your other
equipment and with your programs for more information.
s Warning: If you have a problem with your Apple computer
equipment and nothing presented in the manuals that came
with the equipment solves the problem, call Apple Computer
directly at 800-SOS-APPL (800-767-2775), or take the computer
or accessory to your authorized Apple dealer or service
provider. Attempting to repair the equipment yourself may
void the Limited Warranty. Contact your authorized Apple
dealer or service provider for additional information about
this or any other warranty question. s
m The computer may be on, but the screen brightness or
contrast may be turned down. Adjust the brightness and
contrast controls to see whether an image appears on the
screen.
m The battery may be drained. Plug in the power adapter, wait
15 minutes, and then try to turn on the computer.
m There may be a temporary problem with the computer’s
power system. Use a paper clip or similar object to press the
reset button on the computer’s back panel, and then try to
turn the computer on again.
Quick Reference 239
The computer just stopped.
The computer is very hot.
m The computer may have gone to sleep. Press any key on the
keyboard (except Caps Lock) to wake it again.
m It is normal for the computer to be warm to the touch while
you are using it, especially on the side beneath the keyboard.
If the computer seems unusually hot, try the following:
m The battery may have drained so far that the computer has
put itself to sleep to protect the contents of RAM. Plug in the
power adapter, wait 15 minutes, and then turn the computer
on again.
m The computer may have “crashed” due to temporary software
problems. Click the Restart button on the screen (if you see
one), or use a paper clip or similar object to press the reset
button on the computer’s back panel. If you use these
methods, you will lose any work you have not saved.
m plug in the power adapter
m turn down the screen brightness
m use the Maximum Conservation setting in the PowerBook
control panel
m make sure processor cycling is on in the PowerBook
control panel
m put the computer to sleep or shut it down
See Chapter 7 for more information on reducing your
computer’s power consumption.
240 Quick Reference
The computer exhibits odd behavior, such as many
unexplained system failures.
Power
m A common cause of unexplained problems is multiple System
Folders on your computer’s startup disk. The System Folder
that the PowerBook is using to operate is marked with an
icon. Use the Find command in the Finder’s File menu to
locate any other System Folders, and throw them in the Trash.
The battery is draining too fast.
m You may have a virus on your hard disk. Obtain a virusdetection program, use it to check all your disks, and
eliminate any viruses the program finds.
m You may be using a program that’s not compatible with your
computer’s system software. Check the information that came
with the program or contact the manufacturer.
m You may have added a control panel or system extension that
is incompatible with other programs you use. Restart the
computer with the Shift key held down until you see the
message “Extensions off.” If the problem does not recur,
remove any such items you recently installed.
m Turn down the screen brightness, turn off virtual memory,
move the Battery Conservation slider in the PowerBook
control panel to Maximum Conservation, or work with the
power adapter plugged in.
m You may be using an input device (such as the mouse
intended for desktop Macintosh systems) not designed for
PowerBook computers. Make sure to use only low-power
input devices.
m Your computer supplies power to the modem whenever a
communications program is open. Quit your communications
program if you aren’t using it.
m If you aren’t using network services, you can also save power
by turning off AppleTalk in the Chooser.
m Your battery may need to be discharged and recharged
completely. See Chapter 7.
m Older PowerBook batteries do not hold a charge as well as
new ones. You may need to replace the battery.
Quick Reference 241
The battery can’t be recharged.
The computer doesn’t go to sleep automatically.
m There may be a loose connection. Make sure all plugs are
securely attached.
m You may have selected “Don’t sleep when plugged in” in the
Options section of the PowerBook control panel. Click the
box to remove the X.
m The battery may be damaged or dead. Obtain a replacement
battery from your authorized Apple dealer.
m The outlet may have no power.
m If the adapter or recharger is plugged into a power strip, the
strip may not be turned on.
m The recharger may be damaged. Try recharging the battery in
the PowerBook.
The computer goes to sleep too often.
m Open the PowerBook control panel and move the Battery
Conservation slider toward Maximum Performance.
242 Quick Reference
m You may be connected to a shared disk on the network. If you
are not using the information on the shared disk, disconnect
from it.
m The printer or modem port may be in use. Quit your
telecommunications program or turn off background printing
in the Chooser (if the documents you’re printing can wait
until later).
m One or more applications may be doing work in the
background. You can choose Sleep from the Special menu to
override them.
See Chapter 7 for more information about batteries and power
consumption.
The screen
There are ghost images or black dots on the screen.
The screen looks blurred or out of focus.
m When the computer is left on for many hours, temporary
defects may appear on the screen. Put the computer to sleep.
The longer the computer was left on, the longer it will take for
the images to fade, but they will eventually disappear.
m The viewing angle may not be optimal. Tilt the display on its
hinge until the screen looks better.
The screen is too dark.
m When you first turn on your computer, it may take several
minutes for the screen brightness to “warm up,” especially if
you’ve chosen a high setting.
m The screen brightness or contrast may not be optimal for the
surrounding lighting. Adjust the brightness or contrast setting.
m The screen dims automatically when the battery starts to run
low. You may need to recharge or replace the battery before
you can turn up the brightness.
The pointer moves too fast/too slowly.
m You need to adjust the pointer’s tracking speed. Open the
Mouse control panel and choose a more comfortable setting.
The pointer won’t move at all.
m A software problem may have caused the computer to
“freeze.” Restart the computer by using a paper clip or similar
object to press the reset button on the computer’s back
panel. You will lose any work you have not saved.
The pointer has disappeared.
m Processor cycling may cause the pointer (expecially the Ibeam) to disappear temporarily. Roll the trackball or mouse
slowly until you locate the pointer.
Quick Reference 243
A window has disappeared.
Memory
m Another open window on the desktop may have covered the
window you’re looking for. Move, resize, close, or hide
windows you aren’t using until you see the one you want.
A “not enough memory” message appears when you try to
open a program.
m Windows belonging to open but inactive programs may be
hidden. Choose Show All from the Application menu to show
hidden windows.
m Quit any programs you aren’t using, then try again to open
the program you want. If that doesn’t work, restart the
computer. Sometimes restarting makes additional memory
available.
An icon is blinking in the menu bar.
m If you are using a RAM disk or a disk cache, reduce its size and
then restart the computer.
m One of your programs needs your attention. For example, you
may have set the Alarm Clock to go off at a particular time, or
PrintMonitor may be alerting you to a printing problem. Make
the program active and take the necessary action.
m Use extra space on your hard disk as virtual memory to
increase the amount of memory available for opening
programs. (Use virtual memory only when the power adapter
is plugged in.)
m If you consistently want to open more programs than memory
allows, you can purchase a memory expansion card from your
authorized Apple dealer.
SCSI devices
You can’t turn on the computer after connecting a
SCSI device.
m SCSI devices connected to your computer must be turned on
before the computer itself. Turn on the SCSI device(s) first,
and then turn on the computer.
244 Quick Reference
The computer doesn’t recognize your SCSI devices.
m The devices may be off. Check to make sure that they are
plugged in and turned on.
m If the device is a disk drive, it may need to be initialized before
you can use it. See the instructions that came with the device.
m The software (driver) needed to communicate with the device
may not be installed in your System Folder. See the
instructions that came with the device.
m Two or more devices in the SCSI chain may have the same ID
number. Check the ID number of each device to make sure
each one has its own number between 1 and 6, and change
any numbers that are not unique.
m When connecting SCSI equipment, it is important to use the
right cables and the correct number and placement of cable
terminators. Check the cables and terminators in the SCSI
chain and make sure that all cables are firmly attached.
See Chapter 13 for more information about working with SCSI
devices.
Disk drives and disks
The computer won’t start up from its hard disk, or the
hard disk icon doesn’t appear on the desktop.
m There may have been a temporary software problem. Shut
down the computer, wait at least 10 seconds, and then turn it
on again.
m There may be a problem with the system software on the hard
disk. Start up the computer with the Disk Tools disk. If the
hard disk’s icon appears, reinstall system software as
described in Chapter 6. Disk repair programs can sometimes
fix problems of this kind.
m The information on the disk drive may be damaged. Try using
a disk repair program to repair or recover the information. If
this doesn’t work, you’ll need to reinitialize the hard disk. See
Chapter 8.
m There may be a mechanical problem with the disk drive. If
none of the above suggestions works, take the computer to an
authorized Apple service provider.
Quick Reference 245
The hard disk keeps stopping and starting again.
m The hard disk may be going to sleep to conserve power. Open
the PowerBook control panel and move the Battery
Conservation slider toward Maximum Performance.
The hard disk is full.
m You can reclaim space on your hard disk by removing
unneeded files; installing a smaller, customized System Folder;
turning off virtual memory; or purchasing a disk optimization
program to reorganize the information on the hard disk.
A disk you use with your PowerBook computer is not
recognized by another Macintosh.
m Some disk drives cannot recognize high-density disks. If the
disk is high-density (marked with the icon Ó), try inserting an
800K or 400K disk in the disk drive of the other Macintosh. If
that works, copy your files to an 800K disk or a 400K disk. If
you regularly plan to use floppy disk drives of different types,
use the lower-capacity disks in all drives.
m The disk may be damaged. Try using Disk First Aid or another
disk repair program to fix it. If this problem occurs frequently,
one of the disk drives may need repair.
The icon of a floppy disk doesn’t appear on the screen.
You can’t eject a disk from a floppy disk drive.
m There may be a problem with the disk or disk drive. Try
inserting a different disk. If its icon does appear, the original
disk is probably damaged. You may be able to repair the disk
or recover some of the information on it. See Chapter 8. If the
icon of the second disk does not appear either, take the
computer or disk drive to an authorized Apple service
provider for repair.
m There may be a temporary mechanical problem with the disk
drive. Restart the computer and hold down one of the
trackball buttons while the computer starts up. If that doesn’t
work, carefully insert the end of a straightened paper clip into
the small hole near the disk drive’s opening, and push gently
until the disk is ejected.
246 Quick Reference
A message says that a disk is not initialized—but you
know that it is.
m The disk may not be seated properly in the disk drive. Eject it
and try inserting it again.
m The disk may be damaged. If you insert another disk in the
drive and the message does not appear, you can assume that
the original disk needs repair. See Chapter 8 for information
about recovering information from a damaged disk. If the
second disk is also not recognized, take the computer or disk
drive to an authorized Apple service provider.
You can’t save or copy files onto a floppy disk.
m The disk may be locked. Unlock it by sliding the tab so that it
covers the hole at the corner of the disk.
m The disk may be full. Delete files you no longer need or use a
different disk.
See Chapter 8 for more information about working with disk
drives and disks.
You can’t delete a file on a floppy disk.
m The disk may be locked. Unlock it by sliding the tab so that it
covers the hole at the corner of the disk.
m The file may be locked. You can unlock it in its Info window
(choose Get Info from the File menu). Or you can hold down
the Option key while you choose Empty Trash from the
Special menu.
m An application program may be using the file. You’ll need to
quit the program.
Quick Reference 247
Modems
Printers
The external modem doesn’t work.
Your computer can’t find the printer.
m The modem may be turned off or improperly connected.
Make sure that it is turned on and that all connections are
correct.
m The printer may be turned off. Turn it on.
m The modem port may not be activated. Open the PowerBook
control panel and make sure that External Modem is selected.
The internal modem doesn’t work.
m The modem port may not be activated. Open the PowerBook
control panel and make sure that Internal Modem is selected.
See the modem manual for more information about using and
solving problems with your modem.
m If it’s a network printer, there may be a problem with the
network. Check with your network administrator.
m The printer may not be selected in the Chooser. Open the
Chooser and select the printer you want to use.
Your printer does not appear in the Chooser window.
m The printer may not be connected properly. Check the
connections between your computer and the printer,
including relevant sections of the network if appropriate.
m The printer software may not be in your System Folder. Close
the Chooser and install the software you need.
m AppleTalk must be active before you can use a network
printer. Make sure that AppleTalk is active in the Chooser.
m If your network has zones, the printer you want may not be in
the currently selected zone. Make sure the correct zone is
selected.
m There may be a problem with the network. Check with your
network administrator.
248 Quick Reference
The network printer keeps restarting.
Your documents are printed with the wrong fonts.
m Someone on the network may be using a different version of
the printer software. Everyone connected to a network should
use the same printer software version. Consult the network
administrator for more information.
m The printer may not have your fonts in its memory and is
substituting other fonts. You may be able to add the necessary
fonts to your printer (see Chapter 11), or print on a different
printer that has the fonts you want. If you have a LaserWriter,
you can turn off Font Substitution in the Page Setup dialog
box.
Nothing happens, or you see an error message, when you
try to print.
m The printer may not be turned on. Make sure it is turned on
and warmed up.
See Chapter 11 for general information about printing documents.
See the printer manual for more information about your printer’s
features or problems with the printed output.
m The printer may be out of paper or have some other problem.
Check the printer status lights and any messages on your
screen.
m If an error message states that the printer could not print your
document, turn the printer off for at least 10 seconds. Then
turn it on again, wait for it to warm up, and try to print again.
Quick Reference 249
Networks
The shared disk you want to connect to does not appear in
the Chooser window.
You can’t find or can’t open icons needed to set up
file sharing.
m AppleTalk must be active before you can use a shared disk.
Make sure that AppleTalk is active in the Chooser.
m One or more icons may be in the wrong place. Make sure that
the Sharing Setup icon is in the Control Panels folder, and that
the File Sharing Extension file, the Network Extension file, and
the AppleShare file are in the Extensions folder. (Both folders
are inside the System Folder.)
m If your network has zones, the shared disk you want may not
be in the currently selected zone. Make sure the correct zone
is selected.
m Some network software may not be installed correctly. Use
the Installer to install the appropriate network software.
m The shared disk may be temporarily unavailable. Wait a few
moments to see if its name appears in the Chooser.
m The computer that the disk is on must be turned on before
the disk can be shared. Make sure that computer is on.
m There may be a problem with the network. Check with your
network administrator.
250 Quick Reference
You can’t open a shared disk or folder.
Application programs
m You may not have the access privileges needed to use the disk
or folder. Ask the network administrator or the owner of the
shared item to grant you access.
A program won’t open.
m You may have entered your name or password incorrectly
when you tried to open the shared disk or folder. Check with
the owner of the item to make sure you are entering your
name and password correctly, and try again.
You can’t connect to your own computer from
another Macintosh.
m Make sure that your computer is turned on and connected to
the network. Make sure that file sharing is turned on, you
have the correct access privileges, and you entered your name
and password correctly.
See Chapter 12 for more information about using your computer
on a network.
m Some programs can’t be opened from a locked floppy disk.
Make sure the disk is unlocked.
m The program may be damaged. Recopy it from a known good
source (such as the original program disk).
m There may not be enough memory available to open the
program. Quit other programs or change the program’s
memory size in its Info window.
A program runs very slowly.
m Some programs are slowed by processor cycling. You can turn
processor cycling off; see Chapter 7. Turning processor cycling
off will drain your battery faster and cause the computer to
become hotter.
Quick Reference 251
A program doesn’t work, or malfunctions consistently.
You just did something you didn’t mean to do.
m You may have more than one copy of the program on your
hard disk. Remove extra copies by dragging them to the Trash.
m If you have not yet taken any other action, you can usually
undo your most recent action (even if you aren’t sure what it
was). Most programs have an Undo command in the Edit
menu (x-Z). Choose Undo to go back one step in your work.
You cannot undo more than one action.
m The program may be damaged. Recopy it from a known good
source (such as the original program disk).
m Your version of the program may be incompatible with your
system software. Consult the software manufacturer to find
out which version of the program you should be using.
m The program may be using less memory than it needs to work
with your documents. Choose Get Info from the File menu
and increase the memory size.
A message says that a program could not be found.
m You may be trying to open a document created with a
program you don’t have on your computer, or created with a
different version of the program. Obtain the correct program
and version. Or open the document with another program
that can read its format. (If another program can open a
document, the program icon becomes highlighted when you
drag the document icon to it.)
252 Quick Reference
See the documentation that came with your programs for more
information about their operation and features.
Appendix A
Keyboard and Character Sets
Tab key: Moves the insertion point
to the next stopping place (such as
a tab stop or data field).
Caps Lock key: A Shift key for
letters only (numbers and
symbols aren’t affected).
Shift key: Produces capital
letters (or the upper character
on the key).
Control key: In combination
with other keys, provides
shortcuts or modifies actions.
Option key: In combination with
other keys, produces special
characters or modifies actions.
~
'
!
1
caps
lock
W
A
option
R
D
X
Delete key: Deletes selected
material, or the character to
the left of the insertion point.
%
5
E
S
Z
shift
ctrl
2
Q
tab
$
4
#
3
@
C
&
7
6
T
F
U
H
B
(
9
*
8
Y
G
V
Return key: Moves the
insertion point to the
beginning of the next
line. In a dialog box,
pressing Return is the
same as clicking the
outlined button.
I
J
N
+
=
)
0
O
K
M
esc
x (Command) key: Works in combination
with other keys as an alternative to choosing
a menu command.
{
[
P
:
;
L
<
>
,
.
delete
}
]
"
'
?
/
\
return
shift
enter
Arrow keys: Move the insertion
point, as an alternative to using the
trackball. In some programs, the
arrow keys have other functions.
253
Using Caps Lock
Typing special characters and symbols
The Caps Lock key on PowerBook computers does not stay
depressed even when it’s locked. You can tell whether Caps Lock
is on or off by looking at the menu bar. An arrow appears to the
left of the Help menu icon when Caps Lock is on.
You can type a variety of special characters (with diacritical marks)
and symbols by pressing modifier keys in combination with
certain letter and number keys.
To turn Caps Lock on or off, press the Caps Lock key.
The Key Caps program, which is installed with the system
software, shows you the characters produced when you type
certain keys and key combinations in the fonts available on your
computer. Choose Key Caps from the Apple (K) menu, then
choose the font from the Key Caps menu.
Characters appear here when you press keys on
the keyboard or click them in the window.
Characters available in
the Chicago font
254 Appendix A: Keyboard and Character Sets
Characters
available in
the Chicago
font when the
Option key is
pressed
The highlighted key represents the
key held down on the keyboard—in
this case, the Option key.
To type a character with a diacritical mark (such as an acute accent
or an umlaut), you press the Option key along with a specific
letter key, and then type the character.
Diacritical mark
Key combination
Grave accent ( ` )
Option–`, then type the character
Acute accent ( ´ )
Option–e, then type the character
Circumflex (^)
Option–i, then type the character
Tilde (~)
Option–n, then type the character
Umlaut ( ¨ )
Option–u, then type the character
The letter “c” with a cedilla (ç)
Option–c
If the character appears after the diacritical mark (rather than
with it), then the marked character is not available in the font
you’re using.
Appendix A: Keyboard and Character Sets 255
Appendix B
Exchanging Disks and Files
With MS-DOS Computers
Initializing a disk in MS-DOS format
( You can also follow these instructions to initialize a disk in
ProDOS format.)
1. Locate the Apple File Exchange icon and open it.
Apple File Exchange is a file format conversion program supplied
on your system software disks. The program and translator files
are stored in the Apple File Exchange Folder.
You can use the program to initialize a disk in MS-DOS (or
Apple II ProDOS) format and convert files to and from MS-DOS
(or ProDOS). Apple File Exchange cannot open converted files;
you need to open them with an application program that
recognizes the converted files.
Apple File Exchange is supplied on one of your system
software disks.
When you open the program, the contents of the active
window are listed on the left side and an empty box appears
on the right side.
2. Insert a blank disk into your floppy disk drive.
A message reports that the program can’t read the disk and
asks if you want to initialize it. The message lists the formats
available in Apple File Exchange, including Macintosh,
MS-DOS, and ProDOS.
( You can initialize a disk that is not blank by inserting it,
clicking the Drive button until the disk’s name appears,
and then choosing Erase Disk from the File menu.)
257
3. Click MS-DOS.
4. If necessary, click the capacity (in K) of the disk you
inserted.
If you want to initialize a high-density (Ó) disk in MS-DOS
format, 1440K is the only option and it is already selected. If
you inserted a double-sided disk, click 720K.
Apple File Exchange cannot initialize a high-density disk in
720K format, nor can it read a double-sided disk that has been
initialized in the high-density (1.4 MB) format.
5. Click Initialize.
When initialization is finished, a message asks you to name
the disk.
6. Type a name for the disk, and then click OK.
MS-DOS filenames can have up to eight characters, followed
by an optional period and up to three characters.
The name of the disk you initialized appears above an empty
window. The disk’s icon doesn’t appear on your Macintosh
screen because the Macintosh can’t recognize a disk in
MS-DOS format.
7. Choose Quit from the File menu.
Disk capacity is the same
for Macintosh and MS-DOS
high-density disks.
258 Appendix B: Exchanging Disks and Files With MS-DOS Computers
Follow these steps to translate an MS-DOS (or ProDOS) file:
Converting files to and from
MS-DOS format
1. Locate the Apple File Exchange program and open it.
Apple File Exchange provides two methods of file conversion—
text and binary. Text translation is for text files, and binary
translation is for other file types.
Apple File Exchange can also use translator files designed to
convert files into formats that specific programs can use. One
such translator file is provided with Apple File Exchange:
DCA-RFT/MacWrite, which converts documents between MacWrite
format (for the Macintosh) and Document Content Architecture/
Revisable Form Text format (used by many MS-DOS wordprocessing programs).
File selected
for translation
Menus of
translator files
Directory
title or disk
name
Apple File Exchange is supplied on one of your system
software disks.
When you open the program, the contents of the active
window are listed on the left side and an empty box appears
on the right side.
2. Insert the floppy disk containing the files you want
to translate.
3. Use the Open, Drive, and Eject buttons to display the
files you want to translate and the disk or folder where
you want to store the translated files.
4. Click the names of the files or folders you want to
translate.
The appropriate translation menus (for translating from or to
Macintosh format) appear in the menu bar when you select
MS-DOS files.
Disk name
Appendix B: Exchanging Disks and Files With MS-DOS Computers 259
5. Pull down the translation menu you want.
6. Make sure that the translators for the types of files you
selected have checkmarks; if not, choose them so
checkmarks appear next to them.
An active translator has a checkmark. The default translator
has a diamond (indicating that it’s always active). Choosing an
active translator makes it inactive.
7. Compare the size of the files or folders selected
for translation with the space available on the
destination disk.
Total space required appears between the lists; the space
available on the destination disk appears below its name.
If the size of the selected items is greater than the space
available on the destination disk, deselect some of the items,
remove some files on the destination disk (click Remove), or
use another destination disk (click Eject).
8. Click Translate.
If two or more active translators (other than Text or Default)
are capable of translating a selected file, a message asks you to
select the translator you want.
If the names of files or folders on the destination disk are the
same as those of files or folders being translated, a message
asks you to rename the file being translated.
If you need to select options before a file is translated, a dialog
box appears in which you can select the options.
9. Respond to any messages by selecting a translator,
renaming a file, or selecting options.
When Macintosh files are translated into MS-DOS files,
filenames may be shortened to conform to MS-DOS naming
conventions.
10. Choose Quit from the File menu.
v Converting MS-DOS files on a file server: Some file servers
can store information created by both Macintosh and MS-DOS
computers. For example, the AppleShare PC program allows
MS-DOS computers to store and translate files on an
AppleShare file server. Consult your authorized Apple dealer
or representative for more information about using a file
server and MS-DOS files. v
260 Appendix B: Exchanging Disks and Files With MS-DOS Computers
Other file-conversion options
Apple File Exchange’s File menu provides several other options to
assist you with file conversions.
The active translators
and options for each
translator can be saved
in a file by choosing
“Save settings as.” You
can use these options
again later by choosing
“Restore settings from”
and opening the file.
To see explanations of the translators Apple File Exchange uses,
choose About Apple File Exchange from the Apple menu. Select a
translator from the list, and then click the About button for more
information. (Click Done to return to the program’s window.)
The program keeps a
log of all files translated,
showing the date, time,
and type of conversion.
Choose to rename
destination
(translated) files.
Names of files that can’t
be converted by the
active translators are
dimmed when this
item is checked.
Choose to reinitialize
a disk in any
available format.
Appendix B: Exchanging Disks and Files With MS-DOS Computers 261
Appendix C
Map
The Map control panel lets you set your computer’s location and
find out the distance and the time difference between your
location and cities around the world. If you travel with your
computer and use Map to reset your location accordingly, the
time (in the Date & Time control panel) is automatically reset to
the local time.
Certain programs (in networking and telecommunications, for
example) can use your computer’s location to account for time
zones and distances when making calculations.
Setting your location
1. Choose Control Panels from the Apple (K) menu and
open the Map control panel.
To magnify the map in the control panel (showing less of the
world at a larger scale), hold down the Option key while you
open Map.
263
2. Type the city nearest your current location and then
click the Find button (or press the Return key).
If you aren’t sure how the city is spelled, type the first few
letters and press the Return key. If the city isn’t found, you can
add it to the list of cities stored in Map (instructions are given
elsewhere in this appendix).
3. Click the Set button.
Your current location is indicated by a blinking cross.
Comparing locations
After you set your computer’s location, you can use Map to find
out:
m the distance from your location to another location
m the time at another location
m the time difference between your location and another
location
Open the Map control panel and find or add the other location
(instructions are given elsewhere in this appendix). You can also
choose a location by clicking anywhere on the map (the unnamed
location’s coordinates appear in the boxes for latitude and
longitude).
Click here to
display time
difference.
Distance to
location shown
264 Appendix C: Map
Local time in
location shown
The distance to and the time at the other location are shown at
the bottom of the window. The distance is based on the shortest
possible route (called the great circle).
To find out the time difference between your location and the
other location, click the words “Time Zone.” Click again to see the
other location’s time zone.
Finding a location
The Map has a list of locations, with information on the latitude,
longitude, and time zone of each location.
1. Choose Control Panels from the Apple (K) menu.
2. Open the Map control panel.
To magnify the map in the control panel (showing less of the
world at a larger scale), hold down the Option key while you
open the Map control panel.
3. Type the city you are looking for and then click the
Find button (or press the Return key).
If you aren’t sure how the city is spelled, type the first few
letters and press the Return key.
If you don’t know the name of a city but know where it is, you
can find it by clicking its location on the map. Each blinking
point is a location in the list. If you click in the map and then
drag to a blinking point, that location’s name, latitude,
longitude, and time zone appear.
(If you hold down the Option key while clicking the Find
button, Map displays, one at a time, all the locations in its list.)
Appendix C: Map 265
Adding or removing a location
Adding a location
1. If the map does not show the location you want to add,
scroll by dragging beyond the map in the direction of
the location.
2. Click the location.
A blinking star appears at the location, and its coordinates and
approximate time zone are displayed.
3. Type the name of the new location.
5. If the time zone is not correct, click the Time Zone
boxes and type in the correct number.
When the box at the end of the Time Zone line is checked,
the boxes show how much time the location is ahead (east) of
Greenwich Mean Time. Otherwise, they display how much
time the location is behind (west of ) Greenwich Mean Time.
The map estimates the time difference based solely on
longitude. Since the boundaries and time of time zones are
determined politically, you may need to consult a time zone
chart, map, atlas, or globe for the correct time.
6. Click the Add City button.
4. If you know the coordinates, type them in the latitude
and longitude boxes.
The new location is added to the list. If your computer beeps,
the location is already part of the list.
When the N and E boxes are checked, the boxes next to them
display North latitude and East longitude, respectively.
Otherwise, they display South latitude and West longitude.
To change details about a location, you need to remove it and
then add it again.
Changing or removing a location
1. Find a location.
2. Click the Remove City button.
If you want to keep the location but change the coordinates
or time zone, type the new coordinates or time zone, then
click the Add City button.
266 Appendix C: Map
Index
A
About This MacintoshCommand 155, 158,
225
accent marks, typing 254–255
access privileges 207–211.
See also file sharing; guests;
network; passwords
checking 211
icons and 211
restricting 201–195
set by others 211
setting 208–209
strategies for using 209–210
turning off 203–204
types of 207–208
active programs 54–56, 58
identifying 94
active windows 38–40
printing contents of 173
ADB. See Apple Desktop Bus (ADB)
air travel tips 227–228
Alarm Clock 143–144
setting date and time with 143
aliases
connecting to shared disks with 190
creating 128
locating original of 129
locking 118
searching for 133
troubleshooting 128–129
uses for 128
amplifiers 224
APDA (Apple Programmers and
Developers Association) 232
AppleCare Service Agreement 230
Apple Communications Library 231
Apple Desktop Bus (ADB) 9, 223
Apple Developer Programs 232
Apple File Exchange 257–261
converting files with 259–261
initializing disks with 257–258
Apple HDI-30 SCSI System Cable 218,
220, 221
Apple HD SC Setup program 113–114,
121, 124
Apple menu. See also control panels;
desk accessories
adding items to 92, 129, 140
aliases and 128
pulling down 34
removing items from 129, 140
troubleshooting 129
Apple Menu Items folder 140
AppleShare extension 155
AppleShare icon 187–188
AppleShare PC program 260
AppleTalk
and choosing printers 168, 169
installing 186
memory management and 155
sleep and 186
turning on/off 185–186
AppleTalk Remote Access 155
AppleTalk zones 169
Apple Technical Library 231
Apple II ProDOS file format 257, 259
Index 269
Application menu 52
hiding and showing windows 94
making open program active 55–56
programs listed in 94
switching programs 94
application programs 57. See also programs
installing 92
locating 133
making active 55–56
switching 94
troubleshooting 92, 251–252
arrow keys 49, 238, 253
arrow pointer 7, 8, 32, 243.
See also I-beam pointer; arrow keys
B
background pattern, changing 162–164
background printing 169, 174, 175, 242
backing up
file 119
on networks 119
system software 88
travel and 227
backlight dimming 240
Balloon Help 83–84, 170
270 Index
battery. See also power management
disposing of 107
low power messages 102–103, 108
maximizing life of 108
maximizing work time with 109
monitoring charge level of 82, 101–103
power adapter and 2
power conservatio 83, 109–112, 242, 246
processor cycling and 112
processor speed and 111
recharging 23, 25, 102–106, 108, 228–229,
242
removing or replacing 106–107
safety tips for 23, 25, 107
sleep and 18, 110, 111
storing 228, 229
transporting 23, 227
troubleshooting 241–242
using computer without 106
Battery Conservation settings 83, 109–112,
242, 246
Battery desk accessory 82, 101–103
battery recharger 105–106
beep sound
choosing 159
installing 160
recording 161–162
removing 141, 160
Berkeley Macintosh User’s Group (BMUG)
231
binary translation 259
bitmap fonts 176–177
blinking icons 5, 87, 117, 175, 244
blinking line (insertion point) 53, 58, 151
blinking rate 151
Boston Computer Society 231
brightness control 5, 9, 10, 28, 109, 239
bulletin boards 93, 210
By Label option 136
C
cables
network 185
safety instructions 23
for SCSI connections 218, 220–221
cache, disk 156, 244
capitalization. See case sensitivity
Caps Lock key 253, 254
passwords and 189
waking computer and 10, 17, 18, 110
care instructions 23–25
for floppy disks 75
for hard disks 121
carpal tunnel syndrome 26
carriage returns 53
case, computer 24
case sensitivity
passwords and 187, 198
registered user names and 188, 197
CD-ROM disc
access privileges for 209
ejecting 120
selecting for sharing 195–196
character repeat rate, adjusting 149
character sets 253–255
Chooser 167–169, 185–186
cities. See Map control panel
cleaning the computer 25, 28
Clean Up command 36, 125
Clear command 96
clicking 33, 35. See also double-clicking;
shift-clicking
Clipboard 60
clock, setting 142
close box 44, 45
CloseView control panel 164–166
Close Window command 46, 75
cold, computer use and 25
colon (:), in icon names 66
color documents, printing 173
comfort tips 27–29
Command key 49, 62, 238, 253
ejecting disks with 120
startup scan and 117
undoing last action with 252
commands
choosing 36
keyboard shortcuts for 62, 238
computer viruses 93, 241
connectors, safety tips for 24
contrast control 5, 9, 10, 28, 239
Control key 49, 253
control panels
appearance of Finder windows 152
background pattern 162–164
battery conservation 82–83, 109–112, 242
beep sound 159
blinking rates 151
currency formats 147
date and time 142–143, 263
disk cache 156
Easy Access 150
file sharing 194–195, 197–198, 201, 202,
205–206
guest access 194–195
keyboard response 149
labels 142
magnifying screen images 164–166
map 263–266
memory 97, 98, 109, 156–158
modem selection 222
monitoring file sharing 204–205
mouse 148
network identity 186, 194, 203–204,
206–207
number formats 147
passwords 186, 198, 206–207
processor cycling 112
program linking 214, 215–216
sleep 110–111
sound 159–161
startup disk 99, 116
32-bit addressing 158
time 142–143, 263
trackball speed 148
troubleshooting and 241
Views 136, 152
virtual memory 157–158
Copy command 96
copying
a disk 74–75, 78–79, 119
a document 65–66, 247
files without a floppy disk 92
icons 234
items to and from Scrapbook 96
copyright law, file sharing and 196
crashes 21, 240
creating
alias 128
document 53
folder 126
folder on shared disk 191
RAM disk 97–98
stationery 134–135
virtual memory 157–158, 225
Index 271
currency formats, changing 147
cursor. See arrow pointer; insertion point
customized system software, installing 90–91
Cut command 60, 160
D
damage to computer 229, 241
DAs. See desk accessories
Date & Time control panel
changing date format 145
changing time format 146
Map control panel and 263
setting date and time 142–143
DCA-RFT/MacWrite translator file 259
dealer support 229–230
Delete key 53, 253
deleting
a file 67–68, 247
Scrapbook items 96
text 59–60
typing errors 53
deselecting an item 35
desk accessories (DAs)
Battery 82, 101–103
Chooser 167–169, 185–186
Key Caps 180, 254–255
switching between 94
272 Index
desktop 46
changing background pattern 162–164
Clean Up Desktop command 36
contents of 20, 46–48
dragging an object on 35
hiding and showing windows on 94
moving an item to 129
pointing to an object on 32
printing contents of 173
selecting an object on 33
startup and 5, 6, 20
straightening up 125
VM Storage file 158
development tools 232
device drivers 218, 243
diacritical marks, typing 254–255
dimmed icons 94
directory dialog box 127, 238
disk cache 156, 244
diskettes. See floppy disks
Disk First Aid 22, 121, 122–123
disk repair programs 22, 119, 123
disks. See CD-ROM disc; floppy disk drive;
floppy disks; hard disk; RAM disk;
shared disks; startup disk
Disk Tools disk
Apple HD SC Setup program 113–114,
121, 124
Disk First Aid 121, 122–124
initializing hard disk with 113
restarting with 22
starting up with 91
display. See screen
Document Content Architecture (DCA)
format 259
documents 48
aliases for 128–129
automatic updating of 184
backing up 119
changing name of 66–67
changing text in 58–61, 62–64
closing 56, 65
converting to and from MS-DOS format
257–261
converting to and from stationery
134–135
copying 65–66, 247
creating 53
deleting 67–68, 247
labels for 136
making document window active 55, 65
naming 53–54, 127
opening 57–58, 65
opening automatically 140
organizing 125
printing 172–173, 175
saving 53, 127, 247
saving changes in 61
saving as templates 134–135
transferring 137
“Don’t sleep when plugged in” option 110,
242
DOS, exchanging files with 257–261
double-clicking 233. See also clicking
adjusting speed of 148
icons 58, 94
selecting text by 64
double-sided floppy disks 70, 71. See also
floppy disks
downloading printer fonts 178–179
Download PostScript File command 182
dragging 35
size box 40–41, 43
title bar 45
drivers 218, 245
drop boxes 210
Duplicate command 66
duplicating. See copying
E
Easy Access control panel 150
Easy Install dialog box 6, 89
editing documents 58–61
Edit menu
Clear command 96
Copy command 96
Cut command 60
Paste command 60, 96
Quit command 64
Undo command 252
ejecting a floppy disk 76, 120
electrical safety tips 23
electronic bulletin boards 93, 210
elevation feet 9, 28
Empty Trash command 68, 98
turning off warning 154
Enter key 53, 67, 238, 253
Erase Disk command 98, 116
erasing
a floppy disk 116
a RAM disk 98
typing errors 53
ergonomics 27–29
error messages
printing 174
“system error” 21
Ethernet cables 185
Extensions folder
AppleShare file 188
File Sharing icon 186
Network icon 186
troubleshooting and 241
external battery recharger 105–106
external hard disk 117
external microphone 9, 161, 224
external modems 222, 248
external monitors 104
F
fax/data modem 222
file exchange 257–261
File menu
Close Window command 46, 75
Download Fonts command 179
Download PostScript File command 182
Duplicate command 66
Find Again command 130
Find command 91, 130–133
Get Info command 95, 118, 135
Initialize Printer’s Disk command 180
Make Alias command 128, 190
New Folder command 126
New Group command 198
New User command 197
Open command 37
Page Setup command 170–172
Preferences command 175
Print command 172–173
Print Desktop command 173
Print Window command 173
Put Away command 76, 120, 189
Save command 53–54, 61–62
Sharing command 193, 195, 196, 200, 203,
208–209
files 47–48. See also documents; file sharing;
System Folder;
system software
adding to System Folder 140–141
aliases for 128–129
backing up 119
Index 273
closing 56, 65
converting to and from MS-DOS format
257–261
copying 65–66, 247
deleting 67–68, 247
getting information about 135
labels for 136
locating 128–129, 130–133
locking and unlocking 118, 247
naming 127
opening 57–58, 65
opening automatically 140
organizing 125
program versus document 47–48
RAM disk and 97
removing from System Folder 141
saving 53, 127, 247
straightening up 125
transferring 137
file servers 187, 188, 260
file sharing 184, 193–206. See also
access privileges; guests; networks
access privileges for 195, 207–209
ceasing to share a folder 196
changing ownership of a folder 191, 193,
203, 207
changing your password 191–192, 206
274 Index
checking access privileges 211
copyright laws and 196
creating a shared folder 191
disconnecting someone from your
computer 205
giving away ownership of folders or disks
203
memory management and 155
monitoring 204
naming users and groups for 197–199
passwords for registered users 198
preventing access to your disk 201–202
reconnecting to shared disks 203
removing users or groups 202
selecting folders or disks to share
195–196
selecting users or groups for sharing
200–202
sharing your own files 193–196
taking back shared folders or disks 196
turning on guest access 194–195
turning off 201–202, 203–204
turning on 194
viewing names of group members 199
File Sharing icon 186
File Sharing Monitor 204–205
file translators 257, 259
Find Again command 130
Find command 91, 130–133
Find dialog box 130–133
Finder 57
changing appearance of windows in 152
checking memory use in 155, 225
Find command 91
keyboard shortcuts in 238
making active 54–56
printing and 172
fixed-size (bitmap) fonts 177
floppy disk drive 9
inserting disks into 6, 15, 70
removing disk from 76, 120
restarting with 22
starting up with 117
troubleshooting 119, 120, 246, 247
floppy disks 47, 71
backing up contents of 119
capacities of 70, 71
caring for 75
copying contents of 74–75, 78–79, 119
double-sided 70, 71
ejecting 76, 120, 246
erasing 116
file sharing an 195
high-density 70, 71, 77, 246
initializing 72–73, 115, 247
initializing in MS-DOS format 257–258
inserting 6, 15, 70
installing system software from 87–91
locking and unlocking 77, 117
obtaining 69
repairing 22, 119
restarting from 22
starting Macintosh Basics tour from
11–14
starting up from 91
transferring files with 137
troubleshooting 119, 120, 122–123,
246–247
types of 70, 71
viruses and 93
folders 47, 126. See also file sharing; System
Folder
access privileges to 208–209
aliases for 128–129
Apple Menu Items folder 140
ceasing to share 196
changing ownership of 191, 193, 203, 207
creating and naming 126
locking 118
opening 75
opening higher-level folder windows 235
organizing files in 126
sharing 195–196, 251
Startup Items folder 92, 140
viewing contents of 236
Font menu 180
fonts 176–182
bitmap (fixed-size) 176–177
displaying available 180
downloading to a printer 174, 178–179
font families in suitcases 177, 178
installing 177
Key Caps program and 180, 254–255
outline (scalable or variable-size) 176
PostScript 178–179
removing 141, 178
troubleshooting 174, 249
TrueType 176
types of 176–177
in views 152
Fonts folder 176, 180
formats
date 145
file exchange 257–261
number and currency 147
time 146
formatting. See initializing
fragmented memory 155
G
General Controls panel
adjusting blinking rate 151
changing background pattern 162–164
setting time and date 143
Get Info command 95, 118, 135
graphics tablets 148
gray-scale documents, printing 173
groups, network. See registered group
guests
access privileges of 187, 188, 194–195,
209
connecting to a shared disk as 188, 190
denying access to 201–202
folder ownership of 191
program linking and 213, 214, 215
registered groups and 199
removing from a group 202
turning on 194–195, 196
H
hard disk 47, 71. See also shared disks
access privileges for 208–209
backing up 119
battery consumption and 101, 104
capacity of 71
caring for 121
connecting to a printer 180
damage symptoms 113
deleting items from 67–68
designating as startup disk 116
external 117
finding items on 130–133
Index 275
hard disk sleep 111
initializing (formatting) 72, 88, 113–114
initializing printer 180
installing programs on 74–75, 78–79, 92
installing system software on 6, 87–91
safety tips for 24, 121
saving space on 90
scanning order at startup 117
starting Macintosh Basics tour from
11—14
as startup disk 20, 116–117
testing and repairing 121–124
transferring files from 137
troubleshooting 22, 87, 113, 114,
121–124, 245–246
virtual memory and 157–158
hard disk icon
failure to appear 121–122
opening 37
removing from desktop 120
hardware development support 232
HDI-30 SCSI System Cable 218, 220–221
headphones, connecting 224
health concerns 26–29
heat
batteries and 25, 103
troubleshooting 240
Help 83–84, 170
276 Index
Help menu
Hide Balloons command 84
Page Setup options and 170
Show Balloons command 83, 170
hidden windows, viewing 94
Hide Balloons command 84
Hide Others command 94
high-density floppy disks 70, 71, 77, 246.
See also floppy disks
highlighting icons 33
highlighting text 59–60
by double-clicking 64
with Shift key 63
horizontal scroll bar 43–44
I,J
I-beam pointer 58–59, 243. See also
arrow pointer
icons 46–48
access privileges and 211
alias 128
arrangement of 125, 152
blinking 5, 87, 117, 175, 244
changing appearance of 153–154
changing names of 66–67
copying 234
of currently active program 56
dimmed 94
double-clicking 58
dragging 35
ejecting disks with 120
highlighting 33
labels for 136
moving 129, 234
opening 37, 59, 234
organizing 125, 126
pointing to 32
pressing 34
question mark 5, 83–84, 87, 117
Quick Reference 233–234
renaming 234
selecting 33, 233
of shared folders you own 191
size of in views 152
types of 46–48, 71
ID numbers. See SCSI ID numbers
ImageWriter
Page Setup options for 170
troubleshooting 174
Info window 95, 118
changing an icon 153–154
creating stationery 134–135
getting information about a file 135
locating original of an alias 129
locking a file 118
Initialize Printer’s Disk command 180
initializing
disk repair and 123
a floppy disk 72–73, 115, 247
a floppy disk in MS-DOS file format
257–258
a hard disk 72, 88, 113–114
injuries 26
inserting text 53, 58–59
insertion point 53, 58
adjusting blinking of 151
positioning 59
Inside Macintosh 231
Install disk 6, 88, 90, 99
Installer program 6, 88, 99
printer software installation with 168, 169
printer software update with 171–172
installing
Apple menu items 129, 140
AppleTalk software 186
application programs 92
CloseView control panel 164–165
device drivers 218
fonts 177
printer software 168, 169
programs 74–75, 78–79, 92
sounds 160
System Folder items 140–141
system software 6, 87–91
without a floppy drive 92
internal modems 222, 248
interrupt button 9, 21
K
keyboard. See also mouse; trackball
adjusting response of 149
arrow keys 49, 238
comfort tips 27–28
layout and key functions 253–255
modifier keys 49, 62, 150
Slow Keys feature 150
Keyboard control panel 149
keyboard files 141
keyboard shortcuts 62
CloseView 165
ejecting disks 120
outline view 236
Quick Reference 238
Quit command 64
Save command 62
selecting text 63
Sticky Keys feature 150
turning on and off 166
Key Caps desk accessory 180, 254–255
kilobyte (K) 71
L
Label menu 133, 136, 142
labels, file 136
Labels control panel 142
LaserWriter. See also printers
background printing with 175
choosing 168
connecting 223
downloading fonts to 178–179
fonts available for 180
Page Setup options for 170
printing on 172–173
restarting 181
selecting in Chooser 168
transferring PostScript file to 182
turning start page on or off 181
LaserWriter Font Utility program 178, 180,
182
licensing agreements
file sharing and 196
software installation and 92
lightning bolt icon 104
linking programs 212–216
list views 136, 152, 236
LocalTalk cables 185
locked files, searching for 133
Index 277
locking
aliases 118
files 118, 247
floppy disks 77, 117, 247
folders 118
log files, printer 182
long-term storage 103, 229
low-power input devices 223, 241
low-power messages 102–103
M
Macintosh Basics tour
versus book’s tutorial 10
finding 11
starting from floppy disk 11, 15–16
starting from hard disk 11–14
Macintosh desktop computer, connecting to
193
Macintosh HD icon, opening 37, 74
Macintosh user groups 231
MacWrite format, converting to and from 259
magnifying screen image 164–166
maintenance instructions 23–25
Make Alias command 128, 190
malfunctions, computer 229
Map control panel 263–266
megabyte (MB) 71
member of a group. See registered group
278 Index
memory 155–158. See also disk cache;
RAM disk;
random-access memory (RAM);
virtual memory
adding 225
AppleTalk and 155
checking use of 95, 155, 225
disk cache and 156, 244
fragmentation of 155
management tips 155–156
programs’ use of 95, 155–156
system sleep and 111
32-bit addressing and 158
troubleshooting 244
Memory control panel
disk cache size 156
RAM disk 97, 98
32-bit addressing 158
virtual memory 109, 157–158
menu bar 20
menus 48
adjusting blinking of items in 151
choosing items from 237
commands in 36
keyboard shortcuts 62
pop-up 237
pull-down 34, 236
Quick Reference 236–238
submenus 237–238
titles (names) of 20
viewing 34
microphone 9, 161, 224
“minimal software” option 90
modem port 9, 24, 168, 222, 242
modems
connecting internal and external 222
power consumption of 109, 241
selecting internal/external 222
transferring files with 137
troubleshooting 248
viruses and 93
modifier keys 49, 62, 238. See also
keyboard shortcuts
Sticky Keys feature for 150
typing special characters with 254–255
monitors, external 104
mouse. See also trackball
adjusting response of 148
comfort tips for 28
connecting 223
Mouse control panel 148
moving
icons 129, 234
text 60
windows 45–46, 234
MS-DOS file format 257–261
converting to and from 259–261
initializing disks in 257–258
multiple programs 94
N
naming
a document 53–54, 66–67, 127
a folder 126
an icon 66–67, 234
a registered group 198–199
a registered user 188, 197
your Macintosh 186
network administrator 184, 187, 191, 192
Network icon 186
network printers. See also printers
choosing 168–169
troubleshooting 248, 249
updating software for 171—172
network 183–216. See also
access privileges; file sharing;
guests; passwords; shared disks
accessing your own computer on
205–206, 251
advantages of 183–184
AppleTalk and 185–186, 188
assigning access privileges 207–211
assigning passwords to users/groups 198
backing up on 119
ceasing to share a folder or disk 196
changing your own password 191–192,
206–207
checking your access privileges 211
connecting to 185
connecting to a shared disk 187–191
converting MS-DOS files on 260
creating bulletin boards on 210
disconnecting from a shared disk 120, 189
disconnecting users from your computer
205
installing programs from 92
installing system software from 88, 90
linking programs 212–216
monitoring file-sharing activity 204
naming registered groups 198–199
naming registered users 197–198
naming your computer and its owner 186
ownership of folders/disks 191, 193, 203,
207
preventing access to your computer
201–202
removing items from System Folder on
141
removing users/groups from list of
registered users 202
selecting a folder or disk to share
195–196
selecting a user/group for sharing 200
setting up your computer 184–186
shared disk icons 47
sharing your own files 193–196
sleep and 110, 186, 242
technical information on 231
transferring files over 137
troubleshooting 188, 189, 197, 206, 248,
249, 250–251
turning file sharing off 201–202, 203–204
turning file sharing on 194
updating printer software on 171–172
viewing group members 199
viruses and 93
working with files and folders 191–193
network software, removing from System
Folder 141
network zones 169, 187, 188, 212, 248, 250
new folder, creating 126, 191
New Group command 198
New User command 197
nickel-cadmium (NiCad) batteries.
See battery
number formats 147
O
Open command 37
opening
a document 57–58, 65, 140
a folder 75, 235
an icon 37, 59, 74, 234
a program 52, 65, 140
screen 3
operating system. See system software
Index 279
Option key 49, 253
Clean Up command and 125
Empty Trash warning override 154
typing accent marks with 255
organizing files 125–129
outline form in list views 236
outline (scalable or variable-size) fonts 176
out of paper signal 175
owner icon 191, 199
owner password 186
P
Page Setup options 170–172, 174
passwords 186, 191
assigning to others 198
case sensitivity of 187, 198
changing your own 191–192, 206–207
troubleshooting 189
Paste command 60, 96, 160
pattern, background 162–164
peripheral devices 217–225. See also printers
Apple Desktop Bus (ADB) devices 223
external hard disks 117
external monitors 104
headphones 224
microphone 9, 161, 224
modems 93, 109, 137, 222, 248
mouse 28, 148
SCSI devices 217–221
speakers 224
280 Index
Personal LaserWriter SC. See LaserWriter
plug adapters 228
pointer. See arrow pointer; I-beam pointer
pointing 32
ports. See also modem port; printer port
safety tips for 24
PostScript files, transferring to LaserWriter
182
PostScript fonts, downloading 178–179
PostScript log, creating 182
power adapter
conserving power with 109
“Don’t sleep when plugged in” option
110, 242
for external recharger 105
long-term storage and 229
plugging in 2
preventing automatic sleep while using
110, 242
recharging battery with 102, 103–104
safety tips 2, 24, 25, 104, 223
short-term storage and 228
for StyleWriter printer 223
travel tips 228
power adapter port 2, 9
PowerBook control panel
battery conservation 82–83, 109,
110–112, 242, 246
“Don’t sleep when plugged in” option
110, 242
hard disk sleep adjustment 110, 111, 242,
246
modem options 222
processor cycling 112
processor speed 111
system sleep adjustment 110, 111, 242,
246
power button 9, 19
RAM disk and 22
restarting computer with 22
“Shut Down” warning 17
turning computer on with 4, 10, 19
power management 101–112. See also
battery
Apple Desktop Bus devices and 223
battery conservation settings 82–83,
109–112, 241, 242, 246
low-power messages 102–103, 108
maximizing battery life 108
monitoring battery charge level 82,
101–103
processor cycling 112
RAM disks and 97, 109
recharging the battery with power adapter
103–104
recharging the battery with recharger
105–106
removing or replacing battery 106–107
troubleshooting 241
power problems
low battery 102–103
troubleshooting 5, 239, 241–242
power states 17–19
Preferences command 175
pressing 34
Print command 172–173
Print Desktop command 173
printer port 9, 24, 168, 185, 223, 242
printers. See also ImageWriter; LaserWriter;
network printers; StyleWriter
choosing 167–169
connecting 167, 223
downloading fonts to 178–179
initializing hard disk connected to 180
LaserWriter Font Utility and 180–182
out of paper signal 175
Page Setup options for 170
PrintMonitor and 175
restarting 181
troubleshooting 168, 169, 174, 248–249
turning start page on or off 181
updating printer software on networks
171–172
printer software
installing 168, 169
removing from System Folder 141
updating on networks 171–172
Printer Update document 171
printing 167–182. See also fonts
background 169, 174, 175
choosing printer 167–169
color documents 173
desktop contents 173
documents 172–173, 175
error messages 174
gray-scale documents 173
LaserWriter start page 181
on networks 168–169, 171–172
Page Setup options 170–172
troubleshooting 174, 248–249
window contents 173
PrintMonitor program 175
Print Window command 173
problems. See troubleshooting
processor cycling 109, 112, 240, 243, 251
processor speed 111
ProDOS file format 257, 259
program linking
allowing guests to link to your programs
215
allowing users to link to your programs
213
disconnecting 213
linking to a program on another computer
212–213
registered users and groups and 215–216
selecting a program for 214
turning on 214
programs 47. See also application programs
adding to Apple menu 129, 140
aliases for 128
application versus system 57
copying from floppy disk 74–75, 78–79
copyright laws and 196
disk repair 22, 119, 123
Info window and 95
installing 74–75, 78–79, 92
installing without a floppy disk 92
linking 212–216
making active 54–56, 94
memory use of 95, 155–156
multiple 94
opening 52, 65
opening automatically at startup 140
performance of 92, 112
quitting 56, 64, 65
RAM disks and 97
switching active 54–56, 94
troubleshooting 92, 251–252
types of 57
protecting disk contents 77, 117–118
publish-and-subscribe feature 184
Put Away command 76, 120, 189
Index 281
Q
question mark (Help menu) icon 83–84
question mark startup icon 5, 87, 117
Quick Reference 233–238
icons 233–234
keyboard shortcuts 238
menus 236–238
windows 234–236
Quit command 64
R
RAM. See random-access memory (RAM)
RAM disk 97
creating 97–98
erasing 98
icon 98
insufficient memory and 244
low-power messages and 103
memory recommendations for 97, 99
power button and 22
power conservation and 109
reset button and 21
resizing or removing 98
Restart command and 7, 21
Shut Down and 97, 99
as startup disk 99, 109, 117
282 Index
random-access memory (RAM). See also
memory
adding 225
checking use of 95, 155, 225
disk cache and 156, 244
low-power conditions and 103
management tips 155–156
programs’ use of 95, 155–156
RAM disk requirements for 97, 99
sleep and 110
32-bit addressing and 158
virtual memory and 157–158, 244
recharger, external 105–106
recharging the battery 23, 25, 102–106, 108,
228–229, 242
recharging times 106
recording sound 161–162
registered group 198–202, 207
access privileges of 207–209, 210
giving folder or disk ownership to 203
naming 198–199
program linking and 215–216
removing 202
removing a user from 202
sharing folders and disks with 200
viewing members of 199
registered user 187, 188, 207
access privileges of 207–209, 210
changing password of 191–192
connecting to a shared disk as 191
creating a folder as 191
denying access to 201–202
disconnecting 205
folder ownership and 191, 203
naming 197–198
passwords for 198
program linking and 215–216
removing 202
sharing your files with 200
removing
battery 106–107
extra System Folders 79, 91
floppy disk 76, 120
fonts 141, 178
guests 202
RAM disk 98
registered users or groups 202
sounds 141, 160
System Folder items 141
repairing computer 24, 239
repetitive stress injuries (RSIs) 26
reset button 9, 21, 239
Restart command 7, 21
restarting the computer 21–22
RAM disk and 97
Restart Printer command 181
Return key 53, 67, 238, 253
Revisable Form Text (RFT) format 259
RSIs (repetitive stress injuries) 26
S
safety instructions 23–25
battery 23, 25, 107
floppy disk 75
hard disk 24, 121
malfunction or damage 229
power adapter 2, 24, 25, 104, 223
RAM disk 97
SCSI devices 221
traveling 227–228
viruses 93
Save As command 127, 134
Save command 53–54, 62, 134
saving
changes 61
in a directory 127
documents 53–54, 127, 247
documents as templates 134–135
and quitting 64
scalable fonts 176
scanning order for startup disks 117
Scrapbook 96
screen
background pattern, changing 162–164
battery and 101, 104, 109, 243
brightness control 5, 9, 10, 28, 239, 243
cleaning 25, 28
comfort tips 28
contrast control 5, 9, 10, 28, 239, 243
external monitors 104
magnifying image on 164–166
opening 3
position of 3, 243
power consumption of 109
safety tips for 25
troubleshooting 5, 10, 239, 243
waking from sleep 10, 17, 18, 110
scroll bars 43–44
SCSI (Small Computer System Interface) 217
SCSI cables 218, 220, 221
SCSI chains 122, 220–221
SCSI devices 217–221
connecting 221, 223
ID numbers for 114, 122, 218–219
installing software for 218
terminators for 122, 220, 221
troubleshooting 244–245
SCSI icon 217, 221
SCSI ID numbers 114, 122, 218–219
SCSI port 9, 217, 221
SCSI terminators 122, 220, 221
searches 91,130–133
selecting an icon 33, 36–37
selecting text 59–60, 63–64
service locations 229–230, 239
setting up. See also peripheral devices
computer 1–9
computer on a network 184–186
shared disk icons 47, 190
shared disks 187–193. See also
access privileges; file sharing;
network
accessing files on 191–196
access privileges for 207–209
aliases for 128, 190
belonging to you 193–196
ceasing to share 196
changing ownership of 203
changing your password 191–92, 206–207
connecting to 187–191
creating new folders on 191
disconnecting from 120, 189
folder ownership on 191, 193, 203, 207
preventing access to your computer
201–202
reconnecting to 203
selecting a disk to share 195–196
sleep and 110, 242
troubleshooting 188, 250–251
shared files. See file sharing
Sharing command 193, 195, 196, 200, 203,
208–209
Sharing Setup control panel
changing your password 206–207
identifying your computer on a network
186
turning file sharing off 203–204
turning file sharing on 194
turning program linking on 214
Index 283
shift-clicking 63, 233
Shift key 253
Clean Up command and 125
system extensions and 241
short-circuiting battery 23
shortcuts. See keyboard shortcuts
short-term storage 228
Show All command 94
Show Balloons command 83
Shut Down command 17
RAM disk and 97, 99
size box 40–41, 42–43
size of window, changing 40–41, 54, 234
sleep 18, 19, 110–111
AppleTalk and 186
automatic 18, 103, 110, 111
battery conservation settings and
110–111, 237, 246
hard disk sleep 111
low-power messages and 103
networks and 110, 186, 242
preventing 110, 186, 242
startup process and 20
system sleep 111
travel and 227
troubleshooting and 240, 242
waking the computer from 10, 17, 18, 110
when to use 18, 109
284 Index
Sleep button 102
Sleep command 18, 97
Slow Keys feature 150
Small Computer System Interface. See SCSI
software. See application programs;
programs; system software
software development support 232
software drivers 218, 245
software licensing agreements 92, 196
Sound control panel 159–161
sound input port 9, 161, 224
sound output devices 224
sound output port 9, 224
sounds. See also microphone
alarm clock 143–144
choosing 159
installing 160
recording 161–162
removing 141, 160
setting volume of 159
Slow Keys alert 150
speakers 9, 224
special characters, typing 254–255
Special menu
Clean Up command 36, 125
Eject Disk command 120
Empty Trash command 68, 98
Erase Disk command 98, 116
Restart command 7, 21
Shut Down command 17
Sleep command 18
start page, LaserWriter 181
startup
from floppy disks 22, 91
opening items automatically at 140
scanning order for 117
troubleshooting 5, 21–22, 239
startup disk 20, 71, 79, 87, 91
conserving power with 158
designating 116
installing system software on 87–89
RAM disk as 99, 109
scanning order for 117
System Folder on 79, 91, 158
troubleshooting 5, 87, 88, 91, 121–122,
239, 241
virtual memory and 158
Startup Disk control panel 99, 116
startup disk icon 20
Startup Items folder 92, 140
stationery, creating 134–135
Sticky Keys feature 150
storing the computer 103, 228–229
storing items in Scrapbook 96
StyleWriter
background printing with 175
power adapter caution 223
submenus 237–238
suitcases, font 177, 178
support services 229–230
Switch Disk button 89
symbols, typing 254–255
System 7 software, networks and 193
system crashes 21, 240
system error, restarting after 21–22
system extensions 155, 241
system failures 241
System Folder
Extensions folder 186, 188, 241
Find command and 130
Fonts folder 176, 180
installing files in 140–141
installing fonts in 176, 177
installing sounds in 160
listing fonts in 180
on program disks 79
on RAM disk 99
removing extra System Folders 79, 91, 241
removing files from 141, 160
removing fonts from 178
removing sounds from 160
on startup disk 79, 91, 158
VM Storage file in 158
system sleep 111
system software 57, 87
backing up 88
compatibility of 88
installation, custom 90–91
installation, standard 6, 88–89
publish-and-subscribe feature 184
question mark icon and 5
technical guide to 231
troubleshooting 241
updating 88
T
Tab key 238, 253
TeachText program 52
technical information 231
technical support 229–230
telephone lines, transferring files over 137
telephone numbers, service 230, 239
temperature
batteries and 25, 103, 108
computer use and 25
storing computer and 103, 228, 229
templates, creating 134–135
terminators, checking SCSI 122, 220, 221
text
changing 58–64
deleting 59–60
inserting 53, 58–59
moving 60
replacing 63–64
selecting 59–60, 63–64
typing 53
text translation 259
32-bit addressing 158
3.5-inch disks. See floppy disks
time
automatic reset during travel 263
changing format of 160, 162
setting Alarm Clock 143–144
setting system clock 142–143
tracking time zones 263–265
title bar 40, 45
TokenRing cables 185
trackball. See also mouse
adjusting 148
buttons 8, 32
choosing a command with 36
clicking with 8, 33, 35
comfort tips 27
double-clicking with 58, 64
dragging with 35
pointing with 7, 32
pressing with 34
using 32–36
tracking speed 148
transferring. See also copying
files 137
PostScript files 182
translator files 257, 259
Index 285
Trash
deleting files with 67–68
ejecting a disk with 120
emptying 68, 98
location of 20
purpose of 48
retrieving items from 68
turning off warning for 154
travel tips 227–228. See also
Map control panel
troubleshooting 239–252
aliases 128–129
Apple menu 129
application programs 92, 251–252
backup problems 119
battery 241–242
blinking icons 5, 87, 244
Chooser 168, 169
computer is hot 240
computer stops working 240
damage to computer 229, 241
ejection problems 120
floppy disk drive 119, 120, 246, 247
floppy disks 119, 120, 122–123, 246–247
fonts 174, 249
hard disks 22, 87, 113, 114, 121–124,
245–246
286 Index
malfunctioning computer 241
memory 244
modems 248
networks 188, 189, 197, 206, 248, 249,
250–251
passwords 189
power problems 5, 239, 241–242
printers 168, 169, 174, 248–249
printing 174, 248–249
restart problems 21–22
screen 5, 10, 239, 243
SCSI devices 244–245
shared disks 188, 250–251
sleep 242
startup 5, 21–22, 239
startup disk 5, 87, 88, 91, 121–122, 239,
241
system crash 21, 240
system failures 241
system software 241
32-bit addressing 158
viruses 93, 241
windows 244
TrueType fonts 176
turning computer off 17, 19, 22
turning computer on 4, 10, 19, 221, 244
and automatically connecting to a shared
disk 190–191
and automatically opening a program 140
U
Undo command 252
unlocking
files 118
floppy disks 77, 117
untitled window 52, 53
upgrades, memory 225
user, network. See registered user
user groups, Macintosh 231
Users & Groups control panel
accessing your own computer over a
network 205–206
assigning a password 198
denying file sharing access 201–202
naming a registered group 198–199
naming a registered user 197
naming users for program linking
215–216
removing a registered group 202
removing a registered user from a group
202
turning on guest access 194–195
Utilities menu
Restart Printer command 181
Start Page Options 181
V
W
X,Y
variable-size fonts 176
vertical scroll bar 43–44
viewing
contents of folders 236
contents of windows 38–40
hidden contents of windows 42–44
hidden windows 94
list views 136, 152, 236
members of registered group 199
menus 34
View menu 136, 236
Views control panel 136, 152
virtual memory
creating 157–58, 225
insufficient memory and 244
power conservation and 109
viruses 93, 241
VM Storage file 158
waking the computer 10, 17, 18, 110
warranty service 24, 230, 239
windows 48. See also Info window
active 38–40, 54–56, 65, 234
changing display of Finder 152
closing 44, 45–46
finding lost 244
hiding and showing program 94
moving 45–46, 234
opening higher-level folder 235
opening icons into 37
printing contents of 173
Quick Reference 234–236
resizing 40–41, 54, 234
scrolling through 235
straightening items in 125
title bar of 40, 45
troubleshooting 244
untitled 52, 53
viewing contents of 38, 136, 235–236
viewing hidden contents of 42–44
word wrap 53
X-ray machines 227
Z
zones, network 169, 187, 188, 212, 248, 250
zoom box 40–41
Index 287
Apple Computer, Inc.
20525 Mariani Avenue
Cupertino, California 95014-6299
(408) 996-1010
TLX 171-576
030-3643-A
Printed in U.S.A.