1
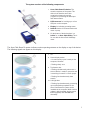
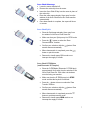
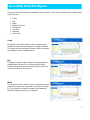
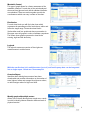
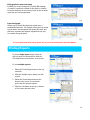
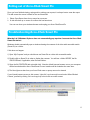
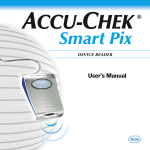
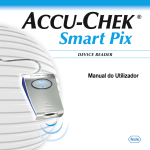
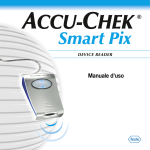
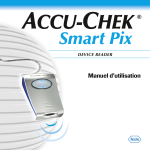
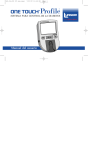
Short Instruction Guide
Accu-Chek Smart Pix System Overview
The Accu-Chek Smart Pix system is used for the quick and easy transfer of data from up to 3 Accu-Chek
blood glucose meters and an insulin pump to your PC using infra-red technology. A report on your blood
glucose results will be prepared automatically. Graphs, charts and logs can be viewed within seconds
using Internet Explorer*. Results can then be stored, emailed, faxed and/or printed.
In many clinics and practices, such reports are used successfully for facilitating and speeding up
assessment of the patient’s metabolic situation. The Accu-Chek Smart Pix device features similar
functionality - just a few mouse clicks on a computer are sufficient to see the finished report on the
monitor or retrieve a printout.
New Features – Accu-Chek Smart Pix V2.01
¾ Results from multiple meters (up to 3) and an insulin pump can be downloaded and integrated into a
single report. Ideal for insulin dependant patients who may use multiple meters.
¾ Patients can view pump information at the same time as their blood glucose results.
¾ Patients can flag post meal values, which are then easily identified in graphs and charts.
¾ Improved handling for meters with incorrectly set time. The meter memory defines the date of the
report.
¾ Customized setting options for target range, hypo threshold, sort order and printout.
¾ Results can be saved, forwarded, printed and emailed.
Downloading with Accu-Chek Smart Pix
The downloading procedure is simple:
For more information on how to place the meter or pump in ‘Connectivity Mode’,
please refer to page 6.
If the internet browser does not open up automatically,
please refer to page 13.
*Microsoft® Internet Explorer 5 and 6, Firefox® 1.x, Opera 8.x.
2
The system consists of the following components:
1. Accu-Chek Smart Pix device: The
central component of the system. This
device is the interface and it also
contains the electronics and the
programs for processing the data input
and measurements..
2. USB connector for hooking up to a free
USB port on the computer.
3. Display for indicating operating status
4. Infrared window for communication with
meter or pump.
5. On the bottom of the device there is a
holder for an Accu-Chek IR Key. This is
for use with the Accu-Chek Advantage
meter.
The Accu-Chek Smart Pix system indicates various operating statuses on the display on top of the device.
The following signals can appear on this display:
7. Off
8. Centre display section
• Lit continuously: report is ready on the
computer, idle state.
• Flashing slowly: error
9. Top/bottom dots
• Flashing simultaneously about once a
second: device is ready for operation and
is searching for meters or insulin pumps.
• Flashing fast simultaneously: data
transfer
10. Left/right dots
• Flashing fast simultaneously: processing
report data Software updates for the
Accu-Chek Smart Pix system can be
installed via the computer. While such an
update is being installed display section
8 and (together) dots 9 and10 flash
alternately.
3
Accu-Chek Smart Pix System Requirements
•
•
•
•
•
PC with an available USB port
Microsoft® Windows 2000, XP Home, XP Professional or Vista
Screen resolution 1024 x 768 pixel
Microsoft® Internet Explorer 5 and 6, Firefox® 1.x, Opera 8.x
Printed results require a printer.
Accu-Chek Meter & Insulin Pump Compatibility
• Accu-Chek Performa
• Accu-Chek Integra
• Accu-Chek Go
• Accu-Chek Advantage (with IR key)
•
•
•
•
Accu-Chek Active
Accu-Chek Spirit
Accu-Chek D-TRONplus
Disetronic D-TRON plus
Overview of the Accu-Chek Smart Pix User interface
The Accu-Chek Smart Pix system has a user interface that is shown in standard Internet browsers. You
do not require an Internet connection if you wish to use the Accu-Chek Smart Pix system – the relevant
pages are stored in the device itself where they can be called up.
11 Internet browser (Microsoft Internet
Explorer, Firefox, Opera)
12 Buttons for calling up various functions:
• Settings
• Create Report (Print)
• Erase Report
• Read Device
13 Navigation bar for calling up the
individual pages (reports and settings),
which are then shown in the display panel
14 Display panel for reports and settings
4
Connecting the Accu-Chek Smart Pix
1. Plug the USB connector from the Accu-Chek Smart Pix device into a free USB port on your computer.
The centre display and left and right dots are switched on.
2. When the dots at the top and bottom are flashing, the Accu-Chek Smart Pix is ready to use. Windows
automatically opens a window showing the contents of the drive as a folder. If this does not occur,
please refer to Page 13.
Personalising the Accu-Chek Smart Pix Web Browser
1. Open the file START.HTM with a double click. The default Internet browser will be launched.
2. Click on the Settings button.
3. Select Language and change to English (or other). Click save.
4. Click on the display options title. Ensure that the date/time settings are in the format that you wish to
see them. Click save.
5. Click on the personal settings title. Here you can personalise the reports with name and time blocks.
Click save.
6. Click on report setup, where you can change the time and target ranges.
7. Click Read Device.
Flagging Test Results on the meter
Feature of Accu-Chek Performa & Accu-Chek Go
If you wish, you can “flag” your test result with an asterisk (*) to indicate a special result. When you review
your results in memory, this “flag” can help you remember what was different about the result. Here is
how to flag a result:
1. Perform a test
2. With the test result on the display, and the test strip STILL IN THE METER, press the ‘left’ or ‘right’
arrows once. The * appears in the bottom right hand corner of the display,
3. Remove and discard the test strip.
4. Flagged results on the Accu-Chek Smart Pix graphs are circled.
5
Downloading results from the Accu-Chek meter/insulin
pump to Accu-Chek Smart Pix
Accu-Chek Performa
• Place the meter approximately 10cm away from the
infrared window on the Accu-Chek Smart Pix
• Switch the meter on by pressing the ‘right’ and ‘left’
buttons at the same time. The window will show 2
arrows and data starts transferring automatically.
• Once data transfer is complete, the report will show
on screen.
Accu-Chek Integra
• Place the meter approximately 10cm away from the
infrared window on the Accu-Chek Smart Pix.
• Switch the meter on by pressing the SET and MEMO
buttons at the same time. The display will show 2
arrows and data starts transferring automatically.
• Once data transfer is complete, the report will show
on screen.
Accu-Chek Go (Accu-Chek Active)
• Place the meter approximately 10cm away from the
infrared window on the Accu-Chek Smart Pix.
• Switch the meter on by keeping the M button
pressed for more than 3 seconds. The display shows
PC and data starts transferring automatically.
• Once data transfer is complete, the report will show
on screen.
Accu-Chek Go (New)
• Place the meter approximately 10cm away from the
infrared window on the Accu-Chek Smart Pix.
• With the meter turned off, briefly press the on/off
button and left hand buttons at the same time.
• Once data transfer is complete, the report will show
on screen.
6
Accu-Chek Advantage
• Leave the meter switched off.
• Remove the code chip from the meter.
• Insert the Accu-Chek IR key into the meter in place of
the code chip.
• Place the meter approximately 10cm away from the
window of the Accu-Chek Smart Pix. Data transfers
automatically.
• Once data transfer is complete, the report will show
on screen.
Accu-Chek Spirit
•
Place the Spirit approximately 10cm away from
the window of the Accu-Chek Smart Pix.
•
Make sure that your Spirit pump is in STOP mode.
•
Press the
button to select the ‘Data
Communication’ function.
•
Confirm your selection with the
transfer starts automatically.
•
When data transfer is completed, press the
button to quit this mode.
•
Resume the insulin pump RUN mode to not
interrupt the supply of insulin.
button. Data
Accu-Chek D-TRONplus
(and Disetronic D-Tronplus)
•
Place the D-TRONplus (Disetronic D-TRON plus)
approximately 10cm away from the window of the
Accu-Chek Smart Pix. Both infra-red windows
must be facing one another.
•
Make sure that the D-TRON pump is in STOP
mode and that the keylock is unlocked.
•
Press the button 4 times to select the ‘Data
Transfer’ function.
•
Confirm your selection with the
transfer starts automatically.
•
When data transfer is completed press the
button to quit data transfer mode.
Resume the insulin pump RUN mode to not
interrupt the supply of insulin.
•
button. Data
7
Accu-Chek Smart Pix Reports
There are several different reports available to view on screen. These can be selected on the settings menu
panel. They are:
•
•
•
•
•
•
•
•
Trend
Day
Week
Metabolic Control
Distribution
Log Book
Overview
Record List
Trend
This graph is time block related – all the measurements
within a certain period are assigned to a single time block.
The figures are then displayed as mean, variance, minimum
and maximum of those measurements.
Day
This graph is used to make it easier to recognise patterns
repeated daily. All data is on a 24 hour grid and all the
measurements taken at the same time of day are shown at
the same position on the time axis.
Week
This analysis is used to make it easier to recognise repeated
patterns but in this case it depends on the day of the week.
E.g.: it is possible to recognise changes in the metabolic
situation brought about by your occupation.
8
Metabolic Control
This type of graph allows for a faster assessment of the
metabolic situation. For each day of the period analysed
the mean blood glucose level and the standard deviation
are calculated. These two results together provide the
coordinates at which one entry is made on the chart.
Distribution
For each time-block you will find a bar chart which
represents the percentages of the levels above, within and
below the target range. Consecutive time blocks
(before/after meal) are positioned above one another in
the upper-most six graphs in order to facilitate comparison.
The bottom three graphs represent the time blocks
evening, night and the whole day.
Logbook
The logbook creates an overview of blood glucose
measurements in a table format.
With the new Version 2.01, multiple meters (up to 3) and insulin pump data can be integrated
into a single report. Below are a few examples:
Overview Report
Identifies which blood glucose meters have been
downloaded and provides information on the number of
tests, highest, lowest and average blood glucose values,
as well as target values for highs and lows.
Weekly graph with multiple meters
Allows you to identify blood glucose trends over a week
in order to identify patterns related to different levels of
physical exercise.
9
Daily graph for meter and pump
Enables you to view changes in your daily BG readings
(2 weeks of results are overlaid in this graph) in relation
to boluses delivered on the insulin pump, as well as basal
rates that you have programmed.
Line trend graph
Allows you to identify blood glucose trends over a
predetermined period. For example, blood glucose control
may be better over weekends than during the week and,
therefore, treatment and lifestyle adjustments may only
be needed during the week
For more detail on the above reports, please refer to your Accu-Chek Smart Pix Instruction Manual.
Printing Reports
To print a single report, simply select the
style of report you want and then click the
Print Page button at the bottom of the screen.
To print multiple reports:
1. Select the Create Report button in the top
menu bar.
2. Click the multiple reports which you wish
to print.
3. Select the Create Report button at the
bottom of the screen. A new screen
opens with the selected reports.
4. Click the Print button at the top or bottom
of the screen and then close.
10
Saving & Forwarding Reports
Saving reports in HTML format
You can save reports on your computer in a HTML format. These reports can then be viewed without the
Accu-Chek Smart Pix being plugged in. To save a report:
1. Once you have downloaded the results from your meter, click on Create Report.
2. Select the report types you would like to save by ticking the boxes.
3. Click the Create Report button. A new view will open up with your reports in them.
4. From the menu bar, go File, Save as and select the directory you would like to save your personal
reports.
5. Name your file and select save. Your report will be saved as an html file.
Storing the entire Report folder
When using this method, the entire relevant memory content of Accu-Chek Smart Pix (more than 150 files)
will be transferred to the hard disk or another medium.
1) Select START and double-click on the Smart Pix drive. The folder REPORT within the drive has to be
copied, e.g. using a right mouse click , select ‘Copy’ from the pop-up menu.
2) The folder must then be pasted to the hard disk. A meaningful folder name to receive the files is
recommended (this folder will remain named – REPORT, unless renamed).
3) Accu-Chek Smart Pix reports can be reviewed as required. To do so, open the folder from the hard disk,
originally named REPORT.
4) Select the file named - REVIEW.HTM ( opened by a double-click.) This launches the web browser and
one can review the stored reports even without an Accu-Chek Smart Pix attached.
Forwarding a single graph by email
1) A right mouse click on the graph e.g. a Trend or Day graph brings up the pop-up menu.
2) Select Email Picture and this then brings up a dialogue box. Make your selection and this will then
automatically attach a bitmap file (*BMP) to an email message.
The bitmap file only contains the pure graphics, no other elements are included.
11
Forwarding files (XML)
Other files can be found by directly navigating to the drive contents of Accu-Chek Smart Pix and attached
to emails.
XML files, containing all data from uploaded devices can be found in the directory REPORT\XML.
This folder contains 2 style sheets (*XSL) for the convenient display of *XML files in Microsoft Excel†.
The XML file with the BG data may be opened with different applications.
When opened with Microsoft Excel, a pop op window offers a selection of the corresponding style sheet
(ACSPIXMT.XSL)
When this style sheet is used, the data can be displayed in an easy to read fashion.
It can be stored – and forwarded – in Excel (*.XSL) format.
†
There may be up to 2 XML-files containing data from a BG meter and an insulin pump.
The filename for the BG meter file starts with G (lucose) followed by 7 digits representing the serial number of the meter.
The filename of the insulin pump file starts with I (nsulin) followed by 7 digits representing the serial number of the pump.
Forwarding files (HTML)
HTML files, containing listed data from uploaded devices can be found in the directory REPORT.
Particularly:
1) BGRECLST.HTM, containing the Record List with the BG values.
2) IPRECLST.HTM containing bolus, basal and event data from an insulin pump.
If available, the files can be opened with Microsoft Word, edited, saved (as Word documents) and
forwarded via email.
Personal Setup – Saving Name & Address Details
Once name and address details have been entered into the fields, these settings must be saved
immediately in a text file on the removable media (i.e. Accu-Chek Smart Pix). The following settings are
defaults and must not be changed:
- Name “Settings”
- File Type “Text File (*.txt)”
- Code “Unicode (UTF-8)”
The text file generated in this way is read by the Accu-Chek Smart Pix system and the entries are adopted
as the settings of the system.
Please be advised that once these personal settings have been saved, name & address details cannot be
changed as they will be permanently embedded into the Accu-Chek Smart Pix browser.
12
Exiting out of Accu-Chek Smart Pix
Once you have finished viewing, saving and/or printing your reports, it is always best to erase the report.
This will ensure the screen is blank for the next download.
1. Select Erase Report from the top menu bar on screen.
2. A tick will show up on screen to confirm this has been done.
You can now close your windows browser and unplug your Accu-Chek Smart Pix.
Troubleshooting Accu-Chek Smart Pix
What do I do if Windows Explorer does not automatically pop-up when I connect the Accu-Chek
Smart Pix device?
Windows should automatically open a window showing the contents of the drive with removable media
(Smart Pix) as a folder.
If this does not happen:
1) Open ‘My Computer’ and you should now see Smart Pix as a drive with removable media.
2) Double-click on Smart Pix in order to display the contents. You will see a folder REPORT, the file
START.HTM and, if applicable, other files and folders.
3) Open the file START.HTM with a double-click. Now the default Internet browser set on your computer
will be launched and the Accu-Chek Smart Pix user interface will be loaded at the same time.
4) The blood glucose data from your Accu-Chek meter or pump can now be viewed.
If your firewall prevents access to this content, ‘right click’ on the security bar and select ‘Allow Blocked
Content’, proceed by clicking ‘Yes’ on the pop-up to let the file run active content.
13
What do I do if the Accu-Chek Smart Pix system fails to appear on the PC as a drive?
•
•
•
•
•
First, check whether your PC and your operating system satisfy the system requirements for the
Accu-Chek Smart Pix system.
Check to make sure the USB connector is firmly plugged into the correct USB port on the PC.
If the Accu-Chek Smart Pix system is still not recognized as a drive, plug the device into a different
USB port on your PC.
If the Accu-Chek Smart Pix system fails to emit any display signals whatsoever and if all the above
tests are to no avail, you could possibly test the device on a different PC.
If there is still no sign of operation, the device is probably faulty. Please contact the Accu-Chek
Enquiry Line (1800 251 816) for technical support.
Quick, easy, effective results with Accu-Chek Smart Pix
For people with diabetes, use only as directed & consult your healthcare professional for advice.
ACCU-CHEK, ACCU-CHEK SMART PIX, ACCU-CHEK PERFORMA, ACCU-CHEK INTEGRA, ACCU-CHEK GO, ACCU-CHEK ADVANTAGE, ACCUCHEK ACTIVE, ACCU-CHEK SPIRIT and ACCU-CHEK DTRONPLUS are trademarks of Roche. ©2008 Roche Diagnostics
Disetronic D-TRON plus is a trademark of Disetronic
Microsoft, Windows and Internet Explorer 5/6 are trademarks of Microsoft Corporation.
Firefox is a trademark of Mozzilla.
www.accu-chek.com.au
Roche Diagnostics Australia Pty Ltd
31 Victoria Avenue, Castle NSW 2154
ABN 29 003 001 205
Accu-Chek Enquiry Line: 1800 251 816
14
15