1
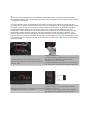
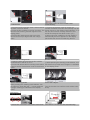
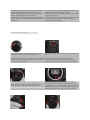
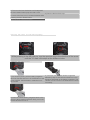
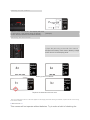
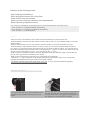
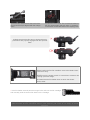
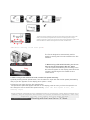
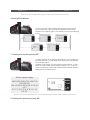
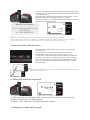
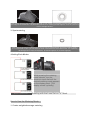
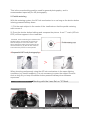
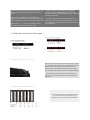
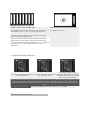
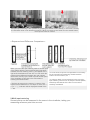
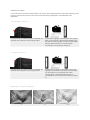
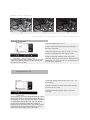
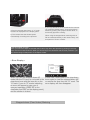
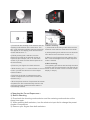
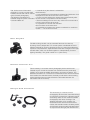
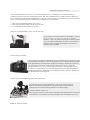
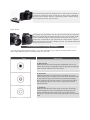
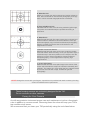
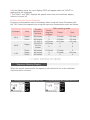
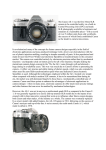
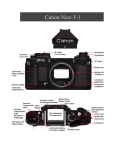
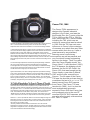
Canon T90, 1986
The Canon T90's appearance is
designed by German industrial
designer Luigi Colani, and was the
third model from the T series, after the
T50 in 1983 and the T70 in 1984 (In
total, there were five T-series models
including the T80, which was an
Although the design of the A-series lineup including AE-1 and its successor, autofocus camera that was launched
the A-1, was well-received among users, the Canon camera design
in 1985. But the T90 has cast more
department was aware of the limitation in the conventional design method.
influences to Canon's future designs
In automated cameras which no longer require a winding lever or rewinding of cameras as a whole than any other
crank, the mechanical design applied to the A-series cameras would result in camera within their line-up. It was a
something like an empty shell. Design is meaningless without contents.
great camera by any standard,
Different contents shall be met with different designs; consequently, the highfeaturing some revolutionary
tech cameras with advanced technologies deserve their own designs. The
camera design department had confidence that they were the ones who could innovations as well as practical and
break through the barrier with pride of success achieved in the design of the
very functional human engineering
A-series.
factors in its design. Thus, five years
The camera design department successively developed design models for
after the Canon flagship model, the
the new concept camera, though their activities were not necessarily
Canon New F-1 was launched (1981),
encouraged within the company. There was already an established design
the T90 became the bridging model
concept for the advanced SLR cameras on the market and half of Canon's
between the first full AF model, the
overall sales were brought by such camera sales.
Canon 650, that was brought out by
Against this situation, the camera design department proclaimed its design
Canon barely a year later in March,
policy, which worked as the guidelines for the next-generation cameras: "as
long as a camera functions as a tool to extend the roles of human hands and 1987 and the older manual focus
eyes for image reproduction, it must be human-friendly." Thus the earliest
Canons. The life span of the Canon
idea of ergonomic design, which is incorporated commonly to many products
T90 was the shortest and can also be
nowadays, emerged through the development of the T90.
considered the last of 's e r i o u s' FDbased manual focus SLR camera
Enhancing the capability of image reproduction requires a camera to be multi- from Canon (The Canon T60 was
functional, but the camera does not qualify as truly "multifunctional" if its
launched in 1990) - but it is also the
versatile functions make the operation complicated. Look at the Canon A-1 at
most sophisticated automatic
the right below. The A-1 is the first model which realizes the fully-automated,
computerized control with multiple functions. When the A-1 was launched in exposure 35mm SLR that Canon has
1978, it dominated the market with a catch phrase, the "camera robot."
ever produced prior to the new EF
“Multifunctional” was directly reflected in its design style deserving its name
mounted EOS AF SLR cameras, and
"robot." Still, there was a room for improvement in terms of easy operation.
was also affectionately nicknamed as
After the A-1, Canon pursued the easier-to-use camera design through the T- the 'Tank" in Japan.
series (the T50, the T70, and the T80). The catch phrase, "Canon camera is
becoming more and more like the human hand" was created when the T50
first came on the market in 1983.
"Harmony between the automated control and the use's will" was the
development concept for the T90, the final model in the T-series. The design
target was to integrate the user at the highest possible level with the camera
which is armed with the advanced technology.
T
he Canon T90 is designed as a comprehensive package of the most advanced and innovative
technologies available in the world today, balancing your photographic desires with automatic features
- a state-of-the-art camera.
Your photographic range is heightened by 1) the built-in motor drive capable of winding film at a
maximum of 4.5 frames per second with merely four size-AA batteries, 2) the high-speed PMS shutter
permitting 1/4000 sec shutter speed and 1/250 sec flash synchronization, 3) the three switchable
metering distribution patterns, and 4) a wide range of AE shooting modes responding to your
photographic needs. Meanwhile, complete automation in areas such as film transportation and film
speed setting makes "multiple functions and simple operation" finally and fully compatible. Your
shooting options are further expanded by optional accessories like the Speedlite 300TL, the Macro
Ring Lite ML-2, the Data Memory Back 90 and the Command Back 90. For a full understanding of the
T90, please read this instruction booklet which has been converted into HTML format carefully before
using the camera.
Set the lens to the "A" mark.
1) While pressing in the AE lock pin, turn the
aperture ring until the "A" mark click-stops at the
distance index.
Turn on the camera.
Load the batteries.
1) Pull the battery magazine latch out and turn it in
the direction of "OPEN" to pull the battery
magazine out of the camera.
2) Load the batteries so that their terminals face in
the directions indicated on the battery magazine.
Check the batteries.
1) Open the palm wing and press the battery
Slide the main switch to "A" to activate the camera. check button () in it.
The display will come on at this time.
2) If two or more battery check marks appear in
the display panel, battery power is sufficient.
The camera sets the first usable frame
automatically.
1) Push the back cover latch down, while pressing 1) As soon as the back cover is closed, the
the back cover lock button.
camera will advance the film automatically until the
2) Place the film cartridge in the film chamber. The frame counter on the display panel indicates "1". (If
film-load check mark () will then appear on the
the film has not been correctly advanced, this
display panel.
whole film transport bars blink to warn you.)
3) Pull the film leader across the back of the
2) When using DX-coded film, the film speed is
camera until its tip is aligned with the orange
automatically set and it appears on the display
index.
panel while the camera is advancing the film.
Load the film.
Set the film winding mode.
1) Open the palm wing and set the film winding
mode/self-timer selector to "S-C".
2) Press and release the film winding mode select
button to set the single-frame mode on the display
panel.
Set the shooting mode.
Set the metering mode.
While pressing the metering mode selector, turn
the electronic input dial until " " (center-weighted
average metering) is indicated on the display
panel.
Focus the subject.
1) While pressing the shooting mode selector, turn
the electronic input dial until "Program" is indicated
on the display panel.
Turn the focusing ring until the main subject looks
sharp.
Confirm the viewfinder information and shoot. The camera rewinds the film automatically.
1) Press the shutter button halfway to check the
exposure. Exposure will be correct unless the
shutter speed display and/or the aperture value
display start blinking in the viewfinder.
2) Press the shutter button all the way to take the
picture. The film is automatically advanced to the
next frame.
1) When the film reaches its end, the camera will
start rewinding the film automatically.
2) When the roll is completely rewound, film rewind
stops automatically.
3) When the film-load check mark ( ) starts blinking
on the display panel, open the back cover to
remove the film cartridge.
Attaching the Lens
1) Turn the rear lens cap in the direction of the
arrow until it stops, and pull it off the lens.
2) Turn the body cap counterclockwise and pull it
off.
To attach the rear lens cap, align its arrow with the To attach the body cap, first align its red
red dot on the lens. Then lightly push it in and turn positioning point with the red dot above the
it clockwise until it stops.
camera mount, and then turn the cap clockwise.
3) To mount the lens, first align the lens' mount
positioning point with the camera's red dot.
*Do not mount the lens if the red dot inside the
camera mount is showing; correct exposure is
impossible if you do. In this case, push in the stopdown lever so that it locks in the normal position
and this warning mark can no longer be seen.
4) Then turn the lens clockwise until it stops and
the lens release button pops out with a click.
5) Remove the front lens cap.
To remove the lens, turn it counterclockwise while
pressing the lens release button.
Preliminary Preparations
Setting the Lens for AE Photography
While pressing in the AE lock pin, turn the aperture ring in the direction of the arrow
until the "A" mark click-stops at the distance index.
Loading the Batteries
2) Load four new size-AA alkaline-maganese
1) As shown in photo, pull the battery magazine
batteries (LR6) so that their terminals face in the
latch out first and then turn it in the direction of the
directions indicated on the battery magazine. The
arrow (OPEN). Pull the battery magazine out of
camera will not function if the batteries are loaded
the camera.
incorrectly.
3) Insert the loaded battery magazine back in the
camera. While pressing the latch firmly, turn it the
reverse direction to lock it.
Turning on the Camera
Slide the main switch to "A". The display will come
on at this time. If the display does not appear,
(example)
confirm that the batteries are loaded correctly.
Checking the Batteries
1) Open the palm wing on the side of the camera
and press the battery check button. Battery voltage
is then shown on the display panel.
Battery power is sufficient.
Replace the batteries with new ones.
Even if one blinking bar mark or no bar mark appears on the display panel while checking the batteries, exposure will be correct as long
as the shutter releases.
< Batteries >
This camera will not operate without batteries. Try to make a habit of checking the
batteries at the following times.
After loading new batteries.
After storing the camera for a long time.
If the shutter does not release.
When you are using the camera in low temperatures.
Before shooting important events.
Use a new set of batteries as specified below or equivalent batteries of another brand.
1. Four AA size 1.5 V alkaline batteries LR6 (AM-3)
2. Four AA size 1.5 V carbon-zinc batteries R6 (SUM-3)
3. Four AA size 1.2 V Ni-Cd batteries
Notes:
Always use four new batteries of the same brand and replace them at the same time.
Wipe the battery terminals and the camera contacts with a clean, dry cloth before loading, to ensure
proper contact.
Remove the batteries if you do not expect to use the camera for about three weeks or longer.
When shooting in temperatures below 0°C (32°F), keep your camera and spare batteries close to
your body or in a pocket to keep them warm until you are ready to take a picture. You can also use a
set of Ni-Cd batteries which function well in low temperature. - approx. 15 rolls in the HIGH mode and
45 rolls. in the LOW mode at -20°C ( - 4°F) with 24-exp. film. (- p.34)
When using Ni-Cd batteries, please note that different brands have different types of terminals. Be
sure to use a type which is suitable for the camera.
Refer to the manufacturer's instructions for recharging Ni-Cd batteries.
Three bars ( - ) may not appear on the display panel during the battery check, even if using fully
charged Ni-Cd batteries, because of their low nominal voltage.
The battery naturally discharges even when not in use, so try to check the batteries regularly.
Preliminary Preparations
Loading the Film
1) To open the back cover, push the back cover
latch down while pressing the back cover lock
button.
2) Insert the upper flat end of the film cartridge into
the film chamber first, then lower the other end.
The film-load check mark (@) will then appear on
the display to indicate that film is loaded.
3) Pull the film leader across the back of the
camera until its tip is aligned with the orange
index.
4) Close the back cover. The camera will advance
the film automatically and stop when "1" appears
in the frame counter brackets on the display panel.
5) Make sure that the film has no slack and that its
perforations are properly engaged with the sprocket
teeth.
CAUTION
Before loading the first film cartridge, remove the plastic insert
and throw it away.
NEVER touch the shutter curtain. It is sensitive to pressure due
to its high precision design.
Be careful that the film leader does not touch the shutter
curtain, either.
* If the film leader extends past the orange index, take out the film cartridge
and manually wind the excess film back into the cartridge.
When the humidity is high, film becomes soft and is easily torn. Keep the
film stored in its canister until just before you load it to keep it from
tearing.
While the camera is advancing the film, the film transport bars (also serve as the
battery check marks) will appear at the bottom of the display panel moving in
sequence from left to right. If the film has not been correctly advanced, however, the
bars blink after the camera has stopped. In that case, reload the film.
<Automatic Setting of the Film Speed>
The T90 is designed to automatically set film
speed by sensing the DX code marked on the film
cassette.
1. When using a film with DX code, you do not
have to set the film speed. (ISO 25 - 5000)
The film speed automatically set according to the
DX code will appear on the display panel while the
camera is advancing the film toward the first
usable frame.
2. When using a film without DX code, set the film speed manually.
a) While pressing the film speed button, turn the electronic input dial until the film speed (indicated by
ISO) of your film appears on the display panel. (ISO 6 - 6400)
b) Remove your finger from the film speed button.
The preset film speed will appear and blink on the display panel to warn you if the film speed is not
set. Always be sure to set the film speed correctly. (Once the film speed is set, the
warning stops)
Film passing through X-ray examinations at airports, even when loaded in a
camera, may be exposed and ruined. To avoid accidental exposure, tell the
inspector you want your camera and film hand checked.
Basic Operation
Shooting with the Lens Set on "A" Mark.
Setting the Film Rewind Mode
Shooting Capacity (with 24-exp. film)
Temperature/Battery
Normal (20°C/68°F)
Low (-10°C/14°F)
Low (-20°C/-4°F)
Film winding mode
HIGH
LOW
HIGH
LOW
HIGH
LOW
Alkaline (LR6/AM-3)
75
150
7
1
Carbon-zinc (R6/SUM-3)
10
30
3
-
*based on canon's standard test method
S (single) : single frame
C (continuous): H (high): max. 4.5 frames per
second
C (continuous): L (low): max. 2 frames per second
1 ) Open the palm wing and set the film winding mode/selftimer selector to "S-C".
S-C: film winding mode setting
: self-timer setting ( - p.84)
2) Press and release the film winding mode button (also
serves as the self-timer button) to set the desired film
winding mode on the display panel.
Automatic Film Winding Speed Changeover Function
The Canon T90 has an automatic film winding speed changeover function which will change the film
winding speed from HIGH to LOW mode when battery power drops below a prescribed voltage. This
saves battery energy and extends battery life, so more pictures can be taken with the same batteries.
When the winding speed is automatically switched to the LOW from HIGH, the ">" mark pointing at the
HIGH on the display panel starts blinking to warn you.
In this case:
1. If you wish to drive the camera in the HIGH mode, replace the batteries with new ones.
2. If you want to make the blinking ">" stop, though you continue to shoot in the LOW mode, press the
film winding mode button to set the "> " mark to LOW mode on the display panel.
Basic Operation
Shooting with the Lens Set on "A" Mark.
Setting the Shooting Mode
<Shooting Modes of the T90>
The Canon T90 has various shooting modes to meet your needs and what you want your picture to
portray. The following is an explanation of the shooting modes in which the FD lens must be set to the
"A" mark. (AE photography is possible only with FD lenses.)
1. Shutter-priority AE (with safety shift function)
You set the shutter speed and the camera automatically chooses the correct aperture for the lighting
conditions. This mode is useful for taking pictures of moving subjects and for normal snap shots. By
controlling the shutter speed, you can also control the subject's movement. Faster shutter speeds
freeze subject motion while slower shutter speeds can provide artistic blur effects.
<Shutter-priority safety shift function (ON/OFF possible)>
If the selected shutter speed is too slow or too fast for the light conditions, the T90 automatically
switches the shutter speed to a higher or a lower one to avoid under- or overexposure.
Shuttle-priority AE with safety shift function (when the shuttle
speed is set to 1/125 sec and the FD50mm f/1.4 lens is used)
2. Aperture-priority AE (with safety shift function)
You set the aperture and the camera automatically chooses the correct shutter speed for the lighting
conditions. This mode is useful for portraits, landscapes and still life photography in which depth of
field, i.e. the range of in-focus images is an important factor.
<Aperture-priority safety shift function (ON/OFF possible)>
If the selected aperture is too large or too small for the lighting conditions, the T90 automatically
switches the aperture to a smaller or larger one to avoid incorrect exposure.
Aperture-priority AE with safety shift function ( when the
aperture is set to f/5.6 and the FD 50mm f/1.4 lens is used)
3. Standard program AE (Program)
3. Standard program AE (Program)
Both the shutter speed and the aperture are
automatically set according to the brightness of the
subject and a programmed shutter speed/aperture
combination. The standard program AE is the most
popular programmed AE because it emphasizes neither
the shutter speed nor the aperture size. The program AE
mode is convenient for those who are taking pictures
with an SLR for the first time, those who do not like to
worry about complicated operation, those who would
simply like to concentrate on picture composition, or
daily snap shots.
4. Variable-shift program AE
This is also the program AE mode as mentioned above,
but there are 7 types of programmed characteristics inthis mode. Choose any one of them according to your
shooting objectives and the focal length of your lens.
1. Standard program AE (P)
This has all same programmed characteristics as No.3, but is displayed in "P" on the display panel
while "PROGRAM" is displayed on No. 3. This mode is basically oriented toward the tele programs
and the wide programs when using the electronic input dial.
2. Tele Program AE (TELE 1 - TELE 3)
Tele program's shutter speed/aperture combination is programmed so that the camera chooses the
fastest possible shutter speed. It is effective for emphasizing the main subject by making the depth-infield shallower. It is also well suited to stopping action in, for example, sports photography. When using
a telephoto lens, a small amount of blur due to camera shake, becomes accentuated because of its
long focal length. This program's fast shutter speeds reduce the risk of blur.
3. Wide Program AE ( WIDE 1 - WIDE 3)
The wide program chooses the smallest possible aperture, thus allowing a deep depth-in-field. It is
suitable for bringing not only the main subject but also the background and foreground into sharp focus
and so is appropriate for landscapes or large group shots.
WIDE P-3
STANDARD
TELE P-3
There are four other shooting modes, though the FD lens must be removed from the "A" mark.
<Setting Each Mode>
To select a mode, while pressing the shooting mode selector,
turn the electronic input dial until the desired shooting mode
appears on the display panel. (The display moves in the following
cycle.)
1. Setting the shutter-priority AE
1) While pressing the shooting mode selector, turn the electronic
input dial until the "Tv" indicating the shutter-priority AE appears
on the display panel.
2) Remove your finger from the shooting mode selector. At this
point, the initial shutter speed setting is always 125. (1/125 sec.)
3) Turn the electronic input dial until the desired shutter speed is
displayed on the display panel.
Shutter speed display
4000 3000 2000 1500 1000 750
500 350 250
180 125 90 60 45 30 20 15 10 8 6
432
0"7 1" 1"5 2" 3" 4" 6" 8" 10" 15"
20" 30"
Note: The shutter speed is automatically set to 1/125 sec when switching to the shutter-priority AE mode from other modes.
2. Setting the aperture-priority AE
1) While pressing the shooting mode selector, turn the electronic
input dial until the "Av" indicating the aperture-priority AE appears
on the display panel.
2) Remove your finger from the shooting mode selector. At this
point, the initial aperture setting is always 5.6 (f/5.6)
3) Turn the electronic input dial until the desired aperture value is
displayed on the display panel.
Aperture Value display
1.2 1.4 1.8 2.0 2.5 2.8 3.5 4 4.5
5.6 6.7 8 9.5
11 13 16 19 22 27 32
Notes:
The aperture is automatically set to f/5.6 when switching to the aperture-priority AE mode from other modes.
Be sure that the aperture value set on the display panel is between the maximum and minimum aperture of your lens. Otherwise
exposure will be incorrect. (e.g. when using the FD 50mm f/1.4 lens, set the aperture between f/1.4 and f/22.)
<Setting the Safety Shift Function>
1) Set the T90 to the shutter-priority AE (Tv) or the aperturepriority AE (Av).
2) Press both the film speed button and the exposure
compensation button at the same time for approx. 1 sec.
3) The " SS " mark indicating the safety shift will then appear on
the display panel and the safety shift function will be activated.
4) To clear the safety shift function, press both the film speed
button and the exposure compensation button again until the "
SS " disappears.
Notes:
Setting the safety shift function is possible in any mode, but is effective only in the shutter-priority AE
and the aperture-priority AE modes.
3. Setting the standard program AE
1) While pressing the shooting mode selector, turn the electronic input dial until
"Program" appears on the display panel.
2) Remove your finger from the shooting mode selector.
4. Setting the variable-shift program
1) While pressing the shooting mode selector, turn the electronic
input dial until "P" indicating the variable-shift program AE
appears on the display panel.
2) Remove your finger from the shooting mode selector.
3) Turn the electronic input dial until the desired program AE (any
one of seven modes ) is displayed on the display panel.
Shooting with the Lens Set on "A" Mark.
Basic Operation
Setting the Metering Mode
<Metering Modes of the T90>
With the T90, the metering mode, i.e., the metering sensitivity pattern, can be
changed regardless of which lens you use or the subject you are shooting.
Do not use a linear polarization filter.
1. Center-weighted average metering
This is a convenient metering system for general photography under normal shooting conditions. The
meter measures the entire viewing area, emphasizing the central portion where the subject is most
likely to be and diminishing toward the edges.
2. Partial metering
This system, with its 13% coverage of the field of view, allows you to meter only the central portion of
the image in the viewfinder. It is particularly effective for metering backlit subjects, such as a person in
front of a bright window.
3. Spot metering
Spot metering is ideal for subjects which require precise measurement. Since the metering area is
2.7% of the field of view, you can select a small, exact area from the overall scene. It is especially
advantageous for stage photography, photomacrography or photomicrography.
<Setting Each Mode>
While pressing the metering
mode selector, turn the
electronic input dial until the
desired metering mode appears
on the display panel. (The
display moves cyclically.)
Basic Operation
Shooting with the Lens Set on "A" Mark.
How to Use the Metering Mode
1. Center-weighted average metering
This is the normal setting position used for general photography, and is
recommended especially for AE photography.
2. Partial metering
With this metering system, the AE lock mechanism is on as long as the shutter button
is being pressed halfway down.
1 ) Put the main subject in the center of the viewfinder so that the partial metering
mark covers it
2) Press the shutter button halfway and compose the picture. A red "*" mark (AE lock
LED) will then appear in the viewfinder.
If desired, while continuing to hold down the
shutter button, recompose the picture so
that the subject is not in the center. The
same exposure value is kept locked in the
camera's memory by the AE lock function
even when the picture is recomposed.
<Sequential AE lock photography>
>
When shooting continuously using the AE lock mechanism in the same lighting
conditions (e.g. backlit subjects), it is not necessary to meter the subject for each
shot as long as you keep the shutter button pressed halfway down between
exposures.
Basic Operation
Shooting with the Lens Set on "A" Mark.
Focusing
1) While looking into the viewfinder, turn
2) The subject is in focus when the upper
the focusing ring until the main subject is
sharp.
and lower halves of the central split
rangefinder merge to become one
unbroken image.
Laser-matte screen
New split rangefinder
This screen can be used on all surfaces.
This divides the subject in half
The subject is in focus when the image is
horizontally. The subject is in focus when not fuzzy.
the two halves merge to become one
unbroken image.
Microprism rangefinder
This breaks the subject into tiny
fragments, causing a shimmering effect
when out of focus. The subject is in focus
when the image in the microprism ring is The T90's focusing screen can be
changed according to the subject you are
clear and not shimmering.
shooting and the lens in use.
Shooting
1 ) Gently press the shutter button halfway down 3) Slide the main switch to "L" to turn off the
to check the exposure. Exposure will be correct
camera when shooting is finished.
unless the aperture value and/or the shutter speed
blink in the viewfinder.
Press the shutter button GENTLY for the least
camera shake.
2) Compose the picture and gently press the
shutter button all the way to take the picture. The
film will be automatically advanced to the next
frame.
ï When shooting continuously, the viewfinder
information will not be displayed. Your picture,
however, will be correctly exposed since exposure
will not be affected.
If the correct exposure is not possible, the
aperture value and/or the shutter speed will blink ï The film will be automatically advanced to the
in the viewfinder to warn you of incorrect exposure next frame after exposure and the frame counter
on the display panel also indicates the next frame
Please see p. 1 1 1 on the exposure warning
to be exposed.
displays and how to correct each case.
< Viewfinder Information Examples >
< Exposure Preview Button >
When you only want to check the exposure, press
the exposure preview button instead of the shutter
button. When the exposure preview button is
pressed, the viewfinder information is turned on
just as when the shutter button is pressed halfway.
° The exposure preview button is positioned so
that you can press it while turning the electronic
input dial.
< Remaining Frame Counter >
You can check how many frames remain
any time, even during shooting, as
displayed on the right of the viewfinder.
1. When using a film with DX code
2. When using a film without DX code
The remaining frames are displayed on the right of the
viewfinder by the "<" mark, "F" (Film) and the figure.
The display is only "F".
° The figure display appears only when the remaining
frames has become less than 9.
When the T90 is used in the spot metering mode, the
stopped-down (fixed index) metering mode or the FE
lock mode together with the Speedlite 300TL, "<" mark is
not displayed. "F" and the figures from 1 to 9 are
displayed.)
< Viewfinder Display Selector >
The display panel and the
The entire viewfinder information The entire viewfinder information viewfinder information on the right
are illuminated when the shutter
can be turned ON.
can be turned OFF.
button is pressed halfway.
All the viewfinder information (both the right and the bottom of the viewfinder) can be turned off to save
battery consumption. The whole display panel and the viewfinder information on the right can be
illuminated to make shooting in the dark easier. Use the viewfinder display selector inside the palm
wing.
Basic Operation
Shooting with the Lens Set on "A" Mark.
Automatic Film Rewind
At the end of the roll, the camera rewinds the film
automatically.
1) While the camera is rewinding the film, the film
transport bars will move in sequence from right to
left to indicate that the film is being rewound. At
this time, the frame counter will count down.
2) Film rewind stops automatically when the roll is
completely rewound.
4) Remove the film cartridge.
3) Open the back cover when the film-load check
mark (@ ) starts blinking.
5) Slide the main switch to "L" to turn off the
camera.
< Manual Film Rewind >
If you want to rewind the film before the end
2) As soon as the manual rewind button ( @<< ) is
of the roll, manual film rewind is possible.
pressed, the camera starts rewinding the film.
1) Open the palm wing.
Intermediate
Operation
Shooting with the Lens Set on "A" Mark.
Spot Metering
The spot metering can be used in the following three ways:
1 One-point spot metering
2 Multi-spot metering
3 H/S control
ï When the shutter button is pressed halfway, the AE lock function works as in the
partial metering mode, and the sequential AE lock photography is also possible.
1. One-point spot metering
Only one point is measured in the viewfinder.
1 ) Put the main subject in the center of the
viewfinder so that the spot metering mark covers
it.
2) Press the spot metering button. As shown in the
photo on the right page, when you want to take a
picture of a glass backlit by a bright window, press
the spot metering button so that it covers the
glass. (When the subject transmits light exposure
compensation is necessary,)
ï When the spot metering button is pressed, the
exposure value is kept locked in the camera's
memory for 30 sees after you have removed your
finger.
ï The exposure value stored into memory in the
spot metering mode is cleared under the following
conditions:
1. When more than 30 secs. have elapsed without
releasing the shutter after the spot metering button
has been pressed and the finger has been
removed.
ï When the spot metering button is pressed, both
the shutter speed and the aperture are displayed 2. When the metering mode selector is pressed.
at the bottom of the viewfinder. The fixed dot (<)
will then appear at the position of the triangle index 3. When the finger is removed from the shutter
on the right of the viewfinder.
button after exposure.
One-point spot metering is also possible by pressing the shutter button halfway. In this case, however,
the exposure value is not stored into memory. When you remove your finger from the shutter button,
the exposure value is cleared.
< Exposure Level Difference Comparison >
When you move the spot metering mark to another point
of the subject after the spot metering button has been
pressed, the new metering value (<) will appear to the
right of the viewfinder as a free dot. You can check the
exposure level difference between the main subject
(stored into memory by the fixed dot) and another point
of the viewfinder, that exists in the scene before
pressing the shutter button.
ï The free dot moves in the range of +4 steps. If the
exposure level difference is +4.5 steps or more, the "~"
(+) or "~" ( - ) indicator will be displayed instead of the
"~" dot.
ï In most cases, exposure compensation is necessary
for the one-point spot metering. Please read the
column of "H/S control", too.
ï In order to obtain correct exposure in the one point
spot metering, factors such as subject contrast pattern,
reflectivity and latitude of the film in use must be
carefully considered.
2.Multi-spot metering
Several points can be measured in the scene in the viewfinder, taking your
measuring reference point into account.
1) As shown in the photo above, when you want to obtain correct exposure on her face and also want
to obtain correct exposure on the background, press the spot metering button twice on her face and
once on the background.
2) The final exposure is made by averaging each exposure value of the three points. The emphasis of
the exposure is put on her face since it is metered twice and the correct exposure can be obtained,
while even the exposure on the background can be maintained since it is metered once.
ï The digital values of both the shutter speed and the aperture appearing at the bottom of the
viewfinder are sequential weighted averages calculated each time a point is metered.
ï The triangle index in the center of the right-hand LCD is also used as the center point around which
the other readings also marked by the "~" dot are divided.
ï When three points are measured, three fixed dots are displayed finally.
ï The exposure value stored into memory in the multi-spot metering mode is cleared under the
following conditions:
1. When more than 30 sees have elapsed without releasing the shutter after the spot metering button
has been pressed last.
2. When the metering mode selector is pressed.
3. When the finger is removed from the shutter button after exposure.
Multi-spot metering is only possible by pressing the spot metering button unlike the one-point spot
metering.
Up to eight points can be metered using the multi-spot metering. Subsequent attempts will be
disregarded.
3. H/S Control
ï "H" stands for "highlight" and is used when the subject is white, while "S" stands for "shadow" and is
used when it is black.
ï The H/S control can be used with both the one-point spot metering and the multi-spot metering. Here
is how to use the H/S control in the one-point spot metering explained in consideration of its
application.
< Highlight Control >
1) Press the spot metering button to indicate the
fixed dot at the position of the triangle index.
2) When the highlight control button at the upper
back of the camera is pressed and released, the
dot starts moving upward to make compensation.
Set the desired amount of compensation
according to how bright the subject is.
< Shadow Control >
1) Press the spot metering button to indicate the
fixed dot at the position of the triangle index.
2) When the shadow control button next to the
highlight control button is pressed and released,
the dot starts moving downward to make
compensation. Set the desired amount of
compensation according to how dark the subject
is.
Highlight Control Examples
0
+2
+2.5
Shadow Control Examples
0
-1
-2
*figures indicate the amount of exposure compensation
Manual Override
l ) Set the display panel to "tv".
2) Set the desired shutter speed by turning the
electronic input dial.
3) Remove the lens from the "A" mark. An " CD "
will then be displayed on the display panel.
This is a creative mode in which you can control
exposure by setting both the shutter speed and
the aperture as you like.
4) Set the desired aperture value to the lens
manually, referring to the aperture displayed in the
viewfinder. You must rely on your own experience
for setting the exposure.
Stopped-down AE
1 ) Set the display panel to any one of "Av", "P",
or "Program".
2) When using an FD lens, remove the aperture
ring from the "A" mark.
3) Set the desired aperture value to the lens
manually.
It is necessary to use the stopped-down AE mode
when using close-up accessories which have no
FD signal pins, such as extension tubes or bellows
in combination with an FD lens. You can take a
picture while confirming the depth of-field by
pushing in the stop-down lever. This mode is also
useful when using the Canon Reflex Lens or FL
lenses and when using simple FD lenses.
4) Push in the stop-down lever. A " A'' mark
will then be displayed on the display panel.
5) The camera sets the shutter speed
automatically according to the aperture
If your eye will not be at the viewfinder the moment
you press the shutter button, close the eyepiece
shutter by pushing the eyepiece shutter lever, to
avoid stray light from entering.
When using the stopped-down metering with an
FD lens attached directly to the camera body, use
an aperture of f/2.8 or smaller.
<Checking Depth-of-Field >
When you check the depth-of-field with the FD lens, stop down the aperture by pushing in the stopdown lever as mentioned above. When you look through the viewfinder with the lever pushed in, you
can see the range of sharpness i.e. the depth-of-field.
< Error Display >
When you use the stopped-down AE
mode with the FD lens, do not push in the
stop-down lever with the lens set on the
"A" mark. If you do "E" marks indicating
an error will appear to warn you of
incorrect operation (EEEE EE in the
viewfinder and EEE on the display panel),
and the shutter is locked.
In this case, either push in the stop-down
lever again to clear the stopped-down AE
or remove the lens from the "A" mark. The
error display will then disappear.
Stopped-down (Fixed Index) Metering
The shooting objectives of this mode are the same 6) Turn the aperture ring of the lens until the "oo"
as for stopped-down AE mode, but this mode
is displayed.
needs manual operation.
7) Press the shutter button.
1 ) Set the display panel to "Tv".
ï To the right of the viewfinder, "<" dot is displayed
2) Set the desired shutter speed by turning the
and it moves upward or downward as the aperture
electronic input dial.
is changed. When the "oo" mark is displayed at
3) When using an FD lens, remove the aperture
the bottom of the viewfinder, the "<" is aligned with
ring from the "A" mark
the triangle index.
4) Push in the stop-down lever. An "@" mark
ï If the " OP" is still displayed when the aperture ring
will then be displayed on the display panel.
is turned to the maximum aperture of your lens, set a
5) Check the exposure in the viewfinder.
slower shutter speed on the display panel.
ï In the viewfinder, any one of "OP", "oo", or "CL"
ï If the " CL " is still displayed when the aperture ring
is displayed as well as the shutter speed you have is turned to the minimum aperture of your lens, set a
set. The meaning of each display is as follows:
faster shutter speed.
0P: underexposure (Open the aperture.)
oo : correct exposure
CL: overexposure (Close the aperture.)
* Notes for this mode and the situations in which the error is displayed are all the same as for stopped-down AE mode.
underexposure display: indicates that the aperture must be opened.
overexposure display: indicates that the aperture must be closed.
< Manual Diaphragm Control >
Stopped-down metering is necessary whenever you insert
accessories, such as Extension Tubes M, between the camera and
the FD lens for close-up photography.
1 ) Insert the slot of the accessory manual diaphragm adapter
(optionally available) over the tip of the automatic aperture lever at
the rear of the lens.
2) Push the lever counterclockwise and lower
the adapter into the groove.
3) Mount the lens as it is onto the accessory.
Do not mount the lens with the manual diaphragm I adapter directly onto the camera or the Auto
Bellows I etc.
< Film Plane Indicator >
This mark, engraved on the top of the camera body, indicates the
exact position of the film plane. It is useful for measuring the exact
shooting distance from film to subject in close-up photography.
Distance on the lens' distance scale are calibrated from this mark.
Bulb (Long Exposure)
It is possible to make an exposure longer than 30secs when
doing such types of photography as astro or night photography.
1) While pressing the shooting mode selector, turn the
electronic input dial until "bulb" appear on the display panel.
2) Manually set an aperture.
3) The shuttle will remain open as long as you press the shuttle
button.
The Canon T90 is designed so that bulb exposure requires relatively little power, thus saving energy.
When using an FD lens, be sure to remove the aperture ring of the lens from the "A" mark.
-Bulb operation time is display on the
display panel by a series of 3 bars and the
numbers 1-30. Each bar mark(-) indicates
30 seconds. Exposure time up to 120
seconds is possible( 3 bars plus 30)
-It is possible to control the exposure time
within a range of 23hours 59 minutes 59
30 seconds
seconds by using the command Back 90
(optionally available)
-Use of a tripod and cable release is
recommended when making long
exposures.
40 seconds
120 seconds
Self-timer Photography
The self-timer allows you a time-lag of either 2 or
10 sees. Use the 10 sec self-timer when you want
to be in the picture too' end use the 2 sec timer as
an alternative to a cable release for the softest
possible shutter release in close-up photography.
1 ) Open the palm wing and set the film winding
mode/self-timer selector to " ~ "
2) Press and release the self-timer button (also
serves as the film winding mode button) to set
either 2 or 10 sees. on the display panel.
3) Focus the subject and compose the picture.
4) Make sure the exposure is correct by checking
the viewfinder information, then press the shutter
button. The self-timer operation indicator will start
blinking and the frame counter will display the
countdown of seconds until shutter release.
5) The shutter will be released automatically 10
sees after the shutter button is pressed. 2 sees
before shutter release, the self-timer operation
indicator will begin blinking at a faster rate.
* When the 2 sec timer is set, the self-timer
operation indicator begins blinking at a faster rate.
If your eye will not be at the viewfinder the
moment you press the shutter button, close the
eyepiece shutter by pushing the eyepiece shutter
lever to avoid stray light from entering.
Do not stand in front of the lens when you press
the shutter button or exposure may be incorrect.
If you have started the self-timer but wish to
cancel it before shutter release, press the battery
check button inside the palm wing or move the
film winding mode/self-timer selector off the " @ "
position.
Exposure Compensation
It is necessary to correct exposure in the cases for example, when you want high-key (intentionally
overexposed) or low-key (Intentionally underexposed) shots, and when you take a backlit subject with
center-weighted average metering. With the T90, exposure compensation is possible in the following
two ways:
1) the exposure compensation index
2) H/S control in the spot metering
< Exposure Compensation Index >
1) Press the exposure compensation button. The 2) While pressing the exposure compensation
exposure compensation index will then appear on button, turn the electronic input dial to move the "
the display panel instead of the film transport bars. ~ " dot under " [1] " to the desired point on the
exposure compensation index.
ï " [1] " indicates that no exposure compensation is made.
ï It is possible to make the exposure compensation
in increments as small as 1/3 f/stop.
3) Remove your finger from the exposure
compensation button. The film transport bars will
appear on the display panel again, and " w " dot
will blink at the position where you have moved it
for exposure compensation. At the bottom of the
viewfinder, "+/ - " mark will be displayed to warn
you that the camera is in the exposure
compensation status.
The whole numbers are for increasing exposure
while the fractions are for reducing exposure The
numbers of "2" and "1/2" are equivalent to one
f/stop (or one step of the shutter speed). while "4"
and "1/4" are equivalent to two f/stops (or two
steps of the shutter speed). The intermediate
settings indicate increments of 1/3f/stop.
When it is difficult to determine exactly how much
correction to make, bracket the exposure by
changing the position of the "~" dot.
4) To cancel the exposure compensation, move
the " ~ " dot back to "[1]" position, in the same as
above.
Other Shooting/ Exposure Compensation
Multiple Exposure
The T90's provision for multiple exposures allows you to easily make two or more
exposures on the same frame for creative effect. Preset multiple exposures up to 9
times with the single operation of the electronic input dial and continuous multiple
exposure photography are possible.
1) Press both the shooting mode selector and the
metering mode selector at the same time. The "
ME " mark indicating multiple exposure mode will
then appear on the display panel and the frame
counter will become "1".
2) While pressing both, selectors, turn the
electronic input dial to the desired number of
exposures (for example, set "3" on the frame
counter if you want to make three exposures on
the same frame )
1 Before shooting
1) Press both the shooting mode select and the
metering mode selector at the same time again.
2) While pressing both selectors turn tt electronic
input dial to return the frame counter to "1".
3) Remove your fingers from both selector The "
ME " mark will disappear and multiple exposure
mode is cleared.
2 While shooting
The operating procedures are basically the same
as above, but turn the electronic inp dial until the
ï While shooting, the " 3 " mark will flash on and off frame counter is blank or there no frame counter
to warn you that the camera is in the multiple
display in step 2).
exposure status.
3) Remove your fingers from both selectors.
ï Each time the shutter is released the preset
number of exposures on the frame counter will
decrement by 1.
ï When the preset number of exposures have been
completed, the film is automatically wound to the
next frame and the multiple exposure status is
automatically cleared.
<Changing the Preset Exposures >
1) Before shooting
1) Press both the shooting mode selector and the metering mode selector at the
same time again.
2) While pressing both selectors, turn the electronic input dial to change the preset
number of exposures.
3) Remove your fingers from both selectors.
2) While shooting
The operating procedures are all the same as above.
< Exposure Compensation in Multiple Exposures >
When you make multiple exposures, it is necessary to correct the amount of
exposure depending on the situation because the same frame is exposed several
times. You can easily correct the exposure with the exposure compensation index.
Notes
1 The method described above is merely a general guideline. Actually, the amount of
exposure compensation varies according to the situation so your technique will
benefit greatly from practice.
2 It is not advisable to make multiple exposures on the first or last several frames due
to possible film curl which may adversely affect image registration.
3 Generally, the first exposure of a series should be of a relatively dark subject so
that the image in the next exposure will show up clearly.
Number of multiple exposure
Double
Triple
Quadruple
Exposure compensation index
1/2
Between 1/2 and 1/4
1/4
Other Shooting/ Exposure Compensation
Shooting with Infrared Film
When you load the T90 with black and white
infrared film, it is necessary to make a slight
adjustment in focus. A red infrared index is
engraved on most Canon lenses for this purpose.
1) Focus as usual looking through the viewfinder.
2) If, for example, the lens is focused at 10 m on
the distance scale turn the focusing ring to align
the 10 m mark with the red dot.
3) Release the shutter after making this correction.
Notes
1. When using infrared film, it is necessary to use
a deep red filter, as specified by the film
manufacturer.
2. The position of the infrared index mark has
been computed for the use of infrared film with
peak sensitivity at 800 nm.
3. When using color infrared film, read the
instructions of the film manufacturer.
Flash Photography
Canon developed the PMS (Permanent
Magnet Shutter), which makes flash
photography with an X-sync speed of
1/250 sec possible.
The Canon Speedlite 300TL is an
impressive flash unit for exclusive use
with the T90. It has solved the
problems of both conventional TTL and
external flash systems. The main
features are as follows:
< Canon Speedlite 300TL >
1. A-TTL Mode
2. FE Lock TTL Mode
This mode automatically responds to a wide range
of illuminations from dark surroundings to bright,
so automatic fill-in flash is possible. Using the TTL
control system, this mode measures the light
reflected from the film surface directly by the
sensor inside the camera. In cases such as fill-in
flash photography, this A (Advanced)-TTL mode
balances the exposure level between the main
subject and the background to prevent unnatural
With the world's first spot metering for flash
photography using the principle of AE lock, this
mode gives correct exposure even when the main
subject is not in the center of the viewfinder. TTL
flash photography is possible without being
affected by the reflectivity of the film in use since
the TTL control system of this mode does not use
the reflection from the film surface. Automatic fill-in
flash is possible.
effects.
ï "FE lock" stands for flash exposure
lock.
4. Second Curtain Synchronization
With the focal plane shutter, flash synchronization
is made when the first shutter curtain is fully open.
With the combination of the Speedlite 300TL,
however, it is also possible to make the flash
synchronization just before the second shutter
curtain starts running.
3. FE Lock + H/S Control
It is also possible to use the FE lock mode of the
Speedlite 300TL with the H/S control of the T90 to
independently control the exposure level for the
main subject with the flash and the exposure level
for the background with the ambient light.
In addition, the "P" position at which even
beginners can enjoy advanced techniques such as
fill-in flash, without fear of failure, is provided.
Manual flash photography is also possible in the
Manual Hi mode with a guide number of 30 (ISO
100.m) and in the Manual Lo mode with that of 7.5
(ISO 100.m). Aside from exposure control, the
Speedlite 300TL offers several other features. One
is bounce flash. Another feature is the built-in
zoom of its flash head, which can use flash energy
more efficiently. One of its safety features is the
SE (Save-energy) function which prevents
unnecessary consumption of battery energy if you
forget to turn off the flash. The Canon Speedlite
300TL is thus a high-performance, automatic,
electronic flash unit.
When using multiple flash accessories such as the TTL Hot Shoe Adapter, the
TTL Distributor and the Off-camera Shoe Adapter with the Speedlite 300TL
automatic TTL multiple flash photography is possible with up to four flash
units
* First curtain synchronization (The flow of light is
unnatural for the subjects' movement)
* Second curtain synchronization (natural)
Viewfinder Information
When the shutter button is pressed halfway,
after the flash has been charged, you can
confirm the exposure in the viewfinder.
<Other Canon Speedlites >
1. T-series Speedlites
ï PROGRAM mode - The shutter speed is automatically set to 1/90 sec upon flashcharge completion. An aperture is selected automatically by the flash.
ï F.NO.SET mode - The shutter speed is automatically set to 1/90 sec upon flashcharge completion. An aperture is set on the flash manually.
2. 577G, 533G and A-series Speedlites
ï The shutter speed is automatically set to 1 /90 sec upon flash -charge completion.
An aperture is set on the flash manually.
When using the Speedlite with the manual mode for example, the 299T in manual flash mode, the Xsync speed will be 1/250 sec. (When the lens is removed from the "A" mark and the T90 is set to the
shutter-priority AE mode, the X-sync speed can be set between 30 and 1/250 sec.)
It is recommended that a Canon Speedlite be used with this camera. Using a flash (usually with more
than two contacts) or flash accessory of another maker may cause the camera to work improperly or
even possibly damage the camera itself.
1. Standard type flash The X-sync speed can be set to 1/250 sec or slower.
2. Large studio type flash The X-sync speed must be set to 1/125 sec or slower.
When the large studio type flash or the general cable connection type flash is used with the T90, the
Canon Hot Shoe Adapter is required to connect the flash with the camera.
Speedlite 300TL :
Exclusively designed for the T90, the Speedlite 300TL is a highperformance, automatic electronic flash unit which has excluded several
problems both with TTL and external flash systems. For further information
on the Speedlite 300TL.
Note
With the Interface Unit D.M.B. all data can be
checked on the screen of an MSX personal
computer. (Data Memory Back 90, Interface Unit
D.M.B. and the MSX computer are not available in
North America and some other areas.)
The Data Memory Back 90 is an interchangeable
camera back designed for exclusive use with the
T90, and can memorize up to 16 types of
exposure control data automatically. The Data
Memory Back 90 has two modes; the standard
mode for storing all 16 types of data and the
reduced mode for storing the 6 types of data.
Primary data stored can be checked on the Data
Memory Back's LCD monitor panel. In addition like
the Command Back 90, the Data Memory Back 90
can also imprint several data automatically.
DATA FUNCTION
1. Printing of the auto date up through the year
2099. (automatic compensation for leap years and
long and short months)
2. Printing of the Day/Hour/Minute in a 24 hour
format.
3. Printing of a frame counter number. (4-digit
number)
MEMORY FUNCTION
ï Standard Mode (Data can be stored up to 1 56 frames.)
1. Shutter speed
2. Aperture value
3. Shooting mode
4. Metering mode
5. Use flash or not
6. Aperture stopped down or not
7. Spot metering data*
8. FE lock data*
9. Use exposure compensation or not
10. Amount of exposure compensation*
11. Number of exposures made
12. Film speed
13. Use manual exposure or not
14. Auto calendar (Year/Month/Day and Day/ Hour/Minute)
15. Auto frame counter (4-digit serial number)
16. Lens in use
Note: These items can only be displayed on the screen of an MSX computer
connected to the Data Memory Back 90 through the Interface Unit D.M.B.
Command Back 90
DATA FUNCTION
1. Printing of the auto date up through the year 2029. (automatic
compensation for leap years and long and short months)
2. Printing of the Day/Hour/Minute in a 24 hour format.
3. Printing of an arbitrary 6-digit number plus the letters A
through F.
4. Printing of a frame counter number up to 4 digits.
The Command Back 90 is an
interchangeable camera back
designed for exclusive use with the
TIMER FUNCTION
1. Self-timer (the shutter is released after a
fixed period of time).
T90. As the name "Command"
suggests, it not only records data
but also controls the T90 for various
types of timed photography.
The following operations are
possible using the quartz controlled
Command Back 90:
2. Interval timer (the shutter is released at
fixed intervals).
3. Long release timer (the shutter is released and held open for a
fixed period of time when the T90 is set to "bulb").
4. Frame counter setting (the camera stops automatically after
the set number~of exposures has been made).
ï The timer settings can be set to any value from one second to
23 hours, 59 minutes, 59 seconds.
ï It is possible to use both the data and
timer functions at the same time.
ï It is possible to program the camera completely by combining
modes 1 - 4 in the timer function.
Macro Ring ML-2
The Macro Ring Lite ML-2 is an automatic flash unit for close-up
shooting. Since it adopts the TTL control system considered the most
effective method for close-up shooting, there is no need of troublesome
exposure compensations. Separate flash tubes are arranged on the right
and left sides, which can be fired together or independently for extra
lighting versatility. The guide number is 11 (ISO 100.m).
Wireless Controller LC-2
This accessory is a remote control photography device which uses
infrared rays to control the camera from a distance and is particularly
useful in such areas as wildlife photography and news coverage. The
Wireless Controller LC-2 consists of a transmitter and a receiver and has
three modes; the standard mode, the delay mode and the auto sensing
mode (activates when an object blocks the light path between the
transmitter and the receiver).
Multiple Flash Accessories
This accessory is a remote control
photography device which uses infrared rays
to control the camera from a distance and is
particularly useful in such areas as wildlife
photography and news coverage. The
Wireless Controller LC-2 consists of a
transmitter and a receiver and has three
modes; the standard mode, the delay mode
and the auto sensing mode (activates when
an object blocks the light path between the
transmitter and the receiver).
The accessories consist of the TTL Hot Shoe Adapter the TTL Distributor, the Off-camera Shoe
Adapter and the Connecting Cords 60 and 300. With the Speedlite 300TL and/or the Macro Ring Lite
ML-2, automatic multiple flash photography by the TTL control system is possible using up to four flash
units. The combination of the automatic TTL multiple flash is as follows:
1. With only the Speedlite 300TL (up to four)
2. With only the Macro Ring Lite ML-2 (up to four)
3. In combination with the both (up to four)
Dioptric Adjustment Lens with Eyecup
Ten eyesight correction lenses are available in powers
of +3, +2, +1.5, +1, +0.5, o,, - 0.5, ó2, - 3 andó4
diopters.. They may make viewing and focusing easier
if you are near or farsighted. Choose the one which is
closest to your eyeglass prescription, and make a
practical test if possible.
Positioning Guide
This accessory is a special stabilizer which is necessary when the T90 is used
with the Camera Holder F4, the Focusing Rail, or the camera support bracket
of the Speedlites 577G and 533G. Slide the Positioning Guide 90 to attach it.
The Positioning Guide 90 comes with the attachment screw. When the
Camera Holder F4 or the | camera support bracket of the Speedlites 577G
and 533G is used with the T90, use the attachment screw provided with the
Positioning Guide 90. When the Focusing Rail is used, however, use the one
provided with the Focusing Rail.
Close-up/ Macrophotography Accessories
Accessories such as the Auto Bellows, Copy Stand 5 and various
extension tubes are designed for everything from simple close-up
photography to life-size and magnified macro photography.
ï Cable Release Adapter T3
This is an accessory for use with the Double Cable Release when using the
Auto Bellows. It is possible to use this adapter with the Release 30 or 50.
Remote Switch 60T3
The Remote Switch 60T3 is designed to be used when the camera is
mounted on a tripod for close-up shooting or when using a telephoto
lens with which camera-shake is a particular problem. Attach directly
to the camera's remote control socket.
Lens Hood
We strongly recommend the use of a lens hood to keep out side light
which may cause flare and ghost images to form on the image. Rigid
Canon hoods also help to protect the lens from shock. Use only a
hood which is specified for your particular lens. Most Canon hoods fit
into the bayonet mount and are fixed by turning. For details please see
the lens instruction manual.
Interchangeable Focusing Screens
You can change the focusing screen in your T90 according to your specific focusing needs. Canon
offers eight different types of focusing screens for the T90.
Type
Application
A: Microprism
Matte/Fresnel field with microprism rangefinder spot in the
center of the screen. Especially suited for general photography
when using an aperture of f/5.6 or larger.
B: New Split
Matte/Fresnel field with split-image rangefinder spot in the
center of the screen. The lens is in focus when the bottom half
is even with the upper half. Suited for general photography
since unlike former focusing screens, rarely does one-half of
the rangefinder darken, even when using small maximum
aperture lenses.
C: All Matte
Matte/Fresnel field with clear matte center spot. Especially
recommended for macro and telephoto photography, this
screen enables the entire field of view to be seen without
distraction. The lens is in focus when the subject can be clearly
seen.
D: Matte/Section
Similar to C screen but with horizontal and vertical reference
lines. Recommended for architectural photography and copy
work in which accurate image placement is essential.
E: New Split/Microprism
Standard with the T90. Three focusing methods (split image,
microprism and matte/fresnel) are possible according to
preference.
H: Matte/Scale
Matte/Fresnel field with fine matte center plus horizontal and
vertical scales in millimeters. Recommended for close-ups,
photomacrography copy work and architectural photography
where it is useful to know the size of the subject or the
magnification involved.
I: Double Cross-hair Reticle
Matte/Fresnel field with clear center spot containing double
cross-hair reticle. While focusing, move your eye left to right. If
crosshairs stay in the same position on the subject, then the
subject is in focus. Recommended for photomicrography,
astrophotography, or other applications requiring high
magnifications.
L: Cross Split-image
Matte/Fresnel field with cross split-image in the center of the
screen which divides the subject in half both horizontally and
vertically. The subject is in focus when the four quarters merge
to become one unbroken image. Suitable for general
photography.
NEVER change the screen with your fingers. A special tool is provided with each accessory focusing
screen to facilitate screen replacement.
These focusing screens are exclusively designed for the T90.
Do not use them on other cameras.
Caring for Your Camera
As with any precision instrument proper care and maintenance involve a few simple
rules in addition to common sense. Observing these few rules will keep your T90 in
top condition at all tames.
We recommend that you clean your T90 periodically using the tools listed below.
Cleaning tools: Blower brush, Cleaning fluid; Cleaning tissue, Silicone cloth
(1) To clean the lens surface and the view finder :
Blow off dust with the blower brush and then gently wipe the lens surface with a lens
cleaning tissue which has been moistened with a few drops of lens cleaner.
(2) To clean the reflecting mirror and the focusing screen:
Use only a blower brush. If more cleaning is necessary, NEVER attempt to do it
yourself but take it to an authorized Canon service facility.
(3) To clean the film chamber:
The film chamber also requires occasional cleaning with a blower brush to remove
accumulated film dust particles which might scratch the film.
(4) To clean the film pressure plate and the film guide rails:
Lightly wipe the surface with a cleaning tissue moistened with cleaning fluid.
PRECAUTIONS
ï Be careful NEVER to touch the shutter curtain.
ï After using the camera on a beach, clean it thoroughly. Salt and sand are your T90's
worst enemies.
ï Aerosol spray dust removers are not recommended for the shutter curtain area. If
used hold the can at least 20 cm (8 inches) away from the curtain.
Storage of your T9O
The best thing you can do for your T90 is to use it regularly. In the event that you
must store it for quite a while, however, first remove it from its case or camera bag.
Remove the batteries. Wrap the camera in a clean, soft cloth and place it in a cool,
dry, dust-free place. If you store the body and lens separately, attach both the body
and rear lens caps.
Avoid storing your T90 in the following places:
ï "Hot Spots" such as the trunk, rear window shelf or glove compartment of a car.
ï Laboratories or other such areas where chemicals may cause corrosion.
ï In direct sunlight.
Before using the T90 after it has been stored for a long time or before using the
camera for important events, carefully check the operation of each part.
Other Notes
1. Liquid Crystal Display
The T90's display panel uses liquid crystal to display exposure information. After
about 5 years of normal use, the display may become hard to read.
The liquid crystal may respond relatively slowly in low temperatures and the display
may become dark at high temperatures (about 60°C/140°F). Normal functioning will
return when the temperature returns to normal.
2. Back-up Battery
The T90 has a built-in back-up battery which memorizes the display panel data, such
as the frame counter number and the ISO film speed, when the AA-size batteries are
being changed. Battery life is about 5 years. When voltage becomes insufficient, "lSO
100" will blink (at 2 Hz) on the display panel after loading batteries for normal camera
operations. If the back-up battery is removed, the memory will be erased. In this
case, reset the film speed.
Take your camera to the nearest Canon Service facility for the replacement of the liquid crystal or the
back-up battery. (Replacement will be at owner's expense.)
3. Batteries
Even if one blinking bar mark or no bar mark appears on the display panel during
batter~ check, indicating that the batteries are low as long as the shutter releases
exposure will be correct. Automatic rewind, however, ma~ not be possible because of
the insufficient power of the batteries. Also, if the camera happens to stop during
rewind, all of the film transport bars start blinking on the display panel to warn you.
Automatic rewind will start again once you replace the batteries with the new ones.
4. HELP Display
"HELP" may appear in the viewfinder in the case of camera malfunction or
operational error warning. When "HELP" is displayed 'perform the following
operations:
1 ) Check the batteries by pressing the battery check button inside the palm wing.
2) If the battery voltage is sufficient, remove the battery magazine once and reset it.
3) Release the shutter once.
If "HELP" does not appear again the camera ï has returned to normal condition and
you can keep shooting. If "HELP" will not disappear after repeating the operation
described above several times, there has been a camera malfunction and the camera
needs repair. Take the camera to the nearest Canon Service facility.
ï On the display panel, the error display (EEE) will appear while the "HELP" is
displayed in the viewfinder.
ï The "HELP" and "EEE" displays will appear even when the viewfinder display
selector is turned off.
5. When Using the Canon Extenders
Exposure compensation may be necessary when using the Canon Extenders with
the T90. Correct the exposure by using the exposure compensation index as follows:
The Max
aperture of
the lens
Extender
Lens
2X-A
Single
Zoom
2X-B
1.4X
Single
Zoom
Single
Zoom
All lenses
All Lenses
f/1.2-f/2.0
f/2.5-f/2.8
f/3.5 or
slower
All lenses
All lenses
All lenses
T90's metering mode
Centerweighted
average
0
0
+2/3 step
+2/3 step
Partial
Spot
-2/3 step
-2/3 step
+2/3 step
0
-2/3 step
-1/3 step
+1/3 step
0
0
0
0
+1/3 step
0
0
-1/3 step
-2/3 step
0
0
-2/3 step
0
* "+" means increasing the exposure
* "-" means decreasing the exposure
Exposure Warning Display
When the shutter speed and/or the aperture value blink at 4 Hz in the viewfinder,
exposure will be incorrect.
1. Shuttle-priority AE (Safety shift ON)
2. Shuttle-priority AE (Safety shift OFF)
3.Aperture-priority AE (Safety shift ON)
4. Aperture-priority AE (Safety shift OFF)
5. Standard program AE
6.Variable-shuft program AE
Countermeasure for Each Case
1) Switch to flash photography
-1
2) Use a film with higher ISO film speed.
-2 1 ) Use an ND (neutral density) filter.
-3
-4
-5
-6
-7
-8
-9
10
11
2) Use a film with lower ISO film speed.
1) Decrease the shutter speed setting until the aperture value stops
blinking.
1) Increase the shutter speed setting until the aperture value stops blinking.
1) Increase the aperture setting until the shutter speed stops blinking.
1) Decrease the aperture setting until the shutter speed stops blinking.
1) Open the aperture manually.
1) Close the aperture manually.
1) Increase the aperture setting until "oo" iS displayed.
2) Decrease the shutter speed setting.
1) Decrease the aperture setting until " oo" iS displayed.
2) Increase the shutter speed setting.
1) Remove the aperture ring of the lens from "A" mark.
Notes
1) In the case of out-of-metering range warning (low) and underexposure warning, the maximum
aperture of the lens in use blinks in the viewfinder. When the FD 200 mm f/2.8 is used'"2.8" will blink in
the viewfinder.
2) When using a lens with a minimum aperture of f/16 such as the FD 50 mm f/1.2L, the aperture
displays of "16" and "19" also indicate overexposure warning. In this case, please note that the
aperture does not blink in the viewfinder.
3) When using a lens with a minimum aperture of f/32 such as the FD 135 mm f/2, exposure will be
correct even if the aperture display of "27" is blinking in the viewfinder. When "32" starts blinking,
however, your picture will be overexposed.
Display Panel
The T90 uses a large liquid crystal display panel to indicate
shooting information. The diagram beside shows all the
information at the same time; however, the display never
actually looks like this. Normally, the panel display only the
information required at the time.
Viewfinder Information
This viewfinder is bright and easy to read. Only the
necessary information is displayed outside the field of view.
The diagram below shows all the information at the same
time for convenience.
Carrying the Camera
1) Thread the ends of the neckstrap through the
rings on the camera as shown.
2) Put the camera in the case as shown above.
* Canon offers two types of soft case in addition to the standard case.
- Canon Snap Case T90 SA-3 can store the T90 with the FD 35-70mm f/3.5-4.5 lens
- Canon Snap Case T90 SB-3 can store the T90 with the FD 35-105mm f/3.5-4.5 lens