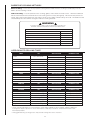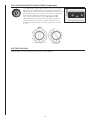
1
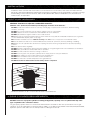
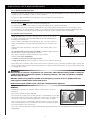
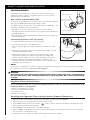
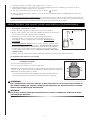
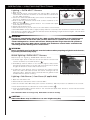
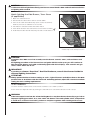
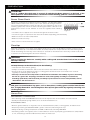
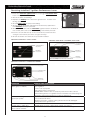
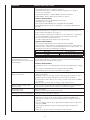
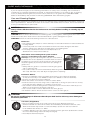
WARRANTY
STO P
D o not ret u r n t h is produ ct to t h e store.
IF YOU NEED HELP OR PARTS, CALL THE COLEMAN® HOTLINE
1 -800-275-4617
HOURS: 10AM-7PM EST Mon-Fri, CLOSED Saturday and Sunday
GET HELP FO R:
MISSING/DAMAGED PARTS • ASSEMBLY • TROUBLESHOOTING
• WARRANTY ASSISTANCE • PRODUCT INFORMATION
TIP: ASSEMBLE YOUR GRILL IMMEDIATELY. MISSING OR DAMAGED PARTS
MUST BE CLAIMED WITHIN 30 DAYS OF PURCHASE.
GRILL SAFETY CHECK-LIST
For your family’s safety, please check the following:
READ and UNDERSTAND the owner’s manual and safety instructions.
DO NOT position or operate barbecue under overhang or unprotected construction, against
a wall, near aluminum siding, windows, or fencing.
CHECK that the regulator nipple is centered into the LP tank valve. Do NOT cross thread this
connection. Cross threading may result in a fire, or explosion at the tank connection.
PERFORM LEAK TEST on all connections as specified in this user manual. Leak Checks should
be performed on all new BBQ’s even if assembled by an assembler or gas technician. Leak
checks should be performed frequently thereafter.
BEFORE OPENING THE GAS SUPPLY, ensure the lid is open, control knobs are in “OFF”
position, gas is turned off, and the regulator is attached to tank correctly. Then follow the
PROPER LIGHTING PROCEDURE as shown in the manual. If above steps are not followed, you
may experience low flames, or other performance issues.
Beware HOT SURFACES including lid, lid handle, side tables, and control panel.
protective gloves while barbecuing.
Wear
Remove and Clean the QUICK CLEAN™ Grease collection Tray, QUICK CLEAN™ grease cup,
and the Even Heat™ Heat Distribution plates, to avoid grease fires and flare ups.
Remove and Clean the EVEN HEAT™ Burners to avoid flash fires caused by spider webs and
blockages.
1
DURABILITY • POWER • PERFORMANCE
SAFE U SE & CAR E
MAN UAL
THIS MANUAL MUST REMAIN WITH THE PRODUCT AT ALL TIMES
To ORDER non-warranty replacement parts or accessories,
or to register your warranty, please visit us on the web at
www.colemanbbqs.com
CAUTION
DANGER
Read and follow all safety statements,
assembly instructions, use and care
directions before attempting to assemble
and cook.
1. If you smell Gas:
a. Shut off gas to the appliance
b. Extinguish any open flame
c. Open lid
d. If odor continues, keep away from
the appliance and immediately
call your gas supplier or your
fire department
INSTALLER OR ASSEMBLER/
CONSUMER
This manual should be kept with the BBQ
at all times.
WARNING
Failure to follow all of the Manufacturer’s
instructions could result in hazardous fires,
explosions, property damage, or serious
personal injury or even death.
Follow all leak check procedures carefully
prior to operation of barbecue, even if grill
was dealer assembled. Do not try to light
this barbecue without reading the Lighting
Instructions section of this manual.
2. Do not store or use gasoline or
other flammable liquids or vapours
in the vicinity of this or any other
appliance.
3. An LP cylinder not connected for use
shall not be stored in the vicinity of
this or any other appliance.
CAUTION
IN DIRECT SUN, AND IN OPERATION,
YOUR BBQ’S STAINLESS STEEL AND
PAINTED STEEL PARTS CAN BECOME
VERY HOT.
T H I S B A R B E C U E I S F O R O U T D O O R U S E O N LY
Manual Revision #: 06302014 AT
CAUTION
Some parts may contain sharp edges, especially as noted in the manual. Wear protective gloves
during assembly and usage of this appliance.
For residential use ONLY. Do not use for commercial cooking.
WARNING
Do not attempt to repair or alter the hose and regulator or valve assembly for any assumed defect
or for any type of retro fit or conversion. Any modifications to this assembly will void your warranty
and create the risk of a gas leak and fire. Use only authorized replacement parts supplied by the
manufacturer, for your model.
To ensure your satisfaction and for follow-up service,
register your BBQ online at
www.colemanbbqs.com
TABLE OF CONTENTS
Installation/ Additional warnings
1
Gas Hook-Ups and Warnings
LP cylinder requirements2
LP cylinder removal, transport and storage3
LP cylinder filling3
Safety Hose and Regulator:
Connecting regulator to LP cylinder4
Regulator flow limiting device (Propane)4
Resetting the regulator flow limiting feature4
Leak Testing
5
Natural Gas Models
6
Resetting flow limiting device (Natural Gas)6
Operation- Lighting instructions
7
Operation- To extinguish
8
Prevention
Burner Flame Check 9
Flare-Ups9
Grease Fires9
Flash-Back Fires10
Troubleshooting
Instastart™ Ignition11
Even Heat™ burners11
Care and Cleaning
Seasoning Cooking Grates
Storing your barbecue
13
14
15
Start Grilling
Barbecue Cooking Methods and Grilling Tips16
BBQ control settings 16
General Side Burner / Sear Stove Tips
18
Quick Check ™ Fuel Gauge
18
Easy Read 60 Minute Timer
18
Warranty and Service
21
INSTALLATION
Installation must conform with local codes or, in the absence of local codes, with either the National Fuel
Gas Code, ANSI Z223.1/NFPA 54, Natural Gas and Propane Installation Code, CSA B149.1, or Propane Storage
and Handling for Recreational Vehicles, ANSI A 119.2/NFPA 1192, and CSA Z240 RV Series, Recreational
Vehicle Code, as applicable.
ADDITIONAL WARNINGS
Minimum clearance to adjacent combustible materials:
Minimum of 36˝ (91.44 cm) from furthest protruding edge on all sides of the barbecue.
·DO NOT operate this barbecue under or near any overhanging or unprotected construction, aluminum siding,
windows, or fencing.
·DO NOT use in enclosed spaces such as carport, garage, porch or covered patio.
·DO NOT obstruct the flow of combustion and ventilation air to the barbecue.
·DO NOT place Barbecue against a wall or other solid structure
·DO always keep the area around this barbecue clean and clear of any and all combustible materials such as gasoline
or other inflammable liquids, paper or oily rags.
·DO remember this barbecue is for outdoor use only and is not for use on any boat or recreational vehicle.
·DO use this barbecue outdoors in a well-ventilated area, at least 36” (91.44 cm) from any dwelling or building.
·DO always close LP cylinder valve and remove coupling nut before moving LP cylinder from specified operating
position.
·DO check burner flames regularly.
·DO NOT attempt to light burner with lid closed. A buildup of non-ignited gas inside a closed barbecue is hazardous.
·DO NOT leave your barbecue unattended while in operation.
·DO NOT use while under the influence of drugs or alcohol.
·DO NOT store any spare L.P. (propane) cylinder, full or empty, under or near your barbecue.
·DO NOT allow children or pets to play anywhere near the barbecue.
·DO NOT block ventilation holes in the sides or back of barbecue.
·DO NOT use charcoal or ceramic briquettes in this gas barbecue.
·DO NOT use barbecue until a leak-test and a safety check is completed
Minimum clearance of 36” on both sides and rear of the barbecue.
L.P.GAS CYLINDER REQUIREMENTS
DO NOT connect to a propane cylinder exceeding 9.1 kg (20 lb) capacity or use a cylinder with any other
type of cylinder valve connection device.
LP-gas supply cylinder must be constructed and marked in accordance with the specifications for LP-gas
cylinders of the U.S.Department ofTransportation (DOT) or the National Standard of Canada, CAN/CSA-B339,
Cylinders Spheres and Tubes for the Transportation of Dangerous Goods.
1
GAS HOOK-UP’S AND WARNINGS
(LP) LIQUID PETROLEUM GAS
• LP gas is nontoxic, odorless and colorless when produced. For Your Safety, LP gas has been given an odor
(similar to rotten cabbage) so that it can be smelled.
• LP gas is highly flammable and may ignite unexpectedly when mixed with air.
LP cylinder requirements:
• Use LP cylinder only with these required measurements:
• 12”(30.5cm) (diameter) x 18” (45.7 cm) (tall) with 20 lb. (9 kg) capacity maximum.
• LP cylinders must be constructed and marked in accordance with specifications for LP cylinders of the
U.S. Department of Transportation (DOT) or the National Standard of Canada, CAN /CSA-B339, Cylinders
spheres and tubes for transportation of dangerous goods. See LP cylinder collar for marking.
LP cylinder valve must have:
• Shut-off valve with a correct cylinder valve output as specified
in current standards. ANSI Z21.58b-2012/CSA 1.6b-2012 Outdoor
Cooking Gas Appliances.
OPD Hand Wheel
• Type 1 outlet compatible with regulator or grill. The type 1 valve is
easily recognized by the large external thread on the outside of the
valve.
• Safety relief valve with direct connection to the vapour space of the
cylinder.
Type 1 outlet with
thread on outside
Safety Relief Valve
• UL listed Overfill Protection Device (OPD). This OPD safety feature is
identified by a unique triangular hand wheel.
Use only LP cylinders equipped with this type of valve.
Strap and Cap
• A device for vapor withdrawal.
• A collar to protect the LP tank shut off valve.
• A ring on the bottom of the LP tank to secure it to the support assembly.
• Place dust cap on cylinder valve outlet whenever the cylinder is not in use. Only install the type of dust cap
on the cylinder valve outlet that is provided with the cylinder valve. Other types of caps or plugs may result
in leakage of propane.
WARNING
Any attempt to connect a regulator to any connectors other than the mating TYPE -1 connector
could result in fires, explosions, injuries, or property damage. Use only LP cylinders equipped
with this type of valve.
DO NOT connect to a propane cylinder exceeding 9.1 kg capacity or use a cylinder with any
other type of cylinder valve connection device.
Before opening LP cylinder valve, check the coupling nut for tightness.
DANGER
• NEVER store a spare LP cylinder, empty or full, under or near the
appliance.
• Never fill a cylinder beyond 80% full.
• An over filled or improperly stored cylinder is a hazard due to possible
gas release from the safety relief valve. This could cause an intense fire
or explosion with risk of property damage, serious injury or death.
• Do not store objects or materials inside the barbecue cart enclosure
that would block the flow of combustion air to the underside of either
the control panel or the burner box.
• If you see, smell or hear gas escaping, immediately get away from the LP cylinder/appliance and call your fire
department.
2
LP GAS WARNINGS:
• Always turn cylinder valve off when the barbecue is not in use.
• Always handle the tank valve with the utmost care.
• Never connect an unregulated LP gas cylinder to the barbecue
• Always keep the cylinder, in use, securely fastened in an upright position
• Never expose the cylinder to direct sunlight or excessive heat.
• Never insert any kind of object into the valve outlet as this may cause damage to the Backcheck.
A damaged Backcheck can leak resulting in fires, explosions, property damage, severe injuries or death.
• Do not store an LP cylinder in enclosed spaces such as a carport, garage, porch, covered patio or other
building. Make sure the storage area has a lot of ventilation.
• Do not store an LP cylinder in an area where children play.
L.P. CYLINDER REMOVAL, TRANSPORT AND STORAGE
Before disconnecting the LP cylinder:
1. Turn “OFF” all control knobs and the LP cylinder valve.
2. Turn coupling nut counterclockwise by hand only - do not use tools to disconnect. Remove LP Cylinder
from inside cart.
3. Install safety cap onto LP cylinder valve. Always use cap supplied with tank valve.
• Failure to use safety cap as directed may result in serious personal injury and/or property damage.
WARNING
When transporting and storing the cylinder, make sure it is in an upright position and not on its
side. Do not smoke around cylinder, especially when transporting in a vehicle.
L.P. CYLINDER FILLING
• Use only licensed and experienced dealers.
• Ensure that the dealer checks and tests the tank for leaks after filling
• LP dealer must purge new cylinder before filling.
• Dealer should NEVER fill LP cylinder more than 80% of LP cylinder volume. Volume of propane in cylinder
will vary by temperature.
• Do not release liquid propane (LP) gas into the atmosphere. This is a hazardous practice.
• To remove gas from LP cylinder, contact an LP dealer or call a local fire department for assistance.
WARNING
If the above instructions are not completely adhered to, it could cause a fire/explosion, resulting
in death or serious Injury, or property damage.
CAUTION
A frosty regulator indicates gas overfill. Immediately close LP cylinder valve and call local LP gas
dealer for assistance.
3
SAFETY HOSE AND REGULATOR
PROPANE MODELS:
Regulator
Your Barbecue is designed to operate on L.P gas at a pressure of
2.74Kpa (11” water column). A regulator preset to this pressure is
supplied with your Barbecue.
QCC-1 QUICK CLOSING COUPLING
All models are designed to be used with an LP gas cylinder equipped
with the new QCC-1 Quick Closing Coupling system.
Heat sensitive hand wheel
Nipple has to be centered
into the LP cylinder valve.
The QCC-1 system incorporates new safety features required by the
Canadian Standards Steering Committee.
• Gas will not flow until a positive connection has been made
• A thermal element will shut off the flow of gas between 240 degrees
and 300 degrees F.
Nipple with flow limiting device
• When activated, a Flow Limiting Device will limit the flow of gas to 10
cubic feet per hour.
Shut off valve
Connecting Regulator to the LP Cylinder
1. LP cylinder must be properly secured onto grill.
2. Turn all control knobs to the OFF position.
3. Turn LP cylinder OFF by turning hand-wheel clockwise to a full
stop.
Check valve
4. Remove the protective cap from LP cylinder valve. Always use cap
and strap supplied with valve.
5. Hold regulator and insert nipple into LP cylinder valve. Hand
tighten the coupling nut. Hold the regulator in a straight line
with LP cylinder valve so as not to cross-thread the connection.
Hold coupling nut and
regulator as shown for
proper connection to
LP cylinder valve.
6. Turn the coupling nut clockwise and tighten to a full stop. The
regulator will seal on the back-check feature in the LP cylinder valve,
resulting in some resistance.
NOTE:
If you cannot complete the connection, disconnect regulator and repeat steps 5 and 6. If you are still unable
to complete the connection, do not use this regulator!
DANGER
Do not insert any tool or foreign object into the valve outlet or safety relief valve. You may damage
the valve and cause a leak. Leaking propane may result in explosion, fire, severe personal injury,
or death.
Regulator Flow Limiting Device
If you are experiencing any of the following performance issues you may have activated the flow
limiting feature in your regulator:
•
•
•
•
Burners not getting hot enough
Low or incomplete burner flames
Low gas pressure
Burners not staying lit
Resetting the Regulator Flow Limiting feature (Propane Barbecues)
1. With all control knobs and the gas source in the “OFF” position, open the BBQ lid.
2. Disconnect the hose and regulator from the propane tank.
3. Turn all BBQ control knobs to the “MAX” (
gas in valves and manifold to dissipate.
) position, and let stand for 1-3 minutes, allowing all excess 4. Turn all BBQ control knobs back to the “OFF” position.
5. With the BBQ lid still OPEN, reconnect the hose and regulator to the propane tank- Do not cross thread
the connection. Hand-tighten only.
6. Check all hose connections to ensure that a positive seal has been made.
4
7. Slowly turn “ON” the propane gas supply, 1/4 to 1/2 a turn.
8. Wait approximately 5 seconds for the hose and regulator pressure to stabilize (to prevent the flow
limiting device feature from being re-activated).
9. Turn the selected burner control knob, to the “MAX” (
) position.
10.Press the Electronic ignition button, or use the match and match holder, or a BBQ lighter to ignite the
selected burner.
Avoid activating the Flow Limiting Feature by following the proper start up and shut down procedures and
performing a complete leak test and safety check to ensure that there are no leaks in the system, and that a
positive connection has been made between the gas source and manifold assembly.
LEAK TESTING THE VALVE, HOSE AND REGULATOR ASSEMBLY
1. Turn all grill control knobs to “OFF”.
2. Ensure that the regulator is tightly connected to LP cylinder.
3. Brush soapy solution onto hose and regulator and all connections from
the LP tank to the main and side burner manifold.
4. Completely open LP cylinder valve by turning hand wheel
counterclockwise. If you hear a rushing sound, turn gas off
immediately. There is a leak at the connection. Correct before
proceeding.
5. If “growing” bubbles appear, there is a leak. Close LP cylinder valve
immediately and re-tighten connections. If leaks cannot be stopped
do not try to repair. Call for replacement parts. Order new parts by
providing the serial number, model number, name and part number
of items required (see parts list) to a Coleman® Customer Care Agent
1-800-275-4617.
6. Always close LP cylinder valve after performing leak test by turning hand wheel clockwise.
LP Cylinder Leak Test For Your Safety
ATTENTION: Leak Test must be repeated each time the LP cylinder is
exchanged or refilled.
• Do not smoke during leak test.
• Do not use an open flame to check for gas leaks
• BBQ must be leak tested outdoors in a well ventilated area, away from ignition
sources such as gas fired electrical appliances. During leak test, keep your
BBQ away from open flames or sparks.
• Use a clean paint brush and a 50/50 mild soap and water mixture.
• Brush soapy solution onto areas indicated by arrows in figure A.
ATTENTION
If it is evident there is excessive abrasion or wear, or the hose is cut, it must be replaced prior to
the outdoor cooking gas appliance being put into operation. The replacement hose assembly
shall be that specified by the manufacturer.
WARNING
For all new, at home, natural gas connections please contact a certified gas technician to install
your natural gas barbecue.
5
NATURAL GAS HOOK-UPS AND WARNINGS
FOR NATURAL GAS MODELS ONLY
All Coleman® Natural Gas Barbecues come equipped with a 10’ Natural Gas hose with a quick connect socket
connection. This will allow you to attach your Barbecue to your residential gas line.
To Connect
1. Push back the sleeve on the Quick Connect socket, insert the plug and release the sleeve.
2. Push the two pieces together until the sleeve snaps forward, to lock the plug in the socket.
To Disconnect
1. Push sleeve back and pull the plug out.
Testing For Gas Leaks
Before attempting to operate this Grill:
• Always confirm that all burner control knobs are in the “OFF” position.
• Always connect the gas supply hose first, open lid and then open the gas shutoff valve.
o Always use a brush or spray bottle to apply a 50/50 solution of liquid soap and water to all connection
points, to test for gas leaks. Never use a match or open flame
for that purpose.
o Always look for bubbles to appear, as the appearance of
Natural gas hose
connection point
bubbles will indicate a gas leak.
Side burner
valve gas jet
o Always turn off the gas immediately and tighten the
connection, if you find that a leak has been detected.
Natural Gas Home Supply /
Safety shut off valve
o Before lighting the grill, always repeat this procedure until
no further gas leaks are found.
Natural Gas Hose
o If a leak cannot be stopped, do not attempt to light the grill.
Always contact a certified Natural Gas technician for assistance
or the Coleman® Customer Care Agent 1-800-275-4617.
NEW Natural Gas Barbecue
If you are experiencing poor natural gas barbecue performance,
including but not limited to low flame, low heat or poor heat
distribution, please review the following information:
Quick Connector
Ensure that the Quick Connector is fully
connected to the natural gas hose
•Always consult the Rating Label on the back of the barbecue to
confirm that it has already been configured to burn natural gas.
•If experiencing performance issues with a brand new barbecue hooked up to an older natural gas home
connection, it is possible that the natural gas supply line is not able to supply up to the essential 85,000 BTU’s
required (depending on the model). Please contact Coleman® Customer Care for requirements and then
consult with your certified natural gas technician.
•All gas supply plumbing must be carried out by a qualified service agency. The Supply connection shall be
carried out in accordance with provincial authorities having jurisdiction, and in accordance with CAN/CGA
1-B149.1 & 2 installation code requirements.
•A shut off valve must be installed between the barbecue and the main supply. For natural gas, use a 3/8” or
1/2” natural gas supply line capable of an input of up to 85,000 BTU’s (depending on the model).
•When conducting pressure test always isolate the barbecue from the gas supply piping system by
disconnecting the barbecue and closing its individual manual shutoff valve. The gas supply piping system
should be tested at pressures which exceed 1/2 psi (3.5kPa).
•All gas supply plumbing must be able to supply 7” water column to the barbecue WITH ALL BURNERS IN
OPERATION.
Resetting Flow Limiting Device (Natural Gas Models)
If you are experiencing low heat performance issues, you may have activated the flow limiting feature in
your home’s natural gas connection. To reset the flow limiting device, follow these steps:
1.
2.
3.
4.
Open the lid of your BBQ
Ensure that the control knobs are in the OFF/CLOSED position
Ensure that the Natural Gas Supply valve is in the OFF/CLOSED position at the Home Connection
Disconnect the Natural Gas Supply hose by separating the Quick Connect Assembly at the Home
connection
5. Turn all control knobs to the ON/OPEN position (MAX)
6. Reconnect the Natural Gas Supply hose by securing the Quick Connect assembly connection
7. Using your hands only, check all connections to confirm that positive seal has been made
8. Turn the knobs to the OFF/CLOSED position
9. Slowly turn ON the Natural Gas Supply valve to the ON/OPEN position
10.Wait 30 seconds for the gas pressure to stabilize (60 seconds in cold weather)
11. Turn ON/OPEN the selected burner control knob, to the MAX position and wait 3 to 5 seconds
12.Press the Electronic ignition button, or use the match and match holder to ignite the selected
burner (BBQ lighter)
13.Repeat steps if not successful on first try.
WARNING
ALL Coleman® BBQ’s are sold either NATURAL GAS or PROPANE READY and are not convertible
from one gas source to another.
6
OPERATION — LIGHTING INSTRUCTIONS
Lighting — EVEN HEAT™ Burners:
OFF
OFF
1.Open the lid
MIN
MAX
2.Make sure all burner control knobs are turned “OFF”. (Push the
MIN
MAX
control knob in and turn clockwise, to ensure that the control knob
is in the “OFF” position.)
3.Turn the LP tank valve ON slowly (turn counter clockwise). Wait for
pressure to stabilize for 5 seconds.
4.Push in and turn selected control knob counter clockwise to the
MAX position (
).
5.Push the INSTASTART™ ignition button. You should hear rapid
clicks. Repeat if necessary.
6.Check that the burner is lit
7.After the burner is lit you can turn on the other burner control knobs.
If the EVEN HEAT™ burner fails to light properly within 3-5 seconds, turn the burner control knob off. Also
turn off the L.P cylinder valve. Wait five minutes before attempting to light the burner again. This will allow
time for released gas to disperse.
WARNING
The burner control knobs must be in the “OFF” position before turning on the liquid propane
cylinder tank valve. If left in the “ON” position, when the LP cylinder valve is opened, the
“Flow Limiting Device” feature will activate, limiting the flow of gas from the LP cylinder. If
this should occur, turn “OFF” the LP cylinder valve and burner control knobs and follow the
“Resetting the flow limiting device instructions”.
WARNING
Never stand with your head directly over the barbecue when preparing to light the main burners,
to prevent possible bodily injury.
Match-lighting—EVEN HEAT™ Burners
Repeat steps 1-3 “Lighting - EVEN HEAT™ Burners” above.
4.To match light: push in and turn the far left burner control knob
).
counter clockwise to the MAX position (
5.Immediately strike a match or use a butane lighter, and position
through the lighting hole on the left side of the burner box. Shown
in figure A. Check to ensure that the burner is lit.
6.To light the other burners, press in and turn the nearest control
knob. The flame will track around the burner and light via the
carryover tubes. Allow the grill to preheat with the grill lid closed
for 10-15 minutes before cooking.
A
Model may not be exactly as shown.
Lighting- Side Burner / Sear Stove (if applicable)
1.Open the side burner lid
2.Check that the side burner valve is turned “OFF”.
3.Turn the LP tank valve ON slowly (turn counter clockwise). Wait for pressure to stabilize for 5 seconds.
4. Push down and turn the side burner control valve to MAX (
).
5. Press the INSTASTART™ Ignition button. You should hear rapid clicks. Check to ensure that the burner
is lit. Repeat if neccessary.
The side burner lid is for storage only. Wait until cool before closing.
CAUTION
Side burner flame may be difficult to see on a bright sunny day
7
CAUTION
If side burner fails to light immediately, turn burner control knobs “OFF” and wait 5 minutes before
re-lighting with a match
Match lighting the Side Burner / Sear Stove
(if applicable)
1. Open the side burner lid
2. Check that the side burner valve is turned “OFF”.
3. Turn the LP tank valve ON slowly (turn counter clockwise).
Wait for pressure to stabilize for 5 seconds.
4. Put match in a match holder and strike match
5. Push down and turn the side burner control valve to MAX (
).
Side Burner
6. Hold match holder and lit match by left side of side burner.
Sear Stove
*Models may not be exactly as shown.
CAUTION
If ignition does NOT occur in 5 seconds, turn the burner controls “OFF”, wait 5 minutes and
repeat
the lighting procedure. If the burner does not ignite with the valve open, gas will continue to
flow out of the burner and could accidentally ignite with risk of injury. Turn controls and gas
source “OFF” when not in use.
IMPORTANT
If you have a Coleman® Even Heat™ Dual Fuel Barbecue, consult the Charcoal Guide for
charcoal lighting instructions.
ATTENTION
Always preheat barbecue before starting to cook. Light all burners and adjust them to the MAX
position for 5 to 10 minutes with the lid closed. Following preheat; adjust the controls to medium
setting for most cooking requirements.
To EXTINGUISH
1.Push in and turn each burner control knob clockwise to the “OFF” position.
2.Turn off the LP Cylinder valve by turning the hand wheel in a clockwise direction until it stops.
WARNING
If the heat output is too low, the “Flow Limiting Device” may have been activated by a gas leak or
improper lighting procedure. If so, turn “OFF” the burner valve and cylinder valve, and perform
a “Leak Test”. If there are no leaks, perform a complete regulator Flow Limiting Device reset.
8
PREVENTION
ATTENTION
Once lit, confirm that the burner is properly lit and that the flame pattern is as desired. If the
flame pattern is other than normal, consult the troubleshooting guide for corrective action.
Burner Flame Check
Always do a visual check of all burners prior to lighting. The Coleman® EVEN
HEAT™ Burners have been factory set for the correct air and gas mixture.
The correct flame pattern is shown in figure A. If you experience one of the
following symptoms, follow the burner cleaning procedure outlined in the
maintenance section of this manual, or reset the regulator Flow Limiting
Device:
• The flames do not appear to be uniform throughout the burner tube
Figure A
• The smell of gas in conjunction with the burner flames appearing yellow and lazy
• Barbecue does not reach temperature
• Barbecue heats unevenly
• One or more of the burners do not ignite.
Flare-Ups
Flare-ups sometimes occur when food drippings fall onto the hot heat distribution plates or burners, and
ignite. Some flare-up is normal and desirable, as it helps impart the unique flavours associated with grilled
foods. Controlling the intensity of the flare-ups is essential to avoid burned or unevenly cooked foods, and
to prevent un-controlled grease fires from erupting.
WARNING
Always monitor the barbecue carefully while cooking and turn the flame level to low, or off, if
flare-ups intensify.
To keep flare-ups to the desired level, do the following:
• Trim fat from meats before grilling.
• Always cook with the lid down, and cook at the lowest most efficient heat setting.
• Ensure that the heat distribution plates, cooking grates and the bottom of the firebox are cleaned
regularly to eliminate grease build up.
• Flare-ups can increase the temperature of the barbecue and add to the buildup of grease, increasing
the risk of a grease fire. Keeping your barbecue clean, and regularly checking for obstructions,
including; spider webs, will ensure that your family is protected from serious safety hazards, such as
“Flash-Back” and “Grease Fires”.
WARNING
Old grease accumulated on key parts, such as heat plates, cooking grates and the lower burner
box, is highly flammable. Avoid dangerous flare-up and grease fires by regularly removing and
cleaning key parts.
Grease Fires
Characteristics of a Grease Fire
•A fire burning inside the barbecue burner box that may become uncontrollable, if not monitored
•Usually accompanied by high flames, a lot of smoke and black soot
Prevent Grease Fires:
•Remove grease build-up on key parts such as heat distribution plates, cooking grates, and burner box
•Frequently cleaning the QUICK CLEAN™ grease collection plate and grease cup
•Always reducing cooking temperature to MED or LOW heat, following PREHEAT.
•Performing a burn-off of grease prior to each barbecue session, by adjusting your barbecues temperature
to “HI”, and letting it stand for 10-15 minutes with the lid closed.
9
Flash-Back Fires
Spiders and insects are attracted to the smell of gas, and often build nests inside your
barbecue’s burners, causing the potential risk of a Flash-Back fire. Lighting your burners
without first cleaning the venturi tubes, port holes, and interior of your burners, can lead to a
serious Flash-Back fire resulting in property damage and/ or personal injury.
Characteristics of a Flash-Back fire
•Burners will burn with large yellow flames
•Hot or melting control knobs
•A fire or flash of fire burning outside of the burner box,
usually visible behind or under the control panel
CONTROL
PANEL
VALVE
SPIDER WEBS
INSIDE VENTURI
BURNER
•Burners may not light
Prevent “Flash-Back Fires” by:
•Remove burners to clean and clear blockages
•Clean tip of valve gas jet to remove any build-up or blockages
WARNING:
At first sight of yellow, unruly flames, or poorly lit burners, shut down your BBQ and remove and
clear obstructions, like insect webs, from your burners and valve gas jet.
FOR YOUR SAFETY
•DO NOT throw water on a fire
•DO keep baking soda handy to extinguish a fire
•DO follow all warnings and safety checks outlined in the Safety & Care Manual and Assembly Manual
•DO protect your family and home by performing the cleaning and maintenance steps outlined in this
manual
For more information regarding these issues please visit us at www.colemanbbqs.com
10
TROUBLESHOOTING
Resolving InstaStart™ Ignition Performance Issues
1. Check the electronic ignition box for un-plugged electrode wires.
Push-in firmly.
2. Check the wires for damage.
3. Replace the battery in the electronic ignition box. Positive end
facing outwards.
4. Check battery cap for proper threading.
5. Check that all electrodes (attached to the burners) spark when
the Instastart™ button is pressed.
6. Check to make sure that the Instastart™ ignition button, located on
the control panel, has continuous clicking sound when pressed.
Battery
Igniter
Battery Cap
-
+ the Lid.
Replace the battery. Open
Press Ignition button and listen for rapid clicks.
7. Check to ensure that the tip of the electrode is positioned close
enough to the burner port holes to light correctly.
8. Check electrodes for cracks in the porcelain insulator.
Coleman® Even heat™ SMALL SPACES
Coleman® Even heat™ 3 BURNER / DUAL FUEL
Instastart™ Ignition
Button Wires
Instastart™ Ignition
Button Wires
Main Burner
Electrode wire
Main Burner
Electrode wire
* Dual Fuel BBQ does not have side burner
Side Burner
Electrode Wire
Coleman® Even heat™ barbecue 4 Burner
Side Burner
Electrode Wire
Instastart™ Ignition
Button Wires
Main Burner
Electrode wire
PROBLEM
Burners will not light
(with igniter or match)
Burners will not light with the
igniter (No spark)
Fire at control knob and
control panel = Flash Fire
Yellow smokey flames/ gas
odour can be smelled
IDENTIFYING THE CAUSE:
• Positive connection has not been made between the tank and
the regulator.
• Low or out of propane
• Gas supply valve is turned off
• EVEN HEAT™ Burners are not properly seated over valve orifices
• Flow limiting device in regulator has been activated. See Resetting the
Regulator Flow Limiting Device on page 4 and page 6.
• Ignition battery is dead or corroded
• Loose Electrode Wires
• Broken electrode – ceramic casing around electrode damaged
• Faulty Electronic Ignition box
• EVEN HEAT™ burner and/or burner tubes have a blockage
• EVEN HEAT™ burner is improperly seated over gas jet
• EVEN HEAT™ burner and/or burner tubes have a blockage
11
PROBLEM
Flame blows out on LOW
IDENTIFYING THE CAUSE:
PROPANE MODELS:
• Flow limiting device in regulator has been
activated either due to a leak or improper lighting. See page 4.
• Low or out of propane
• High Wind condition – Adjust BBQ to shield from wind
• EVEN HEAT™ burner improperly seated on gas jet
NATURAL GAS MODELS:
• Installation issues. See Natural Gas Hook-Ups
and Warnings on page 6.
• Not using the Natural Gas Hose supplied with this BBQ.
• Flow limiting device has been activated. See page 6 (Natural Gas
models).
Low heat
PROPANE MODELS:
• Flow limiting device in regulator has been activated either due to a
leak or improper lighting. See page 4.
• Make certain the problem is isolated to only one burner. If it appears
so, the EVEN HEAT™ burner and/or burner tubes are blocked
• Check for a bent or kinked fuel hose
• In colder temperatures preheat for longer periods.
NATURAL GAS MODELS:
• Not using the Natural Gas Hose supplied with this BBQ.
• Gas pressure is affected by the length and piping size of the gas line
from the home. Follow the recommendations in the chart below. See
natural gas hook-ups and warnings on page 5.
From Home to BBQ
Up to 25’
3/8” diameter
26-50’
1/2” diameter
51- 100’
2/3” of run 3/4” or 1/3”of run 1/2”
Low or incomplete flame
(assuming burners and
Venturi tubes are free and clear
of blockages)
PROPANE MODELS:
• Flow limiting device in regulator has been activated. Flow limiting
device has been activated. See page 4.
Too much heat/
Excessive flare up
• Grease build up around burner system causing dangerous flare ups
and over-heating.
• Cooking on the “Hi” setting, without adjusting temperature control.
• Grease collection plate and grease cup need to be cleaned.
• Covering more than 70% of the cooking surface may cause the BBQ
to overheat.
• Excessive fat on meat and cooking on high temperatures.
Inside of lid is peeling - like
paint peeling
• The interior lid is Aluminum not painted. Baked on grease build-up
has turned to carbon and is flaking off. Clean thoroughly.
Decreasing heat,
“popping sound”
• Out of Propane
• Burner and/or burner tubes are blocked
Humming noise from Regulator
• Cylinder valve opened too quickly
Melting gas supply hose
• Your BBQ’s Gas supply hose and regulator contains a thermal element
that will shut off the flow of gas between 240°F and 300 °F, by
melting the supply hose and essentially disconnecting from the LP
cylinder.
• Poor ventilation caused by in-appropriate clearance at the sides and
rear of the BBQ.
• Overheating caused by high cooking temperatures and grease
build-up.
• Build up of grease in quick clean grease cup and tray.
NATURAL GAS MODELS:
• Installation issues. See Natural Gas Hook-Ups and Warnings on page
6.
• Not using the Natural Gas Hose supplied with this BBQ.
• Flow limiting device has been activated. See page 6.
12
CARE AND CLEANING
If you are experiencing any of the following performance or safety issues, including, but not limited to;
1) barbecue not reaching temperature potential, 2) yellow burner flames, 3) the smell of gas, 4) popping
noises, 5) delayed burner ignition, 6) uneven heat, 7) flash fires, or 8) grease fires, TURN OFF YOUR
barbecue immediately and perform the following COLEMAN® Care and Cleaning regime.
Care and Cleaning Regime
Cleaning and maintaining your barbecue ensures your families safety, optimal parts performance, and a long
life for your barbecue. Perform at the start of the season, and at least twice in-season, more if the barbecue
is being used frequently or year-round.
CAUTION:
Always allow sufficient time for the barbecue to cool fully before handling or cleaning any of
its parts.
STEP ONE: Remove and/or disassemble the following parts; cooking grates, warming rack, Even Heat™ heat
distribution plates, Even Heat™ burners and the Quick Clean™ grease management system.
STEP TWO: Follow the care and cleaning instructions outlined below.
Burner box
• Use a plastic paint scraper to remove build-up, food residue and ashes inside the barbecue
housing and lid.
• If necessary, wash the inside of the barbecue burner box with detergent and water
solution. Always rinse and dry thoroughly before re-installing parts.
• For heavily soiled burner boxes use a crumpled piece of
aluminum foil to help remove build up.
Quick Clean™ Grease Management system channels
grease to a removable grease cup for effortless
clean-up. The grease cup and grease tray are located below
the burner box of the appliance, accessible from the rear of
the barbecue. The grease cup and collection tray should be
emptied regularly to prevent possible flare ups, spillage or
grease fires.
Quick Clean™
grease tray
Quick Clean™
• Always wait for grease to cool before removing the grease
grease cup
cup or collection tray.
• Use a paint scraper to remove all build-up. Wash the grease collection tray and grease cup
with soap and water, rinse and dry thoroughly before replacing.
Even Heat™ Burners
• Remove the hardware used to assemble the burners to the carryover assembly.
(It may be necessary to use WD40 to help loosen difficult to remove hardware)
• Remove your burners from the barbecue
• Brush the surface of the burner to remove surface debris
• Clean the burner port holes using a wire or paperclip to unclog the ports. Do not use any
tools that will cause damage to or enlarge the port holes.
• Use a flexible venturi cleaning brush to clean the interior of the burner. Shake any loose
debris out of the burner, through the gas inlet.
• Use a cotton swab to remove debris from the valve gas jets
• Re-install the burner. Ensure that the burner covers the valve gas jet.
CAUTION:
Do not use anything larger in diameter than the port hole itself as this may cause damage to
the burner port holes.
Sear Stove (if applicable)
• Due to the high intensity of the Sear stove burner, most drippings and food
particles that fall onto the burner surface are immediately incinerated. However, some
debris and residue may remain. To remove buildup, operate the Sear stove burner
for an additional 5 minutes on “MAX”.
• If ceramic appears to be wet, remove the burner from the grill. Turn upside down to drain
the excess water. Bring indoors and dry thoroughly.
• Avoid impact with hard objects.
13
EVEN HEAT™ Heat Distribution Plates
Your EVEN HEAT™ Heat Distribution Plates will protect burners from direct drippings of
grease, fats and salty marinades, distribute heat evenly across the cooking surface and incinerate grease drippings creating the authentic barbecue flavours we love.
When allowed to accumulate, the build-up of grease may cause a number of safety issues,
including flare-ups and grease fires. Failure to follow the steps outlined below may lead to
rapid deterioration of this part, moisture damage or rust-through.
Note: Do not allow grease to build up on the heat distribution plates. Any leftover grease
can ignite causing serious flare-up fires or more dangerous and uncontrollable grease
fires.
• Remove and clean heat distribution plates every other time you barbecue, the moment
you notice build-up, or after cooking fatty meats including; sausages, hamburgers or
pork ribs.
• Use a grill brush to remove buildup. We recommend doing this over a large garbage
receptacle.
• Clean away all remaining debris with mild soap and warm water.
• Dry thoroughly.
• Re-install.
COLEMAN® DUAL SURFACE CAST IRON COOKING GRATES
Seasoning cooking grates with vegetable shortening improves cooking performance and
heat retention, prevents damage and deterioration due to moisture and humidity, creates a
non-stick surface for cooking, and extends the life of your cooking grates.
Tips:
• Always have vegetable shortening on hand for seasoning your cooking grates.
• Never use your cooking grates until they have been seasoned. Follow the directions
outlined in this manual.
• Always prep your cooking grates with a light coating of vegetable shortening or vegetable
oil, and preheat on “HI” to the desired temperature.
• Always perform a burn-off and clean up with your grill brush, at the start of your cooking
session. Leftover oil on your cooking grates, will help to protect them in between cooking
sessions.
How to season your COLEMAN® DUAL SURFACE CAST IRON COOKING GRATES
1. Brush away build-up with a barbecue grill brush.
2. Wash cooking grates with soap and water. Do not immerse grates in water.
3. Rinse and dry thoroughly with a towel. If cleaning on a very hot day, allow grates to dry
in the sun.
Important: Never allow cooking grates to soak in water or stay wet.
4. Coat entire cooking grate, top, bottom, sides and each rod with vegetable shortening.
DO NOT use salted fat such as margarine, butter, or any non-stick cooking spray. Do not
use olive oil as it burns off at high temperatures.
5. Place your COLEMAN® Dual Surface Cast Iron Cooking Grates in position on the barbecue
and preheat on “HI” for 20 minutes.
6. Shut down and allow your grates to cool down.
7. When the grates have been allowed to cool, the seasoning process is complete.
When you season your porcelain cast iron cooking grates with vegetable shortening, you are
permeating the pores of your cooking grates, to create an improved non-stick surface, better
performance and optimal protection against moisture and water damage. With continued
care and seasoning your cooking grates will offer years of excellent performance.
STORING YOUR COOKING GRATES
1. Remove your Dual Surface Cast Iron Cooking Grates.
2. Clean, season, and wrap in a dry cloth
3. Store indoors or in a dry location
14
CARE AND CLEANING
Caring for your Barbecues EXTERIOR SURFACES
ALL MATERIALS including stainless steel, porcelain and black or silver painted steel parts
can become stained, soiled and corroded by dirt, pollution, deposits from inappropriate
cleaners and especially grease. To protect the appearance and integrity of the surface,
routine cleaning is essential. Contaminants vary greatly in their effect on appearance,
corrosivity and ease of removal. It may be necessary to identify the contaminant or
experiment with various cleaners in order to resolve issues including the removal of free-iron
contamination.
• DO remove dirt and contamination immediately to avoid permanent damage to stainless
steel, porcelain or painted surfaces,
• DO test all cleaners on a small inconspicuous area to ensure that it is beneficial for surfaces,
• DO only use cleaners made specifically for outdoor products
• DO use one of the following methods of cleaning:
o Warm water and mild soap solution to remove all contaminants
o Warm water, detergent, solvent solution to remove grease buildup
o 50/50 mixture of vinegar and water for removing surface dirt and contamination
o Commercial grade stainless steel cleaner for polishing
• DO thoroughly rinse off all cleaners, with clean warm water, and dry completely with
a soft cloth.
• DO only use a soft clean cloth, when cleaning surfaces to avoid scratching finish. Microfiber
cloths are highly recommended
• DO NOT use any chloride-containing detergents.
• DO NOT use any abrasive cleaners.
• DO NOT use any chemical cleaners as they may strip the paint, causing permanent damage
• DO NOT use ordinary carbon steel brushes, steel wool or scouring pads as they may leave
particles embedded on the surface which can lead to rust
• DO NOT use bleach or cleaners containing bleach. If accidental contact occurs wash
immediately with baking soda and rinse thoroughly.
For more COLEMAN® Care and Cleaning tips, visit us online @ www.colemanbbqs.com
STEP THREE: Storing your barbecue
To avoid the deterioration and degradation of parts, perform the following tasks prior to
storing your BARBECUE for the season.
• Remove and clean all Barbecue components as outlined in the Care and Cleaning section
of this manual
• Remove cooking grates, wrap them in a towel and store indoors. For porcelain cast iron
cooking grates, be sure to season the cooking grates before wrapping in a towel and
storing indoors.
• If storing the BBQ away for the winter, or for a prolonged period of time, remove
the igniter battery to avoid corrosion
• If storing the Barbecue indoors: the propane cylinder MUST be removed.
• The propane cylinder MUST always be stored outdoors, in a well ventilated area.
• When storing your Barbecue in a garage, you should place a piece of cardboard
underneath your Barbecue to protect it from concrete moisture damage.
• If storing the Barbecue outdoors: the propane cylinder valve must be turned “OFF”.
• DO NOT under any circumstances store the Barbecue with propane tank in the garage or
near any heat source.
• Use a BARBECUE cover to help protect your Barbecue
• Please note: covering your BBQ will protect it from the effects of snow, rain, animal
droppings and more, but will not protect against moisture damage, condensation, and
other corrosive agents.
IMPORTANT
If you have a Coleman® Even Heat™ Dual Fuel Barbecue, consult the Charcoal Guide for
charcoal care, cleaning and storing tips.
15
START GRILLING!
WARNING:
Always observe safe food handling and safe food preparation practices when using this
Barbecue, to prevent food-borne illnesses.
Avoiding Cross Contamination
Sanitize counters, equipment and utensils after handling raw meat, seafood or poultry. Rinse with a dilute
chlorine bleach solution, one teaspoon to a quart of water. Avoid cross-contamination in preparing food.
• Always cook foods adequately. Undercooked foods can retain bacteria, especially if thawed or exposed to
warm conditions prior to cooking
• Always use a meat thermometer to confirm that foods have been fully cooked.
• Always use separate plates and utensils for the handling of raw food. Never place raw food and cooked
food on the same plate, and never place cooked food on a plate that was used for handling raw food.
• Always carefully wash all plates and utensils used to handle raw food before using them to handle cooked
food.
• Always wash all vegetables, seafood and poultry before cooking.
• Always leave uncooked foods in the refrigerator until you are ready to start cooking
• Always marinate meat in the refrigerator. Always dispose of the excess marinade, and never reuse it.
• Always preheat your barbecue to the desired temperature before cooking, and clean all grease and food
residue before using the cooking grates.
GRILLING TIPS:
ATTENTION:
Cooking grates must be seasoned before first use. Refer to the instructions on p. 14. For best results use
vegetable shortening.
A few helpful hints will ensure that your grilling results are perfect every time!
• Apply a light coating of cooking oil or vegetable shortening to your cooking grates before grilling, to
prevent foods from sticking.
• Always remove and clean heat distribution plates before preheating.
• Trim excess fat from meats and slit the remaining fat at two-inch increments to avoid flare-ups and curling.
Fatty meats may be cooked indirectly on lower heat settings.
• Baste meat with barbecue sauce or other sugar-based sauces only during the last few minutes of cooking
to prevent burning.
• Always preheat the appliance on “HI” to the desired temperature before adding food.
Coleman® Even Heat™ Barbecues have been designed to offer a range of temperatures and unlike most
grills, can quickly reach searing temperatures:
• To Preheat: depending on the foods you are preparing, always preheat your grill to the temperature
required.
• If lower temperatures are required for slow cooking foods such as; chicken and pork ribs, ensure that
you do not preheat to very high temperatures. The Dual Surface Cast Iron Cooking Grates have the
best heat retention and will hold very high temperatures longer. Always target the temperature you
need during preheat.
• Cook similar portion sizes together, so that they all cook evenly
• Always ensure that the temperature is adjusted following preheat. “MAX” is intended for fast pre-heating
of the appliance, searing steaks and other cuts of meat.
• Medium heat is intended for most grilling, baking and roasting
• Low heat is intended for warming, slow cooking, smoking or cooking delicate foods
• Never pierce foods while they are cooking on the Barbecue, as this will dry them out
• Turn foods infrequently. Turn food only once, halfway through cooking time.
• Always cook with lid down to preserve BARBECUE temperature.
• Apply salt only after cooking to prevent drying out the meat.
16
BARBECUE COOKING METHODS
Direct Cooking — This is the most popular cooking method and involves cooking food directly over the
flame, such as searing a steak
Indirect Cooking — Food is placed on the cooking grates, offset from the heat source. With the barbecue
lid closed reflected heat surrounds the food cooking it more evenly and gently. This method is perfect for
roasts, but is also useful whenever you want to slow cook or bake a wide variety of foods. The barbecue lid
should always be closed when using the indirect cooking method.
WARNING
To ensure that it is safe to eat, food must be cooked to the
minimum internal temperatures listed in the table below.
AAFC* Safe Minimum Internal Temperatures
Fish
145° F
Pork
160° F
Egg Dishes
160° F
Steaks and Roasts of Beef, Veal or Lamb
145° F
Ground Beef, Veal or Lamb
160° F
Whole Poultry (Turkey, Chicken, Duck, etc.)
165° F
Ground or Pieces Poultry (Chicken Breast, etc.)
165° F
* Agriculture and Agri-Food Canada
APPROXIMATE GRILLING TIMES
BEEF
Size
GRILLING TIME
INTERNAL TEMP
Steaks
3/4” (2cm) thick
3 to 4 min. /side
med rare 145°F (62°C)
4 to 5 min. /side
med 160°F (71°C)
Kabobs
1” (2.5cm) cubes
1/2” (12mm) thick
3 to 4 min. /side
145°-160°F (62-71°C)
3 to 4 min. /side
med 160°F (71°C)
18 to 22 min /lb.
145°-160°F (62-71°C)
Sirloin tip
4-6 lbs. (1.8-2.7kg)
3 1/2--4 lbs. (1.5-1.8kg)
20 to 25 min. /lb.
145°-160°F (62-71°C)
Ribs, back
cut in 1-rib portions
10 min. /side
med 160°F (71°C)
half, 2-3 lbs. (0.9-1.3kg)
10 to 12 min. /side
med rare 145°F (62°C)
Tenderloin
whole, 4-6 lbs. (1.8-2.7kg)
12 to 15 min. /side
med 160°F (71°C)
Size
3/4” (2cm) thick
1 1/2” (4cm) thick
GRILLING TIME
INTERNAL TEMP
3 to 4 min. /side
med 160°F (71°C)
7 to 8 min. /side
med 160°F (71°C)
1/2-1 1/2 lbs. (0.2-0.6kg)
15 to 25 min. total
med 160°F (71°C)
2-4 lbs. (0.9-1.8kg)
1 1/2 to 2 hrs.
med 160°F (71°C)
Size
GRILLING TIME
INTERNAL TEMP
6-7 lbs. (2.7-3.1kg)
3/4” (2cm) thick
25 to 30 min. /lb.
145°-160°F (62-71°C)
6 to 7 min. /side
med 160°F (71°C)
Size
GRILLING TIME
INTERNAL TEMP
3-4 lbs. (1.3-1.8kg)
60 to 75 min.
in thigh 180°F (82°C)
18-24 oz. (510-680g)
45 to 55 min.
in thigh 180°F (82°C)
6-8 oz. ( 170-226g) each
10 to 15 min. /side
170°F (77°C)
Hamburger patties
Roast, rolled rump
PORK
Chops, bone-in
Chops, bone-out
Tenderloin
Ribs (indirect heat)
VENISON
Roast, saddle or leg
Steaks
CHICKEN
Broiler fryer (indirect heat)
Cornish hens
Breast halves, bone-in
Breast halves, boneless
Legs or thighs
Drumsticks
Wings
4 oz. (113g) each
6 to 8 min. /side
170°F (77°C)
4-8 oz. (113-226g)
10 to 15 min. /side
180°F (82°C)
4 oz. (113g)
8 to 12 min. /side
180°F (82°C)
2-3 oz. (56-85g)
8 to 12 min. /side
180°F (82°C)
•When outside temperature is cooler than 65°F (18°C) and/or altitude is above 3,500 ft. (1067m), additional
cooking time may be required. To insure that meat is completely cooked use a meat thermometer to test
internal temperature.
• Lifting grill lid during cooking process may extend cooking time due to heat loss.
17
GENERAL SIDE BURNER TIPS (if applicable)
Your side burner will boil, sauté, stir fry and warm with ease.
• For best results preheat your side burner for 10-15 minutes on “HI”
• When boiling water or warming foods always ensure that you are using a covered pot or wok
• Ensure that your gas barbecue is positioned away from high winds or cold air as this will adversely affect
your side burner preheating and cooking performance
• Your 11,000-13,000 BTU/hr side burner will take longer to preheat and cook than your indoor range.
• Inspect and clean your side burner orifice periodically and confirm that it is clear of cobwebs or
other insect debris that may cause a FLASH FIRE.
GENERAL SEAR STOVE TIPS (if applicable)
•
•
•
•
ALWAYS wear protective gloves when using this high intensity Sear stove.
ALWAYS keep children, pets and guests away from this Sear stove when in operation.
The Sear stove lid is for STORAGE ONLY. Only close after stove has cooled down.
Your Sear stove includes a versatile grate. Always position the accessory needed first, before lighting
the Sear stove burner.
• Never place frozen foods on cooking griddle. Always thaw in fridge or at room temperature prior to
cooking.
• This Sear stove is temperature adjustable. Only use the “MAX” setting for preheating (only
2 minutes), or for searing foods.
• Avoid overcooking foods by using the temperature setting that best describes the foods you are cooking.
• Due to the intense heat of the Sear stove, food left unattended will burn quickly.
• Avoid Flash-Back Fires by routinely inspecting and cleaning the Sear stove Venturi tube of all
debris.
• Avoid water damage and other liquids.
• Do not throw water into the grill to douse a flame or control flare ups.
• Do not attempt to operate the Sear stove in open air while raining.
• When using Sear stove to fry, use a wok topper. Ensure that a lid or splatter screen is used to
protect against grease splatter.
• When using Sear stove to sear, always reduce temperatures when desired sear marks have been
achieved.
ATTENTION
Do not operate the infrared side stove if it appears wet! Remove the burner, turn upside down
to drain the excess water, and bring indoors to dry thoroughly.
QUICK CHECK™ FUEL GAUGE (if applicable)
Your COLEMAN® EVEN HEAT™ Barbecue comes equipped
with the Quick Check™ Fuel Gauge, which helps to remove
the guess-work surrounding fuel levels. This easy to read,
control panel mounted fuel gauge, will allow the user to
quickly check propane levels before, during and after a
barbecue session.
Quick Check™
Fuel Gauge
Quick Check™
Hydraulic Tube
Quick Check™
The Quick Check™ Fuel Gauge Assembly is made up of
Tank Support Bracket
three parts, namely; Quick Check™ Fuel gauge, Quick
Check™ Hydraulic tube, and the Quick Check™ Tank
support bracket. All three parts are factory pre-assembled, and tested to ensure proper
function and reliability.
CAUTION: To avoid damaging the Quick Check™ Hydraulic systems please pay attention
to the following;
DO avoid over-bending the hydraulic tube, during assembly.
Avoid causing leaks in the system by NOT pulling, crimping or bending the Quick Check™
hydraulic tube
DO avoid excess force at any of the connection points of the Quick Check™ Fuel Gauge
Assembly
DO assemble the Quick Check™ hydraulic tube to the left side panel, to protect and avoid
damaging
DO ensure that ALL HARDWARE is tightened correctly to ensure proper support for the
Quick Check™ tank support bracket and tank
18
EASY READ 60 MINUTE COOKING TIMER (if applicable)
Your COLEMAN® EVEN HEAT™ Barbecue comes equipped
with the easy read 60-minute cooking timer. Times 0 to
60 minutes in 1 minute increments, and sounds with a loud
5-second bell when time expires. This timer is completely
mechanical so battery replacement is never needed.
To use the timer function on your COLEMAN® EVEN
HEAT™ Barbecue, turn the timer knob fully clockwise to
enable the alarm, then turn it counter-clockwise to set
desired time (in minutes). The timer rings when set time
is over.
Timer
Turn timer knob fully clockwise
Turn timer knob to
desired set time
BATTERY DISPOSAL
Always dispose of used batteries according to local regulation.
19
WARNING:
HOT SURFACES
!
!
!
T
E V E N H E A
WARNING
EXTERIOR SURFACES WILL BECOME VERY HOT. TO PREVENT BURNS,
ALWAYS WEAR INSULATED PROTECTIVE BARBECUE MITTS WHEN
WORKING AT THE BARBECUE.
• KEEP AWAY FROM COMBUSTIBLE MATERIALS
• KEEP CHILDREN AND PETS AWAY FROM THIS GAS FIRED APPLIANCE
• AVOID DANGEROUS FIRES: DO NOT LEAVE YOUR BBQ UNATTENDED
WHILE IN OPERATION
20
WARRANTY AND SERVICE
BEFORE YOU CALL FOR SERVICE have the following information available:
1. Serial number: The serial number can be found on the side of the BBQ carton, the cover page of the user
manuals, and on the rating label located on the BBQ cart side panel.
2. Model number: The model number is located on the front cover of the user manual, the bottom right
corner of the rating label and also on your cash register receipt.
3. Proof of purchase by the original owner.
Call the Coleman® Customer Care Hotline 1-800-275-4617
HOURS: 10AM- 7PM EST Mon-Fri, Closed Saturday and Sunday
IF YOUR PRODUCT IS DAMAGED:
1. Call the Coleman® Customer Care Hotline 1-800-275-4617
2. Do not return to the store for replacement of damaged or defective parts. Coleman® Customer Care will
ensure that all in-stock replacement parts arrive at your home within 3-10 business days.
3. Concealed Damage: If damage is unnoticed until merchandise is unpacked, resolve issue by contacting
Coleman® Customer Care immediately. Missing or damaged parts should be claimed within 30 days of
purchase.
To ensure your satisfaction and for follow-up service,
register your BBQ online at www.colemanbbqs.com
LIMITED Warranty:
Winners Products, hereby warrants to the ORIGINAL PURCHASER of this Coleman® EVEN HEAT™
Barbecue that it will be free of defects in workmanship, from the date of purchase, for the period of the
warranty, as outlined below.
Please see Limitations and Exclusions section on the following page.
Coleman® SMALL SPACES BARBECUE / Coleman® EVEN HEAT™ 3-BURNER BARBECUE /
Coleman® EVEN HEAT™ 4-BURNER BARBECUE / Coleman® EVEN HEAT™ DUAL FUEL BARBECUE
Limited Lifetime:
InstaStart™ Ignition
Limited 5 Year:
Stainless Steel EVEN HEAT™ Burners
Manifold Assembly
Carryover Bar
Limited 1 Year:
All remaining parts
CAUTION
Some parts may contain sharp edges – especially as noted in the manual! Wear protective gloves
if necessary. For residential use ONLY. Do not use for commercial cooking.
WARNING
Do not attempt to repair or alter the hose/ valve/ regulator for any assumed defect or for any
type of retro fit or conversion. Any modifications to this assembly will void your warranty and
create the risk of a gas leak and fire. Use only authorized replacement parts supplied by the
manufacturer, for your model.
21
WARRANTY
LIMITATION AND EXCLUSIONS
Winners Products has the following limitations to its warranty:
1. This limited warranty is non-transferable and becomes void if used for commercial or rental purposes.
2. This warranty applies only when barbecue is used in Canada
3. Warranty is in lieu of all warranties, expressed or implied, and all other obligations or liabilities related
to the sale or use of its grill products.
4. Winners Products shall not be liable for incidental, consequential, special or contingent damages
resulting from its breach of this written warranty or any implied warranty.
5. Winners Products will repair or replace parts, at its option, proven defective under normal use and
service and which on examination during the applicable warranty period. (See exclusions to warranty
coverage below)
6. Shipping and handling charges are the responsibility of the original consumer-purchaser for all in/out of
warranty part orders.
7. This limited warranty will not reimburse you for the cost of any inconvenience, food, personal injury or
property damage.
8. Winners Products does not authorize any person or company to assume for it any other obligation or
liability in connection with the sale, installation, use, removal, return, or replacement of its equipment;
and no such representations are binding on Winners Products.
9. Visit us at www.colemanbbqs.com to register your product on line. The purchaser shall retain a copy
of the purchase invoice for future claims.
Winners Products excludes from its warranty the following:
a. Accidental damage, abuse, tampering or misuse, misapplication, vandalism, careless handling,
b. Damages caused by improper assembly or installation, alteration, clearance to combustible materials,
and failure to follow proper usage, safety and maintenance instructions presented throughout this
manual,
c. Failure to perform regular maintenance, safety checks and service, including but not limited to removal
of insects from venturi tubes, resulting in a flash-back fire, damage caused by grease fires,
flare-up fires or fires resulting from improper connection of hose to gas source,
d. Part failure due to lack of cleaning and maintenance, part failure due to use of improper cleaning
products, such as indoor stainless steel cleaners, abrasive and chemical cleaners, porcelain oven cleaner
and other chemical cleaners which can cause damage to surfaces,
e. Normal wear and tear, chipping and scratching on painted or porcelain enamel surfaces, dents,
discoloration caused by environment or heat, surface corrosion, rust or rust perforation, chemical
exposure in the atmosphere and other damages which result with normal use and are otherwise
uncontrollable by the manufacturer.
There are no other express warranties except as set forth herein and any applicable implied warranties
of merchantability and fitness are limited in duration to the period of coverage of this express written
limited warranty.
To ensure your satisfaction
And for follow-up service, register your grill online at:
www.colemanbbqs.com
Join the conversation
facebook.com/colemangrills
Coleman®,
, and
twitter.com/colemangrills
are registered trademarks of
The Coleman Company, Inc. used under license. ©2015 The Coleman Company, Inc.
22