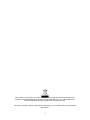
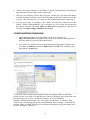
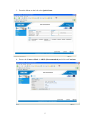
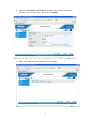
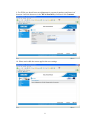
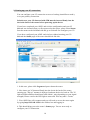
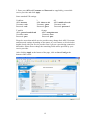
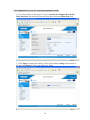
1
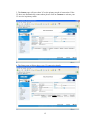
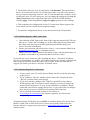
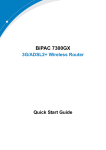
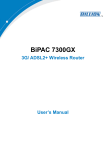
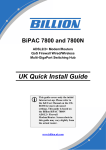
BiPAC 7300GX
ADSL2/2+ Modem/Router with 3G back-up
QoS Firewall Wireless
Multi-Port Switching Hub
UK Quick Install Guide
L
This guide covers only the initial
Internet set-up. Please refer to
the full User Manual on the CDROM for more advanced
settings. This guide is based on
the Billion BiPAC 7300GX
3G/ADSL2+ Wireless
Modem/Router. Screen shots in
this guide may vary slightly from
the actual router.
www.billion.uk.com
This symbol on the product or in the instructions means that your electrical and electronic
equipment should be disposed at the end of its life separately from your household waste.
There are separate collection systems for recycling in the EU.
For more information, please contact the local authority or your retailer where you purchased
the product.
2
QUICK INSTALL GUIDE
Billion 7300GX 3G/ADSL2+ Wireless Modem/Router Installation
1.1 Starting out:
Before you can establish an Internet connection through your Billion 7300GX
Modem/Router make sure you have the following:
1.
A Computer or Notebook with an installed Network Adaptor (sometimes called
an Ethernet Adaptor, Network Card or NIC)
2.
An ADSL or DSL service account and configuration information provided by
your Internet Service Provider (ISP). You should need only a User Name and
Password, but you can check with your ISP to see if you require any of the
other following configuration parameters to connect your Billion 7300GX
Modem/Router to the Internet :
a.
b.
c.
d.
e.
f.
ISP User Name and Password
VPI/VCI parameters
Multiplexing Method
Host and Domain Names
ISP Domain Name Server ( DNS ) Address
Fixed or Static IP Address.
3.
A compatible 3G datacard for 3G connectivity with SIM card (see
www.billion.uk.com/compatible-3G.htm for a full list of compatible cards) from
your mobile service provider.
4.
Username and Password and APN from your mobile service provider.
1.2 Steps for Connection:
The following are the steps to properly connect your Billion 7300GX Modem/Router:
1. Turn off your computer.
2. If you do not have an ADSL faceplate installed by your service provider, you
must ensure ADSL splitters (also called microfilters or filters) are fitted to all
telephone sockets in use.
3. Connect the supplied ADSL (RJ-11) cable from the splitter/filter of your chosen
telephone socket (or ADSL faceplate if you have one) to the DSL Port of your
Billion 7300GX Modem/Router.
4. Connect the yellow Ethernet cable (RJ-45) from one of the Ethernet ports of your
Billion 7300GX Modem/Router to the Network Adaptor in your computer.
5. Insert your 3G datacard with SIM firmly into the slot at the back of the
Billion 7300GX Modem/Router. Ensure any “flip-out” antenna is deployed.
3
6. Connect the Power adaptor to the Billion 7300GX Modem/Router and plug the
other end into a Power outlet. Power up the unit.
7. Turn on your computer. Please allow up to 45 seconds for your Network Adaptor
to locate the Router. Please wait for the DSL light on the front of the router to turn
to solid – this may take up to 1-2 mins (see 3.1 Troubleshooting the connection).
8. You are now ready to configure your ADSL and Wireless connection for the
Billion 7300GX Modem/Router. All you need to do is to follow the instructions
that follow and enter your User Name and Password as supplied by your Service
Provider. No other changes should be necessary.
2.1 ADSL and Wireless Configuration:
1. Open Internet Explorer or your default web browser and type in
http://192.168.1.254 in the address bar (where you would normally enter the
web site address) as per the illustration below.
2. You will be presented with a user name and password prompt.* Simply enter
user name as admin, password as admin and click OK. This will take you to
the modem’s Status page.
* If the user name and password prompt box does not appear make sure that any
firewall or anti-virus such as Trend Micro or Norton is disabled. Also ensure that your
Internet settings are correct. (In Internet Explorer go to Tools/Internet
Options/Connections and make sure “Never dial a Connection” is checked. Then
Click on the LAN settings and ensure “Automatically detect settings” is checked and
all other fields are blank. Then go to Tools/Internet Options/Security and return your
Security settings to “default”. )
4
3. From the Menu on the left select Quick Start.
4. Ensure the Connect Mode is ADSL (Recommended) and click on Continue.
5
5. Enter your Username and Password as supplied by your Internet Service
Provider in the relevant fields, and click on Continue.
6. Please wait while the router applies the new settings.
6
7. Now click on Next to Wireless. N.B. If you do not go through the wireless
setup on the Wizard, then you must click Save Config at the bottom of the page
and then click Apply settings to save your username and password to Flash.
8. From the drop down menu in the Security Mode field you can choose your
preferred wireless security (or keep the wireless security disabled.) Please ensure
your wireless adaptor or laptop is compatible with your chosen security mode.
7
9. For WPA you should enter an alphanumeric password (numbers and letters) of
between 8 and 64 characters in the WPA Shared Key field and click Continue.
10. Please wait while the router applies the new settings.
8
11. This completes the wireless security configuration.
12. You should now be connected to the Internet. You can check your connection
on the Status page by selecting Status from the menu on the left-hand side.
13. You are now ready to set up your 3G connection.
To set up your 3G connection your 3G datacard with SIM must be inserted
firmly into the slot in the back of the router before powering up the device.
If your 3G card has a “flip-out” antenna then please ensure that this is
deployed after inserting the card into the slot, before powering up the device.
9
2.2 Setting up your 3G connection:
You can configure your 3G connection to act as a backup (Autofailover mode),
or as your primary connection.
In both cases your 3G datacard with SIM must be inserted firmly into the
slot in the back of the router before powering up the device.
If your have completed your ADSL and wireless configuration and your 3G
datacard was inserted when you first powered up the router, please select Status
from the menu on the left-hand side and go to section 2.3 to configure your 3G.
If you have configured your ADSL and wireless without inserting your 3G
datacard the Status page of the router should look like this.
1. In this case, please click Logout and power down the router.
2. Now insert you 3G datacard firmly into the slot in the back of the router,
ensuring any “flip-up” antenna is deployed, and turn the device back on. The 3G
light will flash and then should turn solid within 1 min (depending on your signal
strength). Please wait for the DSL light to turn solid. This may take 1-2 mins.
3. Your ADSL line will reconnect and you will need to access the router again
by typing http://192.168.1.254 in the address bar and logging in.
4. This should bring you to the router’s Status page. You are now ready to
configure your 3G connection.
10
2.3 Configuration of your 3G connection in Autofailover mode:
1. From Status page, select Advanced>Configuration>WAN>WAN Interface.
2. Ensure Failover/Failback is ticked and then scroll down and click Apply at the
bottom of the page. Now click the blue 3G icon in the Backup Port field.
11
3. Enter your APN and Username and Password as supplied by your mobile
service provider and click Apply.
Some standard UK settings:
Vodafone
APN: internet
Username: web
Password: web
T-mobile
APN: general.t-mobile.uk
Username: user
Password: pass
3
APN: three.co.uk
Username: guest
Password: guest
O2
APN: mobile.o2.co.uk
Username: web
Password: password
Orange
APN: orangeinternet
Username: user
Password: pass
Please be aware that mobile service providers may change their APN, Username
and Password settings depending on the nature of your contract, so be advised to
double-check with your service provider first if you are experiencing connection
difficulties. Please do not change the remaining fields unless specified by your
service provider.
After clicking Apply at the bottom of the page, click on Save Config at the
bottom of the screen.
12
4. Click Apply to write your settings to Flash.
5. This completes the set up of your 3G connection in backup mode. If your
ADSL connection goes down, the router will automatically Failover to your 3G
connection. The Status page will look like this. N.B. The time it takes to Failover
is dependant on the settings in the router and the 3G signal strength. The Default
settings of the router should enable Failover in around 1-2 mins.
13
2.4 Configuration of your 3G connection in primary mode:
1. To set the primary connection to 3G go to Advanced>Configuration>WAN>
WAN Interface and select 3G from the drop down list in the Main Port field.
2. Click Apply to change the settings. Then click on Save Config at the bottom of
the page and Apply to write your settings to Flash.
14
3. The Status page will now show 3G as the primary mode of connection. If the
3G does not automatically connect then please click on Connect to activate your
3G service in primary mode.
4. The Status page will then show your 3G connection details.
15
5. The default setting for your 3G connection is On Demand. This means that if
there is no internet activity the 3G will disconnect after a set time. Once internet
activity resumes (browsing, email etc.) the 3G will automatically reconnect. If you
would prefer your 3G to be always on, you can change the settings by clicking the
Always On button in the Connection field in the 3G WAN Profile and then
clicking Apply, followed by Save Config and Apply again to save the settings.
6. This completes the configuration of your 3G connection. Please logout of the
router when you have finalized your required settings.
7. For advance configuration please access the manual on the CD provided.
3.1 Troubleshooting the ADSL connection:
1. Check that the ADSL light on the front of the router has turned solid. This can
take up to 1-2 mins after switching on. (If the ADSL light slowly flashes then
the router is not detecting an ADSL signal and you should contact your
Service Provider immediately)
2. Ensure your username and password are correct – your username should read
[email protected] (or something similar).
3. Ensure you have a filter attached to the master socket, and check that there are
no phones connected to any extensions that do not have a filter.
If you still can’t get a connection after checking the above – disconnect all phones,
sky boxes, fax machines etc., double–check that all cables are correctly connected and
filters properly attached, restart the router, and try again. If this still fails then we
suggest you contact your Service Provider for further advice.
3.2 Troubleshooting the 3G connection:
1. Always ensure your 3G card is inserted firmly into the slot before powering
up the device.
2. If you card has a “flip-out” antenna, please ensure this is deployed in the
“flip-out” position before powering up.
3. If you have initially configured the 7300GX with ADSL as the primary
WAN interface and 3G as failover mode, and then you want to change the
primary WAN interface to 3G (say for an exhibition or roadshow), then be
aware that your failover settings may be lost, so you will need to reconfigure
them when you revert to ADSL as your primary WAN interface.
4. Please check the Downloads section of our website at
www.billion.uk.com/esupport for firmware upgrades for current card
compatibility.
Telephone Support for Internet Access ONLY is available during office hours from
Mon-Fri 10am–5pm on 0870-8501528. If you are successfully connected to the
Internet and have a support query please go to www.billion.uk.com/esupport and
submit a ticket.
16