1
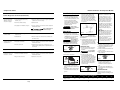
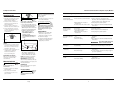
Extreme Contractor Air Compressor Models
Modèles de compresseurs d’air Extreme Contractor
Compresores de aire de Extreme Contrator Modelos
Notes
Operating Instructions
Extreme Contractor Air Compressor Models
Please read and save these instructions. Read carefully before attempting to assemble, install, operate or maintain the product described.
Protect yourself and others by observing all safety information. Failure to comply with instructions could result in personal injury and/or
property damage! Retain instructions for future reference.
Air
Compressors
Notas
Description
General Safety
All models are equipped with
regulators, needle and ball bearings,
and motors with automatic overload
protection. Draining moisture from the
air receivers is required maintenance.
Air compressors are utilized in a variety
of air system applications. Because air
compressors and other components
(material pump, spray gun, filters,
lubrications, hoses, etc.) used make up a
high pressure pumping system, the
following safety precautions should be
observed at all times. Only persons well
acquainted with these rules of safe
operation should be allowed to use the
air compressor.
Safety Guidelines
This manual contains information that is
very important to know and understand.
This information is provided for SAFETY
and to PREVENT EQUIPMENT PROBLEMS.
To help recognize this information,
observe the following symbols.
Danger indicates
!
an imminently
hazardous situation which, if not
avoided, will result in death or serious
injury.
DANGER
Warning indicates
a potentially
hazardous situation which, if not
avoided, could result in death or
serious injury.
! WARNING
Caution indicates a
!
potentially
hazardous situation which, if not
avoided, MAY result in minor or
moderate injury.
CAUTION
Notice indicates
important
information, that if not followed, may
cause damage to equipment.
NOTICE
Unpacking
When unpacking unit, inspect carefully
for any damage that may have occurred
during transit. Make sure any loose
fittings, bolts, etc., are tightened before
putting unit into service.
All electrical work
!
should be done by a
qualified (licensed or certified)
electrician. On a properly wired circuit,
the black wires supply a voltage
potential even when the unit is off.
WARNING
1. Read instruction manuals for each
component carefully, before
attempting to assemble,
disassemble or operate your
particular system.
2. Do not exceed pressure rating of
any component in system.
3. Protect material lines and air lines
from damage or puncture. Keep
hose and power cord away from
sharp objects, chemical spills, oil,
solvents, and wet floors.
4. Never point a spray gun or nailer at
oneself or any other person.
Accidental discharge may result in
serious injury.
5. Check hoses for weak or worn
condition, before each use, making
certain all connections are secure;
do not use if deficiency is found.
Notify an authorized service facility
for examination or repair.
!
DANGER
Breathable Air Warning
This compressor/pump is not
equipped and should not be used
“as is” to supply breathing
quality air. For any application of
air for human consumption, the
air compressor/pump will need
to be fitted with suitable in-line
safety and alarm equipment. This
additional equipment is
necessary to properly filter and
purify the air to meet minimal
specifications for Grade D
breathing as described in
Compressed Gas Association
Commodity Specification G 7.1 1966, OSHA 29 CFR 1910. 134,
and/or Canadian Standards
Associations (CSA).
DISCLAIMER OF WARRANTIES
In the event the compressor is
used for the purpose of
breathing air application and
proper in-line safety and alarm
equipment is not simultaneously
used, existing warranties shall be
voided, and Campbell Hausfeld
disclaims any liability
whatsoever for any loss,
personal injury or damage.
6. Release all pressures within system
slowly; dust and debris may be
harmful.
Disconnect power
!
and depressurize
system before servicing air compressor!
(Turn pressure regulator knob fully
clockwise after shutting off
compressor).
WARNING
REMINDER: Keep your dated proof of purchase for warranty purposes! Attach it to this manual or file it for safekeeping.
www.chpower.com
© 2002 Campbell Hausfeld/Scott Fetzer
For parts, product & service information
visit www.chpower.com
IN602701AV 8/02
Air Compressors
General Safety (Cont.)
7. Follow all local electrical and safety
codes, as well as the National
Electrical Code (NEC) and the
Occupational Safety and Health Act
(OSHA).
8. Wiring and fuses should follow
electrical codes, and current capacity
outlet should be properly grounded.
9. Electric motors must be securely and
adequately grounded. See
grounding instructions and
extension cord information, in this
manual.
10. Always disconnect power source
before working on or near a motor,
or its connected load. If power
disconnect point is out-of-sight, lock
it in the open position and tag to
prevent unexpected application of
power.
11. Guard all moving parts; keep visitors
away. Never allow children in work
area.
Compresores de aire de Extreme Contractor Modelos
23. Do regular maintenance; keep all
nuts, bolts, and screws tight, to be
sure equipment is in safe working
condition .
24. Keep cleaning rags and other
flammable waste materials in a
tightly closed metal container and
dispose of later in the proper
fashion.
25. Drain tank of moisture after each
day’s use. If unit will not be used for
a while, it is best to leave drain cock
open until such time as it is to be
used. This will allow moisture to
completely drain out and help
prevent corrosion of inside of tank.
26. Inspect tank yearly for rust, pin
holes or any other imperfections that
could cause it to become unsafe.
NEVER weld or drill holes in air tank.
Assembly
12. Wear shoes to prevent shock
hazards.
HOSE
The hose should be assembled to hose
connector to connect to coupler on
compressor.
13. Be careful when touching exterior
of operating motor; it may be hot
enough to cause injury.
Installation
14. Protect power cord from coming in
contact with sharp objects.
15. Clean electrical or electronic
equipment with an approved
cleaning agent, such as dry,
nonflammable cleaning solvent.
16. To avoid spontaneous combustion,
discard waste rags into approved
metal waste cans.
17. Never store flammable liquids or
gases in vicinity of compressor.
18. When spraying with solvent of toxic
chemicals, follow instructions
provided by the chemical
manufacturer.
19. Spray in a well ventilated area, to
keep fumes from collecting and
causing health and fire hazards.
20. Do not spray in vicinity of open flames
or other places where a spark can
cause ignition. Do not smoke when
spraying paint, insecticides, or other
flammable substances.
21. Use a respirator when spraying.
22. NEVER reset safety valve or pressure
switch. Keep safety valve free from
paint and other accumulations. This
provides safety against over
pressure.
1. Check and tighten all bolts, fittings,
etc., before operating compressor.
2. Operate compressor in a ventilated
area so that compressor may be
properly cooled.
3. Compressor should be located where
it can be directly plugged into an
outlet, but if this is not possible, an
extension cord may be used. It should
be selected using the extension cord
chart on page 3 as a guide.
WIRING
1. Local electrical wiring codes differ
from area to area. Source wiring,
plug and protector must be rated
for at least the amperage and
voltage indicated on compressor
nameplate, and meet all electrical
codes for this minimum.
2. Use a slow blow fuse type T or a
circuit breaker.
Overheating, short
circuiting and fire
damage will result from inadequate
wiring, etc.
!
CAUTION
EXTENSION CORDS
1. Use only a 3-wire extension cord that
has a 3-blade grounding plug, and a
3-slot receptacle that will accept plug
on product.
2. Make sure extension cord is in good
condition, and heavy enough to
carry current product will draw. An
undersized cord will cause a drop in
line voltage resulting in loss of
power and overheating.
3. To avoid loss of power and
overheating, it is better to use
additional air hose instead of
extension cords to reach work area.
4. Table below shows correct size to
use depending on cord length and
nameplate ampere rating. If in
doubt, use next heavier gauge.
NOTE: The smaller the gauge number,
the heavier the cord.
5. This product is for use on a nominal
120 volt circuit and has a polarized
plug. Make sure that the product is
connected to an outlet having the
same configuration as the plug.
!
DANGER
Do not use an adapter
with this product!
GROUNDING INSTRUCTIONS
1. This product should be grounded. In
the event of an electrical short
circuit, grounding reduces risk of
electrical shock by providing an
escape wire for electric current. This
product is equipped with a cord
having a grounding wire with an
appropriate grounding plug. Plug
must be plugged into an outlet that
is properly installed and grounded
in accordance with all local codes
and ordinances.
Grounding
Pin
Grounded
Outlet
TEST
RESET
Figure 1 - Grounding Method
Improper use of
grounding plug can
result in a possible risk of electrical shock!
!
DANGER
NOTE: Do not use grounding adapter.
2. If repair or replacement of cord or
plug is necessary, do not connect
grounding wire to either flat blade
terminal. The wire with insulation
having an outlet surface that is green
with or without yellow stripes is the
Garantía Limitada
1. DURACION: A partir de la fecha de compra por el comprador original tal como se especifica a continuación: Productos Estándard
(Standard Duty) - Un año, Productos Resistentes (Serious Duty) -Dos años, Productos Robustos (Extreme Duty) - Tres años.
2. QUIEN OTORGA ESTA GARANTIA (EL GARANTE: Campbell Hausfeld / The Scott Fetzer Company 100 Production Drive, Harrison, Ohio
45030 Teléfono: (800) 543-6400
3. QUIEN RECIBE ESTA GARANTIA (EL COMPRADOR): El comprador original (que no sea un revendedor) del producto Campbell Hausfeld.
4. PRODUCTOS CUBIERTOS POR ESTA GARANTIA: Cualquier compresor de aire Campbell Hausfeld.
5. COBERTURA DE LA GARANTIA: Los defectos substanciales de material y fabricación que ocurran dentro del período de validez de la
garantía.
6. LO QUE NO ESTA CUBIERTO POR ESTA GARANTIA:
A. Las garantías implícitas, incluyendo aquellas de comercialidad E IDONEIDAD PARA FINES PARTICULARES, ESTAN LIMITADOS A LO
ESPECIFICADO EN EL PARRAFO DE DURACION. Si el compresor de aire es empleado para uso comercial, industrial o para renta, la
garantía será aplicable por noventa (90) días a partir de la fecha de compra. La garantía de los Compresores para Contratistas Productos Robustos (Extreme Duty) no queda limitada a los noventa (90) días cuando se los usa en aplicaciones de contratistas. La
garantía de los compresores de cuatro cilindros de una y dos etapas, no está limitada a noventa (90) días si éstos se utilizan para
trabajos comerciales o industriales. En algunos estados no se permiten limitaciones a la duración de las garantías implícitas, por lo
tanto, en tales casos esta limitación no es aplicable.
B. CUALQUIER PERDIDA DAÑO INCIDENTAL, INDIRECTO O CONSECUENTE QUE PUEDA RESULTAR DE UN DEFECTO, FALLA O
MALFUNCIONAMIENTO DEL PRODUCTO CAMPBELL HAUSFELD. En algunos estados no se permite la exclusión o limitación de daños
incidentales o consecuentes, por lo tanto, en tales casos esta limitación o exclusión no es aplicable
C. Cualquier falla que resulte de un accidente, abuso, negligencia o incumplimiento de las instrucciones de funcionamiento y uso
indicadas en el (los) manual(es) que se adjunta(n) al compresor.
D. Los servicios requeridos antes de la entrega tales como: ensamblaje, aceite o lubricantes y ajustes.
E. Artículos o servicios normalmente requeridos para el mantenimiento del producto, tales como:lubricantes, filtros, empaques, etc.
F. Los motores de gasolina están específicamante excluidos de la cobertura de esta garantía limitada. El comprador debe seguir las
clausulas de la garantía otorgada por el fabricante del motor de gasolina que se suministra con el producto.
G. Artículos adicionales no cubiertos bajo esta garantía:
1. Todos los Compresores
a. Cualquier componente dañado durante el envío o cualquier daño ocasionado por haber instalado u operado la unidad bajo
condiciones contrarias a lo indicado en las instrucciones para instalar u operar la unidad o daños ocasionados por el contacto
con herramientas o los alrrededores.
b. Daños del cabezal o las válvulas ocasionados por la lluvia, humedad excesiva, agentes corrosivos u otros contaminantes.
c. Daños de apariencia que no afecten el funcionamiento del compresor.
d. Tanques oxidados, incluyendo pero no limitado al óxido debido al drenaje inadecuado u agentes corrosivos en el ambiente.
e. Motores eléctricos, válvulas de chequeo y presostatos después del primer año a partir de la fecha de compra.
f. Llaves de drenaje
g. Daños debidos al alambrado incorrecto o conexión a cicuitos con voltaje inadecuados para la unidad.
h. Otros artículos no enumerados pero considerados de desgaste general.
i. Presostatos, controles de flujo de aire y válvulas de seguridad cuyos parametros fijados de fábrica se modifiquen.
2. Compresores lubricados
a. Daños del cabezal o las válvulas debidos al uso de aceites no especificados.
b. Daños del cabezal o las válvulas debidos a cualquier contaminación del aceite o por no haber seguido las instrucciones de
lubricación.
3. Compresores con bandas/ de accionamiento directo/ motores de gasolina
a. Bandas
b. Daños de los anillos debido al mantenimiento inadecuado del filtro.
c. Ajustes manuales de los instrumentos de carga/descarga y válvula de estrangulación.
7. RESPONSABILIDADES DEL GARANTE BAJO ESTA GARANTIA: Reparar o reemplazar, como lo decida el Garante, el compresor o
componentes que estén defectuosos, se hayan dañado o hayan dejado de funcionar adecuadamente, durante el período de validez de la
garantía
8. RESPONSABILIDADES DEL COMPRADOR BAJO ESTA GARANTIA:
A. Suministrar prueba fechada de compra y la historia de mantenimiento del producto.
B. Entregar o enviar los compresores de aire portátiles o componentes lal Centro de Servicio autorizado Campbell Hausfeld más cercano.
Los gastos de flete, de haberlos, deben ser pagados por el comprador.
C. Tener cuidado al utilizar el producto, tal como se indica(n) en el (los) manual(es) del propietario.
9. CUANDO EFECTUARA EL GARANTE LA REPARACION O REEMPLAZO CUBIERTO BAJO ESTA GARANTIA: La reparación o reemplazo
dependerá del flujo normal de trabajo del centro de servicio y de la disponibilidad de repuestos.
Esta Garantía Limitada sólo es válida en los Estados Unidos de América y Canadá y le otorga derechos legales específicos. Usted también
puede tener otros derechos que varían de un Estado a otro. o de un país a otro.
www.chpower.com
2
19 Sp
Extreme Contractor Air Compressor Models
Compresores de Aire
Installation (Cont.)
grounding wire.
Guía de Diagnóstico de Averías (Continuación)
Problema
La presión del tanque
disminuye cuando el
compresor se apaga
Posible(s) Causa(s)
Acción a Tomar
1. Conecciones flojas (coneciones,
tuberías, etc.)
1. Chequée todas las conecciones con agua enjabonada
y apriete las conecciones flojas
2. La llave de salida está floja
2. Apriete la llave
3. Hay fugas en la válvula de chequeo
3. Lleve el compresor a un centro de servicio Campbell
Hausfeld autorizado
!
PELIGRO
Antes de desmantelar la
válvula de chequeo
purgue el aire del tanque
Exceso de humedad en
el aire de salida
3. Check with a qualified electrician or
serviceman if grounding instructions
are not completely understood, or if in
doubt as to whether product is
properly grounded. Do not modify
plug provided; if it will not fit outlet,
have proper outlet installed by a
qualified electrician.
Compresor vibra
WARNING
Operation
1. Excesiva cantidad de agua en el
tanque de aire
1. Drene el tanque
2. Humedad alta
2. Mueva el compresor a un área menos humeda; use
un filtro de línea
FOR TROUBLE-FREE OPERATION
1. Read instructions: Carefully read
through this owner’s manual BEFORE
OPERATING the new air compressor.
It contains information about
operation and maintenance of unit.
1. Presostato está dañado
1. Lleve el compresor a un centro de servicio Campbell
Hausfeld autorizado
Do not attach air
chuck or other tool
to open end of hose until start-up has
been completed and unit checks OK.
2. Excesivo uso de aire
2. Disminución del uso de aire; el compresor no es lo
suficientemente grande para los requerimientos de su
herramienta
El suministro de aire es
menos de lo normal
Pernos están flojos
Apriete los pernos
1. Válvulas de entrada están rotas
1. Lleve el compresor a un centro de servicio Campbell
Hausfeld autorizado
Figure 4
Electric switch must
!
be turned off and
tank must be drained to below 10 psi
before any maintenance is performed on
the compressor.
WARNING
8. Drain tank daily: Open drain cock and
drain moisture from tank. Be sure to
close cock tightly before operating
compressor. This helps prevent tank
corrosion and keeps oil and moisture
out of air used.
CAUTION
2. Turn regulator knob fully clockwise.
Close
ASME SAFETY VALVE
1. This valve automatically releases air if
air receiver pressure exceeds preset
maximum.
Open
Figure 2
!
3. Turn switch to OFF position, and plug
in power cord.
DANGER
Do not attempt to
tamper with this
valve!
2. This valve should be checked
occasionally by pulling the ring by
hand. Air may leak even after ring has
been released. However, if the leaking
continues for an extended period of
time, or if the safety valve is stuck and
cannot be activated by the ring, the
safety valve MUST be replaced. (Note:
Valve will reset when tank pressure
reaches 40-50 PSI.)
4. Turn switch to ON position.
2. Apriete las conecciones
2. Fugas en las conecciones
MOISTURE IN COMPRESSED AIR
Moisture in compressed air will
form into droplets as it comes
from an air compressor pump.
When humidity is high or when a
compressor is in continuous use
for an extended period of time,
this moisture will collect in the
tank. When using a paint spray or
sandblast gun, this water will be
carried from the tank through the
hose, and out of the gun as
droplets mixed with the spray
material.
IMPORTANT: This condensation
will cause water spots in a paint
job, especially when spraying
other than water based paints. If
sandblasting, it will cause the
sand to cake and clog the gun,
rendering it ineffective.
A filter in the air line, located as
near to the gun as possible, will
help eliminate this moisture.
Never connect
!
green (or green and
yellow) wire to a live terminal.
!
Compresor funciona
constantemente
7. Attach air chuck or other tool to open
end of hose. Turn regulator fully
clockwise (ON). Apply a soap and
water solution around hose fittings
and check for signs of leaks (bubbles
forming). If there is a leak, tighten
connections and check again. When
there are no leaks, compressor is ready
for operation.
Figure 3
5. Turn regulator knob fully
counterclockwise. Compressor will
build to maximum preset pressure and
shut off.
6. Turn regulator knob counterclockwise
to shut off air and turn switch to OFF
position.
Figure 5
REGULATOR KNOB
1. This knob controls air pressure to an air
operated tool, paint spray gun or nailer.
2. Turning knob clockwise increases air
pressure at outlet.
3. Turning counterclockwise will lower air
pressure at outlet.
4. Fully counterclockwise will shut off flow
of air completely.
Open
Close
Figure 6
REGULATED OUTLET GAUGE
1. This gauge shows at-a-glance, air
pressure at outlet. Air pressure is
measured in pounds per square inch
(psi).
2. Be sure this gauge reads ZERO before
changing air tools or disconnecting hose
from outlet.
TANK PRESSURE GAUGE
Gauge shows pressure in air receiver
indicating compressor is building pressure
properly.
Extension cords for 120V/8 Amp Unit
Length of Cord (ft)
25
50
100
150
200
250
300
400
500
Gauge of Cord
18
14
12
10
8
8
6
6
4
www.chpower.com
18 Sp
3
Air Compressors
Compresores de aire de Extreme Contractor Modelos
If thermal overload protector shuts motor
OFF frequently look for the following
causes.
Maintenance
Release all
pressure and
disconnect power before making any
repair.
! WARNING
1. Check compressor for any visible
problems.
2. Pull ring on safety valve and allow it to
snap back to normal position.
Drain
Cock
Problema
Compresor no funciona
The motor must be
!
allowed to cool
down before start-up is possible. The
motor will automatically restart without
warning if left plugged into electrical
outlet, if the motor is turned on.
CAUTION
Figure 7
NOTE: This unit has no air filter to
maintain.
Safety valve must
!
be replaced if it
cannot be actuated or it leaks air after ring
is released.
IMPORTANT: Unit should be located as
far from spraying area as hose will allow.
3. With compressor shut off reduce tank
pressure below 10 psi, then drain
moisture from tank daily to avoid tank
corrosion. The procedure to drain tank
depends on the compressor type:
This is a compressor that requires no
additional lubrication.
For pancake units: Drain by tilting
tank.
Guía de Diagnóstico de Averías
2. Wrong gauge wire or length of
extension cord.
3. Lack of proper ventilation.
Figure 8
4. Turn power OFF and clean dust and dirt
from motor, tank, air lines and pump
cooling fins.
WARNING
1. Low voltage.
LUBRICATION
STORAGE
1. When not in use, hose and compressor
should be stored in a cool dry place.
2. Tank should be drained of moisture.
3. Hose should be disconnected and hung
open ends down to allow any moisture
to drain.
THERMAL OVERLOAD PROTECTOR
This compressor is
!
equipped with an
automatic reset thermal overload
protector which will shut off motor if it
becomes overheated.
Motor hace ruido pero
no funciona o funciona
lentamente
Troubleshooting Chart
Symptom
Possible Cause(s)
2. No hay energía eléctrica
2. ¿Está conectado? Chequee el fusible/cortacircuito o
protector de sobrecarga del motorfuse/breaker or
motor overload
3. Disyuntor abierto/fusible quemado
3. Reposicione el disyuntor o reemplace el fusible
quemado
4. Protector térmico desconectado
4. Espere a que el motor se enfrie
5. Presostato dañado
5. Reemplácelo
6. El tanque está lleno de aire
6. El compresor se encenderá cuando la presión del
tanque disminuya a la presión de arranque
1. Voltaje bajo
1. Chequee con un voltimetro
2. Cordón de extensión inadecuado
2. Chequee la tabla sobre los calibres y longitudes
adecuadas del cordón
3. Defecto de la bobina del motor
3. Lleve el compresor a un centro de servicio Campbell
Hausfeld autorizado
4. Válvula de chequeo o desfogue
defectuosa
4. Lleve el compresor a un centro de servicio Campbell
Hausfeld autorizado
1. Fusible inadecuado, circuito
sobreacrgado
1. Cerciórese de que está usando el fusible adecuado.
Desconecte los otros artefactos del circuito o conecte
el compresor a otro circuito
2. Cordón de extensión inadecuado
2. Chequee la tabla en la sección de funcionamiento
3. Válvula de chequeo o desfogue
defectuosa
3. Lleve el compresor a un centro de servicio Campbell
Hausfeld autorizado
1. Voltaje bajo
1. Chequée con un voltimetro
2. Poca ventilación/temperatura
ambiental muy alta
2. Mueva el compresor a un área bien ventilada
3. Cordón de extensión inadecuado
3. Chequée la tabla en la sección de funcionamiento
Corrective Action
1. Check for proper use of extension cord (see
EXTENSION CORDS, page 3)
2. Plugged in? Check fuse/breaker or motor overload
3. Reset breaker or replace blown fuse.
4. Motor will restart when cool
5. Replace
6. Compressor will turn on when tank pressure drops to
cut in pressure
1. Loss of power or overheating
2. No electrical power
3. Breaker open/blown fuse
4. Thermal overload open
5. Pressure switch bad
6. Tank is full of air
Motor hums but cannot
run or runs slowly
Acción a Tomar
1. Chequee el cordón de extensión adecuado (vea la
sección CORDONES DE EXTENSION, página 3)
CAUTION
For horizontal units: No tilting is
necessary to drain.
Compressor will not run
Posible(s) Causa(s)
1. Pérdida de potencia o se
sobrecalienta
1. Low voltage
2. Wrong gauge wire or length of
extension cord
3. Shorted or open motor winding
4. Defective check valve or unloader
1. Check with voltmeter
2. Check gauge chart, under Operation for proper
gauge wire and cord length
3. Take compressor to authorized Campbell Hausfeld
service center
4. Take compressor to authorized Campbell Hausfeld
service center
Fusibles/cortacircuito se
activa con frecuencia
El protector de
sobrecarga térmica se
activa constantemente
www.chpower.com
4
17 Sp
Extreme Contractor Air Compressors (FP) Models
Compresores de Aire
Si el protector térmico apaga al
compresor con mucha frecuencia puede
ser por lo siguiente:
Funcionamiento
(Continuación)
PERILLA DEL REGULADOR
1. Esta perilla controla la presión de aire a
una herramienta operada por aire,
pistola rociadora o clavadora.
2. Gírela en el mismo sentido de las
agujas del reloj para aumentar la
presión salida de aire.
3. Gírela en sentido contrario para
disminuir la presión de salida de aire.
4. Gírela completamente en sentido
contrario a las agujas del reloj para
trancar la salida de aire
completamente.
Debe
reemplazar la válvula de seguridad si no la
puede activar o si hay fugas de aire una
vez que haya soltado el anillo.
ADVERTENCIA
3. Con el compresor apagado reduzca la
presión del tanque por debajo de 10 psi,
luego drene la humedad del tanque
diariamente para evitar la corrosión del
tanque. Drene la humedad del tanque
inclinándolo y abriendo la llave de
drenaje de debajo del tanque.
Para unidades chatas: Drene
inclinando el tanque.
Cierro
Abro
Para unidades horizontales: No es
necesario inclinarlas para drenar el
tanque.
Figura 6
MANOMETRO REGULADO DE LA
SALIDA
1. Este manómetro le permite verificar
la presión de salida muy facilmente.
Dicha presión se mide en libras por
pulgadas al cuadrado (PSI).
2. Cerciórese de que el manómetro esté
en ZERO antes de cambiar de
herramientas neumáticas o
desconectar la manguera.
MANOMETRO DEL TANQUE
Mide la presión del tanque para
verificar que está funcionando
adecuadamente.
Mantenimiento
! ADVERTENCIA
Libere
toda la
presión y desconecte la unidad antes
de darle cualquier tipo de
mantenimiento.
1. Verifique el compresor por cualquier
problema visible.
2. Hale el anillo de la válvula de
seguridad y deje que calce en su
posición normal.
Symptom
Possible Cause(s)
Corrective Action
1. Voltaje bajo.
Figura 7
!
Troubleshooting Chart (Continued)
Llave
de
Drenaje
Figura 8
4. Apague el compresor (póngalo en
OFF ) y limpie completamente el
motor, tanque, líneas de aire y las
aletas de enfriamiento del cabezal.
NOTA: Esta unidad no tiene filtro de
aire que necesite mantenimiento.
IMPORTANTE: La unidad se debe
ubicar a la mayor distancia posible que
permita la manguera, con respecto a las
áreas de pulverización.
2. El cordón de extensión es muy corto
o del calibre inadecuado.
Fuses blow/circuit
breaker trips repeatedly
1. Incorrect size fuse, circuit overloaded
3. La ventilación es inadecuada.
Para
poder
arrancaar de nuevo el motor, se debe
dujar enfriar. Ele motor se pondra en
marcha de nuevo, sinninguna senal de
aviso, si se daja conectado a un
tamacorriente y si el motor ya esta
enceneito.
!
2. Wrong gauge wire or length of
extension cord
3. Defective check valve or under loader
PRECAUCION
ALMACENAMIENTO
1. Mientras no lo esté usando debe
almacenar el compresor y las
mangueras en un sitio seco y frío.
2. Debe drenar el tanque.
3. Debe desconectar las mangueras y
colgarlas con los extremos hacia
abajo para que se drenen.
1. Check for proper fuse, use time-delay fuse.
Disconnect other electrical appliances from circuit or
operate compressor on its own branch circuit
2. Check gauge chart, under Operation
3. Take compressor to authorized Campbell Hausfeld
service center
1. Low voltage
2. Lack of proper ventilation/room
temperature too high
3. Wrong gauge wire or length of
extension cord
1. Check with voltmeter
2. Move compressor to well ventilated area
Air receiver pressure
drops when compressor
shuts off
1. Loose connections (fittings, tubing,
etc.)
2. Loose drain lock
3. Check valve leaking
1. Check all connections with soap and water solution
and tighten
2. Tighten
3. Take compressor to authorized Campbell Hausfeld
service center
Do not disassemble check valve
! DANGER with air in tank; bleed tank
Excessive moisture in
discharge air
1. Excessive water in air tank
2. High humidity
1. Drain tank
2. Move to area of less humidity; use air line filter
Compressor runs
continuously
1. Defective pressure switch
1. Take compressor to authorized Campbell Hausfeld
service center
2. Decrease air usage; compressor not large enough for
your tool’s requirement
Thermal overload
protector cuts out
repeatedly
3. Check gauge chart, under Operation
2. Excessive air usage
Compressor vibrates
Loose mounting bolts
Tighten
Air output lower than
normal
1. Broken inlet valves
1. Take compressor to authorized Campbell Hausfeld
service center
2. Tighten connections
2. Connections leaking
LUBRICACION
Este es un compresor que no requiere
lubricación adicional.
PROTECTOR TERMICO
Esta com!
presora
está equipada con un protector de
sobrecarga térmica de reposición
automática.
PRECAUCION
www.chpower.com
16 Sp
5
Air Compressors
Compresores de aire de Extreme Contractor Modelos
Limited Warranty
1. DURATION: From the date of purchase by the original purchaser as follows: Standard Duty - One Year, Serious Duty - Two
Years, Extreme Duty - Three Years.
2. WHO GIVES THIS WARRANTY (WARRANTOR):
Campbell Hausfeld / Scott Fetzer Company, 100 Production Drive, Harrison, Ohio, 45030, Telephone: (800) 543-6400
3. WHO RECEIVES THIS WARRANTY (PURCHASER): The original purchaser (other than for purposes of resale) of the Campbell
Hausfeld compressor.
4. WHAT PRODUCTS ARE COVERED BY THIS WARRANTY: Any Campbell Hausfeld air compressor.
5. WHAT IS COVERED UNDER THIS WARRANTY: Substantial defects due to material and workmanship with the exceptions noted
below.
6. WHAT IS NOT COVERED UNDER THIS WARRANTY:
A. Implied warranties, including those of merchantability and FITNESS FOR A PARTICULAR PURPOSE ARE LIMITED FROM THE
DATE OF ORIGINAL PURCHASE AS STATED IN THE DURATION. If this compressor is used for commercial, industrial or rental
purposes, the warranty will apply for ninety (90) days from the date of purchase. Extreme Duty Contractor Compressors are
not limited to a ninety (90) day warranty when used in contractor applications. Four cylinder single-stage and two-stage
compressors are not limited to a ninety (90) day warranty when used in commercial or industrial applications. Some States
do not allow limitations on how long an implied warranty lasts, so the above limitations may not apply to you.
B. ANY INCIDENTAL, INDIRECT, OR CONSEQUENTIAL LOSS, DAMAGE, OR EXPENSE THAT MAY RESULT FROM ANY DEFECT,
FAILURE, OR MALFUNCTION OF THE CAMPBELL HAUSFELD PRODUCT. Some States do not allow the exclusion or limitations
of incidental or consequential damages, so the above limitation or exclusion may not apply to you.
C. Any failure that results from an accident, purchaser’s abuse, neglect or failure to operate products in accordance with
instructions provided in the owner’s manual(s) supplied with compressor.
D. Pre-delivery service, i.e. assembly, oil or lubricants, and adjustment.
E. Items or service that are normally required to maintain the product, i.e. lubricants, filters and gaskets, etc.
F. Gasoline engines and components are expressly excluded from coverage under this limited warranty. The Purchaser must
comply with the warranty given by the engine manufacturer which is supplied with the product.
G. Additional items not covered under this warranty:
1. All Compressors
a. Any component damaged in shipment or any failure caused by installing or operating unit under conditions not in
accordance with installation and operation guidelines or damaged by contact with tools or surroundings.
b. Pump or valve failure caused by rain, excessive humidity, corrosive environments or other contaminants.
c. Cosmetic defects that do not interfere with compressor functionality.
d. Rusted tanks, including but not limited to rust due to improper drainage or corrosive environments.
e. Electric motors, check valves and pressure switches after the first year of ownership.
f. Drain cocks.
g. Damage due to incorrect voltage or improper wiring.
h. Other items not listed but considered general wear parts.
i. Pressure switches, air governors and safety valves modified from factory settings.
2. Lubricated Compressors
a. Pump wear or valve damage caused by using oil not specified.
b. Pump wear or valve damage caused by any oil contamination or by failure to follow proper oil maintenance
guidelines.
3. Belt Drive / Direct Drive / Gas Driven Compressors
a. Belts.
b. Ring wear or valve damage from inadequate filter maintenance.
c. Manually adjusted load/unload and throttle control devices.
7. RESPONSIBILITIES OF WARRANTOR UNDER THIS WARRANTY: Repair or replace, at Warrantor’s option, compressor or
component which is defective, has malfunctioned and/or failed to conform within duration of the warranty period.
8. RESPONSIBILITIES OF PURCHASER UNDER THIS WARRANTY:
A. Provide dated proof of purchase and maintenance records.
B. Portable compressors or components must be delivered or shipped to the nearest Campbell Hausfeld Authorized Service
Center. Freight costs, if any, must be borne by the purchaser.
C. Use reasonable care in the operation and maintenance of the products as described in the owner’s manual(s).
9. WHEN WARRANTOR WILL PERFORM REPAIR OR REPLACEMENT UNDER THIS WARRANTY: Repair or replacement will be
scheduled and serviced according to the normal work flow at the servicing location, and depending on the availability of
replacement parts.
Limited Warranty applies in the U.S. and Canada only and gives you specific legal rights. You may also have other rights which
vary from State to State or country to country.
¡El uso
inadecuado del enchufe con conexión a
tierra podría ocasionarle choques
eléctricos!
!
PELIGRO
6
Cierro
Terminal de
conexión a
tierra
TEST
RESET
Abro
Figura 2
NOTA: No use un adaptador para
conexión a tierra.
3. Coloque el interruptor en OFF y
conecte el cordón eléctrico.
4. Gire el interruptor a la posición de
encendido.
Tomacorrientes
conectado a
tierra
8.Drene el tanque diariamente: Abra la
llave de salida para drenar el tanque.
Cerciórese de cerrarla bien antes de
utilizar el compresor. Ésto evita que
el tanque se oxide o la acumulación
de aceite y humedad en el aire
usado.
VALVULA DE SEGURIDAD ASME
1. Esta válvula automáticamente libera
el aire cuando la presión del tanque
excede un máximo fijado de fábrica.
!
PELIGRO
¡No trate
de mod-
ificar esta válvula!
Figura 1 - Para conectar a tierra
2. Si necesita reparar o reemplazar el
cordón o el enchufe, no conecte el
cable de conexión a tierra a ninguno
d los terminales planos. El cable con
forro verde con o sin rayas amarillas
es el cable de conexión a tierra.
Figura 3
5. Gire el regulador completamente en
sentido contrario a las agujas del reloj.
Al alcanzar la presión máxima se
apagará.
3. Consúltele a un electricista calificado
o a un técnioco de reparación en
caso de que no comprenda bien las
instrucciones o si tiene dudas de que
esté conectado a tierra
adecuadamente. No modifique el
enchufe, si éste no entra en el
tomacorrientes mande a instalar un
tomacorrientes adecuado con un
electricista calificado.
6. Gire la perilla del regulador en sentido
contrario a las agujas del reloj para
trancar la entrada de aire y coloque el
interruptor en OFF.
7. Conecte el mandril o cualquier otra
herramienta al extremo libre de la
manguera. Gire el regulador
totalmente hacia la derecha (ON).
Aplíquele agua enjabonada a las
conexiones de la manguera para ver si
hay fugas (si se forman burbujas). De
haberlas apriete las conexiones y haga
la prueba una vez más. Cuando no haya
ninguna fuga el compresor estará listo
para funcionar.
Nunca
conecte
los cables verdes o verde con rayas
amarillas a un terminal con tensión
terminal.
!
ADVERTENCIA
Funcionamiento
PARA EVITAR PROBLEMAS
1. Lea las instrucciones: Lea este manual
cuidadosamente ANTES DE UTILIZAR
el compresor de aire nuevo. En el
manual encontrará información
sobre el funcionamiento y
mantenimiento de la unidad.
Figura 4
El
!
interruptor eléctrico debe estar apagado y se
debe drenar el tanque hasta una presión
menor a 10 psi antes de realizar cualquier
mantenimiento en el compresor.
No
!
conecte
un mandril o ninguna otra herramienta al
extremo de la manguera hasta que haya
completado el proceso para encender el
compresor y todo esté en perfectas
condiciones para funcionar.
PRECAUCION
ADVERTENCIA
2. El funcionamiento de esta válvula
debe verificarse ocasionalmente
tirando del anillo con la mano. Es
posible que exista alguna fuga de aire
después de soltar el anillo. Sin
embargo, si la fuga continúa durante
un período de tiempo extenso, o si la
válvula de seguridad está trabada y
no se puede activar con el anillo, la
válvula de seguridad DEBE ser
reemplazada. (Nota: La válvula se
reajustará cuando la presión del
tanque alcance los 40-50 PSI.)
Figura 5
HUMEDAD EN EL AIRE
COMPRIMIDO
La humedad que se acumula en el aire
comprimido se convierte en gotas a
medida que sale del cabezal del
compresor de aire. Cuando el nivel de
humedad es muy alto o cuando el
compresor ha estado en uso continuo
por mucho tiempo, ésta se acumulará
en el tanque. Al usar una pistola
pulverizadora de pintura o una
rociadora de arena, la misma saldrá a
través de la manguera mezclada con
el material que esté rociando.
IMPORTANTE: Esta condensacion
ocasionara manchas en la superficie
pintada, especialmente cuando este
pulverizando pinturas que no sean a
base de aqua. Al rociar arena esta
ocasionara que la arena se aglutine y
obstruya la pistola, reduciendo su
eficacia.
Para eliminar este problema, coloque
un filtro en la línea de aire, lo más
cerca posible de la pistola.
Cordones de extensión para los modelos de 120V/8 Amp
Longitud
del cordón (m)
Calibre del cordón
www.chpower.com
2. Gire el regulador completamente en el
mismo sentido de las agujas del reloj.
Instalación
(Continuación)
7,62
15,24
30,48
45,72
60,96
76,2
91,44
121,92
152,4
18
14
12
10
8
8
6
6
4
15 Sp