1
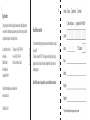
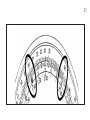
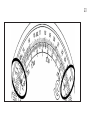
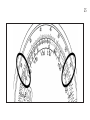
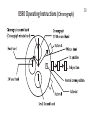
PURCHASED FR OM
ADDRESS
Accurist Helpline
020 7447 3945
Further information or instructions can be obtained
from the Accurist Helpline during office hours Monday to Friday.
Folding
OWNERS NAME
MODEL NO
Perforation
DATE OF PURCHASE
Chronograph Watch Setting Instructions
Including 0S60, 0S90,
JS00, JS25, JS15, JS05, JS50/54
46
Registration
£10.00 / €12.50
To register your Accurist watch, please go to www.accurist.co.uk/registration to
enter some basic information so you can keep abreast of the latest special offers
and product developments for Accurist Watches.
Telephone: +44 (0)20 7447 3900
Fax: +44 (0)20 7447 3949
Email: [email protected]
1. Return the watch with payment to your nearest International service agent
(see page 56).
2. Enclose a cheque for €12.50. This charge covers handling, return packing,
postage via mail and insurance for loss or damage whilst being returned or
undergoing repairs.
No liability for loss or damage will be accepted without this remittance.
For latest information please check our website:
www.accurist.co.uk
Published Dec 2011
Perforation
Accurist Watches Limited
Asher House
Blackburn Road
West Hampstead
London, NW6 1AW
For all other countries
Folding
1
2
Contents
How to use these instructions 4
Using the Slide Rule Bezel 6
0S60 Chronograph Operating Instructions 7
0S90 Chronograph Operating Instructions 11
JS00 Chronograph Operating Instructions 18
JS25 Chronograph Operating Instructions 20
JS15 Chronograph Operating Instructions 21
JS05 Chronograph Operating Instructions 21
JS50/54 Chronograph Operating Instructions 23
3
3
Care of your watch 26
Ceramic special Care Instructions (ceramic watches only)
30
WEEE Directive32
Bracelet Adjustment35
International Service Agents 37
Resistance to water 39
Accurist Quartz Guarantee 42
After Sales Service 44
Payment & Postage Instructions 45
4
How to use these instructions
This booklet contains setting instructions for the Accurist Quartz Chronograph series of
watches. Each section describes a particular calibre (also called watch movement)
which offers a unique set of functions and features. As such, it is necessary to identify
the correct calibre of your watch before proceeding to the appropriate section
(see diagram on next page).
Further information
The latest setting instructions, technical manuals and interactive instructions
are available from our website at www.accurist.co.uk
When on the Accurist website please click on the service area for more information.
The Accurist technical helpline is also available during office hours:
+44 (0)20 7447 3945 or email [email protected]
5
5
Caseback Markings
MB 836
JS.15
SR927W
Model Number
Calibre Number
Battery Number
6
25
Using the Slide Rule Bezel
Flying distance and other navigation calculations as well as general calculations
can be performed using the slide rule bezel located around the outside of the
dial. This slide rule bezel is not able to display decimal places for calculation
results, and should only be used as a general reference as an alternative to more
accurate calculations. The outside scale moves by turning the bezel.
Inside scale
Outside scale
26
7
27
8
A. Navigation Calculator
1. Calculation of time required
Problem: How long does it take an airplane flying 180 knots to fly a distance of
450 nautical miles?
Solution: Set the 18 mark on the outside scale to the SPEED INDEX ( ). At this
time, the point on the inside scale that is aligned with 45 on the outside scale
indicates (2:30), the answer is 2 hours and 30 minutes.
9
28
29
10
2. Speed (Ground Speed) Calculation
Problem: What is the speed (ground speed) of an airplane when it takes 1 hour
and 20 minutes to fly a distance of 240 nautical miles?
Solution: Align the 24 on the outside scale with 1:20 (80) on the inside scale. At
this time, 18 is aligned with the SPEED INDEX ( ) on the inside scale, and the
answer is 180Kt.
11
30
31
12
3. Flying distance calculation
Problem: What is the flying distance travelled in 40 minutes at a speed of 210
knots?
Solution: Align the 21 on the outside scale with the SPEED INDEX ( ) of the
the inside scale. The 40 of the inside scale is now pointing to 14 and the answer
is 140 nautical miles.
13 32
33
14
4. Fuel consumption rate calculation
Problem: If 120 gallons of fuel are consumed in 30 minutes’ flying time, what is
the fuel consumption rate?
Solution: Align the 12 of the outside scale with the 30 of the inside scale. The
SPEED INDEX ( ) now points to 24 and the answer is 240 gallons per hour.
15 34
35
16
5. Fuel consumption calculation
Problem: How much fuel is consumed in 6 hours at a fuel consumption rate of
250 gallons per hour?
Solution: Align the 25 of the outside scale with the inside scale’s
SPEED INDEX ( ) of the inside scale. The 6:00 is aligned with 15 and the answer
is 1500 gallons.
17
36
37
18
6. Maximum flying hours
Problem: With a fuel consumption rate of 220 gallons per hour and a fuel
supply of 550 gallons, what is the maximum number of flying hours?
Solution: Align the 22 of the outside scale with the inside scale’s
SPEED INDEX ( ). The 55 of the outside scale is now aligned with 2:30 and the
answer is 2 hours and 30 minutes.
19 38
20
B. General calculation functions
1. Multiplication
Problem: 20 x 15
Solution: Align 20 on the outside scale with 10 on the inside scale and read the
outside mark which is aligned with 15 of the inside scale. Figure the number of
decimal places and the answer is 300. Remember: decimal places cannot be read
on this scale.
21 40
41
22
2. Division
Problem: 250/20
Solution: Align 25 on the outside scale with 20 on the inside scale. On the
outside scale read the 12.5 mark that is aligned with 10 on the inside scale.
Figure the number of decimal places and the answer is 12.5 .
42
23
43
24
3. Reading ratios
Problem: 30/20 = 60/x
Solution: Align 30 on the outside scale with 20 on the inside scale. At this time,
the answer of 40 can be read from the inside scale corresponding to 60 on the
outside scale. In addition, the ratio of the value on the outside scale to the value
on the inside scale is 30:20 at all positions on the scale.
25 44
19
OS60
Operating
Instructions
(Chronograph)
0S60,
0S10
Operating
Instructions
(Chronograph)
Dial A
(minute dial)
Top Right (TR)
Date window
Dial C
(hour dial)
Position A Position B Position C
Dial B Bottom Right (BR)
(seconds dial)
26
20
To set the time:
1. Gently pull out crown to position C.
2. Turn crown either way to correct time.
3. Push in crown to position A.
To set your watch accurately visit www.britishrealtime.com
To set the date:
1. Gently pull out crown to position B.
2. Turn crown anti-clockwise to adjust date.
3. Push in crown to position A.
Using the chronograph:
1. Press BR Button to put the watch in Chronograph mode.
Making sure all sub dials are zeroed. If not, refer to ‘Chronograph Zero Reset’.
2. Press TR Button to start and stop the chronograph.
27
21
28
OS60
0S60,
0S10Operating
OperatingInstructions
Instructionscontinued
continued. .... .
3. Press BR Button to reset the chronograph.
4. When you have finished with the Chronograph function, press BR Button
again; this re-starts the small second hand on Dial B.
Note: After 30 seconds the Second hand on Dial B will stop at the zero position,
however, the time is still continuing to be measured in seconds and when TR
Button is pressed to stop the timing, the second hands will automatically move
to show the time.
Chronograph zero set:
This procedure is only necessary when the battery is replaced, or when the
Chronograph hands do not return to the ‘0’ position, when the Chronograph
mode is selected.
1. Gently pull out crown to position C
2. Push TR Button to advance the sweep second hand to the 12 0’clock position.
Please note each push of the TR Button will advance the hand 1 second.
Alternatively, depress and hold the Button for 2 seconds and the hand advances
continuously.
3. Push BR Button; this automatically re-sets sub dials. Each subsequent push
will advance the Second hand on sub dials by 1 marking. Alternatively, depress
and hold Button for 2 seconds; the hand will advance continuously until
released.
4. Push in crown to Position A.
22
29
53
53
0S90 Operating Instructions (Chronograph)
0S90 Operating Instructions (Chronograph)
30
31
54
To set the time:
1. Pull the crown out to the 2nd
position.
2. Turn the crown to set hour and
minute hands.
3. When the crown is pushed back to
the normal position, small second hand
begins to run.
To set the date:
1. Pull the crown out to the 1st position.
2. Turn the crown counter-clockwise to set
the date.
*If the date is set between the hours of
around 9:00 PM and 1:00 AM, the date may
not change on the following day.
3. After the date has been set, push the
crown back to the normal position.
55
0S90 Operating instructions continued . . .
Using the Chronograph:
The chronograph is able to measure and display time in 1/100 second united up
to maximum of 59 minutes 59 seconds.
• The chronograph 1/100 second hand moves for 61 seconds after measurement
is started, after which time it will stop at 0 position. After that time, it then
changes to demonstration operation, making one revolution every minute.
To start the chronograph
• Press button A.
• The small second hand will advance to the zero position at the same time the
chronograph starts, and then begin to run as the chronograph second hand.
After 1 minute and 1 second after the chronograph has been started:
• The chronograph second hand will change over to running as the chronograph
minute hand.
32
33
To stop the chronograph:
• Press button A.
• When the measured time is less than 61 seconds, the chronograph minute,
second and 1/100 second hands will stop at the measured time.
• When the measured time is over 61 seconds, the chronograph minute and
second hands will stop at measured time. The chronograph 1/100 second hand
will remain stopped at the zero position. Read the seconds and minutes from the
chronograph at this time. Next, press button A again to advance the chronograph
1/100 second hand to the measured time.
Read the time in 1/100 seconds from the chronograph at this time.
To reset the chronograph
• Press button B.
• The chronograph second hand will change over to running as the second hand
for current time. The other chronograph hands are returned to the zero position.
Operating instructions continued . . .
57 570S90 0S90
Operating instructions continued . . .
34
35
58
59
0S90 Operating instructions continued . . .
0S90 Operating instructions continued . . .
Chronograph
(Incl.
after
replacing
battery)
CHRONOGRAPHreset
RESET
(INCL.
AFTER
REPLACING
BATTERY)
CHRONOGRAPH RESET (INCL. AFTER REPLACING BATTERY)
This procedure should be performed when the chronograph 1/100 second hand
This procedure should be performed when the chronograph 1/100 second hand
and the chronograph second hand do not return to zero position after the
and the chronograph
hand
do notafter
return
zero position
the
chronograph
has been second
reset, and
including
thetobattery
has beenafter
replaced.
chronograph has been reset, and including after the battery has been replaced.
1. Pull the crown out to the 2nd position.
1. Press
Pull the
crown
to the
position.1/100 second hand to zero position.
2.
button
"A"out
to set
the 2nd
chronograph
2. Press
Press button
button"B"
"A"totoset
setthe
thechronograph
chronograph
1/100hand
second
to to
zero
position.
3.
second
at 6hand
o’clock
zero
3.
Press
button
"B"
to
set
the
chronograph
second
handbyatcontinuously
6 o’clock to zero
position. The chronograph hands can be advanced
rapidly
60
position.button
The chronograph
pressing
“A” or “B” hands can be advanced rapidly by continuously
pressing button “A” or “B”
4. Once the hands have been zeroed, return the crown to the normal position.
* Do not push the crown to the normal position while the chronograph 1/100
second hand and the chronograph second hand return to zero position. Each
hand stops on the way when crown is returned to the normal position and these
positions are recognized as zero position.
36
61 61
JS00 Operating
Operating Instructions
(Chronograph)
JS00
Instructions
(Chronograph)
37
To set the time:
1. Gently pull out the crown to position B.
2. Turn the crown either way to correct
time.
3. Push in crown to position A.
To set your watch accurately visit
www.britishrealtime.com
For timing events up to 30 minutes
1. To start chronograph press button TR.
2. To stop chronograph press button TR.
3. To return hand to zero position press
button BR.
62 38
Chronograph zero set:
This procedure is only necessary when the
battery is replaced, or when the chronograph
hands do not return to the 12 o’clock
position.
1. Gently pull out the crown to position B.
2. Push TR button which will advance the 60
second counterhand to the 12 o’clock
postion. Please note each push of the TR
button will advance the 60 second
counterhand 1 second. Alternatively depress
and hold the button and the hands advance
continuosly.
3. When hands are aligned to 12 o’clock
position push in crown to position A.
JS25 / JS15 / JS05 Operating Instructions
(Chronograph)
Button A
Second Hand
Normal position
1st postion
Stopwatch
Minute Hand
2nd postion
7
Calendar
Button B
Stopwatch
Second Hand 24 Hour Hand
JS25
39
JS15
40
JS05
24 Hour Hand
Stopwatch
Minute Hand
Second Hand
24 Hour Hand
Calendar
7
Stopwatch
Minute Hand
Stopwatch Second Hand
Second Hand
7
Calendar
Stopwatch
Second Hand
41
Setting the time
1. Pull the crown out to the 2nd Click Position.
2. Turn the crown to set hour and minute hands.
3. After the time has been set, push the crown back to the Normal position.
Setting
SETTINGthe
THEdate
DATE
1. Pull the crown out to the 1st Click Position.
2. Turn the crown clockwise to set the date.
* If the date is set between the hours of around 9:00 PM and 1:00 AM, the date may
not change on the following day.
3. After the date has been set, push the crown back to the Normal position.
42
JS50/54 Operating Instructions (Chronograph)
Second Hand
Button A
Minute Hand
Hour Hand
1st Click postion
Stopwatch
Second Hand
Stopwatch
Minute Hand
Normal position
Button B
24 Hour Hand
JS50/54
43
Setting the time
1. Pull the crown out to the 1st Click Position.
2. Turn the crown to set hour and minute hands.
3. When the crown is pushed back to the normal position in synchronization with a time
signal, second hand begins to run.
Using the Stopwatch
This stopwatch is able to measure and display time in 1 second units up to maximum
of 29min 59sec.
The stopwatch will stop automatically after running continuously for 30 minutes.
Measuring time with the stopwatch
1. Press button “A” to start the stopwatch.
2. The stopwatch can be started and stopped each time button “A” is pressed.
3. Pressing button “B” resets the stopwatch and stopwatch minute and second hands
return to their ZERO positions.
2. The stopwatch can be started and stopped each time button "A" is pressed.
3. Pressing button "B" resets the stopwatch and stopwatch minute and second hands
return to their ZERO positions.
* Button
A / Bnotdoes
not during
function
during
resetting the stopwatch.
* Button
A / B does
function
resetting
the stopwatch.
RESET
"A"
TIME MEASUREMENT
44
"A"
"A"
STOP
"B"
D) STOPWATCH
RESET
(INCL.
AFTER
REPLACING
BATTERY)
Stopwatch reset
(Incl.After
replacing
battery)
Stopwatch
reset
(Incl.
after
replacing
battery)
This procedure should be performed when the stopwatch second hand does not
This procedure should be performed when the stopwatch second hand does
return to the ZERO second position after the stopwatch has been reset,
toafter
thethe
ZERO
second
position
after the stopwatch has been reset,
andreturn
including
battery
has been
replaced.
not
and including after the battery has been replaced.
1. Pull the crown out to the 1st Click Position.
2. Press button "A" to set the stop watch second hand to the ZERO position.
1. Pull the crown out to the 1st Click Position.
*The stopwatch minute hand is syncronized with stopwatch second hand.
2. Press
button
“A”hand
to set
stop watch
second
hand topressing
the ZERO
position.
*The
stop watch
second
canthe
be advanced
rapidly
by continuously
button
"A".
3. Once*The
the hands
have been
zeroed,hand
reset the
time and returnwith
the crown
to its normal
position.
stopwatch
minute
is syncronized
stopwatch
second
hand.
*The stop watch second hand can be advanced rapidly by continuously pressing button “A”.
3. Once the hands have been zeroed, reset the time and return the crown to its normal position.
85
45
Care of your watch
Avoid temperature extremes
1. Avoid leaving your watch in direct sunlight or in extremely warm conditions
for long periods of time: this will cause malfunctioning and shorten the life of
the battery.
2. Do not leave your watch for long periods of time in extremely cold places;
this may cause your watch to gain or lose time. Should it begin to gain or lose
time, place your watch on your wrist to restore its original accuracy.
Avoid wet conditions
1. Do not operate the buttons when your watch is wet, even on models marked
'Water Resistant'
2. Check case back markings and refer to the Resistance to water section.
continued...
46 8
Avoid strong shocks
1. This watch will withstand the bumps and jars normally incurred during sports
activities.
2. Avoid dropping your watch on the ground or otherwise imparting severe shock
to it.
Avoid strong magnetic fields
1. Keep your watch away from strong magnets.
2. Generally, your watch is not affected by magnetic fields from household
appliances such as television sets and stereo equipment.
continued...
87
47
Care of your watch continued . . .
Avoid harmful chemicals, solvents & gases
1. Avoid wearing your watch in the presence of strong chemicals, solvents or
gases.
2. Avoid materials such as gasoline, benzene, paint thinner, alcohol, spray
cosmetics, nail polish, nail polish remover, adhesives or paint.
Periodic inspection
1. A regular 4 to 5 years service by an authorised Accurist technician will ensure
trouble free operation.
2. Refer to the After Sales Service section for details.
continued...
48
IMPORTANT
1. Keep the batteries out of reach of infants and small children. Should
accidental ingestion occur consult a doctor immediately.
2. Do not attempt to replace the battery yourself as this invalidates your
guarantee.
Keep you watch clean
Wipe off any moisture that adheres to the case, glass or band with a soft,
clean cloth.
Ceramic special Care Instructions (ceramic watches only)
49
Every care has been taken in the manufacture of this ceramic watch but
due to the nature of the material used extra care should be taken.
The ceramic although scratchproof is not shatterproof therefore
care must be taken to avoid dropping or knocking the watch against
a hard surface.
We would therefore recommend storing the watch in its watch box or
suitable storage box when not being worn. To clean just use a clean damp lint
free cloth do not use any cleaning agents as these may affect the look and
lustre of the ceramic.
lly, your watch is not affected by magnetic fields from household
s such as television sets and stereo equipment.
Ceramic special Care Instructions
continued...
Important
• Ceramics will not wear over time
• Ceramics are scratch-resistant
• Ceramic is a naturally porous material
• Ceramic is fragile and should be handled with care
You should note that whilst our guarantee covers the watch movement
the ceramic parts and glass are not covered other than for manufacturing
defects.
50
51
WEEE Directive
The crossed-out wheeled bin indicates that used electrical and electronic
equipment should not be mixed with general domestic waste. There is a separate
collection point for these products.
The objectives of the Community’s environment policy are, in particular, to
preserve, protect and improve the quality of the environment, protect human
health and utilise natural resources prudently and rationally.
WEE
The
equ
colle
The
52
Disposal information for consumers
EU Countries
In accordance with legislation that requires proper treatment, recovery and
recycling of used electrical and electronic equipment. Private households within
the EU states may return their used electrical and electronic equipment to
designated collection points free of charge. Equally return your product to an
Accurist stockist or Accurist headquarters, who will see to the products disposal.
Please contact your authority for further details.
37
WEEE Directive continued . . .
Non EU Countries
If you wish to discard this product, please contact your local authorities and ask
for the correct method of disposal. Otherwise please return to Accurist
headquarters, who will see to the products disposal.
Disposal information for business users
EU Countries
Please contact your Accurist dealer who will inform you about the ‘take back’ of
products.
Non EU Countries
If you wish to discard this product, please contact your local authorities and ask
for the correct method of disposal. Otherwise please return to Accurist
headquarters, who will see to the products disposal.
53
92
Bracelet Adjustment
The bracelet requires a small adjustment and the model has a Z-type clasp.
1. Depress the end of the spring bar on the centre clasp with a pin.
2. Relocate the spring bar in an alternative hole.
54
55
93
The bracelet requires a significant adjustment or the model does not have a
Z-type clasp.
1. Use the enclosed wrist gauge to measure and mark the size of your wrist.
2. Return the completed wrist gauge with your watch.
3. Follow the instructions in the After Sales Service section to return your watch
for adjustment. Your watch will be adjusted free of charge.
International Service Agents
International Service Headquarters
Accurist Watches Limited, Asher House, Blackburn Road, West Hampstead,
London, NW6 1AW
Tel: +44 (0)20 7447 3945, Fax: +44 (0)20 7447 3946
Netherlands
Sabre Nederland B.V., Ellermanstraat 23, 1099 BX Amsterdam, The Netherlands
Tel: 0031 20 692 8888, Fax: 0031 20 665 2184
Malta
Maxi Quartz Ltd, 311-313 Zabbar Road, Fgura, Malta
Tel: 00356 21806661, Fax: 00356 21676393
56
57
International Service Agents continued...
Kingdom of Saudi Arabia
Al Asasyah, Sitteen Street, P.O. Box 19248 - 19249, Jeddah 21435
Tel: 00966 261 92035, Fax: 00966 676 2262
Cyprus
Timeworx Ltd, 45 Andrea Demetriou St, Nicosia 2024, Cyprus
Tel: 00357 22441328, Fax: 00357 22441329
USA
Parsec Enterprises Inc, 7501 N.Harker Drive, Peoria , IL, 61615
Tel 1 800 359 2508
43
43
43water
Resistance to43
Resistance
water
Resistance to water
Resistance to water
58
18
INDICATIONS ON DIAL OR CASEBACK
INDICATIONS ON DIAL OR CASEBACK
INDICATIONS
CASEBACK
INDICATIONS ON DIAL OR CASEBACK
LIGHT SPRAY,
LIGHT
LIGHT
SPRAY,
DIAL
CASEBACK
PERSPIRATION,
SWIMMING
LIGHTSPRAY,
SPRAY
DIAL
CASEBACK
DIAL
CASEBACK
PERSPIRATION,
SWIMMING
LIGHT
RAIN
ETC...PERSPIRATION
DIAL
CASEBACK
PERSPIRATIO
LIGHT
RAIN ETC...
ETC... LIGHT
BATHING,
LIGHTRAIN
RAIN
BATHING, ETC...
BATHING,
BATHING,ETC
ET
WATER RESISTANT
OK
X
WATER RESISTANT
OKWATER
RESISTANT
OK
WATER
RESISTANTX OK
OK
WATER RESISTANT
WATER -RESISTANT
OK
50M RESISTANT
(5 ATM)
WATER
WATER
OKWATER RESISTANT OK
WATERRESISTANT
RESISTANT
OK
WATER
RESISTANT
WATER RESISTANT
OK
50M (5 ATM)
50M (5
(5 ATM)
50M
WATER RESISTANT
WATERATM)
RESISTANT
OK
OK
100MRESISTANT
(10 ATM)
WATER
WATER
OKWATER RESISTANT OK
WATERRESISTANT
RESISTANT
OK
WATER RESISTANT
WATER RESISTANT
OK
100M (10 ATM)
100M (10 ATM)
100M
(10RESISTANT
ATM)
WATER RESISTANT
WATER
OK
OK
150MRESISTANT
(15 ATM)
WATER
WATER
RESISTANT
OK
OK
WATER RESISTANT
WATER RESISTANT
OK
WATER RESISTANT
WATER RESISTANT
OK
AND(15
DEEPER
150M
ATM)
150M (15 ATM)
AND DEEPER
150M
(15 ATM)
AND DEEPER
AND DEEPER
nces such as television sets and stereo equipment.
43
43
19
ResistanceResistance
to water to water continued...
59
19
ON DIAL OR CASEBACK
INDICATIONS ONINDICATIONS
DIAL OR CASEBACK
DIAL
DIAL
CASEBACK
LIGHT SPRAY,
LIGHT SPRAY,
CASEBACKPERSPIRATION,
SKIN DIVING: PERSPIRATION,
SCUBA
SWIMMING
LIGHT
RAIN DIVING
DIVING
LIGHT
RAIN WITHOUT
ETC...
AN AIRETC...
TANK BATHING, ETC...
AN AIR
BATHING,
OKX
X
WATER RESISTANTWATER RESISTANT
WATER RESISTANTWATER RESISTANT
OK X
50M (5 ATM)
50M (5 ATM)
OKOK
X
WATER RESISTANTWATER RESISTANT
WATER RESISTANTWATER RESISTANT
OK OK
100M (10 ATM) 100M (10 ATM)
OKOK
X
WATER RESISTANTWATER RESISTANT
WATER RESISTANTWATER RESISTANT
OK OK
150M (15 ATM) 150M (15 ATM)
AND DEEPER
AND DEEPER
OKOK
OK
-
- WATER RESISTANTWATER RESISTANT
OK X
from strong magnets
45affected by magnetic fields from household
s not
ion sets and stereo equipment.
Resistance to water
continued...
IMPORTANT - NEVER PULL OUT THE CROWN WHEN THE WATCH IS WET.
• Tighten screwlock crown completely.
• Water resistance is not a permenant property. We strongly
recommend you return your watch for resealing every 4 - 5 years and/or
when changing batteries.
• “Water resistant” may sometimes be abbreviated as “Water resist” or “WR”.
• Never pull out the crown when the watch is wet.
• Always set the crown in the normal position.
60
61
Accurist Quartz Guarantee
The terms of this guarantee provide rights that are in addition to your statutory
rights and do not in any way limit or otherwise affect those statutory rights.
Your Accurist watch is guaranteed for 3 years from the date of original retail
purchase against any malfunction of the watch movement due to defective
materials or workmanship. This guarantee is applicable only to watches
purchased in the United Kingdom. This guarantee does not cover the following:
Breakages caused from maltreatment, mishandling or accident; Water damage
unless marked water resistant (5ATM or above); batteries; the replacement or
repair of bracelets and leather watch straps. To make a claim under the guarantee
please return your watch directly to the International Service Headquarters at the
address set out on page 37 or an International Service Agent.
47
62
Accurist Quartz Guarantee continued . . .
When returning your watch, please indicate brief details of the nature of the
problem and the repair required.
We will, at our option, repair or replace your watch with a model of similar
appearance or value.
After the expiry of this guarantee the Accurist Service Centre and International
Service Agents are at your complete disposal.
We will be pleased to quote for routine maintenance, oiling or repair of your
watch by our factory trained staff of experts.
This guarantee is provided by Accurist Watches Limited of Asher House,
Blackburn Road, West Hampstead, London, NW6 1AW, England, United Kingdom
63
48
After Sales Service
Each Accurist watch comes with a lifetime commitment to quality after sales
service. Our award winning customer service team are dedicated to providing
expert servicing from bracelet adjustments to full overhaul. We pride ourselves in
identifying our customer's requirements and reacting to their individual needs.
An expert watchmaker personally services each watch and Accurist guarantees
quality at every step of the process.
64
Payment & Postage Instructions
1. Complete the payment details form opposite.
2. Return the watch and payment details form together with this guarantee to
the Accurist Service Centre address listed on page 37.
3. Enclose a cheque, postal order or MasterCard/Visa payment for £10.00 payable
to Accurist Service Centre. This charge covers handling, return packing,
postage via mail and insurance for loss or damage whilst being returned or
undergoing repairs.
No liability for loss or damage will be accepted without this remittance.
4. Please do not return your presentation box as we cannot guarantee its return.