1
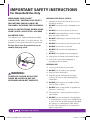
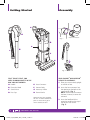
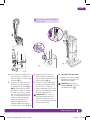
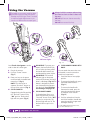
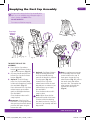
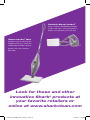
UV300
Owner’s Guide
Manual del usuario
www.sharkclean.com
UV300_26_IB_ENG_SPA_111005_1.indd 1
12-05-23 11:45 AM
This manual covers model:
UV300 26
TECHNICAL SPECIFICATIONS
Voltage: 120V.
Watts: 700W
Amps: 5.83A
Hertz: 60Hz
TOLL FREE: 1-800-798-7398
UV300_26_IB_ENG_SPA_111005_1.indd 2
12-05-23 11:45 AM
English
Contents
Thank you for
purchasing
the Shark®
Navigator™
Vacuum.
Important Safety Instructions2
Getting Started4
Assembly4
Using the Vacuum6
Emptying the Dust Cup Assembly7
Proper Care of Your Vacuum8
Troubleshooting9
Checking for Blockages10
Maintenance11
Warranty and Registration13
www.sharkclean.com
UV300_26_IB_ENG_SPA_111005_1.indd 1
1
12-05-23 11:45 AM
IMPORTANT SAFETY INSTRUCTIONS
For Household Use Only
WHEN USING YOUR SHARK®
NAVIGATOR™ VACUUM, BASIC SAFETY
PRECAUTIONS SHOULD ALWAYS BE
FOLLOWED, INCLUDING THE FOLLOWING:
READ ALL INSTRUCTIONS BEFORE USING
YOUR SHARK® NAVIGATOR™ VACUUM.
POLARIZED PLUG:
This appliance has a polarized plug (one blade
is wider than the other). As a safety feature, this
plug will fit into a polarized outlet only one way.
Do not force into the outlet or try to
modify the plug to fit.
GENERAL ELECTRICAL SAFETY:
1.Unplug from electrical outlet when not in use
and before servicing.
2.
DO NOT use vacuum with a damaged cord or
plug.
3.
DO NOT pull or carry vacuum by the cord.
4.
DO NOT unplug by pulling on cord; to unplug,
grasp the plug, not the cord.
5.
DO NOT handle plug or vacuum cleaner with
wet hands.
6.
DO NOT run the vacuum over the power cord.
7. DO NOT close a door on the cord.
8.
DO NOT pull cord around sharp edges or
corners.
9.
DO NOT leave appliance when plugged in.
10.Keep power cord away from heated surfaces.
11.Turn off all controls before plugging or
unplugging vacuum cleaner.
GENERAL USE:
12.Use only as described in this manual.
13.DO NOT put any objects into openings.
WARNING:
TO REDUCE THE RISK OF ELECTRIC
SHOCK OR INJURY DO NOT USE
OUTDOORS OR ON WET SURFACES.
14. Keep your work area well lit.
15.Keep the vacuum moving over the carpet
surface at all times to avoid damaging the
carpet fibers.
16.DO NOT place vacuum on unstable surfaces
such as chairs or tables.
17.
DO NOT allow young children to operate the
vacuum or use as a toy.
18.Close attention is necessary when used by or
near children.
19.DO NOT use vacuum cleaner if the appliance
is not working as it should, has a damaged plug
or cord, if the unit has been dropped, damaged,
left outdoors or submerged in water. Return
to EURO-PRO Operating LLC for examination,
repair or adjustment.
2
TOLL FREE: 1-800-798-7398
UV300_26_IB_ENG_SPA_111005_1.indd 2
12-05-23 11:45 AM
English
GENERAL CLEANING:
HOSE ATTACHMENTS:
20.DO NOT run the vacuum over large-sized
objects.
31.DO NOT put any object into openings. Do not
use with any opening blocked. Keep free of lint,
hair and anything that may reduce airflow.
21.DO NOT pick up hard or sharp objects such as
glass, nails, screws or coins that could damage
the vacuum cleaner.
22.DO NOT pick up smoking or burning objects
such as hot coals, cigarette butts or matches.
23.DO NOT pick up flammable or combustible
materials such as lighter fluid, gasoline,
kerosene or use in areas where they may be
present.
24.DO NOT pick up toxic solutions such as
chlorine bleach, ammonia or drain cleaner.
25.DO NOT use in an enclosed space where
vapors are present from paint, paint thinner,
moth-proofing substances, flammable dust or
other explosive or toxic materials.
32.DO NOT use if air flow is restricted; if the air
paths, the hose or the extension tube become
blocked, turn the vacuum cleaner off. Remove
all obstructions before you turn on the unit
again.
33.Keep the end of the hose, wands and other
openings away from face, body and loose
clothing.
34.Keep rotating brush and suction openings away
from hair, face, fingers, uncovered feet or loose
clothing.
35.Only use manufacturer’s recommended
attachments.
26.DO NOT vacuum up any liquids.
27.DO NOT immerse vacuum cleaner in water or
other liquids.
28.DO NOT use outdoors or on wet surfaces; use
only on dry surfaces.
29.Use extra care when cleaning on stairs.
30.Before turning on the vacuum:
• M
ake sure that dust cup, and all filters are in
place after routine maintenance.
• Make sure that all components and filters are
thoroughly dry after routine cleaning.
• O
nly use filters and accessories provided by
EURO-PRO Operating LLC [Failure to do so
will void the warranty]
SAVE THESE
INSTRUCTIONS
www.sharkclean.com
UV300_26_IB_ENG_SPA_111005_1.indd 3
3
12-05-23 11:45 AM
Assembly
Getting Started
E
A
Fig. 1
Hose Connector
D
G
C
B
F
H
Fig. 2
FIRST THING’S FIRST, YOU
NEED TO KNOW WHAT’S IN THE
BOX YOU JUST OPENED:
YOUR SHARK® NAVIGATOR™
IS EASY TO ASSEMBLE:
AHandle
E Hose Connector
B Extension Wand
F Vacuum Body
C Stretch Hose
G Accessory Holder
D Dust Cup
H Power Nozzle
Optional tools are available
for sale. To order additional
parts or accessories go to
www.sharkclean.com.
4
1Place your vacuum body upright
on a level surface.
2Insert the hose connector into
the opening on the back of the
vacuum body. (Fig. 1)
NOTE: Once the hose connector
has been inserted, it cannot be
removed.
3Insert the handle with the
extension wand into the top of
the vacuum until secure.
(Fig. 2)
TOLL FREE: 1-800-798-7398
UV300_26_IB_ENG_SPA_111005_1.indd 4
12-05-23 11:45 AM
English
ot all accessories are available
N
on all models.
b
Fig. 3
a
Fig. 6
Fig. 5
Fig. 4
4Insert the stretch hose into the
hose connector on the back of
the unit. Make sure that it snaps
in place. (Fig. 3)
6When storing your vacuum,
wind the power cord around
the two cord holders and secure
with cord clip. (Fig. 6)
8 TO CARRY THE VACUUM:
5Store your on-board tools onto
the accessory holder located
on the back of the unit. (Fig. 4)
NOTE: The accessory holder is
removable. In order to remove
or attach the accessory holder,
you must remove the dust cup
first. To remove the accessory
holder, just hold the tab (a),
rotate left and pull out. To
replace, align the pins into
the hinges (b) on the vacuum.
Rotate it fully to secure. (Fig. 5)
7There is a Quick Cord Release
on the top cord holder. Simply
turn to the left or right to
release the power cord. To store
the unit, the cord holder should
be in the upright position.
CAUTION: When lifting or
carrying, DO NOT press Dust
Cup release button ( ).
With the unit in the standing
position, lift by the Dust Cup
Handle (carry handle).
IMPORTANT: For suction to
reach the power nozzle, the
extension wand and stretch
hose must be attached securely
on the vacuum body.
www.sharkclean.com
UV300_26_IB_ENG_SPA_111005_1.indd 5
5
12-05-23 11:45 AM
Using the Vacuum
Always hold the vacuum when using
the hose to clean so that it does not
tip over.
The height of your power nozzle has been
optimized for easy pushing and superior
cleaning on all floor types. There is no need
to make any height adjustments as you
transition to different floor & carpet types.
DO NOT pull vacuum cleaner around by
the hose.
DO NOT over-extend the hose.
Fig. 11
Fig. 7
Fig. 9
Fig. 10
Indicator Light
Fig. 8
Your Shark® Navigator™ can be
used to clean all surface types.
1Plug in the vacuum.
2Push the “Power” button.
(Fig. 7)
3Place your foot on the power
nozzle and pull the handle back
towards you. (Fig. 8)
NOTE: This vacuum has a
separate “Brushroll” button on
the top of the vacuum. (Fig. 9)
4 CLEAN CARPETS:
Engage the brushroll by pushing
the “Brushroll” button to the
“ON” position. The brushroll
light will turn green. (Fig. 9)
6
Fig. 12
IMPORTANT: To protect your
carpets, the brushroll will only
turn on when you have pulled
the handle back towards you
and released the power nozzle.
IMPORTANT: The brushroll
indicator light on the power
nozzle will illuminate solid red if
there is a blockage. (Fig. 10) This
feature is designed to protect
your Lifetime Belt that powers
your brushroll. See Checking
for Blockages on page 10.
5
CLEAN BARE FLOORS:
For cleaning bare floors or to
clean with the hose, push the
“Brushroll” button to the “OFF”
position for suction only. The
brushroll light will turn off. The
brushroll will not spin in this
mode.
6
CLEAN ABOVE-FLOORS WITH
HOSE:
You can attach the accessories onto
the handle or onto the extension
wand for a longer reach.
aStand the vacuum into upright
position.
bTo remove the handle only, press
the handle release button.
(Fig. 11)
cTo remove the handle with
the extension wand, press the
extension wand release button
on the back of the vacuum.
(Fig. 12)
dPush the selected tool into the
end of the handle or handle with
extension wand for longer reach
and begin cleaning.
To order additional parts and accessories,
go to www.sharkclean.com.
TOLL FREE: 1-800-798-7398
UV300_26_IB_ENG_SPA_111005_1.indd 6
12-05-23 11:45 AM
English
Emptying the Dust Cup Assembly
For best results empty the Dust Cup Assembly after
each use; or as needed during prolonged usage. or
when it reaches the MAX fill line.
DO NOT OVERFILL.
Turn vacuum off before emptying.
Dust cup
Release
Button
Fig. 16
Fig. 14
Fig. 17
Fig. 13
Fig. 15
TO EMPTY THE DUST CUP
ASSEMBLY:
1Press the Dust Cup release
button ( )and remove the dust
cup from the vacuum. (Fig. 13)
2Grip carry handle and press the
bottom Dust Cup Door release
button. (Fig. 14)
3
Option A: for Quick Empty:
Insert Dust Cup Assembly deep
inside trash receptacle to contain
dust and debris. (Fig. 15)
Press the bottom Dust Cup Door
release button; tap container
gently to dislodge and release
dust and debris.
Close the bottom door until it
snaps in place.
Important: If the Dust Cup
Door does not swing open freely
after pressing the release button,
push the door open using the
bottom door tabs.
Fig. 18
4
Option B: For Allergy Sufferers:
Wrap a trash bag around the
Dust Cup Assembly leaving
space at the bottom for the door
to swing open. (Fig. 16)
Locate the Dust Cup Door
release button within the trash
bag and press to release as you
shake the dust cup to empty
dust and debris.
Note: It may become necessary
to occasionally clean the metal
screen inside the dust cup. To
clean, press the top dust cup
release button (Fig. 17), pull out
the metal screen and remove
any excess dirt. Then replace the
metal screeen inside the dust
cup and close the top lid.
(Fig. 18)
Close the bottom door until it
snaps in place.
Note: Option B can also be
performed outside of the home
to further minimize releasing
dust back into the air. Carry just
the Dust Cup Assembly and trash
bag outside.
www.sharkclean.com
UV300_26_IB_ENG_SPA_111005_1.indd 7
7
12-05-23 11:45 AM
Proper Care of Your Shark® Upright Vacuum
COMPONENT
MAINTENANCE SCHEDULE
1 Dust Cup
Empty each time you vacuum.
2 Pre-Motor Foam Filter
Rinse and air dry every month under normal use.
3 Pre-Motor Felt Filter
Rinse and air dry every month under normal use.
4 Post-Motor Filter
Clean once every 12 months under normal use.
DO NOT put the filters in the washing machine or dishwasher.
NOTE: The material in the filter will discolor over time. This is
NORMAL and will not affect the performance of the filter.
IMPORTANT: Loss of Suction may
occur if foam filters are not cleaned
every month. Rinse and allow to air dry
completely.
Foam filters may appear dirty after use this is normal.
CAUTION: Unplug
the vacuum while
cleaning filters; failure
to do so might result
in electric shock.
Pre-Motor
Foam Filter
Felt Filter
Fig. 20
Fig. 19
CLEANING THE PRE-MOTOR
FILTERS
CLEANING THE POST-MOTOR
FILTER
1 Remove the dust cup.
1
Remove the filter cover from
the front of the vacuum by
pulling up on the tab and
pulling the cover away from the
vacuum. (Fig. 20)
2
Pull the 2 filters out from the
top of the motor base.
(Fig. 19)
3
Rinse the filters thoroughly in
lukewarm water until the water
runs clear.
4
Squeeze out excess water and
let air-dry for at least 24 hours
before replacing. Do not use
a hair dryer or other heating
methods to dry.
2 Remove the filter from the
frame and wash the filter under
the tap using lukewarm water.
3 A
llow the filter to air dry for 24
hours. Do not use a hair dryer
or other heating methods to
dry.
4
Once the filter is dry, replace it
back into the vacuum.
5 R eplace the cover by inserting
the two tabs into the holes at
the top and and then swinging
the cover down until it clicks
into place.
NOTE: Filters may appear dirty
but frequent cleaning of these is
not necessary. See maintenance
schedule above.
5
Place the felt filter in first, then
the foam filter.
6 Replace the dust cup.
8
TOLL FREE: 1-800-798-7398
UV300_26_IB_ENG_SPA_111005_1.indd 8
12-05-23 11:45 AM
English
Troubleshooting
WARNING:
To reduce the risk of electric shock, the power cord must be disconnected before
performing maintenance/troubleshooting checks.
PROBLEM
POSSIBLE REASONS & SOLUTIONS
Vacuum will not run.
Check to see if the vacuum is plugged in properly.
Check the circuit breaker/fuse.
Check the On/Off button.
Vacuum is not
picking up dirt.
Airflow is restricted. No
suction or light suction.
Brush roll does not turn
on.
Vacuum turns off on its
own.
Check filters to see if they need cleaning. Follow instructions for rinsing
and drying the filters before re-inserting back into the vacuum. (See
“Maintenance” sections for instructions.)
Dust cup may be full; empty dust cup.
Check hose and hose connections for blockages; clear blockages if required.
If dust cup is empty, and attachment inlets are clear, check for other
blockages. (See “Checking for Blockages” for instructions.)
Press the “Brushroll” button to the “ON” position. The brushroll light near
this button will illuminate green when “ON”.
Place your foot on the floor brush and pull the handle back to engage the
brushroll.
If the red light on the power nozzle is illuminated, see the section on
Checking for Blockages.
This vacuum cleaner is equipped with a motor protective thermostat. If for
some reason your vacuum overheats, the thermostat will automatically turn
the unit off. Should this occur, perform the following steps to restart the
motor thermostat:
1. Press the “Power” button to the (Off) position.
2. Unplug the vacuum.
3. Empty the dust cup and clean filters. (See “Maintenance” sections for
instructions.)
4. Check for blockages in hose, accessories and inlet openings.
(See “Checking for Blockages” for instructions.)
5. Allow the unit to cool for a minimum of 45 minutes.
6. Plug in the vacuum.
7. Press the “Power” button to the (On) position to restart the vacuum.
Note: If vacuum still does not start, contact Customer Service at:
1-800-798-7398.
To purchase replacement parts, please visit our website: www.sharkclean.com .
www.sharkclean.com
UV300_26_IB_ENG_SPA_111005_1.indd 9
9
12-05-23 11:45 AM
Checking for Blockages
Blockages may cause your vacuum
to overheat and shut down. If
this occurs, clear the blockages,
then follow the instructions for
Resetting the Motor Thermostat
on page 11.
IMPORTANT: Never insert sharp
objects into any opening to clear
an obstruction. Damages caused
while clearing or attempting to
clear blockages are not covered
under your product’s limited
warranty.
Unplug the vacuum
before checking for
blockages.
Fig. 21
Reassemble all parts
securely before
operating vacuum.
Fig. 23
Fig. 22
3
1 DUST CUP AIR DUCT:
3
HOSE:
Stand vacuum upright.
Disconnect the Stretch Hose by
gently pressing the tabs together
and pulling away from the hose
connector.
Remove Dust Cup Assembly and
empty Dust Cup if necessary.
1
Check Air Duct behind Dust Cup
for clogs; clear before replacing
Dust Cup Assembly. (Fig. 21)
2
HOSE INTAKE OPENING:
Hold the top of the hose access
door and pull firmly to remove.
Slide the knob to the center and
pull out the hose. (Fig. 22)
Remove hose from both the unit
and handle ends. (Fig. 23)
Inspect the length of the hose
and remove any obstuctions.
Remove any obstructions and
push the hose back in.
2
Slide the knob to the left and
snap the hose access door shut.
10
TOLL FREE: 1-800-798-7398
UV300_26_IB_ENG_SPA_111005_1.indd 10
12-05-23 11:45 AM
English
Maintenance
Get even more cleaning from your Shark®
Navigator™ by checking out our cleaning
accessories assortment at
www.sharkclean.com.
Resetting the Motor Thermostat
Your Shark® Navigator™ is
equipped with a protective Motor
Thermostat. If the motor should
overheat, the thermostat shuts off
the power.
Bookmark the page and check back often
to take advantage of the latest products,
promotions and prices!
ADDITIONAL ACCESSORIES (AVAILABLE FOR PURCHASE):
MULTI-TOOL
Convenient crevice tool and dusting brush in one.
PET/UPHOLSTERY TOOL
Removes hair from upholstery and stairs.
TO RESET THE MOTOR
THERMOSTAT:
Press the Power Button ( )to turn
the unit “Off”.
CREVICE TOOL
Reach deep into narrow spaces and clean between cushions,
under radiators and baseboards and in hard to reach crevices and
corners.
NOTE: Some accessories may be included with your
purchase.
Unplug the vacuum.
Check for clogged hose or filter;
unclog hose and replace filter.
Refer to Checking for Blockages
on page 10.
Wait 45 minutes for vacuum to cool;
then plug in the vacuum.
Press the Power Switch ( ) to start
the vacuum.
NOTE: If vacuum still does not start,
contact Customer Service at:
1-800-798-7398.
To order Additional Parts &
Accessories go to
www.sharkclean.com.
PART
PART NO.
Stretch Hose
126FFJ
Multi-Tool
127FFJ
Foam & Felt Filter
XFL100
Extension Wand
1116-FC
24” Crevice Tool
122FFJ
11” Crevice Tool
129FFJ
Pet/Upholstery Tool
128FFJ
www.sharkclean.com
UV300_26_IB_ENG_SPA_111005_1.indd 11
11
12-05-23 11:45 AM
Notes
12
TOLL FREE: 1-800-798-7398
UV300_26_IB_ENG_SPA_111005_1.indd 12
12-05-23 11:45 AM
English
Euro-Pro Three-Year (3) Limited Warranty
EURO-PRO Operating LLC warrants this product to be free from defects in material and workmanship for a period
of three (3) years from the date of the original purchase, when utilized for normal household use, subject to the
following conditions, exclusions and exceptions.
If your appliance fails to operate properly while in use under normal household conditions within the warranty period,
return the complete appliance and accessories, freight prepaid to:
• U.S.: EURO-PRO Operating LLC
For customer service support call 1-800-798-7398
or visit www.sharkclean.com
• Canada: EURO-PRO Operating LLC
4400 Bois Franc, St. Laurent, Québec H4S 1A7
If the appliance is found to be defective in material or workmanship, EURO-PRO Operating LLC will repair or
replace it free of charge. Proof of purchase date and $16.99 to cover the cost of return shipping and handling must
be included.*
Non-durable parts including, without limitation, filters, brushes and electrical parts which normally require
replacement are specifically excluded from warranty.
The liability of EURO-PRO Operating LLC is limited solely to the cost of the repair or replacement of the unit
at our option. This warranty does not cover normal wear of parts and does not apply to any unit that has been
tampered with or used for commercial purposes. This limited warranty does not cover damage caused by misuse,
abuse, negligent handling or damage due to faulty packaging or mishandling in transit. This warranty does not cover
damage or defects caused by or resulting from damages from shipping or repairs, service or alterations to the product
or any of its parts, which have been performed by a repair person not authorized by EURO-PRO Operating LLC.
This warranty is extended to the original purchaser of the unit and excludes all other legal and/or conventional
warranties. The responsibility of EURO-PRO Operating LLC if any, is limited to the specific obligations expressly
assumed by it under the terms of the limited warranty. In no event is EURO-PRO Operating LLC liable for incidental
or consequential damages of any nature whatsoever. Some states do not permit the exclusion or limitation of
incidental or consequential damages, so the above may not apply to you.
This warranty gives you specific legal rights, and you may also have other rights which vary from state to state or
province to province.
*IMPORTANT: Carefully pack item to avoid damage in shipping. Be sure to include proof of purchase
date and to attach tag to item before packing with your name, complete address and phone number
with a note giving purchase information, model number and what you believe is the problem
with item. We recommend you insure the package (as damage in shipping is not covered by your
warranty). Mark the outside of your package “ATTENTION CUSTOMER SERVICE”. We are constantly
striving to improve our products, therefore the specifications contained herein are subject to change
without notice.
Product Registration
Please visit www.sharkclean.com or call 1-800-798-7398 to register your new Shark® product within ten
(10) days of purchase. You will be asked to provide the store name, date of purchase and model number along with
your name and address.
The registration will enable us to contact you in the unlikely event of a product safety notification. By registering
you acknowledge to have read and understood the instructions for use, and warnings set forth in the accompanying
instructions.
www.sharkclean.com
UV300_26_IB_ENG_SPA_111005_1.indd 13
13
12-05-23 11:45 AM
Homecare Cleaning Solutions
to clean better, faster & easier
2 in 1 Vac-then-Steam™
is the complete bare-floor cleaning
system. As the name implies, simply
use the unit to vacuum first and then
steam mop to really sanitize
your hard floor surfaces.
VX63 Cordless
StickVac
2-in-1 Cordless Hand Vac & Stick
Vac designed for whole house
use. The powerful motorized
brush & cyclonic suction dust
cup effectively removes
fine dust, hair and dirt.
UV300_26_IB_ENG_SPA_111005_1.indd 14
12-05-23 11:45 AM
Portable Steam Pocket™
cleans, sanitizes, and deodorize multiple
surfaces and areas – from countertops to
drapery, even upholstery all in one step.
r
Steam Pocket™ Mop
provides maximum cleaning time
and power with its XL water tank.
Doublesided microfiber cleaning
pockets clean and sanitize on
both sides.
Look for these and other
innovative Shark® products at
your favorite retailers or
online at www.sharkclean.com
UV300_26_IB_ENG_SPA_111005_1.indd 15
12-05-23 11:45 AM
Este manual cubre el modelo :
UV300 26
ESPECIFICACIONES TÉCNICAS
Voltaje: 120V.
Potencia: 700W
Amperes: 5.83A
Frecuencia: 60Hz
16
LLAMADA SIN COSTO: 1-800-798-7395
UV300_26_IB_ENG_SPA_111005_1.indd 16
12-05-23 11:45 AM
Español
Table des matières
Gracias por
haber comprado
la aspiradora
Shark®
Navigator™.
Instrucciones importantes de seguridad 18
Introducción20
Armado 20
Usando la aspiradora 22
Vaciando el recipiente para la tierra 23
Cuidado adecuado de la aspiradora24
Solución de problemas 25
Verificación de obstrucciones 26
Mantenimiento 27
Garantía y registro29
www.sharkclean.com
UV300_26_IB_ENG_SPA_111005_1.indd 17
17
12-05-23 11:45 AM
INSTRUCCIONES IMPORTANTES DE SEGURIDAD
Para uso doméstico solamente
AL USAR SU ASPIRADORA SHARK®
NAVIGATOR™ , SIEMPRE DEBE SEGUIR
PRECAUCIONES BÁSICAS DE SEGURIDAD,
INCLUYENDO LAS SIGUIENTES:
LEA TODAS LAS INSTRUCCIONES ANTES
DE USAR SU ASPIRADORA SHARK®
NAVIGATOR™ .
ENCHUFE POLARIZADO:
Este artefacto tiene un enchufe polarizado
(una de las patas es más ancha que la otra).
Como medida de seguridad, este cable entrará
únicamente en un tomacorriente polarizado. No
lo fuerce dentro del tomacorriente ni trate
de modificarlo para que calce.
SEGURIDAD ELÉCTRICA GENERAL:
1.Desenchúfela del tomacorriente cuando no la
utilice y antes de limpiarla.
2.
NO use la aspiradora si el cable o el enchufe
están dañados.
3.
NO jale o transporte la aspiradora por el cable.
4.
NO la desenchufe tirando del cable; para
desenchufarla, sostenga el enchufe, no el cable.
5.
NO toque el enchufe o la aspiradora con las
manos húmedas.
6.
NO pase la aspiradora sobre el cable de
alimentación.
7.
NO apriete el cable al cerrar una puerta.
8.
NO jale del cable alrededor de bordes afilados
o esquinas.
9.
NO deje el artefacto desatendido cuando esté
enchufado.
10. Mantenga el cable alejado de superficies
calientes.
11.Apague todos los controles antes de enchufar o
desenchufar la aspiradora.
USO GENERAL:
12.Utilícela solamente como se indica en este
manual.
13.NO introduzca ningún objeto en las ranuras.
14.Mantenga el área de trabajo bien iluminada.
ADVERTENCIA:
PARA REDUCIR EL RIESGO DE
DESCARGAS ELÉCTRICAS O HERIDAS,
NO LA UTILICE AL EXTERIOR O SOBRE
SUPERFICIES MOJADAS.
15. Mantenga la aspiradora en movimiento sobre
la superficie de la alfombra todo el tiempo para
evitar dañar las fibras de la alfombra.
16.NO coloque la aspiradora sobre superficies
inestables como sillas o mesas.
17.
NO permita que los niños pequeños usen la
aspiradora o que se utilice como un juguete.
18.Debe tener mucho cuidado al ser utilizada por o
cerca de niños.
18
LLAMADA SIN COSTO: 1-800-798-7395
UV300_26_IB_ENG_SPA_111005_1.indd 18
12-05-23 11:45 AM
Español
19.NO use la aspiradora si no está funcionando
como corresponde , si el cable o el enchufe
están dañados, si se ha caído, dañado, dejado
al exterior o sumergido en agua. Retórnela
a EURO-PRO Operating LLC para que sea
examinada, reparada o ajustada.
LIMPIEZA GENERAL:
20.NO pase la aspiradora sobre objetos muy
grandes.
21.NO aspire objetos duros o filosos como vidrios,
clavos, tornillos, monedas, los que podrían
dañar la aspiradora.
22.NO aspire objetos con fuego o humeantes tales
como carbón caliente, colillas de cigarrillos o
fósforos.
23.NO aspire materiales inflamables o
combustibles como líquido para encendedor,
gasolina, kerosene, ni use la aspiradora en áreas
en las cuales puedan estar presentes.
24.NO la use para aspirar soluciones tóxicas tales
como lavandina, amoníaco o destapa cañerías.
• U
se únicamente filtros y accesorios provistos
por EURO-PRO Operating LLC. [El no hacerlo
anulará la garantía.]
ACCESORIOS PARA LA MANGUERA:
31.NO introduzca ningún objeto en las ranuras.
No la use con alguna abertura obstruida.
Manténgala sin pelusa, cabellos o cualquier otra
cosa que pueda reducir la circulación de aire.
32.NO la use si el flujo de aire está restringido; si
las aberturas de circulación de aire, la manguera
o el tubo de extensión se tapan, apague la
aspiradora. Saque todas las obstrucciones antes
de volver a encender la unidad.
33.Mantenga el extremo de la manguera, los tubos
y todas las demás aberturas alejados de la cara,
del cuerpo y de la ropa suelta.
34.Mantenga el cepillo giratorio y las aberturas de
succión alejados del cabello, la cara, los dedos,
los pies o ropa suelta.
35.Use únicamente los accesorios recomendados
por el fabricante.
25.NO la use en lugares cerrados y con vapores
de pintura, diluyente de pintura, substancias
antipolilla, polvo inflamable u otros materiales
explosivos o tóxicos.
26.NO aspire ningún líquido.
27.NO sumerja la aspiradora en agua o ningún
otro líquido.
28.NO la use en el exterior o en superficies
mojadas; úsela únicamente en superficies secas.
29.Tenga especial cuidado al limpiar escaleras.
30.Antes de encender la aspiradora:
• V
erifique que el recipiente para la tierra y
todos los filtros estén en su lugar luego de
realizar el mantenimiento de rutina.
• V
erifique que todos los componentes y
filtros estén completamente secos luego de
limpiarlos.
CONSERVE ESTAS
INSTRUCCIONES
www.sharkclean.com
UV300_26_IB_ENG_SPA_111005_1.indd 19
19
12-05-23 11:45 AM
ARMADO
Procedimientos iniciales
E
Fig. 1
A
Conector de
manguera
D
G
C
B
F
H
Fig. 2
SU SHARK® NAVIGATOR™ ES
FÁCIL DE ARMAR:
PRIMERO LO PRIMERO,
USTED NECESITA SABER QUÉ
CONTIENE LA CAJA QUE
ACABA DE ABRIR:
1Coloque el cuerpo de la
aspiradora en posición vertical
en una superficie nivelada.
A Mango
E Conector de manguera
B Tubo de extensión
F Cuerpo de la aspiradora
C Manguera extensible
G Soporte para accesorios
D Recipiente para la tierra
H Cabezal motorizado
Se pueden comprar accesorios
opcionales. Para comprar partes y
accesorios adicionales vaya a:
www.sharkclean.com.
20
2Inserte el conector de la
manguera en la abertura de la
parte de atrás del cuerpo de la
aspiradora. (Fig. 1)
Inserte el conector de la
manguera en la abertura de
la parte de atrás del cuerpo
de la aspiradora.
3Inserte el mango con el tubo de
extensión en la parte de arriba
de la aspiradora hasta que
quede trabado. (Fig. 2)
LLAMADA SIN COSTO: 1-800-798-7395
UV300_26_IB_ENG_SPA_111005_1.indd 20
12-05-23 11:45 AM
Español
No todos los accesorios están
disponibles para todos los
modelos.
b
Fig. 3
a
Fig. 5
Fig. 6
Fig. 4
4Inserte la manguera extensible
dentro del conector de la
manguera en la parte de atrás
de la unidad. Verifique que se
trabe en su lugar. (Fig. 3)
5Guarde sus accesorios
incorporados en el soporte para
accesorios ubicado en la parte
de atrás de la unidad. (Fig. 4)
NOTA: El soporte de accesorios
es removible. Para remover
o colocar el soporte de
accesorios, debe remover
primero el recipiente de la
tierra. Para remover el soporte
de accesorios, sostenga la
pestaña (a), rótela hacia la
izquierda y tire hacia afuera.
Para volver a colocarlo, alinee
las clavijas dentro de las
bisagras (b) en la aspiradora.
Rótelo completamente para
trabarlo. (Fig. 5)
6Al guardar su aspiradora,
enrolle el cable de alimentación
alrededor de los soportes para
el cable y asegúrelo con el
gancho. (Fig. 6)
7Hay un control de liberación
rápida del cable en el soporte
superior. Simplemente gírelo
hacia la izquierda o la derecha
para liberar el cable de
alimentación. Para guardar la
unidad, el soporte para el cable
debe estar en posición vertical.
IMPORTANTE: Para que
la succión llegue al cepillo
giratorio, el tubo de extensión
y la manguera extensible deben
estar bien conectados al cuerpo
de la aspiradora.
8
PARA TRANSPORTAR LA
ASPIRADORA:
Con la unidad en posición
vertical, levántela por el mango
del recipiente de la tierra
(mango de transporte).
CUIDADO: Al levantarla o
transportarla, NO presione
el botón de liberación del
recipiente ( ) de la tierra.
www.sharkclean.com
UV300_26_IB_ENG_SPA_111005_1.indd 21
21
12-05-23 11:45 AM
Usando la Aspiradora
Sostenga siempre la aspiradora
cuando use la manguera para limpiar,
para que no se caiga.
La altura del cabezal motorizado ha sido
optimizada para facilitar su movimiento y para
limpiar mejor todo tipo de pisos. No hace falta
ajustar la altura al pasar de un tipo de piso a
otro y a alfombras.
NO arrastre la aspiradora por toda la casa.
NO extienda demasiado la manguera.
Fig. 11
Fig. 7
Fig. 9
Fig. 10
Luz indicadora
Fig. 12
Fig. 8
Su Shark® Navigator™ se
puede usar para limpiar todo tipo de
superficie.
1 Enchufe la aspiradora.
2Presione el “Botón de
encendido” (Power). (Fig. 7)
3Coloque su pie en el cabezal
motorizado y tire suavemente el
mango hacia usted. (Fig. 8)
NOTA: Esta aspiradora tiene un
botón separado para el cepillo
“Brushroll” en la parte de arriba
de la aspiradora. (Fig. 9)
4 LIMPIE ALFOMBRAS:
Active el cepillo colocando el
“Botón del mismo” (Brushroll)
en la posición “ON”. La luz del
cepillo se encenderá verde.
(Fig. 9)
22
IMPORTANTE: Para proteger
sus alfombras, el cepillo
funcionará únicamente cuando
tire del mango hacia usted y
suelte el cabezal motorizado.
IMPORTANTE: La luz
indicadora del cepillo del cabezal
motorizado se encenderá en
rojo sólido cuando haya alguna
obstrucción. (Fig. 10) Esta
función está diseñada para
proteger la correa permanente
que mueve el cepillo giratorio.
Consulte ‘Verificación de
obstrucciones’ en la página 26.
5
LIMPIE PISOS LISOS:
Para limpiar pisos lisos o para
limpiar con la manguera, coloque
el “Botón del cepillo” (Brushroll)
en la posición “OFF” para succión
únicamente. La luz del cepillo se
apagará. El cepillo no girará en
este modo.
6
LIMPIEZA POR ENCIMA DEL
PISO CON LA MANGUERA:
Puede colocar los accesorios en el
mago o en el tubo de extensión para
mayor alcance.
aColoque la aspiradora en
posición vertical.
bPara remover el mango
solamente, presione el botón de
liberación del mango. (Fig. 11)
cPara remover el mango con el
tubo de extensión, presione el
botón de liberación del tubo de
extensión en la parte de atrás de
la aspiradora. (Fig. 12)
dColoque el accesorio deseado en
el extremo del mango o del tubo
de extensión para mayor alcance
y comience a limpiar.
Para comprar partes y accesorios adicionales
vaya a www.sharkclean.com.
LLAMADA SIN COSTO: 1-800-798-7395
UV300_26_IB_ENG_SPA_111005_1.indd 22
12-05-23 11:45 AM
Español
Vaciando el recipiente para la tierra
Para obtener los mejores resultados, vacíe el
recipiente de la tierra después de cada uso o cuando
sea necesario durante usos prolongados, o cuando se
llene hasta la línea de MAX.
NO DEJE QUE SE LLENE DE MÁS.
Apague la aspiradora antes de vaciarlo.
Botón de
liberación
Fig. 16
Fig. 14
Fig. 17
Fig. 15
Fig. 13
POUR VIDER LE RÉCIPIENT À
POUSSIÈRE :
1Presione el botón de liberación
del recipiente ( ) de la tierra
y saque el recipiente de la
aspiradora. (Fig. 13)
2Sostenga el mango de transporte
y presione el botón de liberación
del recipiente de la tierra.
(Fig. 14)
3
Opción A: Para vaciado
rápido:Coloque el recipiente de
la tierra dentro de un cesto para
la basura para recolectar la tierra
y los residuo. (Fig. 15)
Presione el botón de liberación de la parte de abajo del
recipiente de la tierra, golpee
suavemente el recipiente para
aflojar y hacer salir la tierra y los
residuos.
Vuelva a cerrar la tapa inferior
hasta que se trabe en su lugar.
Fig. 18
Importante: Si la puerta del
recipiente de la tierra no se abre
libremente al presionar el botón
de liberación, ábrala con la
mano usando las pestañas de la
tapa inferior.
4
Opción B: Para personas con
alergias: Envuelva el recipiente
de la tierra con una bolsa de
residuos, dejando lugar en la
parte de abajo para que se abra
la puerta. (Fig. 16)
Ubique el botón de liberación
de de la tapa del recipiente de
la tierra dentro de la bolsa y
presiónelo mientras sacude el
recipiente para vaciar la tierra y
los residuos.
Vuelva a cerrar la tapa inferior
hasta que se trabe en su lugar.
Nota: La opción B también
se puede realizar fuera de la
casa para reducir aún más la
liberación de polvo en el aire.
Lleve solamente el recipiente
de la tierra y la bolsa de basura
afuera.
Nota: De vez en cuando puede
ser necesario limpiar la rejilla
metálica que está dentro del
recipiente de la tierra. Para
limpiarla, presione el botón de
liberación del recipiente de la
tierra (Fig. 17), saque la rejilla
metálica y remueva la tierra.
Luego vuelva a colocar la rejilla
metálica dentro del recipiente
de la tierra y cierre la tapa de
arriba. (Fig. 18)
www.sharkclean.com
UV300_26_IB_ENG_SPA_111005_1.indd 23
23
12-05-23 11:45 AM
Cuidado adecuado de su aspiradora vertical Shark®
COMPONENTE
CRONOGRAMA DE MANTENIMIENTO
1 Recipiente para la tierra
Vacíelo cada vez que usa la aspiradora.
2 Filtro de espuma del motor
Enjuagar y secar al aire todos los meses durante el uso normal.
3 Filtro de fieltro del motor
Enjuagar y secar al aire todos los meses durante el uso normal.
4 Filtro de salida
Lávelo cada 12 meses bajo condiciones de uso normal.
NO ponga los filtros en una lavadora o lavavajillas.
IMPORTANTE: Puede ocurrir una
pérdida de succión si los filtros
de esponja no se limpian todos los
meses. Enjuáguelos y déjelo secar
completamente al aire.
Los filtros de esponja pueden parecer
sucios luego de usarlos, esto es normal.
NOTA: El material del filtro perderá color con el tiempo.
Esto es NORMAL y no afecta el rendimiento del filtro.
Filtros del motor
Filtro de esponja
Filtro de Tela
Filtro de
salida
Fig. 19
Fig. 20
LIMPIEZA DE LOS FILTROS DEL
MOTOR
1
Quite el recipiente para la
tierra.
2
Saque los 2 filtros de la parte
de arriba de la base del motor.
(Fig. 19)
3
Enjuague bien los filtros en
agua tibia hasta que estén
limpios.
4
Escurra el exceso de agua y
déjelos secar al aire durante 24
horas como mínimo antes de
volver a colocarlos. No use un
secador de cabello u cualquier
otro método para secarlos.
5
Coloque primero el filtro de
fieltro, luego el de espuma.
LIMPIEZA DEL FILTRO DE
SALIDA
1
Saque la cubierta del filtro del
frente de la aspiradora tirando
hacia arriba de la pestaña y
tirando de la cubierta hacia
fuera. (Fig. 20)
CUIDADO: Desenchufe
la aspiradora cuando
limpie los filtros; el no
hacerlo podría causarle
una descarga eléctrica.
4
Una vez que el filtro esté
seco, vuelva a colocarlo en la
aspiradora.
2 Saque el filtro del bastidor y
lávelo debajo de la canilla con
agua tibia.
5 V
uelva a colocar la cubierta
insertando las dos pestañas en
los agujeros de arriba y luego
inclinando la tapa hacia abajo
hasta que se trabe en su lugar.
3 D
eje secar el filtro al aire por
24 horas. No use un secador
de cabello o cualquier otro
método para secarlos.
NOTA: Los filtros pueden parecer
sucios pero no hace falta limpiarlos
muy a menudo. Vea el calendario
de mantenimiento anterior.
6
Vuelva a instalar el recipiente
de la tierra.
24
LLAMADA SIN COSTO: 1-800-798-7395
UV300_26_IB_ENG_SPA_111005_1.indd 24
12-05-23 11:45 AM
Español
Solución de problemas
ADVERTENCIA:
Para evitar el riesgo de una descarga eléctrica, desenchufe la unidad antes de
efectuar mantenimiento o localización de fallas.
PROBLEMA
POSIBLE CAUSA Y SOLUCIÓN
La aspiradora no
funciona.
Verifique que esté enchufada correctamente.
Verifique su fusible o la llave general.
Verifique el botón de encendido.
La aspiradora no
levanta la tierra.
Flujo de aire
restringido. No hay
succión o es muy baja.
Revise si hay que limpiar los filtros. Siga las instrucciones para enjuagar y secar
los filtros antes de volver a instalarlos en la aspiradora. (Consulte la sección
‘Mantenimiento’ por instrucciones.)
El recipiente de la tierra puede estar lleno; vacíelo
Revise que no haya ninguna obstrucción en la manguera y sus conexiones; limpie
las obstrucciones si es necesario.
Si el recipiente para la tierra está vacío y las entradas de los accesorios están
bien, busque otras obstrucciones. (Consulte las instrucciones ‘Verificación de
obstrucciones’.)
El cepillo giratorio no
se enciende.
Presione el “Botón del cepillo” giratorio (Brushroll) en la posición “ON”. La luz
del cepillo cerca del piso se enciende de color verde cuando está en “ON”.
Coloque su pie en el cabezal motorizado y tire suavemente el mango hacia usted
para activar el cepillo.
Si se enciende la luz roja del cabezal motorizado, consulte la sección Verificación
de obstrucciones.
La aspiradora se
apaga sola.
Esta unidad está equipada con un termostato de protección del motor. Si la
aspiradora se sobrecalienta por cualquier motivo, el termostato la apagará
automáticamente. Si pasa eso, siga los siguientes pasos para reiniciar el
termostato del motor:
1. Presione el “Botón de encendido” (Power) en la posición “OFF”.
2. Desenchufe la aspiradora.
3. Vacíe el recipiente para la tierra y limpie los filtros. (Consulte la sección
‘Mantenimiento’ por instrucciones.)
4. Revise que la manguera, los accesorios y las entradas de aire no estén
tapados. (Consulte las instrucciones ‘Verificación de obstrucciones’.)
5. Permita que la unidad se enfríe durante 45 minutos como mínimo.
6. Enchufe la aspiradora.
7. Coloque el “Botón de encendido” (Power) en la posición “ON”.
Nota: Si la aspiradora todavía no se enciende, llame a nuestro servicio al cliente
al: 1-800-798-7395.
Para comprar partes de reemplazo, visite nuestro sitio Web: www.sharkclean.com.
www.sharkclean.com
UV300_26_IB_ENG_SPA_111005_1.indd 25
25
12-05-23 11:45 AM
Verificación de obstrucciones
Las obstrucciones pueden hacer
que su aspiradora se sobrecaliente
y se apague. Si pasa esto, limpie
las obstrucciones, luego siga las
instrucciones para restablecer el
termostato de la página 27.
IMPORTANTE: Nunca
introduzca objetos filosos
dentro de las aberturas para
limpiar una obstrucción. Los
daños ocasionados al limpiar
o al intentar limpiar las
obstrucciones no están cubiertos
por la garantía limitada de este
producto.
Fig. 21
Desenchufe la aspiradora
antes de revisarla por
obstrucciones.
Fig. 23
Vuelva a armar bien todas
las partes antes de usarla.
Fig. 22
1
CONDUCTO DE AIRE DEL
RECIPIENTE PARA LA TIERRA:
Coloque la aspiradora en
posición vertical.
Saque el recipiente de la tierra y
vacíelo si es necesario.
3
Revise el codo del conducto de
aire por obstrucciones; límpielo
antes de volver a colocar el
recipiente de la tierra. (Fig. 21)
1
3
MANGUERA :
Desconecte la manguera
extensible presionando
suavemente las pestañas entre
sí y tirando para remover el
conector.
Saque la manguera de la unidad
y del mango. (Fig. 23)
Inspeccione toda la manguera y
saque cualquier obstrucción.
2
ENTRADA DE AIRE DE LA
MANGUERA:
Sostenga la parte de arriba de la
tapa de acceso de la manguera
y tire para sacarla. Deslice la
perilla hasta el medio y extraiga
la manguera. (Fig. 22)
Saque cualquier obstrucción y
vuelva a colocar la manguera.
2
26
Deslice la perilla hacia la
izquierda y cierre bien la tapa de
acceso de la manguera.
LLAMADA SIN COSTO: 1-800-798-7395
UV300_26_IB_ENG_SPA_111005_1.indd 26
12-05-23 11:45 AM
Español
Mantenimiento
Restablecer el termostato
Su Shark® Navigator™ está
equipada con un termostato de
protección en el motor. Si el motor
se sobrecalienta, el termostato lo
apaga.
Obtenga aún más limpieza de su Shark®
Navigator™ con nuestra variedad de accesorios
de limpieza en www.sharkclean.com.
¡Memorice la página y vuelva a visitarla a
menudo para aprovechar los nuevos productos,
promociones y precios!
ACCESORIOS ADICIONALES (DISPONIBLE PARA LA COMPRA):
HERRAMIENTA PARA MASCOTAS/TAPIZADOS
Remueve pelos de los tapizados y las escaleras.
PARA REESTABLECER EL
TERMOSTATO DEL MOTOR:
Presione el botón de encendido ( )
para apagar la unidad.
Desenchufe la aspiradora.
Revise si la manguera o el filtro
están tapados; destape la manguera
y cambie el filtro. Consulte
‘Verificación de obstrucciones’ en la
página 26.
Espere 45 minutos para que se
enfríe la aspiradora; luego vuelva a
enchufarla.
Presione el botón de encendido ( )
para encender la aspiradora.
NOTA: Si la aspiradora todavía no
se enciende, llame a nuestro servicio
al cliente al: 1-800-798-7395.
CABEZAL ESQUINERO
Llegue bien a los lugares angostos y limpie entre almohadones,
debajo de radiadores y zócalos y en ranuras y esquinas de difícil
acceso.
HERRAMIENTA MULTIPROPÓSITO
Cómoda boquilla esquinera y cepillo limpiador en un solo
accesorio.
NOTA: Algunos accesorios pueden venir incluidos con su
aspiradora.
Para comprar partes y
accesorios adicionales vaya a
www.sharkclean.com.
PARTE Parte No
Manguera extensible 126FFJ
Herramienta multipropósito 127FFJ
Filtro de espuma y de fieltro XFL100
Tubo de extensión 1116-FC
Cabezal esquinero de 24”
122FFJ
Cabezal esquinero de 11” 129FFJ
Herramienta para mascotas/
tapizados128FFJ
www.sharkclean.com
UV300_26_IB_ENG_SPA_111005_1.indd 27
27
12-05-23 11:45 AM
Notas
28
LLAMADA SIN COSTO: 1-800-798-7395
UV300_26_IB_ENG_SPA_111005_1.indd 28
12-05-23 11:45 AM
Español
Garantía limitada de tres (3) años de Euro-Pro
EURO-PRO Operating LLC garantiza este producto contra defectos de materiales y mano de obra por un término
de tres (3) años a partir de la fecha de compra original, siempre que sea utilizado para uso doméstico normal, sujeto
a las siguientes condiciones, exclusiones y excepciones.
Si su artefacto no funciona correctamente al utilizarlo bajo condiciones domésticas normales dentro del período de
garantía limitada, puede devolver el artefacto completo y los accesorios, junto con un comprobante de la fecha de
compra, pagando los gastos de envío:
• EE.UU.: EURO-PRO Operating LLC
Por servicio al cliente, llame al 1-800-798-7395
o visite nuestro sitio Web www.sharkclean.com
• Canadá: EURO-PRO Operating LLC
4400 Bois Franc, St. Laurent, Québec H4S 1A7
Si el artefacto presenta un defecto de materiales o mano de obra, EURO-PRO Operating LLC llo reparará o
remplazará sin cargo. El envío debe incluir un comprobante de la fecha de compra y $16,99 para cubrir los gastos de
envío.*
Los insumos tales como, sin limitación, filtros, cepillos y partes eléctricas que normalmente necesitan ser
reemplazados son explícitamente excluidos de la garantía.
La responsabilidad de EURO-PRO Operating LLC se limita únicamente al costo de reparación o reemplazo de la
unidad, a nuestro criterio. Esta garantía limitada no cubre el desgaste normal de las partes y no cubre ninguna unidad
que haya sido alterada o utilizada con fines comerciales. Esta garantía limitada no cubre daños ocasionados por
uso inadecuado, abuso, negligencia o daños causados por embalaje inapropiado o maltrato durante el transporte.
Esta garantía limitada no cubre daños o defectos causados o resultantes durante el transporte para su reparación
o alteraciones del producto o cualquiera de sus partes, realizadas por una persona no autorizada por EURO-PRO
Operating LLC.
Esta garantía limitada es válida para el comprador original del producto y excluye cualquier otra garantía legal,
implícita y/o convencional. La responsabilidad de EURO-PRO Operating LLC, de existir, se limita a las obligaciones
específicas asumidas expresamente bajo los términos de esta garantía limitada. Bajo ninguna circunstancia, EUROPRO Operating LLC será responsable por daños incidentales o indirectos a cualquiera, de ninguna clase. Algunos
estados no permiten la exclusión o limitación de daños consiguientes o incidentales, por lo tanto lo anterior puede no
ser válido para usted.
Esta garantía limitada le otorga derechos legales específicos, y usted puede también tener otros derechos los que
varían de estado a estado o de provincia a provincia.
*IMPORTANTE: Embale el producto cuidadosamente para evitar daños durante el transporte.
Asegúrese de incluir un comprobante de la fecha de compra y de colocarle una etiqueta al producto
con su nombre, dirección completa y número de teléfono, una nota proporcionando información de la
compra, número de modelo y una descripción del problema que tenga la unidad. Le recomendamos
asegurar el paquete (puesto que la garantía limitada no cubre daños de envío). Escriba en el exterior
del paquete “ATTENTION CUSTOMER SERVICE”. Nosotros nos esforzamos constantemente en mejorar
nuestros productos, por lo tanto las especificaciones aquí indicadas pueden cambiar sin previo aviso.
Registro del producto
Visite www.sharkclean.com o llame al 1-800-798-7395 para registrar su nuevo producto Shark® dentro de los
diez (10) días siguientes a la compra. Se le preguntará el nombre de la tienda, la fecha de compra y el número de
modelo, junto con su nombre y su dirección.
El registro nos permitirá contactarnos con usted en caso de existir alguna notificación de seguridad con respecto al
producto. Al registrarlo, usted reconoce haber leído y comprendido las instrucciones de uso y advertencias incluidas
en estas instrucciones.
www.sharkclean.com
UV300_26_IB_ENG_SPA_111005_1.indd 29
29
12-05-23 11:45 AM
EURO-PRO Operating LLC
U.S.: Canada:
Newton, MA 02459
Ville St. Laurent, Québec H4S 1A7
English: 1-800-798-7398
Español:1-800-798-7395
www.sharkclean.com
Copyright © Euro-Pro Operating LLC 2011
Droit d’Auteur © Euro-Pro Operating LLC 2011
Printed in China / Impreso en china
Illustrations may differ from actual product.
El dibujo puede no ser igual al producto real.
UV300.ES.111005.1
UV300_26_IB_ENG_SPA_111005_1.indd 30
12-05-23 11:45 AM