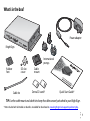
1
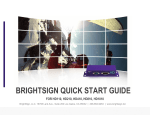
Copyright © 2009 by BrightSign, a division of Roku, Inc. All rights reserved. Roku, the
Roku logo and the BrightSign logo are trademarks of Roku, Inc. Other brand and product
names are trademarks or registered trademarks of their respective holders.
HD110, HD210, HD410, HD810, and HD1010
BrightSign 12980 Saratoga Ave. Suite D, Saratoga, CA 95070
www.brightsign.biz
DOC-005-02
CMYK
Q U I C K S TA R T G U I D E
Contents
What’s in the box?
........................................................... 1
What is BrightSign?
..........................................................
Benefits
.................................................................
Capabilities
..............................................................
Models
..................................................................
2
2
3
4
Connecting a display
........................................................ 5
Using a VGA cable
....................................................... 5
Using an HDMI cable
..................................................... 6
Connecting speakers
Playing the demo
........................................................ 7
........................................................... 8
Playing your own presentations
.............................................. 9
Creating a sample playlist
.................................................... 9
Changing BrightSign settings
. . . . . . . . . . . . . . . . . . . . . . . . . . . . . . . . . . . . . . . . . . . . 13
Adding videos to a playlist
. . . . . . . . . . . . . . . . . . . . . . . . . . . . . . . . . . . . . . . . . . . . . . . 14
Playing your own presentations
..............................................
Playing a series of files in alphabetic order
................................
Playing files from a playlist
...............................................
Setting the video mode
..................................................
Displaying items simultaneously using BrightSign Zones
..................
Playing an interactive presentation
.......................................
Connecting an input device
..............................................
Adding BrightSign to a network
Next steps
15
15
16
18
19
20
21
. . . . . . . . . . . . . . . . . . . . . . . . . . . . . . . . . . . . . . . . . . . . . . 22
. . . . . . . . . . . . . . . . . . . . . . . . . . . . . . . . . . . . . . . . . . . . . . . . . . . . . . . . . . . . . . . . . . . 23
BrightSign feature comparison
. . . . . . . . . . . . . . . . . . . . . . . . . . . . . . . . . . . . . . . . . . . . . . . 24
What’s in the box?
5v Se
r
Res
RS-23
2
US
et
GP
/012
Power adapter
B
Contr
ol
Err Up
d Pw
BrightSign
r Bsy
SD /
MMC
International
prongs
Rubber
feet
SD slot
cover
Cable tie
Cable
mount
Demo SD cards*
Quick Start Guide*
TIP: Use the cable mount and cable tie to keep the cables securely attached to your BrightSign.
* Not included with all models or bundles. Available for download at www.brightsign.biz/support/quickstart.php.
•
• 1
•
What is BrightSign?
Roku BrightSign is a standalone digital sign or kiosk controller. Because BrightSign is a non-PC
device with no moving parts, it is durable, reliable, and an ideal solution for information kiosks,
retail displays, museum exhibits, and other applications.
Benefits
•
•
•
•
•
•
2
Easy to use
Astonishing full HD quality
Reliable solid state platform
Custom interactivity and control
Powerful zones and synchronization
Versatile networking options
•
•
•
Capabilities
You can use BrightSign to do any combination of the following:
•
•
•
•
•
•
•
•
•
•
•
Play content from a Secure Digital card (SD or SDHC card) or USB Flash drive
Display content on a high-definition monitor or TV
Play looping video, images and music in HD
Use zones to divide the display into separate content windows to playback video and
images simultaneously
Play live video using the full screen or in a window using a USB video dongle accessory (sold
separately)
Schedule content to play at a specific time (hour, day, month, year)
Easily create looping displays using text based playlists
Display RSS feeds and other network information
Run interactive presentations that playback content based on inputs such as buttons,
touch screens, mice, and more
Synchronize video playback across multiple BrightSign units
Update software and content remotely with BrightSign networking
•
• 3
•
Models
Looping HD video playlists
Interactivity and control
Networking for remote content
delivery and reporting
BrightSign HD110
• Simple looping video playback
• Full HD
• Playlists and zones
BrightSign HD410
• All HD110 features
• Basic interactivity via buttons,
GPIO controls, and serial devices
• Synchronization for video wall
implementations
BrightSign HD210
• All HD110 features
• Networking support for remote
content update, reporting, live
data feeds, and more
BrightSign HD810
• All HD410 features
• Full interactivity including touch
screens and USB devices
• Schedule content by time/date
• Live video feed
• Support for A/V expansion module
accessories
BrightSign HD1010
• All HD810 features
• Networking support
NOTE: For details on the features of each BrightSign model, see “BrightSign feature
comparison” on page 24.
4
•
•
•
Connecting a display
Using a VGA cable
VGA
Audio
VGA
Y
Pb
Pr
HDMI
Ethernet
Power 5.2V 3A
•
• 5
•
Using an HDMI cable
HDMI
6
•
•
•
Audio
VGA
Y
Pb
Pr
HDMI
Ethernet
Power 5.2V 3A
Connecting speakers
If your presentations include audio, you can route the audio through an HDMI display that you
connected to your BrightSign, or you can connect powered speakers to your BrightSign.
Power
Volume
Audio In
Audio
VGA
Y
Pb
Pr
HDMI
Ethernet
Power 5.2V 3A
•
• 7
•
Playing the demo
BrightSign provides two Quick Start Demos that you can run on your BrightSign. The demo you
use depends on the type of display you connected to your BrightSign. Follow these steps to
play the demo:
1 Connect a display and speakers to your BrightSign as described earlier in this guide.
2 If your BrightSign package includes demo SD cards, go to step 3.
If your BrightSign package does not include demo SD cards, download the demo from
www.brightsign.biz/support/quickstart.php, and then use a card reader to copy the demo
onto an SD card:
• If you connected your BrightSign to a VGA display, download the demo labeled VGA.
• If you connected your BrightSign to an HDMI or component display, download the demo
labeled HDMI/Component.
3 Insert the SD card that contains the demo into your BrightSign.
NOTE: If you’re using a demo SD card that came with your BrightSign, make sure you use the
card that matches the display you connected to your BrightSign: VGA or HDMI/Component.
4 Turn on the power.
8
•
•
•
Playing your own presentations
There are four ways to play your presentations. See the corresponding sections in this guide
and the User Guide to learn more about each of these methods:
• Autoplay the content in alphabetic order by file name. Just put your files on an SD card in the
root directory (see page 15).
• Play files in the order specified in a playlist (see the following section and page 16).
• Play files based on user input as specified in an interactive playlist (see page 20).
• Play files, playlists, and interactive playlists at specific times/dates as specified in an auto-
schedule file (see Chapter 4 in the User Guide at: www.brightsign.biz/support/userguide.php).
Creating a sample playlist
A playlist enables you to play one or more files in a loop. This section shows you how to create
a playlist using the BrightSign sample files.
1 Connect an SD card reader (sold separately) to your computer.
2 Insert the SD card that contains the demo files into the card reader. (See page 8 for info
on locating or creating an SD card with the demo files.)
3 Delete the demo files from the root folder of the SD card.
NOTE: To restore the demo files later visit: www.brightsign.biz/support/quickstart.php.
•
• 9
•
4 Open the Sample Playlist Files folder on the SD card, so you can see the names of the
files in this folder as shown in Example 1.
EXAMPLE 1: Sample Playlist Files folder (3 JPG images, and 2 TS videos)
5 On your computer, open Notepad or a similar text editor.
•
•
10 •
6 On the first line of your Notepad file, set the
video mode by entering one the following:
• If your BrightSign is connected to a VGA display,
enter: Videomode 1024x768x75p
• If your BrightSign is connected to an HDMI
display, enter: Videomode 1280x720x60p
7 On separate lines, type the name of each JPG
file located in the Sample Playlist Files folder,
as shown in Example 2.
8 Save the text file with the name AUTOPLAY.BSP
in the root of the SD card:
a Click File > Save As.
b
c
d
e
In the Save in field, select the root of the
SD card as the place to store the file.
In the File name field, enter
AUTOPLAY.BSP.
In the Save as type field, select All Files.
Click Save. That's it. You just created a
simple playlist that loops three images.
Example 2a: Playlist for VGA display
Example 2b: Playlist for HDMI display
•
• 11
•
9 Copy the three sample JPG images from the Sample Playlist Files folder to the root
directory of the SD card, as shown in Example 3:
EXAMPLE 3: Root of SD card with playlist and 3 JPG images
10 Remove the SD card from your card reader and insert the SD card into your BrightSign.
11 Turn on your BrightSign.
12 As BrightSign boots, the power LED lights up. After it finishes booting, you should see
IMAGE1.JPG on your display followed by IMAGE2.JPG and IMAGE3.JPG several seconds
later. BrightSign repeats this slide show until you turn off the power.
•
•
12 •
Changing BrightSign settings
You can also use a playlist to customize BrightSign settings. Try customizing any of the
following settings in your playlist:
• Set the delay between images. The default delay
•
between images is 3 seconds. You change this
setting by adding one or more Slideinterval
keywords followed by the number of seconds you
want the image to display. In Example 4, image1
plays for 15 seconds, image2 plays for 10 seconds,
and image3 plays for 30 seconds.
Set PowerPoint style image effects. When
displaying images, you can choose from 20+
transition effects. To add a transition, insert one or
more Transition keywords in your playlist. Insert
the keyword before the image to which you want
to apply the transition. In Example 4, there is a
horizontal venetian blind effect before images 2
and 3, and image 3 fades into image 1. For a full list
of transition effects, see the User Guide at:
www.brightsign.biz/support/userguide.php.
Example 4: Change settings
•
• 13
•
Adding videos to a playlist
In addition to playing images, you can use a playlist to play one or more videos. Just add the
names of the videos to your playlist. Try adding the two sample videos to your playlist:
1 Open your AUTOPLAY.BSP file in Notepad or a
similar text editor.
2 On separate lines, add the names of the 2 TS files
from the Sample Playlist Files folder on the SD card.
TIP: The images and videos play in the same order as they
appear in the playlist, so enter the video file names where
you want them to appear.
3 (Optional) Set the volume level by entering the
Volume keyword followed by a volume setting.
The default volume level is 100 (the maximum).
4 Save the changes to your AUTOPLAY.BSP file.
5 Copy your revised AUTOPLAY.BSP file and the
two TS files to the root of the SD card.
6 Remove the SD card from your card reader and
insert the SD card into your BrightSign.
7 Turn on your BrightSign.
•
•
14 •
Example 5: Change settings
Playing your own presentations
There are three ways to play your presentations. See the corresponding sections in this guide
to learn more about each of these methods:
• Autoplay the content in alphabetic order by file name (see page 15)
• Play files in the order specified in a playlist (see page 16)
• Play files based on user input as specified in an interactive playlist (see page 20)
Playing a series of files in alphabetic order
You can play one or more files in alphabetic order by file name.
1 Copy your files into the root directory of an SD card.
• Video: MPEG-2 program streams and MPEG-1 system streams
(MPG or VOB) or MPEG-2 and H.264 MPEG-4 transport streams (TS)
• Image: BMP, PNG, JPG (JPEG)
• Audio: MP3*
2 Insert your SD card into your BrightSign.
3 Turn on your BrightSign. After a few moments, BrightSign plays
the content repeatedly.
* MPEG Layer-3 audio coding technology licensed from Fraunhofer IIS and Thomson.
Example 6:
SD card with video loop
•
• 15
•
Playing files from a playlist
If you want to play your files in a specific order (other than alphabetically), you need to create
a playlist that describes the items you want to play and the order in which you want to play
them. Before creating your own playlist, we recommend that you complete the “Creating a
sample playlist” tutorial on page 9 of this guide. When you’re ready, follow the steps below to
create your own playlist:
1 Using a text editor, such as Notepad, enter the names of the files you want to play in the
order you want them to play. A playlist can include the following types of files:
• Video: MPEG-2 program streams and MPEG-1 system streams (MPG or VOB) or MPEG-2
and H.264 MPEG-4 transport streams (TS)
• Image: BMP, PNG, JPG (JPEG)
• Audio: MP3
NOTE: We’re adding support for more file formats. For a current list of supported file types see
the latest Quick Start Guide and User Guide at www.brightsign.biz/support.
2 Use the Save As command to name the file AUTOPLAY.BSP.
NOTE: Most text editors save files with a TXT extension, so be sure to override the extension.
3 Copy the following files to the root directory of your SD card:
• AUTOPLAY.BSP (the playlist you just created)
• Media files referenced in your playlist
•
•
16 •
Example 7: SD card with playlist files
4 Insert your SD card into your BrightSign.
5 Turn on your BrightSign. After a few moments, BrightSign plays the playlist and repeats
it automatically.
TIP: You can also add commands to your playlist to control playback of the files or to play the
playlist at a scheduled time. For details, see the User Guide at:
www.brightsign.biz/support/userguide.php.
•
• 17
•
Setting the video mode
The BrightSign software automatically sets the video resolution by communicating with the
display attached to your BrightSign. First BrightSign checks to see if a VGA display is attached.
If it finds a VGA display, it sets the video resolution to the best mode supported by the VGA
display and by BrightSign. If BrightSign doesn’t find a VGA display, it looks for an HDMI display.
If it finds an HDMI display, it sets the video resolution to the best mode supported by the HDMI
display and by BrightSign. If BrightSign cannot find a VGA or HDMI display, or if the display does
not comply with standards and properly communicate with BrightSign, it sets the video
resolution to 1024x768x75p. If a display is attached but it is turned off when you turn
BrightSign on, BrightSign tries to communicate with the display and set the best video mode;
if the display is designed correctly, BrightSign can still set the best video mode. However, if a
display does not provide the required information when it is turned off (a violation of the way
displays are supposed to operate), you need to set the video mode explicitly by including the
Videomode keyword in your playlist (see the “Creating a sample playlist” tutorial on page 9 for
details). For additional information on the Videomode keyword, see the User Guide at:
www.brightsign.biz/support/userguide.php.
•
•
18 •
Displaying items simultaneously using BrightSign Zones
With BrightSign zones you can divide the screen into windows and play different types of
content in each window, including video, images, ticker feeds (RSS or text), or a clock. You can
also control transitions, background color, background image, font, text color, text alignment,
and text orientation. See the User Guide for details on adding zones to your presentations.
Example 8: BrightSign Zones examples
•
• 19
•
Playing an interactive presentation
With BrightSign HD410, HD810, and HD1010 you can create an interactive presentation that
responds to user input from buttons or other GPIO devices, or from devices connected to the
RS232 port that generate serial commands. The HD 810 and HD1010 also support input for
interactivity from USB devices such as touch screens, mice, keyboards, and barcode scanners,
and the HD1010 also supports input for interactivity via the Ethernet port.
To play an interactive presentation, you need an interactive playlist. An interactive playlist
is a spreadsheet file that contains a list of information separated by commas (CSV file). The
interactive playlist describes which media files to playback based on the user's input. For a
complete list of supported devices and instructions on creating an interactive playlist, see
the User Guide at: www.brightsign.biz/support/userguide.php.
NOTE: If you're outside the United States, check the regional settings in Excel and make sure
the list separator is a comma and the decimal separator is a period.
•
•
20 •
Connecting an input device
To play interactive presentations, you need to connect an input device to your BrightSign. The
following illustrations show how to connect a button board and touch screen:
Button board
5v Ser
RS-232
Control
Err Upd Pwr Bsy
SD / MMC
Control
Touch screen
USB
Reset
GPIO12
USB
•
• 21
•
Adding BrightSign to a network
When you add your BrightSign HD210 or HD1010 to a network, you can update your content
and the BrightSign software remotely and securely. You can use Simple Networking software
to update content from a BrightSign folder on your web server, or you can use BrightSign
Network Manager, a web-based solution that is designed for enterprise environments. To
obtain a network account, please contact [email protected]. For details on adding your
BrightSign to a network, see the User Guide at: www.brightsign.biz/support/userguide.php.
•
•
22 •
Next steps
To get the most from your BrightSign, download the latest software, read the latest
documentation, and play other demonstrations.
• Documentation: Get the latest User Guides, Release Notes, Scripting references, Hardware
reference manuals, and Regulatory Guide at: www.brightsign.biz/support/userguide.php
• Demos: Get an overview of what BrightSign is capable of: interactivity, looping, high
definition, and multiple content zones on a single screen. Download demos at:
www.brightsign.biz/support/demos
• Downloads: Get the latest BrightSign software, Autoplay script, scripts for manually setting
the date & time, and scripts for testing button boards at:
www.brightsign.biz/support/download.php
• Support: Get answers to your questions on the support website: www.brightsign.biz/support
—or—
Contact technical support at: www.brightsign.biz/support/contact_form.php
•
• 23
•
BrightSign feature comparison
Features
Looping playlist support
Basic interactivity (via GPIO port supporting buttons and LEDs)
Advanced interactivity (buttons, touch screens, LEDs, and any USB
device such as speakers, keyboards, mice, more)
Playback scheduling
Synchronization (video sync of multiple displays)
Zones (multiple content windows on single screen)
Text ticker feed and subtitles
RSS ticker feed
Networking for remote content delivery
Media formats*
Video: H.264 MPEG4 transport streams (TS) with AAC audio,
MPEG-2 transport streams (TS), MPEG-2 program streams, and
MPEG-1 system streams, with MP2 and MP3 audio
Image: BMP, PNG, JPEG (JPG)
Audio: MP3
Display resolutions
1080p (HDMI)
1080i, 720p, 576p, 480p (HDMI & component)
1360x768, 1024x768 (HDMI & VGA)
•
•
24 •
HD110
X
HD210
X
HD410
X
X
HD810
X
X
X
X
X
Ethernet
GPIO
GPIO
GPIO or
ethernet
X
X
X
X
HD110
X
X
X
X
X
HD210
X
HD410
X
HD810
X
X
X
X
X
HD1010
X
X
X
HD110
X
X
X
X
X
HD210
X
X
X
X
X
HD410
X
X
X
X
X
HD810
X
X
X
X
X
HD1010
X
X
X
X
X
X
HD1010
X
X
X
Connectors
SDHC slot
VGA out
Component video out
HDMI out (DVI via adaptor)
GPIO control port (8 bi-directional)
RS232
5V serial mini jack
Reset button
USB host port
Ethernet 10/100
Analog stereo audio out (stereo 1/8” line level)
Miscellaneous
Dimensions (without mounting brackets or connectors)
Weight
Power
International power supply & regulatory approvals
Wall mounting brackets
1 year warranty (parts and labor)
HD110
X
X
HD210
X
X
HD410
X
X
HD810
X
X
X
X
X
X
X
X
X
HD1010
X
X
X
X
X
X
X
X
X
X
X
X
X
X
X
X
X
X
X
X
X
X
HD110
HD210
HD410
HD810 HD1010
168mm (W) x 149mm (D) x 30mm (H)
or 6.6” (W) x 5.9” (D) x 1.2” (H)
630 grams or 20.3 oz.
5V / 3.0A
X
X
X
X
X
X
X
X
X
X
X
X
X
X
X
* We’re adding support for more media formats. For a current list of supported file types see the latest Quick Start Guide
and User Guide at www.brightsign.biz/support.
•
• 25
•
•
•
26 •
Copyright © 2009 by BrightSign, a division of Roku, Inc. All rights reserved. Roku, the
Roku logo and the BrightSign logo are registered trademarks of Roku, Inc. Other brand
and product names are trademarks or registered trademarks of their respective holders.
HD110, HD210, HD410, HD810, and HD1010
BrightSign 12980 Saratoga Ave. Suite D, Saratoga, CA 95070
www.brightsign.biz
DOC-005-02
Q U I C K S TA R T G U I D E