1
Owner’s Manual
Model
VF5452L
VF2927L
IMPORTANT SAFETY INFORMATION: Always read this manual first
before attempting to install or use this fireplace. For your safety, always
comply with all warnings and safety instructions contained in this manual
to prevent personal injury or property damage.
To view the full line of Dimplex products, please visit
www.dimplex.com
7213460100R02
Table of Contents
Welcome & Congratulations. . . . . . . . . . . . . . . . . . . 3
IMPORTANT SAFETY INSTRUCTIONS. . . . . . . . . . 4
Fireplace Installation . . . . . . . . . . . . . . . . . . . . . . . . 6
Locating the Firebox. . . . . . . . . . . . . . . . . . . . . . . . . 6
Hardwire Installation. . . . . . . . . . . . . . . . . . . . . . . . . 6
Operation . . . . . . . . . . . . . . . . . . . . . . . . . . . . . . . . 10
Maintenance . . . . . . . . . . . . . . . . . . . . . . . . . . . . . 12
Warranty. . . . . . . . . . . . . . . . . . . . . . . . . . . . . . . . . 13
Replacement Parts . . . . . . . . . . . . . . . . . . . . . . . . . 15
Always use a qualified technician
or service agency to repair
this fireplace.
! NOTE: Procedures and
techniques that are considered
important enough to emphasize.
CAUTION: Procedures and
techniques which, if not carefully
followed, will result in damage to
the equipment.
WARNING: Procedures
and techniques which, if not
carefully followed, will expose
the user to the risk of fire,
serious injury, or death.
2
www.dimplex.com
Welcome & Congratulations
Thank you and congratulations for choosing to purchase an electric
fireplace from Dimplex, the world leader in electric fireplaces.
Please carefully read and save these instructions.
CAUTION: Read all instructions and warnings carefully before
starting installation. Failure to follow these instructions may result in a
possible electric shock, fire hazard and will void the warranty.
Please record your model and serial numbers below for future
reference: model and serial numbers can be found on the Model and
Serial Number Label of your fireplace.
Model Number
N
A
L
DIM LE
N R
AMERI A
IND
RIAL R AD
AM RID E
N N R
ANADA
MODEL
MODELE
MODELO
CAT.#
No. de Cat.
MADE IN IRELAND
AI EN IRLANDE
E
EN IRLANDA
6909410100
VF2927L
100-240V ~, 50/60HZ, 35W
I
xxxxxxx
SERIAL No./No DE SERIE/No DE SERIE
DDDYYSLF - XXX
R
E
ED
A EN E
ER A EN
E
LL
A EN
ENDIN
IN
A EN
R
E E AR LE
RE E
I AN
R
E ID
RE E
DE E A
NI
A EN E DE E
AD
NID
A
RE
RE E
EN IN
AN E
RA
A EN E
ENDIEN E
R LA
I
IEN E
Serial Number
NO NEED TO RETURN TO THE STORE
Questions with operation or assembly? Require Parts Information?
Product Under Manufacturer’s Warranty?
Contact us at:
OR
www.dimplex.com/customer_support
For Troubleshooting and Technical Support
Toll-Free 1-888-DIMPLEX (1-888-346-7539)
Monday to Friday 8:00 a.m. to 4:30 p.m. EST
Please have your model number and product serial
number ready. (See above)
3
IMPORTANT SAFETY INSTRUCTIONS
When using electrical appliances,
basic precautions should always be
followed to reduce the risk of fire,
electric shock, and injury to persons, including the following:
1. Read these instructions.
2. Keep these instructions.
3. Heed all warnings.
4. Follow all instructions.
5. Do not use this apparatus near
water.
6. The appliance shall not be
exposed to dripping or splashing
and that no objects filled with liquid,
such as vases, shall be placed on
the apparatus.
WARNING: To reduce the risk of
fire or electric shock, do not expose
this apparatus to rain or moisture.
7. Clean only with dry cloth.
8. Do not block any ventilation
openings. Install in accordance with
the manufacturer’s instructions.
9. Do not install near any heat
sources such as radiators, heat registers, stoves, or other apparatus
(including amplifiers) that produce
heat.
10. No naked flame sources, such
as candles should be placed on this
apparatus.
11. Do not defeat the safety purpose of the polarized or groundingtype plug. A polarized plug has
4
two blades with one wider than the
other. A grounding type plug has
two blades and a third grounding
prong. The wide blade or the third
prong are provided for your safety.
If the provided plug does not fit into
your outlet, consult an electrician
for replacement of the obsolete
outlet.
WARNING: This appliance is of
Class I construction and must be
connected to a power outlet with a
protective grounded connection.
12. Protect the power cord from being walked on or pinched particularly at plugs, convenience receptacles, and the point where they
exit from the apparatus.
13. Only use attachments/accessories specified by the manufacturer.
14. Use only with the cart, stand,
tripod, bracket, or table specified
by the manufacturer, or sold with
the apparatus. When a cart is used,
use caution when moving the cart/
apparatus combination to avoid
injury from tip-over.
15. Unplug or disconnect power at
the service panel during lightning
storms or when unused for long
periods of time.
16. Refer all servicing to qualified
service personnel. Servicing is
required when the apparatus has
been damaged in any way, such as
power-supply cord or plug is damwww.dimplex.com
IMPORTANT SAFETY INSTRUCTIONS
aged, liquid has been spilled or objects have fallen into the apparatus,
the apparatus has been exposed to
rain or moisture, does not operate
normally, or has been dropped.
17. If the appliance is damaged,
check immediately with the supplier
before installation and operation.
18. Do not operate any unit with
a damaged cord or plug, or if the
electric fireplace has been dropped
or damaged in any manner, contact
Dimplex Technical Service at
1-888-346-7539.
19. Do not modify the fireplace.
Use it only as described in this
manual. Any other use not recommended by the manufacturer may
cause fire, electric shock or injury to
persons.
20. When transporting or storing the
unit and cord, keep in a dry place,
free from excessive vibration and
store so as to avoid damage.
21. Do not install the remote control
battery backwards; charge; put in
excessive heat such as fire, sunshine or the like; or mix with used or
other battery types - may explode
or leak causing injury.
22. When replacing the battery ensure that it is replaced with alkaline
1.5 Volt (AAA) batteries.
23. Battery must be recycled or
disposed of properly. Check with
your Local Authority or Retailer for
recycling advice in your area.
! NOTE: To disconnect from
mains - set the mains switch to 'O'.
The mains (power) switch is located
at the top left hand side of the appliance above the manual controls
- see 'O/I' Figure 2.
Mains switch shall remain readily
operable.
WARNING: To prevent injury,
this apparatus must be securely
attached to the floor/wall in accordance with the installation instructions.
WARNING: Remote control contains small batteries. Keep away
from children. If swallowed, seek
medical attention immediately.
! NOTE: Changes or modifications not expressly approved by the
party responsible for compliance
could void user's authority to operate the equipment.
CAUTION
RISK OF ELECTRIC SHOCK
DO NOT OPEN
NO USER-SERVICEABLE PARTS INSIDE
SAVE THESE INSTRUCTIONS
5
Fireplace Installation
WARNING: ANY INSTALLATION AND SERVICE WORK
CAN ONLY BE PERFORMED BY
QUALIFIED AND AUTHORIZED
PERSONNEL. ALL INSTALLATIONS MUST COMPLY WITH
ALL LOCAL CODES AND BYLAWS, AND INSPECTED AND
APPROVED FOR OPERATION
BY LOCAL GOVERNING AUTHORITY PRIOR TO USE.
WARNING: Construction
and electrical outlet wiring must
comply with local building codes
and other applicable regulations
to reduce the risk of fire, electric
shock and injury to persons.
Locating the Firebox
The Opti-V uses an illusory reflection technique and is designed
to work best when ambient light
levels are low. If the Opti-V is
installed in brightly lit areas, the
strong reflections may diminish
the flame.
Depending on your specific application, installation of the unit
at a height appropriate for the
viewers enjoyment is important. It
is recommended that the following guidelines be used for locating
the unit.
6
! NOTE: Measurements are to
the bottom of the viewing area of
the flame.
For standing applications:
Maximum - 51 in. (129.5 cm)
Minimum - 26 in. (66.0 cm)
For sitting applications:
Maximum - 36 in. (91.4 cm)
Minimum - 26 in. (66.0 cm)
Hardwire Installation
The Opti-V is supplied in an assembled state and is designed to
be permanently installed. The unit
comes ready for hardwire installation.
WARNING: Do not attempt
to wire your own new outlets or
circuits. To reduce the risk of fire,
electric shock or injury to persons,
always use a licensed electrician.
WARNING: Ensure that the
On/Off switch is set to the Off position (refer to Operation section)
and that the circuit on which the
fireplace is to be installed has the
power cut off at the service panel
until installation is complete.
! NOTE: Please read all instructions before installing.
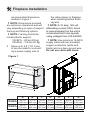
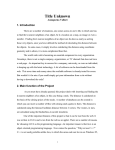
1. For rough in framing, the
opening should follow the
www.dimplex.com
Fireplace Installation
recommended dimensions
located in Figure 1.
! NOTE: Dimensions provided
are minimum clearances and will
vary depending on type of support
framing and finishing options.
! NOTE: Framing should be
constructed to support:
VF2927L - 63 lbs (29 kg)
VF5452L - 116 lbs (52 kg)
2. Allow up to 4 ft. (121.9 cm)
of service cable for connecting a power supply wire to
the cable clamp on fireplace
when installing before finishing wall.
! NOTE: A 15 amp, 120 volt
alternating current (VAC) circuit
is recommended, but the unit is
constructed that it can operate
using voltages from 120-240VAC.
! NOTE: Use minimum 14 AWG
supply cable with two insulated
copper conductors (white and
black) and one bare ground wire.
Do not use cable with alumi-
Figure 1
C
E
F
B
G
D
A
A
VF5452L
VF2927L
B
C
D
E
F
G
53.4 in
17.7 in
13.6 in
2.9 in
5.3 in
18.6 in
55.3 in
(1356 mm) (450 mm) (345 mm) (74 mm) (135 mm) (474 mm) (1404 mm)
29.0 in
17.7 in
13.6 in
2.9 in
5.3 in
18.6 in
29.9 in
(736 mm) (450 mm) (345 mm) (74 mm) (135 mm) (474 mm) (760 mm)
7
Fireplace Installation
num conductors.
! NOTE: It is recommended that
all drywall installation and finishing be completed after unit is fully
installed.
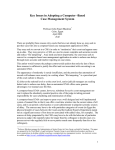
3. In the upper left hand corner
of the unit, loosen the two
securing screws and remove
the electrical cover panel.
(Figure 2)
4. Install a 3/8 in. (10 mm) or
1/2 in. (13 mm) cable connector, not included, suitable for
mounting in a 7/8 in. (22 mm)
hole, to the cable plate and
feed the supply cable through
the connector and secure.
5. Place the unit in the framed
opening, level with shims if
necessary and attach unit to
Figure 2
Grounding
Screw
Cable Clamp
Hole
frame using mounting flanges
provided (Figure 3).
CAUTION: When inserting
the unit take care not to damage
or pinch any of the power cables
that are concealed in the wall.
6. Remove the outer jacket and
strip the individual conductors
½ in. (1.3 cm) from the end.
7. Connect the black wire (live)
from the unit to the live wire
from the power supply using a
wire connectors.
8. Connect the white wire
(neutral) from the unit to the
white wire from the power
supply using a wire connector
(included).
9. Ensure that the green grounding wire is securely attached
Figure 3
Cable Plate
Electrical
Cover Panel
8
Mounting
Flanges
www.dimplex.com
Fireplace Installation
to the back plate.
CAUTION: Ensure the
wire connectors are securely
tightened, so no bare wires (live
or neutral) are exposed.
10. Ensure the grounding wire of
the supply cable is securely
attached to the grounding
screw.
! NOTE: The wire connections
on the firebox feed into a 3-prong
plug just below the electrical cavity opening, before closing the
electrical cover ensure that the
plug is fully installed.
11. Reinstall the electrical cover
panel.
12. Reinstall the protector sheet
to prevent dust from entering
the unit while finishing the
firebox surround.
13. Finish surrounding wall.
There are 3 different options
for finishing the wall:
• Permanent - install drywall
right up to the flange that surrounds the opening.
• Semi Permanent - finish
around edge using flashing
material (not included)
• Flexible - create opening big
enough to access mounting
flanges and a false front that
can be removed.
9
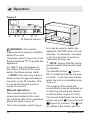
Operation
Figure 2
A
B C
D
E F
IR Remote Sensor
WARNING: This electric
firebox must be properly installed
before it is used.
The power switch (Figure 2A) must
first be switched "I" to operate the
appliance.
An ‘Opti-V’ logo will appear on
the screen for about 3 seconds
before the flame picture starts .
! NOTE: The user may notice a
blank screen for approximately 5
seconds, every 30 minutes. This
is normal and should not be a
cause for concern.
Manual Operation
The manual controls for the
screen are located at the inner
top left hand side of the appliance
above the glass.(Figure 2).
The mains (power) switch (Figure
10
2A) may be used to switch the
appliance Off ("O") when it is not
required, for example, overnight
or for long periods, to avoid unnecessary energy use.
! NOTE: Ensure that the mains
(power) switch shall remain readily operable.
The standby button " " (Figure
2B) is located just below the power switch. A red light will indicate
when the unit is in standby mode.
(Figure 2)
The volume of the wood fire
sound effects may be adjusted up
or down by pressing the volume
control buttons (Figure 2C & 2D).
The screen brightness can be adjusted using the
(Figure 2E) and
(Figure 2F) buttons. The
button darkens the screen and the
www.dimplex.com
Operation
button brightens the screen.
! NOTE: On the VF5452L there
are brightness controls for each
LED screen. The brightness
controls for the right screen are
located in the center of the unit.
Figure 3
Volume
Controls
Battery
Cover
Remote Control Operation
The remote control may be
operated once the appliance is
switched to the ON "I" position
(Figure 2A).
Aim the remote control at the IR
remote sensor located on the left
of the fire display (Figure 2). The
volume may be adjusted up or
down by pressing the volume
control buttons ( + and -).
Battery Replacement
! NOTE: The remote control is
packed separately in the carton.
1. Slide battery cover open on
the remote control (Figure 3).
2. Correctly install 2 1.5 Volt
(AAA) battery in the battery
holder.
3. Close the battery cover.
Battery must be recycled
or disposed of properly.
Check with your Local
Authority or Retailer for recycling
advice in your area.
Standby
Button
11
Maintenance
WARNING: Disconnect power
before attempting any maintenance or cleaning to reduce the
risk of fire, electric shock or damage to persons.
Glass Cleaning
Servicing
Except for installation and cleaning described in this manual, an
authorized service representative
should perform any other servicing.
The glass is cleaned in the factory
during the assembly operation.
During shipment, installation,
handling, etc., the front glass may
collect dust particles, these can
be removed by dusting lightly with
a clean dry cloth.
To remove fingerprints or other
marks, the glass can be cleaned
with a dry cloth. The glass should
be completely dried with a lint free
cloth to prevent water spots. To
prevent scratching, do not use
abrasive cleaners or spray liquids
on the glass surface.
Fireplace Surface Cleaning
To remove fingerprints or other
marks, the exterior finish can be
cleaned with a damp cloth with
a mild detergent. The surface
should be completely dried with
a lint free cloth to prevent water
spots.
12
www.dimplex.com
Warranty
Two Year Limited Warranty
Products to which this limited warranty
applies
This limited warranty applies to the following models of your newly purchased
Dimplex electric fireplace VF5452L and
VF2927L and to newly purchased Dimplex
fireplace surrounds (mantels) and trims.
This limited warranty applies only to purchases made in any province of Canada
except for Yukon Territory, Nunavut, or
Northwest Territories or in any of the 50
States of the USA (and the District of
Columbia) except for Hawaii and Alaska.
This limited warranty applies to the original
purchaser of the product only and is not
transferable.
Products excluded from this limited warranty
Light bulbs are not covered by this limited
warranty and are the sole responsibility of
the owner/purchaser. Products purchased
in Yukon Territory, Nunavut, Northwest
Territories, Hawaii, or Alaska are not
covered by this limited warranty. Products
purchased in these States, provinces, or
territories are sold AS IS without warranty or condition of any kind (including,
without limitation, any implied warranties
or conditions of merchantability or fitness
for a particular purpose) and the entire risk
of as to the quality and performance of the
products is with the purchaser, and in the
event of a defect the purchaser assumes
the entire cost of all necessary servicing
or repair.
What this limited warranty covers and for
how long
Products, other than fireplace surrounds
(mantels) and trims, covered by this
limited warranty have been tested and
inspected prior to shipment and, subject
to the provisions of this warranty, Dimplex
warrants such products to be free from
defects in material and workmanship for a
period of 2 years from the date of the first
purchase of such products.
Dimplex fireplace surrounds (mantels) and
trims covered by this limited warranty have
been tested and inspected prior to shipment and, subject to the provisions of this
warranty, Dimplex warrants such products
to be free from defects in material and
workmanship for a period of 1 year from
the date of first purchase of such products.
The limited 2 year warranty period for
products other than fireplace surrounds
(mantels) and trims and the limited 1 year
warranty period for fireplace surrounds
(mantels) and trims also applies to any
implied warranties that may exist under
applicable law. Some jurisdictions do not
allow limitations on how long an implied
warranty lasts, so the above limitation may
not apply to the purchaser.
What this limited warranty does not cover
This limited warranty does not apply to
products that have been repaired (except
by Dimplex or its authorized service
representatives) or otherwise altered. This
limited warranty does further not apply
to defects resulting from misuse, abuse,
accident, neglect, incorrect installation,
improper maintenance or handling, or
operation with an incorrect power source.
What you must do to get service under
this limited warranty
Defects must be brought to the attention of
Dimplex Technical Service by contacting
Dimplex at 1-888-DIMPLEX (1-888-3467539), or 1367 Industrial Road, Cambridge Ontario, Canada N1R 7G8. Please
have proof of purchase, catalogue/model
and serial numbers available when calling.
Limited warranty service requires a proof
of purchase of the product.
What Dimplex will do in the event of a
defect
In the event a product or part covered by
this limited warranty is proven to be defective in material or workmanship during (i)
the 2 year limited warranty period for products other than fireplace surrounds (mantels) and trims, and (ii) the 1 year limited
warranty period for surrounds (mantels)
and trims, you have the following rights:
13
Warranty
•
•
•
•
14
Dimplex will in its sole discretion either
repair or replace such defective product or part without charge. If Dimplex
is unable to repair or replace such
product or part, or if repair or replacement is not commercially practicable
or cannot be timely made, Dimplex
may, in lieu of repair or replacement,
choose to refund the purchase price
for such product or part.
Limited warranty service will be
performed solely by dealers or service
agents of Dimplex authorized to provide limited warranty services.
For products other than surrounds
(mantels) and trims, this 2 year limited warranty entitles the purchaser to
on-site or in-home warranty services.
Accordingly, Dimplex will be responsible for all labour and transportation associated with repairing or replacing the
product or part except as follows: (i)
charges which may be levied for travel
costs incurred to travel to the purchaser’s site where the product is located
if the purchaser’s site is beyond 30
miles (48 km) from the closest service
depot of Dimplex’s dealer or service
agent; and (ii) the purchaser is solely
responsible for providing clear access
to all serviceable parts of the product.
For surrounds (mantels) and trims,
this 1 year limited warranty does
not entitle the purchaser to on-site
or in-house warranty services. The
purchaser is responsible for removal
and transportation of the surrounds
(mantels) and trims (and any repaired
or replacement product or part) to and
from the authorized dealer’s or service
agent’s place of business. On-site
or in-home services for surrounds
(mantels) and trims may be performed
at the purchaser’s specific request
and expense at Dimplex’s then-current
rates for such services. Dimplex
will not be responsible for, and this
limited warranty shall not include, any
expense incurred for installation or
removal of the surrounds (mantels)
or trims or any part thereof (or any
replacement product or part) including,
without limitation, all shipping costs
and transportation costs to and from
the authorized dealer’s or service
agent’s place of business and all
labour costs. Such costs shall be the
purchaser’s responsibility.
What Dimplex and its dealers and service
agents are also not responsible for:
IN NO EVENT WILL DIMPLEX, OR ITS
DIRECTORS, OFFICERS, OR AGENTS,
BE LIABLE TO THE PURCHASER OR
ANY THIRD PARTY, WHETHER IN CONTRACT, IN TORT, OR ON ANY OTHER
BASIS, FOR ANY INDIRECT, SPECIAL,
PUNITIVE, EXEMPLARY, CONSEQUENTIAL, OR INCIDENTAL LOSS, COST,
OR DAMAGE ARISING OUT OF OR
IN CONNECTION WITH THE SALE,
MAINTENANCE, USE, OR INABILITY TO
USE THE PRODUCT, EVEN IF DIMPLEX
OR ITS DIRECTORS, OFFICERS, OR
AGENTS HAVE BEEN ADVISED OF
THE POSSIBILITY OF SUCH LOSSES,
COSTS OR DAMAGES, OR IF SUCH
LOSSES, COSTS, OR DAMAGES ARE
FORESEEABLE. IN NO EVENT WILL
DIMPLEX, OR ITS OFFICERS, DIRECTORS, OR AGENTS BE LIABLE FOR
ANY DIRECT LOSSES, COSTS, OR
DAMAGES THAT EXCEED THE PURCHASE PRICE OF THE PRODUCT.
SOME JURISDICTIONS DO NOT ALLOW
THE EXCLUSION OR LIMITATION OF
INCIDENTAL OR CONSEQUENTIAL
DAMAGES, SO THE ABOVE LIMITATION
OR EXCLUSION MAY NOT APPLY TO
THE PURCHASER.
How State and Provincial law apply
This limited warranty gives you specific
legal rights, and you may also have other
rights which vary from jurisdiction to jurisdiction. The provisions of the United Nations Convention on Contracts for the Sale
of Goods shall not apply to this limited
warranty or the sale of products covered
by this limited warranty.
www.dimplex.com
Replacement Parts
LED Light Strip . . . . . . . . . . . . . . . . . . . . . . . . . . . . . . . . . . . . . 9600880100RP
LED Light Controller . . . . . . . . . . . . . . . . . . . . . . . . . . . . . . . . . 9600930100RP
Opti-V Remote Control . . . . . . . . . . . . . . . . . . . . . . . . . . . . . . . 9600950100RP
Power Supply Wire Harness. . . . . . . . . . . . . . . . . . . . . . . . . . . 9600980100RP
Electrical Connector . . . . . . . . . . . . . . . . . . . . . . . . . . . . . . . . . 9601030100RP
VF2927L Specific
Single LED Screen Assembly . . . . . . . . . . . . . . . . . . . . . . . . 9600890100RP
Glass. . . . . . . . . . . . . . . . . . . . . . . . . . . . . . . . . . . . . . . . . . . 9600910100RP
Lower Logset Assembly . . . . . . . . . . . . . . . . . . . . . . . . . . . . 9600900100RP
Upper Logset Assembly . . . . . . . . . . . . . . . . . . . . . . . . . . . . 9600940100RP
VF5452L Specific
Double LED Screen Assembly. . . . . . . . . . . . . . . . . . . . . . . 9600970100RP
Double Glass . . . . . . . . . . . . . . . . . . . . . . . . . . . . . . . . . . . . 9601000100RP
Right Lower Logset Assembly. . . . . . . . . . . . . . . . . . . . . . . . 9600990100RP
Left Lower Logset Assembly . . . . . . . . . . . . . . . . . . . . . . . . . 9601010100RP
Right Upper Logset Assembly. . . . . . . . . . . . . . . . . . . . . . . . 9600960100RP
Left Upper Logset Assembly . . . . . . . . . . . . . . . . . . . . . . . . . 9601020100RP
Dimplex North America Limited
1367 Industrial Road
Cambridge ON
Canada N1R 7G8
© 2014 Dimplex North America Limited
15