1
System Settings Guide
Please read this guide before operating this product.
After you finish reading this guide, store it in a safe place for future reference.
ENG
imageRUNNER
2545i/2545
2535i/2535
2530i/2530
2525i/2525
2520i/2520
System Settings Guide
Manuals for the Machine
The manuals for this machine are organized as shown below. Please refer to them for detailed
information. Some manuals may not be needed for certain system configurations and products
purchased.
Guides with this symbol are printed manuals.
• Quick Reference for Basic Operations
CD-ROM
Guides with this symbol are PDF manuals included on the
accompanying CD-ROM.
Easy Operation Guide
CD-ROM
• Legal Notices
• Setup Instructions
User’s Guide
• Basic Operations
• Troubleshooting
Reference Guide
CD-ROM
Copying Guide
CD-ROM
Sending and Facsimile Guide
CD-ROM
Remote UI Guide
CD-ROM
System Settings Guide
(This Document)
CD-ROM
Network ScanGear Guide
CD-ROM
Printer Guide
CD-ROM
Windows Printer Driver Guide
CD-ROM
Windows Fax Driver Guide
CD-ROM
Mac Printer Driver Guide
CD-ROM
• Copying Instructions
• Sending and Fax Instructions
• Remote User Interface Instructions
• Network Connectivity
• Security Management
• Color Network ScanGear Instructions
• USB Memory Media Printing Instructions
• PS/PCL/UFRII LT Printer Instructions
• Windows Printer Driver Instructions
• Windows Fax Driver Instructions
• Macintosh Printer Driver Instructions
To view the manual in PDF format, Adobe Reader/Adobe Acrobat Reader is required. If Adobe Reader/Adobe Acrobat Reader is not installed on your
system, please download it from the Adobe Systems Incorporated website.
How This Manual Is Organized
Chapter 1
Before You Start
Chapter 2
Connecting the Machine to a TCP/IP Network
Chapter 3
Setting up the Machine for Your Network Environment
Chapter 4
Setting the Send Function
Chapter 5
Setting up Computers to Use Print and Send Functions
Chapter 6
Protecting the Machine from Unauthorized Access
Chapter 7
Other System Settings
Chapter 8
Troubleshooting
Chapter 9
Appendix
Includes the list of System Setting items, description about utility software, glossary,
and index.
Considerable effort has been made to ensure that this manual is free of inaccuracies and omissions. However, as we are constantly improving our
products, if you need an exact specification, please contact Canon.
Contents
Preface . . . . . . . . . . . . . . . . . . . . . . . . . . . . . . . . . . . . . . . . . . . . . . . . . . . . . . . . . ix
How to Use This Manual . . . . . . . . . . . . . . . . . . . . . . . . . . . . . . . . . . . . . . . . . . . ix
Symbols Used in This Manual . . . . . . . . . . . . . . . . . . . . . . . . . . . . . . . . . . . . . . ix
Keys and Buttons Used in This Manual . . . . . . . . . . . . . . . . . . . . . . . . . . . . . . . ix
Illustrations Used in This Manual . . . . . . . . . . . . . . . . . . . . . . . . . . . . . . . . . . . . x
Displays Used in This Manual . . . . . . . . . . . . . . . . . . . . . . . . . . . . . . . . . . . . . . x
Abbreviations Used in This Manual . . . . . . . . . . . . . . . . . . . . . . . . . . . . . . . . . . xi
Trademarks . . . . . . . . . . . . . . . . . . . . . . . . . . . . . . . . . . . . . . . . . . . . . . . . . . . . xi
Legal Notices . . . . . . . . . . . . . . . . . . . . . . . . . . . . . . . . . . . . . . . . . . . . . . . . . . . . xii
Copyright . . . . . . . . . . . . . . . . . . . . . . . . . . . . . . . . . . . . . . . . . . . . . . . . . . . . . xii
Disclaimers. . . . . . . . . . . . . . . . . . . . . . . . . . . . . . . . . . . . . . . . . . . . . . . . . . . . xii
Chapter 1
Before You Start
System Settings . . . . . . . . . . . . . . . . . . . . . . . . . . . . . . . . . . . . . . . . . . . . . . . . . .1-2
Setting System Management Mode . . . . . . . . . . . . . . . . . . . . . . . . . . . . . . . . . .1-4
Specifying the System Manager Settings . . . . . . . . . . . . . . . . . . . . . . . . . . . .1-4
Operating the Machine in System Management Mode . . . . . . . . . . . . . . . . . .1-7
When Department ID Management Is Enabled and
User ID Management Is Disabled . . . . . . . . . . . . . . . . . . . . . . . . . . . . . . .1-7
When Both Department ID Management and
User ID Management Are Disabled . . . . . . . . . . . . . . . . . . . . . . . . . . . . . .1-8
When User ID Management Is Enabled. . . . . . . . . . . . . . . . . . . . . . . . . . .1-9
License Registration . . . . . . . . . . . . . . . . . . . . . . . . . . . . . . . . . . . . . . . . . . . . .1-11
Obtaining a License Key . . . . . . . . . . . . . . . . . . . . . . . . . . . . . . . . . . . . . . . .1-11
Registering a License Key . . . . . . . . . . . . . . . . . . . . . . . . . . . . . . . . . . . . . . .1-12
System Requirements . . . . . . . . . . . . . . . . . . . . . . . . . . . . . . . . . . . . . . . . . . . .1-14
Printing or Sending a Fax from a Computer. . . . . . . . . . . . . . . . . . . . . . . . . .1-14
Using E-Mail/I-Fax . . . . . . . . . . . . . . . . . . . . . . . . . . . . . . . . . . . . . . . . . . . . .1-15
Sending Data to a File Server . . . . . . . . . . . . . . . . . . . . . . . . . . . . . . . . . . . .1-16
Checking Your Network Environment . . . . . . . . . . . . . . . . . . . . . . . . . . . . . .1-18
Setup Procedure . . . . . . . . . . . . . . . . . . . . . . . . . . . . . . . . . . . . . . . . . . . . . . . .1-19
Connecting the Machine to a Network . . . . . . . . . . . . . . . . . . . . . . . . . . . . . .1-19
Setting up the Machine for Printing/Sending Faxes from a Computer . . . . . .1-20
Setting up the Machine to Use the E-Mail/I-Fax Functions . . . . . . . . . . . . . .1-21
Setting up the Machine for Sending Data to a File Server . . . . . . . . . . . . . . .1-22
iv
Chapter 2
Connecting the Machine to a TCP/IP Network
Interface Settings (Ethernet Driver) . . . . . . . . . . . . . . . . . . . . . . . . . . . . . . . . . . 2-2
Communication Environment Settings . . . . . . . . . . . . . . . . . . . . . . . . . . . . . . . 2-5
IEEE802.1X Authentication Settings . . . . . . . . . . . . . . . . . . . . . . . . . . . . . . . . . 2-9
Selecting the IEEE802.1X Authentication Method. . . . . . . . . . . . . . . . . . . . . 2-10
Specifying the Machine’s IP Address . . . . . . . . . . . . . . . . . . . . . . . . . . . . . . . 2-15
Setting IPv4 Address . . . . . . . . . . . . . . . . . . . . . . . . . . . . . . . . . . . . . . . . . . . 2-15
Setting IPv6 Address . . . . . . . . . . . . . . . . . . . . . . . . . . . . . . . . . . . . . . . . . . . 2-18
Checking the Network Connection. . . . . . . . . . . . . . . . . . . . . . . . . . . . . . . . . 2-22
Checking TCP/IPv4 Network Connection . . . . . . . . . . . . . . . . . . . . . . . . 2-22
Checking TCP/IPv6 Network Connection . . . . . . . . . . . . . . . . . . . . . . . . 2-23
Chapter 3
Setting up the Machine for Your Network Environment
Setting DNS Server . . . . . . . . . . . . . . . . . . . . . . . . . . . . . . . . . . . . . . . . . . . . . . . 3-2
IPv4 . . . . . . . . . . . . . . . . . . . . . . . . . . . . . . . . . . . . . . . . . . . . . . . . . . . . . . . . . 3-2
IPv6 . . . . . . . . . . . . . . . . . . . . . . . . . . . . . . . . . . . . . . . . . . . . . . . . . . . . . . . . . 3-6
Setting WINS . . . . . . . . . . . . . . . . . . . . . . . . . . . . . . . . . . . . . . . . . . . . . . . . . . . 3-11
Setting SNTP . . . . . . . . . . . . . . . . . . . . . . . . . . . . . . . . . . . . . . . . . . . . . . . . . . . 3-13
Setting SNTP Server Settings . . . . . . . . . . . . . . . . . . . . . . . . . . . . . . . . . . . . 3-13
Confirming SNTP Server Connection . . . . . . . . . . . . . . . . . . . . . . . . . . . . . . 3-15
Setting PASV Mode for FTP . . . . . . . . . . . . . . . . . . . . . . . . . . . . . . . . . . . . . . . 3-16
Setting FTP Extension . . . . . . . . . . . . . . . . . . . . . . . . . . . . . . . . . . . . . . . . . . . 3-18
Managing Key Pairs and Digital Certificates. . . . . . . . . . . . . . . . . . . . . . . . . . 3-20
Generating a Key Pair for SSL Communications. . . . . . . . . . . . . . . . . . . . . . 3-21
Registering a Key and Certificate . . . . . . . . . . . . . . . . . . . . . . . . . . . . . . . . . 3-25
Checking/Deleting a Key and Certificate . . . . . . . . . . . . . . . . . . . . . . . . . . . . 3-26
Registering a CA Certificate. . . . . . . . . . . . . . . . . . . . . . . . . . . . . . . . . . . . . . 3-29
Checking/Deleting a CA Certificate . . . . . . . . . . . . . . . . . . . . . . . . . . . . . . . . 3-31
Setting the Use of HTTP . . . . . . . . . . . . . . . . . . . . . . . . . . . . . . . . . . . . . . . . . . 3-33
Setting the Default Key for SSL Communications . . . . . . . . . . . . . . . . . . . . . 3-35
Setting Port Numbers . . . . . . . . . . . . . . . . . . . . . . . . . . . . . . . . . . . . . . . . . . . . 3-38
Specifying Proxy Settings . . . . . . . . . . . . . . . . . . . . . . . . . . . . . . . . . . . . . . . . 3-41
Confirming the Department ID and Password . . . . . . . . . . . . . . . . . . . . . . . . 3-43
Setting Application Protocols for Printing . . . . . . . . . . . . . . . . . . . . . . . . . . . 3-45
Setting up the Send Files Function of the Machine (SMB Settings). . . . . . . 3-49
Setting up E-Mail/I-Fax Function . . . . . . . . . . . . . . . . . . . . . . . . . . . . . . . . . . . 3-52
Setting up LDAP Server . . . . . . . . . . . . . . . . . . . . . . . . . . . . . . . . . . . . . . . . . . 3-62
Registering LDAP Server. . . . . . . . . . . . . . . . . . . . . . . . . . . . . . . . . . . . . . . . 3-63
Changing LDAP Server Setting . . . . . . . . . . . . . . . . . . . . . . . . . . . . . . . . . . . 3-70
Deleting LDAP Server . . . . . . . . . . . . . . . . . . . . . . . . . . . . . . . . . . . . . . . . . . 3-71
Registering/Editing LDAP Search Attributes . . . . . . . . . . . . . . . . . . . . . . . . . 3-72
Printing LDAP Server Settings. . . . . . . . . . . . . . . . . . . . . . . . . . . . . . . . . . . . 3-74
v
Chapter 4
Setting the Send Function
Specifying Communications Settings . . . . . . . . . . . . . . . . . . . . . . . . . . . . . . . .4-2
E-Mail/I-Fax Settings . . . . . . . . . . . . . . . . . . . . . . . . . . . . . . . . . . . . . . . . . . . .4-2
Fax Settings . . . . . . . . . . . . . . . . . . . . . . . . . . . . . . . . . . . . . . . . . . . . . . . . . . .4-4
Setting Sending/Receiving Start Speed . . . . . . . . . . . . . . . . . . . . . . . . . . .4-4
R-Key Setting . . . . . . . . . . . . . . . . . . . . . . . . . . . . . . . . . . . . . . . . . . . . . . .4-5
Memory Lock Settings . . . . . . . . . . . . . . . . . . . . . . . . . . . . . . . . . . . . . . . . . . .4-8
Selecting Country or Region . . . . . . . . . . . . . . . . . . . . . . . . . . . . . . . . . . . . .4-12
Storing Forwarding Settings. . . . . . . . . . . . . . . . . . . . . . . . . . . . . . . . . . . . . . .4-14
Storing Forwarding Settings. . . . . . . . . . . . . . . . . . . . . . . . . . . . . . . . . . . . . .4-15
Setting Forwarding without Conditions. . . . . . . . . . . . . . . . . . . . . . . . . . . . . .4-23
Checking/Changing Forwarding Settings. . . . . . . . . . . . . . . . . . . . . . . . . . . .4-28
Turning Forwarding ON/OFF . . . . . . . . . . . . . . . . . . . . . . . . . . . . . . . . . . . . .4-29
Erasing Forwarding Settings . . . . . . . . . . . . . . . . . . . . . . . . . . . . . . . . . . . . .4-30
Printing Forwarding Settings . . . . . . . . . . . . . . . . . . . . . . . . . . . . . . . . . . . . .4-31
Handling Forwarding Documents . . . . . . . . . . . . . . . . . . . . . . . . . . . . . . . . . .4-32
Restricting the Send Function . . . . . . . . . . . . . . . . . . . . . . . . . . . . . . . . . . . . .4-35
Setting a Password for the Address Book . . . . . . . . . . . . . . . . . . . . . . . . . . .4-35
Restricting New Addresses . . . . . . . . . . . . . . . . . . . . . . . . . . . . . . . . . . . . . .4-37
Enabling Fax Transmission via the Fax Driver. . . . . . . . . . . . . . . . . . . . . . . .4-38
Restricting Recall . . . . . . . . . . . . . . . . . . . . . . . . . . . . . . . . . . . . . . . . . . . . . .4-40
Entering a Fax Number Twice to Confirm It . . . . . . . . . . . . . . . . . . . . . . . . . .4-41
Restricting Sequential Broadcast . . . . . . . . . . . . . . . . . . . . . . . . . . . . . . . . . .4-42
Restricting Sending Documents to a USB Memory Media Device. . . . . . . . .4-43
Chapter 5
Setting up Computers to Use Print and Send Functions
Setting up a Computer for Printing/Sending a Fax. . . . . . . . . . . . . . . . . . . . . .5-2
Printer Connection Method (LPD/Raw) . . . . . . . . . . . . . . . . . . . . . . . . . . . . . .5-3
Installing a New Driver . . . . . . . . . . . . . . . . . . . . . . . . . . . . . . . . . . . . . . . .5-3
Changing the Port after Installing the Driver . . . . . . . . . . . . . . . . . . . . . . .5-3
Setting File Server (FTP) . . . . . . . . . . . . . . . . . . . . . . . . . . . . . . . . . . . . . . . . . . .5-7
Windows 2000/XP/Vista/7/Server 2003/Server 2008. . . . . . . . . . . . . . . . . . . .5-8
UNIX/Linux . . . . . . . . . . . . . . . . . . . . . . . . . . . . . . . . . . . . . . . . . . . . . . . . . . .5-12
Mac OS X. . . . . . . . . . . . . . . . . . . . . . . . . . . . . . . . . . . . . . . . . . . . . . . . . . . .5-14
FTP Server for iW Gateway . . . . . . . . . . . . . . . . . . . . . . . . . . . . . . . . . . . . . .5-16
vi
Setting File Server (File Sharing) . . . . . . . . . . . . . . . . . . . . . . . . . . . . . . . . . . . 5-18
Confirming Computer Name and Necessary Components for File Sharing
(Windows 2000/XP/Vista/7/Server 2003/Server 2008) . . . . . . . . . . . . . . . . . 5-19
Setting Shared Folder . . . . . . . . . . . . . . . . . . . . . . . . . . . . . . . . . . . . . . . . . . 5-22
Setting Shared Folder without Access Restriction
(Windows 2000/XP/Server 2003) . . . . . . . . . . . . . . . . . . . . . . . . . . . . . . . 5-23
Setting Shared Folder without Access Restriction (Public Folder)
(Windows Vista/7/Server 2008) . . . . . . . . . . . . . . . . . . . . . . . . . . . . . . . . 5-25
Setting Shared Folder with Access Restriction
(Windows 2000/XP/Server 2003) . . . . . . . . . . . . . . . . . . . . . . . . . . . . . . . 5-27
Setting Shared Folder with Access Restriction
(Windows Vista/7/Server 2008) . . . . . . . . . . . . . . . . . . . . . . . . . . . . . . . . 5-32
Setting Shared Folder (Mac OS X). . . . . . . . . . . . . . . . . . . . . . . . . . . . . . 5-34
Setting Shared Folder (Samba (UNIX/Linux)) . . . . . . . . . . . . . . . . . . . . . 5-35
Specifying Destinations . . . . . . . . . . . . . . . . . . . . . . . . . . . . . . . . . . . . . . . . . 5-36
File Sharing without Access Restriction
(Windows 2000/XP/Vista/7/Server 2003/Server 2008) . . . . . . . . . . . . . . . 5-37
File Sharing with Access Restriction
(Windows 2000/XP/Vista/7/Server 2003/Server 2008) . . . . . . . . . . . . . . . 5-38
File Sharing (Mac OS X). . . . . . . . . . . . . . . . . . . . . . . . . . . . . . . . . . . . . . 5-39
File Sharing (UNIX/Linux). . . . . . . . . . . . . . . . . . . . . . . . . . . . . . . . . . . . . 5-40
Chapter 6
Protecting the Machine from Unauthorized Access
Setting Department ID Management . . . . . . . . . . . . . . . . . . . . . . . . . . . . . . . . . 6-2
Registering the Department ID, Password, and Page Limit. . . . . . . . . . . . . . . 6-4
Changing the Password and Page Limit . . . . . . . . . . . . . . . . . . . . . . . . . . . . . 6-8
Erasing the Department ID and Password. . . . . . . . . . . . . . . . . . . . . . . . . . . 6-11
Checking and Printing Counter Information . . . . . . . . . . . . . . . . . . . . . . . . . . 6-12
Clearing Page Totals . . . . . . . . . . . . . . . . . . . . . . . . . . . . . . . . . . . . . . . . . . . 6-15
Accepting Print and Scan Jobs with Unknown IDs . . . . . . . . . . . . . . . . . . . . 6-17
Setting User ID Management . . . . . . . . . . . . . . . . . . . . . . . . . . . . . . . . . . . . . . 6-19
Restricting Access from Computers on the Network . . . . . . . . . . . . . . . . . . 6-21
Setting the IP Address Range . . . . . . . . . . . . . . . . . . . . . . . . . . . . . . . . . . . . 6-21
Setting IPv4 Address Range . . . . . . . . . . . . . . . . . . . . . . . . . . . . . . . . . . 6-21
Setting IPv6 Address Range . . . . . . . . . . . . . . . . . . . . . . . . . . . . . . . . . . 6-25
Setting the MAC Address Filter . . . . . . . . . . . . . . . . . . . . . . . . . . . . . . . . . . . 6-29
Authenticating Users Before Sending Documents (Authorized Send). . . . . 6-32
Restricting the Use of Remote UI. . . . . . . . . . . . . . . . . . . . . . . . . . . . . . . . . . . 6-34
Restricting the Display of Job Log . . . . . . . . . . . . . . . . . . . . . . . . . . . . . . . . . 6-37
Displaying the Current Department ID/User Name. . . . . . . . . . . . . . . . . . . . . 6-39
vii
Chapter 7
Other System Settings
Specifying Device Information . . . . . . . . . . . . . . . . . . . . . . . . . . . . . . . . . . . . . .7-2
Setting Startup Time . . . . . . . . . . . . . . . . . . . . . . . . . . . . . . . . . . . . . . . . . . . . . .7-3
Setting Auto Online/Offline . . . . . . . . . . . . . . . . . . . . . . . . . . . . . . . . . . . . . . . . .7-5
Auto Online . . . . . . . . . . . . . . . . . . . . . . . . . . . . . . . . . . . . . . . . . . . . . . . . . . .7-5
Auto Offline . . . . . . . . . . . . . . . . . . . . . . . . . . . . . . . . . . . . . . . . . . . . . . . . . . .7-6
Retaining Send Log to Memory Media. . . . . . . . . . . . . . . . . . . . . . . . . . . . . . . .7-8
Restricting the USB Interface Port . . . . . . . . . . . . . . . . . . . . . . . . . . . . . . . . . .7-10
Installing Drivers with Plug and Play . . . . . . . . . . . . . . . . . . . . . . . . . . . . . . . .7-12
Using the Inner 2 Way Tray-G1 . . . . . . . . . . . . . . . . . . . . . . . . . . . . . . . . . . . . .7-14
Restricting Printing Images from a USB Memory Media Device . . . . . . . . . .7-16
Setting the Secure Printing Function. . . . . . . . . . . . . . . . . . . . . . . . . . . . . . . .7-18
Displaying an Alert Message When the Available Memory Gets Low . . . . .7-21
Chapter 8
Troubleshooting
Identifying and Isolating Problems . . . . . . . . . . . . . . . . . . . . . . . . . . . . . . . . . .8-2
Network Connection Problems. . . . . . . . . . . . . . . . . . . . . . . . . . . . . . . . . . . . .8-2
Printing Problems . . . . . . . . . . . . . . . . . . . . . . . . . . . . . . . . . . . . . . . . . . . . . . .8-5
Data Sending/File Sharing Problems . . . . . . . . . . . . . . . . . . . . . . . . . . . . . . . .8-7
Chapter 9
Appendix
System Setting Items. . . . . . . . . . . . . . . . . . . . . . . . . . . . . . . . . . . . . . . . . . . . . .9-2
Managing the Machine . . . . . . . . . . . . . . . . . . . . . . . . . . . . . . . . . . . . . . . . . . .9-11
Glossary . . . . . . . . . . . . . . . . . . . . . . . . . . . . . . . . . . . . . . . . . . . . . . . . . . . . . . .9-12
Index . . . . . . . . . . . . . . . . . . . . . . . . . . . . . . . . . . . . . . . . . . . . . . . . . . . . . . . . . .9-21
viii
Preface
Thank you for purchasing the Canon imageRUNNER 2545i/2545/2535i/2535/2530i/2530/
2525i/2525/2520i/2520. Please read this manual thoroughly before operating the machine to
familiarize yourself with its capabilities, and to make the most of its many functions. After
reading this manual, store it in a safe place for future reference.
How to Use This Manual
Symbols Used in This Manual
The following symbols are used in this manual to explain procedures, restrictions,
handling precautions, and instructions that should be observed for safety.
IMPORTANT Indicates operational requirements and restrictions. Be sure to read
these items carefully to operate the machine correctly, and avoid
damage to the machine or property.
NOTE
Indicates a clarification of an operation, or contains additional
explanations for a procedure. Reading these notes is highly
recommended.
Keys and Buttons Used in This Manual
The following tables provide a few examples of how keys, buttons, and other user
interfaces such as icons displayed on the screen are expressed in this manual:
• Keys on the machine’s control panel and touch panel display:
Control Panel
Touch Panel Display
Keys
Example
Key icon + (Key Name)
(Additional Functions)
[Key Name]
[OK], [Cancel], etc.
[Key Icon]
[
], [
], etc.
• Buttons, icons and other user interfaces on computer operation screens:
Buttons, Icons, and Others
Example
[Button Name]
[OK]
[Name] + icon, menu, etc.
[CD-ROM] icon, [Start] menu, etc.
ix
Illustrations Used in This Manual
The machine illustrations used in this manual are those of the imageRUNNER
2545i with the following optional equipment attached: the Inner Finisher-B1, Inner
Finisher Additional Tray-B1, and CST. Feeding Unit-AE1.
Displays Used in This Manual
Screen shots used in this manual may differ from actual displays depending on the
machine configuration.
The keys and buttons to be pressed or clicked are marked with a
below.
, as shown
When multiple keys or buttons can be pressed or clicked, all of them will be marked.
Select the keys or buttons best suited to your needs.
x
Abbreviations Used in This Manual
In this manual, product names are abbreviated as follows:
Microsoft Windows 2000 operating system:
Windows 2000
Microsoft Windows 2000 Professional operating
system:
Windows 2000
Professional
Microsoft Windows XP Professional Edition operating Windows XP Professional
system:
Microsoft Windows XP operating system:
Windows XP
Microsoft Windows Vista operating system:
Windows Vista
Microsoft Windows 7 operating system:
Windows 7
Microsoft Windows 2000 Server operating system:
Windows 2000 Server
Microsoft Windows Server 2003 operating system:
Windows Server 2003
Microsoft Windows Server 2008 operating system:
Windows Server 2008
Microsoft Windows Server 2008 R2 operating system: Windows Server 2008 R2
Microsoft Windows operating system:
Windows
Trademarks
Adobe and Adobe Acrobat are trademarks of Adobe Systems Incorporated.
Macintosh and Mac OS are trademarks of Apple Inc., registered in the U.S. and
other countries.
PCL, PCL5, and PCL6 are trademarks of Hewlett-Packard Company.
IBM is a trademark of International Business Machines Corporation.
Microsoft, Windows, Windows Vista, Windows Server, and Internet Explorer are
either registered trademarks or trademarks of Microsoft Corporation in the United
States and/or other countries.
Other product and company names herein may be the trademarks of their
respective owners.
xi
Legal Notices
Copyright
Copyright 2012 by Canon Inc. All rights reserved.
No part of this publication may be reproduced or transmitted in any form or by any
means, electronic or mechanical, including photocopying and recording, or by any
information storage or retrieval system without the prior written permission of
Canon Inc.
Disclaimers
The information in this document is subject to change without notice.
CANON INC. MAKES NO WARRANTY OF ANY KIND WITH REGARD TO THIS
MATERIAL, EITHER EXPRESS OR IMPLIED, EXCEPT AS PROVIDED HEREIN,
INCLUDING WITHOUT LIMITATION, THEREOF, WARRANTIES AS TO
MARKETABILITY, MERCHANTABILITY, FITNESS FOR A PARTICULAR
PURPOSE OR USE OR NON-INFRINGEMENT. CANON INC. SHALL NOT BE
LIABLE FOR ANY DIRECT, INCIDENTAL, OR CONSEQUENTIAL DAMAGES OF
ANY NATURE, OR LOSSES OR EXPENSES RESULTING FROM THE USE OF
THIS MATERIAL.
xii
Before You Start
1
CHAPTER
This chapter describes information you need to know before you start using the menu and how
to set the System Management mode to protect the System Settings from unexpected
changes. This chapter also includes on how to register the license keys to activate certain
functions. System requirements and setup procedures for using the machine’s functions are
also explained.
System Settings . . . . . . . . . . . . . . . . . . . . . . . . . . . . . . . . . . . . . . . . . . . . . . . . . . . . . . . . 1-2
Setting System Management Mode . . . . . . . . . . . . . . . . . . . . . . . . . . . . . . . . . . . . . . . . . 1-4
Specifying the System Manager Settings . . . . . . . . . . . . . . . . . . . . . . . . . . . . . . . . . . . . . . . . . .1-4
Operating the Machine in System Management Mode . . . . . . . . . . . . . . . . . . . . . . . . . . . . . . . .1-7
License Registration . . . . . . . . . . . . . . . . . . . . . . . . . . . . . . . . . . . . . . . . . . . . . . . . . . . . 1-11
Obtaining a License Key . . . . . . . . . . . . . . . . . . . . . . . . . . . . . . . . . . . . . . . . . . . . . . . . . . . . . .1-11
Registering a License Key . . . . . . . . . . . . . . . . . . . . . . . . . . . . . . . . . . . . . . . . . . . . . . . . . . . . .1-12
System Requirements . . . . . . . . . . . . . . . . . . . . . . . . . . . . . . . . . . . . . . . . . . . . . . . . . . 1-14
Printing or Sending a Fax from a Computer. . . . . . . . . . . . . . . . . . . . . . . . . . . . . . . . . . . . . . . .1-14
Using E-Mail/I-Fax . . . . . . . . . . . . . . . . . . . . . . . . . . . . . . . . . . . . . . . . . . . . . . . . . . . . . . . . . . .1-15
Sending Data to a File Server. . . . . . . . . . . . . . . . . . . . . . . . . . . . . . . . . . . . . . . . . . . . . . . . . . .1-16
Checking Your Network Environment . . . . . . . . . . . . . . . . . . . . . . . . . . . . . . . . . . . . . . . . . . . . .1-18
Setup Procedure. . . . . . . . . . . . . . . . . . . . . . . . . . . . . . . . . . . . . . . . . . . . . . . . . . . . . . . 1-19
Connecting the Machine to a Network . . . . . . . . . . . . . . . . . . . . . . . . . . . . . . . . . . . . . . . . . . . .1-19
Setting up the Machine for Printing/Sending Faxes from a Computer. . . . . . . . . . . . . . . . . . . .1-20
Setting up the Machine to Use the E-Mail/I-Fax Functions . . . . . . . . . . . . . . . . . . . . . . . . . . . .1-21
Setting up the Machine for Sending Data to a File Server . . . . . . . . . . . . . . . . . . . . . . . . . . . . .1-22
1-1
System Settings
The System Settings includes important settings that affect the management of
machine operations. It is recommended that the administrator set the System
Settings to ensure proper operation of the machine.
To make changes to the System Settings, you should log in to the System
Management Mode by entering the System Management ID and System
Password.
Before You Start
1
NOTE
• The System Management ID and System Password are both set to ‘7654321’ at
purchase. Change them before using the machine. For help, see “Specifying the
System Manager Settings,” on p. 1-4.
• If User ID Management is enabled, you can log in to System Management Mode only
by entering the User ID and password of a user registered as “System Manager.” For
help, see “When User ID Management Is Enabled,” on p. 1-9.
This guide provides instructions on how to configure the System Settings and how
to set up computers to use the machine on a network.
Chapter 1 explains how to limit access to the System Settings and how to activate
certain functions by registering license keys. It also contains information you should
know before setting up a network.
Chapters 2 and 3 help you to connect the machine to a network and set it up for
your network environment. Also refer to Chapter 5 for information on how to set up
computers in order to use the machine’s print and send functions on the network.
Chapter 4 describes the System Settings items that are related to the send
function, such as Memory Lock and Forwarding, and how to set restrictions on the
send function.
Chapter 6 describes how to control access to the machine, both from computers on
the network and from the machine’s control panel.
1-2
System Settings
Chapter 7 describes the rest of System Settings items.
Chapter 8 and the Appendix describe troubleshooting tips and include the System
Settings table, glossary, and index.
Before You Start
1
System Settings
1-3
Setting System Management Mode
The System Management mode enables the administrator to restrict access to the
System Settings by setting the System Manager ID and System Password.
Before You Start
1
IMPORTANT
If User ID Management is enabled, only users registered as “System Manager” can
change the System Settings by logging in to the machine with their User ID and
password. In this case, you cannot log in as the System Manager by entering the
System Manager ID and System Password.
Displayed when the machine is in the System Management mode
Specifying the System Manager Settings
Follow the procedure below to set the System Manager ID and System Password.
IMPORTANT
• Attaching the optional Copy Card Reader-F1 and specifying the card IDs to be used
restore the System Manger ID and System Password to their defaults (‘7654321’).
• You must set both System Manager ID and System Password to manage the
operations of the machine.
• If the Language Switch setting is set to ‘On’, some characters are restricted and
cannot be entered. To enter all characters, set the Language Switch setting to ‘Off’.
(See Chapter 3, “Configuring the Machine’s Basic Settings,” in the Reference Guide.)
1-4
Setting System Management Mode
1
Press
(Additional Functions)
➞ [System Settings].
2
Enter the System Manager ID and
System Password using
(numeric keys).
❑ Press [System Manager ID] ➞ enter the
System Manager ID.
❑ Press [System Password] ➞ enter the
System Password.
3
Press
(Log In/Out) on the machine’s control panel.
Setting System Management Mode
1-5
1
Before You Start
NOTE
• If the optional Copy Card Reader-F1 is attached, 1000 sequential numbers used as
the card IDs cannot be used for the System Manager ID.
• For instructions on how to enter characters using the on-screen keyboard, see
Chapter 2, “Basic Operations,” in the Reference Guide.
• The default settings are as follows:
- System Manager ID: 7654321
- System Password: 7654321
4
Press [System Manager
Settings].
Before You Start
1
5
Press [System Manager] ➞ enter
the System Manager’s name ➞
press [OK].
NOTE
You can enter a maximum of 32
characters for the name.
6
Press [System Manager ID] ➞
enter a number (up to seven
digits) using
(numeric
keys).
You cannot store a System Manager ID that
only consists of zeros, such as <0000000>.
If you enter fewer than seven digits, the
machine stores the System Manager ID
with leading zeros.
Example: If <02> or <002> is entered,
<0000002> is stored.
NOTE
If you make a mistake when entering the ID, press
number.
1-6
Setting System Management Mode
(Clear) ➞ enter the correct
7
Press [System Password] ➞
enter a number (up to seven
digits) using
(numeric
keys) ➞ press [OK].
You cannot store a password that only
consists of zeros, such as <0000000>.
Example: If <02> or <002> is entered,
<0000002> is stored.
To cancel storing the System Manager Settings, press [Cancel].
NOTE
If you make a mistake when entering the password, press
correct password.
8
Press
(Clear) ➞ enter the
(Reset) to return to the top screen.
Operating the Machine in System Management Mode
This section describes how to operate the machine in the System Management
mode.
NOTE
• When the operation is complete, be sure to press
(Log In/Out) to log out of the
System Management mode.
• The machine automatically logs out of the System Management mode after the Auto
Clear time has elapsed. For details about the Auto Clear mode, see Chapter 3,
“Configuring the Machine’s Basic Settings,” in the Reference Guide.
When Department ID Management Is Enabled and User ID
Management Is Disabled
When Department ID Management is enabled, the System Manager ID is handled as one of
the departments. Follow the procedure below to log in as the System Manager.
Setting System Management Mode
1-7
1
Before You Start
If you enter fewer than seven digits, the
machine stores the password with leading
zeros.
1
Enter the System Management ID
and password using
(numeric keys).
❑ Press [Department ID] ➞ enter the
System Manager ID.
1
❑ Press [Password] ➞ enter the System
Before You Start
Password.
2
Press
(Log In/Out).
The machine enters the System Management Mode.
When Both Department ID Management and User ID Management
Are Disabled
1
Press
(Additional Functions) ➞ [System Settings].
2
Enter the System Management ID
and password using
(numeric keys).
❑ Press [System Manager ID] ➞ enter the
System Manager ID.
❑ Press [System Password] ➞ enter the
System Password.
1-8
Setting System Management Mode
3
Press
(Log In/Out).
The machine enters the System Management Mode.
Before You Start
1
When User ID Management Is Enabled
IMPORTANT
If User ID Management is enabled, only users registered as “System Manager” can
change the System Settings by logging in to the machine with their User ID and
password. In this case, you cannot log in as the System Manager by entering the
System Manager ID and System Password.
1
Enter the User ID and password.
❑ Press [User ID] ➞ enter the User ID of
the user registered as the System
Manager ➞ press [OK].
❑ Press [Password] ➞ enter the password
for the above user ➞ press [OK].
NOTE
For instructions on how to enter characters using the on-screen keyboard, see
Chapter 2, “Basic Operations,” in the Reference Guide.
Setting System Management Mode
1-9
2
Press
(Log In/Out).
The machine enters the System Management Mode.
Before You Start
1
1-10
Setting System Management Mode
License Registration
Obtaining a License Key
A license key can be obtained by using a web browser to access the license
management system. Access the system by entering the following URL:
http://www.canon.com/lms/license/
■ Administration Numbers That Are Necessary to Obtain a License Key
Follow the procedure displayed on the screen. The following administration
numbers are necessary to obtain the license key:
• License Access Number
Check the License Access Number Certificate that is included in the provided
package.
• Device Serial Number
Press
(Counter Check) on the machine’s control panel to view the device
serial number.
License Registration
1-11
1
Before You Start
To activate certain functions in your machine, it is necessary to register a license
key in License Registration in System Settings (from the Additional Functions
screen).
Registering a License Key
You need to register a license key in your machine to activate certain functions.
IMPORTANT
To make changes to the System Settings, enter the System Management mode. For
details, see “Operating the Machine in System Management Mode,” on p. 1-7.
Before You Start
1
1
Press
2
(Additional Functions) ➞ [System Settings].
Press [ ] or [ ] until [License
Registration] appears ➞ press
[License Registration].
A caution message for the license
registration procedure appears.
3
Confirm the message and press [OK].
4
Enter the license key using
(numeric keys) ➞ press
[Start].
[
][
]:
Press to move the position of
the cursor.
[Backspace]: Press to delete the last
number entered.
The message <Installation was
successful.> appears.
IMPORTANT
A caution message is displayed while the machine is in process. Wait until [OK] is
displayed in the screen and proceed to step 5.
1-12
License Registration
NOTE
• If the message <The value for the license key is not correct. Check the license key.> is
displayed, press [OK] ➞ enter the correct license key.
• If the message <There are not enough features required for installation.> is displayed,
the license key cannot be registered. Press [OK], and then cancel the registration.
Check if the required option or function is properly installed in the machine.
Press [OK].
6
Restart the machine.
1
Before You Start
5
Turn OFF the machine, wait at least 10 seconds, and then turn it ON.
License Registration
1-13
System Requirements
This section describes the system environments with which the machine is
compatible.
Before You Start
1
NOTE
By connecting the machine to the network, its settings and operations can be
performed on computers using the Remote UI. For more information on the Remote
UI, see the Remote UI Guide.
Printing or Sending a Fax from a Computer
The following system environments are compatible when printing or sending a fax
from a computer:
• Compatible OS
- Microsoft Windows 2000 Professional
- Microsoft Windows XP Professional
- Microsoft Windows XP Home Edition
- Microsoft Windows Vista Ultimate
- Microsoft Windows Vista Business
- Microsoft Windows Vista Home Premium
- Microsoft Windows Vista Home Basic
- Microsoft Windows Vista Enterprise
- Microsoft Windows 7 Starter Edition
- Microsoft Windows 7 Home Basic
- Microsoft Windows 7 Home Premium
- Microsoft Windows 7 Professional
- Microsoft Windows 7 Enterprise
- Microsoft Windows 7 Ultimate
- Microsoft Windows 2000 Server
- Microsoft Windows Server 2003
- Microsoft Windows Server 2008
- Mac OS X 10.4.9 or later (Only printing is available on a Macintosh computer.)
• Compatible computers
- Any computer that runs the above systems
1-14
System Requirements
• Compatible protocol
- TCP/IP
IMPORTANT
• Sending faxes from a computer is available only when the optional Super G3 Fax
Board-AG1 is attached to the machine.
• If you are using Windows 2000, you need to install Service Pack 4 or later.
1
Before You Start
Using E-Mail/I-Fax
The system environments listed below are compatible with the e-mail/I-fax
functions.
• Compatible mail forwarding server software
- Sendmail 8.93 or later (UNIX)
- Microsoft Exchange Server (Windows)
(Microsoft Exchange Server 5.5 + Service Pack 1 or later)
- Lotus Domino R4.6 or later (Windows)
• Compatible mail receiving server software
- Qpopper 2.53 or later (UNIX)
- Microsoft Exchange Server (Windows)
(Microsoft Exchange Server 5.5 + Service Pack 1 or later)
- Lotus Domino R4.6 or later (Windows)
IMPORTANT
• To send e-mails or I-faxes with the imageRUNNER 2545/2535/2530/2525/2520, the
Send function must be activated with the optional Color Send Kit-Y1.
• If you are using Windows 2000, you need to install Service Pack 4 or later.
NOTE
• The machine sends e-mail or I-fax messages to mail servers using SMTP.
The machine can receive incoming messages from a mail server using the POP3
protocol or directly using the machine’s own SMTP receiving function.
If the latter method is used, it is not necessary for the mail server to support the POP3
protocol.
• The machine can receive I-fax, e-mail messages in text format, and TIFF-F and JPEG
files attached to e-mail messages in text format.
System Requirements
1-15
Sending Data to a File Server
The system environments listed below are compatible with sending data from the
machine to a file server.
■ When using TCP/IPv4 network (when sending data to an FTP server)
• Compatible servers
- Microsoft Windows XP Professional and Internet Information Services 5.1
- Microsoft Windows Vista Ultimate and Internet Information Services 7.0
- Microsoft Windows Vista Business and Internet Information Services 7.0
- Microsoft Windows Vista Enterprise and Internet Information Services 7.0
- Microsoft Windows 7 Ultimate and Internet Information Services 7.5
- Microsoft Windows 7 Professional and Internet Information Services 7.5
- Microsoft Windows 7 Enterprise and Internet Information Services 7.5
- Microsoft Windows 2000 Server and Internet Information Services 5.0
- Microsoft Windows Server 2003 and Internet Information Services 6.0
- Microsoft Windows Server 2008 and Internet Information Services 7.0
- Microsoft Windows Server 2008 R2 and Internet Information Services 7.5
- Solaris Version 2.6 or later
- Red Hat Linux 7.2
- Mac OS X
- FTP server for iW Gateway
Before You Start
1
• Compatible protocol
- TCP/IP
IMPORTANT
• To send data to a file server with the imageRUNNER 2545/2535/2530/2525/2520, the
Send function must be activated with the optional Color Send Kit-Y1.
• If you are using Windows 2000, you need to install Service Pack 4 or later.
1-16
System Requirements
■ When using TCP/IPv6 network (when sending data to an FTP server)
• Compatible servers
- Solaris Version 9 or later
- Red Hat Enterprise Linux AS/ES/WS 4.0 or later
- Mac OS X 10.3 or later
• Compatible protocol
- TCP/IPv6
Before You Start
1
■ When using SMB network (when sending data to a shared folder)
• Compatible operating system
- Microsoft Windows 2000 Professional
- Microsoft Windows XP Professional
- Microsoft Windows XP Home Edition
- Microsoft Windows Vista Ultimate
- Microsoft Windows Vista Business
- Microsoft Windows Vista Home Premium
- Microsoft Windows Vista Home Basic
- Microsoft Windows Vista Enterprise
- Microsoft Windows 7 Starter Edition
- Microsoft Windows 7 Home Basic
- Microsoft Windows 7 Home Premium
- Microsoft Windows 7 Professional
- Microsoft Windows 7 Enterprise
- Microsoft Windows 7 Ultimate
- Microsoft Windows 2000 Server
- Microsoft Windows Server 2003
- Microsoft Windows Server 2008
• Compatible protocol
- NetBIOS over TCP/IP
System Requirements
1-17
Checking Your Network Environment
The diagram below shows an example network. Confirm the details of the network
environment connected to the machine, and then perform the necessary
operations.
Use TCP/IP to set up the network connected to the machine.
1
Before You Start
In addition to IPv4 (Internet Protocol Version 4), the machine also supports IPv6
(Internet Protocol Version 6), and has a dual stack configuration that enables it to
communicate with both IPv4 and IPv6 networks. The functions of IPv4 are always
enabled, and you can select whether to use the functions of IPv6.
For details, see Chapter 2, “Connecting the Machine to a TCP/IP Network.”
Windows 2000
Windows XP
Windows Vista
Protocol: TCP/IP
Windows Server 2008
The Machine
IMPORTANT
If you want to use the machine as a network scanner, it must be connected to a
computer over an IPv4 network.
NOTE
The sample network connection diagram above shows a Windows-based network
environment. The machine works best in a Windows-only environment, but can be
used in a network of different operating systems as well, including Windows, UNIX,
Linux, and Mac OS X. (See “System Requirements,” on p. 1-14.)
1-18
System Requirements
Setup Procedure
IMPORTANT
• It is recommended that the network administrator perform the following procedures.
• Use the machine’s control panel if you are configuring the protocol settings for the first
time. After configuring the protocol settings, you can change the content by using the
Remote UI.
Connecting the Machine to a Network
Follow the setup procedure described here to connect the machine to a TCP/IP
network.
1
Network Cable Connection (See Chapter 2, “Before You Start Using the
Machine,” in the User’s Guide.)
Connect the machine to the network using network cables.
2
Interface Settings (See “Interface Settings (Ethernet Driver),” on p. 2-2.)
Specify the interface settings for communication between the machine and computers on your network. To
specify the settings, use:
• The machine’s control panel
• The Remote UI (via a web browser)
3
Communication Environment Settings (See “Communication Environment
Settings,” on p. 2-5.)
Set up a configuration for communication between the machine and computers on your network. To specify
the settings, use:
• The machine’s control panel
• The Remote UI (via a web browser)
4
IEEE802.1X Authentication Settings (See “IEEE802.1X Authentication
Settings,” on p. 2-9.)
If access to your network requires authentication to a RADIUS server, specify the settings of IEEE802.1X
authentication.
Setup Procedure
1-19
1
Before You Start
Follow the procedure described below to set up the machine to use its functions.
5
IP Address Settings (See “Specifying the Machine’s IP Address,” on p. 2-15.)
Specify the machine’s network address and establish a connection to a computer on your network. Any of
the following can be used to specify the settings:
• The machine’s control panel (Additional Functions menu)
• The Remote UI (via a web browser)
Before You Start
1
Setting up the Machine for Printing/Sending Faxes from a
Computer
Follow the setup procedure described here to set up the machine for printing and
sending faxes from a computer.
IMPORTANT
• Sending faxes from a computer is available only when the optional Super G3 Fax
Board-AG1 is attached to the machine.
• If you are printing from a computer over a TCP/IP network, you can use the following
application protocols:
- LPD
- Raw (Windows 2000/XP/Vista/7/Server 2003/Server 2008 only)
- WSD (Windows Vista/7/Server 2008 only)
NOTE
For details about system requirements, see “Printing or Sending a Fax from a
Computer,” on p. 1-14.
1
Connect the machine to a computer
• Connection via a network
Follow the procedure described in “Connecting the Machine to a Network,” on p. 1-19.
• Connection via a USB cable*
Follow the procedure described in Chapter 1, “Machine Installation,” in the User’s Guide.
* In this case, proceed to step 3.
2
Set up the machine according to your network environment (See Chapter 3,
“Setting up the Machine for Your Network Environment.”)
Any of the following can be used to specify the settings:
• The Machine’s control panel (Additional Functions menu)
• The Remote UI (via a web browser)
3
1-20
Install drivers in the computer (See “Setting up a Computer for Printing/
Sending a Fax”, on p. 5-2.)
Setup Procedure
Setting up the Machine to Use the E-Mail/I-Fax Functions
Follow the setup procedure described here to set up the machine to use the e-mail
and I-fax functions.
NOTE
For details about system requirements, see “Using E-Mail/I-Fax,” on p. 1-15.
1
Connect the machine to a network
Follow the procedure described in “Connecting the Machine to a Network,” on p. 1-19.
2
Set up the machine according to your network environment (See Chapter 3,
“Setting up the Machine for Your Network Environment.”)
Any of the following can be used to specify the settings:
• The Machine’s control panel (Additional Functions menu)
• The Remote UI (via a web browser)
Setup Procedure
1
Before You Start
IMPORTANT
To send e-mails or I-faxes with the imageRUNNER 2545/2535/2530/2525/2520, the
Send function must be activated with the optional Color Send Kit-Y1.
1-21
Setting up the Machine for Sending Data to a File Server
Follow the setup procedure described here to set up the machine for sending data
to a file server (FTP or a shared folder).
IMPORTANT
To send data to a file server with the imageRUNNER 2545/2535/2530/2525/2520, the
Send function must be activated with the optional Color Send Kit-Y1.
Before You Start
1
NOTE
For details about system requirements, see “Sending Data to a File Server,” on
p. 1-16.
1
Connect the machine to a network
Follow the procedure described in “Connecting the Machine to a Network,” on p. 1-19.
2
Set up the machine according to your network environment (See Chapter 3,
“Setting up the Machine for Your Network Environment.”)
Any of the following can be used to specify the settings:
• The Machine’s control panel (Additional Functions menu)
• The Remote UI (via a web browser)
3
Set up a file server
• To send data to an FTP server:
See “Setting File Server (FTP),” on p. 5-7.
• To send data to a shared folder:
See “Setting File Server (File Sharing),” on p. 5-18.
1-22
Setup Procedure
Connecting the Machine
to a TCP/IP Network
2
CHAPTER
This chapter describes the settings and procedures necessary for connecting and using the
machine with a TCP/IP network.
IMPORTANT
To make changes to the System Settings, enter the System Management mode. For
details, see “Operating the Machine in System Management Mode,” on p. 1-7.
Interface Settings (Ethernet Driver) . . . . . . . . . . . . . . . . . . . . . . . . . . . . . . . . . . . . . . . . . 2-2
Communication Environment Settings . . . . . . . . . . . . . . . . . . . . . . . . . . . . . . . . . . . . . . . 2-5
IEEE802.1X Authentication Settings . . . . . . . . . . . . . . . . . . . . . . . . . . . . . . . . . . . . . . . . 2-9
Selecting the IEEE802.1X Authentication Method . . . . . . . . . . . . . . . . . . . . . . . . . . . . . . . . . . .2-10
Specifying the Machine’s IP Address . . . . . . . . . . . . . . . . . . . . . . . . . . . . . . . . . . . . . . . 2-15
Setting IPv4 Address . . . . . . . . . . . . . . . . . . . . . . . . . . . . . . . . . . . . . . . . . . . . . . . . . . . . . . . . .2-15
Setting IPv6 Address . . . . . . . . . . . . . . . . . . . . . . . . . . . . . . . . . . . . . . . . . . . . . . . . . . . . . . . . .2-18
Checking the Network Connection. . . . . . . . . . . . . . . . . . . . . . . . . . . . . . . . . . . . . . . . . . . . . . .2-22
2-1
Interface Settings (Ethernet Driver)
After physically connecting the machine to a network, you must specify the
communication mode (Half duplex/Full duplex) and Ethernet type (10BASE-T/
100BASE-TX). You can also set the machine to automatically select these settings.
2
Connecting the Machine to a TCP/IP Network
IMPORTANT
• If you are configuring the interface settings for the first time, use the machine’s control
panel. After configuring the protocol settings, you can change the content by using the
Remote UI. For instructions, see the Remote UI Guide.
• Changes made to Interface Settings become effective when the machine is restarted.
To restart the machine, turn it OFF, wait at least 10 seconds, and then turn it ON. For
instructions on how to turn the machine ON and OFF, see Chapter 2, “Before You Start
Using the Machine,” in the User’s Guide.
1
2
2-2
Interface Settings (Ethernet Driver)
Press
(Additional Functions)
➞ [System Settings] ➞ [Network
Settings].
Press [ ] or [ ] until [Ethernet
Driver Settings] appears ➞ press
[Ethernet Driver Settings].
Specify the communication mode.
● If you want the machine to automatically determine the communication
mode (Half duplex/Full duplex) and Ethernet type (10BASE-T/
100BASE-TX):
❑ Press [On] for <Auto Detect>.
2
● If you want to manually specify the communication mode (Half duplex/
Full duplex) and Ethernet type (10BASE-T/100BASE-TX):
❑ Press [Off] for <Auto Detect>.
❑ Press [Half Duplex] or [Full Duplex] for
<Communication Mode>.
❑ Press [Full Duplex] if you want to
alternately send and receive. Press [Half
Duplex] if you want to simultaneously
send and receive.
❑ Press [10 Base-T] or [100 Base-TX] for
<Ethernet Type>.
IMPORTANT
Connect the cable with the power OFF. Even when you set <Auto Detect> to ‘On’, the
Auto Detect function will not work correctly if you reconnect the network cable (for
example, to a different Ethernet hub) with the power ON.
NOTE
• The default setting is ‘On’. Use the [Off] setting when you want to specify a particular
Ethernet setting.
• The above screen also allows you to check the machine’s MAC address.
Interface Settings (Ethernet Driver)
2-3
Connecting the Machine to a TCP/IP Network
3
4
Confirm the settings you specified ➞ press [OK].
5
Restart the machine.
Turn OFF the machine, wait at least 10 seconds, and then turn it ON.
Connecting the Machine to a TCP/IP Network
2
2-4
Interface Settings (Ethernet Driver)
Communication Environment Settings
Specify the SNMP (Simple Network Management Protocol) and dedicated port
settings so that you can configure and browse machine settings from a computer
on the network.
IMPORTANT
• If you are configuring the settings for the first time, use the machine’s control panel.
After configuring the settings, you can change them using the Remote UI. For
instructions, see the Remote UI Guide.
• Changes made to SNMP Settings and Enable Dedicated Port become effective when
the machine is restarted. To restart the machine, turn it OFF, wait at least 10 seconds,
and then turn it ON. For instructions on how to turn the machine ON and OFF, see
Chapter 2, “Before You Start Using the Machine,” in the User’s Guide.
• If you want to use a Canon printer driver or utility, select ‘On’ for both [Use SNMP v. 1]
and [Enable Dedicated Port] (for IPv4 only).
• You can restrict the IP addresses and/or MAC addresses of computers on which items
can be set or browsed. If you restrict these addresses, it is not possible to use the
Remote UI to set or browse detailed information from computers other than those
whose IP addresses are allowed, regardless of the SNMP and dedicated port settings.
For details, see “Restricting Access from Computers on the Network,” on p. 6-21.
• The settings for SNMPv3 can be specified only on the Remote UI. (See Chapter 4,
“Customizing Settings,” in the Remote UI Guide.)
• The settings for SNMPv3 can be specified only when SSL communication is enabled.
See the following information on the SSL communication settings.
- “Managing Key Pairs and Digital Certificates,” on p. 3-20
- “Setting the Default Key for SSL Communications,” on p. 3-35
- Chapter 2, “Managing Jobs and Machine Data,” in the Remote UI Guide
NOTE
For instructions on how to enter characters using the on-screen keyboard, see
Chapter 2, “Basic Operations,” in the Reference Guide.
Communication Environment Settings
2-5
Connecting the Machine to a TCP/IP Network
2
This machine supports SNMPv1, and SNMPv3 with enhanced security and
authentication. You can enable both SNMPv1 and SNMPv3 at the same time,
depending on your needs.
1
Press
(Additional Functions)
➞ [System Settings] ➞ [Network
Settings].
Connecting the Machine to a TCP/IP Network
2
2
2-6
Communication Environment Settings
Press [SNMP Settings].
Select whether or not to use SNMP.
● If you want to set or browse the machine’s settings from a computer:
❑ Press [On] for <Use SNMP v. 1>.
❑ To change the community name, press
[Community Name 1] or [Community
Name 2] ➞ enter the community name
using the on-screen keyboard ➞ press
[OK].
❑ If you want to allow the computers on the
network to access the machine and
modify its settings, press [On] for
[Writable SNMP 1] or [Writable SNMP 2].
❑ If you are using Windows Vista/7 and set
[Standard TCP/IP port] for the printer
driver port, and want to enable the
SNMP port monitoring function to
automatically obtain printer management
information such as information on
application protocols and printer ports,
press [On] for <Get Printer Management
Information from Host>. Otherwise,
press [Off].
❑ Press [OK].
IMPORTANT
If you want to use SNMPv3, specify the settings on the Remote UI. The settings for
SNMPv3 can be specified only on the Remote UI. (See Chapter 4, “Customizing
Settings,” in the Remote UI Guide.)
● If you do not want to set or browse each item of the machine with a utility
that uses SNMP to obtain information:
❑ Press [Off] for <Use SNMP v. 1> ➞ [OK].
IMPORTANT
If you do not want to use SNMP, make
sure that the SNMPv3 is also disabled
on the Remote UI.
(See Chapter 4, “Customizing
Settings,” in the Remote UI Guide.)
Communication Environment Settings
2-7
2
Connecting the Machine to a TCP/IP Network
3
4
Press [Enable Dedicated Port].
2
Connecting the Machine to a TCP/IP Network
● If you want to set or browse the machine’s settings from a computer:
❑ Press [On] ➞ [OK].
● If you do not want to set or browse the machine’s settings from a
computer:
❑ Press [Off] ➞ [OK].
5
Restart the machine.
Turn OFF the machine, wait at least 10 seconds, and then turn it ON.
2-8
Communication Environment Settings
IEEE802.1X Authentication Settings
Authentication Server
Supplicant (Machine)
A supplicant device authenticates itself
to the authentication server by providing
a user name/password or a digital
certificate.
A RADIUS server collectively manages
the authentication information and
verifies the identity of the supplicant
device.
Authenticator
A wired switch or wireless access point
allows/blocks access to the network
depending on the authentication result.
Network
The machine can connect to an 802.1X network as a client device. After installing
and registering the required key pair and digital certificates, select the method of
EAP (Extensible Authentication Protocol). The EAP methods supported by the
machine are outlined below.
NOTE
• Key pairs and digital certificates can be installed from a web browser (Remote UI).
(See Chapter 2, “Managing Jobs and Machine Data,” in the Remote UI Guide.)
• Key pairs and digital certificates can be registered both with the control panel and from
a web browser (Remote UI).
• You cannot set EAP-TLS and EAP-TTLS/PEAP at the same time.
■ EAP-TLS (Transport Layer Security)
Authentication using the EAP-TLS method requires both the client machine and
the RADIUS server to issue their digital certificates to each other. The key and
certificate (in PKCS#12 format) sent from the machine are verified using the CA
certificate on the RADIUS server. The server certificate sent from the RADIUS
server is verified using the CA certificate on the client.
IEEE802.1X Authentication Settings
2-9
2
Connecting the Machine to a TCP/IP Network
IEEE802.1X is a standard for port-based network access control, which realizes a
local area network secured with a robust authentication system. A typical 802.1X
network consists of a RADIUS server (authentication server), LAN switch
(authenticator), and client devices with authentication software (supplicant).
■ EAP-TTLS (Tunneled TLS)
EAP-TTLS requires only the RADIUS server to issue a digital certificate. The
server certificate sent from the RADIUS server is verified using the CA certificate
on the client machine. The client machine is required to provide the user name/
login name and password in order to authenticate itself to the server. As an
internal authentication protocol, MS-CHAPv2 or PAP is available for selection.
■ PEAP (Protected EAP)
When PEAP is selected, only the RADIUS server issues a digital certificate. The
server certificate sent from the RADIUS server is verified using the CA certificate
on the client machine. The client machine is required to provide the user name/
login name and password in order to be authenticated by the server. With PEAP,
the machine uses MS-CHAPv2 as the internal authentication protocol.
Connecting the Machine to a TCP/IP Network
2
Selecting the IEEE802.1X Authentication Method
Follow the procedure below to enable the IEEE802.1X authentication and select
the EAP method.
NOTE
• Before you select the IEEE802.1X Settings, make sure that the required key pairs and
digital certificates are registered in the machine. (See “Managing Key Pairs and Digital
Certificates,” on p. 3-20.)
• If you are going to select EAP-TLS, install and register the key and certificate
beforehand. (See Chapter 2, “Managing Jobs and Machine Data,” in the Remote UI
Guide.)
1
2-10
IEEE802.1X Authentication Settings
Press
(Additional Functions)
➞ [System Settings] ➞ [Network
Settings].
2
Press [ ] or [ ] until
[IEEE802.1X Settings] appears ➞
press [IEEE802.1X Settings].
3
4
Press [On] to enable the
IEEE802.1X authentication ➞
press [Next].
Press [Login Name] ➞ enter the
login name (up to 24 characters).
IEEE802.1X Authentication Settings
2-11
Connecting the Machine to a TCP/IP Network
2
5
Select the desired EAP method.
● To set EAP-TLS:
❑ Press [On] for <Use TLS>.
❑ Press [Key and Cert.].
Connecting the Machine to a TCP/IP Network
2
❑ Select the key pair you want to use ➞
press [Set as Def. Key].
NOTE
• If you want to check the details of
each certificate, select the desired
key pair and press [Cert. Details]. On
the Certificate Details page, pressing
[Cert. Verif.] enables you to check
whether the selected certificate is
expired or not.
• If you want to check what a key pair
on the list is being used for, select the
desired key pair and press [Display
Use Loc.].
❑ Press [Yes].
❑ Press [Done] to return to the
IEEE802.1X Settings screen.
2-12
IEEE802.1X Authentication Settings
❑ Press [OK].
● To set EAP-TTLS:
❑ Press [On] for <Use TTLS>.
❑ Press [MSCHAPv2] or [PAP] to select
the internal authentication protocol ➞
press [OK].
❑ Press [User] ➞ enter the user name (up
to 24 characters) specified on the
RADIUS server. If you want to set the
login name as the user name, press
[Login Name as User Name].
❑ Press [Password] ➞ enter the user
password (up to 24 characters) specified
on the RADIUS server.
❑ Press [OK].
IEEE802.1X Authentication Settings
2-13
Connecting the Machine to a TCP/IP Network
2
● To set PEAP:
❑ Press [On] for <Use PEAP>.
Connecting the Machine to a TCP/IP Network
2
❑ Press [User] ➞ enter the user name (up
to 24 characters) specified on the
RADIUS server. If you want to set the
login name as the user name, press
[Login Name as User Name].
❑ Press [Password] ➞ enter the user
password (up to 24 characters) specified
on the RADIUS server.
❑ Press [OK].
6
Restart the machine.
Turn OFF the machine, wait at least 10 seconds, and then turn it ON.
2-14
IEEE802.1X Authentication Settings
Specifying the Machine’s IP Address
Before specifying the machine’s protocol settings, you must assign the machine an
IP address to enable communication between the machine and computers.
NOTE
For instructions on how to enter characters using the on-screen keyboard, see
Chapter 2, “Basic Operations,” in the Reference Guide.
Setting IPv4 Address
This section describes how to set the IPv4 address from the control panel. After
configuring the TCP/IPv4 settings, make sure that the network connections are
properly set. (See “Checking the Network Connection,” on p. 2-22.)
NOTE
‘DHCP’ is selected as default.
Specifying the Machine’s IP Address
2-15
2
Connecting the Machine to a TCP/IP Network
IMPORTANT
• Before you perform the operations described in this section, make sure that the
machine is turned ON and physically connected to the network.
• If you are configuring the settings for the first time, use the machine’s control panel.
After configuring the settings, you can change them using the Remote UI. For more
information on Remote UI, see “Managing the Machine,” on p. 9-11.
• Changes made to IP Address Settings become effective when the machine is
restarted. To restart the machine, turn it OFF, wait at least 10 seconds, and then turn it
ON. For instructions on how to turn the machine ON and OFF, see Chapter 2, “Before
You Start Using the Machine,” in the User’s Guide.
• Functions that communicate with external servers on the internet may not be able to
access them due to firewall settings, etc. In this case, consult your network
administrator.
1
Press
(Additional Functions)
➞ [System Settings] ➞ [Network
Settings].
Connecting the Machine to a TCP/IP Network
2
2
Press [TCP/IP Settings] ➞ [IPv4
Settings] ➞ [IP Address
Settings].
3
Specify the relevant items for
your system.
● Using a fixed IP address:
❑
❑
❑
❑
2-16
Disable [DHCP], [RARP], and [BOOTP].
Press [IP Address].
Enter the IP address using
-
(numeric keys).
Specify the [Subnet Mask] and [Gateway Address] settings in the same way.
Specifying the Machine’s IP Address
● Using DHCP:
❑ Press [DHCP].
❑ Enter the IP address, subnet mask, and gateway address.
If this information cannot be obtained via DHCP after you restart the machine, the
settings entered in this step are used.
● Using RARP:
❑ Press [RARP].
❑ Enter the IP address, subnet mask, and gateway address.
● Using BOOTP:
❑ Press [BOOTP].
❑ Enter the IP address, subnet mask, and gateway address.
If this information cannot be obtained via BOOTP after you restart the machine, the
settings entered in this step are used.
NOTE
• Only one of the DHCP, BOOTP, or RARP settings can be selected at any one time.
• Even if you press [DHCP], [BOOTP], or [RARP], enter an IP address, subnet mask,
and gateway address. If this information cannot be obtained from the DHCP, BOOTP,
or RARP server, the settings entered in this step are used.
• If the machine is restarted after DHCP, BOOTP, or RARP settings are complete, the
TCP/IP Settings screen displays the IP address setting values obtained from the
DHCP, BOOTP, or RARP server. (If the IP address, host name, and domain name
have been previously set, these will be overwritten by the setting values obtained from
DHCP, BOOTP, or RARP.)
• If you use DHCP without the DNS dynamic update function, it is recommended that an
identical IP address be assigned to the machine at all times. (If the IP address is not
identical, the host name for the machine will not be able to correspond to the IP
address.)
• It takes about two minutes to check whether the DHCP, BOOTP, or RARP settings can
be used. If you do not plan to use one of these settings, it is recommended that you
turn them off.
4
Confirm the settings you specified ➞ press [OK].
5
Restart the machine.
Turn OFF the machine, wait at least 10 seconds, and then turn it ON.
Specifying the Machine’s IP Address
2-17
2
Connecting the Machine to a TCP/IP Network
If this information cannot be obtained via RARP after you restart the machine, the
settings entered in this step are used.
Setting IPv6 Address
This section describes how to set the IPv6 addresses from the control panel. After
configuring the TCP/IPv6 settings, make sure that the network connections are
properly set. (See “Checking the Network Connection,” on p. 2-22.)
With IPv6 communication, multiple IPv6 addresses can be used at the same time.
The machine can use up to seven of the following IPv6 addresses:
• Link local address (1)
An address that is only valid within a subnet or link. A link local address is
automatically set using a specific prefix (fe80::) and an interface identifier
generated from the MAC address of the machine. When the machine is using the
functions of IPv6, one link local address is always registered.
Connecting the Machine to a TCP/IP Network
2
• Manual address (0 or 1)
A fixed address that is set from the control panel.
• Stateless address (0 to 6)
A stateless address is automatically set using the machine’s MAC address and
the prefix (information indicating the network belonged to) included in the RA
(Router Advertisement) notified by the router when the machine is started.
• Stateful address (0 or 1)
A stateful address can be obtained from a DHCP server using DHCPv6.
IMPORTANT
• You should always use the functions of IPv4 even when using that of IPv6.
• You can specify an IPv6 address from the machine’s control panel in abbreviated form,
but it cannot be displayed on the touch panel display in abbreviated form.
1
Press
(Additional Functions) ➞ [System Settings] ➞ [Network
Settings].
For help, see step 1 in “Setting IPv4 Address,” on p. 2-15.
2
2-18
Specifying the Machine’s IP Address
Press [TCP/IP Settings] ➞ [IPv6
Settings] ➞ [Use IPv6].
3
Press [On] or [Off] for <Use
IPv6>.
● If you want to use IPv6:
❑ Press [On] ➞ [OK].
❑ Proceed to step 4.
● If you do not want to use IPv6:
❑ Press [Off] ➞ [OK].
❑ Proceed to step 10.
2
4
5
Connecting the Machine to a TCP/IP Network
NOTE
If you press [On], a link local address is automatically set.
Press [Stateless Address
Settings].
Press [On] or [Off] for <Use
Stateless Address>.
● If you want to use Stateless
Address:
❑ Press [On] ➞ [OK].
● If you do not want to use
Stateless Address:
❑ Press [Off] ➞ [OK].
NOTE
The stateless address is discarded when the machine is restarted (the next time the
machine’s main power switch is turned ON).
Specifying the Machine’s IP Address
2-19
6
Press [Manual Address Settings].
7
Specify manual address settings.
Connecting the Machine to a TCP/IP Network
2
● If you want to set the IPv6
address manually:
❑ Press [On] ➞ [Settings].
❑ Press [Manual Address] ➞ enter the
IPv6 address value ➞ press [OK].
❑ Press [-] or [+] to specify the IPv6
address prefix length.
You can also specify the prefix length
using
(numeric keys).
2-20
Specifying the Machine’s IP Address
❑ Press [Default Router Addr.] ➞ enter the
default router address value ➞ press
[OK].
press [OK].
❑ Press [OK].
● If you do not want to set the IPv6
address manually:
❑ Press [Off] ➞ [OK].
8
Press [ ] or [ ] until [Use
DHCPv6] appears ➞ press [Use
DHCPv6].
Specifying the Machine’s IP Address
2-21
2
Connecting the Machine to a TCP/IP Network
❑ Confirm the settings you specified ➞
9
Specify the use of DHCPv6.
● If you want to use DHCPv6 to
obtain a stateful address from a
DHCP server:
❑ Press [On] ➞ [OK].
● If you do not want to use
DHCPv6:
❑ Press [Off] ➞ [OK].
Connecting the Machine to a TCP/IP Network
2
10
Restart the machine.
Turn OFF the machine, wait at least 10 seconds, and then turn it ON.
Checking the Network Connection
After specifying IP addresses, make sure that the network connections are properly
set.
IMPORTANT
• If you set the startup time of the machine’s network function, execute the PING
command after the startup time elapses. (See “Setting Startup Time,” on p. 7-3.)
• When you connect the machine to a switching hub, the machine may not be able to
connect to the network even if the network settings are correctly set. This problem may
be resolved by delaying the startup of network communications for the machine. (See
“Setting Startup Time,” on p. 7-3.)
Checking TCP/IPv4 Network Connection
1
Press
(Additional Functions) ➞ [System Settings] ➞ [Network
Settings].
For help, see step 1 in “Setting IPv4 Address,” on p. 2-15.
2-22
Specifying the Machine’s IP Address
2
Press [TCP/IP Settings] ➞ [IPv4
Settings] ➞ [PING Command].
3
Enter the IP address of a device
on the network that you want to
connect the machine to ➞ press
[Start].
The result of the PING command is
displayed on the touch panel display.
If this result is inappropriate, check the
settings described in “Interface Settings
(Ethernet Driver),” on p. 2-2, and “Setting
IPv4 Address,” on p. 2-15.
4
Press
(Reset) to return to the top screen.
Checking TCP/IPv6 Network Connection
1
Press
(Additional Functions) ➞ [System Settings] ➞ [Network
Settings].
For help, see step 1 in “Setting IPv4 Address,” on p. 2-15.
2
Press [TCP/IP Settings] ➞ [IPv6
Settings].
Specifying the Machine’s IP Address
2-23
Connecting the Machine to a TCP/IP Network
2
3
Press [ ] or [ ] until [PING
Command] appears ➞ press
[PING Command].
2
Connecting the Machine to a TCP/IP Network
4
Enter the IP address of a device
on the network that you want to
connect the machine to, or the
machine’s host name ➞ press
[Start].
The result of the PING command is
displayed on the touch panel display.
If this result is inappropriate, check the settings described in “Interface Settings
(Ethernet Driver),” on p. 2-2, and “Setting IPv6 Address,” on p. 2-18.
5
2-24
Press
(Reset) to return to the top screen.
Specifying the Machine’s IP Address
Setting up the Machine for
Your Network Environment
3
CHAPTER
This chapter describes how to set up the machine for your network environment.
IMPORTANT
To make changes to the System Settings, enter the System Management mode. For
details, see “Operating the Machine in System Management Mode,” on p. 1-7.
Setting DNS Server . . . . . . . . . . . . . . . . . . . . . . . . . . . . . . . . . . . . . . . . . . . . . . . . . . . . . 3-2
IPv4. . . . . . . . . . . . . . . . . . . . . . . . . . . . . . . . . . . . . . . . . . . . . . . . . . . . . . . . . . . . . . . . . . . . . . . .3-2
IPv6. . . . . . . . . . . . . . . . . . . . . . . . . . . . . . . . . . . . . . . . . . . . . . . . . . . . . . . . . . . . . . . . . . . . . . . .3-6
Setting WINS . . . . . . . . . . . . . . . . . . . . . . . . . . . . . . . . . . . . . . . . . . . . . . . . . . . . . . . . . 3-11
Setting SNTP . . . . . . . . . . . . . . . . . . . . . . . . . . . . . . . . . . . . . . . . . . . . . . . . . . . . . . . . . 3-13
Setting SNTP Server Settings . . . . . . . . . . . . . . . . . . . . . . . . . . . . . . . . . . . . . . . . . . . . . . . . . . .3-13
Confirming SNTP Server Connection . . . . . . . . . . . . . . . . . . . . . . . . . . . . . . . . . . . . . . . . . . . . .3-15
Setting PASV Mode for FTP . . . . . . . . . . . . . . . . . . . . . . . . . . . . . . . . . . . . . . . . . . . . . . 3-16
Setting FTP Extension . . . . . . . . . . . . . . . . . . . . . . . . . . . . . . . . . . . . . . . . . . . . . . . . . . 3-18
Managing Key Pairs and Digital Certificates. . . . . . . . . . . . . . . . . . . . . . . . . . . . . . . . . . 3-20
Generating a Key Pair for SSL Communications . . . . . . . . . . . . . . . . . . . . . . . . . . . . . . . . . . . .3-21
Registering a Key and Certificate . . . . . . . . . . . . . . . . . . . . . . . . . . . . . . . . . . . . . . . . . . . . . . .3-25
Checking/Deleting a Key and Certificate . . . . . . . . . . . . . . . . . . . . . . . . . . . . . . . . . . . . . . . . . .3-26
Registering a CA Certificate. . . . . . . . . . . . . . . . . . . . . . . . . . . . . . . . . . . . . . . . . . . . . . . . . . . .3-29
Checking/Deleting a CA Certificate . . . . . . . . . . . . . . . . . . . . . . . . . . . . . . . . . . . . . . . . . . . . . .3-31
Setting the Use of HTTP. . . . . . . . . . . . . . . . . . . . . . . . . . . . . . . . . . . . . . . . . . . . . . . . . 3-33
Setting the Default Key for SSL Communications. . . . . . . . . . . . . . . . . . . . . . . . . . . . . . 3-35
Setting Port Numbers . . . . . . . . . . . . . . . . . . . . . . . . . . . . . . . . . . . . . . . . . . . . . . . . . . . 3-38
Specifying Proxy Settings . . . . . . . . . . . . . . . . . . . . . . . . . . . . . . . . . . . . . . . . . . . . . . . . 3-41
Confirming the Department ID and Password . . . . . . . . . . . . . . . . . . . . . . . . . . . . . . . . 3-43
Setting Application Protocols for Printing . . . . . . . . . . . . . . . . . . . . . . . . . . . . . . . . . . . . 3-45
Setting up the Send Files Function of the Machine (SMB Settings) . . . . . . . . . . . . . . . . 3-49
Setting up E-Mail/I-Fax Function. . . . . . . . . . . . . . . . . . . . . . . . . . . . . . . . . . . . . . . . . . . 3-52
Setting up LDAP Server . . . . . . . . . . . . . . . . . . . . . . . . . . . . . . . . . . . . . . . . . . . . . . . . . 3-62
Registering LDAP Server . . . . . . . . . . . . . . . . . . . . . . . . . . . . . . . . . . . . . . . . . . . . . . . . . . . . . .3-63
Changing LDAP Server Setting . . . . . . . . . . . . . . . . . . . . . . . . . . . . . . . . . . . . . . . . . . . . . . . . .3-70
Deleting LDAP Server. . . . . . . . . . . . . . . . . . . . . . . . . . . . . . . . . . . . . . . . . . . . . . . . . . . . . . . . .3-71
Registering/Editing LDAP Search Attributes . . . . . . . . . . . . . . . . . . . . . . . . . . . . . . . . . . . . . . .3-72
Printing LDAP Server Settings . . . . . . . . . . . . . . . . . . . . . . . . . . . . . . . . . . . . . . . . . . . . . . . . . .3-74
3-1
Setting DNS Server
If your network has a DNS server, you can take advantage of the DNS Dynamic
Update function. Follow the procedure below to configure the settings for the DNS
server.
IMPORTANT
Changes made to DNS Server settings become effective when the machine is
restarted. To restart the machine, turn it OFF, wait at least 10 seconds, and then turn it
ON. For instructions on how to turn the machine ON and OFF, see Chapter 2, “Before
You Start Using the Machine,” in the User’s Guide.
Setting up the Machine for Your Network Environment
3
IPv4
1
2
3-2
Setting DNS Server
Press
(Additional Functions)
➞ [System Settings] ➞ [Network
Settings].
Press [TCP/IP Settings] ➞ [IPv4
Settings].
4
5
Press [ ] or [ ] until [DNS
Server] appears ➞ press [DNS
Server].
Press [DNS Server Address
Settings].
3
Specify the IPv4 address of a
DNS server.
❑ Press [Primary DNS Server] ➞ enter the
IP address of the DNS server using
(numeric keys).
-
❑ Press [Secondary DNS Server] ➞ enter
the IP address of the DNS server using
(numeric keys).
If you do not want to set up a secondary
DNS server, enter <0.0.0.0>.
❑ Press [OK].
IMPORTANT
If you set [BOOTP] or [DHCP] to ‘On’ on the IP Address Settings screen, the IP
address of a DNS server you set manually will be overwritten. (See “Setting IPv4
Address,” on p. 2-15.)
Setting DNS Server
3-3
Setting up the Machine for Your Network Environment
3
6
7
Setting up the Machine for Your Network Environment
3
Press [DNS Host Name/Domain
Name Settings].
Specify the host name and
domain name.
❑ Press [Host Name] ➞ enter the name of
the machine as the host name ➞ press
[OK].
❑ Press [Domain Name] ➞ enter the
network domain name of the machine ➞
press [OK].
❑ Press [OK].
3-4
Setting DNS Server
IMPORTANT
If you set [BOOTP] or [DHCP] to ‘On’ on the IP Address Settings screen, the host
name and domain name you set manually will be overwritten. (See “Setting IPv4
Address,” on p. 2-15.)
8
Press [DNS Dynamic Update
Settings].
9
Press [On] or [Off] ➞ [OK].
If your environment includes a dynamic
DNS server and you want to automatically
register the IPv4 address, host name, and
domain name set for the machine in the
DNS server using dynamic DNS updating,
press [On].
Otherwise, press [Off].
IMPORTANT
• The DNS dynamic update function enables the machine to register the IP address,
host name, and domain name of the machine to the DNS server automatically. This
function is available in environments with a dynamic DNS server.
• To use the DNS dynamic update function, enter the IP address of the DNS server, the
host name, and the domain name of this machine.
NOTE
• If you have a DHCP server running Windows 2000 Server that uses the DHCP service
and want to register the machine’s DNS record, configure the following settings in the
DHCP server:
- Under the DHCP server, right-click the [Scope] icon ➞ click [Properties]. In the [DNS]
sheet of the displayed dialog box, select [Automatically update DHCP client information
in DNS] ➞ [Update DNS only if DHCP client requests].
• If you have a DHCP server running Windows Server 2003 or Windows Server 2008
that uses the DHCP service and want to register the machine’s DNS record, configure
the following settings in the DHCP server:
Setting DNS Server
3-5
Setting up the Machine for Your Network Environment
3
- Under the DHCP server, right-click the [Scope] icon ➞ click [Properties]. In the [DNS]
sheet of the displayed dialog box, select [Enable DNS dynamic updates according to
the settings below] ➞ [Dynamically update DNS A and PTR records only if requested
by the DHCP clients].
10
Restart the machine.
Turn OFF the machine, wait at least 10 seconds, and then turn it ON.
IPv6
1
Setting up the Machine for Your Network Environment
3
Press
(Additional Functions) ➞ [System Settings] ➞ [Network
Settings].
For help, see step 1 in “IPv4,” on p. 3-2.
2
3
3-6
Setting DNS Server
Press [TCP/IP Settings] ➞ [IPv6
Settings].
Press [ ] or [ ] until [DNS
Server] appears ➞ press [DNS
Server].
5
Press [DNS Server Address
Settings].
Specify the IPv6 address of a
DNS server.
3
❑ Press [Primary DNS Server] ➞ enter the
DNS server address ➞ press [OK].
❑ Press [Primary DNS Server] ➞ enter the
DNS server address ➞ press [OK].
If you do not want to specify a secondary
DNS server, leave [Secondary DNS
Server] blank.
❑ Press [OK].
IMPORTANT
• You cannot enter a multicast address or address composed entirely of zeros in
[Primary DNS Server] or [Secondary DNS Server].
• If you set <Use DHCPv6> to ‘On’ in IPv6 Address Settings, the IPv6 address of a DNS
server you set manually will be overwritten. (See “Setting IPv6 Address,” on p. 2-18.)
6
Press [DNS Host Name/Domain
Name Settings].
Setting DNS Server
3-7
Setting up the Machine for Your Network Environment
4
7
Specify the host name and domain name.
● If you want to set the same host name or domain name used with IPv4
communication for IPv6 communication:
❑ Press [On] for <Use Same Host Name/
Domain Name as IPv4> ➞ press [OK].
Setting up the Machine for Your Network Environment
3
● If you want to set the host name or domain name for IPv6
communication:
❑ Press [Off] for <Use Same Host Name/
Domain Name as IPv4>.
❑ Press [Host Name] ➞ enter the name of
the machine as the host name ➞ press
[OK].
3-8
Setting DNS Server
❑ Press [Domain Name] ➞ enter the
network domain name of the machine ➞
press [OK].
❑ Press [OK].
8
9
Press [DNS Dynamic Update
Settings].
Specify the DNS Dynamic Update
function.
❑ If your environment includes a dynamic DNS server and you want to automatically
register the IPv6 address, host name, and domain name set for the machine in the
DNS server using dynamic DNS updating, press [On] for <DNS Dynamic Update
Settings>.
❑ If you want to register a manual address in the DNS server using dynamic DNS
updating, press [On] for <Register Manual Address>. Otherwise, press [Off].
Setting DNS Server
3-9
3
Setting up the Machine for Your Network Environment
IMPORTANT
If you set <Use DHCPv6> to ‘On’ in IPv6 Address Settings, the domain name you set
manually will be overwritten. (See “Setting IPv6 Address,” on p. 2-18.)
❑ If you want to register a stateful address in the DNS server using dynamic DNS
updating, press [On] for <Register Stateful Address>. Otherwise, press [Off].
❑ Press [OK].
IMPORTANT
Windows 2000 Server and Windows Server 2003 do not support DHCPv6 servers.
10
Restart the machine.
Turn OFF the machine, wait at least 10 seconds, and then turn it ON.
Setting up the Machine for Your Network Environment
3
3-10
Setting DNS Server
Setting WINS
WINS (Windows Internet Name Service) is a service for associating a NetBIOS
name (which is a computer name or printer name on a NetBIOS network) with an IP
address.
To use WINS, a WINS server is required.
NOTE
The default setting is ‘Off’.
1
2
Press
(Additional Functions)
➞ [System Settings] ➞ [Network
Settings].
Press [TCP/IP Settings] ➞ [WINS
Configuration].
Setting WINS
3-11
3
Setting up the Machine for Your Network Environment
IMPORTANT
Changes made to WINS Configuration become effective when the machine is
restarted. To restart the machine, turn it OFF, wait at least 10 seconds, and then turn it
ON. For instructions on how to turn the machine ON and OFF, see Chapter 2, “Before
You Start Using the Machine,” in the User’s Guide.
3
Select whether or not to use WINS to resolve the name.
● If you want to resolve the name with WINS:
❑ Press [On].
❑ Enter the IPv4 address of a WINS server
using
-
(numeric keys).
❑ Press [OK].
IMPORTANT
If you set [DHCP] to ‘On’ on the IP
Address Settings screen, the IP
address of a WINS server you set
manually will be overwritten, whenever
possible. (See “Setting IPv4 Address,”
on p. 2-15.)
Setting up the Machine for Your Network Environment
3
● If you do not use WINS:
❑ Press [Off] ➞ [OK].
4
Restart the machine.
Turn OFF the machine, wait at least 10 seconds, and then turn it ON.
3-12
Setting WINS
Setting SNTP
SNTP (Simple Network Time Protocol) enables the machine to synchronize its
system times with public time servers located around the world. The time provided
by public NTP servers is generally accurate to within milliseconds.
Setting SNTP Server Settings
NOTE
• Time synchronization is not performed during two hours before and after the selected
start and end dates of the daylight saving time settings.
• The default setting is ‘Off’.
1
Press
(Additional Functions)
➞ [System Settings] ➞ [Network
Settings].
Setting SNTP
3-13
Setting up the Machine for Your Network Environment
3
IMPORTANT
• In order to perform time synchronization through SNTP, it is necessary to set the time
zone of the region in which you are using the machine in advance. For instructions on
how to set the time zone, see Chapter 3, “Configuring the Machine’s Basic Settings,” in
the Reference Guide.
• Changes made to SNTP Settings become effective when the machine is restarted. To
restart the machine, turn it OFF, wait at least 10 seconds, and then turn it ON. For
instructions on how to turn the machine ON and OFF, see Chapter 2, “Before You Start
Using the Machine,” in the User’s Guide.
• IPv6 is not supported.
2
Press [TCP/IP Settings].
3
Setting up the Machine for Your Network Environment
3
4
Press [ ] or [ ] until [SNTP
Settings] appears ➞ press [SNTP
Settings].
Select whether or not to use SNTP.
● If you want to perform time synchronization using SNTP:
❑ Press [On].
❑ Use [-] or [+] to set the interval for
performing time synchronization in
<Polling Interval>.
NOTE
You can also enter values using
(numeric keys).
-
❑ Press [NTP Server Address] ➞ enter the
NTP server’s address ➞ press [OK].
❑ Press [OK].
● If you do not want to perform time synchronization using SNTP:
❑ Press [Off] ➞ [OK].
5
Restart the machine.
Turn OFF the machine, wait at least 10 seconds, and then turn it ON.
3-14
Setting SNTP
Confirming SNTP Server Connection
Follow the procedure below to confirm if the TCP/IPv4 setting is properly set and
the time synchronization using SNTP is working correctly.
1
Press
(Additional Functions) ➞ [System Settings] ➞ [Network
Settings].
For help, see step 1 in “Setting SNTP Server Settings,” on p. 3-13.
3
Press [TCP IP Settings].
For help, see step 2 in “Setting SNTP Server Settings,” on p. 3-13.
3
Press [ ] or [
Settings].
] until [SNTP Settings] appears ➞ press [SNTP
For help, see step 3 in “Setting SNTP Server Settings,” on p. 3-13.
4
Press [NTP Server Check].
If <OK> is displayed, time synchronization
is working correctly via SNTP.
When <Error> is displayed, check if the
<NTP Server Address> setting is correct.
NOTE
Even if you perform [NTP Server
Check], the time settings will not be
updated. Check that communications
are possible between the machine and
the NTP server.
5
Press [OK].
6
Press
(Reset) to return to the top screen.
Setting SNTP
3-15
Setting up the Machine for Your Network Environment
2
Setting PASV Mode for FTP
Whether or not to use the PASV mode for FTP depends on the network
environment you are using and the settings of the file server to which you are
sending. Before specifying the PASV mode for FTP, consult your network
administrator.
IMPORTANT
• This setting is available only when the Send function (optional for the imageRUNNER
2545/2535/2530/2525/2520) is activated.
• Changes made to Use PASV Mode for FTP become effective when the machine is
restarted. To restart the machine, turn it OFF, wait at least 10 seconds, and then turn it
ON. For instructions on how to turn the machine ON and OFF, see Chapter 2, “Before
You Start Using the Machine,” in the User’s Guide.
Setting up the Machine for Your Network Environment
3
NOTE
The default setting is ‘Off’.
1
2
3-16
Setting PASV Mode for FTP
Press
(Additional Functions)
➞ [System Settings] ➞ [Network
Settings].
Press [TCP/IP Settings].
3
Press [ ] or [ ] until [Use PASV
Mode for FTP] appears ➞ press
[Use PASV Mode for FTP].
4
Press [On] or [Off] ➞ [OK].
3
Setting up the Machine for Your Network Environment
[On]: Enables the PASV mode for FTP.
[Off]: Disables the PASV mode for FTP.
5
Restart the machine.
Turn OFF the machine, wait at least 10 seconds, and then turn it ON.
Setting PASV Mode for FTP
3-17
Setting FTP Extension
If you are sending to an iW Document Manager* folder, set the FTP server address
specified in iW Gateway as the destination. Set <FTP Extension> to ‘On’. Using iW
Document Manager and the Send function of the machine enables you to manage
digitized paper documents and computer data on the network. For more information
on iW Document Manager, see the appropriate iW Gateway documentation.
* A document management system provided by Canon
3
Setting up the Machine for Your Network Environment
IMPORTANT
• This setting is available only when the Send function (optional for the imageRUNNER
2545/2535/2530/2525/2520) is activated.
• Changes made to FTP Extension become effective when the machine is restarted. To
restart the machine, turn it OFF, wait at least 10 seconds, and then turn it ON. For
instructions on how to turn the machine ON and OFF, see Chapter 2, “Before You Start
Using the Machine,” in the User’s Guide.
NOTE
The default setting is ‘Off’.
1
3-18
Setting FTP Extension
Press
(Additional Functions)
➞ [System Settings] ➞ [Network
Settings].
2
Press [TCP/IP Settings].
Press [ ] or [ ] until [FTP
Extension] appears ➞ press [FTP
Extension].
4
Press [On] or [Off] ➞ [OK].
[Off]: Disables the FTP extension.
[On]: Enables the FTP extension.
5
Restart the machine.
Turn OFF the machine, wait at least 10 seconds, and then turn it ON.
Setting FTP Extension
3-19
3
Setting up the Machine for Your Network Environment
3
Managing Key Pairs and Digital Certificates
The machine can take advantage of key pairs and digital certificates for security
purposes, such as IEEE802.1X port-based authentication and SSL communication.
After key pairs and digital certificates are installed in the machine, register them for
use as described below.
The key pairs and digital certificates registered in the machine are divided into the
following types:
3
Setting up the Machine for Your Network Environment
■ Key and Certificate
In IEEE802.1X port-based authentication, a key pair (or a private key and
certificate) in PKCS#12 format is required for enabling the EAP-TLS method on
the client device. If you want to access the machine securely from a web browser
(Remote UI) or send/receive e-mails and I-faxes securely, generate a key pair
and set it for SSL communications. Up to three key pairs can be registered.
■ CA Certificate
CA certificates are used for verifying the digital certificates sent from other
devices, such as servers, client computers, etc. Up to 10 CA certificates
(including the pre-installed CA certificates) can be registered.
IMPORTANT
• Certificates must meet the following requirements:
- Format: X.509 version 1 or version 3 (DER encoded binary)
- Signature algorithm: SHA1-RSA, SHA256-RSA, SHA384-RSA*, SHA512-RSA*,
MD5-RSA, or MD2-RSA (For CA certificates, SHA1-DSA is also allowed.)
- Key length: 512, 1024, 2048, or 4096 bits (RSA)/2048 or 3072 bits (DSA)
- File extension: ‘.p12’ or ‘.pfx’ (for key pair files)/‘.cer’ or ‘.der’ (for CA certificate files)
* SHA384-RSA and SHA512-RSA are supported only when the key length is 1024 bits or more.
• The machine does not use certificate revocation list (CRL) for verifying digital
certificates.
NOTE
• Key pairs and digital certificates can be installed from a web browser (Remote UI).
(See Chapter 2, “Managing Jobs and Machine Data,” in the Remote UI Guide.)
• Key pairs and digital certificates can be registered both with the control panel and from
a web browser (Remote UI).
3-20
Managing Key Pairs and Digital Certificates
Generating a Key Pair for SSL Communications
If you want to use encrypted SSL communication for accessing the machine from a
web browser (Remote UI) or sending/receiving e-mails and I-faxes, generate a key
pair file as described below.
1
Press
(Additional Functions)
➞ [System Settings] ➞ [Network
Settings].
2
Setting up the Machine for Your Network Environment
3
Press [TCP/IP Settings].
Managing Key Pairs and Digital Certificates
3-21
3
Press [ ] or [ ] until
[Certificate Settings] appears ➞
press [Certificate Settings].
4
Setting up the Machine for Your Network Environment
3
5
Press [Generate Key].
Name the key pair.
❑ Press [Key Name] ➞ enter a name for
the key pair (up to 24 characters) using
the on-screen keyboard ➞ press [OK].
❑ Press [Next].
3-22
Managing Key Pairs and Digital Certificates
6
Specify the signature algorithm and the key length.
❑ Press the Signature Algorithm
drop-down list ➞ press [SHA1],
[SHA256], [SHA384], or [SHA512] to
select the desired hash algorithm.
IMPORTANT
SHA384 and SHA512 are supported
only when the key length is 1024 bits
or more.
❑ Press the Key Length drop-down list ➞
❑ Press [Next].
7
Specify the dates from and to which the certificate is valid.
❑ Press [Validity Start Date] ➞ enter the
date (day, month, and year) from which
the certificate is valid using
(numeric keys).
❑ Press [Validity End Date] ➞ enter the
date (day, month, and year) to which the
certificate is valid using
(numeric keys).
IMPORTANT
The date set for [Validity End Date]
must not be earlier than [Validity Start
Date].
❑ Press [Next].
Managing Key Pairs and Digital Certificates
3-23
3
Setting up the Machine for Your Network Environment
press [512], [1024], [2048], or [4096] to
select the desired key length (expressed
in bits).
8
Specify the details for the self-signed server certificate ➞ press
[Key Gen.] to generate the key pair.
IMPORTANT
• At least one of the items listed below
must be entered.
• A DNS server is required in order to
use the machine’s FQDN as the
common name.
• The generated key pair cannot be
used for SSL communications until it
is set as the default key.
Setting up the Machine for Your Network Environment
3
Specify the following items:
[Country/Region]: Press to select a country/region from the list. If [Other] is selected,
you can specify the country/region by entering an Internet country
code using the on-screen keyboard. An Internet country code
consists of two uppercase letters, such as US, UK, etc.
[State]:
Press to enter the state name (up to 24 characters) using the
on-screen keyboard.
[City]:
Press to enter the city name (up to 24 characters) using the
on-screen keyboard.
[Organization]:
Press to enter the organization name (up to 24 characters) using
the on-screen keyboard.
[Organization Unit]: Press to enter the name of the organization unit, such as a
department, section, etc., (up to 24 characters) using the
on-screen keyboard.
[Common Name]: Press to enter the machine’s IP address or FQDN (up to 48
characters) using the on-screen keyboard ➞ press [OK].
NOTE
For instructions on how to manage the key pair files, see “Checking/Deleting a Key
and Certificate,” on p. 3-26.
9
Proceed to set the default key pair for SSL communications.
For help, see “Setting the Default Key for SSL Communications,” on p. 3-35.
3-24
Managing Key Pairs and Digital Certificates
Registering a Key and Certificate
If you have installed a key pair (or a private key and certificate) in the machine from
a web browser (Remote UI), register the key pair as described below.
1
Press
(Additional Functions) ➞ [System Settings] ➞ [Network
Settings].
For help, see step 1 in “Generating a Key Pair for SSL Communications,” on p. 3-21.
3
Press [TCP/IP Settings] ➞ press [ ] or [ ] until [Certificate
Settings] appears ➞ press [Certificate Settings].
For help, see steps 2 and 3 in “Generating a Key Pair for SSL Communications,” on
p. 3-21.
3
4
Press [Register Key and
Certificate].
Register the desired key and certificate.
❑ Select the key pair file you want to
register ➞ press [Register].
NOTE
• Up to three key pairs can be
registered.
• If you want to delete unnecessary
files, select the file ➞ press [Erase]
➞ [Yes].
Managing Key Pairs and Digital Certificates
3-25
Setting up the Machine for Your Network Environment
2
❑ Press [Key Name] ➞ enter the name of
the private key (up to 24 characters)
using the on-screen keyboard ➞ press
[OK].
❑ Press [Password] ➞ enter the password
for the private key (up to 24 characters)
using the on-screen keyboard ➞ press
[OK].
❑ Press [OK].
5
Setting up the Machine for Your Network Environment
3
Restart the machine.
Turn OFF the machine, wait at least 10 seconds, and then turn it ON.
NOTE
For instructions on how to manage the registered key pair and certificate, see
“Checking/Deleting a Key and Certificate,” on p. 3-26.
Checking/Deleting a Key and Certificate
You can display the details of registered key pairs and check how they are currently
being used. Delete any unnecessary key pair files including those that are
corrupted or marked as invalid.
1
Press
(Additional Functions) ➞ [System Settings] ➞ [Network
Settings].
For help, see step 1 in “Generating a Key Pair for SSL Communications,” on p. 3-21.
2
Press [TCP/IP Settings] ➞ press [ ] or [ ] until [Certificate
Settings] appears ➞ press [Certificate Settings].
For help, see steps 2 and 3 in “Generating a Key Pair for SSL Communications,” on
p. 3-21.
3-26
Managing Key Pairs and Digital Certificates
4
Press [Key and Certificate List].
Check or delete the desired keys and certificates.
3
IMPORTANT
If
(invalid) is displayed to the left of a key pair, it may be invalid or corrupted. After
deleting the invalid or corrupted file, generate or register a new key pair. (See
“Generating a Key Pair for SSL Communications,” on p. 3-21, or “Registering a Key
and Certificate,” on p. 3-25.)
● If you want to display the details of a certificate:
❑ Select the key and certificate you want to
check ➞ press [Cert. Details].
The certificate details are displayed.
NOTE
• Press [All] to display the complete
information of the listing.
• If [Cert. Verif.] is pressed, the machine
checks for errors in the certificate.
Managing Key Pairs and Digital Certificates
3-27
Setting up the Machine for Your Network Environment
3
● If you want to check what a key pair is being used for:
❑ Select the key and certificate with ‘On’
indicated under <Use> ➞ press [Display
Use Loc.].
The Display Use Location screen is
displayed.
Setting up the Machine for Your Network Environment
3
● If you want to delete a registered key pair:
❑ Select the key pair that you want to erase
➞ press [Erase].
IMPORTANT
You may not be able to delete a key pair if ‘On’ is indicated under <Use> in the
list. In this case, press [Display Use Loc.] to check what the key pair is being
used for and perform the following:
- If the key pair is used for SSL, disable the SSL settings for e-mails/I-faxes and
the Remote UI. (See “Setting up E-Mail/I-Fax Function,” on p. 3-52, and
“Restricting the Use of Remote UI,” on p. 6-34.)
3-28
Managing Key Pairs and Digital Certificates
- If the key pair is used for IEEE802.1X authentication, register a new key pair
and set it as the default key. (See “Registering a Key and Certificate,” on
p. 3-25, and “Selecting the IEEE802.1X Authentication Method,” on p. 2-10.)
The key pair reset to ‘Off’ can be deleted.
❑ Press [Yes] to erase the selected file.
To quit, press [No].
❑ Restart the machine.
Turn OFF the machine, wait at least 10
seconds, and then turn it ON.
Registering a CA Certificate
Apart from the X.509 CA certificates (DER) pre-installed in the machine, you can
install additional CA certificates. If you have installed a CA certificate in the
machine from a web browser (Remote UI), register the certificate as described
below.
1
Press
(Additional Functions) ➞ [System Settings] ➞ [Network
Settings].
For help, see step 1 in “Generating a Key Pair for SSL Communications,” on p. 3-21.
2
Press [TCP/IP Settings] ➞ press [ ] or [ ] until [Certificate
Settings] appears ➞ press [Certificate Settings].
For help, see steps 2 and 3 in “Generating a Key Pair for SSL Communications,” on
p. 3-21.
Managing Key Pairs and Digital Certificates
3-29
Setting up the Machine for Your Network Environment
3
3
4
3
Press [Register CA Certificate].
Register the CA certificate.
Setting up the Machine for Your Network Environment
❑ Select the CA certificate file you want to
register ➞ press [Register].
NOTE
• Up to 10 CA certificates can be
registered.
• If you want to delete unnecessary
files, select the file ➞ press [Erase]
➞ [Yes].
❑ Press [Yes].
5
Restart the machine.
Turn OFF the machine, wait at least 10 seconds, and then turn it ON.
NOTE
For instructions on how to manage the registered CA certificate, see “Checking/
Deleting a CA Certificate,” on p. 3-31.
3-30
Managing Key Pairs and Digital Certificates
Checking/Deleting a CA Certificate
You can display the details of registered CA certificates. You can also delete
unnecessary CA certificates.
1
Press
(Additional Functions) ➞ [System Settings] ➞ [Network
Settings].
For help, see step 1 in “Generating a Key Pair for SSL Communications,” on p. 3-21.
3
Press [TCP/IP Settings] ➞ press [ ] or [ ] until [Certificate
Settings] appears ➞ press [Certificate Settings].
For help, see steps 2 and 3 in “Generating a Key Pair for SSL Communications,” on
p. 3-21.
3
4
Press [CA Certificate List].
Check or delete the desired CA certificates.
● If you want to display the details of a CA certificate:
❑ Select the CA certificate you want to
check ➞ press [Cert. Details].
Managing Key Pairs and Digital Certificates
3-31
Setting up the Machine for Your Network Environment
2
The certificate details are displayed.
NOTE
• Press [All] to display the complete
information of the listing.
• If [Cert. Verif.] is pressed, the machine
checks for errors in the certificate.
● If you want to delete a registered CA certificate:
3
❑ Select the CA certificate you want to
Setting up the Machine for Your Network Environment
erase ➞ press [Erase].
❑ Press [Yes] to erase the selected file.
To quit, press [No].
❑ Restart the machine.
Turn OFF the machine, wait at least 10
seconds, and then turn it ON.
3-32
Managing Key Pairs and Digital Certificates
Setting the Use of HTTP
You can enable or disable HTTP on the machine. HTTP is used for communicating
to a networked computer via the Remote UI.
NOTE
The default setting is ‘On’.
1
2
Press
(Additional Functions)
➞ [System Settings] ➞ [Network
Settings].
Press [TCP/IP Settings].
Setting the Use of HTTP
3-33
3
Setting up the Machine for Your Network Environment
IMPORTANT
Changes made to Use HTTP become effective when the machine is restarted. To
restart the machine, turn it OFF, wait at least 10 seconds, and then turn it ON. For
instructions on how to turn the machine ON and OFF, see Chapter 2, “Before You Start
Using the Machine,” in the User’s Guide.
3
Press [ ] or [ ] until [Use
HTTP] appears ➞ press [Use
HTTP].
4
Setting up the Machine for Your Network Environment
3
Press [On] or [Off] to enable or
disable HTTP ➞ press [OK].
NOTE
Pressing [Off] for [Use HTTP]
automatically sets [Remote UI On/Off]
to ‘Off’. (See “Restricting the Use of
Remote UI,” on p. 6-34.)
5
Restart the machine.
Turn OFF the machine, wait at least 10 seconds, and then turn it ON.
3-34
Setting the Use of HTTP
Setting the Default Key for SSL Communications
Follow the procedure below to set the default key for SSL communications.
1
2
Press
(Additional Functions)
➞ [System Settings] ➞ [Network
Settings].
Press [TCP/IP Settings].
Setting the Default Key for SSL Communications
3-35
3
Setting up the Machine for Your Network Environment
IMPORTANT
• Before you start setting the default key for SSL communications, make sure to perform
the following:
- Generate an SSL key pair. (See “Generating a Key Pair for SSL Communications,” on
p. 3-21.)
- Access the E-mail/I-Fax settings and make sure that the SSL settings for POP and
SMTP are set to ‘Off’. (See “Setting up E-Mail/I-Fax Function,” on p. 3-52.)
- Access the Remote UI On/Off settings and make sure that the Use SSL setting is set
to ‘Off’. (See “Restricting the Use of Remote UI,” on p. 6-34.)
• Changes made to SSL Settings become effective when the machine is restarted. To
restart the machine, turn it OFF, wait at least 10 seconds, and then turn it ON. For
instructions on how to turn the machine ON and OFF, see Chapter 2, “Before You Start
Using the Machine,” in the User’s Guide.
3
Press [ ] or [ ] until [SSL
Settings] appears ➞ press [SSL
Settings].
4
Setting up the Machine for Your Network Environment
3
Press [Key and Cert.].
5
Select the key pair you want to
use ➞ press [Set as Def. Key].
IMPORTANT
If the default key cannot be changed,
perform the following:
- Access the E-mail/I-Fax settings and
make sure that the SSL settings for
POP and SMTP are set to ‘Off’. (See
“Setting up E-Mail/I-Fax Function,” on
p. 3-52.)
- Access the Remote UI On/Off
settings and make sure that the Use
SSL setting is set to ‘Off’. (See
“Restricting the Use of Remote UI,”
on p. 6-34.)
NOTE
• If you want to check the details of each certificate, select the desired key pair and
press [Cert. Details]. On the Certificate Details page, pressing [Cert. Verif.] enables
you to check whether the selected certificate is expired or not.
• If you want to check what a key pair on the list is being used for, select the desired key
pair and press [Display Use Loc.].
3-36
Setting the Default Key for SSL Communications
6
Press [Yes].
To quit, press [No].
Restart the machine.
3
Turn OFF the machine, wait at least 10 seconds, and then turn it ON.
IMPORTANT
To enable SSL communication, perform the following depending on your needs:
- Access the E-mail/I-Fax settings and enable the SSL settings for POP and/or SMTP.
(See “Setting up E-Mail/I-Fax Function,” on p. 3-52.)
- Access the Remote UI On/Off settings and set the Use SSL setting to ‘On’. (See
“Restricting the Use of Remote UI,” on p. 6-34.)
Setting the Default Key for SSL Communications
3-37
Setting up the Machine for Your Network Environment
7
Setting Port Numbers
Depending on your network environment, you can change the port number for each
protocol.
IMPORTANT
• <SMTP Receive>, <POP3 Receive>, <FTP Sending>, and <SMTP Sending> are
available only when the Send function (optional for the imageRUNNER 2545/2535/
2530/2525/2520) is activated.
• Changes made to Port Number Settings become effective when the machine is
restarted. To restart the machine, turn it OFF, wait at least 10 seconds, and then turn it
ON. For instructions on how to turn the machine ON and OFF, see Chapter 2, “Before
You Start Using the Machine,” in the User’s Guide.
Setting up the Machine for Your Network Environment
3
NOTE
The default settings are as follows:
- LPD: 515
- RAW: 9100
- HTTP: 80
- SMTP Receive: 25
- POP3 Receive: 110
- FTP Sending: 21
- SMTP Sending: 25
- SNMP: 161
- WSD: 3702
- HTTPS: 443
1
3-38
Setting Port Numbers
Press
(Additional Functions)
➞ [System Settings] ➞ [Network
Settings].
3
4
Press [TCP/IP Settings].
Press [ ] or [ ] until [Port
Number Settings] appears ➞
press [Port Number Settings].
3
Press the key for the desired
protocol to change the port
number.
Press [ ] or [ ] to display the page
containing the key for the desired protocol.
5
Press [-] or [+] to enter the port
number ➞ [OK].
You can also enter the number using
(numeric keys).
Repeat steps 4 and 5 to change the port
number for the other protocols.
Setting Port Numbers
3-39
Setting up the Machine for Your Network Environment
2
6
Press [Done].
7
Restart the machine.
Turn OFF the machine, wait at least 10 seconds, and then turn it ON.
Setting up the Machine for Your Network Environment
3
3-40
Setting Port Numbers
Specifying Proxy Settings
Follow the procedure below to specify Proxy Settings according to your network
environment.
NOTE
The default setting is ‘Off’.
1
2
Press
(Additional Functions)
➞ [System Settings] ➞ [Network
Settings].
Press [TCP/IP Settings].
Specifying Proxy Settings
3-41
3
Setting up the Machine for Your Network Environment
IMPORTANT
Changes made to Proxy Settings become effective when the machine is restarted. To
restart the machine, turn it OFF, wait at least 10 seconds, and then turn it ON. For
instructions on how to turn the machine ON and OFF, see Chapter 2, “Before You Start
Using the Machine,” in the User’s Guide.
3
4
Setting up the Machine for Your Network Environment
3
Press [ ] or [ ] until
[Proxy Settings] appears ➞ press
[Proxy Settings].
Specify proxy settings.
● If you want to use a proxy:
❑ Press [On] for <Use Proxy>.
❑ Press [Server Address] ➞ enter a proxy
server IP address or FQDN (for example,
starfish.company.com) ➞ press [OK].
❑ Press [Port Number] ➞ enter the port
number of a proxy server.
❑ If you want to use a proxy in the same
domain, press [On] for <Use Proxy within
the Same Domain>. Otherwise, press
[Off].
❑ If you want to use proxy authentication,
press [Authentication Settings] ➞ press
[On] for <Use Proxy Authentication> ➞
enter the user name to use for proxy
authentication in [User], and the
password to use for proxy authentication
in [Password].
❑ Press [OK] ➞ [OK].
● If you do not want to use a proxy:
❑ Press [Off] for <Use Proxy> ➞ [OK].
5
Restart the machine.
Turn OFF the machine, wait at least 10 seconds, and then turn it ON.
3-42
Specifying Proxy Settings
Confirming the Department ID and Password
You can confirm the Department ID and password when printing using a driver that
supports Windows Vista/7.
NOTE
The default setting is ‘On’.
1
2
Press
(Additional Functions)
➞ [System Settings] ➞ [Network
Settings].
Press [TCP/IP Settings].
Confirming the Department ID and Password
3-43
3
Setting up the Machine for Your Network Environment
IMPORTANT
Changes made to Confirm Dept. ID Management Password become effective when
the machine is restarted. To restart the machine, turn it OFF, wait at least 10 seconds,
and then turn it ON. For instructions on how to turn the machine ON and OFF, see
Chapter 2, “Before You Start Using the Machine,” in the User’s Guide.
3
Press [ ] or [ ] until [Confirm
Dept. ID Management Password]
appears ➞ press [Confirm Dept.
ID Management Password].
4
3
Press [On] or [Off] ➞ [OK].
Setting up the Machine for Your Network Environment
[On]: Confirms the Department ID and
password when printing using a driver that
supports Windows Vista/7.
[Off]: Does not confirm the Department ID
and password when printing using a driver
that supports Windows Vista/7.
5
Restart the machine.
Turn OFF the machine, wait at least 10 seconds, and then turn it ON.
3-44
Confirming the Department ID and Password
Setting Application Protocols for Printing
You can select the printing method over a TCP/IP network.
NOTE
The default settings are as follows:
- LPD Settings: On
- RAW Settings: On
- WSD Print Settings: Off
1
2
Press
(Additional Functions)
➞ [System Settings] ➞ [Network
Settings].
Press [TCP/IP Settings].
Setting Application Protocols for Printing
3-45
3
Setting up the Machine for Your Network Environment
IMPORTANT
Changes made to LPD Settings, RAW Settings, and WSD Print Settings become
effective when the machine is restarted. To restart the machine, turn it OFF, wait at
least 10 seconds, and then turn it ON. For instructions on how to turn the machine ON
and OFF, see Chapter 2, “Before You Start Using the Machine,” in the User’s Guide.
3
4
3
Press [ ] or [ ] until [LPD
Settings] appears ➞ press [LPD
Settings].
Press [On] or [Off] ➞ [OK].
Setting up the Machine for Your Network Environment
[Off]: Does not use LPD.
[On]: Uses LPD as the printing protocol.
5
3-46
Setting Application Protocols for Printing
Press [ ] or [ ] until [RAW
Settings] appears ➞ press [RAW
Settings].
6
Specify the Raw settings.
● If you want to use Raw as the printing protocol:
❑ Press [On] for <Use RAW>.
❑ If you want to establish bidirectional
communication using Port 9100, press
[On] for <Use Bidirectional>.
❑ Press [OK].
● If you do not want to use Raw as the printing protocol:
❑ Press [Off] for <Use RAW>.
❑ Press [OK].
7
Press [ ] or [ ] until [WSD Print
Settings] appears ➞ press [WSD
Print Settings].
Setting Application Protocols for Printing
3-47
Setting up the Machine for Your Network Environment
3
8
Specify the WSD Print Settings.
● If you want to use WSD (Web Services for Devices) for printing:
❑ Press [On] for <Use WSD>.
❑ If you want to use the multicast discovery
function, press [On] for <Use Multicast
Discovery>. Otherwise, press [Off].
❑ Press [OK].
Setting up the Machine for Your Network Environment
3
● If you do not want to use WSD (Web Services for Devices) for printing:
❑ Press [Off] for <Use WSD>.
❑ If you want to use WSD browsing, press
[On] for <Use WSD Browsing>.
Otherwise, press [Off].
❑ If you want to use the multicast discovery
function, press [On] for <Use Multicast
Discovery>. Otherwise, press [Off].
❑ Press [OK].
NOTE
<Use WSD Browsing> is automatically set to ‘On’ when <Use WSD Print> is set to
‘Off’.
9
Restart the machine.
Turn OFF the machine, wait at least 10 seconds, and then turn it ON.
3-48
Setting Application Protocols for Printing
Setting up the Send Files Function of the Machine
(SMB Settings)
This setting is necessary for sending data to a Windows shared folder.
NOTE
The default settings are as follows:
- SMB Settings: On
- Use LM Announce: Off
1
2
Press
(Additional Functions)
➞ [System Settings] ➞ [Network
Settings].
Press [SMB Settings].
Setting up the Send Files Function of the Machine (SMB Settings)
3-49
3
Setting up the Machine for Your Network Environment
IMPORTANT
• To send data to a file server with the imageRUNNER 2545/2535/2530/2525/2520, the
Send function must be activated with the optional Color Send Kit-Y1.
• IPv6 is not supported.
• Changes made to SMB Settings become effective when the machine is restarted. To
restart the machine, turn it OFF, wait at least 10 seconds, and then turn it ON. For
instructions on how to turn the machine ON and OFF, see Chapter 2, “Before You Start
Using the Machine,” in the User’s Guide.
3
Specify the SMB settings.
● If you send scanned documents to a Windows shared folder:
❑ Press [On] for <Use SMB Client>.
Setting up the Machine for Your Network Environment
3
❑ Press [Server] ➞ enter the name of the
machine ➞ press [OK].
Be sure to enter a unique name that
does not exist as a name for another
computer or printer on the same
network. You can also leave this field
blank.
IMPORTANT
You cannot enter a character string
that includes blanks.
❑ Press [Workgroup] ➞ enter the same
workgroup name as the computer that
has the shared folder you are trying to
access ➞ press [OK].
You can also leave this field blank.
IMPORTANT
• You cannot enter the domain name as
the workgroup name.
• You cannot enter a character string
that includes blanks.
❑ Press [Next].
3-50
Setting up the Send Files Function of the Machine (SMB Settings)
❑ Press [Comment] ➞ enter a comment if
necessary ➞ press [OK].
NOTE
The comment is displayed on the
network.
❑ If you want the machine to notify the LAN
NOTE
• <LM Announce> is provided to
enable the LAN Manager to refer to
the machine.
• If the LAN Manager does not have to
refer to the machine, you can control
the traffic over your network by
selecting [Off] for <LM Announce>.
❑ Press [OK].
● If you do not send scanned documents to a Windows shared folder:
❑ Press [Off] for <Use SMB Client> ➞
[OK].
4
Restart the machine.
Turn OFF the machine, wait at least 10 seconds, and then turn it ON.
Setting up the Send Files Function of the Machine (SMB Settings)
3-51
3
Setting up the Machine for Your Network Environment
Manager of its existence on the network,
press [On] for <LM Announce>.
Otherwise, press [Off].
Setting up E-Mail/I-Fax Function
To set up the Scan to E-mail and I-fax functions, follow the procedure below.
IMPORTANT
• To send e-mails or I-faxes with the imageRUNNER 2545/2535/2530/2525/2520, the
Send function must be activated with the optional Color Send Kit-Y1.
• Changes made to E-mail/I-Fax settings become effective when the machine is
restarted. To restart the machine, turn it OFF, wait at least 10 seconds, and then turn it
ON. For instructions on how to turn the machine ON and OFF, see Chapter 2, “Before
You Start Using the Machine,” in the User’s Guide.
• To enable SSL communications for sending/receiving e-mails and I-faxes, specify the
SSL settings described in this section. Also, an SSL key pair must be generated and
set as the default key. (See “Generating a Key Pair for SSL Communications,” on
p. 3-21, and “Setting the Default Key for SSL Communications,” on p. 3-35.)
Setting up the Machine for Your Network Environment
3
NOTE
You can set the machine to verify the SSL server certificates for POP/SMTP. The
settings are available only on the Remote UI. See Chapter 4, “Customizing Settings,”
in the Remote UI Guide.
1
3-52
Setting up E-Mail/I-Fax Function
Press
(Additional Functions)
➞ [System Settings] ➞ [Network
Settings].
3
Press [ ] or [ ] until [E-maiI/
l-Fax] appears ➞ press [E-mail/
I-Fax].
Specify the mail server for receiving e-mails/I-faxes.
3
The machine supports both SMTP and POP3 functions.
NOTE
The machine can receive I-faxes, e-mail messages in text format, and TIFF-F and
JPEG files attached to e-mail messages in text format.
● If you want to receive e-mails/I-faxes using the machine’s own SMTP
receiving function:
❑ Press [Off] for <POP> ➞ press [On] for
<SMTP Receive>.
❑ Press [E-mail Address] ➞ enter the
e-mail address your machine will use ➞
press [OK].
NOTE
The machine can receive e-mails/
I-faxes sent only to the specified e-mail
address.
❑ To specify the settings for SSL
communications, proceed to the next
step. To specify the settings for sending
e-mails/I-faxes, proceed to step 4.
Setting up E-Mail/I-Fax Function
3-53
Setting up the Machine for Your Network Environment
2
❑ Press [Authentication/Encryption].
❑ Press [Next].
Setting up the Machine for Your Network Environment
3
❑ Press [SSL] or [On] for <Allow SSL
(SMTP Receive)> depending on your
network environment ➞ press [OK].
If you select [SSL] for <Allow SSL
(SMTP Receive)>, the machine receives
SSL-encrypted data only. (The machine
does not receive unencrypted data.)
If you select [On] for <Allow SSL (SMTP
Receive)>, the machine receives
SSL-encrypted data, only when the
client sends a request to the machine to
do so.
IMPORTANT
• If the SMTP server does not support encryption, the data will not be encrypted,
even if you select [SSL] or [On] for <Allow SSL (SMTP Receive)>.
• To receive SSL-encrypted data using SMTP receiving, changing the port number
for <SMTP Receive> may be required. (See “Setting Port Numbers,” on p. 3-38.)
The proper port number differs depending on your network environment. For
details, consult your network administrator or e-mail service provider.
❑ Proceed to step 4 to specify the settings for sending e-mails/I-faxes.
3-54
Setting up E-Mail/I-Fax Function
● If you want to receive e-mails/I-faxes using a POP server:
❑ Press [On] for <POP> ➞ press [Off] for
<SMTP Receive>.
e-mail address your machine will use ➞
press [OK].
❑ Press [Next].
❑ Press [POP Server] ➞ enter the POP
server IP address or name using the
on-screen keyboard ➞ press [OK].
❑ Press [POP Address] ➞ enter the login
name for access to the POP server ➞
press [OK].
Setting up E-Mail/I-Fax Function
3-55
3
Setting up the Machine for Your Network Environment
❑ Press [E-mail Address] ➞ enter the
❑ Press [POP Password] ➞ enter the
password for access to the POP server
➞ press [OK].
❑ Use [-] or [+] to set [POP Interval] at the
interval you want the POP server to
check for incoming e-mails.
Setting up the Machine for Your Network Environment
3
NOTE
• You can also enter values using
(numeric keys).
• If the interval is set to ‘0’, the POP
server is not checked automatically.
For instructions on how to manually
check the POP server, see Chapter
6, “Checking/Changing the Status of
Documents in Memory,” in the
Sending and Facsimile Guide.
❑ Press [Back].
❑ To specify the settings for SSL
communications, proceed to the next
step. To specify the settings for sending
e-mails/I-faxes, proceed to step 4.
❑ Press [Authentication/Encryption].
3-56
Setting up E-Mail/I-Fax Function
❑ Press [Next].
❑ Press [On] for <Allow SSL (POP)> ➞
press [OK].
❑ Proceed to step 4 to specify the settings
for sending e-mails/I-faxes.
4
Specify the mail server for sending e-mails/I-faxes.
NOTE
If the screen <[Network Settings] Effective after ON/OFF> is displayed at this point,
press [ ] or [ ] until [E-mail/I-Fax] appears ➞ press [E-mail/I-fax], and proceed to the
steps below.
Setting up E-Mail/I-Fax Function
3-57
Setting up the Machine for Your Network Environment
3
IMPORTANT
• If the POP server does not support
encryption, the data will not be
encrypted, even if [On] is selected for
<Allow SSL (POP)>.
• To receive SSL-encrypted data using
POP, changing the port number for
<POP3 Receive> may be required.
(See “Setting Port Numbers,” on
p. 3-38.) The proper port number
differs depending on your network
environment. For details, consult your
network administrator or e-mail
service provider.
● If you are using an SMTP server that requires POP before SMTP as the
authentication method:
❑ Press [SMTP Server] ➞ enter the SMTP
server IP address or name ➞ press
[OK].
Enter the SMTP server name if the
SMTP server address is already
registered in the DNS server.
Enter the IP address of the SMTP server
if the SMTP server address is not
registered in the DNS server.
❑ Press [Next].
❑ Press [POP Server] ➞ enter the POP
3
Setting up the Machine for Your Network Environment
server IP address or name using the
on-screen keyboard ➞ press [OK].
❑ Press [POP Address] ➞ enter the login
name for access to the POP server ➞
press [OK].
❑ Press [POP Password] ➞ enter the
password for access to the POP server
➞ press [OK].
❑ Press [Back].
❑ Press [Authentication/Encryption].
❑ Press [On] for <POP Authentication
before Send>.
❑ Press [Next].
❑ To specify the settings for SSL
communications, proceed to the next
step. If you do not use SSL
communications, press [OK] to return to
the [E-mail/I-Fax] screen ➞ press [Next]
➞ [OK], and then proceed to step 5.
3-58
Setting up E-Mail/I-Fax Function
❑ Press [On] for <Allow SSL (POP)> and/
or <Allow SSL (SMTP Send)>,
depending on your network environment
➞ press [OK] to return to the [E-mail/
I-Fax] screen.
❑ Press [Next] ➞ [OK].
❑ Proceed to step 5.
● If you are using an SMTP server that requires SMTP Authentication:
❑ Press [SMTP Server] ➞ enter an SMTP server IP address or name ➞ press [OK].
Enter the SMTP server name if the SMTP server address is already registered in the
DNS server.
Enter the IP address of the SMTP server if the SMTP server address is not
registered in the DNS server.
❑ Press [Authentication/Encryption].
❑ Press [On] for <SMTP Authentication (SMTP AUTH)>.
❑ Select [On] or [Off] for <Disp Auth Screen When Sending> and <Carry Over
Authentication>.
• <Disp Auth Screen When Sending>
Specify whether to display the SMTP authentication screen each time you send
e-mails and I-faxes. To always display the SMTP authentication screen when
sending e-mails and I-faxes, select [On].
• <Carry Over Authentication>
Specify whether to carry over the login information (user name only) from
Authorized Send to SMTP authentication. To use the same user name for SMTP
authentication, select [On]. If you select [On], you do not need to specify the user
name in the next step.
IMPORTANT
• <Disp Auth Screen When Sending> and <Carry Over Authentication> appear
only when Authorized Send is activated.
Setting up E-Mail/I-Fax Function
3-59
3
Setting up the Machine for Your Network Environment
IMPORTANT
• If the POP server and/or SMTP server do not support encryption, the data will
not be encrypted, even when [On] is selected for <Allow SSL (POP)> and/or
<Allow SSL (SMTP Send)>.
• To send SSL-encrypted data using POP before SMTP, changing the port number
for <POP3 Receive> and/or <SMTP Sending> may be required. (See “Setting
Port Numbers,” on p. 3-38.) The proper port number differs depending on your
network environment. For details, consult your network administrator or e-mail
service provider.
• If you select [On] for both <Disp Auth Screen When Sending> and <Carry Over
Authentication>, the user name used to log in to Authorized Send is
automatically inserted in the [User Name] text box of the SMTP authentication
screen.
❑ Press [User] ➞ enter the user name used for logging in to the SMTP server ➞ press
[OK].
If you are using the server that requires the domain name to be included with your
user name, enter a user name in [User] using the following format: user name
@domain name.
❑ Press [Password] ➞ enter the password used for logging in to the SMTP server ➞
press [OK].
❑ Press [Next].
❑ To specify the settings for SSL communications, proceed to the next step. If you do
3
Setting up the Machine for Your Network Environment
not use SSL communications, press [OK] to return to the [E-mail/I-Fax] screen ➞
press [Next] ➞ [OK], and then proceed to step 5.
❑ Press [On] for <Allow SSL (SMTP Send)> ➞ press [OK] to return to the [E-mail/
I-Fax] screen.
IMPORTANT
• If the SMTP server does not support encryption, the data will not be encrypted,
even when [On] is selected for <Allow SSL (SMTP Send)>.
• To send SSL-encrypted data using SMTP Authentication, changing the port
number for <SMTP Sending> may be required. (See “Setting Port Numbers,” on
p. 3-38.) The proper port number differs depending on your network
environment. For details, consult your network administrator or e-mail service
provider.
❑ Press [Next] ➞ [OK].
❑ Proceed to step 5.
● If you are using an SMTP server that does not require authentication for
sending e-mails:
❑ Press [SMTP Server] ➞ enter an SMTP server IP address or name ➞ press [OK].
Enter the SMTP server name if the SMTP server address is already registered in the
DNS server.
Enter the IP address of the SMTP server if the SMTP server address is not
registered in the DNS server.
❑ Press [Authentication/Encryption].
❑ Press [Off] both for <SMTP Authentication (SMTP AUTH)> and <POP Authentication
before Send> ➞ press [Next].
❑ To specify the settings for SSL communications, proceed to the next step. If you do
not use SSL communications, press [OK] to return to the [E-mail/I-Fax] screen ➞
press [Next] ➞ [OK], and then proceed to step 5.
❑ Press [On] for <Allow SSL (SMTP Send)> ➞ press [OK] to return to the [E-mail/
I-Fax] screen.
3-60
Setting up E-Mail/I-Fax Function
IMPORTANT
• If the SMTP server does not support encryption, the data will not be encrypted,
even when [On] is selected for <Allow SSL (SMTP Send)>.
• To send SSL-encrypted data using SMTP, changing the port number for <SMTP
Sending> may be required. (See “Setting Port Numbers,” on p. 3-38.) The proper
port number differs depending on your network environment. For details, consult
your network administrator or e-mail service provider.
❑ Press [Next] ➞ [OK].
❑ Proceed to step 5.
Restart the machine.
3
Turn OFF the machine, wait at least 10 seconds, and then turn it ON.
Setting up the Machine for Your Network Environment
5
Setting up E-Mail/I-Fax Function
3-61
Setting up LDAP Server
If the information for an LDAP (Lightweight Directory Access Protocol) server is
registered in the machine, you can search for e-mail addresses and fax numbers
via the LDAP server. E-mail addresses and fax numbers obtained via the server
can be specified as destinations or stored in the Address Book.
LDAP Server
Setting up the Machine for Your Network Environment
3
[email protected]
012XXXXXXX
NOTE
• The following types of LDAP servers can be used with this machine:
- Windows 2000 Server with Active Directory
- Windows Server 2003 with Active Directory
- Windows Server 2008 with Active Directory
- Lotus Notes R5 to R8
For more information, contact your local authorized Canon dealer.
• You can register up to five LDAP servers.
3-62
Setting up LDAP Server
Registering LDAP Server
Specify the relevant information for the LDAP server, such as the server name and
address.
1
Press
(Additional Functions)
➞ [System Settings].
2
3
Press [ ] or [ ] until [Register
LDAP Server] appears ➞ press
[Register LDAP Server].
Press [Register].
Setting up LDAP Server
3-63
Setting up the Machine for Your Network Environment
3
4
Specify the LDAP server
information.
❑ Press [Server] ➞ enter a server name ➞
press [OK].
Setting up the Machine for Your Network Environment
3
❑ Press [Server Address] ➞ enter the
server’s address ➞ press [OK].
NOTE
If <Login Information> is set to ‘Use
(security authent.)’ for the LDAP server
and Reverse DNS Lookup (a function
that looks up the host name from the
IP address) is not supported, enter a
host name instead of an IP address.
❑ Press [Location to Start Search] ➞ enter
the location to start searching ➞ press
[OK].
Enter the location to start searching
according to the type of LDAP server
you are using, or as described below.
You can leave this field blank.
3-64
Setting up LDAP Server
5
Press [Next].
6
Press [Port Number] ➞ enter a
port number using
(numeric keys).
7
Press [Max. No. of Addresses] ➞
enter the maximum number of
addresses to search using
(numeric keys).
Setting up LDAP Server
3-65
3
Setting up the Machine for Your Network Environment
NOTE
• If you are using Windows 2000 Server, Windows Server 2003, or Windows Server
2008 with Active Directory:
Add “DC=” to each dot separated series of characters in the Active Directory domain
name, and separate each series of characters by a comma.
Example: If <team1.salesdept.canon.co.jp> is the domain name in Active Directory:
DC=team1, DC=salesdept, DC=canon, DC=co, DC=jp
• If you are using Lotus Notes Domino R5 or later:
Enter the dn (Distinguished Name) of the node on the directory tree, such as
“ou=team1”, “ou=salesdept”, “o=canon”, or “c=jp”.
• If the server’s LDAP version is 3, you do not have to specify [Location to Start Search].
(If the LDAP version is 3, the machine automatically retrieves settings from the server,
and sets the location to start searching.) If the server’s LDAP version is 2, you have to
specify [Location to Start Search].
8
Press [Search Timeout] ➞ enter
the timeout time, in seconds,
using
(numeric keys).
IMPORTANT
Depending on the conditions such as
authentication methods you are using,
the timeout time may be shorter than
designated.
9
Setting up the Machine for Your Network Environment
3
Press [Next].
10
Select [Do not use], [Use], or
[Use (security authent.)] for
<Login Information>.
NOTE
• [Use (security authent.)] can be selected only if the LDAP server is running on
Windows 2000 Server, Windows Server 2003, or Windows Server 2008 with Active
Directory.
• If you entered an IP address in step 4, and Reverse DNS Lookup (a function that looks
up the host name from the IP address) is not supported, select either [Do not use] or
[Use].
• If <Login Information> is set to ‘Use (security authent.)’, and if Date & Time Settings in
Timer Settings (from the Additional Functions screen) is different from the time
settings on the LDAP server, the machine may not be able to connect to the LDAP
server.
3-66
Setting up LDAP Server
● If [Do not use] is selected:
❑ Select the Server LDAP version and
character code ➞ press [OK].
Select the LDAP version and character
code according to the LDAP server’s
environment.
❑ Select the LDAP version and character
code according to the LDAP server’s
environment ➞ press [Next].
❑ Press [User] ➞ enter the user name
according to the type of LDAP server you
are using ➞ press [OK].
NOTE
• If you are using Windows 2000 Server, Windows Server 2003, or Windows Server
2008 with Active Directory:
Press [User] ➞ enter “Windows domain name/Windows user name”.
Example: If <team1> is the Windows domain name, and <user1> is the Windows user
name: team1/user1
• If you are using Lotus Notes Domino R5 or later:
Press [User] ➞ enter the dn (Distinguished Name) of the user, such as “cn=admin”,
“ou=team1”, or “ou=salesdept”.
Setting up LDAP Server
3-67
Setting up the Machine for Your Network Environment
3
● If [Use] is selected:
❑ Press [Password] ➞ enter a password ➞
press [OK].
After pressing [OK], the password that
you entered appears as asterisks
(********) on the Register screen.
❑ Select [On] or [Off] for <Display
authentication screen>.
3
Setting up the Machine for Your Network Environment
[On]: When searching for information on
the server, a login information dialog box
is displayed even if a password is not
required.
[Off]: When searching for information on
the server, a login information dialog box
is not displayed.
❑ Press [OK].
NOTE
If Authorized Send is activated, <Carry Over Send Auth. Info.> appears on the top
of the Register screen. Press [On] to use the same user name and password as
the login information for Authorized Send or [Off] to use the user name and
password registered at this step.
● If [Use (security authent.)] is selected:
❑ Press [Next].
3-68
Setting up LDAP Server
❑ Press [User] ➞ enter a user name ➞
press [OK].
Example: If <user1 > is the Windows
user name:
user1
❑ Press [Password] ➞ enter a password ➞
After pressing [OK], the password that
you entered appears as asterisks
(********) on the Register screen.
❑ Press [Domain Name] ➞ enter a domain
name ➞ press [OK].
Enter the directory tree name of the
Active Directory, such as
<team1.salesdept.canon.co.jp>.
❑ Select [On] or [Off] for <Display
authentication screen>.
[On]: When searching for information on
the server, a login information dialog box
is displayed even if a password is not
required.
[Off]: When searching for information on
the server, a login information dialog box
is not displayed.
❑ Press [OK].
Setting up LDAP Server
3-69
3
Setting up the Machine for Your Network Environment
press [OK].
NOTE
If Authorized Send is activated, <Carry Over Send Auth. Info.> appears on the top
of the Register screen. Press [On] to use the same user name and password as
the login information for Authorized Send or [Off] to use the user name and
password registered at this step.
11
Press
(Reset) to return to the top screen.
Changing LDAP Server Setting
You can change the settings for a stored LDAP server.
Setting up the Machine for Your Network Environment
3
1
Press
(Additional Functions) ➞ [System Settings].
For help, see step 1 in “Registering LDAP Server,” on p. 3-63.
2
Press [ ] or [ ] until [Register LDAP Server] appears ➞ press
[Register LDAP Server].
For help, see step 2 in “Registering LDAP Server,” on p. 3-63.
3
4
Select the LDAP server whose
settings you want to change ➞
press [Detail/Edit].
Change the necessary settings ➞ press [OK].
For details about each setting, see “Registering LDAP Server,” on p. 3-63.
5
3-70
Press
Setting up LDAP Server
(Reset) to return to the top screen.
Deleting LDAP Server
You can delete a stored LDAP server.
1
Press
(Additional Functions) ➞ [System Settings].
For help, see step 1 in “Registering LDAP Server,” on p. 3-63.
Press [ ] or [ ] until [Register LDAP Server] appears ➞ press
[Register LDAP Server].
For help, see step 2 in “Registering LDAP Server,” on p. 3-63.
3
4
Select the LDAP server that you
want to erase ➞ press [Erase].
Press [Yes].
If you do not want to erase the LDAP server, press [No].
The selected LDAP server is erased.
5
Press
(Reset) to return to the top screen.
Setting up LDAP Server
3-71
3
Setting up the Machine for Your Network Environment
2
Registering/Editing LDAP Search Attributes
You can register or edit the LDAP search attributes.
1
Press
(Additional Functions) ➞ [System Settings].
For help, see step 1 in “Registering LDAP Server,” on p. 3-63.
2
3
Press [ ] or [ ] until [Register LDAP Server] appears ➞ press
[Register LDAP Server].
Setting up the Machine for Your Network Environment
For help, see step 2 in “Registering LDAP Server,” on p. 3-63.
3
4
Press [Reg./Edit LDAP Search].
Register or edit the LDAP search attributes.
● If you want to register a search attribute:
❑ Press [Not Reg’d 1] or [Not Reg’d 2] ➞
[Register/Edit].
3-72
Setting up LDAP Server
❑ Press [Display Name] ➞ enter the name
to display ➞ press [OK].
❑ Press [Attribute Name] ➞ enter the
attribute name ➞ press [OK].
❑ Press [OK].
● If you want to edit a search attribute:
❑ Select the search attribute that you want
to edit ➞ press [Register/Edit].
❑ Press [Display Name] ➞ edit the name to
display ➞ press [OK].
❑ Press [Attribute Name] ➞ edit the
attribute name ➞ press [OK].
❑ Press [OK].
Setting up LDAP Server
3-73
Setting up the Machine for Your Network Environment
3
● If you want to erase a search category:
❑ Select the search attribute that you want
to erase ➞ press [Erase].
❑ Press [Yes].
Setting up the Machine for Your Network Environment
3
5
Press
(Reset) to return to the top screen.
Printing LDAP Server Settings
You can print the LDAP server settings.
1
Press
(Additional Functions) ➞ [System Settings].
For help, see step 1 in “Registering LDAP Server,” on p. 3-63.
2
Press [ ] or [ ] until [Register LDAP Server] appears ➞ press
[Register LDAP Server].
For help, see step 2 in “Registering LDAP Server,” on p. 3-63.
3
Press [Print List].
NOTE
The Registered LDAP Server List can
be printed only if A3, A4, or A4R (plain,
recycled, or color paper) is loaded in
the paper sources whose settings in
Other in Drawer Eligibility For APS/
ADS in Common Settings (from the
Additional Functions screen) are set to
‘On’. (See Chapter 3, “Configuring the
Machine’s Basic Settings,” in the
Reference Guide.)
3-74
Setting up LDAP Server
4
Press [Yes].
The LDAP Server settings list is printed.
Press
(Reset) to return to the top screen.
3
Setting up the Machine for Your Network Environment
5
Setting up LDAP Server
3-75
Setting up the Machine for Your Network Environment
3
3-76
Setting up LDAP Server
Setting the Send Function
4
CHAPTER
This chapter describes how to set the System Settings items related to the Send function.
IMPORTANT
To make changes to the System Settings, enter the System Management mode. For
details, see “Operating the Machine in System Management Mode,” on p. 1-7.
Specifying Communications Settings . . . . . . . . . . . . . . . . . . . . . . . . . . . . . . . . . . . . . . . . 4-2
E-Mail/I-Fax Settings. . . . . . . . . . . . . . . . . . . . . . . . . . . . . . . . . . . . . . . . . . . . . . . . . . . . . . . . . . .4-2
Fax Settings . . . . . . . . . . . . . . . . . . . . . . . . . . . . . . . . . . . . . . . . . . . . . . . . . . . . . . . . . . . . . . . . .4-4
Memory Lock Settings . . . . . . . . . . . . . . . . . . . . . . . . . . . . . . . . . . . . . . . . . . . . . . . . . . . . . . . . .4-8
Selecting Country or Region . . . . . . . . . . . . . . . . . . . . . . . . . . . . . . . . . . . . . . . . . . . . . . . . . . .4-12
Storing Forwarding Settings . . . . . . . . . . . . . . . . . . . . . . . . . . . . . . . . . . . . . . . . . . . . . . 4-14
Storing Forwarding Settings . . . . . . . . . . . . . . . . . . . . . . . . . . . . . . . . . . . . . . . . . . . . . . . . . . . .4-15
Setting Forwarding without Conditions. . . . . . . . . . . . . . . . . . . . . . . . . . . . . . . . . . . . . . . . . . . .4-23
Checking/Changing Forwarding Settings . . . . . . . . . . . . . . . . . . . . . . . . . . . . . . . . . . . . . . . . .4-28
Turning Forwarding ON/OFF . . . . . . . . . . . . . . . . . . . . . . . . . . . . . . . . . . . . . . . . . . . . . . . . . . .4-29
Erasing Forwarding Settings . . . . . . . . . . . . . . . . . . . . . . . . . . . . . . . . . . . . . . . . . . . . . . . . . . .4-30
Printing Forwarding Settings . . . . . . . . . . . . . . . . . . . . . . . . . . . . . . . . . . . . . . . . . . . . . . . . . . .4-31
Handling Forwarding Documents . . . . . . . . . . . . . . . . . . . . . . . . . . . . . . . . . . . . . . . . . . 4-32
Restricting the Send Function . . . . . . . . . . . . . . . . . . . . . . . . . . . . . . . . . . . . . . . . . . . . 4-35
Setting a Password for the Address Book . . . . . . . . . . . . . . . . . . . . . . . . . . . . . . . . . . . . . . . . .4-35
Restricting New Addresses . . . . . . . . . . . . . . . . . . . . . . . . . . . . . . . . . . . . . . . . . . . . . . . . . . . .4-37
Enabling Fax Transmission via the Fax Driver . . . . . . . . . . . . . . . . . . . . . . . . . . . . . . . . . . . . . .4-38
Restricting Recall . . . . . . . . . . . . . . . . . . . . . . . . . . . . . . . . . . . . . . . . . . . . . . . . . . . . . . . . . . . .4-40
Entering a Fax Number Twice to Confirm It . . . . . . . . . . . . . . . . . . . . . . . . . . . . . . . . . . . . . . . .4-41
Restricting Sequential Broadcast. . . . . . . . . . . . . . . . . . . . . . . . . . . . . . . . . . . . . . . . . . . . . . . .4-42
Restricting Sending Documents to a USB Memory Media Device . . . . . . . . . . . . . . . . . . . . . .4-43
4-1
Specifying Communications Settings
This section describes the System Settings items related to the e-mail, I-fax, and
fax functions.
E-Mail/I-Fax Settings
You can change the e-mail and I-fax transmission settings listed below.
■ Maximum Data Size For Sending
4
Setting the Send Function
Sets the maximum data size for outgoing e-mail messages and I-fax documents.
If the data size of the document sent from the machine exceeds the specified
maximum data size and <Divided TX over Max.Data Size> is set to ‘On’, the
document is split up into multiple files by page and sent as different e-mail or
I-fax messages.
■ Divided TX over Max.Data Size
Sets whether to divide a document into separate files when it is sent if its size
exceeds the data size you specify.
■ Default Subject
The subject that you enter here is used as the default subject whenever you do
not enter a subject when sending a job.
IMPORTANT
This setting is available only when the Send function (optional for the imageRUNNER
2545/2535/2530/2525/2520) is activated.
NOTE
The default settings are:
- Maximum TX Data Size:
3 MB
- Divided TX over Max.Data Size: Off
- Default Subject:
Attached Image
4-2
Specifying Communications Settings
1
Press
(Additional Functions)
➞ [System Settings] ➞
[Communications Settings].
2
Press [E-mail/I-Fax Settings].
3
Setting the Send Function
4
Specify each settings.
<Maximum TX Data Size>:
Use [-] or [+] to specify the maximum data size for sending.
You can set the Maximum TX Data Size from 0 to 99 MB, in 1 MB increments.
If you enter ‘0’ MB as the data size, there is no size limit on the data that is sent.
Specifying Communications Settings
4-3
<Divided TX over Max.Data Size>:
[On]: When the data size of the document exceeds the size set in <Maximum TX Data
Size>, the document is sent as separate files. If the data size of a single page
document exceeds the maximum data size for sending, the send job is handled
as an error and the document cannot be sent.
[Off]: When the data size of the document exceeds the size set in <Maximum TX Data
Size>, the document is not sent.
<Default Subject>:
Press [Subject] ➞ enter the default subject ➞ press [OK].
You can enter up to 40 characters for the default subject.
IMPORTANT
• Be sure to set the maximum data size for sending to a value that does not exceed the
maximum data size allowed by the mail server.
• If the Language Switch setting is set to ‘On’, some characters are restricted and
cannot be entered. To enter all characters, set the Language Switch setting to ‘Off’.
(See Chapter 3, “Configuring the Machine’s Basic Settings,” in the Reference Guide.)
Setting the Send Function
4
NOTE
• You can also enter values for Maximum TX Data Size using
(numeric keys).
• For instructions on how to enter characters using the on-screen keyboard, see
Chapter 2, “Basic Operations,” in the Reference Guide.
4
Confirm the settings you specified ➞ press [OK].
5
Press
(Reset) to return to the top screen.
Fax Settings
Setting Sending/Receiving Start Speed
This section describes how to set the send and receive start speeds. This is useful
when there is difficulty initiating the sending and receiving of a document.
IMPORTANT
This setting is available only when the optional Super G3 Fax Board-AG1 is attached
to the machine.
NOTE
The default setting is ‘33600 bps’ for both the Send Start Speed and Receive Start
Speed.
4-4
Specifying Communications Settings
1
Press
(Additional Functions) ➞ [System Settings] ➞
[Communications Settings].
For help, see “E-Mail/I-Fax Settings,” on p. 4-2.
2
Press [Fax Settings].
3
Select the desired Send Start
Speed and Receive Start Speed
by pressing each drop-down list
➞ press [OK].
If your document transmission or reception
is slow in starting, this may mean that the
telephone lines in your area are in poor
condition. Select a slower speed. You can
select [33600 bps], [14400 bps], [9600
bps], [7200 bps], [4800 bps], or [2400
bps].
4
Press
(Reset) to return to the top screen.
R-Key Setting
If your machine is connected through a PBX (Private Branch Exchange), it is
necessary to set the access method. You can set the PBX type to ‘Prefix’ or
‘Hooking’.
IMPORTANT
This setting is available only when the optional Super G3 Fax Board-AG1 is attached
to the machine.
Specifying Communications Settings
4-5
Setting the Send Function
4
NOTE
• If you select ‘Prefix’ for R-Key Settings, you can set a code of up to 20 digits that will
access an outside line. Be sure to enter a pause [P] after the prefix code.
• The default setting is ‘PSTN’.
1
Press
(Additional Functions)
➞ [System Settings] ➞
[Communications Settings] ➞
[Fax Settings] ➞ [R-key
Settings].
Setting the Send Function
4
2
Press [PSTN] or [PBX].
● If your machine is connected to an outside line:
❑ Press [PSTN] ➞ [OK].
❑ Proceed to step 4.
● If your machine is connected through a PBX:
❑ Press [PBX].
❑ Proceed to step 3.
4-6
Specifying Communications Settings
3
Select the type of PBX you are using.
● If you select [Prefix]:
❑ Press [Prefix] ➞ [Code].
❑ Enter the prefix code using
(numeric keys) ➞ press [OK] ➞ [OK].
● If you select [Hooking]:
❑ Press [Hooking] ➞ [OK].
The selected mode is set.
4
Press
(Reset) to return to the top screen.
Specifying Communications Settings
4-7
4
Setting the Send Function
Be sure to enter a pause after the prefix
code. If you press [Pause] at the end of
the prefix code, <P> is displayed. If you
do not insert a pause, the prefix code is
not registered.
You can enter up to 20 digits for a prefix
code.
Press [Backspace] to delete the number
or character immediately to the left of
the cursor.
You can press
(Clear) to clear your
entry.
Memory Lock Settings
There may be occasions when you want to use the Memory Lock mode, which
stores all incoming documents in the memory until you are ready to print or send
them. After the Memory Lock is turned ‘On’, the machine will enter the Memory
Lock mode. The documents received when the machine is in the Memory Lock
mode are stored in memory until you unlock the memory with a password and print
them. You can also set the machine to automatically enter and leave the Memory
Lock mode at a specified time.
Memory
4
Setting the Send Function
Print
Send
I-Fax Reception
Fax Reception
This section explains how to enable and disable the Memory Lock mode and
configure the Memory Lock settings such as the password and the timer for turning
on and off the Memory Lock.
IMPORTANT
• This setting is available only when the Send function (optional for the imageRUNNER
2545/2535/2530/2525/2520) is activated or the optional Super G3 Fax Board-AG1 is
attached to the machine.
• Additional documents cannot be received in memory if either of the following is true:
- When a total of 95 documents have been stored
- When a total of approximately 1,000 pages have been stored
NOTE
• You can check, erase, or redirect the received documents in memory using the
System Monitor screen. (See Chapter 6, “Checking/Changing the Status of
Documents in Memory,” in the Sending and Facsimile Guide.)
• The default setting is ‘Off’.
4-8
Specifying Communications Settings
1
Press
(Additional Functions) ➞ [System Settings] ➞
[Communications Settings].
For help, see “E-Mail/I-Fax Settings,” on p. 4-2.
2
Press [Memory Lock Settings].
NOTE
If the screen shown on the left
appears, enter the password using
(numeric keys) ➞ press [Next].
3
-
Press [On] or [Off].
● If you want to set the Memory
Lock mode:
❑ Press [On] ➞ [Option].
❑ Proceed to step 4.
● If you do not want to set the
Memory Lock mode:
❑ Press [Off].
❑ Proceed to step 7.
Specifying Communications Settings
4-9
Setting the Send Function
4
4
If you want to set a password for
the Memory Lock mode, enter a
password using
(numeric
keys) ➞ press [Next].
If you do not want to set the Memory Lock
with a password, press [Next] without
entering any number.
Once the Memory Lock password is set, it
is necessary to enter the password when
you want to change the Memory Lock
Settings, except when you have logged in
to the machine by entering the System
Manager ID and System Password.
You cannot store a password that only
consists of zeros, such as <0000000>.
4
Setting the Send Function
If you enter fewer than seven digits, the
machine stores the password with leading
zeros.
Example: If <02> or <002> is entered,
<0000002> is stored.
IMPORTANT
Since there is no way to check a stored password, make sure that you write it down,
and keep it in a safe place.
NOTE
If you make a mistake when entering the password, press
correct password.
5
(Clear) ➞ enter the
Specify the memory lock settings.
● If you want to print the reports which are set to be printed automatically
in Report Settings:
❑ Press [On] for <Report Print>.
If you do not want to print these reports,
press [Off].
4-10
Specifying Communications Settings
● If you want to specify the Memory Lock Time Settings:
❑ Press [On] for <Memory Lock Time
Settings> ➞ press [Next].
If you do not want to set the Memory
Lock Time, press [Off] ➞ go to step 6.
NOTE
If [Off] is selected, the Memory Lock
mode will not start automatically at a
specified time. The machine enters the
Memory Lock mode only when you
manually set Memory Lock to ‘On’
from the Memory Lock Settings
screen.
❑ Press [Memory Lock Start Time] ➞
❑ Press [Memory Lock End Time] ➞
specify the time to exit the Memory Lock
mode using
(numeric keys) ➞
press [OK].
Enter all four digits of the time (including
zeros), using 24-hour notation.
Examples: 9:05 a.m. ➞ 0905
4:18 p.m. ➞ 1618
❑ Go to step 7.
NOTE
• If you make a mistake when entering the time, press
(Clear) ➞ enter another four
digit number.
• If you do not want to specify the time, press [Cancel].
• If you set the same time for Memory Lock Start Time and Memory Lock End Time, the
machine will remain in the Memory Lock mode through the entire day.
Specifying Communications Settings
4-11
4
Setting the Send Function
specify the time to enter the Memory
Lock mode using
(numeric
keys).
6
7
Press
(Reset) to return to the top screen.
Selecting Country or Region
Setting the Send Function
4
When all settings are complete,
press [OK].
Select the country or region where the machine is located.
IMPORTANT
Changes made to Select Country/Region become effective when the machine is
restarted. To restart the machine, turn it OFF, wait at least 10 seconds, and then turn it
ON. For instructions on how to turn the machine ON and OFF, see Chapter 2, “Before
You Start Using the Machine,” in the User’s Guide.
1
Press
(Additional Functions) ➞ [System Settings] ➞
[Communications Settings].
For help, see “E-Mail/I-Fax Settings,” on p. 4-2.
2
4-12
Specifying Communications Settings
Press [Select Country/Region].
3
Restart the machine.
Turn OFF the machine, wait at least 10 seconds, and then turn it ON.
4
Setting the Send Function
4
Select the country or region ➞
press [OK].
Specifying Communications Settings
4-13
Storing Forwarding Settings
You can set the machine to forward received fax/I-fax documents to other machines
or the file servers. If a received document matches the forwarding conditions, it is
forwarded to the specified destination. This section explains forwarding conditions
and how to register, change, and erase forwarding destinations.
■ Document Handling under Forwarding Settings
Setting the Send Function
4
*1 If Forward w/o Cond. is enabled, all received documents that do not match the forwarding conditions are forwarded
to the destination selected for Forward w/o Cond.
4-14
Storing Forwarding Settings
*2 I-fax/fax documents with forwarding errors stored in memory can be confirmed, deleted, printed, and forwarded to
the destinations registered in the One-touch Buttons or the Address Book from the I-Fax or Fax Forwarding Error
Status Screen on the System Monitor screen. (See Chapter 6, “Checking/Changing the Status of Documents in
Memory,” in the Sending and Facsimile Guide.) However, if a forwarding error occurs when Memory Lock is set to
‘On’, the error job appears on the Forwarding Error Status Screen when Memory Lock is turned ‘Off’.
*3 If Print Image in Store/Print When Forwarding in System Settings is set to ‘For Error Only,’ documents with
forwarding errors are printed. If Print Image in Store/Print When Forwarding in System Settings is set to ‘On,’ all of
the forwarded documents (including those with forwarding errors) are printed. However, if Memory Lock is set to ‘On’,
forwarded documents are printed when Memory Lock is set to ‘Off’.
*4 Documents stored in memory can be confirmed, deleted, and forwarded to the destinations registered in the
One-touch Buttons or the Address Book from the I-FAX Memory Lock Document screen (I-Fax) or RX Job Status
screen (fax) on the System Monitor screen. (See Chapter 6, “Checking/Changing the Status of Documents in
Memory,” in the Sending and Facsimile Guide.)
*5 If documents are received while paper is jammed, or paper or toner has run out, they are printed after the paper jam
is cleared, paper is loaded, or toner is replaced.
NOTE
• The maximum number of forwarding settings that you can store is 12: ten settings with
forwarding conditions, and one fax and one I-fax forwarding jobs without conditions.
• You can set whether to print I-fax/fax documents with forwarding errors, and whether
to store them in memory. (See “Handling Forwarding Documents,” on p. 4-32.)
• When Print Image and Memory Lock are set to ‘Off’ and Store Image to Memory is set
to ‘Do Not Store’, the received documents will be lost if a forwarding error occurs.
• For instructions on how to enter characters using the on-screen keyboard, see
Chapter 2, “Basic Operations,” in the Reference Guide.
Storing Forwarding Settings
1
Press
(Additional Functions)
➞ [System Settings] ➞
[Forwarding Settings].
Storing Forwarding Settings
4-15
4
Setting the Send Function
IMPORTANT
• This setting is available only when the Send function (optional for the imageRUNNER
2545/2535/2530/2525/2520) is activated or the optional Super G3 Fax Board-AG1 is
attached to the machine.
• If the Language Switch setting is set to ‘On’, some characters are restricted and
cannot be entered. To enter all characters, set the Language Switch setting to ‘Off’.
(See Chapter 3, “Configuring the Machine’s Basic Settings,” in the Reference Guide.)
• If a blackout occurs or the machine is turned OFF while the machine is receiving the
documents to be forwarded, the received documents are not forwarded to the
specified destination. These documents are printed after the power is turnd ON.
2
Press [Register].
3
Press [Condition Name].
Setting the Send Function
4
4
Enter a name for the forwarding
condition ➞ press [OK].
You can enter up to 50 characters for the
condition name.
5
4-16
Storing Forwarding Settings
Press [Forwarding Conditions].
6
Press [Fax] or [I-Fax] ➞ [Next].
This step is necessary only when the Send
function (optional for the imageRUNNER
2545/2535/2530/2525/2520) is activated
and the optional Super G3 Fax Board-AG1
is attached to the machine.
Set the forwarding conditions.
● If the Send function (optional for the imageRUNNER 2545/2535/2530/
2525/2520) is not activated and the Super G3 Fax Board-AG1 is attached
to the machine, or ‘Fax’ is selected as the receive type:
❑ Press the Fax Number drop-down list ➞
select the forwarding condition.
The available forwarding conditions are:
[disregarded]:
Disregards the Fax Number information as a forwarding condition.
[does not exist]:
Forwards the document if the Fax Number information does not
exist.
[equals]:
Forwards the document if the Fax Number information matches all
of the characters entered.
[differs from]:
Forwards the document if the Fax Number information differs from
the characters entered.
[begins with]:
Forwards the document if the Fax Number information begins with
the characters entered.
[ends with]:
Forwards the document if the Fax Number information ends with
the characters entered.
[contains]:
Forwards the document if the Fax Number information contains the
characters entered.
Storing Forwarding Settings
4-17
4
Setting the Send Function
7
[does not contain]: Forwards the document if the Fax Number information does not
contain the characters entered.
❑ Enter the forwarding criterion using
-
(numeric keys) ➞ press [OK].
[Space]:
Press to insert a space
between numbers.
[+]:
Press to insert a “+” sign
between the country code
and fax number.
[ ] [ ]:
Use to move the position
of the cursor.
[Backspace]: Press to delete the
number immediately to the
left of the cursor.
If you want to change the criterion for the forwarding conditions without changing the
forwarding condition for the Fax Number drop-down list, press
(Clear) ➞ enter the
new criterion ➞ press [OK].
Setting the Send Function
4
You can enter up to 20 characters for the Fax Number forwarding criterion. The
characters that can be entered are: 0 to 9, [Space], [+].
NOTE
If ‘disregarded’ or ‘does not exist’ is selected as the forwarding condition, you cannot
enter any criteria.
4-18
Storing Forwarding Settings
● If the Send function (optional for the imageRUNNER 2545/2535/2530/
2525/2520) is activated and the Super G3 Fax Board-AG1 is not attached
to the machine, or ‘I-Fax’ is selected as the receive type:
❑ Press the Destination, From, or Subject
drop-down list.
The available forwarding conditions are:
[disregarded]:
Disregards the Destination, From, or Subject information as
forwarding conditions.
[equals]:
Forwards the document if the From or Subject information matches
all of the characters entered.
[differs from]:
Forwards the document if the Destination, From, or Subject
information differs from the characters entered.
[begins with]:
Forwards the document if the Destination, From, or Subject
information begins with the characters entered.
[ends with]:
Forwards the document if the Destination, From, or Subject
information ends with the characters entered.
[contains]:
Forwards the document if the Destination, From, or Subject
information contains the characters entered.
[does not contain]: Forwards the document if the Destination, From, or Subject
information does not contain the characters entered.
❑ Select the forwarding condition ➞ press
[Set.].
Storing Forwarding Settings
4-19
Setting the Send Function
4
❑ Enter the forwarding criteria ➞ press
[OK].
❑ If necessary, repeat this step for the other drop-down list(s).
If you want to change the criteria for the forwarding conditions without changing the
forwarding condition for the Destination, From, and Subject drop-down lists, press
[Set.] next to the criteria you want to change ➞ enter the new criteria ➞ press [OK].
You can enter up to 120 characters for the Destination, and 128 characters for the
From or Subject forwarding criteria.
4
Setting the Send Function
❑ When setting is complete, press [OK].
NOTE
If ‘disregarded’ is selected as the forwarding condition, you cannot enter any
criteria.
4-20
8
Press [Next].
9
Press [Forwarding Destination].
Storing Forwarding Settings
10
Select a destination ➞ press
[OK].
Press the alphanumeric keys (e.g., [ABC])
to display the individual keys for each letter
or number. You can select a letter or
number to restrict the displayed range of
entries. Press [All] to return to the full
address list.
If the desired destination is not displayed,
press [ ] or [ ] to scroll to the desired
destination.
You can restrict the type of destinations
displayed in the results list by pressing the
Type drop-down list.
NOTE
• To view the detailed information of a selected destination, select the destination ➞
press [Details].
• To be able to select a forwarding destination, it is necessary to register destinations in
the Address Book beforehand. (See Chapter 4, “Specifying Destinations Easily and
Quickly,” in the Sending and Facsimile Guide.)
11
Press [File Format].
If any of the following is true, steps 11 and
12 are not necessary:
• A fax number is specified as the
forwarding destination.
• An I-fax address is specified as the
forwarding destination.
• For the imageRUNNER 2545/2535/2530/
2525/2520, the Send function is not
activated with the optional Color Send
Kit-Y1.
Storing Forwarding Settings
4-21
4
Setting the Send Function
You cannot select multiple destinations. To
forward to multiple destinations, select a
group address.
12
Select the file format of the document you want to forward ➞
press [Done].
● If [Fax] is selected as the receive type on step 6:
If you want to separate multiple images and
send them as separate files, each of which
consists of only one page, press [Divide
into Pages].
If you want to send multiple images as a
single file without dividing them, do not
press [Divide into Pages].
File Formats:
[TIFF]: Forwards the file in the TIFF (B&W)
format.
4
Setting the Send Function
[PDF]: Forwards the file in the PDF format
regardless of the color mode.
● If [I-Fax] is selected as the receive type on step 6:
<Divide into Pages>:
When the received document contains two or more pages, they are divided into
separate files, each of which consists of only one page.
When using this option, you can select from the following three file formats:
[PDF (B&W)/JPEG (Color)]: Forwards the file in the PDF (B&W) or JPEG (Color) format.
[TIFF (B&W)/JPEG (Color)]: Forwards the file in the TIFF (B&W) or JPEG (Color) format.
[PDF]: Forwards the file in the PDF format regardless of the color mode.
<Do Not Divide into Pages>
The received document is forwarded without being divided into separate pages.
When using this option, you can select from the following two file formats:
[PDF]: Forwards the file in the PDF format regardless of the color mode.
4-22
Storing Forwarding Settings
[TIFF (B&W)/PDF (Color)]: Forwards the file in the TIFF (B&W) or PDF (Color) format.
NOTE
• Documents are forwarded in the same color mode (B&W or Color) as when they were
received.
• To view a TIFF or JPEG file, a software application that supports the TIFF or JPEG
format (such as Imaging for Windows) is required.
• To view a PDF file, Adobe Reader/Adobe Acrobat Reader is required.
13
Press [OK].
14
Press
(Reset) to return to the top screen.
Setting Forwarding without Conditions
You can store the forwarding destinations of a received document if the forwarding
settings of the received document are not registered, or if the received document
does not match all of the forwarding conditions that you have specified.
NOTE
Forwarding destinations can be stored one at a time, according to the Receive Type of
the received document.
1
Press
(Additional Functions) ➞ [System Settings] ➞
[Forwarding Settings].
For help, see step 1 in “Storing Forwarding Settings,” on p. 4-15.
Storing Forwarding Settings
4-23
Setting the Send Function
4
2
3
4
Press [Forward w/o Cond].
Press the Receive Type
drop-down list ➞ select [Fax] or
[I-Fax].
Setting the Send Function
This step is necessary only when the Send
function (optional for the imageRUNNER
2545/2535/2530/2525/2520) is activated
and the optional Super G3 Fax Board-AG1
is attached to the machine.
4
4-24
Storing Forwarding Settings
Press [Forwarding Destination].
5
Select the forwarding destination
➞ press [OK].
Press the alphanumeric keys (e.g., [ABC])
to display the individual keys for each letter
or number. You can select a letter or
number to restrict the displayed range of
entries. Press [All] to return to the full
address list.
If the desired destination is not displayed,
press [ ] or [ ] to scroll to the desired
destination.
You can restrict the type of destinations
displayed in the results list by pressing the
Type drop-down list.
NOTE
• To view the detailed information of a selected destination, select the destination ➞
press [Details].
• To be able to select a forwarding destination, it is necessary to register destinations in
the Address Book beforehand. (See Chapter 4, “Specifying Destinations Easily and
Quickly,” in the Sending and Facsimile Guide.)
6
Press [File Format].
If any of the following is true, steps 6 and 7
are not necessary:
• A fax number is specified as the
forwarding destination.
• An I-fax address is specified as the
forwarding destination.
• For the imageRUNNER 2545/2535/2530/
2525/2520, the Send function is not
activated with the optional Color Send
Kit-Y1.
Storing Forwarding Settings
4-25
4
Setting the Send Function
You cannot select multiple destinations.
7
Select the file format of the document you want to forward ➞
press [Done].
● If [Fax] is selected as the receive type on step 3:
If you want to separate multiple images and
send them as separate files, each of which
consists of only one page, press [Divide
into Pages].
If you want to send multiple images as a
single file without dividing them, do not
press [Divide into Pages].
File Formats:
[TIFF]: Forwards images in the TIFF format.
Forwards the file in the TIFF (B&W) format.
4
Setting the Send Function
[PDF]: Forwards the file in the PDF format.
Forwards the file in the PDF format
regardless of the color mode.
4-26
Storing Forwarding Settings
● If [I-Fax] is selected as the receive type on step 3:
<Divide into Pages>:
When the received document contains two or more pages, they are divided into
separate files, each of which consists of only one page.
[PDF (B&W)/JPEG (Color)]: Forwards the file in the PDF (B&W) or JPEG (Color) format.
[TIFF (B&W)/JPEG (Color)]: Forwards the file in the TIFF (B&W) or JPEG (Color) format.
[PDF]: Forwards the file in the PDF format regardless of the color mode.
<Do Not Divide into Pages>
The received document is forwarded without being divided into separate pages.
When using this option, you can select from the following two file formats:
[PDF]: Forwards the file in the PDF format regardless of the color mode.
[TIFF (B&W)/PDF (Color)]: Forwards the file in the TIFF (B&W) or PDF (Color) format.
NOTE
• Documents are forwarded in the same color mode (B&W or Color) as when they were
received.
• To view a TIFF file, a software application that supports the TIFF format (such as
Imaging for Windows) is required.
• To view a PDF file, Adobe Reader/Adobe Acrobat Reader is required.
8
Press [OK].
9
Press
(Reset) to return to the top screen.
Storing Forwarding Settings
4-27
Setting the Send Function
4
When using this option, you can select from the following three file formats:
Checking/Changing Forwarding Settings
You can check or change forwarding settings that have been stored.
1
Press
(Additional Functions) ➞ [System Settings] ➞
[Forwarding Settings].
For help, see step 1 in “Storing Forwarding Settings,” on p. 4-15.
2
Select the forwarding setting
whose details you want to check
➞ press [Detail/Edit].
4
Setting the Send Function
If the desired forwarding setting is not
displayed, press [ ] or [ ] to scroll to the
desired forwarding setting.
3
Check or change the forwarding
settings ➞ press [OK].
NOTE
For instructions on changing
forwarding settings, see “Storing
Forwarding Settings,” on p. 4-15.
4
4-28
Press
(Reset) to return to the top screen.
Storing Forwarding Settings
Turning Forwarding ON/OFF
You can set whether received documents are forwarded.
1
Press
(Additional Functions) ➞ [System Settings] ➞
[Forwarding Settings].
For help, see step 1 in “Storing Forwarding Settings,” on p. 4-15.
2
Select the desired forwarding
setting ➞ press [Validate/
Invalidate].
<Off>: The received document is not
forwarded to the specified
destination even if it matches the
forwarding conditions.
If the desired forwarding setting is not displayed, press [
desired forwarding setting.
] or [
] to scroll to the
To cancel forwarding, press [Validate/Invalidate] again.
The selected forwarding setting is enabled.
NOTE
You can set whether to print I-fax/fax documents with forwarding errors, and whether
to store them in memory. (See “Handling Forwarding Documents,” on p. 4-32.)
3
Press
(Reset) to return to the top screen.
Storing Forwarding Settings
4-29
Setting the Send Function
4
<On>: The received document is
forwarded to the specified
destination if it matches the
forwarding conditions.
Erasing Forwarding Settings
You can erase forwarding settings that have been stored.
1
Press
(Additional Functions) ➞ [System Settings] ➞
[Forwarding Settings].
For help, see step 1 in “Storing Forwarding Settings,” on p. 4-15.
2
Select the forwarding setting that
you want to erase ➞ press
[Erase].
4
Setting the Send Function
If the desired forwarding setting is not
displayed, press [ ] or [ ] to scroll to the
desired forwarding setting.
3
Press [Yes].
To cancel erasing the forwarding setting,
press [No].
The selected forwarding setting is erased.
4
4-30
Press
(Reset) to return to the top screen.
Storing Forwarding Settings
Printing Forwarding Settings
You can print a list of the stored forwarding settings.
1
Press
(Additional Functions) ➞ [System Settings] ➞
[Forwarding Settings].
For help, see step 1 in “Storing Forwarding Settings,” on p. 4-15.
2
Press [Print List].
3
Press [Yes].
To cancel printing, press [No].
The forwarding settings are printed.
4
Press
(Reset) to return to the top screen.
Storing Forwarding Settings
4-31
4
Setting the Send Function
NOTE
The forwarding settings can be printed
only if A3, A4, or A4R (plain or
recycled paper) is loaded in the paper
sources whose settings in Other in
Drawer Eligibility For APS/ADS in
Common Settings (from the Additional
Functions screen) are set to ‘On’. (See
Chapter 3, “Configuring the Machine’s
Basic Settings,” in the Reference
Guide.)
Handling Forwarding Documents
You can set how the machine handles the documents to be forwarded.
IMPORTANT
This setting is available only when the Send function (optional for the imageRUNNER
2545/2535/2530/2525/2520) is activated or the optional Super G3 Fax Board-AG1 is
attached to the machine.
NOTE
• The default settings are as follows:
- Print Image: On
- Store Image to Memory: Do Not Store
• When Print Image and Memory Lock are set to ‘Off’ and Store Image to Memory is set
to ‘Do Not Store’, the received documents will be lost if a forwarding error occurs.
• If Memory Lock is set to ‘On’, forwarded documents or those with forwarding errors are
not printed even if Print Image is set to ‘On’ or ‘For Error Only’. They are printed when
Memory Lock is set to ‘Off’.
• When Print Image is set to ‘On’ or ‘For Error Only’, the first page of a document with
forwarding errors will be printed on the Error TX Report if it is set to be printed with
image in Report Settings, even if Memory Lock is set to ‘On’. For instructions on
Report Settings, see Chapter 8, “Printing Communication Reports and Lists,” in the
Sending and Facsimile Guide.
Setting the Send Function
4
1
4-32
Handling Forwarding Documents
Press
(Additional Functions)
➞ [System Settings].
2
3
Press [ ] or [ ] until [Store/
Print When Forwarding] appears
➞ press [Store/Print When
Forwarding].
Press [Print Image].
4
Press [On], [For Error Only], or
[Off] ➞ [OK].
[On]: Print all the images that has been
forwarded.
[For Error Only]: Prints the image only when
forwarding has failed.
[Off]: Does not print the image.
5
Press [Store Image to Memory].
Handling Forwarding Documents
4-33
Setting the Send Function
4
6
Press [For Error Only] or [Do Not
Store] ➞ [OK].
[For Error Only]: Stores the image in
memory if forwarding fails.
[Do Not Store]: Does not store the image.
NOTE
If you set Store Image to Memory to ‘For Error Only’, you can redirect the jobs with
forwarding errors to destinations registered in the Address Book or one-touch buttons
from the I-FAX Forwarding Error Status screen or Fax Forwarding Error Status screen.
For help, see Chapter 6, “Checking/Changing the Status of Documents in Memory” in
the Sending and Facsimile Guide.
Setting the Send Function
4
7
4-34
Press
(Reset) to return to the top screen.
Handling Forwarding Documents
Restricting the Send Function
This section describes the setting items that restrict the Send function.
Setting a Password for the Address Book
You can set a password for the Address Book. If a password is set, restrictions can
be placed on registering, editing, and erasing destinations.
NOTE
• It is not necessary to enter the Address Book password when you have logged in to
the machine by entering the System Manager ID and System Password.
• You can enter up to seven digits for the password.
1
Press
(Additional Functions)
➞ [System Settings].
Restricting the Send Function
4-35
4
Setting the Send Function
IMPORTANT
This setting is available only when the Send function (optional for the imageRUNNER
2545/2535/2530/2525/2520) is activated or the optional Super G3 Fax Board-AG1 is
attached to the machine.
2
Press [ ] or [ ] until [Restrict
the Send Function] appears ➞
press [Restrict the Send
Function].
3
Press [Address Book Password].
Setting the Send Function
4
4
Enter the desired password
using
(numeric keys) ➞
press [OK].
If you set a password, it is necessary to
enter the password whenever you want to
change Address Book settings, including
the one-touch buttons.
You cannot store a password that only
consists of zeros, such as <0000000>.
If you enter fewer than seven digits, the
machine stores the password with leading
zeros.
Example: If <02> or <002> is entered,
<0000002> is stored.
IMPORTANT
Since there is no way to check the stored password, be sure to write it down, and keep
it in a safe place.
4-36
Restricting the Send Function
NOTE
• If you make a mistake when entering the password, press
(Clear) ➞ enter the
correct password.
• If you do not want to use the Address Book password, delete the registered password
by pressing
(Clear) ➞ [OK].
5
Press
(Reset) to return to the top screen.
Restricting New Addresses
This mode enables you to restrict the entry of new destinations. When you set
Restrict New Addresses to ‘On’, the following are restricted:
- Specifying a destination using the numeric keys.
- Registering new destinations.
IMPORTANT
• This setting is available only when the Send function (optional for the imageRUNNER
2545/2535/2530/2525/2520) is activated or the optional Super G3 Fax Board-AG1 is
attached to the machine.
• If Restrict New Addresses is set to ‘On’, all stored settings in the Recall mode are
erased.
NOTE
The default setting is ‘Off’.
1
Press
(Additional Functions) ➞ [System Settings].
For help, see step 1 in “Setting a Password for the Address Book,” on p. 4-35.
2
Press [ ] or [ ] until [Restrict the Send Function] appears ➞
press [Restrict the Send Function].
For help, see step 2 in “Setting a Password for the Address Book,” on p. 4-35.
Restricting the Send Function
4-37
Setting the Send Function
4
- Changing registered destinations.
3
Press [Restrict New Addresses].
4
Press [On] or [Off] ➞ [OK].
[On]: You cannot specify new destinations.
[Off]: You can specify new destinations.
Setting the Send Function
4
5
Press
(Reset) to return to the top screen.
Enabling Fax Transmission via the Fax Driver
This mode enables you to send faxes via the fax driver.
IMPORTANT
This setting is available only when the optional Super G3 Fax Board-AG1 is attached
to the machine.
NOTE
The default setting is ‘On’.
1
Press
(Additional Functions) ➞ [System Settings].
For help, see step 1 in “Setting a Password for the Address Book,” on p. 4-35.
4-38
Restricting the Send Function
2
Press [ ] or [ ] until [Restrict the Send Function] appears ➞
press [Restrict the Send Function].
For help, see step 2 in “Setting a Password for the Address Book,” on p. 4-35.
3
Press [Allow Fax Driver TX].
4
Press [On] or [Off] ➞ [OK].
[On]: The machine can send documents
via the fax driver.
[Off]: The machine cannot send documents
via the fax driver.
5
Press
(Reset) to return to the top screen.
Restricting the Send Function
4-39
Setting the Send Function
4
Restricting Recall
This mode enables you to restrict the use of the Recall function.
IMPORTANT
This setting is available only when the Send function (optional for the imageRUNNER
2545/2535/2530/2525/2520) is activated or the optional Super G3 Fax Board-AG1 is
attached to the machine.
NOTE
The default setting is ‘Off’.
1
4
Press
(Additional Functions) ➞ [System Settings].
Setting the Send Function
For help, see step 1 in “Setting a Password for the Address Book,” on p. 4-35.
2
Press [ ] or [ ] until [Restrict the Send Function] appears ➞
press [Restrict the Send Function].
For help, see step 2 in “Setting a Password for the Address Book,” on p. 4-35.
3
Press [Restrict Recall].
4
Press [On] or [Off] ➞ [OK].
[On]: You cannot use the Recall function.
[Off]: You can use the Recall function.
4-40
Restricting the Send Function
5
Press
(Reset) to return to the top screen.
Entering a Fax Number Twice to Confirm It
This mode helps to prevent you from sending documents to the wrong destination
(numeric keys). If you set this mode
when specifying the fax number using
to ‘On,’ you will be asked to enter the fax number again after pressing
(Start).
IMPORTANT
This setting is available only when the optional Super G3 Fax Board-AG1 is attached
to the machine.
NOTE
The default setting is ‘Off’.
1
Press
Setting the Send Function
4
(Additional Functions) ➞ [System Settings].
For help, see step 1 in “Setting a Password for the Address Book,” on p. 4-35.
2
Press [ ] or [ ] until [Restrict the Send Function] appears ➞
press [Restrict the Send Function].
For help, see step 2 in “Setting a Password for the Address Book,” on p. 4-35.
3
Press [ ] or [ ] until [Confirm
Entered Fax Numbers] appears
➞ press [Confirm Entered Fax
Numbers].
Restricting the Send Function
4-41
4
Press [On] or [Off] ➞ [OK].
[On]: The confirmation screen appears
when you enter a fax number using
(numeric keys).
[Off]: The confirmation screen does not
appear.
5
(Reset) to return to the top screen.
Restricting Sequential Broadcast
Setting the Send Function
4
Press
This mode enables you to restrict sending to multiple destinations when one or
more fax numbers are included (except for those registered in a group address).
IMPORTANT
This setting is available only when the optional Super G3 Fax Board-AG1 is attached
to the machine.
NOTE
The default setting is ‘Off’.
1
Press
(Additional Functions) ➞ [System Settings].
For help, see step 1 in “Setting a Password for the Address Book,” on p. 4-35.
2
Press [ ] or [ ] until [Restrict the Send Function] appears ➞
press [Restrict the Send Function].
For help, see step 2 in “Setting a Password for the Address Book,” on p. 4-35.
4-42
Restricting the Send Function
3
Press [ ] or [ ] until [Restrict
Sequential Broadcast] appears ➞
press [Restrict Sequential
Broadcast].
Press [Broadcast Confirmation],
[Prohibit Broadcast], or [Off] ➞
[OK].
[Broadcast Confirmation]: A confirmation
message appears if you try to send
documents with sequential broadcasting.
[Prohibit Broadcast]: You cannot send
documents with sequential broadcasting.
[Off]: Sending documents with sequential
broadcasting is not restricted.
5
Press
(Reset) to return to the top screen.
Restricting Sending Documents to a USB Memory Media
Device
This mode enables you to restrict sending documents to a USB memory media
device.
NOTE
The default setting is ‘Off’.
1
Press
(Additional Functions) ➞ [System Settings].
For help, see step 1 in “Setting a Password for the Address Book,” on p. 4-35.
Restricting the Send Function
4-43
4
Setting the Send Function
4
2
Press [ ] or [ ] until [Memory
Media Settings] appears ➞ press
[Memory Media Settings].
3
Press [Use Scan to Memory
Media].
Setting the Send Function
4
4
Press [On] or [Off] ➞ [OK].
[On]: You can send documents to a USB
memory media device.
[Off]: You cannot send documents to a USB
memory media device.
5
Restart the machine.
Turn OFF the machine, wait at least 10 seconds, and then turn it ON.
4-44
Restricting the Send Function
Setting up Computers to Use Print
and Send Functions
5
CHAPTER
This chapter provides instructions on how to set up a computer for printing and sending faxes,
and how to set up a file server to receive documents sent from the machine.
Setting up a Computer for Printing/Sending a Fax . . . . . . . . . . . . . . . . . . . . . . . . . . . . . . 5-2
Printer Connection Method (LPD/Raw) . . . . . . . . . . . . . . . . . . . . . . . . . . . . . . . . . . . . . . . . . . . .5-3
Setting File Server (FTP) . . . . . . . . . . . . . . . . . . . . . . . . . . . . . . . . . . . . . . . . . . . . . . . . . 5-7
Windows 2000/XP/Vista/7/Server 2003/Server 2008 . . . . . . . . . . . . . . . . . . . . . . . . . . . . . . . . . .5-8
UNIX/Linux . . . . . . . . . . . . . . . . . . . . . . . . . . . . . . . . . . . . . . . . . . . . . . . . . . . . . . . . . . . . . . . . .5-12
Mac OS X . . . . . . . . . . . . . . . . . . . . . . . . . . . . . . . . . . . . . . . . . . . . . . . . . . . . . . . . . . . . . . . . . .5-14
FTP Server for iW Gateway . . . . . . . . . . . . . . . . . . . . . . . . . . . . . . . . . . . . . . . . . . . . . . . . . . . . .5-16
Setting File Server (File Sharing) . . . . . . . . . . . . . . . . . . . . . . . . . . . . . . . . . . . . . . . . . . 5-18
Confirming Computer Name and Necessary Components for File Sharing
(Windows 2000/XP/Vista/7/Server 2003/Server 2008) . . . . . . . . . . . . . . . . . . . . . . . . . . . . . . . .5-19
Setting Shared Folder. . . . . . . . . . . . . . . . . . . . . . . . . . . . . . . . . . . . . . . . . . . . . . . . . . . . . . . . .5-22
Specifying Destinations . . . . . . . . . . . . . . . . . . . . . . . . . . . . . . . . . . . . . . . . . . . . . . . . . . . . . . .5-36
5-1
Setting up a Computer for Printing/Sending a Fax
After you have completed the protocol settings for printing and sending a fax with
the machine, you are ready to set up each of the computers for printing or sending
a fax.
■ Connecting to a TCP/IP Network
All computers that use the machine must have TCP/IP client software installed
and must be enabled for TCP/IP network use. For details, see the documentation
provided with the operating system.
■ Installing the Driver and Specifying the Port Setting
To print or send a fax from a computer, you must install a driver and specify a
port setting. The port setting differs depending on the application protocols used
for printing or sending a fax. Use the information below as a guide to determine
the application protocol you are using, and then perform the necessary
operations.
Setting up Computers to Use Print and Send Functions
5
• LPD
- LPD is a printing protocol generally used with TCP/IP.
See “Printer Connection Method (LPD/Raw),” on p. 5-3.
• Raw
- Raw is a printing protocol used with Windows 2000/XP/Vista/7/Server 2003/
Server 2008. It can print at higher speeds than LPD.
See “Printer Connection Method (LPD/Raw),” on p. 5-3.
• WSD
- WSD is a protocol used with Windows Vista/7/Server 2008.
IMPORTANT
• Sending faxes from a computer is available only when the optional Super G3 Fax
Board-AG1 is attached to the machine.
• To print or send a fax from a computer, you must be able to access the machine from
the computer. Make sure that the IP Address Range Settings and Receiving MAC
Address settings in TCP/IP Settings in Network Settings located in System Settings
are set not to deny access from the computer. (See “Restricting Access from
Computers on the Network,” on p. 6-21.)
5-2
Setting up a Computer for Printing/Sending a Fax
NOTE
If Windows 2000/XP/Vista/7/Server 2003/Server 2008 or Mac OS X (10.4.9 or later) is
on your network, you can set up a print server for more efficient management of
network printers. Once a print server is set up, it can manage the print jobs. Also, by
setting up a driver for the print server, the printer driver can be installed in each
computer via the network.
Printer Connection Method (LPD/Raw)
The procedure described in this section is for specifying the port setting.
NOTE
If you are using Windows Vista, a dialog box may be displayed while you are
performing the procedure. In this case, enter a user name and password. For more
information, see the manuals provided with the operating system.
Installing a New Driver
• If you want to use the UFRII LT/PCL/PS printer driver:
See the installation procedures in the Printer Driver Installation Guide. (See
Chapter 3, “Accompanying CD-ROMs,” in the User’s Guide.)
• If you want to use the fax driver:
See the installation procedures in the Fax Driver Installation Guide. (See Chapter
3, “Accompanying CD-ROMs,” in the User’s Guide.)
NOTE
On Windows, the default printing protocol will be Raw if the driver has been installed
according to the Printer Driver Installation Guide. If you wish to use LPD as the
printing protocol, change the settings after the driver is installed. For details, see
“Changing the Port after Installing the Driver,” on p. 5-3.
Changing the Port after Installing the Driver
NOTE
For Macintosh, change the network configurations of your printer in the [Print & Fax]
setting in [System Preferences]. See the Mac Printer Driver Installation Guide.
1
Open the printer properties dialog box.
● For Windows 2000
❑ Click on the [Start] menu ➞ point to [Settings] ➞ click [Printers].
Setting up a Computer for Printing/Sending a Fax
5-3
5
Setting up Computers to Use Print and Send Functions
Install the driver according to the procedures indicated below, found in the manual
for each driver. For Macintosh, see the Mac Printer Driver Installation Guide.
● For Windows XP Professional/Server 2003
❑ Click on the [Start] menu ➞ [Printers and Faxes].
● Windows XP Home Edition
❑ Click on the [Start] menu ➞ point to [Control Panel] ➞ [Printers and Other Hardware]
➞ click [Printers and Faxes].
● Windows Vista/Server 2008
❑ Click on the [Start] menu ➞ [Control Panel] ➞ [Hardware and Sound] ➞ [Printers].
● Windows 7/Server 2008 R2
❑ Click on the [Start] menu ➞ [Devices and Printers].
2
Setting up Computers to Use Print and Send Functions
5
3
Right-click the icon of the printer you installed ➞ click [Printer
properties] ([Properties] for Windows 2000/XP/Vista/Server 2003/
Server 2008).
Click the [Ports] tab to display the [Ports] sheet.
For Windows 7
4
5-4
Click [Add Port] to open the [Printer Ports] dialog box.
Setting up a Computer for Printing/Sending a Fax
5
From [Available ports types], select [Standard TCP/IP Port] ➞ click
[New Port].
The Add Standard TCP/IP Printer Port Wizard starts.
6
7
Click [Next].
In [Printer Name or IP Address], enter the printer IP address or
printer host name ➞ click [Next].
For Windows 7
8
After the computer has confirmed that there is a printer to which
the entered IP address is assigned, the [Completing the Add
Standard TCP/IP Printer Port Wizard] window appears ➞ click
[Finish].
If the dialog box displays <Additional Port Information Required>, follow the
instructions on the screen to search again, or click [Standard] ➞ click [Canon Network
Printing Device with P9100] under [Device type] ➞ click [Next] to exit the Wizard.
Setting up a Computer for Printing/Sending a Fax
5-5
Setting up Computers to Use Print and Send Functions
5
9
Click [Close] to close the [Printer Ports] dialog box.
● If you want to use LPD:
❑ Proceed to step 10.
● If you want to use Raw:
❑ Proceed to step 11.
10
If you want to use LPD, change the port configuration information.
❑ In the printer properties dialog box, click [Configure Port].
❑ Click [LPR] under [Protocol] ➞ enter a print queue name in [Queue Name] under
[LPR Settings] ➞ click [OK].
For Windows 7
Setting up Computers to Use Print and Send Functions
5
The machine prints according to its spool settings.
11
5-6
Click [OK].
Setting up a Computer for Printing/Sending a Fax
Setting File Server (FTP)
To send data from the machine to a computer on your network, you need to specify
the settings of the computer that receives the data.
This section describes how to set up a computer as an FTP server.
NOTE
You can also send data over a TCP/IP network to a:
- Windows shared folder (Windows 2000/XP/Vista/7/Server 2003/Server 2008)
- Samba shared folder (UNIX/Linux)
- Mac OS X shared folder
For more information, see “Setting File Server (File Sharing),” on p. 5-18.
Setting File Server (FTP)
5-7
5
Setting up Computers to Use Print and Send Functions
IMPORTANT
• To send data to an FTP server with the imageRUNNER 2545/2535/2530/2525/2520,
the Send function must be activated with the optional Color Send Kit-Y1.
• Samba 2.2.8a or later is supported.
• To send data from the machine to a server on the network, you must enter an address
setting from the control panel. For instructions on how to specify recipient address
settings, see Chapter 2, “Sending Documents,” in the Sending and Facsimile Guide.
• Depending on the network environment you are using, you may need to enable the
PASV mode to send scanned documents to an FTP server. For details on how to set
up the PASV mode, see “Setting PASV Mode for FTP,” on p. 3-16. Consult your
network administrator on whether the PASV mode is required or not.
• To send scanned documents to an iW Document Manager folder, you need to enable
the FTP extension. For details on how to set it up, see “Setting FTP Extension,” on
p. 3-18.
• The procedure described in this section is for a sample FTP server setup. Depending
on your environment, the actual setup procedure may differ.
Windows 2000/XP/Vista/7/Server 2003/Server 2008
IMPORTANT
• It is recommended that the FTP server be configured by the network administrator.
• To use a Windows machine as an FTP server, it is necessary to install the IIS versions
listed below. If IIS is not installed in the computer you are using, you will need to install
IIS before entering these settings. For installation procedures, see the documentation
provided with your operating system.
- Windows 2000 Server: Microsoft Internet Information Services 5.0 (IIS 5.0)
- Windows XP Professional: Microsoft Internet Information Services 5.1 (IIS 5.1)
- Windows Server 2003: Microsoft Internet Information Services 6.0 (IIS 6.0)
- Windows Vista/Server 2008: Microsoft Internet Information Services 7.0 (IIS 7.0)
- Windows 7/Server 2008 R2: Microsoft Internet Information Services 7.5 (IIS 7.5)
• Windows XP Home Edition, Windows Vista Starter Edition, Windows Vista Home
Basic, Windows Vista Home Premium, Windows 7 Starter Edition, Windows 7 Home
Basic, and Windows Vista Home Premium cannot be used as an FTP server.
• User authentication for access to FTP servers is done by referencing the local account
database Windows 2000/XP/Vista/7/Server 2003/Server 2008 that is used as the FTP
server. Therefore, it is not possible to use the account of a domain user registered in
Windows 2000/XP/Vista/7/Server 2003/Server 2008 to send data directly from the
machine to FTP servers in other domains.
• This section describes the procedures for using the default home directory under
[Default FTP Site] (for Windows 2000/XP/Vista/Server 2003/Server 2008 only). To use
other settings, enter the FTP site and home directory by referring to the
documentation for IIS.
• IIS 7.5 does not come with [Default FTP Site]. To set up an FTP Server using IIS 7.5,
refer to the documentation for IIS.
Setting up Computers to Use Print and Send Functions
5
NOTE
• If the [User Account Control] dialog box appears during the procedure in Windows
Vista/Server 2008, click [Continue].
• If the [User Account Control] dialog box appears during the procedure in Windows 7/
Server 2008 R2, click [Yes].
1
Log on to Windows as a member of the group with access rights
to the directory to be designated as the FTP site directory.
NOTE
Depending on your environment, the access rights settings for a drive or directory may
differ. For details, see the Windows documentation.
5-8
Setting File Server (FTP)
2
Start IIS.
● If you are using Windows 2000:
❑ Click [Start] on the Windows taskbar ➞ point to [Programs] ➞ point to
[Administrative Tools] ➞ click [Internet Service Manager].
● If you are using Windows XP:
❑ Click [Start] on the Windows taskbar ➞ click [Control Panel].
❑ Click [Performance and Maintenance] ➞ [Administrative Tools] ➞ [Internet
Information Services].
● If you are using Windows Vista:
❑ Click [Start] on the Windows taskbar ➞ right-click [Computer] ➞ click [Manage].
❑ Double-click [Services and Applications].
❑ Double-click [Internet Information Services (IIS) 6.0 Manager].
● If you are using Windows Server 2003/Server 2008:
[Internet Information Services Manager] ([Internet Information Services (IIS) 6.0
Manager] for Windows Server 2008).
3
Enter the FTP site settings.
● If you are using Windows 2000:
❑ Right-click the [Default FTP Site] icon ➞ click [Properties].
❑ In the [Default FTP Site Properties] dialog box, click the [Security Accounts] tab to
display the [Security Accounts] sheet.
❑ Deselect [Allow Anonymous Connections].
❑ Click the [Home Directory] tab to display the [Home Directory] sheet ➞ select both
[Read] and [Write] under [FTP Site Directory].
❑ Click [OK] to close the [Default FTP Site Properties] dialog box.
● If you are using Windows XP/Vista/Server 2003/Server 2008:
❑ Double-click the [FTP Sites] icon ➞ right-click the [Default FTP Site] icon ➞ click
[Properties].
❑ In the [Default FTP Site Properties] dialog box, click the [Security Accounts] tab to
display the [Security Accounts] sheet.
❑ Deselect [Allow only anonymous connection].
❑ Click the [Home Directory] tab to display the [Home Directory] sheet ➞ select both
[Read] and [Write].
❑ Click [OK] to close the [Default FTP Site Properties] dialog box.
Setting File Server (FTP)
5-9
Setting up Computers to Use Print and Send Functions
5
❑ Click [Start] on the Windows taskbar ➞ point to [Administrative Tools] ➞ click
4
Confirm [Full computer name].
● If you are using Windows 2000:
❑ Right-click the [My Computer] icon on the desktop ➞ click [Properties].
❑ Click the [Network Identification] tab to display the [Network Identification] sheet ➞
confirm [Full computer name].
❑ Click [Cancel] to close the [System Properties] dialog box.
● If you are using Windows XP/Server 2003:
❑ Click [Start] on the Windows taskbar ➞ right-click [My Computer] ➞ click
[Properties].
❑ Click the [Computer Name] tab to display the [Computer Name] sheet ➞ confirm
[Full computer name].
❑ Click [Cancel] to close the dialog box.
5
❑ Click [Start] on the Windows taskbar ➞ right-click [Computer] ➞ click [Properties] ➞
Setting up Computers to Use Print and Send Functions
● If you are using Windows Vista/7/Server 2008:
❑ Close the [System] window.
confirm [Full computer name].
5
Set up the users and passwords for access to the FTP server.
❑ For Windows 2000, right-click the [My Computer] icon on the desktop ➞click
[Manage].
For Windows XP/Server 2003, click [Start] on the Windows taskbar ➞ right-click [My
Computer] ➞ click [Manage].
For Windows Vista/7/Server 2008, click [Start] on the Windows taskbar ➞ right-click
[Computer] ➞ click [Manage].
❑ Under [System Tools] ([Configuration] for Windows Server 2008), double-click [Local
Users and Groups] ➞ right-click the [Users] folder ➞ click [New User].
5-10
Setting File Server (FTP)
❑ In the [New User] dialog box, enter the user name in [User name] ➞ enter the
password in [Password] ➞ re-enter the password in [Confirm password].
For Windows 7
Enter a user name not longer than 20
alphanumeric characters, and a password
not longer than 24 (14 for Windows 2000)
alphanumeric characters.
❑ Deselect [User must change password at
next logon].
❑ Select [Password never expires].
❑ Confirm the settings ➞ click [Create].
❑ Click [Close] to close the [New User]
dialog box.
❑ Close the [Computer Management]
window.
5
Set a destination address using the machine’s control panel.
Setting up Computers to Use Print and Send Functions
6
Sample destination setting:
• Server side settings:
[Full Computer Name]: starfish.organization.company.com
Create a directory named “share” in the specified FTP server’s home directory
“\Inetpub\ftproot”, and then set “share” as the data destination.
• The machine’s destination settings:
The Protocol drop-down list: FTP
[Host Name]: starfish.organization.company.com
[File Path]: share
[User]: User name entered in step 5
[Password]: Password for the above user
Setting File Server (FTP)
5-11
IMPORTANT
• To use [Full computer name], which was confirmed in step 4, as the host name for
[Host Name] as shown in the above example, it is necessary to use a DNS server.
(This applies even if the machine and the FTP server are in the same subnet.) If no
DNS server is available, the host name setting should be specified using the IP
address of the FTP server.
• Up to 47 alphanumeric characters can be entered for [Host Name] and 120 characters
for [File Path] on the touch panel display.
• If you switch the language of the touch panel display, [Host Name] and [File Path] may
not be displayed correctly.
NOTE
For instructions on how to specify recipient address settings, see Chapter 2, “Sending
Documents,” in the Sending and Facsimile Guide.
UNIX/Linux
IMPORTANT
• UNlX users must have Solaris 2.6 or later installed in order to use the computer as an
FTP server. Linux users must have Red Hat Linux 7.2 or later installed in order to use
the computer as an FTP server.
• In some environments, detailed settings may be required in order to use FTP. For
details, consult your network administrator.
Setting up Computers to Use Print and Send Functions
5
1
2
Log in to a workstation as a superuser.
Set up the users who send documents from the machine, and their
passwords.
Enter a user name and a password not longer than 24 alphanumeric characters.
3
5-12
Create a shared directory to be used for recipient addresses, and
then enable read access and write access by the users who will be
sending data.
Setting File Server (FTP)
Set a destination address using the machine’s control panel.
Sample destination setting:
• Server side settings:
[Host Name]:
starfish
[Domain]:
organization.company.com
The user’s home directory is /home/hsato, and /home/hsato/share is the data
destination.
• The machine’s destination settings:
5
The Protocol drop-down list:FTP
[Host Name]:
starfish.organization.company.com
[File Path]:
Enter one of the following:
share (when using relative path) /home/hsato/share
(when using absolute path)
[User]:
User name entered in step 2
[Password]:
Password for the above user
IMPORTANT
• To use [Full computer name], which was confirmed in step 4, as the host name for
[Host Name] as shown in the above example, it is necessary to use a DNS server.
(This applies even if the machine and the FTP server are in the same subnet.) If no
DNS server is available, the host name setting should be specified using the IP
address of the FTP server.
• Up to 47 alphanumeric characters can be entered for [Host Name] and 120 characters
for [File Path] on the touch panel display.
• If you switch the language of the touch panel display, [Host Name] and [File Path] may
not be displayed correctly.
NOTE
For instructions on how to specify destination address settings, see Chapter 2,
“Sending Documents,” in the Sending and Facsimile Guide.
Setting File Server (FTP)
5-13
Setting up Computers to Use Print and Send Functions
4
Mac OS X
NOTE
The following procedures are based on Mac OS X version 10.5. The procedures may
differ depending on the versions of Mac OS X you are using.
1
Log in to Mac OS X as Administrator.
2
Start the FTP services under Mac OS X.
❑
❑
❑
❑
❑
Setting up Computers to Use Print and Send Functions
5
3
Click the Apple icon in the top left of the screen ➞ [System Preferences].
Click the [Sharing] icon in the [System Preferences] window.
Select [File Sharing] ➞ click [Options].
Select [Share files and folders using FTP] ➞ click [Done].
Click [Show All] on the toolbar.
Specify the user to whom you want to send documents, and then
the password.
❑
❑
❑
❑
❑
Click the [Accounts] icon in the [System Preferences] window.
Click [+] to create a new account.
Enter a user name, and a password not longer than 24 alphanumeric characters.
Click [Create Account].
Close the [Accounts] window.
4
Create a shared folder to which files are to be sent.
5
Grant access to the shared folder.
❑ Click to select the shared folder created in step 4 ➞ select [Show Info] from the [File]
menu.
❑ In the [<folder name> Info] window, select [Shared Folder] under [General].
❑ Click the lock icon at the bottom of the window to make changes in [Sharing &
Permissions].
❑ Enter your system password in the password prompt dialog box ➞ click [OK].
❑ Click [+] ➞ select the account created in step 3 from the list displayed in [Select New
User or Group] ➞ click [Select].
❑ Set the permissions for the user.
5-14
Setting File Server (FTP)
NOTE
To send files to the shared folder, it is necessary to enable write access for the user.
❑ Close the [<folder name> Info] window.
Set a destination address using the machine’s control panel.
Sample destination setting:
• Server side settings (set using the above procedure):
Create a folder named “share” in the [Public] folder in the [Home] folder of the user
named “yoko,” and then specify “share” as the folder to which files are sent.
• The machine’s destination settings:
5
The Protocol drop-down list: FTP
[Host Name]:
IP address of Macintosh
[File Path]:
Enter an absolute path to a folder to which files are
sent:
/Users/yoko/Public/share
[User]:
User name entered in step 3
[Password]:
Password for the above user
IMPORTANT
Up to 120 alphanumeric characters can be entered for [File Path] on the touch panel
display.
NOTE
For instructions on how to specify recipient address settings, see Chapter 2, “Sending
Documents,” in the Sending and Facsimile Guide.
Setting File Server (FTP)
5-15
Setting up Computers to Use Print and Send Functions
6
FTP Server for iW Gateway
NOTE
An FTP server for iW Gateway is required for receiving data from the machine.
1
Set up the FTP server for iW Gateway.
For details about the settings, see the iW Gateway User’s Guide.
2
On the FTP server for iW Gateway, specify the folder to store data
sent from the machine.
For details about the settings, see the iW Gateway User’s Guide.
NOTE
• Up to 128 alphanumeric characters can be entered for a folder name.
• Enter a user name and a password not longer than 24 alphanumeric characters.
Setting up Computers to Use Print and Send Functions
5
3
On the FTP server for iW Gateway, export destination data.
For details about the settings, see the iW Gateway User’s Guide.
IMPORTANT
• A DNS server is needed to use an FQDN format (for example, starfish.organization.
company.com) for the FTP server address. (A DNS server is also required if the
machine and the FTP server are in the same subnet.) If you have not set up a DNS
server, use IP addresses.
• Up to 128 alphanumeric characters can be entered for an FTP server address using
FQDN format.
5-16
Setting File Server (FTP)
Use the Remote UI of the machine to import the destination data
exported in step 3 into the machine.
❑
❑
❑
❑
❑
Click [Add. Func.] of the Remote UI ➞ click [Import/Export].
Click [Address Book].
Click [Import].
Click [Browse] ➞ select the file to import.
Click [OK].
IMPORTANT
If you switch the language of the touch panel display, [Host Name] and [File Path]
may not be displayed correctly.
NOTE
For instructions on how to specify recipient address settings, see Chapter 2,
“Sending Documents,” in the Sending and Facsimile Guide.
5
Setting up Computers to Use Print and Send Functions
4
Setting File Server (FTP)
5-17
Setting File Server (File Sharing)
To send data from the machine to a computer on your network, you need to specify
the settings of the computer that receives the data.
This section describes how to configure a shared folder.
IMPORTANT
• It is recommended that the network administrator configure the file server.
• To send data from the machine to a server on the network, you must enter an address
setting from the control panel. For instructions on how to specify recipient address
settings, see Chapter 2, “Sending Documents,” in the Sending and Facsimile Guide.
• To send scanned documents to a Windows shared folder, you need to set up the send
files function of the machine. For more information, see “Setting up the Send Files
Function of the Machine (SMB Settings),” on p. 3-49.
• The procedure in this section describes how to configure a sample shared folder.
Depending on your environment, the actual configuration procedure may differ.
• To send data to a shared folder with the imageRUNNER 2545/2535/2530/2525/2520,
the Send function must be activated with the optional Color Send Kit-Y1.
• IPv6 is not supported.
Setting up Computers to Use Print and Send Functions
5
NOTE
• You can also send data to an FTP server over a TCP/IP network. For more
information, see “Setting File Server (FTP),” on p. 5-7.
• If the [User Account Control] dialog box appears during the procedure in Windows
Vista/Server 2008, click [Continue].
• If the [User Account Control] dialog box appears during the procedure in Windows 7/
Server 2008 R2, click [Yes].
5-18
Setting File Server (File Sharing)
Confirming Computer Name and Necessary Components
for File Sharing
(Windows 2000/XP/Vista/7/Server 2003/Server 2008)
NOTE
The number of users or clients that can access a server running Windows 2000/XP/
Vista/7/Server 2003/Server 2008 is limited. After this number of users or clients is
reached, it is not possible to send to a server running Windows 2000/XP/Vista/7/
Server 2003/Server 2008.
1
Log on to Windows with administrator privileges.
2
Confirm the computer name.
❑ Right-click the [My Computer] icon on the desktop ➞ click [Manage] to open the
[Computer Management] dialog box.
❑ Right-click the [Computer Management (Local)] icon ➞ click [Properties].
❑ Click the [Network Identification] tab to display the [Network Identification] sheet ➞
confirm the [Computer name] setting.
❑ Click [Cancel] repeatedly to close all the dialog boxes.
● If you are using Windows XP/Server 2003:
❑
❑
❑
❑
Click [Start] on the Windows taskbar, right-click [My Computer] ➞ click [Properties].
Click the [Computer Name] tab to display the [Computer Name] sheet.
Click [Change] ➞ [More] in the [Computer Name Changes] dialog box.
In the [Computer Name Changes] dialog box, confirm the computer name in the
[Computer name] box.
❑ Click [Cancel] repeatedly to close all the dialog boxes.
● If you are using Windows Vista/7/Server 2008:
❑ Click [Start] on the Windows taskbar, right-click [Computer] ➞ select [Properties].
❑ In the [System] window, confirm the computer name.
❑ Close the [System] window.
Setting File Server (File Sharing)
5-19
Setting up Computers to Use Print and Send Functions
5
● If you are using Windows 2000:
3
Confirm the necessary components for file sharing.
● If you are using Windows 2000:
❑ Right-click the [My Network Places] icon on the desktop ➞ select [Properties] to
open the [Network and Dialup Connections] dialog box.
❑ Right-click the [Local Area Connection] icon ➞ select [Properties].
❑ Make sure that all the check boxes below are selected. If any of the boxes are not
selected, select them.
• [Client for Microsoft Networks]
• [File and Printer Sharing for Microsoft Networks]
• [Internet Protocol (TCP/IP)]
❑ Close all the dialog boxes.
● If you are using Windows XP:
❑ Click [Start] on the Windows taskbar, right-click [My Network Places] ➞ select
[Properties].
❑ Right-click [Local Area Connection] ➞ select [Properties].
❑ Make sure that all the check boxes below are selected. If any of the boxes are not
Setting up Computers to Use Print and Send Functions
5
selected, select them.
• [Client for Microsoft Networks]
• [File and Printer Sharing for Microsoft Networks]
• [Internet Protocol (TCP/IP)]
❑ Close all the dialog boxes.
● If you are using Windows Vista/Server 2008:
❑
❑
❑
❑
Click [Start] on the Windows taskbar, right-click [Network] ➞ select [Properties].
Click [Manage network connections].
Right-click [Local Area Connection] ➞ select [Properties].
Make sure that all the check boxes below are selected. If any of the boxes is not
selected, select it.
• [Client for Microsoft Networks]
• [File and Printer Sharing for Microsoft Networks]
• [Internet Protocol Version 4 (TCP/IPv4)]
❑ Close all the dialog boxes.
● If you are using Windows 7:
❑
❑
❑
❑
❑
5-20
Click [Start] on the Windows taskbar, click [Control Panel].
Click [Network and Internet].
Click [Network and Sharing Center].
Click [Local Area Connection].
Click [Properties].
Setting File Server (File Sharing)
❑ Make sure that all the check boxes below are selected. If any of the boxes is not
selected, select it.
• [Client for Microsoft Networks]
• [File and Printer Sharing for Microsoft Networks]
• [Internet Protocol Version 4 (TCP/IPv4)]
❑ Close all the dialog boxes.
● If you are using Windows Server 2003:
❑
❑
❑
❑
Click [Start] on the Windows taskbar ➞ select [Control Panel].
Select [Network Connections].
Right-click [Local Area Connection] ➞ select [Properties].
Make sure that all the check boxes below are selected. If any of the boxes are not
selected, select them.
• [Client for Microsoft Networks]
• [File and Printer Sharing for Microsoft Networks]
• [Internet Protocol (TCP/IP)]
❑ Close all the dialog boxes.
❑ Click [Start] on the Windows taskbar, right-click [Network] ➞ select [Properties].
❑ Click [Local Area Connection].
❑ Click [Properties].
• Make sure that all the check boxes below are selected. If any of the boxes is not
selected, select it.
• [Client for Microsoft Networks]
• [File and Printer Sharing for Microsoft Networks]
• [Internet Protocol Version 4 (TCP/IPv4)]
❑ Close all the dialog boxes.
NOTE
If any components are not installed, follow the procedures below to install them.
- Click [Install...] to open the [Select Network Component Type] dialog box.
- If [Client for Microsoft Networks] is not installed, select [Client], and then click
[Add...].
- If [File and Printer Sharing for Microsoft Networks] is not installed, select [Service],
and then click [Add...].
- If [Internet Protocol (TCP/IP)] ([Internet Protocol Version 4 (TCP/IPv4)] for Windows
Vista/7/Server 2008) is not installed, select [Protocol], and then click [Add...].
- Select the component you want to install, and then click [OK].
- If [Internet Protocol (TCP/IP)] ([Internet Protocol Version 4 (TCP/IPv4)] for Windows
Vista/7/Server 2008) is not installed, you need to set an IP address for your
computer. For details, ask your network administrator.
4
If required, restart your computer.
Setting File Server (File Sharing)
5-21
Setting up Computers to Use Print and Send Functions
5
● If you are using Windows Server 2008 R2:
Setting Shared Folder
You can set up a shared folder with or without access restriction. If “Access
permissions” are granted to users who are registered for computers, they are
authorized to operate folders and files.
There are two types of access permissions:
• Network-level access permission
This is to control users who access to the shared folder over the network.
• Local-level access permission
This is to control users who access folders by logging on to their computers.
The local-level access permission can be set only for the folders located in the
NTFS formatted drives.
Setting up Computers to Use Print and Send Functions
5
5-22
Setting File Server (File Sharing)
Setting Shared Folder without Access Restriction (Windows 2000/XP/
Server 2003)
This section describes the procedure for granting FULL Control permission to the
“Everyone” account so that any user can access the shared folder.
1
Create a new shared folder in any drive.
It is recommended to create the folder in a place where users can find it easily, such
as the first level in C drive.
Ex.: C:\share
3
4
Right-click the created folder.
Select [Sharing] ([Sharing and Security...] for Windows Server
2003 and Windows XP) to open the [<Folder name> Properties]
dialog box.
Enable file sharing.
● If you are using Windows 2000/Server 2003:
❑ Select [Share this folder].
● If you are using Windows XP:
❑ Click [If you understand the security risks but want to share files without running the
wizard, click here.].
❑ In the [Enable File Sharing] dialog box, select the [Just enable file sharing] check
box, and then click [OK].
NOTE
The procedure above is necessary only when you open the dialog box for the
first time. If you are opening the dialog box for the second or subsequent time,
proceed to the next step.
5
Set access permission.
● If you are using Windows 2000/Server 2003:
❑ Click the [Permissions] button to open the [Permissions for <Folder Name>].
❑ Under [Group or user names], select [Everyone] to grant ➞ select the [Full Control]
box under [Allow] if not selected.
Setting File Server (File Sharing)
5-23
5
Setting up Computers to Use Print and Send Functions
2
NOTE
Select the [Full Control] box so that you can store data scanned with this
machine on a computer (the file server).
❑ Click [OK] to close the [Permissions for <Folder Name>] dialog box.
❑ If the [Security] tab is displayed in the [<Folder name> Properties], click the
[Security] tab to set the local-level access permission. If not, proceed to step 7.
NOTE
The [Security] tab is not displayed when:
• The drive to which the shared folder is set is formatted in FAT16 or FAT32.
• Simple file sharing is enabled.
❑ Click [Add...] to open the [Select Users or Groups] dialog box.
❑ Type “Everyone”.
For Windows 2000
For Windows Server 2003
Setting up Computers to Use Print and Send Functions
5
❑ [Check Names] ➞ make sure that the correct object name is typed.
NOTE
If the object name is entered incorrectly, the [Name Not Found] dialog box is
displayed. If this happens, click [Cancel] to check whether or not the computer
name and user name are incorrect.
❑ Click [OK] to close the [Select Users or Groups] dialog box.
❑ In the [Security] sheet, under [Name], select [Everyone]. Select the [Full Control] box
under [Allow].
NOTE
Select the [Full Control] box so that you can store data scanned with this
machine on a computer (the file server).
● If you are using Windows XP:
❑ Select the [Share this folder on the network] and [Allow network users to change my
files] check boxes under [Network sharing and security].
5-24
Setting File Server (File Sharing)
6
Click [OK] to close the [<Folder name> Properties] dialog box.
7
Activate the Guest user account.
❑ Right-click the [My Computer] icon on the desktop ➞ click [Manage] to open the
[Computer Management] window.
❑
❑
❑
❑
Under [System Tools], click [Local Users and Groups].
Double-click the [Guest] user.
Deselect [Account is Disabled] to activate the Guest user account.
Click [OK] to close the [Guest Properties] dialog box.
NOTE
This step is not necessary for Windows XP.
Setting Shared Folder without Access Restriction (Public Folder)
(Windows Vista/7/Server 2008)
■ For Windows Vista/Server 2008
1
Click [Start] on the Windows taskbar, select [Control Panel].
2
Click [Set up file sharing] under [Network and Internet].
3
In the [Network and Sharing Center] window, click the down arrow
next to [Public folder sharing] under [Sharing and Discovery].
Setting File Server (File Sharing)
5-25
5
Setting up Computers to Use Print and Send Functions
In Windows Vista/7/Server 2008, you can use the special folder named “Public
folder,” which allows files to be shared with other users on the same network.
Using Public folder, you can set up a shared folder without access control. You
can store files in the first level of the Public folder.
4
Select [Turn on sharing so anyone with network access can open,
change, and create files], and then click [Apply].
For Windows Vista
NOTE
Do not select [Turn on sharing so anyone with network access can open files].
Otherwise, you will not be able to store a document scanned with this machine in a
shared folder.
Setting up Computers to Use Print and Send Functions
5
5
6
Click the down arrow next to [Password protected sharing] under
[Sharing and Discovery].
Click [Turn off password protected sharing], and then click
[Apply].
For Windows Vista
7
5-26
Display the Public folder in Windows Explorer, etc.
Setting File Server (File Sharing)
8
Create a new folder in the Public folder.
■ For Windows 7/Server 2008 R2
2
3
4
Click [Start] on the Windows taskbar, select [Control Panel].
Click [Choose homegroup and sharing options] under [Network
and Internet], then click [Change advanced sharing settings].
Click to select [Turn on sharing so anyone with network access
can read and write files in the Public folders] under [Public folder
sharing].
5
Click to select [Turn off password protected sharing] under
[Password protected sharing].
5
Click [Save Changes].
6
Display the Public folder in Windows Explorer, etc.
7
Create a new folder in the Public folder.
Setting up Computers to Use Print and Send Functions
1
Setting Shared Folder with Access Restriction (Windows 2000/XP/
Server 2003)
Follow the procedure below to set up file sharing with access restriction.
NOTE
Windows XP Home Edition does not support file sharing with access restriction.
Setting File Server (File Sharing)
5-27
1
Create a user account for accessing a shared folder.
NOTE
Even if you do not create a new account by following the procedures below, you can
add a pre-registered account for users who are permitted to access the shared folder.
In such case, you need to create a password if one has not been set for the
pre-registered account. Once the password is created, the user is prompted to type it
when he/she logs on to a computer.
● If you are using Windows 2000/Server 2003:
❑ Right-click the [My Computer] icon on the desktop ➞ click [Manage] to open the
[Computer Management] dialog box.
❑ Under [System Tools], double-click [Local Users and Groups].
❑ Right-click the [Users] folder ➞ click [New User].
❑ Set up the user accessing the shared folder.
5
Setting up Computers to Use Print and Send Functions
For Windows Server 2003
1. In the [New User] dialog box, enter
the user name in [User name].
2. Enter the password in [Password] ➞
re-enter the password in [Confirm
password] ➞ enter a user name not
longer than 20 alphanumeric characters,
and a password not longer than 14
alphanumeric characters.
3. Deselect [User must change
password at next logon].
4. Select [Password never expires].
Confirm the settings.
5. Click [Create].
❑ Close the [Computer Management] dialog box.
5-28
Setting File Server (File Sharing)
● If you are using Windows XP:
❑ Click [start] on the Windows taskbar ➞ select [Control Panel].
❑ Click [User Accounts].
❑ Click [Create a new account] ➞ type a user name in [Type a name for the new
account], and then click [Next].
NOTE
The user name can be up to 20 alphanumeric characters long.
confirm], and then click [Create Password].
NOTE
The password can be up to 14 alphanumeric characters long.
❑ Close the [User Accounts] dialog box.
2
Create a new shared folder in any drive.
It is recommended to create the folder in a place where users can find it easily, such
as the first level in C drive.
Ex.: C:\share
Setting File Server (File Sharing)
5-29
Setting up Computers to Use Print and Send Functions
5
❑ Select [Limited] ➞ [Create Account].
❑ Click the created user ➞ click [Create a password].
❑ Type a password in [Type a new password] and [Type the new password again to
3
4
Right-click the created folder.
Select [Sharing and Security...] to open the [<Folder name>
Properties] dialog box.
5
Select [Share this folder].
6
Set the network-level access permission.
❑ Click the [Permissions] button to open the [Permissions for <Folder Name>].
❑ Click [Add...] to open the [Select Users or Groups] dialog box.
❑ Type [Computer Name]\[User Name] in [Enter the object names to select].
For Windows XP
Setting up Computers to Use Print and Send Functions
5
❑ [Check Names]. Make sure that the correct object name is typed.
NOTE
If the object name is entered incorrectly, the [Name Not Found] dialog box appears.
If this happens, click [Cancel] to check whether or not the computer name and user
name are incorrect.
❑ Click [OK] to close the [Select Users or Groups] dialog box.
❑ In the [Permissions for <Folder name>], under [Group or user names], select the
user to whom you want to grant permission. Select the [Full Control] box under
[Allow].
NOTE
Select the [Full Control] box so that you can store data scanned with this machine
to a computer (the file server).
❑ Click [OK] to close the [Permissions for <Folder Name>] dialog box.
❑ If the [Security] tab is displayed in the [<Folder name> Properties], click the
[Security] tab to set the local-level access permission. If not, proceed to step 8.
5-30
Setting File Server (File Sharing)
NOTE
The [Security] tab is not displayed when:
• The drive to which the shared folder is set is formatted in FAT16 or FAT32.
• Simple file sharing is enabled.
7
Set the local-level access permission.
If the drive to which the shared folder is set is formatted in NTFS, you need to set the
local-level as well as the network-level access permissions.
❑ Click [Add...] to open the [Select Users or Groups] dialog box.
❑ Type [Computer Name]\[User Name] in [Enter the object names to select].
For Windows XP
❑ Click [Check Names]. Make sure that the correct object name is typed.
NOTE
If the object name is entered incorrectly, you see the [Name Not Found] dialog
box. If this happens, click [Cancel] to check whether or not the computer name
and user name are incorrect.
❑ Click [OK] to close the [Select Users or Groups] dialog box.
❑ In the [Security] sheet, under [Name], select the user whom you want to grant
permission. Select the [Full Control] box under [Allow].
NOTE
Select the [Full Control] box so that you can store data scanned with this
machine on a computer (the file server).
8
Click [OK] to close the [<Folder name> Properties] dialog box.
Setting File Server (File Sharing)
5-31
Setting up Computers to Use Print and Send Functions
5
Setting Shared Folder with Access Restriction (Windows Vista/7/
Server 2008)
Follow the procedures below to set up file sharing with access restriction.
1
Create a user account for accessing a shared folder.
NOTE
Even if you do not create a new account by following the procedures below, you can
add a pre-registered account for users who are permitted to access the shared folder.
In such case, you need to create a password if one has not been set for the
pre-registered account. Once the password is created, the user is prompted to type it
when he/she logs on to a computer.
❑ Click [Start] on the Windows taskbar, select [Control Panel].
❑ Click [Add or remove user accounts] under [User Accounts and Family Safety] ([User
Accounts] for Windows Vista/Server 2008).
❑ In the [Manage Accounts] dialog box, click [Create a new account].
❑ In the [Create New Account] dialog box, type the desired user name ➞ select
Setting up Computers to Use Print and Send Functions
5
[Standard user], and then click [Create Account].
NOTE
The user name can be up to 20 alphanumeric characters long.
❑ Click the user name created above ➞ click [Create a password].
❑ In the [Create Password] dialog box, type the password in two boxes circled in red,
and then click [Create password].
For Windows 7
NOTE
The password can be up to 14 alphanumeric characters long.
❑ Close the [Change an Account] dialog box.
5-32
Setting File Server (File Sharing)
2
Create a new shared folder in any drive.
It is recommended to create the folder in a place where users can find it easily, such
as the first level in C drive.
Ex.: C:\share
3
Right-click the created folder ➞ select [Share with] ➞ [Specific
people] ([Share...] for Windows Vista/Server 2008) to open the [File
Sharing] dialog box.
4
Click on the down arrow on the left side of [Add...] ➞ select the
user ➞ click [Add...].
For Windows 7
5
Setting up Computers to Use Print and Send Functions
5
Select the added user ➞ select [Read] or [Read/Write]
([Contributor] or [Co-owner] for Windows Vista/Server 2008) ➞
click [Share].
For Windows 7
Setting File Server (File Sharing)
5-33
NOTE
• Access permissions in Windows Vista/Server 2008 are as follows:
- Reader: A reader can only view shared files.
- Contributor: A contributor can create, alter and delete shared files, but not alter
access permissions.
- Co-owner: A co-owner can perform all file operations including creating, altering and
deleting shared files and altering access permissions.
• Access permissions in Windows 7/Server 2008 R2 are as follows:
- Read: Users can view the contents of the folders and open files and folders.
- Read/Write: Users can create new files and folders and make changes to shared
files are allowed.
6
Click [Done] to close the [File Sharing] dialog box.
Setting Shared Folder (Mac OS X)
5
Setting up Computers to Use Print and Send Functions
NOTE
• Samba 2.2.8a or later is supported.
• The procedures described in this section is are based on Mac OS X version 10.5. The
procedures may differ depending on the version of Mac OS X you are using.
• In some environments, detailed settings may be required in order to use Samba. For
details, consult your network administrator.
1
Log in to Mac OS X as Administrator.
2
Start the File Sharing services under Mac OS X.
❑
❑
❑
❑
❑
3
Click the [Sharing] icon in the [System Preferences] window.
Select [File Sharing] ➞ click [Options].
Select [Share files and folders using SMB] ➞ click [Done].
Click [Show All] on the toolbar.
Specify the account for access to the shared folder.
❑
❑
❑
❑
5-34
Click the Apple icon in the top left of the screen ➞ [System Preferences].
Click the [Accounts] icon in the [System Preferences] window.
Click [+] to create a new account.
Select [Sharing Only] in [New Account].
Enter the account information such as [Name] and [Password] ➞ click [Create
Account].
Setting File Server (File Sharing)
❑ Close the [Accounts] window.
4
Create a shared folder to which files are to be sent.
5
Grant access to the shared folder.
❑ Click to select the shared folder created in step 4 ➞ select [Show Info] from the [File]
menu.
❑ In the [<folder name> Info] window, select [Shared Folder] under [General].
❑ Click the lock icon at the bottom of the window to make changes in [Sharing &
Permissions].
❑ Enter your system password in the password prompt dialog box ➞ click [OK].
❑ Click [+] ➞ select the account created in step 3 from the list displayed in [Select New
User or Group] ➞ click [Select].
❑ Set the permissions for the user.
❑ Close the [<folder name> Info] window.
Setting Shared Folder (Samba (UNIX/Linux))
NOTE
• Samba 2.2.8a or later is supported.
• In some environments, detailed settings may be required in order to use Samba. For
details, consult your network administrator.
1
2
Log in to a workstation as a superuser.
Set up the users who access Samba shared folder, and their
passwords.
Set a user name not longer than 24 alphanumeric characters, and a password not
longer than 14 alphanumeric characters.
Setting File Server (File Sharing)
5-35
5
Setting up Computers to Use Print and Send Functions
NOTE
To send files to the shared folder, it is necessary to enable write access for the
user.
Specifying Destinations
Once the shared folder is ready, you can scan and store documents in it. To specify
the shared folder as the destination, use the machine’s control panel. Each table in
this section shows the items you should specify according to the shared folder type
you created.
IMPORTANT
• If you use <Windows (SMB): Browse> to specify each item, use it after the startup
time has elapsed. For details about the Startup Time Settings, see “Setting Startup
Time,” on p. 7-3.
• Up to 47 alphanumeric characters can be entered for [Host Name] and 120 characters
for [File Path] on the touch panel display.
• If you change the language of the touch panel display, [Host Name] and [File Path]
may not be displayed correctly, or you may not be able to browse the directories.
• If the language of the touch panel display differs from the computer on your network,
[Host Name] and [File Path] may not be displayed correctly, or you may not be able to
browse the directories.
• If you are using Window XP Home Edition, you do not need to specify the [User Name]
and [Password].
Setting up Computers to Use Print and Send Functions
5
NOTE
For instructions on how to specify destination address settings, see Chapter 2,
“Sending Documents,” in the Sending and Facsimile Guide.
5-36
Setting File Server (File Sharing)
File Sharing without Access Restriction
(Windows 2000/XP/Vista/7/Server 2003/Server 2008)
If you want to specify a shared folder without access restriction as the destination,
specify the items listed in the table below.
Setting example
Description
5
Example
The Protocol
drop-down list
Windows (SMB)
Host Name
Computer name confirmed in step 2 in
“Confirming Computer Name and
Necessary Components for File
Sharing (Windows 2000/XP/Vista/7/
Server 2003/Server 2008),” on p. 5-19.
File Path
Name of the shared folder created in
Example: share
step 1 in “Setting Shared Folder without
Access Restriction (Windows 2000/XP/
Server 2003),” on p. 5-23, or in step 8
in “Setting Shared Folder without
Access Restriction (Public Folder)
(Windows Vista/7/Server 2008),” on
p. 5-25.
User
Leave this box blank.
Password
Leave this box blank.
Example: \\swan
(Double backslash “\\”
can be omitted)
Setting File Server (File Sharing)
5-37
Setting up Computers to Use Print and Send Functions
Setting Item
File Sharing with Access Restriction
(Windows 2000/XP/Vista/7/Server 2003/Server 2008)
If you want to specify a shared folder with access restriction as the destination,
specify the items listed in the table below.
Setting example
5
Setting up Computers to Use Print and Send Functions
Setting Item
5-38
Description
Example
The Protocol
drop-down list
Windows (SMB)
Host Name
Computer name confirmed in step 2 in
“Confirming Computer Name and
Necessary Components for File
Sharing (Windows 2000/XP/Vista/7/
Server 2003/Server 2008),” on p. 5-19.
File Path
Name of the shared folder created in
Example: share
step 2 in “Setting Shared Folder with
Access Restriction (Windows 2000/XP/
Server 2003),” on p. 5-27, or “Setting
Shared Folder with Access Restriction
(Windows Vista/7/Server 2008),” on
p. 5-32.
User
User name entered in step 1 in “Setting
Shared Folder with Access Restriction
(Windows 2000/XP/Server 2003),” on
p. 5-27, or “Setting Shared Folder with
Access Restriction (Windows Vista/7/
Server 2008),” on p. 5-32.
Password
Password entered in step 1 in “Setting
Shared Folder with Access Restriction
(Windows 2000/XP/Server 2003),” on
p. 5-27, or “Setting Shared Folder with
Access Restriction (Windows Vista/7/
Server 2008),” on p. 5-32.
Setting File Server (File Sharing)
Example: \\swan
(Double backslash “\\”
can be omitted)
File Sharing (Mac OS X)
If you want to specify a folder in a computer running Mac OS X, specify the items
listed in the table below.
Setting example
Description
The Protocol
drop-down list
Windows (SMB)
Example
5
Host Name
IP address of Macintosh
File Path
Name of the folder created in step 4 in Example: \Users\share
“Setting Shared Folder (Mac OS X),” on (If a folder named
p. 5-34.
“share” has been
created in the “Home”
folder in “Users”)
User
“Name” of the account created in step
3 in “Setting Shared Folder (Mac OS
X),” on p. 5-34.
Password
“Password” of the account created in
step 3 in “Setting Shared Folder (Mac
OS X),” on p. 5-34.
Setting File Server (File Sharing)
5-39
Setting up Computers to Use Print and Send Functions
Setting Item
File Sharing (UNIX/Linux)
If you want to specify a folder in a UNIX machine, specify the items listed in the
table below.
Setting example
Setting Item
Setting up Computers to Use Print and Send Functions
5
5-40
Description
Example
The Protocol
drop-down list
Windows (SMB)
Host Name
Computer name of the UNIX machine
Example: \\swan
(Double backslash “\\”
can be omitted)
File Path
Name of the shared folder
Example: \share
User
User name entered in step 2 in “Setting
Shared Folder (Samba (UNIX/Linux)),”
on p. 5-35.
Password
Password entered in step 2 in “Setting
Shared Folder (Samba (UNIX/Linux)),”
on p. 5-35.
Setting File Server (File Sharing)
Protecting the Machine from
Unauthorized Access
6
CHAPTER
This chapter describes how to restrict access to the machine by using the Department ID and
User ID Management, and how to control access from computers on the network.
IMPORTANT
To make changes to the System Settings, enter the System Management mode. For
details, see “Operating the Machine in System Management Mode,” on p. 1-7.
Setting Department ID Management . . . . . . . . . . . . . . . . . . . . . . . . . . . . . . . . . . . . . . . . 6-2
Registering the Department ID, Password, and Page Limit. . . . . . . . . . . . . . . . . . . . . . . . . . . . .6-4
Changing the Password and Page Limit . . . . . . . . . . . . . . . . . . . . . . . . . . . . . . . . . . . . . . . . . . .6-8
Erasing the Department ID and Password. . . . . . . . . . . . . . . . . . . . . . . . . . . . . . . . . . . . . . . . .6-11
Checking and Printing Counter Information . . . . . . . . . . . . . . . . . . . . . . . . . . . . . . . . . . . . . . . .6-12
Clearing Page Totals . . . . . . . . . . . . . . . . . . . . . . . . . . . . . . . . . . . . . . . . . . . . . . . . . . . . . . . . .6-15
Accepting Print and Scan Jobs with Unknown IDs . . . . . . . . . . . . . . . . . . . . . . . . . . . . . . . . . .6-17
Setting User ID Management . . . . . . . . . . . . . . . . . . . . . . . . . . . . . . . . . . . . . . . . . . . . . 6-19
Restricting Access from Computers on the Network . . . . . . . . . . . . . . . . . . . . . . . . . . . 6-21
Setting the IP Address Range . . . . . . . . . . . . . . . . . . . . . . . . . . . . . . . . . . . . . . . . . . . . . . . . . .6-21
Setting the MAC Address Filter . . . . . . . . . . . . . . . . . . . . . . . . . . . . . . . . . . . . . . . . . . . . . . . . .6-29
Authenticating Users Before Sending Documents (Authorized Send) . . . . . . . . . . . . . . 6-32
Restricting the Use of Remote UI . . . . . . . . . . . . . . . . . . . . . . . . . . . . . . . . . . . . . . . . . . 6-34
Restricting the Display of Job Log . . . . . . . . . . . . . . . . . . . . . . . . . . . . . . . . . . . . . . . . . 6-37
Displaying the Current Department ID/User Name. . . . . . . . . . . . . . . . . . . . . . . . . . . . . 6-39
6-1
Setting Department ID Management
You can register a Department ID and password for each department, and manage
the machine by limiting its use to only those who enter the correct Department ID
and password. This is called Department ID Management. Department IDs and
passwords for up to 1000 departments can be registered. Use Department ID
Management to keep track of the copy, scan, and print totals for each department.
Protecting the Machine from Unauthorized Access
6
Top screen when Department ID Management is enabled
With Department ID Management, the following settings can be specified:
• Register the Department ID and password.
• Set page limits for scans, prints, and copies.
• Accept or reject print and scan jobs from computers with unknown IDs.
6-2
Setting Department ID Management
After editing settings on Department ID Management, be sure to press
(Log In/Out) to return to the screen for entering the Department ID and
password.
NOTE
• When the optional Copy Card Reader-F1 is attached to the machine, some screens
that appear are different from those shown in the following procedures for Department
ID Management.
• The default setting is ‘Off’.
Setting Department ID Management
6-3
6
Protecting the Machine from Unauthorized Access
IMPORTANT
• To use the optional Copy Card Reader-F1, Department ID Management must be
activated.
• Do not change the password when using a control card. The control card will become
unusable if the password for the Department ID is changed.
• If you enable both Department ID Management and User ID Management, be sure to
assign a Department ID (and the password for the Department ID) to each User ID.
Users can log in to the machine by entering their User ID that belongs to a Department
ID. For instructions on how to register User IDs, see Chapter 3, “Specifying
Department ID and User Management,” in the Remote UI Guide.
Registering the Department ID, Password, and Page Limit
1
2
Press
(Additional Functions)
➞ [System Settings] ➞
[Department ID Management].
Press [On] or [Off].
● If you want to use the Department
ID Management:
❑ Press [On].
❑ Proceed to step 3.
6
Protecting the Machine from Unauthorized Access
● If you do not want to use the
Department ID Management:
❑ Press [Off].
❑ Proceed to step 11.
3
6-4
Setting Department ID Management
Press [Register ID/Password].
4
5
Press [Register].
Enter the Department ID and
password using
(numeric
keys).
❑ Press [Department ID] ➞ enter the
Department ID.
❑ Press [Password] ➞ enter the password.
NOTE
• If you make a mistake when entering a number, press
(Clear) ➞ enter the correct
number.
• If you do not want to set a password, you can use the machine by entering only the
Department ID.
6
If you want to set a page limit
restriction, press [Turn Limits
On/Off and Set Page Limits].
Setting Department ID Management
6-5
6
Protecting the Machine from Unauthorized Access
You cannot store a Department ID or
password that only consists of zeros,
such as <0000000>.
If you enter fewer than seven digits, the
machine stores them with leading zeros.
Example: If <02> or <002> is entered,
<0000002> is stored.
7
Press [On] under the desired
function(s).
If you do not want to set a page limit
restriction for the function, press [Off].
NOTE
• <Total Print Lim> is the sum of <Copy Limit> and <Print Limit>.
• <B&W Scan Limit> is available only when the Send function (optional for the
imageRUNNER 2545/2535/2530/2525/2520) is activated or the optional Super G3 Fax
Board-AG1 is attached to the machine.
<Color Scan Limit> is available only when the Send function (optional for the
imageRUNNER 2545/2535/2530/2525/2520) is activated.
8
Press [ ] (Page Limit) next to
[On]/[Off] of the desired
function(s) ➞ enter the page limit
restriction using
(numeric
keys).
Protecting the Machine from Unauthorized Access
6
IMPORTANT
• The machine stops sending a fax if the Scan Limit is reached while faxing a document
either from memory or directly to the recipient.
• The machine stops scanning if the Scan Limit is reached while the machine is
scanning originals that are being fed from the feeder. (Those originals that were
scanned before the limit was reached are not added to the scan count.)
NOTE
• If you make a mistake when entering a number, press
(Clear) ➞ enter the correct
number.
• You can set the page limit from 0 to 999,999 pages. Once the page limit is reached,
copying, scanning, or printing is not possible.
• The page limit refers to the number of printed surfaces. Therefore, a two-sided print is
counted as two pages.
6-6
Setting Department ID Management
9
Press [OK] ➞ [OK].
10
Press [Done].
11
Press [OK].
12
Press
(Reset) to return to the top screen.
Setting Department ID Management
6
Protecting the Machine from Unauthorized Access
NOTE
If you selected [On] in step 2, pressing
[OK] activates Department ID
Management.
6-7
Changing the Password and Page Limit
You can change the password and page limit settings that you have registered.
1
Press
(Additional Functions) ➞ [System Settings] ➞
[Department ID Management].
For help, see step 1 in “Registering the Department ID, Password, and Page Limit,” on
p. 6-4.
2
Press [On] ➞ [Register ID/
Password].
Protecting the Machine from Unauthorized Access
6
3
Press [ ] or [ ] to display the
Department ID whose password
you want to change ➞ select the
Department ID ➞ press [Edit].
NOTE
Press and hold down [ ] or [ ] to
quickly and continuously scroll through
the available Department ID pages.
Continuous scrolling is useful when a
large number of Department IDs are
registered.
6-8
Setting Department ID Management
4
Enter the new password (up to
seven digits) using
(numeric keys).
You cannot store a password that only
consists of zeros, such as <0000000>.
If you enter fewer than seven digits, the
machine stores the password with leading
zeros.
Example: If <02> or <002> is entered,
<0000002> is stored.
5
6
(Clear) ➞ enter the
If you want to change or set a
page limit restriction, press [Turn
Limits On/Off and Set Page
Limits].
Change the page limit restriction
if necessary.
❑ Press [On] under the desired function(s).
❑ Press [ ] (Page Limit) next to [On]/[Off]
of the desired function(s) ➞ enter the
page limit restriction using
(numeric keys).
❑ Press [OK] ➞ [OK].
If you do not want to set a page limit
restriction for a function, press [Off]
under the desired function’s name.
The page limit(s) for the selected
function(s) are set.
Setting Department ID Management
6-9
6
Protecting the Machine from Unauthorized Access
NOTE
• If you make a mistake when entering the password, press
correct password.
• You cannot change the Department ID.
NOTE
• If you make a mistake when entering a number, press
(Clear) ➞ enter the correct
number.
• You can set the page limit from 0 to 999,999 pages. Once the page limit is reached,
copying, scanning, or printing is not possible.
• The page limit refers to the number of printed surfaces. Therefore, a two-sided print is
counted as two pages.
Protecting the Machine from Unauthorized Access
6
7
Press [Done].
8
Press [OK].
9
6-10
Press
(Reset) to return to the top screen.
Setting Department ID Management
Erasing the Department ID and Password
You can erase the Department ID and password that you have registered.
NOTE
If Department ID Management is activated through the optional Copy Card
Reader-F1, you cannot delete the Department IDs from the touch panel display.
1
Press
(Additional Functions) ➞ [System Settings] ➞
[Department ID Management].
For help, see step 1 in “Registering the Department ID, Password, and Page Limit,” on
p. 6-4.
3
Press [On] ➞ [Register ID/Password].
Press [ ] or [ ] to display the
Department ID that you want to
erase ➞ select the Department ID
➞ press [Erase].
NOTE
Press and hold down [ ] or [ ] to
quickly and continuously scroll through
the available Department ID pages.
Continuous scrolling is useful when a
large number of Department IDs are
registered.
4
Press [Yes].
If you do not want to erase the selected
Department ID and all of its settings, press
[No].
The selected Department ID and all of its
settings are erased.
Setting Department ID Management
6-11
6
Protecting the Machine from Unauthorized Access
2
5
Press [Done].
6
Press [OK].
Protecting the Machine from Unauthorized Access
6
7
Press
(Reset) to return to the top screen.
Checking and Printing Counter Information
You can display and print a list of page totals for each department.
1
Press
(Additional Functions) ➞ [System Settings] ➞
[Department ID Management].
For help, see step 1 in “Registering the Department ID, Password, and Page Limit,” on
p. 6-4.
6-12
Setting Department ID Management
3
Press [On] ➞ [Page Totals].
Check or print the page total count.
● If you only want to check the counter information:
❑ Press [ ] or [ ] to display the desired
Department ID ➞ press [ ] or [ ] to
display and view the desired page totals.
6
NOTE
• Press and hold down [ ] or [ ] to quickly and continuously scroll through the
available Department ID pages. Continuous scrolling is useful when a large number of
Department IDs are registered.
• The print page totals that belong to print jobs without a Department ID (left blank) are
the number of prints from computers that do not correspond with a registered
Department ID. These prints are referred to as prints with unknown IDs.
• The scan page totals that belong to scan jobs without a Department ID (left blank) are
the number of pages that have been scanned from computers that do not correspond
with a registered Department ID. The scanned pages from computers are referred to
as network scans with unknown IDs.
Setting Department ID Management
6-13
Protecting the Machine from Unauthorized Access
2
● If you want to print the displayed list:
❑ Press [Print List].
❑ Press [Yes].
If you do not want to print the displayed
list, press [No].
Printing starts.
Protecting the Machine from Unauthorized Access
6
NOTE
• To cancel printing, press [Cancel].
• To close the screen that is displayed while the machine is printing the Page Count List,
press [Done].
• The counter information can be printed only if A3, A4, or A4R (plain, recycled, or color
paper) is loaded in a paper source whose settings in Other in Drawer Eligibility For
APS/ADS in Common Settings (from the Additional Functions screen) are set to ‘On’.
(See Chapter 3, “Configuring the Machine’s Basic Settings,” in the Reference Guide.)
4
6-14
Setting Department ID Management
Press [Done].
5
6
Press [OK].
Press
(Reset) to return to the top screen.
Clearing Page Totals
You can clear the page totals made for all departments or for specific departments.
6
Press
(Additional Functions) ➞ [System Settings] ➞
[Department ID Management].
For help, see step 1 in “Registering the Department ID, Password, and Page Limit,” on
p. 6-4.
2
Press [On] ➞ [Page Totals].
For help, see step 2 in “Checking and Printing Counter Information,” on p. 6-12.
3
Press [Clear All Totals].
Setting Department ID Management
6-15
Protecting the Machine from Unauthorized Access
1
If you want to clear page totals for each
Department ID, press [ ] or [ ] to display
the desired Department ID ➞ select the
Department ID ➞ press [Clear].
4
Press [Yes].
If you do not want to clear the page totals,
press [No].
Protecting the Machine from Unauthorized Access
6
The message <Erased.> appears for
approximately two seconds on the touch
panel display.
The page totals are cleared.
5
6-16
Setting Department ID Management
Press [Done].
6
7
Press [OK].
Press
(Reset) to return to the top screen.
Accepting Print and Scan Jobs with Unknown IDs
You can specify whether to accept or reject print and network scan jobs that do not
correspond to any registered Department ID.
NOTE
The default settings are as follows:
- Allow ID Unknown Printer Jobs: On
- Allow ID Unknown Remote Scan Jobs: On
Press
(Additional Functions) ➞ [System Settings] ➞
[Department ID Management].
For help, see step 1 in “Registering the Department ID, Password, and Page Limit,” on
p. 6-4.
2
Press [On].
Setting Department ID Management
6-17
Protecting the Machine from Unauthorized Access
1
6
3
Press [On] or [Off] for <Allow ID
Unknown Printer Jobs> and
<Allow ID Unknown Remote Scan
Jobs> ➞ [OK].
<Allow ID Unknown Printer Jobs>
[On]: The machine accepts print jobs that do not correspond with a registered
Department ID.
[Off]: The machine does not accept print jobs that do not correspond with a registered
Department ID, and you must enter a Department ID and password to operate
the machine.
<Allow ID Unknown Remote Scan Jobs>
[On]: The machine accepts remote scan jobs that do not correspond with a registered
Department ID.
6
Protecting the Machine from Unauthorized Access
[Off]: The machine does not accept remote scan jobs that do not correspond with a
registered Department ID.
4
6-18
Press
(Reset) to return to the top screen.
Setting Department ID Management
Setting User ID Management
You can set whether or not to use the User ID Management.
The User ID Management function enables you to register up to 1,000 User IDs to
manage the use of the machine by registered users.
IMPORTANT
• The User ID and password can be registered only from the Remote UI. For more
information on the User ID Management, see Chapter 3, “Specifying Department ID
and User Management,” in the Remote UI Guide.
• Be sure to register the User ID and password before you set this mode to ‘On’.
• If User ID Management is enabled, only users registered as “System Manager” can
change the System Settings by logging in to the machine with their User ID and
password. In this case, you cannot log in as the System Manager by entering the
System Manager ID and System Password.
1
Press
(Additional Functions)
➞ [System Settings] ➞ [User ID
Management].
Setting User ID Management
6-19
Protecting the Machine from Unauthorized Access
6
NOTE
One Department ID can be registered for each User ID.
2
Select whether or not to use the
User ID Management.
● If you want to use the User ID
Management:
❑ Press [On].
❑ If the Send function (optional for the
imageRUNNER 2545/2535/2530/2525/
2520) is activated and you want to add
the User ID to the name of the sending
document, press [On] for <Add user
name to Send Document Name>.
❑ Press [OK].
● If you do not want to use the User ID Management:
❑ Press [Off] ➞ [OK].
3
Press
(Reset) to return to the top screen.
Protecting the Machine from Unauthorized Access
6
6-20
Setting User ID Management
Restricting Access from Computers on the Network
Restricting unauthorized access to the machine is highly important for enhanced
information security in a digitalized office. To protect the machine from
unauthorized access, you can use IP addresses and/or MAC addresses.
IMPORTANT
Changes made to IP Address Range Settings and Receiving MAC Address Settings
become effective when the machine is restarted. To restart the machine, turn it OFF,
wait at least 10 seconds, and then turn it ON. For instructions on how to turn the
machine ON and OFF, see Chapter 2, “Before You Start Using the Machine,” in the
User’s Guide.
Setting the IP Address Range
IMPORTANT
• Once you specify the IP addresses or IP address ranges with access permission, you
can set or browse machine settings using the Remote UI only from the computers
whose IP addresses are permitted.
• Once you specify the IP addresses or IP address ranges with access permission, the
machine receives the print, fax, and remote scan jobs only from the computers with
the allowed IP addresses.
Setting IPv4 Address Range
1
Press
(Additional Functions)
➞ [System Settings] ➞ [Network
Settings].
Restricting Access from Computers on the Network
6-21
6
Protecting the Machine from Unauthorized Access
You can control access to the machine by specifying (a range of) IP addresses. The
machine can be set to filter access by either accepting or rejecting the set (range
of) IP addresses.
2
3
Press [TCP/IP Settings] ➞ [IPv4
Settings] ➞ [IP Address Range
Settings].
Select whether or not to restrict IP addresses.
● If you want to restrict the access (such as print or fax jobs) from
computers by specifying an IP address or a range of IP addresses:
❑ Press [On] ➞ [Settings].
❑ Proceed to step 4.
Protecting the Machine from Unauthorized Access
6
● If you do not want to restrict the access (such as print jobs) from
computers by specifying an IP address or a range of IP addresses:
❑ Press [Off] ➞ [OK].
❑ Proceed to step 8.
4
6-22
Restricting Access from Computers on the Network
Press [Register].
Specify the IP address (or the IP address range) to be permitted or
rejected.
● If you want to permit or reject a single IPv4 address:
❑ Press [Single Address] ➞ enter the
desired IPv4 address using
(numeric keys) ➞ press [OK].
● If you want to permit or reject a range of IPv4 addresses:
❑ Press [Multiple Addresses] ➞ press
[First Address] ➞ enter the first IPv4
address in the range using
(numeric keys) ➞ press [Last Address]
➞ enter the last IPv4 address in the
range ➞ press [OK].
IMPORTANT
• You can register up to 10 IPv4 addresses or IPv4 address ranges.
• An IPv4 address of <0.0.0.0> cannot be specified.
• The value of [First Address] for [Multiple Addresses] should be smaller than or equal to
that of [Last Address].
Restricting Access from Computers on the Network
6-23
6
Protecting the Machine from Unauthorized Access
5
6
Select the IP address or the
range of IP addresses that is to
be permitted or rejected ➞ press
[Permit/Reject].
[Permit]: Allows the access to the machine
from the specified IPv4 addresses or IPv4
address ranges.
[Reject]: Rejects the access to the machine
from the specified IPv4 addresses or IPv4
address ranges.
IMPORTANT
If the usage of an application protocol is not permitted on your device, it cannot be
used even after its IPv4 address is permitted on the machine. On your device,
configure the settings to permit the protocol.
NOTE
• If you want to delete an IPv4 address or IPv4 address range, select the address or
address range on the IP Address Range Settings screen ➞ press [Erase] ➞ press
[Yes] to delete.
• If you want to edit an IPv4 address or IPv4 address range, select the address or
address range on the IP Address Range Settings screen ➞ press [Edit] ➞ edit the
address or address range in the same manner as to register them ➞ press [OK].
Protecting the Machine from Unauthorized Access
6
7
Press [OK] ➞ [OK].
8
Restart the machine.
Turn OFF the machine, wait at least 10 seconds, and then turn it ON.
6-24
Restricting Access from Computers on the Network
Setting IPv6 Address Range
1
Press
(Additional Functions) ➞ [System Settings] ➞ [Network
Settings].
For help, see step 1 in “Setting IPv4 Address Range,” on p. 6-21.
3
Press [TCP/IP Settings] ➞ [IPv6
Settings].
Press [ ] or [ ] until [IP
Address Range Settings]
appears ➞ press [IP Address
Range Settings].
Restricting Access from Computers on the Network
6
Protecting the Machine from Unauthorized Access
2
6-25
4
Select whether or not to restrict IP addresses.
● If you want to restrict the access (such as print or fax jobs) from
computers by specifying an IP address or a range of IP addresses:
❑ Press [On] ➞ [Settings].
❑ Proceed to step 5.
● If you do not want to restrict the access (such as print jobs) from
computers by specifying an IP address or a range of IP addresses:
❑ Press [Off] ➞ [OK].
❑ Proceed to step 9.
6
Protecting the Machine from Unauthorized Access
5
6-26
Restricting Access from Computers on the Network
Press [Reg.].
Specify the IP address, IP address range, or prefix address to be
permitted or rejected.
● If you want to permit or reject a single IPv6 address:
❑ Press [Single Address].
❑ Press [Address] ➞ enter the desired
IPv6 address ➞ press [OK].
❑ Press [OK].
● If you want to permit or reject a range of IPv6 addresses:
❑ Press [Multiple Addresses].
❑ Press [First Address] ➞ enter the first
IPv6 address in the range ➞ press [OK].
❑ Press [Last Address] ➞ enter the last
IPv6 address in the range ➞ press [OK].
❑ Press [OK].
● If you want to specify the prefix and prefix length for the IPv6 address:
❑ Press [Prefix Address].
❑ Press [IPv6 Prefix] ➞ enter the prefix
value for the IPv6 address ➞ press [OK].
❑ Enter the prefix length ➞ press [OK].
Restricting Access from Computers on the Network
6-27
6
Protecting the Machine from Unauthorized Access
6
IMPORTANT
• A total of 10 IPv6 addresses, address ranges, or address prefixes can be set.
• You cannot specify a multicast address or an address composed entirely of zeros for
an IPv6 address.
• If you enter ‘0’ in [Prefix Length], no IPv6 addresses are permitted.
• If you enter ‘128’ in [Prefix Length], the IPv6 addresses of the machine are not
permitted.
• If you want to enter a range of addresses, make sure that the number entered in [First
Address] is less than the number entered in [Last Address].
7
Select the IP address or the
range of IP addresses that is to
be permitted or rejected ➞ press
[Permit/Reject].
[Permit]: Allows the access to the machine
from the specified IPv4 addresses
or IPv4 address ranges.
[Reject]: Rejects the access to the
machine from the specified IPv4
addresses or IPv4 address
ranges.
Protecting the Machine from Unauthorized Access
6
IMPORTANT
If the usage of an application protocol is not permitted on your device, it cannot be
used even if its IPv6 address is permitted on the machine. Configure the settings of
the device to permit the protocol.
NOTE
• If you want to delete an IPv6 address or IPv6 address range, select the address or
address range on the IP Address Range Settings screen ➞ press [Erase] ➞ press
[Yes] to delete.
• If you want to edit an IPv6 address or IPv6 address range, select the address or
address range on the IP Address Range Settings screen ➞ press [Edit] ➞ edit the
address or address range in the same manner as to register them ➞ press [OK].
8
Press [OK] ➞ [OK].
9
Restart the machine.
Turn OFF the machine, wait at least 10 seconds, and then turn it ON.
6-28
Restricting Access from Computers on the Network
Setting the MAC Address Filter
If the machine is connected to an IPv4 network, you can use the MAC Address
Filter function to protect the machine from unauthorized access.
IMPORTANT
A total of 10 MAC addresses can be set for this function.
1
Press
(Additional Functions) ➞ [System Settings] ➞ [Network
Settings].
For help, see step 1 in “Setting IPv4 Address Range,” on p. 6-21.
2
Press [TCP/IP Settings].
3
Press [ ] or [ ] until [Receiving
MAC Address Settings] appears
➞ press [Receiving MAC
Address Settings].
Restricting Access from Computers on the Network
6-29
Protecting the Machine from Unauthorized Access
6
4
Select whether or not to use the MAC address filter.
● If you want to enable a MAC address filter:
❑ Press [On] for <Apply Settings>.
❑ Press [Register].
❑ Proceed to step 5.
IMPORTANT
If you select [On] for <Apply Settings>, the machine can be accessed only from MAC
addresses specified later in step 5. Be sure to have the correct MAC addresses with
you before specifying them on the machine. If an incorrect MAC address is entered,
you will be unable to access the machine via the network.
6
● If you want to disable the MAC address filter:
Protecting the Machine from Unauthorized Access
❑ Press [Off] for <Apply Settings>.
❑ Proceed to step 6.
5
6-30
Restricting Access from Computers on the Network
Press [C] ➞ specify the MAC
addresses to allow access to ➞
press [OK].
6
Press [OK].
NOTE
• If you want to delete a MAC address, select the MAC address on the Receiving MAC
Address Settings screen ➞ press [Erase] ➞ press [Yes] to delete.
• If you want to edit a MAC address, select the MAC address on the Receiving MAC
Address Settings screen ➞ press [Edit] ➞ edit the address in the same manner as to
register them ➞ press [OK].
Restart the machine.
6
Turn OFF the machine, wait at least 10 seconds, and then turn it ON.
Protecting the Machine from Unauthorized Access
7
Restricting Access from Computers on the Network
6-31
Authenticating Users Before Sending Documents
(Authorized Send)
If your network uses directory services such as Active Directory, we recommend
that you use also Authorized Send. Authorized Send is an authentication feature
that enables you to prevent unauthorized users from sending documents from the
machine. With this feature activated, any user who wants to send documents needs
to enter a valid user name and password.
■ Flow of Sending Documents with Authorized Send
Authentication Server
2
Protecting the Machine from Unauthorized Access
6
3
1
4
User Name: XXX
Password: YYY
Machine
Destinations
1. A user who attempts to send documents is prompted to enter a valid user name
and password.
2. Entered information is checked in the authentication server against the directory
database to authenticate the user.
3. The machine receives the authentication results from the authentication server.
4. Once authenticated, the authorized user can send documents to the specified
destination.
6-32
Authenticating Users Before Sending Documents (Authorized Send)
■ What you can do with Authorized Send
In addition to authenticating users, Authorized Send enables you to do the
following:
• Carry over the login information (both user name and password, or user name only) from
Authorized Send to other authentication systems such as SMTP authentication
• Restrict the destinations of sending documents to the e-mail address and folder of a
logged on user
• Enable/disable sending functionalities
To use Authorized Send, specify authentication server settings and other settings in
the machine beforehand. (See Chapter 4, “Customizing Settings,” in the Remote UI
Guide.)
Authenticating Users Before Sending Documents (Authorized Send)
6-33
6
Protecting the Machine from Unauthorized Access
NOTE
• The following server software can be used as an authentication server:
- Windows 2003 Server with Active Directory
- Windows 2008 Server with Active Directory
- Lotus Domino 5 or later
- Novell eDirectory 8.8 or later
- OpenLDAP 2.4.17 (Windows)
• Supported LDAP version is 3.
• IPv6 is not supported.
• For instructions on how to use Authorized Send, see Chapter 2, “Sending Documents,”
in the Sending and Facsimile Guide.
Restricting the Use of Remote UI
You can set whether to enable the Remote UI to operate the machine and change
settings. If you want to access the machine more securely from a web browser,
enable SSL (Secure Sockets Layer) for encrypted communications.
IMPORTANT
Changes made to Remote UI On/Off become effective when the machine is restarted.
To restart the machine, turn it OFF, wait at least 10 seconds, and then turn it ON. For
instructions on how to turn the machine ON and OFF, see Chapter 2, “Before You Start
Using the Machine,” in the User’s Guide.
NOTE
• For more information on the Remote UI, see the Remote UI Guide.
• To use the Remote UI, it is necessary to set up the communication environment. For
help, see “Communication Environment Settings,” on p. 2-5.
• The default settings are as follows:
- Remote UI On/Off: On
- Use SSL: Off
Protecting the Machine from Unauthorized Access
6
1
6-34
Restricting the Use of Remote UI
Press
(Additional Functions)
➞ [System Settings].
2
Select whether or not to enable the Remote UI and SSL
communication.
● If you want to enable the Remote UI and access the machine using SSL:
❑ Press [On].
❑ Press [On] for <Use SSL>.
❑ Press [OK].
IMPORTANT
To enable SSL communication for the
Remote UI, an SSL key pair must be
generated and set as the default key.
(See “Generating a Key Pair for SSL
Communications,” on p. 3-21, and
“Setting the Default Key for SSL
Communications,” on p. 3-35.)
● If you want to enable the Remote UI and access the machine without
using SSL:
❑ Press [On].
❑ Press [Off] for <Use SSL>.
❑ Press [OK].
● If you want to disable the Remote UI:
❑ Press [Off] ➞ [OK].
IMPORTANT
Enabling the Remote UI opens the machine’s http/https port. If the port is left open, an
unauthorized user may try to access the machine from the open port. Disabling the
Remote UI is recommended if you do not plan to use it.
Restricting the Use of Remote UI
6-35
6
Protecting the Machine from Unauthorized Access
3
Press [ ] or [ ] until [Remote
UI On/Off] appears ➞ press
[Remote UI On/Off].
4
Restart the machine.
Turn OFF the machine, wait at least 10 seconds, and then turn it ON.
Protecting the Machine from Unauthorized Access
6
6-36
Restricting the Use of Remote UI
Restricting the Display of Job Log
You can specify whether or not to display the job log on the touch panel display.
When you set [Job Log Display] to ‘On’, you can check the job log using the System
Monitor screen. When you set [Job Log Display] to ‘Off’, the job log does not
appear on the System Monitor screen.
NOTE
• For more information on the System Monitor screen, see Chapter 2, “Basic
Operations,” in the Reference Guide, and Chapter 6, “Checking/Changing the Status
of Documents in Memory,” in the Sending and Facsimile Guide.
• When you set [Job Log Display] to ‘Off’, [Activity Reports] and [Fax Activity Reports] in
Settings in Report Settings (from the Additional Functions screen) are not displayed.
• When you set [Job Log Display] to ‘Off’, Activity Reports and Fax Activity Reports will
not be printed automatically.
• The default setting is ‘On’.
1
2
Press
(Additional Functions)
➞ [System Settings].
Press [ ] or [ ] until [Job Log
Display] appears ➞ press [Job
Log Display].
Restricting the Display of Job Log
6-37
Protecting the Machine from Unauthorized Access
6
3
Press [On] or [Off] ➞ press [OK].
[On]: The job log is displayed on the
System Monitor screen.
[Off]: The job log is not displayed on the
System Monitor screen.
4
Press
(Reset) to return to the top screen.
Protecting the Machine from Unauthorized Access
6
6-38
Restricting the Display of Job Log
Displaying the Current Department ID/User Name
You can set whether or not to display the Department ID or the user name at the
lower left corner of the touch panel display.
NOTE
• For more information on the Department ID Management, see “Setting Department ID
Management,” on p. 6-2.
• The default setting is ‘On’.
1
Press
(Additional Functions)
➞ [System Settings].
2
Press [ ] or [ ] until [Display
Dept. ID/User Name] appears ➞
press [Display Dept. ID/User
Name].
Displaying the Current Department ID/User Name
6-39
Protecting the Machine from Unauthorized Access
6
3
Select [On] or [Off] ➞ press [OK].
[On]: The Department ID or the user name
is displayed at the lower left corner of
the touch panel display.
[Off]: The Department ID or the user name
is not displayed at the lower left
corner of the touch panel display.
4
Press
(Reset) to return to the top screen.
Protecting the Machine from Unauthorized Access
6
6-40
Displaying the Current Department ID/User Name
Other System Settings
7
CHAPTER
This chapter describes how to specify device information, startup time, and automatic online/
offline, as well as how to set to store the log of send jobs to memory media, how to turn on/off
use of the USB interface port and optional Inner 2 Way Tray-G1, how to restrict printing images
from a USB memory media device, and how to detect and install necessary drivers using Plug
and Play.
IMPORTANT
To make changes to the System Settings, enter the System Management mode. For
details, see “Operating the Machine in System Management Mode,” on p. 1-7.
Specifying Device Information . . . . . . . . . . . . . . . . . . . . . . . . . . . . . . . . . . . . . . . . . . . . . 7-2
Setting Startup Time. . . . . . . . . . . . . . . . . . . . . . . . . . . . . . . . . . . . . . . . . . . . . . . . . . . . . 7-3
Setting Auto Online/Offline . . . . . . . . . . . . . . . . . . . . . . . . . . . . . . . . . . . . . . . . . . . . . . . . 7-5
Auto Online. . . . . . . . . . . . . . . . . . . . . . . . . . . . . . . . . . . . . . . . . . . . . . . . . . . . . . . . . . . . . . . . . .7-5
Auto Offline. . . . . . . . . . . . . . . . . . . . . . . . . . . . . . . . . . . . . . . . . . . . . . . . . . . . . . . . . . . . . . . . . .7-6
Retaining Send Log to Memory Media . . . . . . . . . . . . . . . . . . . . . . . . . . . . . . . . . . . . . . . 7-8
Restricting the USB Interface Port . . . . . . . . . . . . . . . . . . . . . . . . . . . . . . . . . . . . . . . . . 7-10
Installing Drivers with Plug and Play. . . . . . . . . . . . . . . . . . . . . . . . . . . . . . . . . . . . . . . . 7-12
Using the Inner 2 Way Tray-G1. . . . . . . . . . . . . . . . . . . . . . . . . . . . . . . . . . . . . . . . . . . . 7-14
Restricting Printing Images from a USB Memory Media Device . . . . . . . . . . . . . . . . . . 7-16
Setting the Secure Printing Function . . . . . . . . . . . . . . . . . . . . . . . . . . . . . . . . . . . . . . . 7-18
Displaying an Alert Message When the Available Memory Gets Low . . . . . . . . . . . . . . 7-21
7-1
Specifying Device Information
Device Information Settings enables you to set a name for the machine, and enter
information regarding its location.
1
Press
(Additional Functions)
➞ [System Settings] ➞ [Device
Info Settings].
2
Enter the name and location of
the machine.
Other System Settings
7
❑ Press [Device Name] ➞ enter the name
of the machine ➞ press [OK].
❑ Press [Location] ➞ enter the place
where the machine is located ➞ press
[OK].
❑ Press [OK].
You can enter up to 32 characters for
both [Device Name] and [Location].
IMPORTANT
If the Language Switch setting is set to ‘On’, some characters are restricted and
cannot be entered. To enter all characters, set the Language Switch setting to ‘Off’.
(See Chapter 3, “Configuring the Machine’s Basic Settings,” in the Reference Guide.)
NOTE
For instructions on how to enter characters using the on-screen keyboard, see
Chapter 2, “Basic Operations,” in the Reference Guide.
3
7-2
Press
(Reset) to return to the top screen.
Specifying Device Information
Setting Startup Time
If you connect the machine to a switching hub, it may not be able to connect to a
network even though your network settings are set correctly.
This occurs because the spanning tree process performed between switching hubs
prevents them from communicating with each other immediately after the machine
connects to a switching hub.
In this case, use the procedure below to delay the start of communication.
IMPORTANT
Changes made to Startup Time Settings become effective when the machine is
restarted. To restart the machine, turn it OFF, wait at least 10 seconds, and then turn it
ON. For instructions on how to turn the machine ON and OFF, see Chapter 2, “Before
You Start Using the Machine,” in the User’s Guide.
NOTE
The default setting is ‘0 sec(s)’.
7
Press
(Additional Functions)
➞ [System Settings] ➞ [Network
Settings].
Setting Startup Time
7-3
Other System Settings
1
2
Press [ ] or [ ] until [Startup
Time Settings] appears ➞ press
[Startup Time Settings].
3
Set the time period required to
delay the startup of network
communications for the machine
➞ press [OK].
Use [-] or [+] to set the time period.
NOTE
You can also enter values using
(numeric keys).
7
Other System Settings
4
Restart the machine.
Turn OFF the machine, wait at least 10 seconds, and then turn it ON.
7-4
Setting Startup Time
-
Setting Auto Online/Offline
To use the Network Scan function, the machine must be connected to a network
and separately switched online to the network. This section explains how to switch
the machine online and offline to use the Network Scan function.
NOTE
Color Network ScanGear, the application software for remote scanning, is compatible
with the Windows operating systems only. For more information, see the Network
ScanGear Guide.
Auto Online
If Auto Online is set to ‘On’, the machine automatically goes online when you press
(SCAN/PRINT) ➞ [Remote Scan] on the machine’s control panel.
NOTE
The default setting is ‘Off’.
1
Press
(Additional Functions)
➞ [System Settings].
Setting Auto Online/Offline
7-5
Other System Settings
7
2
3
Press [Auto Online].
4
Press [On] or [Off] ➞ [OK].
Other System Settings
7
Press [ ] or [ ] until [Auto
Online/Offline] appears ➞ press
[Auto Online/Offline].
5
Press
(Reset) to return to the top screen.
Auto Offline
If the machine is connected to a network that is online, scanning may not be
possible. By setting Auto Offline to ‘On’, the machine automatically goes offline
when the Auto Clear mode initiates, or when two minutes have passed if the Auto
Clear time is not set.
7-6
Setting Auto Online/Offline
NOTE
The default setting is ‘Off’.
1
Press
(Additional Functions) ➞ [System Settings].
For help, see step 1 in “Auto Online,” on p. 7-5.
2
Press [ ] or [ ] until [Auto Online/Offline] appears ➞ press [Auto
Online/Offline].
For help, see step 2 in “Auto Online,” on p. 7-5.
3
Press [Auto Offline].
4
Select [On] or [Off] ➞ press [OK].
NOTE
If Auto Offline is set to ‘On’, the
machine automatically goes offline
once the Auto Clear mode initiates. If
the Auto Clear mode is not set (the
Auto Clear Time is set to ‘0’), the
machine automatically goes offline
after approximately two minutes. (See
Chapter 3, “Configuring the Machine’s
Basic Settings,” in the Reference
Guide.)
5
Press
(Reset) to return to the top screen.
Setting Auto Online/Offline
7-7
Other System Settings
7
Retaining Send Log to Memory Media
You can set whether to record the job log when storing scanned documents in USB
memory media.
IMPORTANT
This setting is available only when the Send function (optional for the imageRUNNER
2545/2535/2530/2525/2520) is activated and Use Scan to Memory Media in Memory
Media Settings is set to ‘On’. (See “Restricting Sending Documents to a USB Memory
Media Device,” on p. 4-43.)
NOTE
• The default setting is ‘Do Not Retain’.
• When [Memory Media Send Log] is set to [Do Not Retain], the TX Report or Error TX
Report for send jobs to USB memory media is not printed, and such jobs are not
recorded on the Activity Report.
1
Other System Settings
7
2
Press
(Additional Functions)
➞ [System Settings].
Press [ ] or [ ] until [Memory
Media Send Log] appears ➞
press [Memory Media Send Log].
NOTE
[Memory Media Send Log] is displayed
only if Use Scan to Memory Media in
Memory Media Settings is set to ‘On’.
(See “Restricting Sending Documents
to a USB Memory Media Device,” on
p. 4-43.)
7-8
Retaining Send Log to Memory Media
3
Press [Retain] or [Do Not Retain]
➞ [OK].
[Retain]: Records the log of send jobs to
USB memory media.
[Do Not Retain]: Does not record the log of
send jobs to USB memory
media.
Press
(Reset) to return to the top screen.
7
Other System Settings
4
Retaining Send Log to Memory Media
7-9
Restricting the USB Interface Port
You can specify whether to restrict jobs through the USB port.
IMPORTANT
• The Use USB Device setting restricts the jobs from the devices (such as computers)
connected to the USB port of the machine, but does not affect the use of the USB
memory media.
• Changes made to Use USB Device become effective when the machine is restarted.
To restart the machine, turn it OFF, wait at least 10 seconds, and then turn it ON. For
instructions on how to turn the machine ON and OFF, see Chapter 2, “Before You Start
Using the Machine,” in the User’s Guide.
NOTE
The default setting is ‘On’.
1
Other System Settings
7
2
7-10
Restricting the USB Interface Port
Press
(Additional Functions)
➞ [System Settings].
Press [ ] or [ ] until [Use USB
Device] appears ➞ press [Use
USB Device].
3
Press [On] or [Off] ➞ [OK].
[On]: The machine accepts jobs through
the USB port.
[Off]: The machine does not accept jobs
through the USB port.
Restart the machine.
Turn OFF the machine, wait at least 10 seconds, and then turn it ON.
7
Other System Settings
4
Restricting the USB Interface Port
7-11
Installing Drivers with Plug and Play
You can specify functions suitable for the print and fax options installed in the
machine, so your computer detects and installs drivers that are compatible with the
specified functions.
IMPORTANT
Changes made to PDL Selection (Plug-n-Play) become effective when the machine is
restarted. To restart the machine, turn it OFF, wait at least 10 seconds, and then turn it
ON. For instructions on how to turn the machine ON and OFF, see Chapter 2, “Before
You Start Using the Machine,” in the User’s Guide.
NOTE
If the desired driver does not exist in your computer, it cannot be detected or installed.
1
Press
(Additional Functions)
➞ [System Settings].
Other System Settings
7
2
7-12
Installing Drivers with Plug and Play
Press [ ] or [ ] until [PDL
Selection (Plug-n-Play)] appears
➞ press [PDL Selection
(Plug-n-Play)].
3
Select [UFRII LT], [PCL5e],
[PCL6], [FAX] or [PS3] ➞ press
[OK].
The screen shot on the left may differ from
the actual display depending on the
machine configurations.
Restart the machine.
Turn OFF the machine, wait at least 10 seconds, and then turn it ON.
7
Other System Settings
4
Installing Drivers with Plug and Play
7-13
Using the Inner 2 Way Tray-G1
You can specify whether or not to use the Inner 2 Way Tray-G1.
IMPORTANT
• This setting is available only when the optional Inner 2 Way Tray-G1 is attached.
• Changes made to Use Inner 2way Tray become effective when the machine is
restarted. To restart the machine, turn it OFF, wait at least 10 seconds, and then turn it
ON. For instructions on how to turn the machine ON and OFF, see Chapter 2, “Before
You Start Using the Machine,” in the User’s Guide.
• Be sure to designate the output trays to be used for specific job types. For help, see
Chapter 3, “Configuring the Machine’s Basic Settings,” in the Reference Guide.
NOTE
The default setting is ‘Off’.
1
Other System Settings
7
2
7-14
Using the Inner 2 Way Tray-G1
Press
(Additional Functions)
➞ [System Settings].
Press [ ] or [ ] until [Use Inner
2way Tray] appears ➞ press [Use
Inner 2way Tray].
3
Press [On] or [Off] ➞ [OK].
[On]: Uses the Inner 2 Way Tray-G1.
[Off]: Does not use the Inner 2 Way
Tray-G1.
4
7
Restart the machine.
Other System Settings
5
If you have pressed [On] on step
3, read the confirmation message
➞ press [OK].
Turn OFF the machine, wait at least 10 seconds, and then turn it ON.
Using the Inner 2 Way Tray-G1
7-15
Restricting Printing Images from a USB Memory Media
Device
This mode enables you to restrict printing images from a USB memory media
device.
NOTE
The default setting is ‘Off’.
1
Press
(Additional Functions)
➞ [System Settings].
7
Other System Settings
2
7-16
Press [ ] or [ ] until [Memory
Media Settings] appears ➞ press
[Memory Media Settings].
Restricting Printing Images from a USB Memory Media Device
3
Press [Use Media Print].
4
Press [On] or [Off] ➞ [OK].
[On]: You can print images from a USB
memory media device.
[Off]: You cannot print images from a USB
memory media device.
7
Restart the machine.
Other System Settings
5
Turn OFF the machine, wait at least 10 seconds, and then turn it ON.
Restricting Printing Images from a USB Memory Media Device
7-17
Setting the Secure Printing Function
Secure Printing enables you to hold your print jobs until the appropriate password is
entered at the machine. This way, confidential documents are not left lying on the
machine’s output tray.
Set the timeout period (or hold time) for the secure print jobs so that they can be
automatically discarded from the machine’s memory after the timeout period
elapses. You can also set the machine to accept only the secure print jobs when
documents are printed from a computer.
IMPORTANT
To make changes to the System Settings, enter the System Management mode. For
details, see “Operating the Machine in System Management Mode,” on p. 1-7.
NOTE
The default settings are as follows:
- Delete Timeout: 60 minutes
- Only allow secure print jobs: Off
7
Other System Settings
1
Press
(Additional Functions) ➞ [System Settings].
2
7-18
Setting the Secure Printing Function
Press [ ] or [ ] until [Secure
Print Settings] appears ➞ press
[Secure Print Settings].
Select the function.
● To change the timeout setting:
❑ Press [Delete Timeout].
❑ Press [-] or [+] to enter the desired
timeout period ➞ press [OK].
7
You can also enter values using
-
Other System Settings
3
(numeric keys).
The timeout period can be set from 10 to 240 minutes in one minute increments.
The selected mode is set.
Setting the Secure Printing Function
7-19
● To set the machine to accept only the secure print jobs when documents
are printed from a computer:
❑ Press [Only allow secure print jobs].
❑ Press [On] ➞ [OK]
7
Other System Settings
NOTE
To disable the setting, press [Off] ➞ [OK].
4
Press
(Reset) to return to the top screen.
NOTE
For instructions on how to perform Secure Printing see “Printing from a Computer,” in
Chapter 1 of the Printer Guide.
7-20
Setting the Secure Printing Function
Displaying an Alert Message When the Available
Memory Gets Low
This mode shows you an alert message on the touch panel display when the
memory consumption of all jobs such as printing, copying, and sending reaches a
certain level. The memory consumption level that triggers an alert message can be
specified to your preference, in units of percentage. This helps you confirm the
amount of memory consumed when the message appears and avoid using up
memory unnecessarily.
IMPORTANT
This setting is available only when <Only allow secure print jobs> in <Secure Print
Settings> is set to ‘On’. (See “Setting the Secure Printing Function,” on p. 7-18.)
NOTE
The default setting is ‘80%’.
2
Press
(Additional Functions) ➞ [System Settings].
7
Press [ ] or [ ] until [Mem.
Used When Warning Displayed]
appears ➞ press [Mem. Used
When Warning Displayed].
Displaying an Alert Message When the Available Memory Gets Low
7-21
Other System Settings
1
3
Press [On] or [Off].
[On]: Displays an alert message when
the memory consumption reaches the
level to be specified in the next step.
Press [OK] ➞ go to the next step.
[Off ]: Does not display an alert
message even if the available memory
gets low. Press [OK] to complete the
procedure.
4
Press [ ] or [ ] to decide the
memory consumption level for
an alert message ➞ press [OK].
Press [ ] to decrease the memory
consumption level (minimum: 60%) or
press [ ] to increase it (maximum:
95%). Each press of [ ] or [ ]
decreases or increases the level in five
percent increments.
7
Other System Settings
IMPORTANT
The setting values (60 to 95%) are a rough indication and do not always correspond to
the actual memory consumption; even if an alert message appears, there may be
enough memory left to be used.
7-22
Displaying an Alert Message When the Available Memory Gets Low
Troubleshooting
8
CHAPTER
This chapter describes how to resolve problems related to network settings.
Identifying and Isolating Problems . . . . . . . . . . . . . . . . . . . . . . . . . . . . . . . . . . . . . . . . . . 8-2
Network Connection Problems. . . . . . . . . . . . . . . . . . . . . . . . . . . . . . . . . . . . . . . . . . . . . . . . . . .8-2
Printing Problems . . . . . . . . . . . . . . . . . . . . . . . . . . . . . . . . . . . . . . . . . . . . . . . . . . . . . . . . . . . . .8-5
Data Sending/File Sharing Problems . . . . . . . . . . . . . . . . . . . . . . . . . . . . . . . . . . . . . . . . . . . . . .8-7
8-1
Identifying and Isolating Problems
You may experience problems while operating the machine. Take a minute to see if
you have a simple solution to your problem before contacting your local authorized
Canon dealer.
Network Connection Problems
Troubleshooting
<Check the network connection.> is displayed on the touch panel
display.
Cause
The machine and cable are not properly connected.
Remedy
Turn OFF the machine’s power switches, check that the machine is connected
to the network using the proper cable, and then turn the power switches back
ON. (See Chapter 2, “Before You Start Using the Machine,” in the User’s Guide.)
The machine automatically connects to a destination other than the
intended destination via its dial-up access (when a dial-up router is
connected to your network).
8
Cause
The machine periodically or temporarily communicates with devices on your
network. If a dial-up router is on the same network as the machine, the machine
may connect to a destination other than the intended destination, depending on
the settings of the machine or dial-up router. This may result in subscriber line
charges and call charges.
Examples:
• The file or mail server’s host name or IP address set on the machine does not
exist on the network.
• The DNS server exists on an external network.
• You attempt to access a device connected to an external network, if the
device’s information is set on the DNS server on the network to which the
machine is connected.
8-2
Identifying and Isolating Problems
Remedy
Check the following:
• If the dial-up router does not have to send packets via broadcast, change the
router settings to ensure that it sends packets via a method other than
broadcast. If dial-up router has to send packets via broadcast, check that the
settings are correct.
• Check that the file or mail server’s host name or IP address set on the
machine is correct.
• If you attempt to use a DNS server on an external network to access a device
on the network to which the machine is connected, set the destination using
an IP address, not a host name.
• If information about a device on an external network is set on the DNS server
on the network to which the machine is connected, check the settings.
Cause 1
The IP addresses of computers on which the Remote UI or utility is used are not
allowed by the machine.
Remedy
Check the settings for <IP Address Range>. If the machine is set to restrict
access from the IP address of a computer, you cannot browse the machine’s
information from the computer using the Remote UI. (See “Setting the IP
Address Range,” on p. 6-21.)
Cause 2
HTTP is disabled.
Remedy
Set Use HTTP to ‘On’, and make sure that the same port number set in the
machine is used on the browser. (See “Setting the Use of HTTP,” on p. 3-33.)
Cause 3
The Remote UI is disabled.
Remedy
Set Remote UI On/Off to ‘On’. (See “Restricting the Use of Remote UI,” on
p. 6-34.)
Cause 4
SNMP is disabled.
Remedy
Enable SNMP. (See “Communication Environment Settings,” on p. 2-5.)
Cause 5
The SNMP community name does not match.
Remedy
Check that the correct SNMP community name is used. If the SNMP community
name set for your utility is different from the one set for the machine, the utility
will not detect the machine. (See “Communication Environment Settings,” on
p. 2-5.)
Identifying and Isolating Problems
8-3
Troubleshooting
Detailed information concerning the machine cannot be set or
browsed using the Remote UI or utility.
8
<IEEE802.1X Error Set the correct certificate information.> or
<IEEE802.1X error. Set the correct Cert. info.> is displayed.
Cause
The correct client authentication information (the key pair and certificate, user
name and password, and the CA certificate) is not set.
Remedy
Check for incorrect settings in the authentication method and authentication
information (the key pair and certificate, user name and password, and the CA
certificate). (See “IEEE802.1X Authentication Settings,” on p. 2-9.)
<IEEE802.1X Error Change the password.> or
<IEEE802.1X error. Change the password.> is displayed.
Cause
The password has expired.
Remedy
Set a new password. (See “Selecting the IEEE802.1X Authentication Method,”
on p. 2-10.)
Troubleshooting
<IEEE802.1X Error Check authentication settings.> or
<IEEE802.1X error. Check authentication settings.> is displayed.
Cause
The specified authentication method of the machine does not match the
authentication method of the RADIUS server.
Remedy
Make sure that the correct authentication method is specified on the machine. If
the information set on the machine is inconsistent with that of the RADIUS
server, specify the correct authentication method. (See “Selecting the
IEEE802.1X Authentication Method,” on p. 2-10.)
8
<IEEE802.1X Error The Certificate has expired.> or
<IEEE802.1X error. The Certificate has expired.> is displayed.
Cause
The server certificate sent from the RADIUS server has expired.
Remedy
Check the expiration date of the server certificate on the RADIUS server.
<IEEE802.1X Error The Certificate is incorrect.> or
<IEEE802.1X error. The Cert. is incorrect.> is displayed.
8-4
Cause
An error occurred when verifying the server certificate sent from the RADIUS
server using the CA certificate.
Remedy
Check for any errors in the server certificate on the RADIUS server, as well as
the CA certificate registered on the machine. (See “Checking/Deleting a CA
Certificate,” on p. 3-31.)
Identifying and Isolating Problems
<IEEE802.1X Error Cannot analyze the Certificate.> or
<IEEE802.1X error. Cannot analyze the Certificate.> is displayed.
Cause
The machine failed to analyze the server certificate sent from the RADIUS
server.
Remedy
Check for any errors in the server certificate on the RADIUS server.
<IEEE802.1X Error No reply from the destination.> or
<IEEE802.1X error. No reply from the dest.> is displayed.
Cause
An error occurred when communicating with the authenticator.
Remedy
Check for any errors in the authenticator (LAN switch) settings, as well as the
RADIUS server settings.
Cause
An unknown error occurred.
Remedy
Check for any errors in the settings of the supplicant machine, authenticator
(LAN switch), as well as the RADIUS server.
Troubleshooting
<IEEE802.1X Error Unknown error has occurred.> or
<IEEE802.1X err. Unknown err. has occurred.> is displayed.
Printing Problems
8
You cannot install drivers.
Cause
The IP address of the computer in which a driver is to be installed is not
permitted by the settings for [IP Address Range Settings] on the IPv4 or IPv6
Settings screen.
Remedy
If the IP address of the computer in which a driver is to be installed is not
permitted by the settings for [IP Address Range Settings] on the IPv4 or IPv6
Settings screen, the driver cannot be installed successfully. Check the settings
for [IP Address Range Settings] on the IPv4 or IPv6 Settings screen. (See
“Setting the IP Address Range,” on p. 6-21.)
You cannot print from a computer on the network.
Cause 1
The machine and cable are not properly connected.
Remedy
Turn OFF the machine’s power switches, check that the machine is connected
to the network using the proper cable, and then turn the power switches back
ON. (See Chapter 2, “Before You Start Using the Machine,” in the User’s Guide.)
Identifying and Isolating Problems
8-5
Cause 2
TCP/IP network is not properly set up.
Remedy
Check the following:
• Confirm that the IPv4 addresses are properly set up. If the IPv4 addresses
were set using DHCP, BOOTP, or RARP, confirm that they are operating.
• Confirm that the IPv6 addresses are properly set up. After checking the
settings of the router, set <Use Stateless Address> to ‘On’ to confirm whether
you can obtain an address. If the IPv6 addresses were set using DHCPv6,
confirm that DHCPv6 is operating.
NOTE
Your computer may not be able to recognize the machine even though the IP address
settings are appropriate. This problem may be resolved by delaying the startup of
network communications for the machine. (See “Setting Startup Time,” on p. 7-3.)
Cause 3
The computer that is printing is not properly set up.
Remedy
Check the following:
Troubleshooting
• Confirm that the proper printer driver is installed. If you are printing from
Windows, each computer must have a printer driver installed. For instructions
on how to install printer drivers, see the Printer Driver Installation Guide or
Mac Printer Driver Installation Guide. (See Chapter 3, “Accompanying
CD-ROMs,” in the User’s Guide.)
• Confirm that the correct printer is set as the output destination for the
computer that is printing. Check the output destination in [Control Panel]
(Windows) or [System Preferences] (Macintosh). For more information, see
the Windows Printer Driver Guide or the Mac Printer Driver Guide.
8
8-6
Cause 4
The name of the file being printed is too long.
Remedy
Normally LPR (or the Microsoft TCP/IP Printer, if you are using Windows 2000/
XP/Vista/7/Server 2003/Server 2008) sends jobs either under the name of the
application software used for printing or under the file name. However, a job
name longer than 255 characters cannot be sent to the machine. To correct this
problem, rename the file with a shorter name.
Cause 5
The IP address of the computer sending data (print or fax jobs) to the machine
is not permitted by the settings for [IP Address Range Settings] on the IPv4 or
IPv6 Settings screen.
Remedy
Check the settings for [IP Address Range Settings] on the IPv4 or IPv6 Settings
screen. (See “Setting the IP Address Range,” on p. 6-21.)
Cause 6
An error message is displayed on the touch panel display of the machine.
Remedy
After confirming the error message, see Chapter 6, “Troubleshooting,” in the
Reference Guide and perform the necessary operations according to the error
message displayed.
Identifying and Isolating Problems
The Printer Port Name is not displayed in [Print to the following port].
Cause 1
The machine and the cable are not properly connected.
Remedy
Check that the machine is connected to the network using the proper cable, and
then restart the machine. (See Chapter 2, “Before You Start Using the Machine,”
in the User’s Guide.)
Cause 2
The computer that is printing is not properly set up.
Remedy
Check the following:
• Confirm that the proper printer driver is installed in each computer. For
instructions on installing the printer driver, see the Printer Driver Installation
Guide. (See Chapter 3, “Accompanying CD-ROMs,” in the User’s Guide.)
• Confirm that the correct printer is set as the output destination for the
computer which is printing, and that the spool is properly set.
Troubleshooting
Data Sending/File Sharing Problems
You cannot send data to an FTP server.
Cause 1
The FTP server is not set correctly.
Remedy
Perform the following to check the server status. (If you are using Windows,
perform these from the MS-DOS prompt.)
• Example using UNIX, where the FTP server has the IP address:
192.168.1.195
U:>ftp 192.168.1.195
*Connect to server
Connected to 192.168.37.195.
220 canmfs FTP server (UNIX(r) System V Release 4.0) ready.
User (192.168.37.195:(none)): user_name
*User login
331 Password required for user_name.
Password:
*Enter password
230 User user_name logged in.
ftp> cd /export/share
*Move to data destination directory
250 CWD command successful.
ftp> bin
*Set data transfer type (binary)
200 Type set to I.
ftp> put sample.tif
*Set transfer file name for verification
ftp> bye
*Cut off server connection
221 Goodbye
8
NOTE
If the above are confirmed and file sharing still does not operate normally, consult the
network administrator for the environment you are using.
Identifying and Isolating Problems
8-7
Troubleshooting
Cause 2
The machine’s address [User] setting contains one or more spaces after the
user name.
Remedy
Ensure that the machine’s address [User] setting does not contain spaces after
the user name.
Cause 3
The machine was turned OFF while sending data to the FTP server, and when
the machine was turned back ON, it attempted to resend the data. (If a
Windows 2000/XP/Vista/7/Server 2003/Server 2008 FTP server is being used.)
Remedy
If power to the machine is turned OFF while data is being sent to the FTP
server, the FTP server may hold the data in a writing-in-progress state.
Therefore, this data cannot be overwritten even when the machine reconnects
and sends the same data again. Stop the FTP server temporarily and delete the
held data so that it can be sent again.
Cause 4
An error message is displayed on the touch panel display of the machine.
Remedy
After confirming the error message, see Chapter 6, “Troubleshooting,” in the
Reference Guide and perform the necessary operations according to the error
message displayed.
You cannot send data to a shared folder (Windows and Samba file
sharing).
8
Cause 1
File sharing settings for the shared folder are incorrect.
Remedy
Check the following settings:
• On the computer you are using, go into Windows Explorer ➞ double-click
[Entire Network] ➞ check that the computer you want to share is listed there.
You can also check for the computer as follows: On the [Start] menu, point to
[Find] ➞ click [Computer] ➞ enter the name of the computer you want to
share ➞ check that the computer is on the network.
• If the computer you want to share is listed, double-click its icon to see whether
the name of the folder you want to share is listed.
• If the shared folder name does not appear, see “Setting File Server (File
Sharing),” on p. 5-18, and then check the shared folder settings.
8-8
Cause 2
An error message is displayed on the touch panel display of the machine.
Remedy
After confirming the error message, see Chapter 6, “Troubleshooting,” in the
Reference Guide and perform the necessary operations according to the error
message displayed.
Identifying and Isolating Problems
Appendix
9
CHAPTER
This chapter includes the system settings, glossary, and index.
System Setting Items . . . . . . . . . . . . . . . . . . . . . . . . . . . . . . . . . . . . . . . . . . . . . . . . . . . . 9-2
Managing the Machine . . . . . . . . . . . . . . . . . . . . . . . . . . . . . . . . . . . . . . . . . . . . . . . . . . 9-11
Glossary . . . . . . . . . . . . . . . . . . . . . . . . . . . . . . . . . . . . . . . . . . . . . . . . . . . . . . . . . . . . . 9-12
Index . . . . . . . . . . . . . . . . . . . . . . . . . . . . . . . . . . . . . . . . . . . . . . . . . . . . . . . . . . . . . . . . 9-21
9-1
System Setting Items
Item
Settings
Applicable
Page
System Manager Settings
System Manager
32 characters maximum
System Manager ID
Seven digit number maximum, 7654321
System Password
Seven digit number maximum, 7654321
p. 1-4
Appendix
Department ID Management
Department ID
Management
On, Off
Register ID/Password
Register, Edit, Erase, Turn Limits On/Off and Set
Page Limits
Page Totals
Clear, Clear All Totals, Print List
Allow ID
Unknown Printer Jobs
On, Off
Allow ID Unknown
Remote Scan Jobs
On, Off
p. 6-2
Communications Settings*1
Maximum TX Data Size: 0 to 99 MB, in one MB
increments, 3 MB
9
E-mail/I-Fax Settings
Divided TX over Max. Data Size: On, Off
p. 4-2
Default Subject: 40 characters maximum
Send Start Speed: 33600 bps, 14400 bps, 9600
bps, 7200 bps, 4800 bps, 2400 bps
Fax Settings
Receive Start Speed: 33600 bps, 14400 bps,
9600 bps, 7200 bps, 4800 bps, 2400 bps
p. 4-4
R-Key Settings: PSTN/PBX
Memory Lock Settings
9-2
System Setting Items
On, Off
p. 4-8
Settings
Applicable
Page
United Kingdom (GB), Germany (DE), France
(FR), Italy (IT), Spain (ES), Netherlands (NL),
Denmark (DK), Norway (NO), Sweden (SE),
Finland (FI), Austria (AT), Belgium (BE),
Switzerland (CH), Portugal (PT), Ireland (IE),
Greece (GR), Luxemburg (LU), Hungary (HU),
Czech Republic (CZ), Russia (RU), Slovenia (SI),
South Africa (ZA), Poland (PL), Belarus (BY),
Egypt (EG), Jordan (JO), Saudi Arabia (SA),
Ukraine (UA), Other
p. 4-12
Device Name
32 characters maximum
p. 7-2
Location
32 characters maximum
User ID Management
On, Off
Add user name to Send Document Name: On, Off
p. 6-19
IP Address Settings: IP Address, Subnet Mask,
Gateway Address, DHCP, RARP, BOOTP
p. 2-15
PING Command: Enter an IP address and press
[Start].
p. 2-22
IP Address Range Settings: On, Off
Up to 10 IPv4 addresses can be stored.
p. 6-21
DNS Server:
DNS Server Address Settings: Primary DNS
Server, Secondary DNS Server
DNS Host Name/Domain Name Settings: Host
Name (47 Characters maximum), Domain Name
(47 Characters maximum)
DNS Dynamic Update Settings: On, Off
p. 3-2
Item
Select Country/Region
Device Info Settings
Network Settings
IPv4 Settings
Appendix
TCP/IP Settings
9
System Setting Items
9-3
Item
Settings
Applicable
Page
Use IPv6: On, Off
Stateless Address Settings:
Use Stateless Address: On, Off
Manual Address Settings:
Use Manual Address: On, Off
Manual Address: 39 Characters maximum
Prefix Length: 0 to 128 (64)
Default Router Addr.: 39 Characters maximum
p. 2-18
Use DHCPv6: On, Off
PING Command: Enter an IP address or host
name and press [Start].
p. 2-23
IP Address Range Settings: On, Off Up to 10 IPv6
addresses can be stored.
p. 6-25
DNS Server:
DNS Server Address Settings: Primary DNS
Server, Secondary DNS Server
DNS Host Name/Domain Name Settings: Use
Same Host Name/ Domain Name as IPv4 (On,
Off), Host Name (47 Characters maximum),
Domain Name (47 Characters maximum)
DNS Dynamic Update Settings: On, Off
Register Manual Address: On, Off
Register Stateful Address: On, Off
p. 3-6
WINS Configuration
WINS Resolution: On, Off
WINS Server: IP address of the WINS server
p. 3-11
LPD Settings
On, Off
p. 3-45
RAW Settings
Use RAW: On, Off
Use Bidirectional: On, Off
p. 3-45
WSD Print Settings
Use WSD: On, Off
Use WSD Browsing: On, Off
Use Multicast Discovery: On, Off
p. 3-45
SNTP Settings
Use SNTP: On, Off
Polling Interval: Interval for performing time
synchronization (1 to 48 hours, 24)
NTP Server Address: IP address or host name
NTP Server Check
p. 3-13
Appendix
IPv6 Settings
9
9-4
Use PASV Mode for FTP On, Off
p. 3-16
FTP Extension
p. 3-18
System Setting Items
On, Off
Applicable
Page
Generate Key: Generate a key pair by specifying
the following:
Key Name: 24 Characters maximum
Signature Algorithm: SHA1, SHA256, SHA384,
SHA512
Key Length (bit): 512, 1024, 2048, 4096
Validity Start Date: Enter <DD/MM YYYY>.
Validity End Date: Enter <DD/MM YYYY>.
Country/Region: Australia (AU), China (CN),
Czech Republic (CZ), Germany (DE), Denmark
(DK), Estonia (EE), Spain (ES), Finland (FI),
France (FR), United Kingdom (GB), Greece
(GR), Hungary (HU), Italy (IT), Japan (JP),
Korea (KR), Netherlands (NL), Norway (NO),
Poland (PL), Portugal (PT), Russia (RU),
Sweden (SE), Singapore (SG), Slovenia (SI),
Taiwan (TW), United States (US), Other
(two-letter Internet country code)
State: 24 Characters maximum
City: 24 Characters maximum
Organization: 24 Characters maximum
Organization unit: 24 Characters maximum
Common Name: 48 Characters maximum
Key and Certificate List: Show certificate details,
erase a key and certificate, or display what the
certificate is used for.
CA Certificate List: Show certificate details or
erase a CA certificate.
Register Key and Certificate: Keys and
Certificates (a maximum of three key pairs can be
registered)
Register CA Certificate: CA Certificates (a
maximum of 10 CA certificates can be registered)
p. 3-20
Use HTTP
On, Off
p. 3-33
SSL Settings
Functions using SSL are listed. Press [Key and
Cert.] for setting the default key.
Key and Certificate List: Show certificate details,
erase a key and certificate, or display what the
certificate is used for.
p. 3-35
Port Number Settings
LPD (515), RAW (9100), HTTP (80), SMTP Receive
(25), POP3 Receive (110), FTP Sending (21),
SMTP Sending (25), SNMP (161), WSD (3702),
HTTPS (443)
p. 3-38
Certificate Settings
Appendix
Settings
Item
9
System Setting Items
9-5
Settings
Applicable
Page
Receiving MAC
Address Settings
Apply Settings: On, Off
MAC addresses (a maximum of 10 addresses can
be registered)
p. 6-29
Proxy Settings
Use Proxy: On, Off
Server Address: Server name or IP address (128
Characters maximum)
Port Number: 1 to 65535 (80)
Use Proxy within the Same Domain: On, Off
Authentication Settings
Use Proxy Authentication: On, Off
User: 24 Characters maximum
Password: 24 Characters maximum
p. 3-41
Item
Confirm Dept. ID
On, Off
Management Password
p. 3-43
SMB Settings
Use SMB Client
On, Off
Server
15 Characters maximum
Workgroup
15 Characters maximum
Comment
48 Characters maximum
LM Announce
On, Off
p. 3-49
Appendix
SNMP Settings
9
Use SNMP v. 1
On, Off
Community Name 1, 2
15 Characters maximum
Writable SNMP 1, 2
On, Off
Use SNMP v. 3
On, Off
The settings for SNMPv3 can be specified only on
the Remote UI. See Chapter 4, “Customizing
Settings,” in the Remote UI Guide.
User Settings
Context Settings
Get Printer
Management
Information from Host
On, Off
Enable Dedicated Port
Enable Dedicated Port
On, Off
p. 2-5
(See the
Remote UI
Guide.)
p. 2-5
p. 2-5
Ethernet Driver Settings
Auto Detect
9-6
On, Off
Communication Mode
Half Duplex, Full Duplex
Ethernet Type
10 Base-T, 100 Base-TX
MAC Address
Display only
System Setting Items
p. 2-2
Item
Applicable
Page
Settings
E-mail/I-Fax
On, Off
POP
On, Off
Authentication/
Encryption
POP Authentication before Send: On, Off
SMTP Authentication (SMTP AUTH): On, Off
Disp Auth Screen When Sending*4: On, Off
Carry Over Authentication*4: On, Off
User: User name for SMTP authentication (64
Characters maximum)
Password: Password for SMTP authentication (32
Characters maximum)
Allow SSL (POP): On, Off
Allow SSL (SMTP Send): On, Off
Allow SSL (SMTP Receive): SSL, On, Off
The settings to verify the SSL server certificates
for POP/SMTP are available on the Remote UI.
See Chapter 4, “Customizing Settings,” in the
Remote UI Guide.
SMTP Server
Server name or IP address (47 Characters
maximum)
E-mail Address
64 Characters maximum
POP Server
Server name or IP address (47 Characters
maximum)
POP Address
32 Characters maximum
POP Password
32 Characters maximum
POP Interval
0 (Off) to 99
Startup Time Settings
Startup Time Settings
p. 3-52
Appendix
SMTP Receive
9
p. 7-3
0 to 300 seconds, 0 sec(s)
IEEE802.1X Settings
IEEE802.1X Settings
On, Off
Login Name: 24 characters maximum
Use TLS: On, Off
Key and Cert.: Select the default key and
certificate from the list
Use TTLS: On, Off
TTLS Internal Protocol: MSCHAPv2, PAP
Use PEAP: On, Off
User: 24 characters maximum
Password: 24 characters maximum
Login Name as User Name: On, Off
p. 2-10
System Setting Items
9-7
Item
Settings
Applicable
Page
Forwarding Settings
Receive Type*1
All, Fax, I-Fax
Validate/Invalidate
On, Off
Condition Name: 50 characters maximum
Forwarding Conditions
Receive Type*1: Fax, I-Fax
disregarded, does not exist*, equals, differs
from, begins with, ends with, contains, does
not contain
* Only when <Fax> is selected in <Receive
Type>.
Register
Forwarding Destination: Select from the list of
registered addresses
Appendix
File Format:
When <Fax> is selected in <Receive Type>: TIFF,
PDF
When <I-Fax> is selected in <Receive Type>:
PDF (B&W)/JPEG (Color), TIFF (B&W)/JPEG
(Color), PDF, TIFF (B&W)/PDF (Color)
Divide into Pages: Off, On
p. 4-14
Receive Type*1: Fax, I-Fax
Forwarding Destination: Select from the list of
registered addresses
9
Forward w/o Cond.
File Format:
When <Fax> is selected in <Receive Type>: TIFF,
PDF
When <I-Fax> is selected in <Receive Type>:
PDF (B&W)/JPEG (Color), TIFF (B&W)/JPEG
(Color), PDF, TIFF (B&W)/PDF (Color)
Divide into Pages: Off, On
Detail/Edit
See “Register”.
Erase
Yes, No
Print List
Yes, No
Print Image:On, For Error Only, Off
Store/Print When
Forwarding*1
9-8
System Setting Items
Store Image to Memory:For Error Only, Do Not
Store
p. 4-32
Item
Applicable
Page
Settings
Restrict the Send Function*1
Address Book
Password
7 digits maximum
p. 4-35
Restrict New Addresses On, Off
p. 4-37
Allow Fax Driver TX
On, Off
p. 4-38
Restrict Recall
On, Off
p. 4-40
Confirm Entered Fax
Numbers
On, Off
p. 4-41
Restrict Sequential
Broadcast
Broadcast Confirmation, Prohibit Broadcast, Off
p. 4-42
Server: 24 characters maximum
Server Address: 47 characters maximum
Location to Start Search: 120 characters
maximum
Port Number: 1 to 65535, 389
Max No. of Addresses: 1 to 1000, 100
Search Timeout: 30 to 300, 60
Login Information: Do not use, Use, Use (security
authent.)
Server LDAP version and character code: Select
the appropriate LDAP version and character code
Carry Over Send Auth. Info.*4: On, Off
User*2: 120 characters maximum
Password*2: 24 characters maximum
Domain Name*3: 120 characters maximum
Display authentication screen*2: On, Off
p. 3-63
Server: 24 characters maximum
Server Address: 47 characters maximum
Location to Start Search: 120 characters
maximum
Port Number: 1 to 65535, 389
Max No. of Addresses: 1 to 1000, 100
Search Timeout: 30 to 300, 60
Login Information: Do not use, Use, Use (security
authent.)
Server LDAP version and character code: Select
the appropriate LDAP version and character code
Carry Over Send Auth. Info.*4: On, Off
User*2: 120 characters maximum
Password*2: 24 characters maximum
Domain Name*3: 120 characters maximum
Display authentication screen*2: On, Off
p. 3-70
Register
Detail/Edit
Appendix
Register LDAP Server*1
9
System Setting Items
9-9
Item
Settings
Applicable
Page
Erase
Yes, No
p. 3-71
Print List
Yes, No
p. 3-74
Reg./Edit LDAP Search
Register LDAP search attributes, or edit/erase the
stored search attributes.
p. 3-72
Memory Media Send
Log*1
Retain, Do Not Retain
p. 7-8
Remote UI On/Off
On, Off
Use SSL: On, Off
p. 6-34
Auto Online: On, Off
p. 7-5
Auto Online/Offline
Auto Offline: On, Off
Job Log Display
On, Off
p. 6-37
License Registration
Enter a license key using the numeric keys.
p. 1-12
Use USB Device
On, Off
p. 7-10
PDL Selection
(Plug-n-Play)*1
UFRII LT, PCL5e, PCL6, FAX, PS3
Update Firmware
Yes, No
p. 7-12
Secure Print Settings
Appendix
Delete Timeout
9
10 to 240 minutes in one minute increments,
60min
p. 7-18
Only allow secure print
jobs
On, Off
Display Dept. ID/User
Name
On, Off
p. 6-39
Use Inner 2Way Tray*1 On, Off
p. 7-14
Memory Media
Settings
Use Scan to Memory Media: On, Off
Use Media Print: On, Off
p. 4-43
p. 7-16
Mem. Used When
Warning Displayed
On, Off
60 to 95% in five percent increments, 80%
p. 7-21
The default settings are indicated in bold.
*1 Indicates items whose availability may vary depending on the machine configuration.
*2 Indicates items that appear only when ‘Use’ or ‘Use (security authent.)’ is selected for Login Information.
*3 Indicates items that appear only when ‘Use (security authent.)’ is selected for Login Information.
*4 Indicates items that appear only when Authorized Send is activated.
IMPORTANT
If User ID Management is enabled, only users registered as “System Manager” can
change the System Settings by logging in to the machine with their User ID and
password. In this case, you cannot log in as the System Manager by entering the
System Manager ID and System Password.
9-10
System Setting Items
Managing the Machine
You can use the Remote UI installed in the machine to manage it on a web browser.
For more information on the Remote UI, see the Remote UI Guide.
Appendix
NOTE
You can use NetSpot Device Installer, Canon utility software downloadable from the
Canon web site, for the initial settings of the machine connected to a network. For
instructions on how to use NetSpot Device Installer, see Online Help for NetSpot
Device Installer.
9
Managing the Machine
9-11
Glossary
Numerics
10BASE-T
The Ethernet standard supporting data transfer rates up to 10 Mbps, which utilizes a
twisted-pair cable.
100BASE-TX
The Ethernet standard supporting data transfer rates up to 100 Mbps, which utilizes
two pairs of high grade twisted-pair cables.
A
Authentication
Appendix
A system process which validates a user’s logon information. The user’s name and
password must be registered in the system beforehand, and if the system detects a
match, access is granted, depending on the user’s access rights and permissions.
B
BOOTP
9
BOOTstrap Protocol. A protocol that enables a client machine to automatically obtain
network setup information from a server over a TCP/IP network. BOOTP enables a
client to automatically locate such information as the host name, domain name, and
IP address, so that it is not necessary to enter these items manually.
bps
Stands for bits per second. The measure of transmission speed used in relationship
to networks and communication lines.
Broadcasting
Transmitting documents to more than one location (through the machine’s memory).
C
CA certificate
A digital certificate issued by a third party CA (Certificate Authority), to be used for
identification purposes in digital business transactions.
9-12
Glossary
Community Name
An identification keyword for SNMP (Simple Network Management Protocol).
Cursor
The underline symbol you see on the touch panel display when you register numbers
and names in the machine.
D
Daemon
A process that runs in the background and performs a specified operation, at
predefined times or in response to certain events. Typical daemons include print
spoolers and automated network information system protocols.
Default
The machine is configured at the factory with settings that we recommend. These are
known as factory default settings. You can customize your machine by re-configuring
these settings.
Dynamic Host Configuration Protocol. A protocol which automatically specifies the
network settings of a client on a TCP/IP network. Many of the settings required to set
up TCP/IP, which is the standard protocol of the Internet, can be made automatically
using DHCP.
DNS
Domain Name System. The system that associates the IP address assigned to a
computer with the domain name.
9
DNS server
Domain Name System server. A server which maintains a database that translates
the domain names of Internet servers, such as www.w3.org, into Internet Protocol
(IP) addresses, such as “18.176.0.26”. This enables clients to connect to a server
with a host name rather than a numeric IP address.
Domain
A management concept that divides large scale networks into groups for identifying
individual computers and users. The Internet is managed by classifying domains
according to geographical location or type (business, organization, educational
institution, etc.).
Glossary
Appendix
DHCP
9-13
E
Ethernet
An industry standard LAN (Local Area Network) system for connecting multiple
computers. Data is sent from one computer to another by dividing it into packets, and
the packets reach their destinations smoothly without any collision with other packets.
F
File server
A personal computer or workstation to which two or more users on client personal
computers can gain access via a LAN (Local Area Network), to share and use its hard
disk drive.
Forwarding
The process of sending a received fax/I-fax document to another destination. For
example, if your machine at work receives a document, you can have the machine
forward the document to a machine at your home.
FQDN
Appendix
Fully Qualified Domain Name. A full domain name, consisting of its local host name
and its domain name. An FQDN is sufficient to ascertain a specific Internet address
for any host on the Internet. This (name resolution) process uses DNS (Domain
Name System).
FTP
File Transfer Protocol. A client-server protocol enabling a user to transfer files on one
computer to and from another computer over a TCP/IP network. The File Transfer
Protocol also governs the client program with which the user transfers files.
9
G
Gateway Address
The default address of a network or Web site. It provides a single domain name and
point of entry to the site.
H
HTTP
Hypertext Transfer Protocol. The client-server TCP/IP protocol used on the World
Wide Web for the transfer of HTML (Hyper Text Mark-up Language) documents
across the Internet.
9-14
Glossary
I
IEEE802.1X authentication
An authentication method that permits only supplicants (devices) authenticated by a
RADIUS (Remote Authentication Dial-In User Service) server to connect to the
network via an authenticator.
I-fax
I-fax (Internet fax) enables you to send and receive a scanned original converted to
image data as an e-mail attachment to/from any I-fax compatible facsimile or personal
computer with Internet e-mail functionality.
Interface
The connection between two devices that makes it possible for them to communicate
with each other. The machine features a USB interface, which makes it compatible
with IBM and similar personal computers.
Interface cable
The cable used to create the interface between a printer and a computer.
The underlying set of networking rules that describes how data is transmitted across
the Internet. Internet Protocol enables data from one computer to be split into
packets, and sent to another computer with a specific IP address.
IP address
Internet Protocol address. A network address used by IP (Internet Protocol) to specify
a computer or device on the Internet. Currently, two versions of IP are in use: IPv4
and IPv6.
IPv4
Internet Protocol version 4. An IPv4 address is a 32-bit numeric address, usually
written as four numbers delimited by periods. For example, ‘128.121.4.5’.
IPv6
Internet Protocol version 6. An IPv6 address is 128-bit long and consists of eight
groups of four hexadecimal digits delimited by colons. For example,
‘2002:0db6:58b1:02c3:3308:7a2e:6309:2665’. In an IPv6 network, a computer or
device can use multiple addresses, as represented by link local address, stateless
address, etc.
Glossary
9-15
Appendix
Internet Protocol (IP)
9
K
Key pair
In SSL security, the key pair consists of a public key and a private key. A public key is
known to “everyone,” and a private or secret key is known only to the recipient of the
message.
L
LAN
Local Area Network. A network system formed by linking a server, workstations,
devices, and computers, which are all located in the same building or some other
relatively limited area.
LDAP
Lightweight Directory Access Protocol. A network protocol that enables you to locate
organizations, individuals, and other resources, such as files and printers on a
network, whether on the public Internet or on a corporate intranet.
Login Service
Appendix
A service for performing user authentication for a machine. To identify a certified user,
a user name and password are required for authentication. Login services for
machine include Department ID Management.
LPD
Line Printer Daemon. A daemon is a program that runs, without human intervention,
to accomplish a given task. The Line Printer Daemon controls the flow of print jobs to
a printer.
9
LPR
Line Printer Remote. A UNIX command used to print a file via a TCP/IP network.
M
MAC address
Media Access Control address. The hardware address of the network adapter of a
computer connected to a local area network.
Memory Lock
Usually a document is printed as soon as it is received; but with Memory Lock, all
documents received are stored in memory until you enter a password to print them.
This enables you to attend to the documents at your own leisure, and prevents printed
documents from piling up in the output tray.
9-16
Glossary
N
NetBIOS
Network Basic Input Output System. A program that enables applications on different
computers to communicate within a LAN (Local Area Network). NetBIOS is used in
Ethernet, and Windows 2000/XP/Vista/7/Server 2003/Server 2008 networks.
NTFS
NT File System. A native file system of Windows NT, offering a higher level of security
through a file encryption system, as well as native support for file compression. NTFS
is also used in Windows 2000/XP/Vista/7/Server 2003/Server 2008 operating
systems.
P
PASV mode
PBX
Private Branch eXchange. An in-house telephone switching system that
interconnects telephone extensions to each other, as well as to the external
telephone network. A PBX controls the flow of telephone traffic through instruments,
such as paging systems, and automatic callback and dialing.
PCL
Printer Control Language. A protocol originally designed by Hewlett-Packard,
enabling PCs to communicate with printers. PCL has become a standard for laser
and ink jet printers, and is now supported by most printer manufacturers.
PDF
Portable Document Format. The page description language used in Adobe Systems’
Acrobat document exchange system, which is restricted neither by device nor
resolution. PDF displays documents in a way that is independent of the original
application software, hardware, and operating system used to create those
documents. A PDF document can contain any combination of text, graphics, and
images.
Glossary
9-17
Appendix
Passive FTP mode. An alternative mode for initiating FTP connections. In this mode,
data transfer is initiated by the FTP client, rather than the FTP server. As corporate
firewalls generally reject external data requests from FTP servers, the PASV mode
may allow FTP to be used with NAT (Network Address Translation) and with clients
behind firewalls, depending on the environment. The PASV mode also ensures that
all data flow requests come from inside the network where the client is located.
9
PING
PING is a command line utility that allows you to send a request to another machine
on the network which hopefully then replies.This action sends Internet Control
Message Protocol (ICMP) Echo Request messages to verify IP-level connectivity to
another TCP/IP computer. The action prompts the receipt of corresponding Echo
Reply messages, along with the round-trip times. Ping Host is based on the Ping
command, the primary TCP/IP command used to troubleshoot connectivity,
reachability, and name resolution.
Protocol
A set of rules that govern the transmission of data across a network. Examples of
protocols are DHCP, BOOTP, RARP, and TCP/IP.
R
RARP
Reverse Address Resolution Protocol. A protocol which associates a network adapter
address (MAC address) with an IP (Internet Protocol) address.
Raw
A printing protocol used with Windows 2000/XP/Vista/7/Server 2003/Server 2008. It
can print at higher speeds than LPD (Line Printer Daemon).
Appendix
Remote UI
Remote User Interface. The Remote UI is software that enables you to perform
operations, which are usually performed on the machine’s control panel, using a Web
browser (such as Microsoft Internet Explorer or Safari) over a network.
9
S
SMB
Server Message Block. A protocol that provides file and printer sharing over a
network for Windows computers.
SMB server
Server Message Block server. A server running the SMB protocol.
SMTP
Simple Mail Transfer Protocol. A TCP/IP protocol for sending messages from one
computer to another on a network.
9-18
Glossary
SNTP
Simple Network Time Protocol. A simplified version of NTP. This protocol enables
computers in a network to synchronize their system times with a public time server
used around the world. The time public NTP servers provide is generally accurate to
within milliseconds.
Spool
Simultaneous Peripheral Operations On-Line. “Spooling” means putting jobs in a
buffer, which is a special area in memory or on a disk. Devices access data at
different rates. The buffer provides a holding area where the data is held until the
device for which it is meant is ready to access it.
SSL
Secure Sockets Layer. A protocol that ensures security and privacy when transmitting
private documents over the Internet.
SSL encryption
SSL uses two keys to encrypt data: a public key, which is known to “everyone,” and a
private or secret key, which is known only to the recipient of the message.
If the machine is connected to a switching hub, it may not be able to connect to a
network when it is powering ON. This occurs because the spanning tree process,
performed between switching hubs, prevents them from communicating with each
other immediately after the machine connects to the network. A delay in the startup
time is necessary for the machine to connect to the network properly.
Subnet
A portion of a network, which may be a physically independent network segment, that
shares a network address with other portions of the network, and is distinguished by
a subnet number. For example, all devices with IP addresses that start with
100.100.100. would be part of the same subnet.
Subnet Mask
The method used to determine to which subgroup, or subnet, an IP address belongs.
On TCP/IP networks, all devices whose IP addresses have the same prefix would
belong to the same subnet. Dividing a network into subnets is useful for both security
and performance reasons.
Switching hub
A network connection box to which a number of computers can be connected.
Conventional hubs send each data packet to every connected computer on the
network, whereas a switching hub forwards data packets from the network to the
appropriate computer, according to the packet’s address. Since a switching hub
forwards packets only to their intended recipients, it provides greater efficiency.
Glossary
9-19
Appendix
Startup time
9
T
TCP/IP
Transmission Control Protocol/Internet Protocol. The protocol used to connect to the
Internet and wide area networks.
U
UFRII
Ultra Fast Rendering II. A printing algorithm for realizing high speed monochrome
rendering. UFR II enables processing tasks to be executed and divided appropriately
between the host PC and the printer to greatly reduce overall printing time. The UFR
II printer driver supports only monochrome printers.
URL
Uniform Resource Locator. A standard way of specifying the location of an object,
usually a Web page on the Internet. The URL for a Web page would look something
like this: “http://www.w3.org/default.htm”. Here, “http:” indicates that a Web page is
being accessed, “www.w3.org” is the address of the server containing the Web page,
and “default.htm” is the file name under which the Web page is stored on the server.
Appendix
W
WINS
Windows Internet Name Service. A service for associating a NetBIOS name, which is
a computer name or printer name on a NetBIOS network, with an IP address. To use
WINS, a WINS server is required.
9
WSD
Web Services on Devices. A protocol that enables the Windows computers (with
Windows Vista/7/Server 2008) to detect and connect devices such as printers and
scanners on a TCP/IP network.
9-20
Glossary
Index
100BASE-TX, 9-12
10BASE-T, 9-12
A
Access restriction from computers on the
network, 6-21
Address Book Password, setting, 4-35
Allow Fax Driver TX, setting, 4-38
Authentication, 9-12
Authorized Send, 6-32
Auto Online/Offline, 7-5, 9-10
B
BOOTP, 9-12
bps, 9-12
Broadcasting, 9-12
C
CA certificate, 3-20, 9-12
Checking network connection
IPv4, 2-22
IPv6, 2-23
Communication environment settings, 2-5
Communications Settings, 9-2
Communications Settings, specifying, 4-2
Community Name, 9-13
Computer name and necessary components,
confirming
Windows 2000/XP/Vista/7/Server 2003/
Server 2008, 5-19
Computer settings for printing/sending a fax, 5-2
Confirm Dept. ID Management Password,
setting, 3-43
Confirm Entered Fax Numbers, setting, 4-41
Cursor, 9-13
D
Daemon, 9-13
Data sending and file sharing problems, 8-7
Default, 9-13
Department ID Management, 6-2, 9-2
Accepting print/scan jobs
with unknown IDs, 6-17
Changing password and page limit, 6-8
Checking and printing counter information, 6-12
Clearing page totals, 6-15
Erasing Department ID and password, 6-11
Registering the Department ID, password, and
page limit, 6-4
Device Info Settings, 9-3
Device information, setting, 7-2
DHCP, 9-13
Display Dept. ID/User Name, 9-10
Display Dept. ID/User Name, setting, 6-39
DNS, 9-13
DNS server, 9-13
DNS Server Settings, 3-2
IPv4, 3-2
IPv6, 3-6
Domain, 9-13
Index
9-21
Appendix
Numerics
9
E
H
E-mail/I-Fax Settings
(Communications Settings), 4-2
E-mail/I-Fax settings (Network Settings), 3-52
Enable Dedicated Port, 2-5
Ethernet, 9-14
Ethernet Driver Settings, 2-2
HTTP, 9-14
Appendix
F
9
Fax Settings, 4-4
File server, 9-14
File server setting
File sharing, 5-18
FTP, 5-7
Forwarding, 4-14, 9-14
Checking and changing settings, 4-28
Erasing settings, 4-30
Handling documents, 4-32
Printing settings list, 4-31
Storing forwarding settings, 4-15
Turning on/off, 4-29
Without conditions, setting, 4-23
Forwarding Settings, 9-8
FQDN, 9-14
FTP, 9-14
FTP Extension,setting, 3-18
FTP server setting
iW Gateway, 5-16
Mac OS X, 5-14
UNIX/Linux, 5-12
Windows 2000/XP/Vista/7/Server 2003/
Server 2008, 5-8
Identifying and isolating problems, 8-2
IEEE802.1X authentication, 2-9, 9-15
I-fax, 9-15
Inner 2Way Tray, setting the use of, 7-14
Interface, 9-15
Interface cable, 9-15
Interface settings, 2-2
Internet Protocol (IP), 9-15
IP address
IPv4, 9-15
IPv6, 9-15
IP Address Range Settings, 6-21
IPv4, 6-21
IPv6, 6-25
IPv4 address
checking network connection, 2-22
setting, 2-15
IPv6 address
checking network connection, 2-23
setting, 2-18
J
Job Log Display, 6-37, 9-10
K
Key and certificate, 3-20
Key pair, 9-16
G
Gateway address, 9-14
9-22
I
Index
L
P
LAN, 9-16
LDAP search attributes,
registering and editing, 3-72
LDAP server
Changing settings, 3-70
Deleting registration, 3-71
Printing settings, 3-74
Registering, 3-63
Registering/editing search attributes, 3-72
Setting, 3-62
License key
Obtaining, 1-11
Registering, 1-12
License Registration, 1-12, 9-10
License registration, 1-11
Login service, 9-16
LPD, 9-16
LPD Settings, 3-45
LPR, 9-16
PASV mode, 9-17
PBX, 9-17
PCL, 9-17
PDF, 9-17
PDL Selection (Plug-n-Play), 7-12, 9-10
PING, 9-18
Port Number Settings, 3-38
Printer connection method
Changing port settings, 5-3
Printing problems, 8-5
Problems
Data sending and file sharing, 8-7
Identifying and isolating, 8-2
Network connection, 8-2
Printing, 8-5
Protocol, 9-18
MAC address, 2-3, 9-16
MAC address filter, setting, 6-29
Managing the machine, 9-11
Memory Lock, 9-16
Memory Lock Settings, 4-8
Memory Media Send Log, 7-8, 9-10
N
NetBIOS, 9-17
Network connection problems, 8-2
Network connection, checking, 2-22
Network environment, checking, 1-18
Network Settings, 9-3
NTFS, 9-17
RARP, 9-18
Raw, 9-18
RAW Settings, 3-45
Receive Start Speed, setting, 4-4
Receiving MAC Address Filter Settings, 6-29
Register LDAP Server, 9-9
Remote UI, 9-18
Remote UI On/Off, 6-34, 9-10
Remote UI, restricting the use of, 6-34
Restrict the Send Function, 9-9
Restrict the Send Function, setting, 4-35
Restricting
New addresses, 4-37
Recall, 4-40
Sequential Broadcast, 4-42, 4-43
Index
Appendix
M
R
9
9-23
Appendix
S
9
Secure Printing, 7-18
Send function
Restricting, 4-35
Send Start Speed, setting, 4-4
Shared folder
Mac OS X, 5-34
Setting, 5-22
Specifying destinations, 5-36
UNIX/Linux, 5-35
With access restriction (Windows 2000/XP/
Server 2003), 5-27
With access restriction (Windows Vista/7/
Server 2008), 5-32
Without access restriction (Windows 2000/XP/
Server 2003), 5-23
Without access restriction (Windows Vista/7/
Server 2008), 5-25
SMB, 9-18
SMB server, 9-18
SMB Settings, 3-49
SMTP, 9-18
SNMP Settings, 2-5
SNTP, 9-19
SNTP Settings, 3-13
Spool, 9-19
SSL, 3-21, 3-35, 3-52, 6-34, 9-19
SSL encryption, 9-19
Startup time, 9-19
Startup time, setting, 7-3
Store/Print When Forwarding, 9-8
Subnet, 9-19
Subnet Mask, 9-19
Switching hub, 9-19
System management mode
Operating the machine with Department ID
Management OFF, 1-8
Operating the machine with Department ID
Management ON, 1-7
Setting, 1-4
9-24
Index
System Manager Settings, 1-4, 9-2
System requirements, 1-14
Printing of sending a PC-Fax, 1-14
Sending data to a file server, 1-16
Using E-mail/I-fax, 1-15
System Setting items, 9-2
System Settings, 1-2
T
TCP/IP, 9-20
TCP/IP network setup procedures, 1-19
Troubleshooting, 8-1
U
UFRII, 9-20
Update Firmware, 9-10
URL, 9-20
USB interface port, restricting the use of, 7-10
Use HTTP, setting, 3-33
Use Inner 2Way Tray, 7-14, 9-10
Use PASV Mode for FTP,setting, 3-16
Use USB Device, 7-10, 9-10
User ID Management, 9-3
User ID Management, setting, 6-19
W
WINS, 9-20
WINS Settings, 3-11
WSD, 9-20
WSD Print Settings, 3-45
CANON INC.
30-2, Shimomaruko 3-chome, Ohta-ku, Tokyo 146-8501, Japan
CANON U.S.A., INC.
One Canon Plaza, Lake Success, NY 11042, U.S.A.
CANON CANADA INC.
6390 Dixie Road Mississauga, Ontario L5T 1P7, Canada
CANON EUROPA N.V.
Bovenkerkerweg 59-61 1185 XB Amstelveen, The Netherlands
(See http://www.canon-europe.com/ for details on your regional dealer)
CANON LATIN AMERICA, INC.
703 Waterford Way Suite 400 Miami, Florida 33126 U.S.A.
CANON AUSTRALIA PTY. LTD
1 Thomas Holt Drive, North Ryde, Sydney, N.S.W. 2113, Australia
CANON CHINA CO., LTD
15F Jinbao Building No.89 Jinbao Street, Dongcheng District, Beijing 100005, China
CANON SINGAPORE PTE. LTD.
1 HarbourFront Avenue #04-01 Keppel Bay Tower, Singapore 098632
CANON HONGKONG CO., LTD
19/F., The Metropolis Tower, 10 Metropolis Drive, Hunghom, Kowloon, Hong Kong
USRM2-2093-00
© CANON INC. 2012


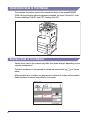


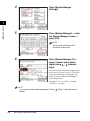
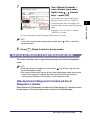

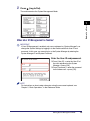
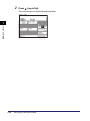

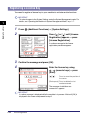
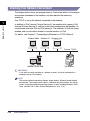

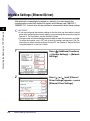
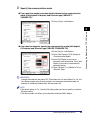
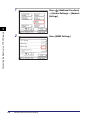
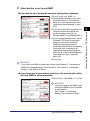
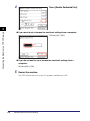
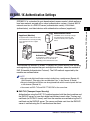


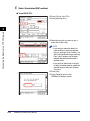

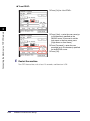

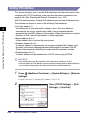

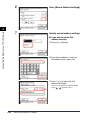

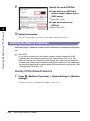
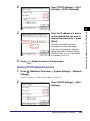
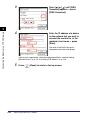


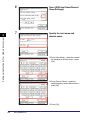
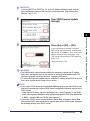

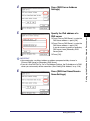

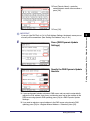
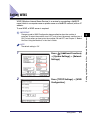
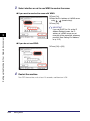
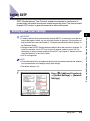
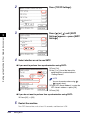
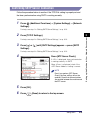
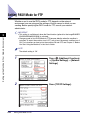

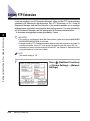
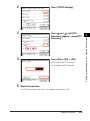

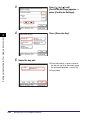
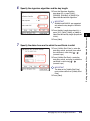
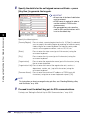
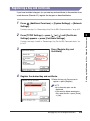
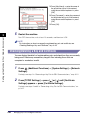

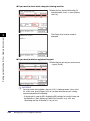


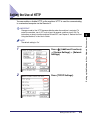

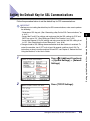

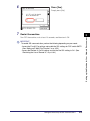
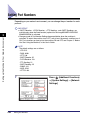
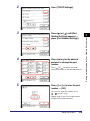

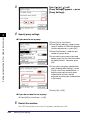


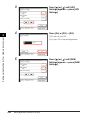

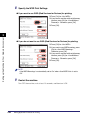

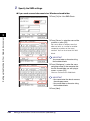
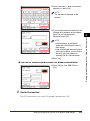
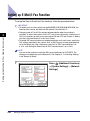
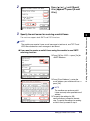
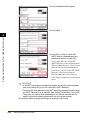

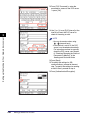
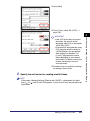
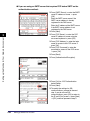
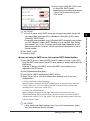
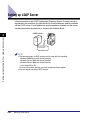
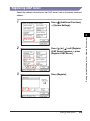
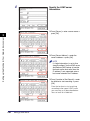
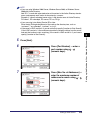
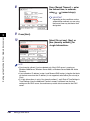
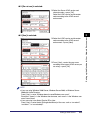

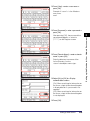
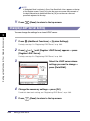
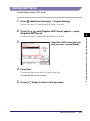

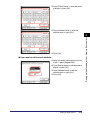

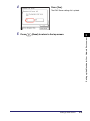


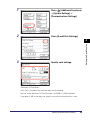
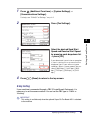

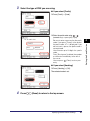

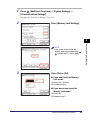
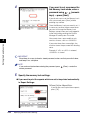
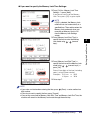

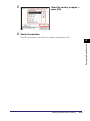
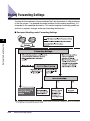

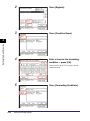
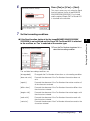

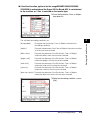
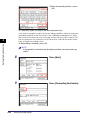

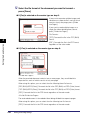
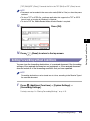


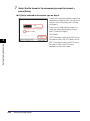


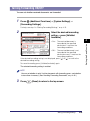


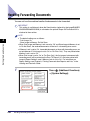
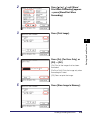
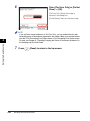


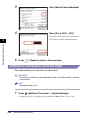

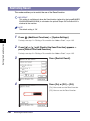

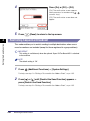
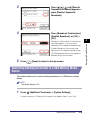
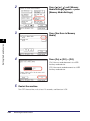

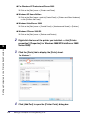


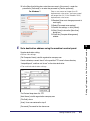

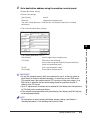
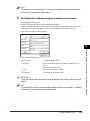


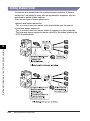
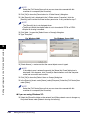
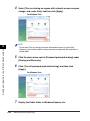
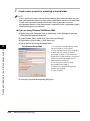


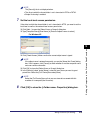
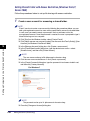
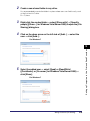


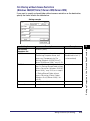

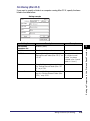


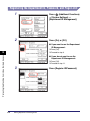
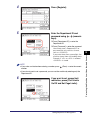
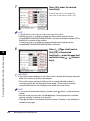
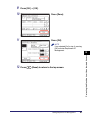
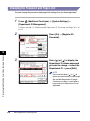
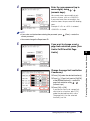

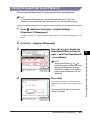
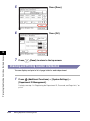

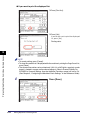
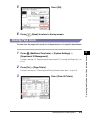


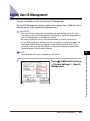
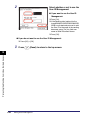


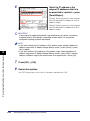

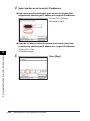
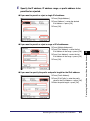

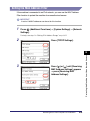
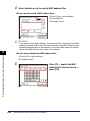
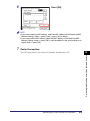


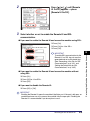


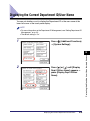
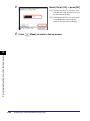
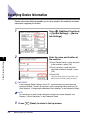
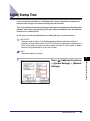
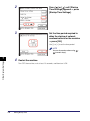
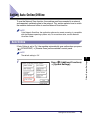
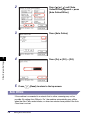


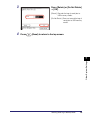


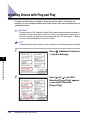
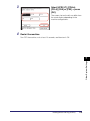


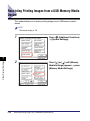
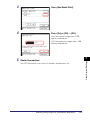
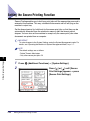
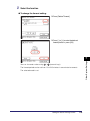
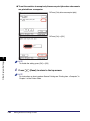
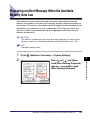
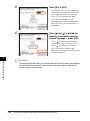


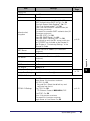

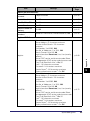


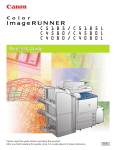
![[Impostazioni rete].](http://vs1.manualzilla.com/store/data/006126015_1-a8b230434cd1a1b69e1ac6b45a87b86d-150x150.png)