1
Getting Started Guide
BlackBerry Curve 8310 Smartphone
MAT-15808-001 | PRINTSPEC-016
SWD-223556-06182007-001 | RBN41GW
Contents
Welcome to BlackBerry! ................................................................................................................ 3
Set up your device .......................................................................................................................... 5
Insert the SIM card and battery ......................................................................................................... 5
Charge the battery ............................................................................................................................... 8
Complete the setup wizard ................................................................................................................. 10
Learn the basics ............................................................................................................................ 15
Move around the screen .................................................................................................................... 16
Open a menu ........................................................................................................................................ 16
Change the value in a field ................................................................................................................. 17
Typing basics ........................................................................................................................................ 18
Applications .......................................................................................................................................... 19
Home screen status indicators ......................................................................................................... 20
Message list status indicators ............................................................................................................ 21
Phone status indicators ...................................................................................................................... 22
Wireless network coverage indicators .............................................................................................. 22
Start using your device ............................................................................................................... 25
Make a call ........................................................................................................................................... 25
Send an email message ...................................................................................................................... 25
Send an SMS text message ............................................................................................................... 26
Add a contact ....................................................................................................................................... 27
Take a picture ...................................................................................................................................... 27
Visit a web page .................................................................................................................................. 28
Pair with a Bluetooth enabled device .............................................................................................. 28
About using your device with a computer ....................................................................................... 29
Transfer a file between your device and your computer using the media manager tool ......... 31
About accessories ................................................................................................................................ 31
About adding applications to your device ....................................................................................... 32
Insert a media card ............................................................................................................................. 32
Find more information ........................................................................................................................ 34
Troubleshooting ........................................................................................................................... 35
I cannot connect to a wireless network ........................................................................................... 35
I cannot associate my device with an email address .................................................................... 35
I do not know which email setup option to select in the setup wizard ....................................... 36
I cannot send messages ..................................................................................................................... 37
I am not receiving messages ............................................................................................................. 38
I cannot make or receive calls ........................................................................................................... 39
Legal notice ................................................................................................................................... 41
Welcome to BlackBerry!
Get ready to experience the freedom and connectivity of your all-in-one mobile
solution. Setting up your BlackBerry® device is easy. Simply verify that your SIM card
and battery are inserted in your device, charge the battery, and complete the setup
wizard. After you complete the setup wizard, take some time to explore the features
on your device. This guide provides tips and instructions to help you learn the basics
quickly.
3
4
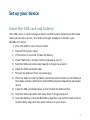
Set up your device
Insert the SIM card and battery
Your SIM card is a small rectangular plastic card that stores important information
about your wireless service. Your SIM card might already be inserted in your
BlackBerry® device.
1.
2.
3.
4.
5.
6.
7.
8.
Press the battery cover release button.
Slide off the battery cover.
If the battery is inserted, remove the battery.
If your SIM card is already inserted, proceed to step 11.
Slide the SIM card holder door toward its hinges to unlock it.
Open the SIM card holder door.
Remove the SIM card from any packaging.
Place the SIM card into the holder so that the metal contacts on the SIM card
face down and the cutoff corner of the SIM card points toward the top of your
device.
9. Close the SIM card holder door so that it holds the SIM card flat.
10. Slide the SIM card holder door away from its hinges to lock it.
11. Insert the battery so that the BlackBerry logo faces up and the metal contacts
on the battery align with the metal contacts on your device.
5
12. Slide the battery cover back onto the device so that it clicks into place.
If the battery is charged, the device turns on. If the device does not turn on, charge
the battery.
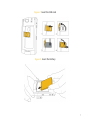
Figure 1. Remove the battery cover
6
Figure 2. Insert the SIM card
Figure 3. Insert the battery
7
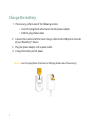
Charge the battery
1. If necessary, perform one of the following actions:
• Insert the plug blade attachment into the power adapter.
• Fold the plug blades down.
2. Connect the small end of the travel charger cable to the USB port on the side
of your BlackBerry® device.
3. Plug the power adapter into a power outlet.
4. Charge the battery to full power.
Figure 4. Insert the plug blade attachment or fold plug blades down (if necessary)
8
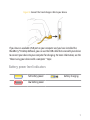
Figure 5. Connect the travel charger cable to your device
If you have an available USB port on your computer and you have installed the
BlackBerry® Desktop Software, you can use the USB cable that came with your device
to connect your device to your computer for charging. For more information, see the
"About using your device with a computer " topic.
Battery power level indicators
full battery power
battery charging
low battery power
9
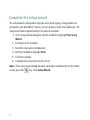
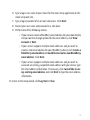
Complete the setup wizard
The setup wizard is designed to help you learn about typing, change options to
personalize your BlackBerry® device, and set up one or more email addresses. The
setup wizard takes approximately 10 minutes to complete.
1. In the setup wizard dialog box, roll the trackball to highlight Run Setup
Wizard.
2. Click (press) the trackball.
3. Read the setup wizard introduction.
4. Roll the trackball to highlight Next.
5. Click the trackball.
6. Complete the instructions on the screen.
Note: If the setup wizard dialog box does not appear automatically, on the Home
screen, press the
key. Click Setup Wizard.
10
Figure 6. Setup wizard screen
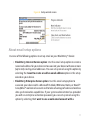
About email setup options
Use one of the following options to set up email on your BlackBerry® device:
• BlackBerry Internet Service option: Use this email setup option to create a
new email address for your device or to associate your device with one or more
(up to ten) existing email addresses. You can set up email using this option by
selecting the I want to create or add an email address option in the setup
wizard on your device.
• BlackBerry Enterprise Server option: Use this email setup option to
associate your device with a Microsoft Outlook, IBM Lotus Notes, or Novell®
GroupWise® work email account and to take advantage of advanced wireless
data synchronization capabilities. If your system administrator has provided
you with an enterprise activation password, you can set up email using this
option by selecting the I want to use a work email account with a
11
BlackBerry Enterprise Server option in the setup wizard on your device. If
you do not have an enterprise activation password, contact your system
administrator.
• BlackBerry Desktop Redirector option: Use this email setup option to
associate your device with a Microsoft Outlook (Workgroup Installation) email
account. You can set up email using this option by installing the BlackBerry
Desktop Software and selecting the BlackBerry Desktop Redirector option. If
you use this email setup option, you must keep your computer turned on to
receive your email messages.
Note: The available email setup options might vary depending on your wireless
service plan.
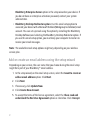
Add or create an email address using the setup wizard
Depending on your service, the user name that you choose during the email setup
might form part of your BlackBerry® email address.
1. In the setup wizard, on the email setup screen, select the I want to create or
add an email address option. Click Next.
2. Click Next.
3. If necessary, click Update Now.
4. Click Create New Account.
5. To accept the terms of the license agreement, select the I have read and
understand the End User Agreement option or check box. Click I Accept.
12
6. Type a login user name of your choice for the email setup application or the
email setup web site.
7. Type a login password of six or more characters. Click Next.
8. Record your user name and password in a safe place.
9. Perform one of the following actions:
• If your service creates a BlackBerry email address for you automatically
and you want to change options for the email address, click View
Account or Next.
• If your service supports multiple email addresses and you want to
create a new email address for your BlackBerry device, click Create a
BlackBerry email address or I would like to create a new BlackBerry
email address. Click Next.
• If your service supports multiple email addresses and you want to
associate an existing, supported email address with your device, type
the email address information. If necessary, click I would like to use
my existing email address and click Next to type the email address
information.
To return to the setup wizard, click Log Out or Close.
13
14
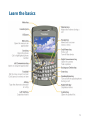
Learn the basics
15
Move around the screen
• To move the cursor in any direction and highlight items, roll the trackball.
• To select an item or follow a link, click the trackball.
• To open a menu, press the
key.
• To close a menu or move back a screen, press the
• To return to the Home screen, press the
key.
key.
Open a menu
• To open a list of the applications on your BlackBerry® device, press the
key on the Home screen.
• To open a menu of all the available actions for a highlighted item in an
application, press the
key.
• If you click an item with more than one common available action, a short menu
of these available actions appears. To view more available actions for the
highlighted item, press the
key or click Full Menu. To close the short
menu, press the
key.
16
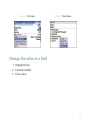
Figure 7. Full menu
Figure 8. Short menu
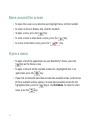
Change the value in a field
1. Highlight a field.
2. Click the trackball.
3. Click a value.
17
Figure 9. Change the value in a field
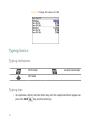
Typing basics
Typing indicators
Shift mode
number lock mode
Alt mode
Typing tips
• To capitalize a letter, hold the letter key until the capitalized letter appears or
press the Shift
key and the letter key.
18
• To type the alternate character on a key, press the
key and the character
key. For example, to type a question mark (?), press the
• To type a symbol, press the
symbol.
key and
.
key. Type the letter that appears below the
• To type an accented or special character, hold the letter key and roll the
trackball to the left or right. Release the letter key when the accented or special
character appears. For example, to type ü, hold
and roll the trackball to
the left until ü appears.
• To turn on NUM lock, press the
key and the Left Shift
• To turn off NUM lock, press the
key.
key.
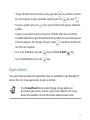
Applications
Take some time to explore the applications that are available on your BlackBerry®
device. Here are a few applications to get you started.
Click Setup Wizard to learn about typing, change options to
personalize your device, and set up your email address. The setup
wizard also provides links to information about common tasks.
19
Click Browser to visit web pages or view the browser bookmark list.
Click Call Log to make a call or view a list of recent calls.
Click Camera to take a picture.
Click Media to view saved songs, ring tones, videos, or pictures.
Click Messages to view a list of your messages. More than one message
list might appear on your device.
Click Options to view the main list of device options. You can access
additional options from the menu in each application.
Click Address Book to view your contact list or add a new contact.
Click Help to view the user guide for your device. The user guide
provides procedures to help you use your device.
Home screen status indicators
alarm set
20
missed call count
unopened
message count
sending data
missed calendar
reminder
receiving data
voice mail message
roaming
Bluetooth®
technology is
turned on
paired with
Bluetooth enabled
device
Message list status indicators
unopened
message
MMS message
opened message
sent message
message with an
attachment
message is sending
message is high
priority
message not sent
SMS text message
21
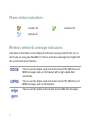
Phone status indicators
missed call
received call
placed call
Wireless network coverage indicators
Indicators on the Home screen display the wireless coverage level for the area in
which you are using your BlackBerry® device. A wireless coverage level might limit
the use of some device features.
You can use the phone, send and receive email, PIN, SMS text, and
MMS messages, and use the browser with a high-speed data
connection.
You can use the phone, send and receive email, PIN, SMS text, and
MMS messages, and use the browser.
You can use the phone and send and receive SMS text messages.
22
You can only make emergency calls.
Your connection to the mobile network is turned off.
You are not in a wireless coverage area.
23
24
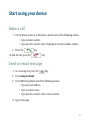
Start using your device
Make a call
1. On the Home screen or in the phone, perform one of the following actions:
• Type a phone number.
• Type part of a contact name. Highlight a contact or phone number.
2. Press the
key.
To end the call, press the
key.
Send an email message
1. In a message list, press the
key.
2. Click Compose Email.
3. In the To field, perform one of the following actions:
• Type an email address.
• Type a contact name.
• Type part of a contact name. Click a contact.
4. Type a message.
25
5. Click the trackball.
6. Click Send.
Note: If your BlackBerry® device is associated with more than one email address, in
the Send Using field, you can set the email address that you want to use to send the
email message.
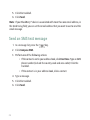
Send an SMS text message
1. In a message list, press the
key.
2. Click Compose SMS.
3. Perform one of the following actions:
• If the contact is not in your address book, click Use Once. Type an SMS
phone number (include the country code and area code). Click the
trackball.
• If the contact is in your address book, click a contact.
4. Type a message.
5. Click the trackball.
6. Click Send.
26
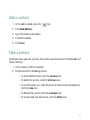
Add a contact
1. In the address book, press the
2.
3.
4.
5.
key.
Click New Address.
Type the contact information.
Click the trackball.
Click Save.
Take a picture
By default, when you take a picture, the camera saves the picture to the BlackBerry®
device memory.
1. In the camera, click the trackball.
2. Perform one of the following actions:
• To take another picture, click the camera icon.
• To delete the picture, click the trash can icon.
• To set the picture as a caller ID picture or Home screen background,
click the crop icon.
• To forward the picture, click the envelope icon.
• To rename and save the picture, click the folder icon.
27
Visit a web page
1. In the browser, press the
key.
2. Click Go To.
3. Perform one of the following actions:
• Type a web address. Press the
key.
• Highlight a web address. Press the
key.
• Highlight a web address. Press the
web address. Press the
key.
key. Click Edit. Change the
4. Click OK.
Pair with a Bluetooth enabled device
Some Bluetooth® enabled devices have passkeys that you must type before you can
pair with them.
1. In the Bluetooth setup application, click OK.
2. Click a Bluetooth enabled device.
3. If required, type the passkey for the Bluetooth enabled device on your
BlackBerry® device.
28
4. If required, type the passkey for the Bluetooth enabled device on the
Bluetooth enabled device.
About using your device with a computer
You can install the BlackBerry® Desktop Software on your computer and connect
your BlackBerry device to your computer to perform any of the following actions:
• Synchronize organizer data such as contacts, calendar entries, tasks, and
memos between your device and your computer.
• Back up and restore device data.
• Transfer files between your device and your computer.
• Add applications to your device.
• Set up and manage email message forwarding or wireless calendar
synchronization if your system administrator has advised you to do so.
• Set up and manage email message forwarding using the BlackBerry Desktop
Redirector to forward email messages from a Microsoft® Outlook®
(Workgroup installation) email account that resides on a Microsoft Exchange
Server version 5.5 or later.
For more information about synchronizing data, backing up or restoring data, adding
applications, or other functions, see the BlackBerry Desktop Software Online Help.
29
Installation prerequisites
• Intel® compatible 486 or higher computer that is compliant with USB 1.1 or
later
• Microsoft® Windows® 2000, or later
• available USB port
• CD drive
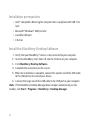
Install the BlackBerry Desktop Software
1.
2.
3.
4.
5.
Verify that your BlackBerry® device is not connected to your computer.
Insert the BlackBerry User Tools CD into the CD drive on your computer.
Click BlackBerry Desktop Software.
Complete the instructions on the screen.
When the installation is complete, connect the smaller end of the USB cable
to the USB port on the side of your device.
6. Connect the larger end of the USB cable to the USB port on your computer.
Note: If the BlackBerry Desktop Manager does not open automatically, on the
taskbar, click Start > Programs > BlackBerry > Desktop Manager.
30
Transfer a file between your device and your
computer using the media manager tool
1.
2.
3.
4.
Connect your BlackBerry® device to your computer.
On your computer, open the BlackBerry® Desktop Manager.
Double-click Media Manager.
Drag a file or folder from one location to another.
For more information about using the media manager tool, see the Media Manager
Online Help.
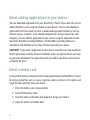
About accessories
You can buy accessories such as batteries, carrying solutions, headsets, and charging
solutions for your BlackBerry® device. Contact your wireless service provider or visit
www.shopblackberry.com for more information.
CAUTION: Use only accessories that Research In Motion has approved for use with
your device model. Use of other accessories might invalidate your warranty and might
be dangerous.
31
About adding applications to your device
You can download applications for your BlackBerry® device from a web site such as
mobile.blackberry.com using the browser on your device. You can also download
application files from a web site such as www.handango.com/blackberry/ using a
browser on your computer. If you download applications using a browser on your
computer, you can add the application to your device using the application loader
tool of the BlackBerry Desktop Software. The BlackBerry Desktop Software is
available on the BlackBerry User Tools CD that came with your device.
CAUTION: If you add an application to your device, read the terms and conditions
for the application carefully. Research In Motion makes no representation, warranty,
or guarantee whatsoever for applications that you add to your device and assumes
no liability for them.
Insert a media card
Use a microSD media card to extend the memory available on your BlackBerry® device
for storing media files such as songs, ring tones, videos, or pictures. The media card
might be sold separately from your device.
1.
2.
3.
4.
32
Press the battery cover release button.
Slide off the battery cover.
Slide the media card holder door toward its hinges to unlock it.
Open the media card holder door.
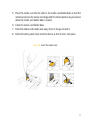
5. Place the media card into the slots in the media card holder door so that the
metal contacts on the media card align with the metal contacts on your device
when the media card holder door is closed.
6. Close the media card holder door.
7. Slide the media card holder door away from its hinges to lock it.
8. Slide the battery cover back onto the device so that it clicks into place.
Figure 10. Insert the media card
33
Find more information
• To view the user guide for your BlackBerry® device, click Help in the
application list or in an application menu.
• To view the BlackBerry 101 tutorial, user guide, safety and product information
booklet, or software license agreement and warranty for your device, insert
the BlackBerry User Tools CD that came with your device into the CD drive on
your computer.
• To try a free 30-minute introductory training course (available in English only)
for your device or to purchase additional training, visit www.blackberry.com/
go/onlinetraining.
• To find information about your wireless network or your wireless service plan,
visit your wireless service provider web site.
• To find software, games, and accessories for your device, visit
www.discoverblackberry.com.
34
Troubleshooting
I cannot connect to a wireless network
Try performing the following actions:
• Verify that your SIM card is inserted in your BlackBerry® device correctly.
• Verify that you have turned on the connection to the wireless network.
• Verify that you are connected to your wireless service provider's network. If
you switched wireless networks manually, your device remains connected to
that wireless network until you select your wireless service provider's network
again.
I cannot associate my device with an email address
Try performing the following actions:
• On the email setup screen, verify that you have typed all the email address
information correctly.
• Verify that the email address is associated with a supported email account
(for example, a POP3 email account or an IMAP email account). For more
information about supported email accounts, contact your wireless service
provider.
35
• Log in to the email setup web site and add the email address to your
BlackBerry® device using a browser on your computer. To log in to the email
setup web site, in a browser on your computer, type the email setup web site
address provided by your wireless service provider. If you have already created
a login user name and password, use this information to log in. If you have not
created a login user name and password, click Create New Account and
complete the instructions on the screen. To associate your device with a
Microsoft® Outlook® email account or an IBM® Lotus Notes® email account,
you must visit the BlackBerry® Internet Service email setup web site using a
browser on your computer.
I do not know which email setup option to select in
the setup wizard
• Select the I want to create or add an email address option if the other options
do not apply to you. This option is the most common option for individual users.
If you select this option, an email setup application or email setup web site
opens on your BlackBerry® device. In the email setup application or on the
email setup web site, you can create a new email address for your device or
associate your device with an existing, supported email address.
• Select the I want to use a work email account with a BlackBerry Enterprise
Server option if a system administrator has provided you with a password that
you can use to activate your device over the wireless network. If you select
this option, an Enterprise Activation screen appears. On this screen, you can
36
type your work email address and the password provided by your system
administrator to activate your device.
• Select the I want to skip email setup option if any of the following situations
apply:
• A representative from the store where you purchased your device has
already helped you to set up your email address.
• You have already visited the email setup web site and have set up an
email address using a browser on your computer.
• You have an existing email account and have access to a BlackBerry®
Enterprise Server, but your system administrator has not provided you
with a password that you can use to activate your device over the
wireless network. For more information about setting up email for your
device, contact your system administrator.
• You have a Microsoft® Outlook® (Workgroup installation) email
account on a Microsoft® Exchange Server Version 5.5. or later and you
want to use the BlackBerry® Desktop Redirector to forward email
messages to your device.
I cannot send messages
Try performing the following actions:
37
• Verify that your BlackBerry® device is connected to the wireless network. If
you are not in a wireless coverage area, your device should send the messages
when you return to a wireless coverage area.
• If the menu item for sending a message does not appear, verify that you have
added an email address or PIN for your contact.
• If you created an email address or added an existing email address to your
device using the email setup web site, verify that you have received an
activation message on your device from the BlackBerry Internet Service. If you
have not received an activation message (the message might take a short
period of time to arrive), use the email setup web site to send a service book
to your device.
• If you have not received a registration message from the wireless network,
register your device. In the device options, click Advanced Options. Click
Host Routing Table. Press the
key. Click Register Now.
• Resend the message. Open the message. Press the
Resend.
key. Click
I am not receiving messages
Try performing the following actions:
• Verify that your BlackBerry® device is connected to the wireless network. If
you are not in a wireless coverage area, you should receive messages when
you return to a wireless coverage area.
38
• If you created an email address or added an existing email address to your
device using the email setup web site, verify that you have received an
activation message on your device from the BlackBerry Internet Service. If you
have not received an activation message (the message might take a short
period of time to arrive), use the email setup web site to send a service book
to your device.
• If you have not received a registration message from the wireless network,
register your device. In the device options, click Advanced Options. Click
key. Click Register Now.
Host Routing Table. Press the
• If you switched devices, verify that you have updated the device PIN on the
email setup web site. To find your device PIN, in the device options, click
Status. Log in to the email setup web site. Click Change Device. Type the
new BlackBerry device information. Click Save.
• If you use email message filters, verify that the options for email message
filters are set correctly.
I cannot make or receive calls
Try performing the following actions:
• Verify that your BlackBerry® device is connected to the wireless network.
• If you cannot make calls and fixed dialing is turned on, verify that the phone
number for your contact appears in your fixed dialing list or turn off fixed
dialing.
39
• If you have traveled to another country and you have not changed your smartdialing options, dial the full phone number, including the country code and
area code, for your contact.
• If you are not receiving calls, verify that call blocking and call forwarding are
turned off.
• If your SIM card supports more than one phone number, but you have only
one phone number, verify that the phone number is set as the primary number.
40
Legal notice
©2007 Research In Motion Limited. All Rights Reserved. The BlackBerry and RIM
families of related marks, images, and symbols are the exclusive properties of
Research In Motion Limited. RIM, Research In Motion, BlackBerry, "Always On, Always
Connected" and the "envelope in motion" symbol are registered with the U.S. Patent
and Trademark Office and may be pending or registered in other countries.
The Bluetooth word mark and logos are owned by the Bluetooth SIG, Inc. and any use
of such marks by Research In Motion is under license. Handango is a trademark of
Handango, Inc. IBM, Lotus, Domino, and Lotus Notes are trademarks of International
Business Machines Corporation. Intel is a trademark of Intel Corporation. Microsoft,
Outlook, and Windows are trademarks of Microsoft Corporation. Novell and
GroupWise are trademarks of Novell, Inc. All other brands, product names, company
names, trademarks, and service marks are the properties of their respective owners.
The BlackBerry device and/or associated software are protected by copyright,
international treaties, and various patents, including one or more of the following
U.S. patents: 6,278,442; 6,271,605; 6,219,694; 6,075,470; 6,073,318; D445,428;
D433,460; D416,256. Other patents are registered or pending in various countries
around the world. Visit www.rim.com/patents for a list of RIM (as hereinafter defined)
patents.
This document is provided "as is" and Research In Motion Limited and its affiliated
companies ("RIM") assume no responsibility for any typographical, technical, or other
inaccuracies in this document. In order to protect RIM proprietary and confidential
41
information and/or trade secrets, this document may describe some aspects of RIM
technology in generalized terms. RIM reserves the right to periodically change
information that is contained in this document; however, RIM makes no commitment
to provide any such changes, updates, enhancements, or other additions to this
document to you in a timely manner or at all. RIM MAKES NO REPRESENTATIONS,
WARRANTIES, CONDITIONS, OR COVENANTS, EITHER EXPRESS OR IMPLIED
(INCLUDING WITHOUT LIMITATION, ANY EXPRESS OR IMPLIED WARRANTIES OR
CONDITIONS OF FITNESS FOR A PARTICULAR PURPOSE, NON-INFRINGEMENT,
MERCHANTABILITY, DURABILITY, TITLE, OR RELATED TO THE PERFORMANCE OR
NON-PERFORMANCE OF ANY SOFTWARE REFERENCED HEREIN OR
PERFORMANCE OF ANY SERVICES REFERENCED HEREIN). IN CONNECTION WITH
YOUR USE OF THIS DOCUMENTATION, NEITHER RIM NOR ITS RESPECTIVE
DIRECTORS, OFFICERS, EMPLOYEES, OR CONSULTANTS SHALL BE LIABLE TO YOU
FOR ANY DAMAGES WHATSOEVER BE THEY DIRECT, ECONOMIC, COMMERCIAL,
SPECIAL, CONSEQUENTIAL, INCIDENTAL, EXEMPLARY, OR INDIRECT DAMAGES,
EVEN IF RIM HAS BEEN ADVISED OF THE POSSIBILITY OF SUCH DAMAGES,
INCLUDING WITHOUT LIMITATION, LOSS OF BUSINESS REVENUE OR EARNINGS,
LOST DATA, DAMAGES CAUSED BY DELAYS, LOST PROFITS, OR A FAILURE TO
REALIZE EXPECTED SAVINGS.
This document might contain references to third-party sources of information,
hardware or software, products or services and/or third-party web sites (collectively
the "Third-Party Information"). RIM does not control, and is not responsible for, any
Third-Party Information, including, without limitation the content, accuracy,
copyright compliance, compatibility, performance, trustworthiness, legality, decency,
links, or any other aspect of Third-Party Information. The inclusion of Third-Party
42
Information in this document does not imply endorsement by RIM of the Third-Party
Information or the third party in any way. Installation and use of Third-Party
Information with RIM's products and services may require one or more patent,
trademark, or copyright licenses in order to avoid infringement of the intellectual
property rights of others. Any dealings with Third-Party Information, including,
without limitation, compliance with applicable licenses and terms and conditions, are
solely between you and the third party. You are solely responsible for determining
whether such third-party licenses are required and are responsible for acquiring any
such licenses relating to Third-Party Information. To the extent that such intellectual
property licenses may be required, RIM expressly recommends that you do not install
or use Third-Party Information until all such applicable licenses have been acquired
by you or on your behalf. Your use of Third-Party Information shall be governed by
and subject to you agreeing to the terms of the Third-Party Information licenses. Any
Third-Party Information that is provided with RIM's products and services is provided
"as is". RIM makes no representation, warranty or guarantee whatsoever in relation
to the Third-Party Information and RIM assumes no liability whatsoever in relation
to the Third-Party Information even if RIM has been advised of the possibility of such
damages or can anticipate such damages.
Research In Motion Limited
295 Phillip Street
Waterloo, ON N2L 3W8
Canada
Research In Motion UK Limited
43
200 Bath Road
Slough, Berkshire SL1 3XE
United Kingdom
Published in Canada
44