1
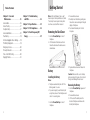
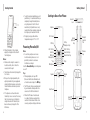
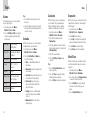
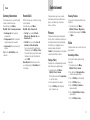
AT&T F160 User Manual Some of the contents in this manual may differ from your phone depending on the software of the phone or your service provider. AT&T marks contained herein are trademarks of AT&T Intellectual Property and/or AT&T affiliated companies. © 2010 AT&T Intellectual Property. All rights reserved. Table of Contents LEGAL INFORMATION Devices purchased for use on AT&T’s system are designed for use exclusively on AT&T’s system. You agree that you won’t make any modifications to the Equipment or programming to enable the Equipment to operate on any other system. A voice plan is required on all voicecapable devices, unless specifically noted otherwise in the terms governing your agreement. Some devices or plans may require you to subscribe to a data plan. Your phone is designed to make it easy for you to access a wide variety of content. For your protection, AT&T wants you to be aware that some applications that you enable may involve the location of your phone being shared. For applications available through AT&T, AT&T offers privacy controls that let you decide how an application may use the location of your phone and other phones on your account. However, AT&T’s privacy tools do not apply to applications available outside of AT&T. Please review the terms and conditions and the associated privacy policy for each location-based service to learn how location information will be used and protected. Your phone may be used to access the Internet and to download, and/or purchase goods, applications, and services from AT&T or elsewhere from third parties. AT&T provides tools for you to control access to the Internet and certain Internet content. These controls may not be available for certain devices which bypass AT&T controls. AT&T may collect certain types of information from your device when you use AT&T services to provide customer support and to improve its services. For more information on AT&T’s Privacy Policy, visit att.com/privacy. Chapter 1 – Getting Started................. 3 Removing the Back Cover......................... 3 Battery....................................................... 3 SIM and Memory Cards............................ 4 Charging Your Phone................................. 5 Powering Phone On/Off............................ 6 Getting to Know Your Phone..................... 7 Chapter 2 – Entering Text................... 13 Changing Input Mode............................. 13 Entering Numbers................................... 14 Entering Symbols.................................... 14 Chapter 3 – Calls.................................. 15 Chapter 4 – Messages........................ 16 Types of Messages................................. 16 SMS and MMS....................................... 16 Voicemail................................................. 17 Message Folders..................................... 17 Using Message Options.......................... 17 Message Settings................................... 18 Chapter 5 – Address Book................. 19 AT&T Address Book................................ 19 Version No.: R1.0 Edition Time: 20100823 Manual No.: 079584501872 Chapter 6 – Bluetooth®....................... 21 Enabling Bluetooth.................................. 21 My Devices............................................. 21 Sending Data.......................................... 22 Receiving Data........................................ 22 Chapter 7 – Mobile Web..................... 23 Using the att.net Homepage................... 23 Visiting a Website................................... 23 Chapter 8 – Tools................................. 24 Alarms..................................................... 24 Calendar.................................................. 24 Calculator................................................ 25 Stopwatch............................................... 25 World Time.............................................. 25 Currency Conversion............................... 26 Recent Calls............................................ 26 Chapter 9 – Entertainment................. 27 Pictures................................................... 27 Video...................................................... 27 Music...................................................... 28 Voice Recorder........................................ 30 Chapter 10 – Settings.......................... 31 Sound Profiles Settings........................... 31 Phone Settings........................................ 31 Display Settings...................................... 32 Connections Settings.............................. 32 Calls Settings.......................................... 32 Security Settings..................................... 33 Chapter 11 – Accessibility................. 35 TTY Mode................................................ 35 HAC (Hearing Aid Compatibility) Mode.. 35 1 Getting Started Table of Contents Chapter 12 – Care and Maintenance..................................... 36 General Care........................................... 36 Aircraft Safety......................................... 37 Hospital Safety....................................... 37 General Guidelines................................. 38 Road Safety............................................. 39 Vehicles Equipped with an Airbag.......... 39 Third-Party Equipment............................ 39 Emergency Service.................................. 40 Privacy Information................................. 40 Turn on the HAC Setting......................... 40 Copyright Notice..................................... 41 Chapter 13 – Troubleshooting and FAQs............................................ 42 Chapter 14 – Specifications............... 45 Note: In this User Manual, “press a key” means to press the key and release it, while “hold a key” means to press the key for at least two seconds and then release it. Chapter 15 – FCC Compliance........... 46 Chapter 16 – Radio Frequency (RF) Energy................................................ 49 Removing the Back Cover 1.Hold the Power/End Key to turn off the phone. 2. Lift the bottom of the back cover from the notch and remove the back cover as shown below. Battery Installing the Battery Notes: • The phone automatically turns off if the battery power is too low. • If you are not going to use the battery for a long time, remove it from the phone and store it in a cool dry place. 1. Hold the Power/End Key to turn off the phone. 2 2. Remove the back cover. 3. Carefully insert the battery, making sure the contacts are located against the gold springs of the phone. 4. Push down the battery until it clicks into place. 5. Replace the back cover on the back of the phone. Caution: Make sure the cover is lined up before pressing it into place. Do not force it. Doing so will damage the back cover. Removing the Battery 1.Hold the Power/End Key to power off the phone. 2. Remove the back cover. 3. Lift the end of the battery near the bottom of the phone and remove the battery from the phone. 3 Getting Started Getting Started SIM and Memory Cards 1. Hold the Power/End Key to power off the phone. 2. Remove the back cover and battery. 3. Carefully insert the memory card into the memory card slot and push it until it clicks into position as shown below. 4. Reinsert the battery, replace the back cover, and turn the phone on. Inserting the SIM (Subscriber Identity Module) Card You can obtain a SIM card from your service provider when you sign on as a subscriber. Caution: • Do not bend or scratch your SIM card. Keep the card away from electricity and magnetism. • Do not touch the metal surface of the SIM card. Doing so could cause information on the card to be lost or destroyed. • Disconnect the charger and other accessories from your phone and remove the battery before inserting and removing your SIM card. 1. Hold the Power/End Key to power off the phone. 2. Remove the back cover and battery. 3. Hold the SIM card with the metal contacts facing downward and the cut corner at the bottom right. Insert the card into the card holder and slide it into position. 4. Replace the back cover on the back of your phone. 4 Removing the SIM Card 1. Hold the Power/End Key to power off the phone. 2. Remove the back cover and battery. 3. Gently remove the SIM card from the card holder. Inserting a Memory Card The memory card gives your phone a very large memory capacity. This allows you to save multimedia data, including images, photos, MP3 audio files, and ringtones. You can also use this memory card to store other files. Tip: Your phone can support a memory card with up to an 8GB capacity. 5. Reinsert the battery, replace the back cover, and turn the phone on. Tips: • Do not remove the memory card while reading or writing to the card. Doing so might corrupt the information on the card or phone. If possible, insert and remove the memory card while the phone is turned off. • If you want to format the memory card on your PC, make sure you select the FAT2 Formatting type. If this is not done, the memory card might not be identified by your phone. Charging Your Phone Caution: Only use approved memory cards for this device. Any use of unapproved memory cards might cause loss of data or damage to your phone. Removing a Memory Card 1. Hold the Power/End Key to power off the phone. 2. Remove the back cover and battery. 3. Push the card inward so that it pops out. 4. Carefully remove the memory card. Your phone uses a rechargeable battery. When you first unpack the phone, the battery is not fully charged, but there might be enough power to turn on the phone. You can use the provided charger to charge the battery. 1. Open the USB port cover. 2. Insert the charger’s USB adapter into the USB port. 3. Plug the charger into a standard AC wall outlet. 5 Getting Started Getting Started • To get the maximum performance out of your battery, it is recommended that you completely charge the battery before using the phone for the first time. A new battery’s full performance is only reached after three complete charge and discharge cycles have been finished. • Charging is only possible within a temperature range of 32°F to 113°F. 4. When the battery is fully charged, unplug the charger and disconnect it from the phone. Notes: • Make sure the charger’s connector is inserted correctly. Do not force the connector into the port. • The battery will remain fully charged for 3 to 4 hours. • Only use the charger provided by the original provider. Using an unapproved charger might be dangerous and violate the authorization and warranty rules of the phone. • If the phone is used too often when the battery is low or not used for a long time, the screen may not display the charge indicator until the battery has been continuously charged for 10 to 40 minutes. 6 Powering Phone On/Off Note: •Do not turn your phone on in areas in which wireless phone use is not permitted, or when it could cause interference or danger. Hold the Power/End Key to turn the phone on or off. Tips: •When prompted, enter your PIN (Personal Identification Number) code or handset code and press the OK Key. •The PIN code is the password provided by your network service provider. You cannot use the SIM card without it. •When the PIN code or handset code is accepted, the phone automatically searches for the network. After a few seconds, your phone displays idle mode. Getting to Know Your Phone Headset Jack Earpiece LCD Screen OK Key Left Soft Key Send Key Multitask Manager Key * Key Microphone Speaker 4-Way Navigation Key Volume Up/Down Keys Right Soft Key Power/End Key Clear & Back Key Charger/ Headset Port Camera Key # Key Camera Lens Back Cover microSD™ Card Slot SIM Card Slot 7 Getting Started Key Functions 8 Getting Started Key Functions Key Description Key Description 4-Way Navigation Key From idle mode: Used to activate preset functions. In lists, messages, and menus: Used to scroll up, down, left, and right. Clear & Back Key Left Soft Key/ Right Soft Key The bottom line of the display shows the options that can be selected using the Left and Right Soft Keys. The options change depending on the application/function being used. Press to delete the character on the left of the cursor when entering text or numbers. Hold to delete all characters during text entry. Press to return to the previous page when navigating menus or browsing the internet. Send Key Press to dial or answer calls. From idle mode: Press to show a list of all calls. Power/End Key Multitask Manager Key Press to activate multitask manager. Number Keys Press the number keys to enter a phone number. Hold to turn the phone on/off. Press to end a call. Press to reject an incoming call. Press to cancel dialing. Press to return to idle mode. * Key Press to enter *. From idle mode, hold to lock the keypad. In an editing screen: Press to enter punctuation and symbols. OK Key From idle mode, press to open att.net. In lists and menus: Press to start an application/function. # Key Press to enter #. In an editing screen: Press to change the input method. From idle mode: Hold to activate meeting mode with vibration. 9 Getting Started Getting Started Idle Mode After powering on the phone, when the name of the network is displayed on the screen, the phone is in idle mode and ready for use. The display has 4 areas: Indicators and Icons area Date and Time area Text and Graphics area Indicator What it means New MMS Main Menu From idle mode, press the Right Soft Key for Menu to access the main menu. New Wap Push Message New voicemail Icon What it means AppCenter Online application store YPmobile Yellow Pages AT&T Music Mobile music experience AddressBook Add and edit contacts Social Net Access social networks like Facebook®, Myspace™, and more My Stuff Contains applications and tools such as Online Locker, Alarm, Calendar, and more Mute and vibrate Headset mode GPRS attach (blue and red) Bluetooth on All calls divert Soft Key function indicators Indicators and Icons Indicator What it means Battery status Missed voice call Roaming Icon What it means AT&T GPS Contains GPS applications like AT&T Navigator Messaging Send and read SMS or MMS messages Email & IM Mobile email and Instant Messaging Online Locker Access online storage for AT&T Mobile Share Mobile Web Access the web with att.net Settings Set up and person alize your phone HSDPA mode Signal strength The message memory is full 3G network Vibrate and ringing EDGE network Headset and vibrate mode GSM network GPRS in use (orange and purple) New SMS Alarm Description Description Additional charges may apply. For more information on these services, please refer to the Quick Start Guide included in your box or visit www.wireless.att.com. 10 11 Entering Text Getting Started Locking/Unlocking Keypad Use the keypad lock to prevent the keys from being pressed accidentally. 1.To lock the keypad automatically, from idle mode, press the Right Soft Key for Menu, then select Settings > Phone > Auto keyguard. Select 5s, 10s, 15s, 30s, or 60s auto keylock to set the keypad. These indicate the delay before the keypad is locked. 2.To lock the keypad manually, from idle mode, hold the * Key. 3.To unlock the keypad, press the Left Soft Key for Unlock and then press the * Key. Tips: •When the keys are locked, the word Unlock is shown on the display. •If a call comes in when the keypad is locked, you can press the Send Key to answer it. When the call is ended or rejected, the keypad locks automatically. •When the keypad lock is on, calls are still possible to the 911 emergency number. Changing Input Mode You can enter text into your phone using the following input methods: ZiAbc, abc, Abc, ABC, and number input. You can also switch the language between English and Spanish. Current Text Mode When you are in a field that allows characters to be entered, the text input mode indicator is shown in the upper right corner of the display. Changing Input Mode or Language Press the # Key and select an input method or language. Using Predictive Text (ZiAbc) The predictive text method is based on a built-in dictionary and generates words from the combination of letters pressed. 1.Press each key once that corresponds to the letter you want to enter. The letters are shown on the display as they are entered. The list of candidate words changes as each key is pressed. 12 2.When the candidate words are displayed, use the Navigation Key to highlight a candidate word and then press the OK Key for Select. 3.Press the 0 Key to insert a space, or press the * Key to select symbols. 4.Press the Clear & Back Key to delete the letter to the left of the cursor. Hold the Clear & Back Key to delete all entered text to the left of the cursor. Entering Letters (Abc/ABC/abc) 1.Press a number key (2 through 9) multiple times until the desired letter is shown on the display. Press once to enter the first letter on the keypad, press twice quickly to enter the second letter, and so on. • Press the 0 Key to add a space. •Press the 0 Key twice quickly or hold the 0 Key to enter 0. Notes: •When using “Abc” mode, only the first letter is a capital letter. •After entering the first capital letter, the input mode will be changed to “abc” mode automatically. 13 Calls Entering Text Entering Numbers Entering Symbols Press the # Key and select 123. The input ) is then shown on the method icon ( display. You can enter numbers directly using the number keys. Tip: When using number input, you need to switch to other text input methods if you want to insert a space by pressing the 0 Key. 1. Press the * Key. 2.Use the Navigation Key to select a symbol. 3. Press the OK Key. Making a Voice Call Receiving Calls 1.From idle mode, enter a phone number. 2.Press the Send Key to call the number. When a voice call comes in, press the Send Key to answer the call. Press the OK Key to answer the call with the speakerphone on. Tip: If you have connected a headset to the phone, you can press the button on the headset to answer the call. Using the Address Book 1.From idle mode, select Menu > AddressBook. 2.Highlight a contact and press the Send Key to call the number. Using Call Options During a call, you can press the Left Soft Key for more options. The options vary depending on the function you are currently using. • Hold/Unhold: Put the current call on hold or retrieve the call. • End call: End the current call. • Record: Record the current call. Press the OK Key to stop recording. • DTMF off/on: Enable or disable the sending of the DTMF tones. •Message: Switch to the Messaging menu during a call. • Contacts: Switch to the AddressBook menu during a call. •Browser: Browse the Internet during a call. 14 Adjusting the Volume During a call, press the Volume Keys to adjust the earpiece or speaker volume. Using Call History From idle mode, press the Send Key to check the All calls log. 15 Messages Types of Messages Your phone provides the following message types: • Text Messages (SMS) • Multimedia (Picture) Messages (MMS) • Instant Messages (IMs) The Short Message Service (SMS) lets you send and receive text messages to and from other mobile phones and email addresses. To use this feature, you may need to subscribe to your service provider’s message service. The Multimedia Messaging Service (MMS) lets you send and receive multimedia messages (such as picture messages) to and from other mobile phones and email addresses. To use this feature, you may need to subscribe to your service provider’s multimedia message service. SMS and MMS Sending a New SMS Message 1.From idle mode, select Menu > Messaging > Create message. 2.Enter the recipient’s phone number(s). You can also press the OK Key for Contacts to add recipient(s). 3.Press down on the Navigation Key to access the Text field. 16 Messages 4.Enter a message. 5.Press the OK Key for Send to send the message. Sending a New MMS Message 1.From idle mode, select Menu > Messaging > Create message. 2.Enter the recipient’s phone number(s). You can also press the OK Key for Contacts to add recipient(s). 3.Press down on the Navigation Key to access the Text field. 4. Enter a message. 5.Press the Left Soft Key for Options and select Insert to insert an image, audio file or video file. The message will convert to MMS automatically. 6.Press the OK Key for Send to send your message. Notes: •To save an unfinished message, press the Left Soft Key for Options and select Save to save it to the Drafts folder. •Messages in Outbox and in Drafts can be edited and sent. Viewing a Message The or envelope icon will appear on the information bar to indicate that you have received a new message. Press the OK Key twice to view the message. Or from idle mode, select Menu > Messaging > Inbox to check your messages. Voicemail Voicemail Settings From idle mode, select Menu > Messaging > Settings > Voicemail number to check the voicemail number. Your voicemail phone number is preset by your service provider. You do not need to set it manually. Receiving a Voicemail When the system sends you a message notifying you that there is a new voicemail, from idle mode, hold the 1 Key to access the voicemail service. Note: Contact your service provider for more information on using the voicemail service. Message Folders •The Inbox folder contains all of your received messages. In this folder you can view your received messages and reply to them or forward messages to another recipient. •The Outbox folder contains all messages that were not sent during the last attempt. In this folder you can edit or resend your messages. •The Sent folder contains messages that were sent successfully. From this folder you can edit or forward messages to another recipient. •The Drafts folder contains drafts and unfinished messages. In this folder you can complete or resend your messages. •The Saved messages folder contains messages that you moved from the Inbox. Notes: •You cannot receive new messages if the message memory is full. •The total amount of space available for saving messages is determined by the space available on the phone and SIM card. Using Message Options While viewing the contents of the Inbox, press the Left Soft Key to access the following options, which apply to the highlighted text message: •Reply: Reply to the message. •Call Sender: Call back the originator of the message. 17 Address Book Messages •Save number: Save the originator’s number to your Address Book. •Delete: Delete this message. • Forward: Forward this message. •Move to saved messages: Move this message to the Saved messages folder. Message Settings From idle mode, select Menu > Messaging > Settings to change the MMS/SMS/ Templates settings. MMS settings (Multi. msg. setting) Retrieval Settings: You have two choices: •Automatic: Retrieve the new multimedia message automatically without selecting the notification message and receiving. •Manual: Retrieve the new multimedia message manually. Delivery mode: You can set immediate delivery or defer it for a specified period of time. Delivery time: You can set a specified period of time to send MMS messages when you set “After sending” in Delivery mode. The max delivery time is 99 hours. 18 Time per page: Set the play time of each page. Validity: You can configure the validity period of outgoing messages. Messages will be saved in the network for the time period specified. Anonymous Msg.: You can choose to accept or refuse anonymous messages. Connections: Please consult the service operator for detailed information. PUSH Message: You can accept or reject PUSH messages. Priority: Set the priority. SMS settings (Text msg. setting) SMS center number: Service center number given to you by your service provider. Template settings The phone has 10 templates for SMS/MMS, and you can edit them. Using Message Templates 1.From idle mode, select Menu > Messaging > Create message. 2. Move to the Text field and select Options > Template. 3.Select a template and press the OK Key to insert the template. You can store contacts with a variety of phone numbers, email addresses, and address details. The phone can store up to 500 items. The capacity of the phone book on your SIM card depends on the type of SIM card provided by your service provider. The saved location is identified by the icon shown after the contact. AT&T Address Book AT&T Address Book automatically synchronizes your contacts between your phone and online address book. This means that you can easily restore contact information if you ever upgrade, damage, or lose your phone. To Activate AT&T Address Book Follow the prompts that are shown the first time you open the address book on your phone, or manually activate from your contact list via Options > Advanced > AT&T Address Book. Manage Your Contacts Online: Visit http://att.com/addressbook • Add or edit contacts • Import contacts from other address books • Add contacts from Yellowpages.com • Find maps and directions for contacts • Send text messages to contacts or groups Adding a Contact 1.From idle mode, select Menu > AddressBook. 2.Press the Left Soft Key for Options and select Add new contact. 3.Enter the contact’s information, such as name, phone number, etc. 4.Select Save to save the new contact. Searching for a Contact To search for a contact, you can enter the first letter of a name and the phone will show all contacts starting with that letter. For example, to search for “John”, press the 5 key once for ”J”. All names starting with ”J” are displayed. Refine the search by entering a subsequent letter that can occur anywhere in the name. For example, ”Jn” will find ”John” and ”Julian” but not ”James.” 19 Bluetooth ® Address Book Using Address Book Entry Options 1.From idle mode, select Menu > AddressBook. 2. Scroll to the desired contact and press the Left Soft Key for more options: Call: Call the highlighted contact. Add new contact: Create a new contact. Send message: Send SMS or MMS messages to this contact. Edit contact: Edit this contact information. Delete contact: Delete this contact. Send contact info: Send this contact as a business card via MMS message. 20 Add to: Add this contact to a group: Family, Friends, or Work. Advanced: •AT&T Address Book: Automatically synchronize your contacts between your phone and online address book. •SIM management: Copy contacts to or from the SIM card, or delete contacts from the SIM card. •Delete multiple: Delete a batch of contacts. • Default memory: Display the default storage location. •About: View the Address Book version. Your phone includes support for Bluetooth, which can be used to connect your phone to a wireless headset. You can also use it to transfer files between your phone and other Bluetooth devices, such as another phone or a laptop. Not all applications or devices can be supported because Bluetooth is an open forum and different manufacturers have different standards and implementation. Enabling Bluetooth By default Bluetooth is disabled on your phone. If you enable Bluetooth and turn off the phone, Bluetooth will be disabled. When you turn the phone on, Bluetooth will automatically be enabled. 1.From idle mode, select Menu > Settings > Connections > Bluetooth. 2. Set Bluetooth to On. 3.Go down to Discoverable and set it to On. 4.Go down to My Bluetooth Info and enter the phone name. 5. Press the OK Key to save the settings. Note: Set Discoverable to On to allow your phone to be found by compatible devices. My Devices 1.From idle mode, select Menu > Settings > Connections > Bluetooth > My devices. 2.Press the OK Key to search for available Bluetooth devices. 3.Highlight a device from the list and press the OK Key. 4.To connect to the device, enter the passcode when prompted and press the Left Soft Key for Pair. There are two options for Bluetooth connection: • Automatic: Set another Bluetooth device that is connecting to your phone as an authorized device. •Always Ask: Set another Bluetooth device that is connecting to your phone as an unauthorized device that must ask before connecting. Tip: Some devices don’t connect to another Bluetooth device automatically. You need to highlight the device name in the My devices list and press the OK Key to connect with it. 21 Mobile Web Bluetooth Sending Data Receiving Data To send files to another device via Bluetooth, check for the following conditions: • Bluetooth is enabled. •The paired device is visible, paired, and connected. 1.From idle mode, select Menu > My Stuff > Audio, Pictures, Video, Other files, or Memory card. 2.Select a file, press the Left Soft Key for Options, and select Send > Via Bluetooth. 3.Select the device from the device list and press the OK Key to send. To receive files from another device via Bluetooth, complete the following steps: 1. Enable Bluetooth. 2.If the paired device tries to send a file to your phone, a popup message is shown on the display. 3.Press the Left Soft Key for Yes to accept the connection. 4.Press the Left Soft Key to accept the incoming file or press the Right Soft Key to reject the incoming file. 22 Browse the web directly from your mobile phone. Check the weather, visit your favorite websites, and enjoy access to the Internet on the go. From idle mode, select Menu > Mobile Web. Using the att.net Homepage The att.net homepage features three tabs, which you can access by scrolling left or right with the Navigation Key: •Web: enter a web address; search the Internet with Yahoo!®; use, add, or manage shortcuts; view social networks; find movie information and buy tickets; and access your account. • Local: set your location, search locally, see maps and traffic, find movie showtimes, get local information, check the weather, and see local news updates. •Popular: get the latest updates on news, finance, sports, entertainment, and more; use email, instant messaging, and social networking. Visiting a Website 1.From the att.net homepage, press down on the Navigation Key to highlight the address bar and press the OK Key. 2.Enter a web address and press the OK Key. 3.To access a link on a website, scroll to it using the Navigation Key and press the OK Key. Mobile Web options: •Home: return to the att.net homepage. •Go to URL: enter a new web address. •Go to Search: enter search terms. •History: view your web browsing history. •Go to Bookmarks: access your list of favorite sites. •Add to Bookmarks: add a site to your list of favorites. •Reload: reload the current page. •Find in Page: search the page for a term. • Settings: adjust browser settings. •Help: find help and answers to frequently asked questions. •Exit: exit the web browser. 23 Tools Tools Alarms This feature allows you to set an alarm to ring at a specific time. 1. From idle mode, select Menu > My Stuff > Tools > Alarm. 2. Press the OK Key for Edit and configure the alarm as required using the Alarm Setup Screen: Alarm type Daily, Workday, Weekly, Once Alarm date Available with Weekly and Once Alarm time Set as required Snooze Off, 5, 10, 15, 30 minutes Ringtone On/Off Ringtone type ATT tone.mid, select Edit to change Status Enable/Disable Alarm remark Optional 24 Tips: •If the alarm time has passed it cannot be saved. •Even if the phone is turned off, the alarm will automatically turn the phone back on so that it can ring. Calendar With this feature, you can use the calendar, set appointments, and view events. 1.From idle mode, select Menu > My Stuff > Tools > Calendar. 2. Press the Left Soft Key for Options to access the following: •New…: Add a Meeting, Memo or Anniversary. •Week view: View the schedule of the current week. •Go to date: Enter a date and go to see the schedule of that day directly. •Delete entry: You can choose to delete entries On this day, Before date, or All entries. •Settings: You can set the Calendar alarm tone, Default view, and Week starts on. •Memory Info: Shows the current memory usage. Calculator Stopwatch With this feature, you can use the phone as a calculator. The calculator provides the basic arithmetic functions; addition, subtraction, multiplication, and division. 1.From idle mode, select Menu > My Stuff > Tools > Calculator. 2.Enter the first number using the Number Keys. 3.Enter the operation for your calculation by pressing up, down, left, or right on the Navigation Key. 4. Enter the second number. 5.Press the OK Key for Equal to view the result. Tips: •Press the Clear & Back Key to clear digits and results. •Press the * Key to toggle the number between positive or negative. •Press the # Key to enter a decimal point. With this feature, you can measure time and take split times or lap times, for example, in different sports. 1.From idle mode, select Menu > My Stuff > Tools > Stopwatch. 2. Select Start to start timing. 3.Select Stop to stop the timing during the operation and view the duration of time. 4. Select Contin. to continue timing. 5. Select Reset to reset the stopwatch. World Time With this feature, you can check the current local time and date for major cities around the world. 1.From idle mode, select Menu > My Stuff > Tools > World time. 2.Press left or right on the Navigation Key to view the time of desired city. 3.Press the OK Key to save the selected city time as the time setting on your phone. 4. Press the Right Soft Key to exit. 25 Entertainment Tools Currency Conversion Recent Calls This feature allows you to convert foreign currency to domestic currency. From idle mode, select Menu > My Stuff > Tools > Currency conversion. • Exchange rate: Enter a currency exchange rate. • Foreign amount: Enter the amount of foreign currency to be converted. • Local amount: The conversion result displays. Tip: Press the Left Soft Key to enter a decimal. With this feature, you can check the call log and call duration. From idle mode, select Menu > My Stuff > Tools > Recent calls. •Call log: You can check All calls, Missed calls, Received calls, and Dialed calls logs. •Call Info: You can check the Last call duration and All calls duration. You can also clear all the call duration timers by pressing the OK Key for Clear. To reset the timers you will need to enter the phone’s lock code. The default lock code is 0000. Note: All calls information can also be accessed by pressing the Send Key while in idle mode. 26 Your phone allows you to use a camera, video camera, and voice recorder to take photos, shoot video clips, record voice memos, and more. Pictures Your phone includes a photo management function. Photos in the phone’s memory or on the external memory card can be browsed, transmitted, set as wallpaper, moved, renamed, copied, and deleted. Caution: The preloaded photos on the phone cannot be transmitted or deleted. Taking a Photo Your phone has an integrated digital camera, which allows you to capture images. 1.From idle mode, select Menu > My Stuff > Tools > Camera. Or from idle mode, hold the Camera Key to start the camera. 2. Aim the camera lens at a subject. 3.Press the OK Key to take the photo; press it again to save. Viewing Pictures You can use the following method to view the photos: 1.From idle mode, select Menu > My Stuff > Pictures > My pictures. 2.Highlight a photo and press the OK Key for Open. Video Your phone allows you to record, store, and play video files. Recording a Video You can use the video camera to record video clips. 1.From idle mode, select Menu > My Stuff > Tools > Camera. 2. Press right on the Navigation Key to switch to video camera mode. 3. Press the OK Key to start recording. 4. Press the OK Key to pause. 5.Press the OK Key for Continue to resume recording. 6.Press the Right Soft Key for Stop to stop recording. 7. Press the OK Key for Save. 27 Entertainment Playing Videos You can use the following method to play a video. 1.From idle mode, select Menu > My Stuff > Video > My Videos. 2.Highlight a video and press the OK Key to play it. Music When you have audio files stored in your phone, you can create a playlist. This allows you to set the order in which the audio files are played. Playing an Individual Music File You can use the following method to play an individual sound file. 1.From idle mode, select Menu > My Stuff > Audio > My Audio. 2.Highlight a sound file and press the OK Key to play it. AT&T Music The AT&T Music application centers on three key music experiences: Play, Discover, and Shop. It includes a free-of-charge music player to play your music files and create playlists, as well as additional 28 Entertainment radio, song purchase, and lyric and song match functionality to enhance your music experience on the phone. Starting AT&T Music 1.From idle mode, select Menu > AT&T Music. 2.Accept the terms and conditions of service. 3. The screen then displays a warning that this feature uses large amounts of data and recommends subscribing to an unlimited data plan. Select Continue. 4. Select Let’s Go! to take a quick tour of AT&T Music. Select Next as each screen displays. Note: The first time you launch AT&T Music, the device plays an introductory tutorial. Some activities within AT&T Music require a monthly subscription for access. A free 3-day trial of all AT&T Music services is included upon first use. After the trial, you may subscribe or continue accessing the free local music player and Shop features. Play Screen Allows you to play the music you own via the My Library feature and to listen to streaming music from Genre and Personal radio stations. Play screen options: • My Favorites: allows you to access shortcuts to favorite artists, albums, songs, and radio stations. • My Library: allows you to access all the music on your phone. Create or manage playlists and find music by artist, album, song, or genre. • Genre Radio: allows you to access pre-programmed stations ranging from today’s hits to deep cuts for the music enthusiast. • Personal Radio: an easy-to-use personal listening experience started by entering an artist, song, or genre. Customized to your tastes by song ratings. • Settings & Support: contextual settings for AT&T Music and help and support in the Play section. Discover Screen Provides the ability to search the AT&T Music song catalog for songs by favorite artists. Song Match enables users to quickly find the name and artist of a song by holding their phone up to a song playing on the radio, TV, or jukebox, and Lyric Match allows lookup of artist/song information based on song lyrics. Discover screen options: • Search Shop: allows you to search for songs and albums available from AT&T Music. • Song Match: allows you to identify nearly any song by holding your phone up to the music and recording a short clip. • Lyric Match: allows you to look up songs by only entering a few words. • View Match History: allows you to see all of the songs you matched via Song and Lyric Match. • Settings & Support: contextual settings for AT&T Music and help and support in the Discover section. Shop Screen Shop is a full music catalog where users can search for their favorite songs and artists and preview, buy, and play songs or albums directly from their AT&T mobile phone. Fast, easy access to music is also available by browsing top songs, new releases, featured artists, and genres. Shop screen options: • Top Downloads: allows you to access the most downloaded music. • New Arrivals: allows you to access new music that was not previously available. 29 Settings Entertainment • Featured Artists: allows you to access music of the presently featured artists. • View Genres: allows you to view the different music genres that you may select from. • Purchase History: allows you to see a history of all of your purchases. • Settings & Support: contextual settings for AT&T Music and help and support in the Shop section. 30 Voice Recorder Sound Profiles Settings Phone Settings This function allows you to record a voice memo. You can also set the voice memo as a ringtone. You can set and edit an appropriate profile depending on your current environment. 1. From idle mode, select Menu > Settings > Sound Profiles. 2. Select a profile and press the Left Soft Key for Edit. •Select Voice call ringtone to set the voice call ringtone. •Select Ring volume to set the volume of the ringtone. •Select Ring type to set the ring type. •Select Message tone to set the notification ringtone for an incoming message. •Select Keypad tone to enable or disable keypad tone. •Select Warning tone to turn the warning tone on or off. •Select Power on/off sound to turn on/off the sound that plays while powering on/off the phone. •Select Earpiece volume to set the volume in the earpiece. From idle mode, select Menu > Settings > Phone. •Select Language to set the current display language. •Select Time and date to set the date, time, and time style. •Select Network time to enable or disable whether the phone synchronizes its clock with the network. •Select Missed calls alert to enable or disable the notification for missed calls. Choose for the alert to repeat every 5 minutes, 10 minutes, 15 minutes, or 30 minutes. •Select Shortcut keys to assign a navigation key as a shortcut for a function, such as the calendar. •Select Auto keyguard to set the phone’s keypad auto lock time or to disable the keypad auto lock. •Select Own phone number to display your phone number in idle mode to remind you which SIM card you are using. •Select Download location to select the phone memory or the external memory card. Recording 1.From idle mode, select Menu > My Stuff > Tools > Voice recorder. 2.Select Start to start recording your voice memo. 3. Select Pause to pause the recording. 4. Select Contin. to resume recording. 5. Select Stop to stop recording. 31 Settings •Select TTY setting to enable the TTY function. Please refer to Accessibility > TTY Mode. •Select HAC setting to enable you to hear the phone audio through a hearing aid with a telecoil. Please refer to Accessibility > HAC Mode. •Select Master Reset to reset the phone to the default factory settings. •Select Master Clear to clear all user data and reset the phone to the default factory settings. Display Settings From idle mode, select Menu > Settings > Display. •Select Wallpaper and select a photo saved in Pictures, Other files, or Memory card. This will be used as wallpaper, which is shown in idle mode. •Select Backlight duration to adjust the backlight duration. •Select Main menu view to set the main menu to be displayed as List or Grid. •Select Brightness to adjust the screen brightness. •Select Keypad light to adjust how long the backlight for the keypad remains on. 32 Settings •Select Owner name to enter the owner name. This is displayed in idle mode. •Select Greeting to enter a text greeting to be shown on the display when the phone is turned on. Call Waiting Connections Settings Send My Number From idle mode, select Menu > Settings > Connections. •Select Bluetooth to set up your phone as a Bluetooth device. •Select Access point settings to add to, edit, or view the access point list. •Select Modem setting to set up the phone as a modem. •Select Profile connect to create or edit the connection data for a service provider. •Select PC connection to choose the connection method between your computer and the phone. This function allows you to send or hide your phone number when making calls. You can also select Set by network. The network then chooses whether to show/hide the phone number. This function requires network support. Calls Settings Call Forwarding Call forwarding allows you to divert your incoming calls to another phone number. Contact your service provider for more information and availability. If a call comes in when you are already on a call, you are notified with a call waiting tone. The phone shows the number/name of the waiting call. Contact your service provider for more information. Security Settings Phone Password A password can protect your phone and help avoid illegal use. If your phone is password protected, you will have to enter the correct password when the phone is turned on. •For a new phone, the protection function is not activated by default, and the default password is 0000. •From idle mode, select Menu > Settings > Security > Activate security codes > Phone lock code to start or stop password protection. •From idle mode, select Menu > Settings > Security > Change security codes > Phone lock code to change the phone’s password. It is suggested that you change the password to something you will easily remember. Notes: •Please remember the password you set. Without it your phone cannot be used normally and you will need to contact your service provider to unlock it. •Contact your service provider for more information. PIN Codes A PIN code is the personal identification code used by the SIM card. Its purpose is to avoid illegal use of your SIM card. The correct PIN code should be entered when the new phone is first turned on, otherwise the phone will only be able to make emergency calls. •For a new card, the default code is supplied by the service provider. •From idle mode, select Menu > Settings > Security > Activate security codes > PIN code to enable or disable the PIN code. 33 Accessibility Settings •From idle mode, select Menu > Settings > Security > Change security codes > PIN code to change the PIN code. •If you enter the wrong PIN code three times in a row, the phone will lock the SIM card and prompt you to enter a PUK code to unlock it. Notes: •If you change the PIN code, please remember the new number. •PIN2 is needed for some settings. Use the same procedure as for the PIN code. PUK Codes A PUK code is the unlock code for the SIM card. When the SIM card is locked, you have to enter the correct PUK code and then enter the new PIN code. The SIM card can then be used normally. •A PUK code may be supplied with a new card. Contact your service provider for more information. •A PUK code can only be entered 10 times in a row. If you enter the wrong PUK code more than 10 times, the SIM card will be locked indefinitely. Note: If a PUK code is supplied with the new card, please store it safely. 34 Fixed Dial Numbers If you enable fixed dial numbers, you cannot dial phone numbers that are not in the FDN list. FDN List Allows you to create a list of fixed dial numbers. TTY Mode Your handset is a TTY-compatible device. Simply connect the TTY equipment to the headset jack. 1. From idle mode, select Menu > Settings > Phone > TTY setting. 2. Select one of the following options and press the OK Key for Select. • Full: Users who cannot talk or hear may use this setting to send and receive text messages through TTY equipment. •Read & talk: Users who can talk, but cannot hear, may use this setting to talk through the phone and receive responses via text messages. •Write & hear: Users who can hear, but cannot talk, may use this setting to listen to the other party and respond via text messages. • Off: Users who can hear and speak may use this setting to disable TTY support. HAC (Hearing Aid Compatibility) Mode This phone supports HAC (Hearing Aid Compatibility) function. When you turn on the Hearing Aid Mode and use a hearing aid with a telecoil to answer the phone, it will help you hear more clearly while speaking on the phone. For more detailed information on HAC, please refer to Care and Maintenance > Turn on the HAC Setting. 1. From idle mode, select Menu > Settings > Phone > HAC setting. 2. Select On or Off and press the OK Key for Select to confirm. Your F160 has been tested for hearing aid device compatibility and has an M4/T4 rating. 35 Care and Maintenance General Care •Do not allow the phone, battery, or accessories to come in contact with liquids or moisture at any time. Do not immerse the phone in any liquid. •Do not place the phone next to computer disks, credit cards, travel cards, and other magnetic media. The information contained on the disks or cards may be affected by the phone. •You can’t fold this phone. •Do not paint the phone. •Do not leave the phone or battery in places where the temperature could exceed 113°F, for example, on a car dashboard or a windowsill, behind glass in direct sunlight, etc. •Do not remove the phone’s battery while the phone is turned on. •Do not allow metal objects, such as coins or key rings, to contact or short-circuit the battery terminals. •Do not dispose of the battery packs in a fire. The handset’s Li-ion batteries may be safely disposed of at a Li-ion recycling point. •Do not put the phone’s battery in your mouth. Battery electrolyte may be toxic if swallowed. 36 •Do not attempt to dismantle the phone or any of its accessories. •There is a risk of explosion if the battery is replaced with the incorrect battery type. Dispose of the used battery in accordance with the manufacturer’s instructions. •Do not put a battery into a microwave oven, dryer, or high-pressure container. •Do not put the battery in direct contact with an electrical outlet or cigarette lighter charger. Use only approved charger units. •Do not pierce the battery with a sharp object, such as a needle. •When the battery is thrown away, be sure it is non-conducting by applying vinyl tape to the (+) and (-) terminals. •Do not disassemble or modify the battery. •Do not drop, throw, or subject the handset to rough treatment. •Stop using the battery if abnormal heat, odor, discoloration, deformation, or any abnormal condition is detected during use, charge, or storage. •In the unlikely event of a battery leak, keep the battery discharge away from your eyes or skin. If the leakage comes into contact with the eyes or skin, please flush thoroughly in clean water and consult a doctor. Care and Maintenance •Do not use a damaged or deformed battery. •Do not directly solder a battery. •If the battery’s life cycle has expired, remove it from the equipment immediately. •The earpiece may become warm during normal use. In addition, the phone itself may become warm while the battery is being charged. •When a phone is in vibration mode, the vibration can sometimes cause the phone to move. •Be careful not to place the phone near heat sources (such as a heater) or too close to the edge of a table. •Use a damp or anti-static cloth to clean the phone. Do not use an ordinary dry cloth or electrostatic cloth. Do not use chemical or abrasive cleaners as these could damage the casing. •Third party equipment: The use of third party equipment, cables or accessories, not made or authorized by the manufacturer, may invalidate the warranty of your handset and adversely affect the phone’s safety/operation. •Remember to make backup copies of all of the important data on your handset. •Remember to recycle: the cardboard packing supplied with this handset is ideal for recycling. Caution: There is a danger of explosion if the battery is replaced with the incorrect type. Dispose of used batteries according to the instructions. Aircraft Safety •Turn off your phone before the airplane takes off. To protect the airplane’s communication system from interference, using a mobile phone in flight is prohibited. If you want to use the mobile phone before the airplane takes off, you should get the air crew’s permission according to the safety regulations. •If the mobile phone has an automatic timing power-on function, please check your alarm setting to ensure that your phone will not be automatically turned on during the flight. Hospital Safety •Switch off your phone and remove the battery in areas where the use of phones is prohibited. •Follow the instructions given by the respective medical facility regarding the use of phones on their premises. 37 Care and Maintenance General Guidelines •In some countries national law prevents unapproved private copying of copyrighted material. Please check the national legislation of the applicable country concerning the use of such material. •Many jurisdictions have laws and regulations about taking pictures in public or private areas and regarding the processing and further use of such pictures. The manufacturer encourages its customers to obey all laws and to respect the personal rights of others. •Please check the roaming agreement availability with your service provider. •The use of mobile phones is not allowed in some radiation sensitive areas, such as hospitals, research centers and airplanes. The user is responsible for turning off the device. If there is any uncertainty, you should remove the battery from the handset. •Observe any signs that indicate that you must turn off your phone, such as those near gas stations or explosives and turn off the phone immediately. •If you have a heart condition, be careful with the settings for call vibration or tone volume. 38 Care and Maintenance •Do not allow children to play with the phone, charger, or batteries. •Do not use the phone where blasting is in progress. •Do not try to make a call if the temperature of the charging battery is above 113°F. •Take care not to put your phone in the back pocket of your trousers or skirt and then sit on it. In addition, do not put your phone at the bottom of a bag where it may be subject to excessive weight or pressure. Doing so may damage the LCD and camera lens and cause them to malfunction. •The operation of some medical electronic devices, such as hearing aids and pacemakers, may be affected if a phone is used next to them. Observe any caution signs and the manufacturer’s recommendations. •Do not leave the phone discharged or without a battery for a long time. Doing so may cause some data to be erased. •Your phone contains metal, which may cause you to itch, or have a rash or eczema depending on your physical condition. Road Safety •You must exercise proper control of your vehicle at all times. Give your full attention to driving. •Observe all of the recommendations contained in your local traffic safety code. •Pull off the road and park before making or answering a call, if driving conditions require this to be done. •Check whether local laws and/or regulations restrict the use of phones while driving. •You MUST NOT stop on the hard shoulder of a highway to answer or make a call, except in an emergency. •Switch off your phone at a refueling point, such as a gas station, even if you are not refueling your own car. •Do not store or carry flammable or explosive materials in the same compartment as the phone. •Electronic vehicle systems, such as anti-lock brakes, speed control, and fuel injection systems are not normally affected by radio transmissions. The manufacturer of such equipment can advise if it is adequately shielded from radio transmissions. If you suspect vehicle problems are being caused by radio transmissions, consult your dealer and do not switch on the handset until it has been checked by qualified, approved installers. Vehicles Equipped with an Airbag An airbag inflates with great force. Do not place objects, including either installed or portable wireless equipment, in the area over the airbag or in the airbag deployment area. If in-vehicle wireless equipment is improperly installed and the airbag inflates, serious injury could result. Third-Party Equipment The use of third-party equipment, cables or accessories, not made or authorized by the manufacturer, may invalidate the warranty of your handset and also adversely affect the handset’s operation. For example, use only the manufacturer’s power cable supplied with the AC charger. 39 Care and Maintenance Care and Maintenance Emergency Service Privacy Information Copyright Notice Note: Emergency service numbers vary by country. They help you to get emergency service from the operator. To make an emergency call in any country: 1.Ensure that your handset is on and in service. 2.Press the Power/End Key to return to idle mode. 3.Enter the local emergency number for your current location, for example, 911. 4.Press the Send Key to dial the number. Follow the instructions you receive and do not end the call until told to do so. When the SIM card is not inserted, enter the official emergency number directly and press the Send Key or OK Key to dial the number. Notes: •Tell the operator which service you require: Police, Ambulance, Fire Brigade, Coast Guard, or Mountain Rescue Service. Tell them where you are and remain stationary to maintain contact if possible. •Due to the nature of the cellular system, the connection of emergency calls cannot be guaranteed. You should never rely solely on any wireless device for essential communications, such as medical emergencies. Camera usage and photo/audio/video recordings carried out with the phone can offend the confidentiality of the subjects. The user therefore is held responsible for respecting legislation in matters of confidentiality and remains the only responsible subject in the case of eventual violations of the enforced norm. The video/audio recordings you make/ download are protected by copyright laws. They are for personal use only and must not otherwise be used without the permission of the copyright owner. 40 Turn on the HAC Setting When the HAC setting is on, your phone sends the audio from your phone calls to the telecoil rather than to the microphone of your hearing aid. You are likely to hear calls much better because volume is increased and background noise and feedback are diminished. The HAC setting improves only the calls you listen to through the earpiece. It does not affect calls heard on the speakerphone or a headset. It’s better to turn off the Bluetooth function when the HAC setting is on. HAC requires extra battery power, so watch your battery consumption when it’s turned on. Caution: Do not turn on the HAC setting unless you use a hearing aid with a telecoil. Using this setting without a hearing aid or with a hearing aid without a telecoil may be harmful to your hearing. 41 Troubleshooting and FAQs Troubleshooting and FAQs Problem Solution Problem Solution No incoming ring or alarm tone. Check the ring volume settings under Sound Profiles. I cannot charge the phone. No key tones when pressing keys. Check the keypad tone settings in the current sound profile. Confirm that the charger is inserted correctly. Remove the battery, clean the contacts, and check that it is inserted correctly. The battery may be worn out and need to be replaced. How do I extend the incoming ring time? This is not a phone setting. Contact your service provider for more information on extending the ring time. How do I enter text in an SMS? A phone number cannot be dialed. Check for network coverage. Check whether any call restrictions are set. From the Recipient field, press down on the Navigation Key to move into the Text field. Use Predictive text or abc mode to manually type the words. How do I change the ringtone? Edit the current sound profile and select a new tune in the Audio folder. Short messages cannot be sent or received. Check Menu > Messaging > Settings > Text msg. setting > SMS center number. Contact your service provider for more information. The phone turns off after charging. The phone is charging in the off state. Hold the Power/ End Key to turn the phone on or charge it in the on state. MMS messages cannot be sent or received. Your subscription does not include data services. Contact your service provider for more information. The phone turns on automatically. An alarm or calendar event will automatically turn the phone on. How do I turn off Predictive Text? The # Key is used to toggle between different text entry modes. My phone is not able to connect to other Bluetooth devices. The battery discharges quickly. Possible network coverage issue. Check the signal strength. With only 1 or 2 bars, the battery has to work harder to maintain contact with the network. Limit multimedia and Bluetooth usage to save power. The battery may be worn out and need to be replaced. Enable Bluetooth and set Discoverable to On. Possible compatibility issues. Manufacturers incorporate different Bluetooth profiles and not all functionality is supported. How do I transfer pictures via Bluetooth to a photo printer (e.g., Kodak)? This is not supported due to different Bluetooth profiles. 42 43 Troubleshooting and FAQs Message Solution No SIM detected. Check that a valid SIM card is inserted. See: Getting Started > Inserting the SIM (Subscriber Identity Module) Card. Enter PIN code. Enter the correct PIN code provided by your service provider. Contact your service provider for more information on how to get a PUK code. Enter PUK code. Enter unlock code. Enter handset lock code. Contact your service provider for more information. The default handset lock code is 0000. Specifications The phone specifications are shown in the following table. Handset Standards WCDMA 850/1900/2100 MHz, GSM 850/900/1800/1900MHz Dimensions (H×W×D) 116mm × 49 mm× 11.3mm Weight Approximately 84g (including battery) Display 2.4” 262K TFT color screen Camera 3.0 megapixel camera Extended memory Supports up to an 8GB microSD card Battery 900 mAh, Lithium ion (Li-ion) Performance BMP/JPG/GIF image; 3GP/MP4 video; MP3/AMR/WAV/ AAC/AAC+ audio; Capture Image: up to 1536x2048, 24b; Capture Video: up to 176x144; USB 2.0; JAVA MIDP 2.0; MMS Video and Picture, Calendar, Speakerphone, Voice Recorder, Bluetooth Continuous idle time Up to 200 hours Continuous talk time About 180 minutes Charge time Approximately 3 hours Note: The phone’s talk time and idle time are based on ideal working environments. The use of extended backlighting, browser, and network conditions can reduce battery life and talk/idle time. 44 45 FCC Compliance FCC Compliance for Part 15B/Part 15C This device complies with part 15 of the FCC Rules. Operation is subject to the following two conditions: (1) This device may not cause harmful interference, and (2) this device must accept any interference received, including interference that may cause undesired operation. Caution: Changes or modifications not expressly approved by the manufacturer could void the user’s authority to operate the equipment. Note: This equipment has been tested and found to comply with the limits for a Class B digital device, pursuant to part 15 of the FCC Rules. These limits are designed to provide reasonable protection against harmful interference in a residential installation. This equipment generates, uses, and can radiate radio frequency energy and, if not installed and used in accordance with the instructions, may cause harmful interference to radio communications. However, there is no guarantee that interference will not occur in a particular installation. If this equipment does cause harmful interference to radio or television reception, which can be determined by turning the equipment off and on, the user is encouraged to try to correct the interference by one or more of the following measures: 46 FCC Compliance •Reorient or relocate the receiving antenna. •Increase the separation between the equipment and receiver. •Connect the equipment into an outlet on a circuit different from that to which the receiver is connected. •Consult the dealer or an experienced radio/TV technician for help. NONE PART 15B/PART 15C is as below FCC Compliance This device complies with part 15 of the FCC Rules. Operation is subject to the condition that this device does not cause harmful interference. Caution: Changes or modifications not expressly approved by the manufacturer could void the user’s authority to operate the equipment. Using Your Phone with a Hearing Aid Device Your F160 device is compliant with the FCC and IC Hearing Aid Compatibility (HAC) requirements. When some wireless phones are used near some hearing devices (hearing aids and cochlear implants), users may detect a buzzing, humming, or whining noise. Some hearing devices are more immune than others to this interference noise, and phones also vary in the amount of interference they generate. The wireless telephone industry has developed ratings for some of their mobile phones to assist hearing-device users in finding phones that may be compatible with their hearing devices. Not all phones have been rated. Phones that have been rated have a label on the box. Your F160 has been tested for hearing aid device compatibility and has an M[4] and/or T[4] rating. These ratings are not guaranteed. Results will vary, depending on the level of immunity of your hearing device and the degree of your hearing loss. If your hearing device happens to be vulnerable to interference, you may not be able to use a rated phone successfully. Trying out the phone with your hearing device is the best way to evaluate it for your personal needs. M-Ratings: Phones rated M3 or M4 meet FCC requirements and are likely to generate less interference with hearing devices than phones that are not labeled. M4 is the better/higher of the two ratings. T-Ratings: Phones rated T3 or T4 meet FCC requirements and are likely to be more usable with a hearing device’s telecoil (“T Switch” or “Telephone Switch”) than unrated phones. T4 is the better/higher of the two ratings. (Note that not all hearing devices contain telecoils.) The more immune your hearing aid device is, the less likely you are to experience interference noise from your wireless phone. Hearing aid devices should have ratings similar to those of phones. Ask your hearing health-care professional for the rating of your hearing aid. Hearing devices may also be measured for immunity to this type of interference. Your hearing device manufacturer or hearing health professional may help you find results for your hearing device. The more immune your hearing aid is, the less likely you are to experience interference noise from wireless devices. For additional information about the FCC’s actions with regard to hearing aid compatible wireless devices and other steps the FCC has taken to ensure that 47 FCC Compliance individuals with disabilities have access to telecommunications services, please go to www.fcc.gov/cgb/dro. Turn on the HAC Setting When the HAC setting is on, your F160 sends the audio from your phone calls to the telecoil rather than to the microphone of your hearing aid. You are likely to hear calls much better because volume is increased and background noise and feedback are diminished. The HAC setting improves only the calls you listen to through the earpiece. It does not affect calls heard on the speakerphone or with a headset. Turn off the Bluetooth function. HAC requires extra battery power, so watch your battery consumption when it’s turned on. Caution: Do not turn on the HAC setting unless you use a hearing aid with a telecoil. Using this setting without a hearing aid or with a hearing aid without a telecoil may be harmful to your hearing. Radio Frequency (RF) Energy This model phone meets the government’s requirements for exposure to radio waves. This phone is designed and manufactured not to exceed the emission limits for exposure to radio frequency (RF) energy set by the Federal Communications Commission of the U.S. Government: The exposure standard for wireless mobile phones employs a unit of measurement known as the Specific Absorption Rate, or SAR. The SAR limit set by the FCC is 1.6 W/kg.* Tests for SAR are conducted using standard operating positions accepted by the FCC with the phone transmitting at its highest certified power level in all tested frequency bands. Although the SAR is determined at the highest certified power level, the actual SAR level of the phone while operating can be well below the maximum value. This is because the phone is designed to operate at multiple power levels so as to use only the power required to reach the network. In general, the closer you are to a wireless base station antenna, the lower the power output. The highest SAR value for the model phone as reported to the FCC when tested for use at the ear is 1.08 W/kg and when worn on the body, as described in this user guide, is 0.693 W/kg. (Body-worn measurements differ among phone models, depending upon available enhancements and FCC requirements.) While there may be differences between the SAR levels of individual F160 phones and at various positions, they all meet the government requirement. The FCC has granted an Equipment Authorization for this model phone with all reported SAR levels evaluated as in compliance with the FCC RF exposure guidelines. SAR information on this model phone is on file with the FCC and can be found under the Display Grant section of http://www.fcc.gov/oet/ea/fccid/ after searching on FCC ID: Q78-ZTEF160. For body-worn operation, this phone has been tested and meets the FCC RF exposure guidelines for use with an accessory that contains no metal and that positions the handset a minimum of 1.5 cm from the body. Use of other enhancements may not ensure compliance with FCC RF exposure guidelines. If you do not use a body-worn accessory and are not holding the phone at the ear, position the handset a minimum of 1.5 cm from your body when the phone is switched on. *In the United States and Canada, the SAR limit for mobile phones used by the public is 1.6 watts/kg (W/kg) averaged over one gram of tissue. The standard incorporates a substantial margin of safety to give additional protection for the public and to account for any variations in measurements. 48 49 Notes 50 Notes 51 Notes 52