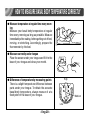
1
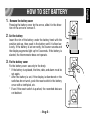
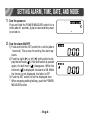
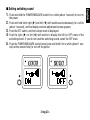
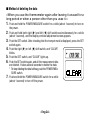
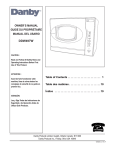
INSTRUCTION MANUAL
FOR
CT915
SAFETY PRECAUTIONS
WARNING
● Keep the battery away from infants. If an infant swallowed the battery, meet a doctor immediately.
● Measure temperature according to directions given by a doctor and consult him
(her).
CAUTION
●
●
●
●
Do not disassemble the thermometer.
Do not pull the cord strongly.
Do not splash water over the thermometer.
Do not leave the thermometer in a place where it will be exposed to high temperature or direct sunlight or where the ambient temperature will be below 0°C or the
humidity is high.
- Eng 2 -
● CT915 records measurement results automatically.
CT915 records data of up to 120 days (measurements).
● Basal body temperature recording mode or all-measurements recording mode can
be selected.
If the basal body temperature recording mode is selected, the temperature is recorded
only one time a day. If the all-measurements recording mode is selected, all the measurement results are recorded.
● You can check the change of your body temperature by graph.
Since the temperature data of 31 days (31 measurements) are displayed by a graph, you
can check the measurement result and measurement date in order.
● Alarm to notify measurement time is available.
You can measure your body temperature at regular time every day.
● You can take out and store the probe easily.
You can take out and store the probe easily and carry the whole set easily since it is small
in size.
● Antibacterial plastic is used.
Since an antibacterial plastic is used for the probe, it is kept clean.
- Eng 3 -
English
FEATURES OF CT915
NAME OF EACH PART
Sensor
Display in value
(Temperature, date)
Probe
Display in graph
(Display by dots)
POWER/MEASURE switch
Right shift switch
Cover
Left shift switch
SET switch
Cord
RESET switch
Battery cover
- Eng 4 -
1.
Remove the battery cover
Pressing the battery cover by the arrow, slide it in the direction of the arrow to remove it.
2. Set the battery
Insert the rim of the battery under the battery hook with the
positive side up, then push in the battery until it is fixed securely. If the battery is set correctly, the buzzer sounds and
the display segments light up for 5 seconds. If the battery is
slanted, the thermometer does not operate.
3. Fix the battery cover
Fix the battery cover securely to the body.
* If the battery is replaced, the time, date, and alarm must be
set again.
* After the battery is set, if the display is disordered or the
switches do not work, push the reset switch in the battery
cover with a toothpick, etc.
* Even if the reset switch is pushed, the recorded data are
not deleted.
- Eng 5 -
English
HOW TO SET BATTERY
SETTING ALARM, TIME, DATE, AND MODE
1. Turn the power on
Push and hold the POWER/MEASURE switch for a
while (about 1 second). A pip is heard and the power
is turned on.
2. Turn the alarm ON/OFF
1) Push and hold the SET switch for a while (about
1 second). The screen for setting the alarm appears.
2) Push the right (s) or left (t) shift switch to display the bell mark ( ). If the shift switch is pushed
again, the bell mark ( ) disappears. While the
bell mark ( ) is displayed, the alarm is ON. While
the former is not displayed, the latter is OFF.
3) Push the SET switch to set the displayed item.
* When stopping setting halfway, push the POWER/
MEASURE switch.
- Eng 6 -
1) The alarm time is displayed and the “minute”
blinks.
2) Push the right (s) or left (t) shift switch to set
the “minute”. If the shift switch is pushed and held,
the number changes fast. If the right (s) shift
switch is pushed the number increases. If the left
(t) shift switch is pushed the number decreases.
3) Push the SET switch to set the “minute”. The item
to be set next blinks.
4. Set the “hour” of the alarm time
1) The alarm time is displayed and the “hour” blinks.
2) Set the “hour” by the operation in 3. 2) above,
then push the SET switch to set the “hour”.
* The “hour” is displayed in 24-hour display mode.
5. Set the “minute” of the present time
1) The present time is displayed and the “minute”
blinks.
2) Set the “minute” by the operation in 3. 2) above,
then push the SET switch to set the “minute”.
- Eng 7 -
English
3. Set the “minute” of the alarm time
6. Set the “hour” of the present time
1) The present time is displayed and the “hour”
blinks.
2) Set the “hour” by the operation in 3. 2) above,
then push the SET switch to set the “hour”.
7. Set the “day” of the present date
1) The present date is displayed and the “day” blinks.
2) Set the “day” by the operation in 3. 2) above, then
push the SET switch to set the “day”.
8. Set the “month” of the present date
1) The present date is displayed and the “month”
blinks.
2) A Set the “month” by the operation in 3. 2) above,
then push the SET switch to set the “month”.
9. Set the “year” of the present date
1) The present date is displayed and the “year” blinks.
2) A Set the “year” by the operation in 3. 2) above,
then push the SET switch to set the “year”.
* The “year” can be set to 2000 - 2099.
- Eng 8 -
all-measurements recording mode.
If the “LADY” mark is displayed, the thermometer is
in the basal body temperature recording mode. In
this mode, the basal body temperature measured
for the first time on each day is recorded. If the “LADY” mark is not displayed, the
thermometer is in the all-measurements recording mode. In this mode, all the measured temperatures are recorded.
1) Push the right (s) or left (t) shift switch to turn on (or off) the display of “LADY”.
2) Push the SET switch to set turning-on (or turning-off) of the display of “LADY”.
* If you have made any mistake in setting or you need to change the alarm time,
repeat setting from the first.
* If any key is not touched for about 1 minute, the set screen changes to the record
display screen automatically.
- Eng 9 -
English
10. Set the basal body temperature recording mode/
BASAL BODY TEMPERATURE RECORDING MODE
1. Remove the probe from the body
1) Open the cover and push the rear end (left end)
of the probe lightly to remove the probe from the
hook.
2) Unwound the cord from the body.
2. Measure the basal body temperature
■ Method of measuring basal body temperature
(at a regular time once a day)
1) The alarm buzzer wakes you.
2) Push any one of the switches.
The alarm buzzer stops after about 30 seconds
automatically. If any switch is pushed, however,
the alarm buzzer stops and the measure screen
appears.
If any switch is not pushed, the alarm buzzer
sounds again after 7 minutes.
- Eng 10 -
Measurement
Screen
Display of
LADY
Measurement mark
* If the POWER/MEASURE switch is pushed and held for a while (about 1 second),
the power is turned off. When displaying the measure screen while the power is
turned on, push and release the POWER/MEASURE switch quickly.
3) Place the probe under your tongue.
(See “How to measure basal body temperature correctly” on page 20.)
Apply the probe tip (sensor) to the groove at the center of the underside of your
tongue and close your mouth lightly.
* If peeps are heard, the measurement is in error (“E” is displayed). In this case, push
the POWER/MEASURE switch again and start measurement.
4) A pip is heard. When more pips are heard about 5 minutes after measurement is
started, measurement is finished.
* The first electronic pip indicates that the temperature is being measured normally.
* In the basal body temperature recording mode, the temperature measured for the
first time on each day is recorded automatically.
- Eng 11 -
English
* If you do not want to be woken by the alarm of this thermometer but by your own
alarm clock, etc., push and hold the POWER/MEASURE switch for a while (about 1
second) to turn on the power. Then, push the POWER/MEASURE switch momentarily to display the measure screen.
* The measure mark indicates how many minutes have passed after measurement is
started as shown below.
Start of
measurement
After 1
minute
After 2
minutes
After 3
minutes
3. Store the probe in the body
1) Wipe off saliva with tissue paper, etc.
2) Wind the cord clockwise onto the body by 2
turns and a half.
3) Fix the probe to the hook with a click and
close the cover.
- Eng 12 -
After 4
minutes
After 5 minutes /
Finish of
measurement
the power.
If the POWER/MEASURE switch is not pushed, the record display screen appears automatically and the power is turned off 30 more seconds after.
the basal body temperature recording mode, the temperature mea* In
sured for the first time on each day is recorded automatically, but the
temperatures measured for the second time and after on the same day
are not recorded automatically. When recording the temperature measured for the second time or after, push the SET switch while the measurement finish screen is displayed, and the record is rewritten.
- Eng 13 -
English
4. Push and hold the POWER/MEASURE switch for a while (about 1 second) to turn off
ALL-MEASUREMENTS RECORDING MODE
1. Remove the probe from the body
1) Open the cover and push the rear end of the probe
lightly to remove the probe from the hook.
2) Unwound the cord from the body.
2. Measure the body temperature
■ Method of measuring body temperature (Allmeasurements recording mode)
1) Push and hold the POWER/MEASURE switch for
a while (about 1 second) to turn on the power. Fix
the probe to the hook with a click and close the
cover.
When the power switch is pressed ON, the display will read as a check that all part of the display is working (Safety test for system).
- Eng 14 -
Measurement
Screen
No display
of LADY
Measurement mark
* If the POWER/MEASURE switch is pushed and held for a while (about 1 second),
the power is turned off. When displaying the measure screen while the power is
turned on, push and release the POWER/MEASURE switch quickly.
* To change the basal body temperature recording mode ( LADY is displayed) to
the all-measurements recording display ( LADY is not displayed), repeat the operation of “Setting alarm, time, date, and mode” (on pages 6-10) from the first, then
select the all-measurements recording mode.
3) Place the sensor of the probe under your tongue to start measurement. If peeps are
heard, the measurement is in error (“E” is displayed). In this case, push the POWER/
MEASURE switch again and start measurement.
4) A pip is heard. When more pips are heard about 5
minutes after measurement is started, measurement is finished.
* The first electronic pip indicates that the temperature is being measured normally.
- Eng 15 -
Ending of
measurement
English
2) Then, push the POWER/MEASURE switch momentarily to display the measure screen.
5) In the all-measurements recording mode ( LADY is not displayed), all the measured
temperatures are recorded automatically.
* Even in the basal body temperature recording mode ( LADY is displayed), you can
measure your body temperature by the above method. Your body temperatures
measured after your basal body temperature is measured are not recorded, however.
3. Store the probe in the body
1) Wipe off saliva with tissue paper, etc.
2) Wind the cord clockwise onto the body by
2 turns and a half.
3) Fix the probe to the hook with a click and
close the cover.
4. How to turn off the power
Push and hold the POWER/MEASURE switch for a while (about 1 second) to turn off
the power.
If the POWER/MEASURE switch is not pushed, the record display screen appears automatically and the power is turned off 30 more seconds after.
- Eng 16 -
● You can check the change of your body temperatures in 31 days (31 measurements) at a glance.
1) Push and hold the POWER/MEASURE switch for a while (about 1 second) to turn on
the power. (The record display screen appears.)
2) The temperatures recorded up to now are displayed in graph on the lower graph
display unit. In the upper value display unit, the temperature and the date of the
blinking bar are displayed alternately.
- Eng 17 -
English
READING RECORDS/CHECKING GRAPH
3) Move the graph forward or in reverse with the
right (s) or left (t) shift switch and check the
temperature and date of each bar displayed on
the value display unit.
* If the SET switch is pushed, the unit of the vertical axis of the graph changes (0.05°C or
0.2°C). Select either unit to check the change
of your body temperature.
[Unit: 0.05°C]
[Unit: 0.2°C]
SET
Detailed graph in the range of
1.5°C suitable for of basal body
temperature
Wide graph in the range of 6°C
suitable for check of usual body
temperature
- Eng 18 -
This thermometer can record data of up to 120 days (measurements). If the
temperature is measured more, the past records are deleted automatically
in order from the oldest one. It is recommended that you should take notes
of important data.
- Eng 19 -
English
Number of recorded days (measurements)
HOW TO MEASURE BASAL BODY TEMPERATURE CORRECTLY
● Measure temperature at regular time every morning
Measure your basal body temperature at regular
time every morning as long as possible. Measure
immediately after waking, before getting out of bed,
moving, or stretching. Accordingly, prepare the
thermometer by the bed.
● Measure correctly under tongue
Place the sensor under your tongue and fit it to the
base of your tongue and close your month.
● Difference of temperature by measuring points
There is a slight temperature difference between
parts under your tongue. To obtain the accurate
basal body temperature, always measure it at a
fixed point of the base of your tongue.
High
Medium
Low
- Eng 20 -
■ How to make personal mark “ ”
You can make a personal mark for your menstrual period, etc. for convenience.
1. Push and hold the POWER/MEASURE switch for a while
(about 1 second) to turn on the power. (The record display
screen appears.
2. Move the graph forward or in reverse with the right (s) or
left (t) shift switch and to select a date on which you want
make a personal mark.
3. Push both right (s) and left (t) shift switches simultaneously and momentarily, and the personal mark “ ” blinks.
If both switches are pushed and held for a while simultaneously, the display contrast adjustment screen appears
(See page 22.) In this case, push the POWER/MEASURE
switch to return to the record display screen, then push
both switches momentarily.
4. Press the SET switch, and “ ” lights up and is set.
5. To delete the set personal mark, display the data on which “ ” is made and push both
right (s) and left (t) shift switches simultaneously and momentarily. Check that “ ”
is blinking, the push the POWER/MEASURE switch.
6. Push and hold the POWER/MEASURE switch for a while (about 1 second) to turn off
the power.
- Eng 21 -
English
EXPLANATION OF OTHER FUNCTIONS
■ Method of adjusting display contrast
1. Push and hold the POWER/MEASURE switch for a while (about 1 second) to turn on
the power.
2. Push and hold both right (s) and left (t) shift switches simultaneously for a while
(about 1 second), and the display contrast adjustment screen appears.
3. To heighten the contrast, push the right (s) shift switch. To lower the contrast, push
the left (t) shift switch. The contrast can be adjusted to 5 levels.
4. Push the POWER/MEASURE switch twice [push and hold it for a while (about 1 second) at the second time] to turn off the power.
- Eng 22 -
1. Push and hold the POWER/MEASURE switch for a while (about 1 second) to turn on
the power.
2. Push and hold both right (s) and left (t) shift switches simultaneously for a while
(about 1 second), and the display contrast adjustment screen appears.
3. Push the SET switch, and the trumpet mark is displayed.
4. Push the right (s) or left (t) shift switch to display the ON (or OFF) mark of the
switching sound. If you do not need the switching sound, select the OFF mark.
5. Push the POWER/MEASURE switch twice [push and hold it for a while (about 1 second) at the second time] to turn off the power.
- Eng 23 -
English
■ Setting switching sound
■ Method of deleting the data
<When you use the thermometer again after leaving it unused for a
long period or when a person other than you uses it.>
1. Push and hold the POWER/MEASURE switch for a while (about 1 second) to turn on
the power.
2. Push and hold both right (s) and left (t) shift switches simultaneously for a while
(about 1 second), and the display contrast adjustment screen appears.
3. Push the SET switch. After checking that the trumpet mark is displayed, press the SET
switch again.
4. Push the right (s) or left (t) shift switch, and “CLEAR”
blinks.
5. Push the SET switch, and “CLEAR” lights up.
6. Push the SET switch again, and all the measurement data
are deleted. It takes several seconds to delete the data.
* To stop deleting the data halfway, push the POWER/MEASURE switch.
7. Push and hold the POWER/MEASURE switch for a while
(about 1 second) to turn off the power.
- Eng 24 -
SFunction of notifying lowering of battery voltage
Lighting of battery mark: The battery voltage is lowering. Replace the battery immediately.
Blinking of battery mark: The battery mark blinks for 4 seconds. The battery is almost
dead. Replace it as soon as possible.
Display condition:
If the display is faint or cannot be read, replace the battery as
soon as possible.
* Since the battery attached to the purchased thermometer is for monitoring, it may be
used up before the standard life.
* Dispose of the used battery correctly to protect the environment.
■ How to replace battery
• Referring to “How to set battery” on page 5, replace
the battery.
• Remove the used battery with a thin bar (toothpick,
spit, etc.)
• Use the specified lithium battery (CR2032).
- Eng 25 -
English
REPLACING BATTERY
BASAL BODY TEMPERATURE
<Basal body temperature is important information from
a woman’s body.>
The body temperature of an adult woman
becomes low and high regularly after each
ovulation period. That is, the body temperature keeps low until an ovulation period, then
becomes high after the ovulation period. It
lowers again after the menstruation.
The difference between the high temperature
and low temperature is less than 1°C. The
temperature measured to check the high and
low-temperature periods is the basal body
temperature. The basal body temperature
should be measured ideally in your mouth just
after you wake every morning.
If you record the basal body temperature for several months, you will see its change unique
to you. From change of the basal body temperature, you can forecast your ovulation period and menstruation, then you can control birth. If your menstruation is not regular, you
can receive proper advice based on the record of your basal body temperature from your
doctor. Furthermore, you can forecast a menopausal disorder by observing your basal
body temperature. The basal body temperature is important information for every woman.
- Eng 26 -
English
N Basal body temperature graph
High temperature
period
Ovulattion Day
Low temperature
period
[Precaution]
The change of the basal body temperature depends on each
woman.
When using the basal body temperature graph, record the basal
body temperature continuously for at least three months and consult your doctor.
- Eng 27 -
PRECAUTIONS
Observe the following precautions to prevent a malfunction and
a trouble.
1. Do not use the thermometer for any purpose other than measurement of the body
temperature.
2. Do not splash water over the body.
3. Do not bring the thermometer near strong static electricity, radio wave, magnet, or TV
4. Do not use a cellular phone near the thermometer.
5. Do not bite the probe strongly.
6. Do not pull the cord more than necessity or swing the body with the cord.
7. Do not open or close the body cover forcibly.
8. Keep the thermometer away from children since it can injure them and can be damaged.
9. Do not use paint thinner, benzene, or cresol water to clean the thermometer.
10. Do not clean the thermometer with water, hot water, or ultrasonic cleaner.
11. Do not dip the thermometer in disinfectant alcohol.
12. When storing the probe in the body, wipe off moisture with tissue paper, dry cloth,
etc.
13. Never repair, modify, or disassemble the thermometer.
- Eng 28 -
15. Do not store the thermometer in a place where it may be badly affected by atmospheric pressure, temperature, humidity, ventilation, sunlight, dust, salt, air containing sulfur, etc. or where chemicals are stored or gas is produced.
16. Protect the thermometer from vibrations and impacts (during transportation, too).
17. Do not mistake the polarities of the battery.
18. Do not use the thermometer together with another device.
19. If any trouble is found in the thermometer, turn off the power.
- Eng 29 -
English
14. Store the thermometer in a place where water will not be splashed over it.
HOW TO CLEAN
● Wipe the body and cord with a cloth soaked in neutral detergent.
(Since the body and cord are not water-resistant, take care extremely.)
● Wipe the probe and sensor with a cloth soaked in disinfectant alcohol or neutral detergent.
● Since the probe and sensor are water-resistant, they can be washed in water.
Take care extremely, however, that water will not be splashed over the body and cord.
- Eng 30 -
Nothing is displayed
Is battery set correctly?
See page 5.
Is contrast adjusted properly?
See page 22.
Is battery normal?
See page 25.
is displayed (Error)
Measure again.
See pages 10 and 14.
is displayed
Cool down probe, then measure again.
Display is light
- Eng 31 -
English
BEFORE ASKING FOR REPAIR OR SERVICE
RATING AND SPECIFICATIONS
Measuring method
Temperature sensor
Display method
Actual measurement
Thermistor
Display in value: 4-digit LCD (Mm. unit: 0.01)
Display in graph: Bra graph of data of 31 days (measurements)
[Detailed graph (Unit: 0.05°C), Wide graph (Unit: 0.2°C)]
Measurement range
32.00°C - 42.00°C
Measurement accuracy ±0 05°C (In range of 35.00°C - 38.00°C)
±0.10°C (In range out of above)
Using condition
Temperature: 10°C - 40°C, Humidity: 30% - 85%
Storage condition
Temperature: –20°C - 60°C, Humidity: 30% - 95%
Power source
DC 3V [Lithium battery (CR2032) × 1 piece]
Rated voltage
DC 3V 2mA ( : Direct current)
Current collector
2mA
Battery life
Approx. 1 year (When used once a day)
Eectrical shock protection Internal power source device
Safety classification
Type B Equipment
Dimensions
Body: Approx. 100mm (W) × 90mm (D) × 23.5mm (H)
Probe: Approx. 60mm (including sensor)
Cord: Approx. 400mm
Weight
Approx. 100g
1 piece of lithium battery (CR2032) for monitoring Instruction manual
Accessories
Attention, consult accompanying documents.
*Specifications and design may be subject to change without notice for improvement purposes.
- Eng 32 -
WEEE
If you want to dispose this product, do not mix with general household waste. There is
a separate collection systems for used electronics products in accordance
with legislation under the WEEE Directive (Directive 2002/96/EC) and is
effective only within European Union.
Reference European standard:
This products complies with EC instructions 93/42/EEC.
(Medical Device Directive) and with the following standards: EN 12470-3.
Manufacturer:
Name:
Address:
Flat A-B, 4th floor, Hung Mou Industrial Building, 62 Hung To Road,
Kwun Tong, Kowloon, Hong Kong
European Representative:
Name:
WvW elektronische Geräte Vertrieb GmbH.
Address:
Robert-Koch-Straße 20, D-80538 München, GERMANY
- Eng 33 -
English
Protect the natural environment:
Please help protect natural environment by respecting national and /or local recycling
regulations when disposing of the batteries and the product and at the end of their useful
lives.
● CITIZEN is a registered trademark of Citizen Holdings Co., Japan.
CITIZEN es una marca registrada de Citizen Holdings Co., Japón.
● Design and specification are subject to change without notice.
- Pyc 34 -