1
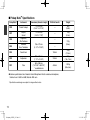
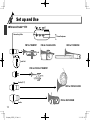
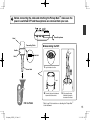
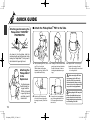
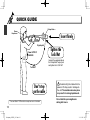
Pickup Mute™
Руководство пользователя
PickupMute_JEDFES_1125.indd 1
11/11/26 9:05
Pickup Mute™
Thank you for purchasing the Yamaha SILENT
BRASS™ Pickup Mute™. In order to obtain the
maximum performance and enjoyment from your
Pickup Mute™, we urge you to read this Owner’s
Manual thoroughly before using. Please keep
this Owner’s Manual in a safe place for later
reference.
ContentsofSet
● Pickup Mute™ PM9/PM7/PM6/PM5/PM3/PM2/PM1
● Cable
● Owner’s Manual
* Personal Studio™ ST9 is not included.
11
PickupMute_JEDFES_1125.indd 11
11/11/26 9:05
■ Pickup Mute™ Specifications
Pickup Mute™
PM9
Instrument
Dimensions (diameter x length)
PiccoloTrumpet
Width at handle
70x145mm
(2-3/4"x5-11/16")
—
Weight
80g
(2.8oz.)
120g
(4.2oz.)
PM7
Trumpet,
Cornet
70x200mm
(2-3/4"x7-7/8")
—
PM6
Flugelhorn,
AltoTrombone
—
PM5
Trombone,
BassTrombone
108x270mm
(4-1/4"x10-5/8")
—
PM3
Frenchhorn
150mm
300g
(10.5oz.)
PM2
Euphonium
190x410mm
(7-1/2"x16-1/8")
220mm
800g
(1lbs.,12oz.)
PM1
Tuba
380x980mm
(14-15/16"x38-9/16")
*assembledsize
430mm
2900g
(6Ibs.,6oz.)
270g
(9.5oz.)
●Commonspecificationsforallmodels:InternalMicrophone:Electriccondensermicrophone,
NominalLevel:-25dBto-35dB,Material:ABSresin
* Specifications and design are subject to change without notice.
12
PickupMute_JEDFES_1125.indd 12
11/11/26 9:05
Your Pickup Mute™ will give you years of
reliable service if you follow the simple rules
given below:
■ Location
Donotexposeittothefollowingconditionstoavoid
deformation,discoloration,ormoreseriousdamage.
•Directsunlight(e.g.nearawindow).
•Hightemperatures(e.g.nearaheatsource,out
side,orinacarduringthedaytime).
•Excessivehumidity.
•Excessivedust.
•Strongvibration.
■ Handling and Transport
•Neverapplyexcessiveforcetothecontrols,connectorsorotherparts.
•Alwaysunplugcablesbygrippingtheplugfirmly,
notbypullingonthecable.
•Disconnectallcablesbeforemovingtheunit.
•Physicalshockscausedbydropping,bumping,
orplacingheavyobjectsontheunitcanresultin
scratchesandmoreseriousdamage.
■ Cleaning
•Cleanthecabinetandpanelwithadrysoftcloth.
•Aslightlydampclothmaybeusedtoremove
stubborngrimeanddirt.
•Neverusecleanerssuchasalcoholorthinner.
YAMAHAisnotresponsiblefordamagecausedby
improperhandlingoroperation.
SPECIAL MESSAGE SECTION
SPECIFICATIONS SUBJECT TO CHANGE:
The information contained in this manual is believed to be correct at the time of printing. However, Yamaha reserves the right
to change or modify any of the specifications without notice or
obligation to update existing units.
Do not attempt to service this product beyond that described in
the user-maintenance instructions. All other servicing should be
referred to qualified service personnel.
This product, either alone or in combination with an amplifier
and headphones or speaker/s, may be capable of producing
sound levels that could cause permanent hearing loss. DO NOT
operate for long periods of time at a high volume level or at a
level that is uncomfortable. If you experience any hearing loss or
ringing in the ears, you should consult an audiologist.
IMPORTANT: The louder the sound, the shorter the time period
before damage occurs.
NOTICE:
Service charges incurred due to a lack of knowledge relating to
how a function or effect works (when the unit is operating as
designed) are not covered by the manufacturer’s warranty, and
are therefore the owner’s responsibility. Please study this manual
carefully and consult your dealer before requesting service.
Disposal Notice:
Should this product become damaged beyond repair, or for some
reason its useful life is considered to be at an end, please observe
all local, state, and federal regulations that relate to the disposal
of products that contain lead, batteries, plastics, etc. If your
dealer is unable to assist you, please contact Yamaha directly.
92-BP
13
PickupMute_JEDFES_1125.indd 13
11/11/26 9:05
SetupandUse
■ Personal Studio™ ST9
Connecting Cable
Stereo Earphones
PM7 for TRUMPET
PM6 for FLUGELHORN
PM5 for TROMBONE
Lock Nut
PM9 for PICCOLO TRUMPET
Handle (P. 17)
PM3 for FRENCH HORN
Handle
PM2 for EUPHONIUM
14
PickupMute_JEDFES_1125.indd 14
11/11/26 9:05
Before connecting the cable and attaching the Pickup Mute™, make sure the
power is switched OFF and the earphones are removed from your ears.
Stereo Earphones
Head
Connecting Cable
■ Assembling the PM1
Handle
Lock Nut
Body
Inner Head
1. LaytheHeadonthefloor.
Hook
2. PlacetheBodyontheHeadand
fastenwiththethreehooks.
PM1 for TUBA
PickupMute_JEDFES_1125.indd 15
3. FullyextendtheInner
Headthatislocatedin
thecenteroftheHead.
* Refer to pg.16 for instructions on attaching the Pickup Mute™
to the instrument.
15
11/11/26 9:05
QUICKGUIDE
Attaching and removing the
Pickup Mute™ PM9/PM7/
PM6/PM5/PM3
As shown in the illustration, hold the
instrumentwithyourlefthandand,while
turningthePickupMute™,firmlyinsertit
intothebellwithyourrighthand.
Attaching the
Pickup Mute™
to the
Euphonium
ForEuphoniums,
withthebellfacingup,holdthe
PM2byitshandle
inyourrighthand
andfirmlyinsertit
intothebell.
■ Attach the Pickup Mute™ PM1 to the Tuba
1. AfterassemblingthePM1(referto 2. HoldingthePM1withbothhands, 3. AdjustthePM1sothatitisposi
pg.15)layitonitsside.
Whileseated,holdthetuba
betweenyourlegs.HoldthePM1
byitshandleandliftitup.
gentlyinserttheInnerHeadinto
thebellofthetuba.(Continue
holdingthetubabetweenyour
legs.)
tionedinthecenterofthebell.
* Noise will result if the Inner Head
is touching the bell.
After removing the PM1 from
the instrument, lay the PM1 on its
side. If the PM1 is stood vertically,
the Inner Head will collapse causing
a burst of noise in the earphones that
may result in hearing impairments.
4. AttachthePM1fixinghooks
tothebell.Ifnecessary,adjust
thelength(tension)ofthehook
belt.
5. Connectthelocknutequipped
endofthesuppliedcabletothe
PM1’soutputjackandsecure
thelocknut.
When putting the PM1 away, hold
the Inner Head with both hands and
gently collapse it back into the Body.
Strongly dropping the Inner Head may
result in damage to the PM1.
16
PickupMute_JEDFES_1125.indd 16
11/11/26 9:05
Holding the Pickup Mute™ when
playing the horn standing up
The following cautions are for your own safety and to avoid
possible damage to and malfunctioning of the equipment,
and thus should be observed carefully.
● FirmlyinsertthePickupMute™intothebelloftheinstrument.
● AvoiddroppingthePickupMute™.Droppingthemutemayresultin
damage.Also,shocktotheearfromthenoiseproducedbydropping
themutemayresultindamagetoyourhearing.
● DonottouchorjabthePickupMute™’smicrophonecomponent.
Microphone
Asshownintheillustration,lightlysupport
thehandleinthemiddleofthePickupMute™
withtheballofyourthumbwhileholdingthe
instrument at the bell rim with your other
fingers.Thehandlealsofeaturesaringfora
wristband,allowingyoutohangthePickup
Mute™fromyourwrist(justlikeanyother
mute)whileemptyingthehorn.(Wristband
isnotincluded.)
* Always remove the Pickup Mute™ before emptying
the instrument.
● Avoidsteppingonthecable.
● Whenyouarefinishedplaying,removethePickup
Mute™fromtheinstrument.Cleananymoisture
onthePickupMute™withacloth.DO NOT WASH
WITH WATER.
● IfmoisturegetsonthePickupMute™duringor
afterplaying,pleasedrythoroughly.
17
PickupMute_JEDFES_1125.indd 17
11/11/26 9:05
QUICKGUIDE
Pickup Mute TM
Stereo
Earphones
Insert firmly
Signal path
From OUTPUT/
PHONES
ST9
To INPUT
Don’t step
on the cable
* Personal Studio™ ST9 and stereo earphones are not included.
Tighten the
Lock Nut
Connectthesuppliedcableto
thePickupMute™outputjack
andtightentheLOCKNUT.
Disconnectingthecablewhilethe
powerisONmayresultindamageto
theunit.The sudden noise may also
may result in hearing impairments.
Do not disturb your neighbours
during late hours.
18
PickupMute_JEDFES_1125.indd 18
11/11/26 9:05