1
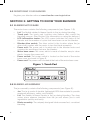
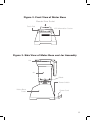
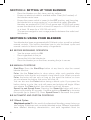
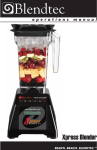
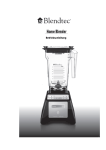
HomeBlender
™
Owner’s Manual
and user guide
Table of Contents
SECTION 1: IMPORTANT SAFEGUARDS� � � � � � � � � � � � � � � � � � � � � � � � � � � � � � � � � � � � � 1
SECTION 2: UNPACKING YOUR BLENDER � � � � � � � � � � � � � � � � � � � � � � � � � � � � � � � � � 4
SECTION 3: GETTING TO KNOW YOUR BLENDER � � � � � � � � � � � � � � � � � � � � � � 4
SECTION 4: SETTING UP YOUR BLENDER � � � � � � � � � � � � � � � � � � � � � � � � � � � � � � � � � 6
SECTION 5: USING YOUR BLENDER� � � � � � � � � � � � � � � � � � � � � � � � � � � � � � � � � � � � � � � � � 6
SECTION 6: CARING FOR YOUR BLENDER� � � � � � � � � � � � � � � � � � � � � � � � � � � � � � 10
SECTION 7: TROUBLESHOOTING PROBLEMS � � � � � � � � � � � � � � � � � � � � � � � � � 10
SECTION 8: WARRANTY INFORMATION � � � � � � � � � � � � � � � � � � � � � � � � � � � � � � � � � � 12
SECTION 1: IMPORTANT SAFEGUARDS
Please read all instructions carefully before using your Blendtec Home blender.
Then, save these instructions for future reference.
Note: The instructions and information that are included in this user manual are not
meant to cover every possible condition or situation that may occur. Good judgment
must be used when operating your Home Blender.
1.1 SAFETY CERTIFICATION
The Blendtec home blenders (model ES3) comply with UL 982, CSA C22.2 No.
195-M1987 and IEC 60335-2-14.
1.2 HEALTH CERTIFICATION
The blender and its accessories are certified by NSF International under
“Blendtec” in the NSF official listing.
1.3 HOME USE ONLY
The Home Blender is intended for home use only. Any use of the blender
for commercial purposes will void the warranty.
1.4 USE AND SUPERVISION
This blender is not intended for use by individuals with reduced physical,
sensory, or mental capabilities unless these individuals are instructed
on using the blender by a person responsible for their safety. Children
should be supervised to ensure that they do not play with the blender.
1.5 AVOIDING CONTACT WITH MOVING PARTS
Follow the precautions below to prevent personal injury and damage to
the blender:
•
•
•
•
•
•
•
Keep hands, hair and clothing away from all moving parts.
Never put hands in the blender jar or add substances by hand when the
blender jar is on the motor base.
Never touch the blade with your fingers, regardless of whether the jar is on the
motor base.
Keep all utensils away from the drive socket (see Section 3.1 and Figure
1) and blender jar blade during operation.
Never place the jar on the drive socket if the blender motor is operating.
Never remove the jar if the blender motor is operating.
Do not rock or remove the blender jar during operation.
1
1.6 BLENDER BLADE
The blender blade has blunt edges; however, to avoid the chance of injury
please be careful when adding ingredients to the jar and washing the jar.
1.7 MATERIALS NOT APPROPRIATE FOR USE IN THE BLENDER JAR
Never put metal (e.g., utensils), rocks or glass in the blender jar. Damage
caused by such materials is not covered under the warranty. Utensils should
only be used in the jar when the motor is not running.
1.8 BLENDER JAR
Ensure the jar is placed securely on the blender base before operating
the blender. Never operate the blender if the jar is filled higher than the
capacity marked on the jar.
1.9 BLENDER LID
To prevent blender ingredients from flying out of the jar and making a mess,
always secure the lid on the blender jar before blending. When blending hot
liquids, the vented lid will release pressure. Be careful not to come in contact
with any steam coming from the lid.
1.10 ATTACHMENTS NOT SOLD BY BLENDTEC
Do not operate the blender with any attachments not made by Blendtec.
Using such attachments may cause fire, electric shock, and injury and will
void the warranty.
1.11 CAUTION ABOUT TOUCHING DRIVE SOCKET AFTER EXTENSIVE USE
The blender drive socket may become hot after numerous cycles. Therefore,
avoid touching the drive socket after using the blender extensively.
1.12 POWER CORD PRECAUTIONS
•
•
•
•
Never operate the blender with a damaged cord or plug. If the supply cord is
damaged, it must be replaced by Blendtec or an authorized service agent.
Do not permit the cord to hang over the edge of the work surface.
Never use an extension cord with the unit.
Unplug the blender when not in use, before changing blender locations and
before cleaning.
1.13 LIQUID
To protect against the risk of electrical shock, do not put the motor base in water or any
other liquid. Do not use the blender outdoors, where it might be subject to precipitation.
2
1.14 POWER SWITCH
Turn the power switch off when you are finished using the blender. The power
switch (On/Off switch) is located on the back of the blender motor cover.
1.15 MOTOR ADJUSTMENTS AND SERIVCE
Never remove the blender motor cover. The blender motor does not contain
user-adjustable or user-serviceable parts. A Blendtec authorized service
agent must make all service adjustments. Removing the cover or attempting
to service the blender will void the warranty.
1.16 UNIT MALFUNCTION AND DAMAGE
If your blender malfunctions, is dropped, or is damaged in any other way,
stop using the blender and immediately call your Blendtec service agent.
See Section 8 for warranty information.
SECTION 2: UNPACKING
Note: Save all packaging materials and instructions for future use.
2.1 UNPACKING YOUR BLENDER
Your package includes the following:
•
•
•
•
Home Blender motor base
Blender jar with lid
Fresh Blends recipe book
Owner’s manual
To unpack your blender:
•
•
•
•
•
Remove the blender motor, blender jar, and jar lid from the packaging.
Unwind the power cord.
Check for and remove any packing material that blocks ventilation holes in the
motor base.
Inspect all items to ensure no damage occurred during shipping.
If any damage has occurred, contact your Blendtec service agent immediately.
2.2 RECORDING THE SERIAL NUMBER AND DATE OF PURCHASE
Record the blender motor serial number, date of purchase and place of
purchase on the following lines. You will need this information if you contact
Blendtec for service or questions for service.
Motor Serial No. (found on bottom of motor base): ___________________________
Date of Purchase: ________________________________________________________
Place of Purchase:________________________________________________________
3
2.3 REGISTERING YOUR BLENDER
Register your blender online at www.blendtec.com/registration.
SECTION 3: GETTING TO KNOW YOUR BLENDER
3.1 BLENDER MOTOR BASE
The motor base contains the following components (see Figures 1-3):
•
•
•
•
•
•
•
•
Lid: The flexible rubber lid keeps liquids in the jar during blending.
Touch pad: The touch pad contains nine buttons that control the
blending process. (See Section 5 for information on using the buttons.)
LCD information center: The LCD screen indicates the status of the
blender and the number of cycles that have been run on the blender.
Blender drive socket: The drive socket is the location where the jar
drive shaft couples with the motor to turn the blade assembly.
Power unit: The power unit is located next to the blender motor and
contains the machinery that runs the blender.
Motor base cover: The cover, which is made of durable, easy-to-clean
plastic, houses the power unit.
Power switch: The power switch is located on the back of the motor
base cover as shown in Figure 3.
Power cord: The power cord is located at the back of the motor base cover.
Figure 1. Touch Pad
3.2 BLENDER JAR ASSEMBLY
The jar assembly contains the following components (see Figure 3):
•
•
•
4
Jar: The jar is made of durable, lightweight, BPA-free material to provide
maximum efficiency, safety, and visibility.
Lid: The flexible lid keeps liquids in the jar during blending. The clear
center piece releases pressure from the jar and allows you to add
ingredients quickly and easily.
Blade assembly: The uniquely designed blade ensures fast, consistent
blending.
Figure 2. Front View of Motor Base
Blender Drive Socket
Touch Pad
LCD Information Center
Figure 3. Side View of Motor Base and Jar Assembly
Lid
Jar
Blade
Power Switch
Motor Base
Cover
Power Cord
5
SECTION 4: SETTING UP YOUR BLENDER
•
•
•
Place the blender on a flat, clean, and dry surface.
Ensure an electrical outlet is available within 2 feet (0.61 meters) of
the blender motor base.
Ensure the power switch is turned to the OFF position, and then plug
the blender into a surge protector* or an electrical outlet. (Blendtec
blenders are produced in 100/120-volt power and 220/240-volt power;
ensure the electrical circuit is at least 6.5 amps for a 220/240-volt unit
or at least 13 amps for a 100/120-volt unit.)
*You are encouraged to use a surge protector between the outlet and
the blender.
SECTION 5: USING YOUR BLENDER
Your blender has been programmed with 25 blend cycles, as well as optional
manual controls. This section describes how to use the blend cycles and
manual controls to blend a wide variety of ingredients.
5.1 BEFORE BEGINNING OPERATION
•
•
•
•
Turn the power switch to ON.
Place ingredients in the jar.
Secure the lid to the blender jar.
Place the blender jar on the base, ensuring the jar is secure.
5.2 MANUAL CONTROLS
Start/Stop. Press the Start/Stop button at any time to stop the current
blender function.
Pulse. Use the Pulse button to chop, mince, whip, and complete other
momentary tasks that do not require a long blend cycle. When you push
Pulse, the motor will run only as long as you press the button; as soon
as you release the button, the motor will shut off.
You can also use the Pulse button during a blend cycle. If you press the
button during a cycle, the cycle will pause and pulsing will begin. When
you release the Pulse button, the selected cycle will resume.
Speed Up and Speed Down. Pressing the Speed Up button will start a
speed cycle lasting 50 seconds. Continue pressing Speed Up to increase
the speed (up to speed 10). Press Speed Down to decrease the speed.
5.3 AUTOMATIC AND CUSTOM CONTROLS
5.3.1 Blend Cycles
Why blend cycles? In the world of professional blending, many factors go
into making a delicious and consistent blended recipe. Different ingredients
have different blending characteristics, and each ingredient must be
6
considered. For example, thick and fibrous ingredients need to blend
longer and at higher speeds than other ingredients. The Home Blender’s
blend cycles were developed based on these principles. With these blend
cycles, you can make a virtually limitless number of recipes and achieve
consistently impressive results.
How will blend cycles help my recipes? Blend cycles allow the Home
Blender to produce consistent results across a wider range of recipes than
any competitors’ blenders. During a cycle, the Home Blender will speed
up and slow down in a specific pattern based on the desired end results.
However, factors like the temperature of ingredients and the amount of liquid
used will create different blending characteristics. The Fresh Blends recipe
book is designed for the typical amounts of liquid in and temperatures of
ingredients. If your ingredients differ from the typical characteristics, you
may need to include more or less ice or other ingredients. For example, if a
drink is too thick to blend adequately, reduce the ice a little or replace the
ice with water or another liquid. The difference in blending will be obvious.
With the unique blend cycles, combined with the high-powered motor,
patented square jar, single-prong wingtip blade, and direct-drive coupling,
the Home Blender will blend faster and more easily than other blenders.
You will have a great blending experience and enjoy the delicious results.
5.3.2 Preset Buttons
The numbered buttons on the left side of the touch pad provide quick
access to four blend cycles. Simply press the desired number button to
begin the blend cycle. The buttons are preprogrammed with the following
blend cycles:
Button 1: Slow cycle
Button 2: Smoothie cycle
Button 3: Mixed Drinks cycle
Button 4: Whole Juice cycle
5.3.3 Programming Preset Buttons
If you would like to assign different blend cycles to the four quick-access
buttons, complete the following steps:
•
•
•
Access the cycle menu by pressing the Cycle Menu button. Continue
pressing Cycle Menu to scroll through the cycle categories. (See Table
1 for a list of the blend cycles in each category.)
Once you reach the desired blend cycle category, press Speed Up or
Speed Down to scroll through the blend cycles in the category. When
you find the desired blend cycle, press the desired number button for
two seconds.
The LCD will show the name of the existing cycle and then
7
ProgrammingBttnX, where X is the number of the selected button.
When the programming is complete, the display will read Program
Complete. The blender will exit the menu mode automatically, and the
quick-access button will be programmed with the new blend cycle. If
the blender fails to assign the new blend cycle to the selected button,
the display will read Program Failed. If you continue to receive this
message after multiple attempts to program the numbered buttons,
contact a Blendtec service agent.
Table 1. Cycle Menu Categories and Blend Cycles
Beverages
Category
Drinks/
Ice Cream
Category
Whole Foods
Category
Food
Processing
Category
Multiuse
Category
Smoothie
Iced
Cappuccino
Granita
*Chop (pulse)
Slow
XL Smoothie
Fruit Drinks
Dressings, Dips
*Whip (pulse)
Medium
Light Juice
Milkshake, Ice
Batters, Sauces
*Puree (pulse)
Medium High
Whole Juice
Mixed Drinks
Frozen Yogurt
Knead
High
Hot Chocolate
Ice Cream
Soups,
Fondues
Grind Grains
Fast
*The Chop, and puree options function as pulse cycles.
5.3.4 Restoring Preset Button Defaults
To restore the four cycle buttons to the default settings, press Button 4 and
Start/Stop. The display will read Restoring Defaults. When the programming
is complete, the display will read Restore Complete, indicating the blender
is ready to use.
5.3.5 Accessing Other Blend Cycles
In addition to using the blend cycles assigned to the numbered buttons, you
can access 21 other blend cycles by completing the following steps:
•
•
8
Access the cycle menu by pressing the Cycle Menu button. Continue
pressing Cycle Menu to scroll through the cycle categories. (See Table
1 for a list of the blend cycles in each category.)
Once you reach the desired blend cycle category, press Speed Up or
Speed Down to scroll through the blend cycles in the category. When
you find the desired blend cycle, press Start/Stop, which will begin
the blend cycle. The LCD display will show the cycle name and the
time remaining in the blend cycle. contact a Blendtec service agent.
SECTION 6: CARING FOR YOUR BLENDER
6.1 AFTER-USE CLEANING
•
•
•
•
•
Turn the power switch to OFF, and unplug the blender.
Clean the blender base by wiping the base and touch pad with a
damp cloth.
If needed, clean the drive socket with a toothpick or cotton swab.
Wash the jar and lid by filling the jar with 1–2 cups (237 ml) of warm
water and a drop of dish soap. Secure the lid, and blend on low speed
for one cycle. The jar may also be washed in the dishwasher on the
top shelf, with the heated-drying option turned off.
If the jar will be stored upside down, shake excess water from the jar
so no water collects around the drive shaft (located on the underside
of the jar bottom).
6.2 CLEANING CAUTIONS
•
•
•
•
Do not use abrasives or stiff brushes to clean the blender motor base
or jar; using such materials will scratch and dull the surface of the jar.
Cosmetic damage is not covered under the warranty.
Do not use a water jet of any kind to clean the blender base. Using a
water jet to clean the blender will void the warranty.
Never submerge the blender motor in water. Doing so will void the warranty.
Do not soak the jar in water for an extended period; doing so may
shorten the life of the jar bearing..
6.3 LONG-TERM JAR CARE INSTRUCTIONS
•
•
•
•
•
Sanitize the jar periodically by filling the jar with a sanitizer diluted according
to the manufacturer’s specifications. (Bleach, properly diluted, can be used
as a sanitizer.)
If you do not use your jar daily, before each use, reach under the bottom of
the jar and turn the drive shaft for a few seconds. Doing so will help keep
the seal in good shape and prolong the life of the jar. If the shaft does not
spin easily, add some hot water to the jar and twist the shaft by hand until
it begins to spin freely.
Do not place the jar on the motor base while the motor is running; doing so
will cause the jar drive shaft to wear prematurely. Shaking and rocking the
jar while it is on the motor base will also cause premature wear.
To maintain the best seal between the lid and the jar, do not store the jar
with the lid in place.
When blending hard or abrasive grains, the jar may become hazy. This is
not covered by the warranty as the integrity of the jar is not compromised.
9
•
Blending spices and coffee can permanently discolor the jar and impregnate
the flavors into the jar. Consider purchasing a second jar specifically for
blending spices and coffee.
SECTION 7: TROUBLESHOOTING PROBLEMS
7.1 NO POWER (BLENDER MOTOR WILL NOT TURN ON)
If the blender motor will not turn on, try the following:
•
•
•
•
Ensure the power switch is set to the ON position.
Ensure your home’s circuit breaker switch or fuse is set to the ON
position.
Unplug the power cord from the electrical outlet, wait 5 seconds, and
then plug the power cord back in.
Determine whether the LCD is lit. If the LCD is not lit, the unit lacks power.
7.2 ERROR MESSAGES
•
•
Overtemp: The Overtemp message indicates that the motor is
overheating and the blender has been disabled until the unit cools to
normal operating temperatures. Turn off and unplug the unit, and allow
it to cool for at least 20 minutes.
Overload: The Overload message indicates the motor has
overloaded. Turn off and unplug the unit. Remove the blender jar from
the base, and remove anything blocking the blender blade. Replace
the jar, and press Pulse to move the blade through the mixture. Once
the blade spins freely, you may use a touch pad button.
If the blade will still not spin, remove the blender jar from the
blender base and turn the shaft by hand to see if it rotates easily. If
it does, plug in the unit and turn the blender on to clear the overload
condition. If the overload message reappears, contact your Blendtec
service agent.
7.3 NOISE-LEVEL CHANGES
If the blender noise has increased from the original levels, determine
whether the sound is coming from the blender motor or jar.
Blender motor: Remove the jar, and press Button 2 or Button 3. Listen to
the motor sound. If it is excessively noisy, contact your Blendtec service agent.
Jar: Place the jar back on the motor. Run the motor for a few seconds
using the Pulse button. If you have more than one jar, test a different jar to
determine whether the sound changes depending on the jar used. If a jar is
excessively noisy or if the blade assembly seems loose or sounds gravelly
when turned by hand, contact your Blendtec service agent.
10
7.4 UNSATISFACTORY BLENDED TEXTURE
If the texture of the mixture is lumpy or uneven, do the following:
• Ensure the mixture is not cavitating during the cycle. Cavitation is a
condition in which an air pocket forms in the mixture because the
mixture is too cold or too solid, causing the blender blade to spin
freely. To correct this problem, increase the mixture temperature by
reducing the ice, increasing the liquid, and/or ensuring the frozen
ingredients used in the recipe are never colder than 10ºF (-12ºC).
• If the ingredients are mixing well but have not had enough time
for complete blending, try a longer cycle or press Pulse until the
ingredients are well blended.
• If neither of the preceding suggestions work, contact a Blendtec
service agent for further assistance.
SECTION 8: WARRANTY
8.1 WARRANTY OVERVIEW
The quality of Blendtec blenders is unsurpassed. You will enjoy years of
wonderful and reliable service from your Blendtec Home Blender.
The motor base and jar assembly, including all moving jar parts, are
covered against leaking and breaking for the warranty period. The warranty
begins on the date of purchase.
This warranty does not include cosmetic damage, product abuse,
unreasonable use, damage resulting from an accident (including fire,
flood, earthquake, and other natural disasters), product tampering, use of
accessories not approved by Blendtec, service performed by unauthorized
service agencies, units that have been modified, and units that have been
used for commercial purposes.
The warranty applies only to units sold by Blendtec and its authorized
dealers. Units are warranted in the country of purchase only.
8.2 WARRANTY DETAILS
Blendtec warrants the blender motor to be free of defect in material and
workmanship for the warranty period provided by your authorized dealer. During
this period, such defects will be repaired or the product will be replaced, at
Blendtec’s discretion, without charge. This warranty does not cover damage
caused by misuse, accident, or negligence. All implied warranties, including
but not limited to implied warranties of fitness and merchantability, are limited
in duration to the warranty period on the motor and the jar. Any unit submitted
for repair must be accompanied by proof of original purchase and should be
shipped prepaid to the nearest Blendtec service center. For warranty service
in the US, call 801-222-0888 or visit blendtec.com. Outside of the US, email
[email protected] to find the closest authorized service center.
11
8.3 PROBLEMS UNDER WARRANTY
If you experience a problem with your blender, contact a Blendtec service
agent immediately to diagnose the problem. Do not attempt to repair the
blender; the warranty will be voided if repairs are attempted by persons
other than Blendtec authorized service agents. When contacting a Blendtec
service agent, please be ready to provide the blender serial number and to
describe the problem. Many issues can be resolved simply and quickly over
the phone.
If the difficulty cannot be resolved over the phone, your unit may require
repair or replacement. If the blender is under warranty, the Blendtec service
agent will repair or replace your blender at no cost. (Cosmetic damage and
abuse are not covered under the warranty.)
Upon receiving instructions from the Blendtec service agent, package your
blender and send it to the service center for repair or replacement.
8.4 PROBLEMS OUT OF WARRANTY
If you experience a problem with your blender, contact a Blendtec service
agent immediately to diagnose the problem. Do not attempt to repair the
blender; the warranty will be voided if repairs are attempted by persons
other than Blendtec authorized service agents. When contacting a Blendtec
service agent, please be ready to provide the blender serial number and to
describe the problem. Many issues can be resolved simply and quickly over
the phone.
If the difficulty cannot be resolved over the phone and your blender is not
under warranty, you can have your blender repaired for a fee. Upon receiving
instructions from the Blendtec service agent, package your blender and
send it to the service center for repair.
12
13
1206 South 1680 West
Orem, Utah 84058 U.S.A.
1-801-222-0888
blendtec.com
©2011 K-TEC, INC., All Rights Reserved.
Blendtec is a registered trademark of K-TEC, INC.
OWN-RE-023 Manual, Owner’s, Model HP3A Rev M