1
A COMPLETE GUIDE TO WIRELESS CONFIGURATION
LINUX
UNWIRED
ROGER WEEKS,
EDD DUMBILL & BRIAN JEPSON
Chapter 7
CHAPTER 7
Bluetooth
Bluetooth is a wireless cable-replacement technology that uses low-power
signals in the 2.4 GHz band. Using Bluetooth, devices can transfer up to
720 kbps. This bandwidth is restricted in comparison to those obtainable
from 802.11 wireless technology, and while networking is one application
of Bluetooth, it is not the primary application area.
Bluetooth’s goal is to be a low-cost, low-power, and, above all, pervasive
technology. As well as to increase convenience for the user, its aim is also to
reduce the cost to the manufacturer by eliminating the need to supply cables
with devices. As opposed to single-use cables, a Bluetooth transceiver sustains multiple connections, and, for most applications, the bandwidth constraints are not an issue.
As befits a cable-replacement technology, many of Bluetooth’s applications
are in areas where infrared, USB, or serial connections were previously used:
in connecting peripherals, PDAs, cell phones, and other portable devices.
One much-trumpeted application that bucks this general trend is mobile
phone headsets, which use Bluetooth to carry the audio to and from the
user, who is liberated from the tiresome cable.
Support for Bluetooth in the Linux kernel is mature, being present in both
the 2.4 and 2.6 series of stable kernels. Popular core functions of Bluetooth,
such as emulated serial connections and networking, are well-supported.
More recent Bluetooth technologies, such as keyboard and mice support,
have less well-developed support and require more involvement from the
user. User-level applications that support Bluetooth on Linux are of varying
maturity: applications simply requiring an emulated serial port work out of
the box, whereas specialized Bluetooth tools are under heavy development.
173
This chapter first introduces the core Bluetooth concepts that will aid a
Linux system administrator in his deployment, discusses kernel configuration and system-level tools, and finally covers user-level applications.
Quick Start
We tested a Belkin Bluetooth USB adapter with several Linux distributions
on an IBM ThinkPad A20m. In all cases, we got it up and running to the
point where we created a serial port connection between a Bluetooth cell
phone (Nokia 3650) and the Linux machine.
After we set up Bluetooth on each distribution, we completed the following
steps (all of this is explained in detail throughout the chapter):
1. Set the pinin /etc/bluetooth/pin to a numeric-only pin (1234)
2. Restarted the hcid daemon with killall -HUP hcid
3. Plugged in the adapter
4. Discovered the cell phone’s Bluetooth address with hcitool scan
5. Configured the serial port (/dev/rfcomm0) with:
# rfcomm bind 0 bluetooth_address
Upon completion, we conversed with the phone over the serial port using
Kermit (see “Phones and Cards” in Chapter 9).
The following sections describe our distribution-specific notes. Even if your
distribution isn’t listed here, check these notes out.
Debian 3.0r1
We abandoned the older 2.4.18 kernel that was the latest 2.4 kernel available
for Debian 3.0, and we compiled kernel 2.4.24 according to the instructions
in “Configuring the kernel,” later in this chapter. To get Bluetooth to the
point where we could make an rfcomm connection, we follow these steps:
1. Edited /etc/apt/sources.list according to the instructions at http://
bluez.sourceforge.net/download/debian/APT-README.
2. Next, we completed an apt-get update and then installed the following
packages:
• bluez-hcidump
• bluez-pan
• bluez-sdp
• bluez-utils
• hotplug
174
|
Chapter 7: Bluetooth
3. The bluez-utils and bluez-sdp packages configured themselves to start in
runlevel 3 and 5. After installing these packages, we started them with
the following commands (but we could also have rebooted):
/etc/init.d/bluez-utils start
/etc/init.d/bluez-sdp start
4. The /dev/rfcomm* devices already exist, so we didn’t need to create
them.
SuSE 9.0
We used SuSE 9.0 (FTP install) with the latest available kernel package
(2.4.21-166-default). To enable Bluetooth, we followed these steps:
1. Installed the following packages using YaST:
• bluez-bluefw
• bluez-libs
• bluez-pan
• bluez-sdp
• bluez-utils
2. The packages configured themselves to start in runlevels 3 and 5. After
installing these packages, we started them with /etc/init.d/bluetooth
start (but we could also have rebooted).
3. The /dev/rfcomm* devicesdid not exist, so we created them as shown in
Example 7-4.
Mandrake 9.2 and RedHat 9
On Mandrake, we used the latest available kernel package (2.4.22-10mdk),
but on Red Hat, we rebuilt the kernel the same way we built it for Debian.
For rfcomm to work on RedHat and Mandrake, we followed these steps:
1. Downloaded the following RedHat RPMs from http://bluez.sourceforge.net:
• bluez-bluefw
• bluez-hcidump
• bluez-libs
• bluez-pan
• bluez-sdp
• bluez-utils
2. Next, we ran rpm --test -ivh bluez-*, and all looked well, so we
installed them with rpm -ivh bluez-*.
Quick Start |
175
3. To make sure that the Bluetooth scripts were started on boot, we ran
chkconfig --add bluetooth.
4. We ran /etc/init.d/bluetooth start (we could also have rebooted).
5. The /dev/rfcomm* devices did not exist, so we created them as shown in
Example 7-4.
Troubleshooting
Generally, following the previous steps went smoothly, but we did run into
some problems. Here are some tips that should help you out:
Start hcid in the foreground
By default, the startup scripts launch hcid in the background. If you
want to see verbose messages from it, kill it and then start it with -n:
# killall hcid
# hcid -n
This helps you figure out what’s going on with failed PIN requests.
Restart hcid after PIN changes
If you edit the PIN in /etc/bluetooth/pin, restart hcid (killall -HUP hcid
should do the trick).
Replace bluepin
In theory, the bluepin utility should either use the PIN in /etc/bluetooth/
pin or prompt you when it needs a PIN. However, on Mandrake, the
PIN exchange was silently failing. So, we replaced bluepin with a script
that spat out the PIN in /etc/bluetooth/pin:
#!/bin/sh
# file: /usr/local/bin/bluepincat
echo -n "PIN:"
cat /etc/bluetooth/pin
Then we set the pin_helper line in /etc/bluetooth/hcid.conf:
pin_helper /usr/local/bin/bluepincat
Make sure the rfcomm module is loaded
When we installed Bluetooth support on Mandrake and Red Hat, the
rfcomm module wasn’t loaded automatically, so we received a complaint when we ran /etc/init.d/bluetooth start:
"Can't open RFCOMM control socket: Address family not supported by
protocol"
So, we added modprobe rfcomm to the start( ) section of the /etc/init.d/
bluetooth script and rebooted to make sure everything worked OK.
176
|
Chapter 7: Bluetooth
Double-check your kernel configuration
If you’re compiling the kernel from source, be sure everything is configured the way it should be. For example, one of us was testing the examples in this chapter and received an Operation not supported error when
we tried to make a connection over /dev/rfcomm0. We hadn’t configured RFCOMM TTY support (CONFIG_BLUEZ_RFCOMM_TTY) in the kernel.
Well, we had, but it was configured as a module rather than statically
compiled into the kernel. Although make menuconfig showed [*], a peek
inside our .config file showed:
CONFIG_BLUEZ_RFCOMM_TTY=m
So we changed m to y, recompiled the kernel, installed it, and rebooted,
and all was well.
Bluetooth Basics
Bluetooth Special Interest Group (SIG), a consortium of telecommunications,
electronics, and computer manufacturers, develops Bluetooth. The founding
members were Ericsson, Nokia, IBM, Intel, and Toshiba. The first version of
the Bluetooth specification was formally adopted by the SIG in 1999.
The first revisions of the Bluetooth specification had a mixed reception,
because implementations were dogged by interoperability problems. The 1.1
release, published in 2001, eliminated the gray areas from the 1.0b specification and, as a result, improved device interoperability. Over two years since
the 1.1 release, Bluetooth is well on its way to becoming a ubiquitous technology in portable devices. At the time of writing, the current approved revision
of the Bluetooth specification is Version 1.2, released in November 2003.
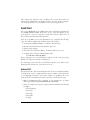
The Bluetooth specification itself covers the many levels involved in getting a signal between two applications, from the radio through link control to application-level protocols. Figure 7-1 shows just some of the
various strata specified by Bluetooth, which we encounter in this chapter.
Further details, including the specifications themselves, can be obtained
from http://www.bluetooth.org.
Bluetooth hardware typically takes the form of one or two microchips,
which are embedded in devices. Computers are increasingly shipping with
integrated Bluetooth adapters, but the prevailing way of adding Bluetooth
support is by adding an external adapter, typically via the USB or PC card
ports. Before a device can sport the Bluetooth logo and use the Bluetooth
trademarks, it must be put through a series of tests known as qualification.
Qualification involves tests for all parts of the Bluetooth specification, from
radio testing to protocol conformance.
Bluetooth Basics |
177
RFCOMM
(serial emulation)
SDP
(service discovery)
SCO
(for audio)
L2CAP
(logical link control and adaptation protocol)
HCI
(host controller interface)
Radio transport
Figure 7-1. Some layers of the Bluetooth specification
What You Can Do with Bluetooth
As Bluetooth is intended to replace cable, it can be used for more or less the
same purposes as a cable, within the bandwidth constraints of the technology. All the following usage scenarios are supported within Linux and are
discussed in this chapter:
Serial port
Bluetooth’s serial port emulation enables the connection of modems
(such as in cell phones) and printers. Serial emulation is also an easy
way of writing simple data exchange applications using Bluetooth.
Object exchange (OBEX)
Facilitated by implementing the OBEX protocol, object exchange is
used for “beaming” data objects between devices, such as contacts from
address books. It is the main way that cell phones exchange data and is
often implemented by Bluetooth-enabled printers.
Synchronization
Devices that implement the IrMC specification permit synchronization
of data sources, such as calendars and address books. Many Bluetoothenabled cell phones have this feature. More modern devices implement
the SyncML specification, which requires a networking connection.
Networking
Bluetooth supports two different forms of networking. The most basic
and commonly implemented form is dial-up networking using PPP over
a serial connection. In addition, there is BNEP, an encapsulation of
Ethernet networking, which allows Bluetooth devices to join a network
in a manner much more analogous to Wi-Fi networking.
178
|
Chapter 7: Bluetooth
Input devices
Bluetooth supports an array of input devices similar to USB. Major
manufacturers such as Apple and Microsoft are shipping Bluetoothenabled mice and keyboards.
Audio
Audio is one of the most-promoted aspects of Bluetooth by cell phone
manufacturers; it is possible to support bi-directional audio connections to headsets over Bluetooth.
Concepts
The following sections describe essential Bluetooth concepts that you need
to be aware of. These include the Bluetooth address, which uniquely identifies a Bluetooth adapter; the protocols and profiles that define the communication techniques and device capabilities; bonding, discoverability, and
device classes, which Bluetooth devices use to find each other and communicate their abilities; and piconets, scatternets, masters, and slaves, which
describe the topology of Bluetooth networks and the relationships of one
device to another.
Bluetooth address
Each Bluetooth interface has a Bluetooth address, also known as its
BDADDR. These addresses look very much like Ethernet interface MAC
addresses, and follow the same address allotments that the ANSI/IEEE 802
standard, administered by the IEEE, has laid down. The first three octets of
the Bluetooth address denote the organizationally unique identifier (OUI).
For instance, the address 00:80:98:23:15:6E has an OUI of 008098, which is
registered to the TDK Corporation.
OUIs can be looked up online using the IEEE’s search interface at http://standards.ieee.org/regauth/oui/. As some device
manufacturers subcontract to others, it may not always be
possible to determine the manufacturer of a device from its
OUI.
In addition, Bluetooth adapters have a programmable name used to present
to the user in interactions. Example 7-2 shows both the Bluetooth addresses
and the names that are discovered in a device scan.
Bluetooth Basics |
179
Protocols
The Bluetooth specification defines some protocols of its own and also
reuses some existing standards. A protocol is an agreement about the way
data is exchanged. It is on top of these protocols that all applications of
Bluetooth are built. An in-depth knowledge of the protocols is not necessary to deploy Bluetooth, but passing familiarity with them helps in troubleshooting situations.
Confusingly, some of the protocols have very similar names to the profiles in
which they are used and are listed next. (Additionally, some protocols are
layered on top of lower-level protocols. This happens elsewhere in computing—for example, when a computer connects to the Internet via a modem, it
uses the RS232 protocol to communicate serial port data, the PPP protocol
on top of that to facilitate a network connection, and TCP/IP on top of that
to carry the data.)
Link Manager Protocol (LMP)
Provides basic control of interdevice communication links
Logical Link Control and Adaptation Protocol (L2CAP)
Provides logical channels of communication to higher protocol layers
Radio Frequency Communication (RFCOMM)
Provides emulated serial connections
Object Exchange (OBEX)
A simple file transfer protocol
Bluetooth Network Encapsulation Protocol (BNEP)
Provides Ethernet encapsulation for wireless networking
Service Discovery Protocol (SDP)
Enables the querying and reporting of services that a device supports
Telephony Control Protocol Specification (TCS)
Provides call control for voice and data telephone calls
Profiles
A profile is the name given to the implementation of one more protocols to
provide a particular application service. Bluetooth devices advertise profiles.
Many of the profiles build on each other—for instance, the OBEX profile
builds on the serial port profile.
Commonly implemented profiles include:
Service Discovery Access Profile (SDAP)
Enables a device to discover the profiles supported by other devices
Serial Port Profile (SPP)
Emulates a serial port connection
180
|
Chapter 7: Bluetooth
Hardcopy Cable Replacement (HCRP)
Emulates a parallel port connection for the purposes of printing
Dial-up Networking Profile (DUN)
A connection to a modem or cell phone, which connects to an Internet
access point
LAN Access Profile (LAP)
A point-to-point (PPP) access to a network
Headset Profile (HS)
A combination voice and control channel, which provides a link
between a cell phone and audio headset
Generic Object Exchange Profile (GOEP)
A file exchange, which exchanges business cards on cell phones
File Transfer Profile (FTP)
Analogous to Internet FTP, which allows navigation and access to a
filesystem
Synchronization Profile (SP)
An address book and calendar synchronization, which uses the IrMC
protocol
Human Interface Device Profile (HID)
A connection to a keyboard, mouse, joystick, barcode scanner, or other
input devices
Personal Area Networking (PAN)
An Ethernet-like access to a network
Basic Printing Profile (BPP)
Enables devices to print text, as well as formatted documents; useful for
low-powered devices such as phones or pagers
Bonding
Bonding, also called pairing, is the process by which trust is established
between two Bluetooth devices. The user is required to input matching
codes, called personal identification numbers (PINs), into the two devices. In
some situations, one of the devices may have the PIN pre-set—for example,
some headsets come with a PIN of 0000. PINs are typically a sequence of
digits; they provide little security, and they are intended only for the initial
pairing.
Given a successful match of PIN, the devices negotiate a link key, a much
more cryptographically secure code, which is used thereafter as an access
control mechanism between the two devices.
Bluetooth Basics |
181
Discoverability
A Bluetooth device is discoverable if it can be found by another device’s
inquiry. During discovery, the inquiring device broadcasts a specially coded
message. As remote devices receive the message, they send a return message
indicating their presence. In most circumstances, you must make a device
discoverable in order to initiate bonding.
Bluejacking
Cell phone owners who inadvertently leave their phones discoverable may
suffer from “bluejacking,” the phenomenon in which unknown people send
data transfers such as address cards. The address card carries a message in
place of contact details. Although a remote device can never force a data
transfer on another device, leaving devices discoverable makes the user vulnerable to these half technical, half social-engineering attacks. And it’s possible for bluejacking to go beyond pranks: one early smartphone operating
system had a bug that caused the phone to lock up if it was sent a GIF image
file constructed in a particular way.
Device classes
Bluetooth devices fulfill many functions, so there should be a way that a
device can quickly indicate its primary function. As we have already mentioned, the SDP exists to provide a complete description of running services. However, Bluetooth provides an additional way for a device to
describe itself: the device class. Although the SDP provides the description of
the running services, the device class provides the purpose of them.
The device class code is a 24-bit number that incorporates three subcodes:
the major device type, the minor device type, and additional service codes,
which broadly indicate the services available. Table 7-1 shows the meaning
of the useful major device types (other types are reserved or undefined), and
Table 7-2 shows the useful service class bits. The meaning of the minor
device type bits (bits 7–0) depends on the major device type. You can find a
full explanation of these values on the Bluetooth Special Interest Group web
site at http://www.bluetoothsig.org/assigned-numbers/baseband.htm.
Table 7-1. Major device types as expressed in the device class
Bit pattern (bits 12–8)
Meaning
0 0 0 0 0
Miscellaneous
0 0 0 0 1
Computer (from desktop to PDA)
182
|
Chapter 7: Bluetooth
Table 7-1. Major device types as expressed in the device class (continued)
Bit pattern (bits 12–8)
Meaning
0 0 0 1 0
Telephone (cell phone, payphone, cordless phone)
0 0 0 1 1
Network access point
0 0 1 0 0
Audio/video device (headset, speakers)
0 0 1 0 1
Peripheral (keyboard, mouse, joystick)
0 0 1 1 0
Imaging (printer, camera, scanner)
1 1 1 1 1
Uncategorized
Table 7-2. Service classes as expressed in the device class
Bit
Meaning if set
16
Positioning (location information, e.g., GPS)
17
Networking
18
Rendering (printer, speakers)
19
Capturing (scanner, microphone)
20
Object transfer
21
Audio (speaker, microphone, headset)
22
Telephone (modem, cordless telephone, headset)
23
Information (web server)
Piconets and scatternets, and masters and slaves
A piconet is a network of Bluetooth devices created by a master connecting
to one or more slaves. The master is the device that initiates the connection.
Figure 7-2 shows the topology of a piconet. A master may be connected to
as many as seven slaves simultaneously.
Slave
Slave
Master
Slave
Slave
Figure 7-2. Topology of a piconet
Bluetooth Basics |
183
Various applications such as LAN access points require the master/slave
relationship to be the same as the server/client relationship. For this reason,
a client device, which serves as a master, initiates a connection to the access
point; once connected, a role-switch occurs, and the client device now
becomes a slave. For most applications of Bluetooth on Linux, you do not
need to be aware of these distinctions, but the knowledge of their existence
may be useful in debugging scenarios. Some Bluetooth hardware has
restricted role-switching ability.
Sometimes, a slave in one piconet is connected to a master of another piconet. The linking together of multiple piconets in this way is called a scatternet.
Bluetooth Hardware
There is a wide variety of hardware available for adding Bluetooth support
to your computer. Devices fall into several categories:
USB dongle
Plugs into the USB port. This device is the most common and economical.
Built-in
Increasingly, laptops are shipping with a Bluetooth transmitter built in.
Typically this device appears to the operating system as if it were a USB
device.
PC card
Plugs into a laptop’s PCMCIA slot and provides a serial interface to the
Bluetooth transmitter.
CF card
Behaves in the same way as a PCMCIA card, and it is used with PDA
devices.
Serial dongle
A Bluetooth transmitter that plugs into the serial port. In the early days
of Bluetooth deployment, it was a popular choice; today, however, it is
not a recommended option.
Compatibility between Linux and Bluetooth hardware is good. A comprehensive table of verified device compatibility can be found on Marcel Holtmann’s web site, at http://www.holtmann.org/linux/bluetooth/devices.html.
This table includes information for laptops with built-in Bluetooth, too. If
you have no specific overriding criteria, it is best to choose a USB dongle.
Due to the standardization of the Bluetooth USB interface, compatibility is
very good.
184
|
Chapter 7: Bluetooth
If you dual-boot your computer between Linux and the manufacturer’s operating system, such as Windows XP or Mac
OS X, you may want to use the Bluetooth device your vendor recommends. Both the Apple-sold D-Link USB dongle
and Microsoft-manufactured USB dongle are known to work
with Linux. If in doubt, consult the Linux device compatibility list.
When choosing a Bluetooth device, be aware of the difference between Class
1 and Class 2 Bluetooth devices. Class 1 devices have a more sensitive radio
and work up to distances of 100 meters, whereas Class 2 devices work up to
10 meters and are cheaper.
Linux Bluetooth Support
As with many emerging technologies, there are competing implementations
of Linux Bluetooth support. The main two implementations are Affix and
BlueZ. Affix was originally developed by Nokia and is now hosted as an
open source project at SourceForge (http://affix.sourceforge.net). BlueZ is
also hosted at SourceForge is (http://bluez.sourceforge.net) and the official
Bluetooth stack of the Linux kernel.
Although Affix is a mature and functional project, BlueZ receives more testing and has more widespread adoption. For this reason, this chapter focuses
on the uses of the BlueZ Linux Bluetooth stack and libraries.
This section includes all the information that you need to install and configure Bluetooth support from scratch. It is possible that your Linux distribution already contains preconfigured Bluetooth support, which will save you
effort. However, the installation instructions provide useful background
information for troubleshooting.
Distributions
As Bluetooth is a relative newcomer to Linux, BlueZ support across commercial distributions varies. Generally speaking, if the kernel shipping with
your distribution is older than 2.4.22, it is a good idea to upgrade it. Users of
“bleeding-edge” distributions such as Debian Unstable and Gentoo should
find that Bluetooth is adequately supported.
Linux Bluetooth Support |
185
Configuring the Kernel
Bluetooth support under Linux requires a recent kernel. If your kernel is Version 2.4.22 or better, or a 2.6 series kernel, then you’re all set. Otherwise,
you must upgrade your kernel. Alternatively, if you do not wish to upgrade,
and have kernel 2.4.18 or better compiled from source, you can apply the
patches from the “kernel patches” area of the BlueZ web site (http://bluez.
sourceforge.net). Regardless, it’s worth checking out the patches, because
there are often improvements available that have not yet been merged into
the main Linux kernel source.
Patching the Kernel
To patch the kernel, first download the most recent patch for your kernel version from the BlueZ web site (for example, patch-2.4.22-mh1.gz), and place
it somewhere convenient, such as /usr/src/. Change into the directory where
your kernel source is unpacked, typically /usr/src/linux, and apply the patch:
cd /usr/src/linux
gzip -dc ../patch-2.4.22-mh1.gz | patch -p1
Next, run this command:
find . -name '*rej'
If any of the patches were rejected, you’ll find some files ending in .rej. If they
were, delete the kernel source, extract it again (be sure that you have the correct patch for your kernel version), and try the patch again.
You can then proceed with configuring your kernel for Bluetooth by running
make menuconfig, make xconfig, or make config.
Chapter 2 explains how to configure and compile a kernel. Table 7-3 and
Table 7-4 show the options that must be set in your kernel configuration to
enable Bluetooth support. You can either configure Bluetooth support to be
compiled into the kernel or to be loadable on-demand in the form of modules. Many Linux distributions choose to ship with modules, so we proceed
on the assumption that you will use modules. This removes the need to
recompile your kernel if you acquire a different type of Bluetooth device.
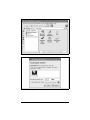
Figure 7-3 and Figure 7-4 show the Bluetooth configuration options from
the 2.4.24 kernel.
186
|
Chapter 7: Bluetooth
Figure 7-3. Configuring Bluetooth support in the Linux kernel
Figure 7-4. Configuring Bluetooth hardware support in the Linux kernel
Table 7-3. BlueZ protocol configuration options
Option
Purpose
Recommended value
Bluetooth subsystem support
Enables the entire BlueZ stack
m
L2CAP protocol support
A basic Bluetooth protocol
m
Linux Bluetooth Support |
187
Table 7-3. BlueZ protocol configuration options (continued)
Option
Purpose
Recommended value
SCO links support
Bluetooth Audio
m
RFCOMM protocol support
Serial data transfer
m
RFCOMM TTY support
Maps Linux terminal devices (e.g., /dev/
rfcomm0) to Bluetooth serial ports
y
BNEP protocol support
Personal area networking
m
BNEP Multicast filter support,
protocol filter support
Advanced filtering for networking
y
Table 7-4. BlueZ hardware support configuration options
Option
Purpose
Recommended value
HCI USB driver
Support for USB dongles
m
SCO (voice) support
Audio transmission support
y
USB zero packet support
Workaround for buggy USB devices
n
HCI UART driver
Support for serial dongles: either PCMCIA, CF,
or RS232 serial port
y
UART (H4) protocol support
Serial protocol used for most PCMCIA and CF
cards
y
BCSP protocol support
Serial protocol used for PCMCIA and CF cards
based on the CSR BlueCore chipset
y
Transmit CRC with every BCSP
packet
Improves reliability of BCSP support, at a
slight cost to efficiency
y
HCI BlueFRITZ! USB driver
Support for BlueFRITZ! Bluetooth ISDN
m
HCI VHCI (Virtual HCI device)
driver
Support for a virtual Bluetooth device for testing purposes
m
You should not enable the Bluetooth device support in the
USB drivers section of your kernel configuration (CONFIG_
USB_BLUETOOTH). This is a vestigial driver from very
early Bluetooth work and will prevent the BlueZ Bluetooth
stack from operating. If you are using a distribution’s precompiled kernel, this corresponds to the bluetooth kernel
module, and you should prevent it from being loaded. This
can be done either by ensuring the BlueZ hci_usb module is
loaded instead of the USB Bluetooth module or by disabling
the module by adding its name to hotplug’s configuration
list (/etc/hotplug/blacklist).
Once your kernel is compiled and you have rebooted, you must configure
Linux so it knows how to load the appropriate Bluetooth protocol modules.
Most modern distributions come with /etc/modules.conf already set up for
Bluetooth use, but you may be missing the required configuration.
188
|
Chapter 7: Bluetooth
To verify this, ensure that the contents of Example 7-1 are present in /etc/
modules.conf. If you need to change this file, run depmod -a to ensure automatic loading of modules by the kernel. You must be the root user to perform this operation.
Example 7-1. Module configuration for BlueZ
# BlueZ modules
alias net-pf-31 bluez
alias bt-proto-0 l2cap
alias bt-proto-2 sco
alias bt-proto-3 rfcomm
alias bt-proto-4 bnep
alias tty-ldisc-15 hci_uart
alias char-major-10-250 hci_vhci
Linux distributions may vary in the way they manage the /etc/
modules.conf file. Debian GNU/Linux, for example, requires
you put the contents of Example 7-1 in a separate file in /etc/
modutils and run /sbin/update-modules; however, if you use
the pre-packaged Debian BlueZ utilities, this file is already
provided for you.
Supporting Subsystems
Depending on your hardware configuration, you must ensure you are running some extra supporting software to initialize your Bluetooth device.
PCMCIA
If your Bluetooth adapter is a PC card or a CF card, you must have kernel
support for PCMCIA and the PCMCIA card services software installed. This
software is responsible for initializing your adapter when it is plugged in and
loading the required drivers into the kernel.
BlueZ requires PCMCIA card services to be Version 3.2.2 or higher. If your
Linux distribution has an older version, you can update it from http://
pcmcia-cs.sourceforge.net. See Chapter 2 for complete instructions on compiling pcmcia-cs from source.
Hotplug
The Linux hotplug subsystem enables you to plug in a device and have it
immediately ready to use. It is similar in function to the card manager from
PCMCIA card services, except it is generalized to include USB, Firewire
(IEEE 1394), and network devices. The 2.6 series of Linux kernels adds hotplug capability to even more subsystems, such as SCSI and input devices.
Linux Bluetooth Support |
189
When hotplug detects a new device, it loads the necessary driver modules
into the kernel, and it runs any scripts the user has configured. In the case of
BlueZ, hotplug is required for certain Bluetooth devices that require firmware downloaded to them, such as the USB dongles based on the Broadcom
chipset.
Hotplug ships with most Linux distributions. Version 2002_08_26 or later is
required. If you need to install it separately, download it from http://linuxhotplug.sourceforge.net/.
Installing the BlueZ Utilities
In addition to the kernel support, you must install a set of utility programs
to help you manage your Bluetooth devices. Table 7-5 shows the names of
the packages and their purpose. You can either install the versions of these
tools that come with your Linux distribution, or compile and install them
from source.
Table 7-5. BlueZ software packages
Package
Purpose
bluez-libs
The application library that all other Bluetooth tools require in order to function
bluez-utils
Main utilities that enable you to initialize and control Bluetooth devices
bluez-sdp
Service discovery protocol tools that enable the advertisement and discovery of
Bluetooth services
bluez-pan
Tools that enable personal area networking using Bluetooth
bluez-hcidump
A debugging tool that permits the monitoring of Bluetooth packets
bluez-bluefw
The firmware for Broadcom chipset-based Bluetooth devices
If you are compiling the tools from source code, compile and install in the
order shown in Table 7-5 to avoid dependency problems.
Precompiled version of the utilities can be obtained for Red Hat Linux as
RPMs, for Debian stable as .deb packages (the latest BlueZ utilities are an
integral part of Debian unstable), and as packages suitable for the Sharp
Zaurus Linux PDA. These can be downloaded, along with the source code
packages, from the BlueZ download page at http://bluez.sourceforge.net/.
In order to determine whether your Bluetooth system is working, you only
need to install the bluez-libs and bluez-utils packages, and also bluez-bluefw
if your dongle contains a Broadcom chip (you can determine this from Marcel Holtmann’s Bluetooth hardware page at http://www.holtmann.org/linux/
bluetooth/devices.html). Install the rest when you have verified that everything is working properly.
190
|
Chapter 7: Bluetooth
Basic Configuration and Operation
The bluez-utils package contains the tools you need to configure and test
your Bluetooth setup. Once you’ve installed the package, run the init script
(/etc/init.d/bluez-utils start on Debian, /etc/init.d/bluetooth start
on Red Hat) to start the Bluetooth subsystem. These scripts normally run on
boot, so they may have been started already if you installed from RPMs or
Debian packages.
The hcid daemon should now be running. This program controls the initialization of Bluetooth devices on the system and handles the bonding process
with other devices. We discuss configuration of hcid later in this chapter.
The prefix “hci” derives from the name of the interface between the computer and the Bluetooth device, the Host Controller Interface.
Examining Local Devices
The hciconfig tool allows the configuration of the characteristics of your Bluetooth adapter. If you are familiar with the configuration of network interfaces, you will find it parallel in operation to ifconfig. Use -a to display
extended information about each Bluetooth device attached to the computer:
# hciconfig -a
hci0:
Type: USB
BD Address: 00:80:98:24:15:6D ACL MTU: 128:8 SCO MTU: 64:8
UP RUNNING PSCAN ISCAN
RX bytes:4923 acl:129 sco:0 events:168 errors:0
TX bytes:2326 acl:87 sco:0 commands:40 errors:0
Features: 0xff 0xff 0x05 0x00
Packet type: DM1 DM3 DM5 DH1 DH3 DH5 HV1 HV2 HV3
Link policy: HOLD SNIFF PARK
Link mode: SLAVE ACCEPT
Name: 'saag-0'
Class: 0x100100
Service Classes: Object Transfer
Device Class: Computer, Uncategorized
HCI Ver: 1.1 (0x1) HCI Rev: 0x73 LMP Ver: 1.1 (0x1) LMP Subver: 0x73
Manufacturer: Cambridge Silicon Radio (10)
From this output, you can observe several things, which have been rendered
in bold text in the example.
• Bluetooth interfaces are referred to as hci0, hci1, etc. in the same way as
Ethernet interfaces are generally named eth0, eth1, etc.
• The unique Bluetooth address of our device is 00:80:98:24:15:6D.
• The hci0 device in question is activated, that is, UP.
Basic Configuration and Operation |
191
• Other Bluetooth devices will see this computer as saag-0. This name is
configurable, as explained in Table 7-6.
• The chipset is manufactured by Cambridge Silicon Radio (CSR). The
CSR chipset is the most commonly used chipset for USB dongles.
When diagnosing and reporting problems to kernel driver authors, you may
be asked for the output of hciconfig -a. Note that you must be the root user
to use some of the features of hciconfig.
Table 7-6 shows the most useful options of the hciconfig tool.
Table 7-6. Common usages of the hciconfig tool
Command
Description
hciconfig hci0 up
hciconfig hci0 down
Activates or deactivates the Bluetooth device. Normally, in hcid
does this for you when you plug the device.
hciconfig hci0 reset
Sends a reset command to the Bluetooth device.
hciconfig hci0 name myname
Sets the device’s public name to myname.
hciconfig hci0 features
Shows a human-readable list of the Bluetooth features the device
supports. The most useful feature is SCO link, required in order to
use audio.
Scanning for Remote Devices
The acid test is, of course, to see if your computer can detect other Bluetooth devices. The hcitool toolcan be used to do this. Switch on your other
Bluetooth device, and ensure it is in “discoverable” mode. Issue the command hcitool scan and wait (see Example 7-2). You don’t need to be root
in order to run this command.
Example 7-2. An example scan of remote Bluetooth devices
$ hcitool scan
Scanning ...
00:0A:D9:15:CB:B4
00:40:05:D0:DD:69
ED P800
saag-1
Example 7-2 shows a typical output of a scan. In this case, the author’s cell
phone, “ED P800,” and second Bluetooth adapter, “saag-1,” are shown as
discoverable.
The hcitool and hciconfig programs produce similar output for the remote
devices. You must be root to use this option of hcitool. Here’s an example
session with hcitool where we specify the Bluetooth address of the P800 cell
phone discovered in Example 7-2:
# hcitool info 00:0A:D9:15:CB:B4
Requesting information ...
192
|
Chapter 7: Bluetooth
Why Isn’t Scanning Instantaneous?
The reason scanning can take a long time is because a Bluetooth inquiry is
being performed. As Bluetooth devices frequency-hop, inquiry cannot be
instantaneous. The device performing the inquiry transmits a special code on
two consecutive frequencies. When the other devices’ hop patterns take them
onto those frequencies, they listen for a repetition of that code and then indicate their presence to the inquirer.
BD Address: 00:0A:D9:15:CB:B4
Device Name: ED P800
LMP Version: 1.1 (0x1) LMP Subversion: 0x9040
Manufacturer: Ericsson Mobile Comunications (0)
Features: 0xff 0xfb 0x01 0x00
<3-slot packets> <5-slot packets> <encryption> <slot offset>
<timing accuracy> <role switch> <hold mode> <sniff mode>
<park mode> <RSSI> <SCO link> <HV2 packets>
<HV3 packets> <u-law log> <A-law log> <CVSD>
Pinging a Remote Device
The ping command is an incredibly useful tool for discovering whether
remote computers are reachable over a TCP/IP network. BlueZ has an analog to ping, called l2ping. Its name refers to the fact that it attempts to create
a connection to the device using the logical link control and adaptation protocol (L2CAP), the lowest-level link-based protocol in Bluetooth.
In other words, before despairing because you cannot connect to a device,
check it with l2ping. There may be a fault with software higher up the chain;
l2ping enables you to determine whether a basic connection can be established with a remote device. Here’s an example of l2ping in action (you need
to run l2ping as root):
# l2ping 00:0A:D9:15:CB:B4
Ping: 00:0A:D9:15:CB:B4 from 00:80:98:24:15:6D (data size 20) ...
0 bytes from 00:0A:D9:15:CB:B4 id 200 time 54.85ms
0 bytes from 00:0A:D9:15:CB:B4 id 201 time 49.35ms
0 bytes from 00:0A:D9:15:CB:B4 id 202 time 34.35ms
0 bytes from 00:0A:D9:15:CB:B4 id 203 time 28.33ms
4 sent, 4 received, 0% loss
If you have not yet paired your computer with the device with
which you are testing, using l2ping may result in a “permission denied” error. To remedy this, you must either pair your
device with the computer (see “Bonding/Pairing” later in this
chapter) or ensure that the remote device is discoverable.
Basic Configuration and Operation |
193
Configuring hcid
The hcid daemon handles various low-level aspects of a system’s Bluetooth
devices, including activating and configuring the Bluetooth interfaces, and
handling device bonding. hcid should be running at all times on your system, and it is usually started by initialization scripts installed along with the
rest of the tools from the bluez-utils package.
The configuration file for hcid, /etc/bluetooth/hcid.conf, has two parts: global
configuration and Bluetooth device configuration. In normal operation,
most of the default options are acceptable. In this chapter, we cover only the
options that are most useful to change.
Global options
This section is introduced by the options keyword in the configuration file
and controls the behavior of the hcid program. The most useful option in
this section is pin_helper, which tells the computer the program to run in
order to obtain a PIN code when pairing. The default PIN helper that ships
with bluez-utils is a Python script, which uses the Python bindings to the
GTK graphical toolkit. Unless you have Python and the Python-GTK package installed on your computer, this helper will not work, and you will not
be able to pair your computer with other Bluetooth devices. (See the “Troubleshooting” section earlier in this chapter for instructions on replacing the
PIN helper with one that returns the same PIN code every time.)
A better-looking PIN helper is available separately from bluez-utils, in a
package called bluez-pin. Installing this package is recommended, and several Linux distributions ship it as a default. If you install bluez-pin, you must
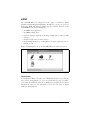
amend the pin_helper option accordingly. Figure 7-5 shows bluez-pin in
action.
Figure 7-5. A request for a PIN from bluez-pin
194
|
Chapter 7: Bluetooth
Device options
This section is introduced by the devices keyword, which controls the configuration that hcid gives to each Bluetooth device as it is activated. This has
the same effect as if you were to manually configure the device with hciconfig. Table 7-7 explains the most useful options available in this section.
Table 7-7. Useful device-level options from /etc/bluetooth/hcid.conf
Option
Explanation
name
The name of the adapter as it appears to other devices. The special sequence %h is
replaced by the machine’s hostname, and %d is replaced by the interface number.
class
The Bluetooth device and service class advertised to other devices. The default is hex
0x000100, indicating a computer device class, with no special service class. Depending
on how the Bluetooth adapter is to be used, it may be helpful to amend this value. For
more information, see the section at the beginning of this chapter entitled “Device
classes.”
iscan pscan
These two options control whether the adapter responds to inquiry and page scans. If
inquiry scanning (iscan) is enabled, the adapter is discoverable by other devices. If page
scanning (pscan) is enabled, the computer permits adapter connections from remote
devices.
Bonding/Pairing
Many devices require that bonding, or pairing, is performed before a Bluetooth connection is established. Bonding may be initiated by the computer
or by the remote device.
If the computer initiates bonding—usually by making an outgoing connection—then the pin_helper program (usually bluepin) will present a graphical dialog box to the user requesting that he input a PIN, which should
match the code set on the remote device. If the remote device initiates bonding, then the remote device is required to provide a PIN to match that set in
the file /etc/bluetooth/pin.
In some distributions of bluez-utils, the PIN code is set to
the alphabetical string BlueZ. This is troublesome, because
many Bluetooth devices, including most cell phones, are
only capable of delivering numeric PINs. It is therefore recommended that you alter the contents of /etc/bluetooth/pin to
a numeric code.
If bonding is successful, the hcid daemon will store the resulting link key,
used to authenticate all future connections between the two devices concerned, in the database file /etc/bluetooth/link_key.
Basic Configuration and Operation |
195
Service Discovery
Bluetooth devices implement the service discovery profile (SDP) in order to
describe to other devices how their services may be accessed. SDP is generally used in two ways: browsing and searching. An SDP browse request
causes a device to respond with a list of services that it supports. A search
request is a query for details of a particular service.
Two tools found in the bluez-sdp package handle SDP on Linux. The first is
sdpd, which provides an SDP server and allows remote devices to query the
computer. The second, sdptool, allows administration of the SDP server and
querying of the remote device.
Not all Bluetooth-enabled devices support SDP browsing—
for example, the Palm Tungsten-T PDA. Applications that
wish to connect to these devices must instead search for the
services they wish to use, as shown in the following section.
Using sdptool
The simplest invocation of sdptool is sdptool browse. This performs an
inquiry and then browses each available device. Example 7-3 shows the
result of this command.
Example 7-3. Results of an SDP browse
$ sdptool browse
Inquiring ...
Browsing 00:80:98:24:15:6D ...
Service Name: SDP Server
Service Description: Bluetooth service discovery server
Service Provider: BlueZ
Service RecHandle: 0x0
Service Class ID List:
"SDP Server" (0x1000)
Protocol Descriptor List:
"L2CAP" (0x0100)
PSM: 1
Version: 0x0001
Language Base Attr List:
code_ISO639: 0x656e
encoding:
0x6a
base_offset: 0x100
Service
Service
Service
Service
Service
196
|
Name: Public Browse Group Root
Description: Root of public browse hierarchy
Provider: BlueZ
RecHandle: 0x804d008
Class ID List:
Chapter 7: Bluetooth
Example 7-3. Results of an SDP browse (continued)
"Browse Group Descriptor" (0x1001)
Language Base Attr List:
code_ISO639: 0x656e
encoding:
0x6a
base_offset: 0x100
Service Name: LAN Access Point
Service RecHandle: 0x804d6f0
Service Class ID List:
"LAN Access Using PPP" (0x1102)
Protocol Descriptor List:
"L2CAP" (0x0100)
"RFCOMM" (0x0003)
Channel: 3
Profile Descriptor List:
"LAN Access Using PPP" (0x1102)
Version: 0x0100
Service Name: OBEX Object Push
Service RecHandle: 0x804d7f0
Service Class ID List:
"OBEX Object Push" (0x1105)
Protocol Descriptor List:
"L2CAP" (0x0100)
"RFCOMM" (0x0003)
Channel: 4
"OBEX" (0x0008)
Profile Descriptor List:
"OBEX Object Push" (0x1105)
Version: 0x0100
The output from the browse command shows a list of service descriptions
obtained from the SDP server. In this case, you can see that the device is
running an SDP server, has support for public browsing of the SDP server
contents, is offering network access via PPP, and supports OBEX via OBEX
PUSH. The two profiles that use RFCOMM as a base protocol also indicate
the RFCOMM channel on which the service is available. The term “channel” is somewhat overloaded in radio technologies such as Bluetooth, so you
may find it helpful to consider each RFCOMM channel a virtual serial port
number.
If the BDADDR of the device to query is known, it can be specified on the
command line: sdptool browse 00:80:98:24:15:6D.
The sdptool program is also used to search for devices supporting a particular service. For instance, sdptool search OPUSH returns the service descriptor
for OBEX PUSH support from any available device supporting it. Unfortunately, unlike the browse command, there is no way of searching only one
Basic Configuration and Operation |
197
device with the current version of sdptool; it must perform an inquiry and
search for the service on every device. Table 7-8 shows the service abbreviations that sdptool understands.
Table 7-8. Service abbreviations for sdptool
Abbreviation
Service
SP
Serial port
DUN
Dial-up networking
LAN
LAN access
HSET
Headset profile
FAX
Fax profile
OPUSH
Object push
FTRN
Object file transfer protocol
NAP
Network access point
GN
Ad-hoc peer networking
HID
Human interface device
CIP
Common ISDN access
CTP
Cordless telephony
Although the use of sdptool appears clumsy, in practice it is normally
required only for diagnostic purposes. Bluetooth application software generally performs its own SDP requests to determine how to connect to a service
on a remote device.
Configuring sdpd with sdptool
Unlike hcid, sdpd does not remember its settings by use of a static configuration file. The service directory is dynamic, allowing services to register and
deregister themselves as they come and go. Most applications do this by
using the BlueZ SDP libraries, but on occasion, it is useful to configure this
manually using sdptool.
To see which services the system’s SDP daemon is advertising, use the special Bluetooth address FF:FF:FF:00:00:00, which refers to the local Bluetooth device: sdptool browse FF:FF:FF:00:00:00.
The add subcommand of sdptool registers a service via SDP. It takes the service name as a parameter, with an optional parameter for the RFCOMM
channel. For instance, to advertise a serial port connection on RFCOMM
channel 3, use the following command: sdptool add --channel=3 SP. Obviously, the channel option makes sense only for those services based on serial
emulation, such as dial-up networking, OBEX, and fax.
198
|
Chapter 7: Bluetooth
Removing a service is slightly more complex, requiring the identifying
“handle” of the record. In the output from an SDP browse in Example 7-3,
there is a Service RecHandle entry for each record; the del command
requires this number. So, assuming Example 7-3 refers to a local SDP
server, you could remove the object push record with the command
sdptool del 0x804d7f0.
The sdptool command provides even more granular control over the SDP
records through the use of setattr and setseq, which adjust particular
parameters. Use of setattr and setseq require knowledge that is likely to be
useful only if you are writing sophisticated Bluetooth programs.
Serial Connections
Using BlueZ’s RFCOMM implementation, it is possible to create and use
emulated serial port connections over Bluetooth. RFCOMM actually underlies many Bluetooth profiles such as dial-up networking and OBEX.
As with SDP, BlueZ provides both application libraries, so programs can create and utilize RFCOMM connections and an administrative tool for the
user to set up connections herself.
Ensuring RFCOMM is set up
To use RFCOMM connections, you must ensure that:
• The rfcomm kernel module is either compiled into the kernel or available to load
• The /dev/rfcomm* devices exist on your machine
Kernel configuration was covered in “Configuring the Kernel” earlier in this
chapter. Most Linux distributions should automatically create the
RFCOMM device entries for you, but if they don’t exist, create them using
the script in Example 7-4, which must be run as the root user.
Example 7-4. Creating the /dev/rfcomm devices
#!/bin/sh
# script: mkrfcomm
C=0;
while [ $C -lt 256 ]; do
if [ ! -c /dev/rfcomm$C ]; then
mknod -m 666 /dev/rfcomm$C c 216 $C
fi
C=`expr $C + 1`
done
Basic Configuration and Operation |
199
Connecting to a cell phone
To see an example of RFCOMM usage, you could set up a serial connection
to a cell phone’s modem and try some commands on it. First, you must discover the RFCOMM channel that dial-up networking uses on the phone.
For this, use sdptool browse ADDR (where ADDR is a Bluetooth address you
retrieved with sdptool browse):
$ sdptool browse 00:0A:D9:15:CB:B4
...
Service Name: Dial-up Networking
Service Description: Dial-up Networking
Service Provider: Sony Ericsson
Service RecHandle: 0x10002
Service Class ID List:
"Dialup Networking" (0x1103)
Protocol Descriptor List:
"L2CAP" (0x0100)
"RFCOMM" (0x0003)
Channel: 3
The phone uses channel 3 for dial-up networking. A virtual serial port on
the Linux machine must be bound to this channel on the phone. As the root
user, use the rfcomm command to bind the port and then again to confirm
that the port is bound, as shown in Example 7-5.
Example 7-5. Binding to and checking an RFCOMM serial port
# rfcomm bind 0 00:0A:D9:15:CB:B4 3
# rfcomm
rfcomm0: 00:0A:D9:15:CB:B4 channel 3 clean
The 0 in bind 0 corresponds to the 0 in the device /dev/rfcomm0, which can
now be used with applications in the same way that traditional serial ports
(known as /dev/ttyS0, etc.) are used. A terminal emulation package, such as
the popular minicom, can be used to confirm that the phone’s modem is
working, as shown in the following listing. The command ATI3 usually
returns useful model information for a remote modem.
OK
ATI3
P800 Bluetooth (TM) Modem
OK
For more information on minicom, see http://alioth.debian.
org/projects/minicom/. You must create a configuration file
for minicom referencing /dev/rfcomm0 or change the serial
device to /dev/rfcomm0 from within minicom’s option
screens, which you can find by running minicom -s. You can
also use Kermit, as shown in Chapter 9.
200
|
Chapter 7: Bluetooth
Internet access via a cell phone
By creating PPP connections with RFCOMM serial ports, you can use your
cell phone for Internet access. (To learn how to do this with GPRS cell
phones, see Chapter 9.) For example, to connect to AT&T Wireless’s GPRS
network with a Nokia 3650 (see “GSM/GPRS Phone with Data Cable” in
Chapter 9), use the peers script shown in Example 7-6. Be sure to use
rfcomm bind as shown in Example 7-6. You can use the attws-connect and
attws-disconnect scripts from Chapter 9.
Example 7-6. PPP peer settings for AT&T Wireless and the Nokia 3650
over Bluetooth
# File: /etc/ppp/peers/attws-rfcomm
#
/dev/rfcomm0 # Nokia 3650
115200
# speed
defaultroute # use the cellular network for the default route
usepeerdns
# use the DNS servers from the remote network
nodetach
# keep pppd in the foreground
nocrtscts
# no hardware flow control
lock
# lock the serial port
noauth
# don't expect the modem to authenticate itself
local
# don't use Carrier Detect or Data Terminal Ready
connect
"/usr/sbin/chat -v -f /etc/chatscripts/attws-connect"
disconnect "/usr/sbin/chat -v -f /etc/chatscripts/attws-disconnect"
Object Exchange
OBEX is a simple file transfer protocol. It is used when you “beam” files from
one device to another. This is known as OBEX PUSH. Some devices also support OBEX FTP. As its name suggests, OBEX FTP behaves similarly to the
Internet FTP protocol, allowing file uploads and downloads to a device.
The OBEX protocol was introduced as part of the group of technologies created for infrared device connections. Its implementation in devices such as
cell phones is widespread but not without its quirks. OBEX itself is a binary
protocol layered on top of a serial connection. With Bluetooth, it is layered
on top of an RFCOMM connection. Example 7-3 shows an entry for the
OBEX PUSH profile, using RFCOMM channel 4.
Some older cell phones don’t actually provide OBEX implementation in this
way. Instead, they have extended AT commands accessible from a serial
connection to their internal modem, as described in the previous section.
These commands place the connection into OBEX mode. We do not cover
this use, often called “cable OBEX,” but rather focus on the Bluetooth
OBEX profiles.
Basic Configuration and Operation |
201
OBEX FTP over Bluetooth is not very well supported on Linux. The most
popular package, obexftp, still has Bluetooth support in development at the
time of writing. We advise you to check the project’s home page at http://
triq.net/obex.
OBEX PUSH is better supported and is more practical since it is consistently implemented in consumer devices such as cell phones. There are several graphical programs available to support OBEX PUSH on Linux, as we
shall see later. First, we look at the command-line tools available to perform
file transfers.
Basic support
OBEX support on Linux is implemented through a project called OpenOBEX.
Any OBEX-related program requires you to have these libraries installed. They
can be obtained and compiled from the project’s home page at http://openobex.
sourceforge.net/ or installed through your Linux system’s package management system.
If your Linux distribution is relatively old, be aware that
OpenOBEX might not have been compiled with Bluetooth
enabled. If you are encountering inexplicable errors in starting up OBEX applications, this may well be the case, and
you should contact your Linux distribution vendor.
The OpenOBEX libraries have a companion package called openobex-apps.
The openobex-apps package contains a set of basic test programs that you
can use to get started. They are by no means production quality, but they
enable you to test your setup. We’ll use the obex_test program to test
receiving and sending files.
To send a file to a remote device, you must first discover the RFCOMM port
the OBEX PUSH support uses, as shown in Example 7-3. Use sdptool to discover this, and then run obex_test. Let’s suppose our remote device has the
address 11:22:33:44:55:66 and uses RFCOMM port 3 for OBEX PUSH.
Here is an imaginary session:
$ obex_test -b 11:22:33:44:55:66 3
> c
> p localfilename remotefilename
This session presents two arguments to the p command: the location of the
file you want to send and the name of the file to use when it reaches the
remote device.
202
|
Chapter 7: Bluetooth
To receive a file from a remote device, use the test program in server mode.
(This is shown in the following listing.) You can then push a file to your
computer from a remote device.
$ sdptool add --channel=4 OPUSH
$ obex_test -b ff:ff:ff:00:00:00 4
> s
Note that some devices require the OBEX capability to be reflected in your
Bluetooth device’s device class setting before they allow transfers to be made
to your computer. (See the section “Device classes” for a detailed discussion
on the exact values that this can take.) In most cases, it is sufficient to set the
class to service_class_obex | device_class_computer (0x100100). This can be
set in /etc/bluetooth/hcid.conf or by dynamically using the hciconfig command.
The test applications that come with the OpenOBEX libraries are necessarily very rough and require you to do the legwork. Happily, more polished
applications are available. These applications form part of the KDE and
GNOME desktop projects, and are mentioned later in this chapter.
Other software meriting investigation can be found on the Web. These
programs include ussp-push, obextool, and the OBEX PUSH daemon.
They can be found either by searching the Web or visiting a page on Linux
and Bluetooth, created by BlueZ maintainer Marcel Holtmann, at http://
www.holtmann.org/linux/bluetooth.
PPP Networking
Point-to-point networking is useful for networking two computers together.
If one of the peers permits routing or bridging to a wider network, then the
other gains access to that network. This is what happens when you dial up
your Internet service provider on a traditional modem.
PPP networking is used in the implementation of the Bluetooth LAN access
profile. Here is what an SDP record for the LAN access profile looks like:
Service Name: LAN Access over PPP
Service RecHandle: 0x804dae0
Service Class ID List:
"LAN Access Using PPP" (0x1102)
Protocol Descriptor List:
"L2CAP" (0x0100)
"RFCOMM" (0x0003)
Channel: 2
Profile Descriptor List:
"LAN Access Using PPP" (0x1102)
Version: 0x0100
Basic Configuration and Operation |
203
You can use LAN access to provide Bluetooth devices with access to your
local network. Many PDA devices support this connection method, both for
purposes of synchronization over TCP/IP and general Internet access.
In order to use LAN access, you need the bluez-pan package installed on
your computer. This contains two tools: dund and pand. LAN access is provided by dund, which we discuss here. You also need PPP support in your
Linux kernel, and the PPP daemon pppd installed on your computer. With
most Linux distributions, this is already installed.
While no pppd expertise is assumed in this section, you are strongly recommended to familiarize yourself with its documentation. The Linux PPP
HOWTO at http://www.linux.org/docs/ldp/howto/PPP-HOWTO is a good
starting point.
The dund daemon can be used to manage both sides of the LAN connection. It provides PPP access to a remote device or connects to a provider.
Acting as the server, it listens on a specific RFCOMM channel, and when a
connection is made, it invokes pppd to establish the network connection.
Acting as the client, it establishes a connection over Bluetooth to a remote
device and then invokes pppd to handle the network connection.
Creating a LAN access server
The simplest invocation of dund is dund --listen --persist. You should run
this command from the account of a user with permission to run pppd (as a
fallback, you can always run it as the root user.) This command line causes
dund to register the LAN access profile with the local SDP server and listen
for incoming connections as a daemon. (For debugging purposes, dund can
be given the --nodetach argument, which causes it to run in the foreground
like a normal program.) The persist option causes the daemon to continue
running after a connection has terminated and await new connections. You
can check the system log /var/log/syslog for status messages from dund.
When a connection is established, dund invokes pppd with its default
options. You can normally find these in /etc/ppp/options. Some systems use /
etc/pppd instead of /etc/ppp. However, it’s better to create a separate configuration file especially for your connections. Anything you pass to dund on the
command line after its own configuration options is sent straight to pppd.
Create a file called dun in /etc/ppp/peers with the content shown in
Example 7-7.
Example 7-7. PPP daemon configuration for LAN access
noauth
debug
204
|
Chapter 7: Bluetooth
Example 7-7. PPP daemon configuration for LAN access (continued)
crtscts
lock
local
proxyarp
ms-dns 192.168.0.5
# local : remote
192.168.7.1:192.168.7.2
You may want to adjust the last two entries in the configuration to suit your
setup: the ms-dns line specifies the IP address of your DNS server. This will
become useful when you enable routing. The two colon-separated addresses
are the local IP address and the IP address to give the remote device. You
should choose addresses in the 10.x.x.x or 192.168.x.x ranges that don’t
clash with any of your internal subnets.
The dund program can then be invoked with dund --listen --persist call
dun. When a remote device connects, the PPP connection is brought up.
Because of the “debug” option to pppd, you should see a verbose report of the
connection in the system log. To confirm that a connection has been established, run the ifconfig command and look for the ppp0 network interface.
Invoke the ping command to confirm that your remote device is reachable:
$ ping 192.168.7.2
PING 192.168.7.2 (192.168.7.2): 56 data bytes
64 bytes from 192.168.7.2: icmp_seq=0 ttl=255 time=77.8 ms
64 bytes from 192.168.7.2: icmp_seq=1 ttl=255 time=80.5 ms
64 bytes from 192.168.7.2: icmp_seq=2 ttl=255 time=78.3 ms
The final step is to ensure that your Linux box can route for the remote
device, so it can take advantage of your network facilities. Various Linux distributions have their own way of doing this in their network configuration,
but to test you can enable it by issuing the command echo 1 > /proc/sys/
net/ipv4/ip_forward. Further instructions on routing can be found on the
iptables home page (http://www.netfilter.org) and also in “Sharing a Network Connection over IrDA” in Chapter 8. There are a few ways to set up
this kind of routing, depending on your distribution and kernel version, but
make sure that other machines on your network know how to route to your
connected Bluetooth device.
If you are connecting to a device running Microsoft software, you should pass the --ms-dun option to dund. This
enables the extra negotiation required to talk to the Windows dial-up networking implementation.
Basic Configuration and Operation |
205
Our setup so far has no security considerations. There are several steps one
can take to improve the security situation:
• Require username/password authentication for the PPP setup; see the
pppd documentation for how to do this.
• Configure your Bluetooth device to always use link-level encryption in
hcid.conf.
You should rely on neither of these to provide more than basic security.
Bluetooth is still a relatively new technology, and its security measures have
not yet been subjected to many attacks in the wild. It’s always best, if the
remote device is capable of it, to assume link-level security is weak and to
use secure connection tools such as ssh to encrypt your network traffic at the
application layer.
Connecting to a LAN access server
The dund program can be configured to connect to a known LAN access
point or to search for one and connect to it. Here are the command lines for
these two functions:
dund --connect 11:22:33:44:55:66
dund --search
You can also specify a PPP configuration file by appending the call keyword
and the name of the configuration in /etc/ppp/peers/ to the command line.
Personal Area Networking
While you can achieve much with file transfers via OBEX and point-to-point
networking with PPP, devices can take the full advantage of being interlinked in the same way that Ethernet networks are. They can then run protocols such as IPv4, IPv6, and IPX. For this reason, the Bluetooth
specifications define a protocol called Bluetooth Network Encapsulation
(BNEP). BNEP is used by the Personal Area Networking (PAN) profiles.
The PAN profiles cover two basic modes of networking. The first profile is a
network access point (NAP). NAPs provide network access in the same way
that an access point for a Wi-Fi network does. They are typically connected
to a wider network and provide bridging. Figure 7-6 shows the structure of a
NAP network. Clients connect using a profile called PAN user (PANU).
The second PAN profile is a group ad-hoc network (GN). GNs are not
intended to provide access to any further network but can be used to create
ad-hoc networks among a group of devices. Figure 7-7 shows the structure
of a GN.
206
|
Chapter 7: Bluetooth
LAN
NAP
PANU
PANU
PANU
Figure 7-6. Structure of a network connected to a NAP
PANU
PANU
PANU
GN
PANU
PANU
PANU
Figure 7-7. Structure of a GN
Both of these types of network are supported under Linux. To set them up,
you must have some familiarity with Linux network administration.
Creating a GN
GNs are easier to create, so they are good starting points to test PAN functionality. To set up a GN or NAP, the bluez-pan package must be compiled
and installed. You must also ensure that your kernel has the BNEP module
compiled (Table 7-3). Load the BNEP module with modprobe bnep.
On the server machine, run this command as root:
# pand --master --listen --role GN
On the client machine, run this command, substituting the Bluetooth
address of the master machine:
# pand --connect 11:22:33:44:55:66
As usual, you can check for status reports from pand in the system log file.
To bring a network up, configure the interfaces’ network addresses. On the
master:
# ifconfig bnep0 192.168.7.1
Basic Configuration and Operation |
207
and on the client:
# ifconfig bnep0 192.168.7.2
If you use the 192.168.7.x network locally, substitute other suitable IP
addresses. Test the connection by using ping to verify the connection from
each end. Use ifconfig to display the interface configuration:
# ifconfig bnep0
bnep0
Link encap:Ethernet HWaddr 00:80:98:24:15:6D
inet addr:192.168.7.1 Bcast:192.168.7.255 Mask:255.255.255.0
inet6 addr: fe80::280:98ff:fe24:156d/64 Scope:Link
UP BROADCAST RUNNING MULTICAST MTU:1500 Metric:1
RX packets:0 errors:0 dropped:0 overruns:0 frame:0
TX packets:5 errors:0 dropped:0 overruns:0 carrier:0
collisions:0 txqueuelen:1000
RX bytes:20 (20.0 b) TX bytes:188 (188.0 b)
You may not want to specify the GN host’s Bluetooth address on the client.
By default, pand registers the GN or NAP service with the master host’s SDP
server. To make the client find its access point via SDP, give the client the
following command line:
# pand --role PANU --search --service GN
Omitting the service argument causes pand to search for the NAP by default.
Specifying the --persist option to the client’s pand line causes it to search
for the GN whenever it is not connected. Using this option, you can configure a machine to automatically connect to the network whenever it comes in
range of the master machine.
To automate the IP address configuration, use the methods provided by
your Linux distribution. On Red Hat, this means creating suitable scripts to
go into /etc/sysconfig/network-scripts. On Debian, you should edit /etc/
network/interfaces. The BNEP network interfaces are not present at boot
time, but they will be initialized by the hotplug utility when a BNEP connection is made. For further details of this configuration, read the manpages on
your system for ifup, interfaces (Debian only), and hotplug.
The ideal configuration is to give the GN master a static IP address and
require the clients to use DHCP. If your DHCP server is running on the GN
master, you may need to run a command to cause it to take note of the new
network interface to listen on. This should be possible through your system’s network configuration.
Bridging interfaces
As you will discover if you attempt to connect more than one client machine
to your host, each connection is given its own network interface: bnep0,
bnep1, bnep2 and so on. Not only is it a nuisance to specify multiple
208
|
Chapter 7: Bluetooth
configurations on the master side for each interface, but it leaves the client
devices unable to communicate with each other. The solution to this is called
bridging. Bridging enables multiple network devices to appear as one interface on a network by tying, on the master side, all the bnep* devices into one
interface.
The first step is to ensure that bridging is enabled in your Linux kernel;
bridging is supported in both the 2.4 and 2.6 series of kernels. This option
can be found under “Networking options” from the kernel’s menu configuration and is called 802.1d Ethernet Bridging. You also need the bridge-utils
software package installed. If this is not part of your Linux distribution,
download it from http://bridge.sourceforge.net/.
Once you have the kernel modules and tools installed, you can bring up and
configure a bridge interface:
#
#
#
#
brctl addbr pan0
ifconfig pan0 192.168.7.1
brctl setfd pan0 0
brctl stp pan0 disable
This bridged interface then handles all the BNEP interfaces. The latter two
commands disable two features of Ethernet bridging known as Listening and
Learning States and Spanning Tree Protocol. For noncomplex networks, they
are not required and may cause delays to initializing the network. Further
information on these features can be found on the O’Reilly Network web site
at http://www.oreillynet.com/pub/a/network/2001/03/30/net_2nd_lang.html.
The second part of the trick is to get pand to add each interface to the bridge
as it comes up. Create a script, as shown in Example 7-8, and save it to /etc/
bluetooth/pan/dev-up. Ensure it is executable.
Example 7-8. A script to add each BNEP network interface to the bridge
#!/bin/sh
brctl addif pan0 $1
ifconfig $1 0.0.0.0
The bridging method provides another advantage: you don’t need to inform
your DHCP server of the existence of a new interface whenever a BNEP connection is made.
Here is the configuration of the network interfaces after a bridged network
connection has been established with one NAP and two PANU clients:
bnep0
Link encap:Ethernet HWaddr 00:40:05:D0:DD:69
inet6 addr: fe80::240:5ff:fed0:dd69/64 Scope:Link
UP BROADCAST RUNNING MULTICAST MTU:1500 Metric:1
RX packets:11 errors:0 dropped:0 overruns:0 frame:0
TX packets:13 errors:0 dropped:0 overruns:0 carrier:0
Basic Configuration and Operation |
209
collisions:0 txqueuelen:1000
RX bytes:789 (789.0 b) TX bytes:880 (880.0 b)
bnep1
Link encap:Ethernet HWaddr 00:80:98:24:15:6D
inet6 addr: fe80::280:98ff:fe24:156d/64 Scope:Link
UP BROADCAST RUNNING MULTICAST MTU:1500 Metric:1
RX packets:49 errors:0 dropped:0 overruns:0 frame:0
TX packets:72 errors:0 dropped:0 overruns:0 carrier:0
collisions:0 txqueuelen:1000
RX bytes:6453 (6.3 KiB) TX bytes:9019 (8.8 KiB)
pan0
Link encap:Ethernet HWaddr 00:40:05:D0:DD:69
inet addr:192.168.7.1 Bcast:192.168.7.255 Mask:255.255.255.0
inet6 addr: fe80::200:ff:fe00:0/64 Scope:Link
UP BROADCAST RUNNING MULTICAST MTU:1500 Metric:1
RX packets:11 errors:0 dropped:0 overruns:0 frame:0
TX packets:13 errors:0 dropped:0 overruns:0 carrier:0
collisions:0 txqueuelen:0
RX bytes:700 (700.0 b) TX bytes:1254 (1.2 KiB)
Creating a network access point
If you intend to incorporate PAN networking as part of your network’s infrastructure, you will want to set up a NAP. The initial part of NAP configuration is exactly the same as for the aforementioned GN configuration, except
it specifies --role NAP to the pand command line rather than --role GN.
The remaining configuration required is to set up the routing in your network to ensure that the client machines and the rest of your LAN know how
to reach each other. To illustrate, consider a network where the LAN uses the
10.x.x.x subnet and your NAP machine has the IP 10.0.3.2. The Bluetooth
access point you just set up uses the 192.168.7.x subnet with 192.168.7.1 as
your NAP machine. On your client machines, you must run:
# route add -net 10.0.0.0 netmask 255.0.0.0 gw 192.168.7.1
On the LAN router, you must run the following command, or insert an
equivalent configuration in the case of a non-Linux router:
# route add -net 192.168.7.0 netmask 255.255.255.0 gw 10.0.3.2
As with the configuration for dund, you must also ensure your NAP machine
has IP forwarding enabled.
Finally, for further information, you should consult the “PAN HOWTO”
document, available from the documentation area of the BlueZ web site
(http://www.bluez.org/documentation.html). This document serves as the
source for much of the information in this section.
210
|
Chapter 7: Bluetooth
Experimental Features
The uses of Bluetooth covered so far in this chapter are the widespread
applications of the BlueZ stack. In this section, we cover the more experimental uses: printing over Bluetooth, connecting Bluetooth mice and keyboards, and using audio with Bluetooth headsets. If you’re not afraid of
some system configuration, happy with compiling programs from source,
and understand how to use CVS, this section is for you.
Printing over Bluetooth
The Common Unix Printing System (CUPS) is a popular solution for managing printers on Linux systems. If you run CUPS, you can add a Bluetooth
printer to your system. Assuming you don’t already have a Bluetoothenabled printer, you can buy Bluetooth-to-Centronics dongles that plug into
the back of your printer. These devices are produced by several manufacturers, which include AnyCom, Axis, HP, and TDK.
To configure CUPS to use a Bluetooth printer, you must first download and
install Marcel Holtmann’s software from http://www.holtmann.org/linux/
bluetooth/cups.html. Once you have compiled and installed the software as
per Marcel’s instructions, you can configure the CUPS backend.
Edit the file /etc/bluetooth/printers.conf and add an entry similar to the
following:
default {
# Bluetooth address of the device
device 00:40:8C:5E:5D:A4;
# Bluetooth printing protocol
protocol serial;
# Description of the connection
comment "My Bluetooth printer";
}
Restart your CUPS system, and you should then see the printer ready for
administration. The Bluetooth backend performs an SDP inquiry on the target printer to discover the RFCOMM channel on which to send data.
Connecting input devices
Vendors such as Apple and Microsoft both produce Bluetooth-connected
mice and keyboards. There is experimental support available from the BlueZ
project for these devices, and they will be supported more fully in the 2.0
release of the BlueZ tools.
Basic Configuration and Operation |
211
Input device support entails enabling the user-level driver support in the
Input device drivers section of your Linux kernel. As its name suggests, this
allows regular programs to inject events into the system’s input device channels. Secondly, you must compile and configure the development version of
BlueZ:
# cvs -d :pserver:[email protected] login
# cvs -z3 -d :pserver:[email protected] \
co libs2 utils2
# cd libs2
# ./bootstrap
# ./configure --prefix=/opt/bluez2
# make && make install
# cd ../utils2
# ./bootstrap
# ./configure --prefix=/opt/bluez2 --with-bluetooth=/opt/bluez2
# make && make install
# echo /opt/bluez2/lib >> /etc/ld.so.conf
# ldconfig
Put BlueZ into /opt/bluez2 to avoid conflict with earlier,
production-quality versions of the BlueZ tools. We suggest
that you don’t put /opt/bluez2/bin in your path, but invoke
the 2.0 tools with their full path. When BlueZ 2.0 is
released, however, feel free to use them with wild abandon.
Next, you must verify that the user-level input module is working. Check
that the device /dev/misc/uinput exists. If not, create it with mknod /dev/misc/
uinput c 10 223. Load the module with modprobe uinput.
If you use your mouse with the XFree86 windowing system, ensure that it
has a suitable entry. If you already use a USB mouse, you should have this
already. Here is a configuration appropriate for the Microsoft Bluetooth
mouse, supporting its scroll wheel:
Section "InputDevice"
Identifier "MSMouse"
Driver "mouse"
Option "Protocol" "IMPS/2"
Option "Device" "/dev/input/mice"
Option "ZAxisMapping" "4 5"
Option "Buttons" "5"
Option "Emulate3Buttons" "false"
EndSection
Additionally, ensure that InputDevice "MSMouse" "SendCoreEvents" is added
to the ServerLayout section of your XFree86 configuration.
212
|
Chapter 7: Bluetooth
Adding Bluetooth input devices to your system is now a matter of invoking
the /opt/bluez2/bthid program. This runs once as a daemon, and then you
should invoke it again, each time to add a device:
# /opt/bluez2/bin/bthid -d
# /opt/bluez2/bin/bthid -c 11:22:33:44:55:66
Note that the input devices need to be paired before they will connect. With
mice, the manufacturer presets the PIN, usually to 0000. With keyboards,
you enter a PIN and press return on the Bluetooth keyboard. As ever, keep
an eye on the system log to help diagnose failures.
Connecting to Bluetooth ISDN modems
Marcel Holtmann has written the necessary tools to interface with Bluetoothenabled ISDN modems. The relevant software and instructions can be found
on his web site at http://www.holtmann.org/linux/bluetooth/cmtp.html.
Graphical Applications
Linux has several popular graphical user interface systems, the most wellknown being KDE and GNOME. These projects both have tools that provide an easy-to-use interface to your system’s Bluetooth devices. At the time
of writing, neither project is an official part of the KDE or GNOME desktop, but both will be integrated in future. This section presents a brief survey of the tools available and where to get them.
KDE
The KDE Bluetooth Framework’s home page is at http://kde-bluetooth.
sourceforge.net/. Its features include:
• A control center plug-in to configure Bluetooth devices
• An OBEX server application
• An OBEX sending client
• Graphical exploration of remote devices
• Cell phone handsfree implementation using your computer’s microphone and speakers
• Proximity-based screen locking
The KDE Bluetooth Framework can be downloaded from the project’s web
page. Figure 7-8 and Figure 7-9 show KDE’s Bluetooth applications in
action.
Graphical Applications
|
213
Figure 7-8. Browsing a device’s services in KDE
Figure 7-9. Receiving a file via OBEX in KDE
214
|
Chapter 7: Bluetooth
GNOME
The GNOME Bluetooth subsystem’s home page is available at http://
usefulinc.com/software/gnome-bluetooth. Download it from the project’s
home page. RPM and Debian packages are also available. Features of the
GNOME Bluetooth subsystem include:
• An OBEX server application
• An OBEX sending client
• A phone manager application allowing sending and receiving of SMS
messages
• Graphical exploration of remote devices
• Programming libraries for creating Bluetooth-aware applications in C,
Python, or C#
Figure 7-10 and Figure 7-11 show GNOME’s Bluetooth features in action.
Figure 7-10. Exploring nearby Bluetooth devices in GNOME
Synchronization
If your PDA uses Bluetooth and you use Ximian Evolution as your calendar
and contacts management tool, you can synchronize the two over Bluetooth using the Multisync application. Multisync is available in most Linux
distributions, and you can download it from its home page at http://
multisync.sourceforge.net.
Graphical Applications
|
215
Figure 7-11. Sending a file via OBEX in GNOME
Cool Bluetooth Tricks
Aside from the everyday file management and connectivity, Bluetooth on
Linux provides scope for some fun applications. This section outlines a few
of them, mostly involving interfacing a cell phone with your computer.
Use a Bluetooth Cell Phone to Control Presentations
Wireless devices that control presentations have been available for some
time, but at a relatively hefty price tag, they’re probably not worth the
investment for the occasional presenter. Instead, why not program your cell
phone to do the work?
This trick works with Ericsson phones, such as the T610, T68i, and R520m.
These phones provide an advanced ability to map keypad presses to output
over an RFCOMM serial connection. In turn, a program running on the
Linux side can translate these codes into system input events.
216
|
Chapter 7: Bluetooth
You can find the code at http://www.hackdiary.com/projects/bluetoothremote.
Controlling Music Players
Using a similar trick as mentioned previously, the popular MP3-playing
application XMMS can be controlled from a suitable Ericsson phone. The
bluexmms program even supports display of the MP3 playlist on the phone’s
screen. You can find instructions and a download at http://linuxbrit.co.uk/
bluexmms.
Proximity-Sensitive Screen Blanking
The BlueZ Bluetooth stack reports the signal strength of an active Bluetooth
connection. The KDE Bluetooth Framework has a program that takes
advantage of this and activates your screensaver when you take your cell
phone out of range.
If you don’t run the KDE desktop, then try Jon Allen’s Perl script to do a
similar task, available from http://perl.jonallen.info/bin/view/Main/
BluetoothProximityDetection.
Cool Bluetooth Tricks |
217