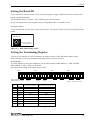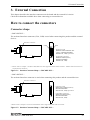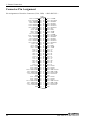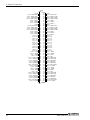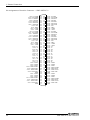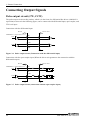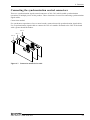
1
PC-HELPER High-Speed Motion Control Board for PCI (4 axes) SMC-4DF-PCI (8 axes) SMC-8DF-PCI User’s Guide CONTEC CO.,LTD. Check Your Package Thank you for purchasing the CONTEC product. The product consists of the items listed below. Check, with the following list, that your package is complete. If you discover damaged or missing items, contact your retailer. Product Configuration List - Board (One of the following) [SMC-4DF-PCI or SMC-8DF-PCI] …1 - First step guide …1 - CD-ROM *1 [API-PAC(W32)] …1 - Synchronization control cable (10cm) …1 *1 The CD-ROM contains the driver software and User’s Guide (this guide) Board First step guide SMC-4DF-PCI, SMC-8DF-PCI CD-ROM [API-PAC(W32)] Synchronization control cable i Copyright Copyright 2007 CONTEC CO., LTD. ALL RIGHTS RESERVED. No part of this document may be copied or reproduced in any form by any means without prior written consent of CONTEC CO., LTD. CONTEC CO., LTD. makes no commitment to update or keep current the information contained in this document. The information in this document is subject to change without notice. All relevant issues have been considered in the preparation of this document. Should you notice an omission or any questionable item in this document, please feel free to notify CONTEC CO., LTD. Regardless of the foregoing statement, CONTEC assumes no responsibility for any errors that may appear in this document or for results obtained by the user as a result of using this product. Trademarks MS, Microsoft and Windows are trademarks of Microsoft Corporation. Other brand and product names are trademarks of their respective holder. ii SMC-4DF-PCI, SMC-8DF-PCI Table of Contents Check Your Package............................................................................................................................ i Copyright ............................................................................................................................................ ii Trademarks ......................................................................................................................................... ii Table of Contents............................................................................................................................... iii 1. BEFORE USING THE PRODUCT 1 About the Board.................................................................................................................................. 1 Features ........................................................................................................................................ 1 About Migration From The Existing Products............................................................................ 2 Support Software ......................................................................................................................... 3 Cable & Connector (Option) ...................................................................................................... 3 Accessories (Option) .................................................................................................................. 3 Customer Support ............................................................................................................................... 4 Web Site....................................................................................................................................... 4 Limited Three-Years Warranty .......................................................................................................... 4 How to Obtain Service ....................................................................................................................... 4 Liability............................................................................................................................................... 4 Safety Precautions .............................................................................................................................. 5 Safety Information ....................................................................................................................... 5 Handling Precautions................................................................................................................... 6 Environment................................................................................................................................. 7 Inspection..................................................................................................................................... 7 Storage ......................................................................................................................................... 7 Disposal ....................................................................................................................................... 7 2. SETUP 9 What is Setup? .................................................................................................................................... 9 Using the Board under Windows Using the Driver library API-PAC(W32).............................. 9 Using the Board under Window Using Software Other than the Driver library API-PAC(W32)............................................................................................................................ 9 Using the Board under an OS Other than Windows ................................................................. 10 Step 1 Installing the Software .......................................................................................................... 11 Which Driver to Use .................................................................................................................. 11 Starting the Install Program....................................................................................................... 11 Selecting API-SMC(WDM) ...................................................................................................... 12 Executing the Installation .......................................................................................................... 12 SMC-4DF-PCI, SMC-8DF-PCI iii Step 2 Setting the Hardware ............................................................................................................. 13 Parts of this product and Factory Defaults ................................................................................ 13 Setting the Board ID .................................................................................................................. 15 Setting the Terminating Registor............................................................................................... 15 Plugging the Board .................................................................................................................... 16 Step 3 Installing the Hardware ......................................................................................................... 17 Turning on the PC...................................................................................................................... 17 When Using API-SMC(WDM) ................................................................................................. 17 Step 4 Initializing the Software ........................................................................................................ 19 Step 5 Checking Operations with the Diagnosis Program ............................................................... 21 What is the Diagnosis Program?................................................................................................ 21 Check method ............................................................................................................................ 21 Using the Diagnosis Program .................................................................................................... 23 Setup Troubleshooting...................................................................................................................... 26 Symptoms and Actions .............................................................................................................. 26 If your problem cannot be resolved ........................................................................................... 26 3. EXTERNAL CONNECTION 27 How to connect the connectors......................................................................................................... 27 Connector shape......................................................................................................................... 27 Connector Pin Assignment ........................................................................................................ 28 Connecting Output Signals ............................................................................................................... 34 Pulse output circuit (CW, CCW) ............................................................................................... 34 Control signal/general-purpose signal output circuit (OUT1 - OUT3, ERC, CP1, CP2)......... 36 Connecting Input Signals.................................................................................................................. 37 Encoder input circuit.................................................................................................................. 37 Limit input/general-purpose input/control input circuit (IN1 - IN7, +LIM, -LIM, ORG) ....... 40 Connection Examples ....................................................................................................................... 41 Surge Voltage Countermeasures....................................................................................................... 42 4. FUNCTIONS 43 About each motor control operation................................................................................................. 43 PTP operation function .............................................................................................................. 43 JOG operation function.............................................................................................................. 43 ORG operation function............................................................................................................. 43 Linear interpolation ................................................................................................................... 43 Circular interpolation................................................................................................................. 43 S-curve acceleration/deceleration function ............................................................................... 43 Frame (bank) sequence operation function ............................................................................... 44 Synchronous control function.................................................................................................... 45 iv SMC-4DF-PCI, SMC-8DF-PCI Meanings of signals .......................................................................................................................... 46 Limit input signals ..................................................................................................................... 46 Encoder input signal .................................................................................................................. 47 Pulse output signal..................................................................................................................... 48 General-purpose input signals ................................................................................................... 49 General-purpose output signals ................................................................................................. 50 P.COM (Plus common).............................................................................................................. 50 GND (Ground) ........................................................................................................................... 50 Connecting the synchronization control connectors ................................................................. 51 Motion control system ...................................................................................................................... 53 System configuration ................................................................................................................. 53 5. ABOUT SOFTWARE 55 CD-ROM Directory Structure .......................................................................................................... 55 About Software for Windows........................................................................................................... 56 Accessing the Help File ............................................................................................................. 56 Uninstalling the Driver library .................................................................................................. 57 6. ABOUT HARDWARE 59 For detailed technical information ................................................................................................... 59 Hardware specification ..................................................................................................................... 59 Block Diagram.................................................................................................................................. 63 SMC-4DF-PCI, SMC-8DF-PCI v vi SMC-4DF-PCI, SMC-8DF-PCI 1. Before Using the Product 1. Before Using the Product This chapter provides information you should know before using the product. About the Board This product is a PCI board that supports stepping motors and (“pulse string input” types of) servomotors. SMC-4DF-PCI can perform motor control for up to 4 axes. SMC-8DF-PCI can perform motor control for up to 8 axes. Multi-axis independent control and linear/circular interpolation control are performed via a motor driver unit. It can store positioning information for up to 1024 frames per axis and control multiple axes simultaneously. In addition, it can override speed/target positions during operation. Windows driver is bundled with this product. These various functions make it possible to build complex positioning control systems for variety of uses such as manufacturing devices and test devices. Features - Capable of multi-axis independent control and pulse output up to 6.5Mpps SMC-4DF-PCI : Control for up to 4 axes and motor control pulse output up to 6.5Mpps are available. SMC-8DF-PCI : Control for up to 8 axes and motor control pulse output up to 6.5Mpps are available. Command pulse for motor control supports common pulse, independent pulse and 90°C phase difference pulse. Limit input 3channels/axis, general-purpose input 7channels/axis, and general-purpose output 3channels/axis are equipped. Also, depending on the software setting, 6 general-purpose inputs can be used as alarm inputs, and general-purpose outputs as deviation counter clear outputs. - Capable of various control operations such as positioning, linear/circular interpolation, frame continuous operations, synchronization control, and so on Various control operations such as positioning, origin returning, linear/circular interpolation, S-curve acceleration/deceleration, frame continuous motion, synchronization control, and so on are available. Changing speed/target position during operation is available. " PCL6045 series" from Nippon Pulse Motor CO., LTD. is used as the motor control IC. - Provided with various input/output formats enabling connection to an encoder input circuit as well as pulse output circuit. Encoder input circuits can be connected with differential output, TTL level output, and open-collector output. Pulse output circuits can be connected with differential input, opto-coupler and TTL level input. - Capable of storing positioning information up to 1024 frames for each axis and control without extra CPU load The parameters which are necessary for motor operations such as travel distance, travel speed, acceleration/deceleration rate, and so on as 1 frame can be stored up to 1024 frames for each axis. In addition, the control from the ending of 1 frame to the beginning of the next frame is mainly performed by hardware, complex continuous positioning can operate at a high speed. It is possible to repeatedly execute the frame after executing a frame once (loop operation). SMC-4DF-PCI, SMC-8DF-PCI 1 1. Before Using the Product - With the multi-axis synchronization control function, capable of aligning the timing for operation start and end Synchronization control of multi-axis simultaneous start/stop control, linear interpolation operation (constant speed operation only) is available. Synchronization control of up to 16 boards is possible, when dedicated synchronization control cables are connected. - Windows compatible driver libraries is attached. Using the attached driver library API-PAC(W32) makes it possible to create applications of Windows. In addition, a diagnostic program by which the operations of hardware can be checked is provided. - Connector shape and pin assignments are compatible with SMC-4DL-PCI, SMC-8DL-PCI Since this product is compatible with SMC-4DL-PCI and SMC-8DL-PCI in the connector shape and signal allocation, it can be replaced with them. - Provided with a terminal strip CCB-SMC2 (option) to which driver units up to 4 pieces can be connected A dedicated terminal strip CCB-SMC2 (option) which assigns signals for each axis is provided. Driver units and limit sensors for stepping motors and servo motors can be connected up to 4 pieces. About Migration From The Existing Products This product cannot use [API-SMC(98/PC)] (CD-ROM attached) which is the driver software for the existing products SMC-2P(PCI), SMC-4P(PCI), and SMC-3(PC). [API-SMC(98/PC)] (bundled CD-ROM) cannot be used. Please use [API-SMC(WDM)] (bundled CD-ROM) which is the driver software for this product. As a reference material when migrating from the existing products to this product, “Migration guide” which summarizes migration methods and differences about initial settings and API function units is provided. Please use the guide for your reference. ”Migration guide” can be downloaded from the download library of CONTEC’s Web site (http://www.contec.com/download) 2 SMC-4DF-PCI, SMC-8DF-PCI 1. Before Using the Product Support Software You should use CONTEC support software according to your purpose and development environment. Windows version of motion control driver API-SMC(WDM) [Stored on the bundled CD-ROM driver library API-PAC(W32)] The API-SMC(WDM) is the Windows version driver library software that provides products in the form of Win32 API functions (DLL). Various sample programms such as Visual Basic and Visual C++, etc and diagnostic program useful for checking operation is provided. < Operating environment > OS Windows XP, Server 2003, 2000 Adaptation language Visual Basic, Visual C++, Visual C# You can download the updated version from the CONTEC’s Web site (http://www.contec.com/apipac/). For more details on the supported OS, applicable language and new information, please visit the CONTEC’s Web site. Cable & Connector (Option) Shielded Cable With Two 100pin Connector : : : : PCB100PS-0.5 (0.5m) PCB100PS-1.5 (1.5m) PCB100PS-3 (3m) PCB100PS-5 (5m) Flat Cable with One 100-Pin Connector : PCA100P-1.5 (1.5m) : PCA100P-3 (3m) : PCA100P-5 (5m) Accessories (Option) Connection Conversion Board for SMC Screw Terminal (M3*100) : CCB-SMC2 *1*2*3 : EPD-100A *2*3 *1 Distributes 100-pin 0.8-mm pitch connector x 1 to: D-SUB 37 connector x 4, D-SUB-9 connector x 4. *2 A PCB100PS optional cable is required separately. *3 Cables and accessories are required each connector. * Check the CONTEC’s Web site for more information on these options. SMC-4DF-PCI, SMC-8DF-PCI 3 1. Before Using the Product Customer Support CONTEC provides the following support services for you to use CONTEC products more efficiently and comfortably. Web Site Japanese English Chinese http://www.contec.co.jp/ http://www.contec.com/ http://www.contec.com.cn/ Latest product information CONTEC provides up-to-date information on products. CONTEC also provides product manuals and various technical documents in the PDF. Free download You can download updated driver software and differential files as well as sample programs available in several languages. Note! For product information Contact your retailer if you have any technical question about a CONTEC product or need its price, delivery time, or estimate information. Limited Three-Years Warranty CONTEC products are warranted by CONTEC CO., LTD. to be free from defects in material and workmanship for up to three years from the date of purchase by the original purchaser. Repair will be free of charge only when this device is returned freight prepaid with a copy of the original invoice and a Return Merchandise Authorization to the distributor or the CONTEC group office, from which it was purchased. This warranty is not applicable for scratches or normal wear, but only for the electronic circuitry and original products. The warranty is not applicable if the device has been tampered with or damaged through abuse, mistreatment, neglect, or unreasonable use, or if the original invoice is not included, in which case repairs will be considered beyond the warranty policy. How to Obtain Service For replacement or repair, return the device freight prepaid, with a copy of the original invoice. Please obtain a Return Merchandise Authorization number (RMA) from the CONTEC group office where you purchased before returning any product. * No product will be accepted by CONTEC group without the RMA number. Liability The obligation of the warrantor is solely to repair or replace the product. In no event will the warrantor be liable for any incidental or consequential damages due to such defect or consequences that arise from inexperienced usage, misuse, or malfunction of this device. 4 SMC-4DF-PCI, SMC-8DF-PCI 1. Before Using the Product Safety Precautions Understand the following definitions and precautions to use the product safely. Safety Information This document provides safety information using the following symbols to prevent accidents resulting in injury or death and the destruction of equipment and resources. Understand the meanings of these labels to operate the equipment safely. DANGER DANGER indicates an imminently hazardous situation which, if not avoided, will result in death or serious injury. WARNING WARNING indicates a potentially hazardous situation which, if not avoided, could result in death or serious injury. CAUTION CAUTION indicates a potentially hazardous situation which, if not avoided, may result in minor or moderate injury or in property damage. SMC-4DF-PCI, SMC-8DF-PCI 5 1. Before Using the Product Handling Precautions DANGER Do not use the product where it is exposed to flammable or corrosive gas. Doing so may result in an explosion, fire, electric shock, or failure. CAUTION - There are switches and jumpers on this product that need to be set in advance. Be sure to check these before installing this product. - Only set the switches and jumpers on this product to the specified settings. Otherwise, this product may malfunction, overheat, or cause a failure. - Do not strike or bend this product. Otherwise, this product may malfunction, overheat, cause a failure or breakage. - Do not touch this product’s metal plated terminals (edge connector) with your hands. Otherwise, this product may malfunction, overheat, or cause a failure. If the terminals are touched by someone's hands, clean the terminals with industrial alcohol. - Do not install or remove this product to or from the extension slot while the computer's power is turned on. And also do not connect this product and external device while the power is turned on. Otherwise, this product may malfunction, overheat, or cause a failure. Be sure that the personal computer or the I/O extension unit power is turned off. - Do not connect or remove a cable with or from this product while the computer's power is turned on. And also do not connect this product and external device while the power is turned on. Otherwise, this product may malfunction, overheat, or cause a failure. Be sure that the personal computer or the I/O extension unit power is turned off. - When you use this product in a noisy environment or are nervous about noise, attach ferrite cores to the connection cable - Make sure that your PC or expansion unit can supply ample power to all the products installed. Insufficiently energized products could malfunction, overheat, or cause a failure. - The specifications of this product are subject to change without notice for enhancement and quality improvement. Even when using this product continuously, be sure to read the manual and understand the contents. - Do not modify this product. CONTEC will bear no responsibility for any problems, etc., resulting from modifying this product. - Regardless of the foregoing statements, CONTEC is not liable for any damages whatsoever (including damages for loss of business profits) arising out of the use or inability to use this CONTEC product or the information contained herein. 6 SMC-4DF-PCI, SMC-8DF-PCI 1. Before Using the Product Environment Use this product in the following environment. If used in an unauthorized environment, the board may overheat, malfunction, or cause a failure. Operating temperature 0 - 50ºC Humidity 10 - 90%RH (No condensation) Corrosive gases None Floating dust particles Not to be excessive Inspection Inspect the product periodically as follows to use it safely. - Check that the bus connector of the board and its cable have been plugged correctly. - Check that the board has no dust or foreign matter adhering. - The gold-plated leads of the bus connector have no stain or corrosion. Storage When storing this product, keep it in its original packing form. (1) Put this product in the storage bag. (2) Wrap it in the packing material, then put it in the box. (3) Store the package at room temperature at a place free from direct sunlight, moisture, shock, vibration, magnetism, and static electricity. Disposal When disposing of the product, follow the disposal procedures stipulated under the relevant laws and municipal ordinances. SMC-4DF-PCI, SMC-8DF-PCI 7 1. Before Using the Product 8 SMC-4DF-PCI, SMC-8DF-PCI 2. Setup 2. Setup This chapter explains how to set up this product. What is Setup? Setup means a series of steps to take before the product can be used. Different steps are required for software and hardware. The setup procedure varies with the OS and applications used. Using the Board under Windows Using the Driver library API-PAC(W32) This section describes the setup procedure to be performed before you can start developing application programs for the board using the bundled CD-ROM “Driver library API-PAC(W32)”. Taking the following steps sets up the software and hardware. You can use the diagnosis program later to check whether the software and hardware function normally. Step 1 Installing the Software Step 2 Setting the Hardware Step 3 Installing the Hardware Step 4 Initializing the Software Step 5 Checking Operations with the Diagnosis Program If Setup fails to be performed normally, see the “Setup Troubleshooting” section at the end of this chapter. Using the Board under Window Using Software Other than the Driver library API-PAC(W32) For setting up software other than API-PAC(W32), refer to the manual for that software. See also the following parts of this manual as required. This chapter Step 2 Setting the Hardware This chapter Step 3 Installing the Hardware Chapter 3 External Connection Chapter 6 About Hardware SMC-4DF-PCI, SMC-8DF-PCI 9 2. Setup Using the Board under an OS Other than Windows For using the board under an OS other than Windows, see the following parts of this manual. This chapter Step 2 Setting the Hardware Chapter 3 External Connection Chapter 6 About Hardware 10 SMC-4DF-PCI, SMC-8DF-PCI 2. Setup Step 1 Installing the Software This section describes how to install the API function libraries. Before installing the hardware on your PC, install the API driver libraries from the bundled API-PAC(W32) CD-ROM. The following description assumes the operating system as Windows XP. Although some user interfaces are different depending on the OS used, the basic procedure is the same. Which Driver to Use This product supports the advanced motion control driver API-SMC(WDM) only. The motion control driver API-SMC(98/PC) cannot be used. Starting the Install Program (1) Load the CD-ROM [API-PAC(W32)] on your PC. (2) The API-PAC(W32) Installer window appears automatically. If the panel does not appear, run (CD-ROM drive letter):\AUTORUN.exe. (3) Click on the [Install Development or Execution Environment] button. CAUTION Before installing the software in Windows XP, Server 2003, 2000, log in as a user with administrator privileges. SMC-4DF-PCI, SMC-8DF-PCI 11 2. Setup Selecting API-SMC(WDM) (1) The following dialog box appears to select “Driver Type” and “Install Type”. (2) Select the "High Functionality WDM Motor Control driver". (3) Click on the [Install] button. * Clicking the [API-SMC] button displays detailed information about API-SMC(WDM) and API-SMC(98/PC). Executing the Installation (1) Follow the on-screen instructions to proceed to install. (2) After finishing installing, Readme file is displayed. You have now finished installing the software. 12 SMC-4DF-PCI, SMC-8DF-PCI 2. Setup Step 2 Setting the Hardware This section describes how to set this product and plug it on your PC. This product has some switches and jumper to be preset. Check the on-product switches and jumpers before plugging this product into an expansion slot. This product can be set up even with the factory defaults untouched. You can change this product settings later. Parts of this product and Factory Defaults Figure 2.1. - 2.2. shows the names of major parts on this product. Note that the switch setting shown below is the factory default. - Synchronization signal connector (CN2, CN3) - Terminator setting SW (SW2 - SW5) 1 2 3 4 5 6 7 8 SW1 BOARD ID SW4 SW5 - Board ID setting switch - Interface connector (CNA, CNB) CNB CNA 456 SW1 BOARD ID 789 23 1 2 3 4 5 6 7 8 1 2 3 4 5 6 7 8 SW3 1 2 3 4 5 6 7 8 ON SW3 ON SW4 ON CN3 BCDE SW5 CN2 A ON SW2 CN3 F01 SW2 CN2 Figure 2.1. Component Locations < SMC-8DF-PCI > SMC-4DF-PCI, SMC-8DF-PCI 13 2. Setup - Synchronization signal connector (CN2, CN3) 1 2 3 4 5 6 7 8 1 2 3 4 5 6 7 8 ON SW3 ON SW2 - Terminator setting SW (SW2 - SW3) CN2 CN2 CN1 CN3 CN3 SW1 BOARD ID SW2 SW3 - Interface connector - Board ID setting switch 23 78 9 CD AB E 456 SW1 BOARD ID F0 1 Figure 2.2. Component Locations < SMC-4DF-PCI > 14 SMC-4DF-PCI, SMC-8DF-PCI 2. Setup Setting the Board ID If you install two or more boards on one personal computer, assign a different ID value to each of the boards to distinguish them. The board IDs can be set from 0 - Fh to identify up to sixteen boards. If only one board is used, the original factory setting (Board ID = 0) should be used. Setting Procedure To set the board ID, use the rotary switch on the board. Turn the SW1 knob to set the board ID as shown below. 789 CD E 23 AB 456 SW1 BOARD ID Factory setting: (Board ID = 0) F01 Figure 2.3. Board ID Settings (SW1) Setting the Terminating Registor You can select whether to insert a terminator (terminal resistor) in the differential input section. Select whether to insert the terminator depending on the system to be used. Setup Method To select whether to insert the terminator, use the DIP switches (SMC-4DF-PCI : SW2 and SW3, SMC-8DF-PCI : SW2 - SW5) on the board. Set each SW according to the figure shown below. SW2 ON SW3 ON 1 2 3 4 5 6 7 8 SMC-8DF-PCI : Axis6 SMC-4DF-PCI : Axis0 SW4 ON 1 2 3 4 5 6 7 8 Axis7 Axis1 Axis4 Axis2 Axis5 Axis3 SW5 ON 1 2 3 4 5 6 7 8 Axis2 Bit Input signal Insert the terminal Not insert the terminal 1 Phaze-A ON OFF 2 Phaze-B ON OFF 3 Phaze-Z ON OFF 4 N.C. ---- ---- 5 Phaze-A ON OFF 6 Phaze-B ON OFF 7 Phaze-Z ON OFF 8 N.C. ---- ---- Axis3 1 2 3 4 5 6 7 8 Axis0 Axis1 Factory setting : All is ON Figure 2.4. Terminator Setup SW and Settings SMC-4DF-PCI, SMC-8DF-PCI 15 2. Setup Plugging the Board (1) Before plugging the board, shut down the system, unplug the power code of your PC. (2) Remove the cover from the PC so that the board can be mounted. (3) Plug the board into an expansion slot. (4) Put the cover back into place. Applicable PCI bus slots PCI bus slots used in PCs have keys to prevent 5V and 3.3V PCI bus boards from being accidentally plugged into wrong bus slots. This board can be plugged into both of the 5V and 3.3V PCI bus slots. <PCI bus slot> <PCI bus board> 5-V PCI bus slot 3.3-V PCI bus slot 5V key 3.3V key B A : Slit for 5-V PCI bus slot B : Slit for 3.3-V PCI bus slot A CAUTION - Do not touch the board's metal plated terminals (edge connector) with your hands. Otherwise, the board may malfunction, overheat, or cause a failure. If the terminals are touched by someone's hands, clean the terminals with industrial alcohol. - Do not install or remove the board to or from the slot while the computer's power is turned on. Otherwise, the board may malfunction, overheat, or cause a failure. Doing so could cause trouble. Be sure that the personal computer or the I/O expansion unit power is turned off. - Make sure that your PC or expansion unit can supply ample power to all the boards installed. Insufficiently energized boards could malfunction, overheat, or cause a failure. - Power supply from the PCI bus slot at +5V is required. 16 SMC-4DF-PCI, SMC-8DF-PCI 2. Setup Step 3 Installing the Hardware For using an expansion board under Windows, you have to let the OS detect the I/O addresses and IRQ to be used by the board. The process is referred to as installing the hardware. In the case of using two or more boards, make sure you install one by one with the Found New Hardware Wizard. Turning on the PC Turn on the power to your PC. CAUTION - The board cannot be properly installed unless the resources (I/O addresses and interrupt level) for the board can be allocated. Before attempting to install the board, first determine what PC resources are free to use. - The resources used by each board do not depend on the location of the slot or the board itself. If you remove two or more boards that have already been installed and then remount one of them on the computer, it is unknown that which one of the sets of resources previously assigned to the two boards is assigned to the remounted board. In this case, you must check the resource settings. When Using API-SMC(WDM) (1) The “Found New Hardware Wizard” will be started. Select “Install from a list or specific location[Advanced]”, then click on the [Next] button. SMC-4DF-PCI, SMC-8DF-PCI 17 2. Setup (2) Specify that folder on the CD-ROM which contains the setup information (INF) file to register the board. * The name of the board you have just added is displayed. - SMC-4DF-PCI - SMC-8DF-PCI Source folder The setup information (INF) file is contained in the following folder on the bundled CD-ROM. \INF\WDM\SMC \INF\WDM\SMC You have now finished installing the hardware. 18 SMC-4DF-PCI, SMC-8DF-PCI 2. Setup Step 4 Initializing the Software The API function library requires the initial setting to recognize the execution environment. It is called the initialization of the API function library. Setting the device name (1) Run Device Manager. From [My Computer] - [Control Panel], select [System] and then select the [Device Manager] tab. (You can also open Device Manager by right clicking on My Computer and selecting Properties.) * The name of the board you have just added is displayed. - SMC-4DF-PCI - SMC-8DF-PCI (2) The installed hardware appears under the CONTEC Devices node. Open the CONTEC Devices node and select the device you want to setup (the device name should appear highlighted). Click [Properties]. SMC-4DF-PCI, SMC-8DF-PCI 19 2. Setup (3) The property page for the device opens. Enter the device name in the common settings tab page and then click [OK]. The device name you set here is used later when programming. * The name of the board you have just added is displayed. - SMC-4DF-PCI - SMC-8DF-PCI * The initial device name that appears is a default value. You can use this default name if you wish. * Make sure that you do not use the same name for more than one device. You have now finished installing the initial setting of Software. 20 SMC-4DF-PCI, SMC-8DF-PCI 2. Setup Step 5 Checking Operations with the Diagnosis Program Use the diagnosis program to check that the board and driver software work normally, thereby you can confirm that they have been set up correctly. What is the Diagnosis Program? The diagnosis program diagnoses the states of the board and driver software. For Quick Check, the program checks the board resources for validity. The resources include the I/O addresses, interrupt level (IRQ), board ID, and sync signal. For Detail Check, the program checks the connections of the motor control board, driver unit, and limit sensor for validity. The program inputs/outputs signals in interactive mode to check for validity. Check items are Limit Signals Input, Control Signals Input/Output and Pulse Signals Output. Check method Perform the input/output test and check the execution environment with the driver unit connected. The dedicated screw terminal CCB-SMC2 will come in handy when you check the board. The board should be checked with the factory defaults. For direct connection to the board, see Chapter 3 “External Connection”. Connection diagram The following connection diagrams show connections using the dedicated screw terminal CCB-SMC2. <Pulse output> CCB-SMC2 Driver Unit CW+ CW+ CW- CW- CCW+ CCW+ CCW- CCW- CW CCW Figure 2.5. Connection diagram < 1 / 2 > SMC-4DF-PCI, SMC-8DF-PCI 21 2. Setup <Limit input> CCB-SMC2 ORG ORG ORG GND +LIM +LIM +LIM GND -LIM -LIM -LIM GND +12V - +24VDC + - + - Figure 2.5. Connection diagram < 2 / 2 > 22 SMC-4DF-PCI, SMC-8DF-PCI 2. Setup Using the Diagnosis Program Starting the Diagnosis Program Click the [Diagnosis] button on the device property page to start the diagnosis program. * The name of the board you have just added is displayed. - SMC-4DF-PCI - SMC-8DF-PCI Checking for motor control (1) Select the name of the axis you want to diagnose, then click on the [Execute Initial Setup Utility] button to execute Quick Check. SMC-4DF-PCI, SMC-8DF-PCI 23 2. Setup To execute Detail Check, click on the [Next] button. Otherwise, click on the [Back] or [Cancel] button. (2) Check/mask each signal. When the alarm (ALM/ES) is ON or each limit (+LIM, -LIM) is ON, the motor does not operate in that direction. In this case, check the connection of the signal or mask it. 24 SMC-4DF-PCI, SMC-8DF-PCI 2. Setup (3) Simple operation is performed. SMC-4DF-PCI, SMC-8DF-PCI 25 2. Setup Setup Troubleshooting Symptoms and Actions Data input or output does not operate correctly - Run the diagnosis program to check that the device is registered and whether any initialization errors have occurred. - Is there a problem with the device settings, wiring, or similar? Check the I/O setting of motor driver unit and limit sensor for validity. The diagnostic program works correctly but the application program does not. The diagnostic program uses the API-TOOL functions. If the diagnostic program works correctly, other applications should work correctly also. If you have a problem, recheck your program taking note of the following points. - Check the return values of the API functions. - Refer to the source code for the sample programs. The OS does not boot correctly or does not detect the device correctly. Refer to the "Troubleshooting" section of API-SMC(WDM) HELP. If your problem cannot be resolved Contact your retailer. 26 SMC-4DF-PCI, SMC-8DF-PCI 3. External Connection 3. External Connection This chapter describes the interface connectors on the board and the external I/O circuits. Check the information available here when connecting an external device. How to connect the connectors Connector shape < SMC-8DF-PCI > The on-board interface connector (CNA, CNB) is used when connecting this product and the external devices. Interface connector CNB CNA - Connector used HDRA-E100W1LFDT1EC-SL+ [mfd.by HONDA TSUSHIN KOGYO CO., LTD] equivalent - Compatible connector HDRA-E100MA1[mfd.by HONDA TSUSHIN KOGYO CO., LTD] * Please refer to chapter 1 for more information on the supported cable and accessories. Cables and accessories are required each connector. Figure 3.1. Interface Connector Shape < SMC-8DF-PCI > < SMC-4DF-PCI > The on-board interface connector is used when connecting this product and the external devices. Interface connector - Connector used HDRA-EC100LFDT+ [mfd.by HONDA TSUSHIN KOGYO CO., LTD] equivalent - Compatible connector HDRA-E100MA1[mfd.by HONDA TSUSHIN KOGYO CO., LTD] * Please refer to chapter 1 for more information on the supported cable and accessories. Figure 3.2. Interface Connector Shape < SMC-4DF-PCI > SMC-4DF-PCI, SMC-8DF-PCI 27 3. External Connection Connector Pin Assignment Pin Assignments of Interface Connector (CNA, CNB) < SMC-8DF-PCI > CNB axis0 : P-COM axis0 : IN1/ALM axis0 : IN2/INP axis0 : IN3/SD axis0 : IN4/LTC axis0 : IN5/PCS axis0 : IN6/CLR axis0 : IN7 axis0 : ORG axis0 : +LIM axis0 : -LIM axis1 : P-COM axis1 : IN1/ALM axis1 : IN2/INP axis1 : IN3/SD axis1 : IN4/LTC axis1 : IN5/PCS axis1 : IN6/CLR axis1 : IN7 axis1 : ORG axis1 : +LIM axis1 : -LIM axis0 : A+ axis0 : Aaxis0 : B+ axis0 : Baxis0 : Z+ axis0 : Zaxis1 : A+ axis1 : Aaxis1 : B+ axis1 : Baxis1 : Z+ axis1 : Zaxis0 : OUT3 axis0 : OUT2 axis0 : OUT1 axis0 : DIR+/CCW+ axis0 : DIR-/CCWaxis0 : OUT+/CW+ axis0 : OUT-/CWGND axis1 : OUT3 axis1 : OUT2 axis1 : OUT1 axis1 : DIR+/CCW+ axis1 : DIR-/CCWaxis1 : OUT+/CW+ axis1 : OUT-/CWGND 28 100 99 98 97 96 95 94 93 92 91 90 89 88 87 86 85 84 83 82 81 80 79 78 77 76 75 74 73 72 71 70 69 68 67 66 65 64 63 62 61 60 59 58 57 56 55 54 53 52 51 50 49 48 47 46 45 44 43 42 41 40 39 38 37 36 35 34 33 32 31 30 29 28 27 26 25 24 23 22 21 20 19 18 17 16 15 14 13 12 11 10 9 8 7 6 5 4 3 2 1 axis2 axis2 axis2 axis2 axis2 axis2 axis2 axis2 axis2 axis2 axis2 axis3 axis3 axis3 axis3 axis3 axis3 axis3 axis3 axis3 axis3 axis3 axis2 axis2 axis2 axis2 axis2 axis2 axis3 axis3 axis3 axis3 axis3 axis3 axis2 axis2 axis2 axis2 axis2 axis2 axis2 GND axis3 axis3 axis3 axis3 axis3 axis3 axis3 GND : P-COM : IN1/ALM : IN2/INP : IN3/SD : IN4/LTC : IN5/PCS : IN6/CLR : IN7 : ORG : +LIM : -LIM : P-COM : IN1/ALM : IN2/INP : IN3/SD : IN4/LTC : IN5/PCS : IN6/CLR : IN7 : ORG : +LIM : -LIM : A+ : A: B+ : B: Z+ : Z: A+ : A: B+ : B: Z+ : Z: OUT3 : OUT2 : OUT1 : DIR+/CCW+ : DIR-/CCW: OUT+/CW+ : OUT-/CW: : : : : : : OUT3 OUT2 OUT1 DIR+/CCW+ DIR-/CCWOUT+/CW+ OUT-/CW- SMC-4DF-PCI, SMC-8DF-PCI 3. External Connection Plus common B+ IN1/ALM P-COM General-purpose input1/Alarm input B- Encoder phaseB input- IN2/INP General-purpose input2/Positionig input Z+ Encoder phaseZ input+ Z- Encoder phaseZ input- IN3/SD IN4/LTC IN5/PCS IN6/CLR IN7 General-purpose input3/Slow down input General-purpose input4/counter latch input General-purpose input5/positioning operation start input General-purpose input6/Counter clear input General-purpose input7 Encoder phaseB input+ OUT1 General-purpose output1 OUT2 General-purpose output2 OUT3 General-purpose output3 DIR+/CCW+ Direction/CCW output+ ORG Origin input DIR-/CCW- Direction/CCW output- +LIM Positive-direction limit OUT+/CW+ Pulse/CW output+ -LIM Negative-direction limit OUT-/CW- Pulse/CW output- A+ Encoder phaseA input+ A- Encoder phaseA input- GND Power ground input (common to internal GND) Figure 3.3. Pin Assignments of Interface Connector (CNB) < SMC-8DF-PCI > SMC-4DF-PCI, SMC-8DF-PCI 29 3. External Connection CNA GND axis7 : OUT-/CWaxis7 : OUT+/CW+ axis7 : DIR-/CCWaxis7 : DIR+/CCW+ axis7 : OUT1 axis7 : OUT2 axis7 : OUT3 GND axis6 : OUT-/CWaxis6 : OUT+/CW+ axis6 : DIR-/CCWaxis6 : DIR+/CCW+ axis6 : OUT1 axis6 : OUT2 axis6 : OUT3 axis7 : Zaxis7 : Z+ axis7 : Baxis7 : B+ axis7 : Aaxis7 : A+ axis6 : Zaxis6 : Z+ axis6 : Baxis6 : B+ axis6 : Aaxis6 : A+ axis7 : -LIM axis7 : +LIM axis7 : ORG axis7 : IN7 axis7 : IN6/CLR axis7 : IN5/PCS axis7 : IN4/LTC axis7 : IN3/SD axis7 : IN2/INP axis7 : IN1/ALM axis7 : P-COM axis6 : -LIM axis6 : +LIM axis6 : ORG axis6 : IN7 axis6 : IN6/CLR axis6 : IN5/PCS axis6 : IN4/LTC axis6 : IN3/SD axis6 : IN2/INP axis6 : IN1/ALM axis6 : P-COM 30 1 51 2 52 3 53 4 54 5 55 6 56 7 57 8 58 9 59 10 60 11 61 12 62 13 63 14 64 15 65 16 66 17 67 18 68 19 69 20 70 21 71 22 72 23 73 24 74 25 75 26 76 27 77 28 78 29 79 30 80 31 81 32 82 33 83 34 84 35 85 36 86 37 87 38 88 39 89 40 90 41 91 42 92 43 93 44 94 45 95 46 96 47 97 48 98 49 99 50 100 GND axis5 : OUT-/CWaxis5 : OUT+/CW+ axis5 : DIR-/CCWaxis5 : DIR+/CCW+ axis5 : OUT1 axis5 : OUT2 axis5 : OUT3 GND axis4 : OUT-/CWaxis4 : OUT+/CW+ axis4 : DIR-/CCWaxis4 : DIR+/CCW+ axis4 : OUT1 axis4 : OUT2 axis4 : OUT3 axis5 : Zaxis5 : Z+ axis5 : Baxis5 : B+ axis5 : Aaxis5 : A+ axis4 : Zaxis4 : Z+ axis4 : Baxis4 : B+ axis4 : Aaxis4 : A+ axis5 : -LIM axis5 : +LIM axis5 : ORG axis5 : IN7 axis5 : IN6/CLR axis5 : IN5/PCS axis5 : IN4/LTC axis5 : IN3/SD axis5 : IN2/INP axis5 : IN1/ALM axis5 : P-COM axis4 : -LIM axis4 : +LIM axis4 : ORG axis4 : IN7 axis4 : IN6/CLR axis4 : IN5/PCS axis4 : IN4/LTC axis4 : IN3/SD axis4 : IN2/INP axis4 : IN1/ALM axis4 : P-COM SMC-4DF-PCI, SMC-8DF-PCI 3. External Connection Plus common B+ IN1/ALM P-COM General-purpose input1/Alarm input B- Encoder phaseB input- IN2/INP General-purpose input2/Positionig input Z+ Encoder phaseZ input+ Z- Encoder phaseZ input- IN3/SD IN4/LTC IN5/PCS IN6/CLR IN7 General-purpose input3/Slow down input General-purpose input4/counter latch input General-purpose input5/positioning operation start input General-purpose input6/Counter clear input General-purpose input7 Encoder phaseB input+ OUT1 General-purpose output1 OUT2 General-purpose output2 OUT3 General-purpose output3 DIR+/CCW+ Direction/CCW output+ ORG Origin input DIR-/CCW- Direction/CCW output- +LIM Positive-direction limit OUT+/CW+ Pulse/CW output+ -LIM Negative-direction limit OUT-/CW- Pulse/CW output- A+ Encoder phaseA input+ A- Encoder phaseA input- GND Power ground input (common to internal GND) Figure 3.4. Pin Assignments of Interface Connector (CNA) < SMC-8DF-PCI > SMC-4DF-PCI, SMC-8DF-PCI 31 3. External Connection Pin Assignments of Interface Connector < SMC-4DF-PCI > axis0 : P-COM axis0 : IN1/ALM axis0 : I N2/INP axis0 : IN3/SD axis0 : IN4/LTC axis0 : IN5/PCS axis0 : IN6/CLR axis0 : IN7 axis0 : ORG axis0 : +LIM axis0 : -LIM axis1 : P-COM axis1 : IN1/ALM axis1 : IN2/INP axis1 : IN3/SD axis1 : IN4/LTC axis1 : IN5/PCS axis1 : IN6/CLR axis1 : IN7 axis1 : ORG axis1 : +LIM axis1 : -LIM axis0 : A+ axis0 : Aaxis0 : B+ axis0 : Baxis0 : Z+ axis0 : Zaxis1 : A+ axis1 : Aaxis1 : B+ axis1 : Baxis1 : Z+ axis1 : Zaxis0 : OUT3 axis0 : OUT2 axis0 : OUT1 axis0 : DIR+/CCW+ axis0 : DIR-/CCWaxis0 : OUT+/CW+ axis0 : OUT-/CWGND axis1 : OUT3 axis1 : OUT2 axis1 : OUT1 axis1 : DIR+/CCW+ axis1 : DIR-/CCWaxis1 : OUT+/CW+ axis1 : OUT-/CWGND 32 100 99 98 97 96 95 94 93 92 91 90 89 88 87 86 85 84 83 82 81 80 79 78 77 76 75 74 73 72 71 70 69 68 67 66 65 64 63 62 61 60 59 58 57 56 55 54 53 52 51 50 49 48 47 46 45 44 43 42 41 40 39 38 37 36 35 34 33 32 31 30 29 28 27 26 25 24 23 22 21 20 19 18 17 16 15 14 13 12 11 10 9 8 7 6 5 4 3 2 1 axis2 axis2 axis2 axis2 axis2 axis2 axis2 axis2 axis2 axis2 axis2 axis3 axis3 axis3 axis3 axis3 axis3 axis3 axis3 axis3 axis3 axis3 axis2 axis2 axis2 axis2 axis2 axis2 axis3 axis3 axis3 axis3 axis3 axis3 axis2 axis2 axis2 axis2 axis2 axis2 axis2 GND axis3 axis3 axis3 axis3 axis3 axis3 axis3 GND : P-COM : IN1/ALM : IN2/INP : IN3/SD : IN4/LTC : IN5/PCS : IN6/CLR : IN7 : ORG : +LIM : -LIM : P-COM : IN1/ALM : IN2/INP : IN3/SD : IN4/LTC : IN5/PCS : IN6/CLR : IN7 : ORG : +LIM : -LIM : A+ : A: B+ : B: Z+ : Z: A+ : A: B+ : B: Z+ : Z: OUT3 : OUT2 : OUT1 : DIR+/CCW+ : DIR-/CCW: OUT+/CW+ : OUT-/CW: : : : : : : OUT3 OUT2 OUT1 DIR+/CCW+ DIR-/CCWOUT+/CW+ OUT-/CW- SMC-4DF-PCI, SMC-8DF-PCI 3. External Connection Plus common B+ IN1/ALM P-COM General-purpose input1/Alarm input B- Encoder phaseB input- IN2/INP General-purpose input2/Positionig input Z+ Encoder phaseZ input+ Z- Encoder phaseZ input- IN3/SD IN4/LTC IN5/PCS IN6/CLR IN7 General-purpose input3/Slow down input General-purpose input4/counter latch input General-purpose input5/positioning operation start input General-purpose input6/Counter clear input General-purpose input7 Encoder phaseB input+ OUT1 General-purpose output1 OUT2 General-purpose output2 OUT3 General-purpose output3 DIR+/CCW+ Direction/CCW output+ ORG Origin input DIR-/CCW- Direction/CCW output- +LIM Positive-direction limit OUT+/CW+ Pulse/CW output+ -LIM Negative-direction limit OUT-/CW- Pulse/CW output- A+ Encoder phaseA input+ A- Encoder phaseA input- GND Power ground input (common to internal GND) Figure 3.5. Pin Assignments of Interface Connector < SMC-4DF-PCI > SMC-4DF-PCI, SMC-8DF-PCI 33 3. External Connection Connecting Output Signals Pulse output circuit (CW, CCW) The pulse output circuit on this product, which is in the form of a differential line driver (AM26LS31 equivalent) as shown in the following figure, can be connected with differential input, opto-coupler, and TTL level input. Connection with the differential input Driver Unit Board AM26LS31 or equivalence to it CW+ CW CWCCW+ CCW CCW- Figure 3.6. Pulse output circuit (Connection with the differential input) Connection with the opto-coupler input (When the driver unit guarantees the connection with the differential output) Driver Unit Board AM26LS31 or equivalence to it CW+ CW CW CWCCW+ CCW CCW CCW- Figure 3.7. Pulse output circuit (connection with the opto-coupler input) 34 SMC-4DF-PCI, SMC-8DF-PCI 3. External Connection Connection with the opto-coupler input Driver Unit Board AM26LS31 or equivalence to it CW+ CW CW CWCCW+ CCW CCW CCWGND Figure 3.8. Pulse output circuit (connection with the opto-coupler input) Connection with TTL level input Driver Unit Board AM26LS31 or equivalence to it Vcc Vcc CW+ CW CW CWVcc CCW+ CCW Vcc CCW CCWGND Figure 3.9. Pulse output circuit (connection with the TTL level input) CAUTION - When connecting with the photo-coupler input or the TTL level input, check the specification for the driver unit beforehand. In addition, please insert a current-limiting resistor according to the allowable current and drive current of the connected input circuit. - To prevent the circuit from malfunctioning due to noise, wire it as far away from other signal lines and noise sources as possible. SMC-4DF-PCI, SMC-8DF-PCI 35 3. External Connection Control signal/general-purpose signal output circuit (OUT1 - OUT3, ERC, CP1, CP2) Output circuit of each output signal on this product is illustrated below. The signal output is an open-collector output. A ground wire must therefore be connected for driving. Board Driver Unit OUT1 - OUT3 GND + +12 - +24VDC Figure 3.10. Output circuit 36 SMC-4DF-PCI, SMC-8DF-PCI 3. External Connection Connecting Input Signals Encoder input circuit Encoder input circuit on this product is illustrated below. The signal input is a differential input capable of connecting a line driver output, TTL level output and open-collector output. Connection with the differential output Board Vcc Driver Unit Vcc AM26LS31 or equivalence to it A+ Phase A+ A- Phase A- B+ Phase B+ B- Phase B- Z+ Phase Z+ ZGND Phase ZGND Vcc Vcc AM26LS31 or equivalence to it Vcc Vcc AM26LS31 or equivalence to it Figure 3.11. Encoder input circuit SMC-4DF-PCI, SMC-8DF-PCI 37 3. External Connection Connection with the TTL level output Board Vcc Driver Unit Vcc Vcc AM26LS31 or equivalence to it A+ TTL level output Phase A+ A- Vcc Vcc Vcc AM26LS31 or equivalence to it B+ TTL level output Phase B+ B- Vcc Vcc Vcc AM26LS31 or equivalence to it Z+ ZGND Phase Z+ TTL level output GND Figure 3.12. Encoder input circuit 38 SMC-4DF-PCI, SMC-8DF-PCI 3. External Connection Connection with the open-collector output Board Vcc Driver Unit Vcc Vcc AM26LS31 or equivalence to it A+ Output (open-collector) Phase A+ A- Vcc Vcc Vcc AM26LS31 or equivalence to it B+ Output (open-collector) Phase B+ B- Vcc Vcc Vcc AM26LS31 or equivalence to it Z+ ZGND Phase Z+ Output (open-collector) GND Figure 3.13. Encoder input circuit CAUTION - When connecting open-collector output signals or TTL level output signals, please do not insert a terminating resistor with reference to "Setting the Terminating Resistor in chapter 2". When inserted with a terminating resistor (factory setting), this product may malfunction, overheat, or causes a failure. - Restrict the use of cables to 10m for the line driver output, 3m for the open-collector output, and 1.5m for the TTL level output. - To prevent the circuit from malfunctioning due to noise, wire it as far away from other signal lines and noise sources as possible. SMC-4DF-PCI, SMC-8DF-PCI 39 3. External Connection Limit input/general-purpose input/control input circuit (IN1 - IN7, +LIM, -LIM, ORG) The limit input/general-purpose input/control input circuit on this board is illustrated below. The signal input is an current drive input by opto-coupler (Corresponding to the current sink output). To drive the limit input/ general-purpose input/control input block, therefore, an external power supply is required at +12 - +24 V. External Device Board Vcc External Power Supply +12 - +24VDC Plus Common Photocoupler Input Pin Swich Vcc Photocoupler Input Pin Swich * Input pin is IN1 - IN7, +LIM, -LIM, ORG. Figure 3.14. Limit input/general-purpose input/control input circuit 40 SMC-4DF-PCI, SMC-8DF-PCI 3. External Connection Connection Examples Given below are practical examples of connection of this product that outputs pulses by the independent pulsing method to motor drivers. These examples show the connections through axis0. Example of Connection to driver unit (Σ II Series) for Servo motor Servo motor SMC-4DF-PCI SMC-8DF-PCI +12 - +24VDC + - P.COM(100) ORG Motor driver by YASKAWA ELECTRIC CORPORATION Σ II Series +24V IN (47) (92) +LIM (91) P-OT (42) -LIM (90) N-OT (43) IN1 ALM+ (31) ALM- (32) (25) (26) (29) (30) (27) (28) (37) (38) (99) IN2 (98) IN3 (97) IN4 (96) IN5 (95) /COIN+ /COIN/S-RDY+ /S-RDY/TGON+ /TGONALO1 IN6 (94) ALO2 IN7 (93) ALO3 (39) A+ (78) PAO (33) A- (77) /PAO (34) B+ (76) PBO (35) B- (75) /PBO (36) Z+ (74) PCO (19) Z- (73) /PCO (20) GND (59) SG (01) OUT1 (64) /S-ON (40) OUT2 (65) /ALM-RST (44) PL3 (18) CLR (15) /CLR (14) OUT3 (66) CW+ (61) PLUS (7) CW- (60) /PLUS (8) CCW+ (63) SIGN (11) CCW- (62) /SIGN (12) Figure 3.15. Example of Connection to driver unit (Σ II Series) for Servo motor SMC-4DF-PCI, SMC-8DF-PCI 41 3. External Connection Surge Voltage Countermeasures When connecting a load that generates surge voltages and inrush currents, such as an induction load (relay coil) or an incandescent light bulb, to the digital output, appropriate protection must be provided in order to prevent damage to the output stage or a malfunction due to noise. The rapid shutoff of a coil, such as a relay, generates a sudden high-voltage pulse. If this voltage exceeds the voltage tolerance level of the output transistor, it can cause the transistor to gradually deteriorate, or even completely damage the transistor. Therefore, when driving an induction load, such as a relay coil, you should always connect a surge-absorbing device. The following illustrates a surge voltage countermeasure that can be employed: Examples of use of relay coil Board Board Relay coil Diode OUT 1 - 3 External Power Supply +12 - +24VDC OUT 1 - 3 Relay coil External Power Supply +12 - +24VDC Zener diode GND GND External power voltage < Zener diode voltage Examples of use of lump Board Board External Power Supply +12 - +24VDC OUT 1 - 3 OUT 1 - 3 Surge current prevention resistor GND External Power Supply +12 - +24VDC Resistor GND Figure 3.16. Surge Voltage Countermeasure CAUTION In order for a protection circuit to operate effectively, it must be connected within 50 cm of a load and a contact point. 42 SMC-4DF-PCI, SMC-8DF-PCI 4. Functions 4. Functions This chapter describes the functions of this product. You can easily set up and execute each of the functions using the bundled driver library. For more information on this product, please refer to the “API-SMC HELP” after installing. About each motor control operation PTP operation function This function moves the motor from one point to another (Point To Point motion). Use the function for simple position control. JOG operation function This function moves the motor without specifying the travel distance. Use the function to manually position the motor. ORG operation function This function moves the motor to the origin. Linear interpolation This product supports multi-axial linear interpolation. Linear interpolation causes linear motion to the specified position. Circular interpolation This product supports any 2-axial circular interpolation. Circular interpolation causes circular motion from the current coordinate to the target coordinate along an arc centered at the center point. S-curve acceleration/deceleration function This product has the S-curve acceleration/deceleration function in addition to the linear acceleration/deceleration function. The S-curve acceleration/deceleration function reduces acceleration when starting and stopping accelerating/decelerating the motor, thereby suppressing the vibration generated at the start and end of motion. SMC-4DF-PCI, SMC-8DF-PCI 43 4. Functions Frame (bank) sequence operation function This product handles the set of parameters which are necessary for motor operations such as travel distance, travel speed, acceleration/deceleration rate, and so on as 1 frame, and can store up to 1024 frames for each axis. It is possible to repeatedly execute the frame after executing a frame once (loop operation). By storing and executing continuous multiple frames in the memory of the board, the following benefits can be got. - Decrease the CPU load on the PC for complex control - Shorten the idling time for the operation switchover of each frame - By combination with synchronization control function, multi-axial continuous interpolation control is available. Difference in minimum time when possible to the frame (bank) sequence operation by system configuration When the time of a frame (bank) is short, the frame (bank) sequence operation might not be able to be done normally. Time of a frame (bank) sequence operation that can be normally operated depends on the speed of CPU. Information on PC (CPU and Chip Set), the number of axes for operation, and time of operation a frame that confirms normal operation are showed in the following table. Table 4.1. When it inserts in the expansion slot of a personal computer CPU / Chip Set / Number of operation axes Time of a frame (bank) sequence (Min.) Core 2 Duo E6300 / Q965 / 1 axis 200µsec Core 2 Duo E6300 / Q965 / 4 axes 200µsec Core 2 Duo E6300 / Q965 / 8 axes 400µsec Pentium III 800MHz / i815 / 1 axis 400µsec Pentium III 800MHz / i815 / 4 axes 600µsec Pentium III 800MHz / i815 / 8 axes 800µsec Table 4.2. When CONTEC's expansion unit ECH(PCI)BE-H2B, ECH(PCI)BE-H4B, ECH(PCI)BE-F2B, ECH(PCI)BE-F4B and ECH(PCI)BE-H4A are used CPU / Chip Set / Number of operation axes Time of a frame (bank) sequence (Min.) Core 2 Duo E6300 / Q965 / 1 axis 200µsec Core 2 Duo E6300 / Q965 / 4 axes 200µsec Core 2 Duo E6300 / Q965 / 8 axes 400µsec Pentium III 800MHz / i815 / 1 axis 500µsec Pentium III 800MHz / i815 / 4 axes 600µsec Pentium III 800MHz / i815 / 8 axes 900µsec These values may not be satisfied depending on the system configuration including other boards and applications. 44 SMC-4DF-PCI, SMC-8DF-PCI 4. Functions Synchronous control function This product makes it possible for synchronization control up to 128 axes (SMC-8DF-PCI : 16 pieces in use) by connecting to SMC-4DF-PCI or SMC-8DF-PCI with a dedicated synchronization control cable. Synchronization is the function that makes the motors start operation at the identical timing or, if any of the motors is stopped with an alarm (abnormal stop), stops all the relevant axes at once. The following types of synchronous control are available. - Multi-axis synchronous start control - Multi-axis synchronous stop - Linear interpolation (constant speed only) SMC-4DF-PCI, SMC-8DF-PCI 45 4. Functions Meanings of signals Limit input signals Limits switches are used to detect the position of the carrier in a positioning system using a stepping motor to stop the motor when the carrier has reached the target position (final destination). This product is also provided with the slow-down stop input to slow down the high-speed rotation at acceleration or deceleration. The mounting position of each limit switch is shown below. Pulse motor Connection part -LIM SD ORG carrier Negative Positive (CCW) (CW) SD +LIM Figure 4.1. The attachment position relation of a limit switch +LIM (Positive-direction end limit input), -LIM (Negative-direction end limit input) Place +LIM at the end position when the stepping motor rotates clockwise (CW) and -LIM at the end position when the stepping motor rotates counterclockwise (CCW). When the carrier reaches either position (the limit input is turned on), the motor stops immediately unconditionally. Even when a subsequent operation directive (instruction) for moving in the same direction is issued, the carrier won’t move forward beyond the limit position as long as the limit has been applied. The motor restarts operation (rotation) in response to an operation directive for moving in the opposite direction. The logical direction can be set by software. SD (deceleration (decelerated stop) input) SD is a limit input to detect the position at which to start deceleration during high-speed rotation (accelerating/decelerating operation). The carrier operating (moving) at high speed starts deceleration at that position and stops after slowing down to the initial speed. The logical direction can be set by software. ORG (origin input) ORG is the switch input to detect the origin to be set as the base point for each operation. The logical direction can be set by software. 46 SMC-4DF-PCI, SMC-8DF-PCI 4. Functions Encoder input signal Phases A, B and Z are available to this product for encoder input. The signals that can be connected are those in the following output forms: the line driver output form, the TTL level output form, and the open-collector output form. The specifications for the input pulse that can be set are as follows: - 2-phase Input, Multiply by 1 - 2-phase Input, Multiply by 2 - 2-phase Input, Multiply by 4 - Single-phase Input, Multiply by 1 2-phase Input Two-phase input is a pulse input consisting of two phases between which there is a phase difference of 90° : Phase A (leading signal) and Phase B (trailing signal). The minimum phase difference between Phase A and Phase B should be set to 0.2µ sec for line driver output connection, to 0.34µ sec for TTL level output connection or to 1µ sec for open-collector output connection. A A B B Multiply by 1 Multiply by 2 Multiply by 4 U - - - U - - - U U - U - U - U - U U U U U U U U U U Multiply by 1 D - - - D - - - D Multiply by 2 D - D - D - D - D Multiply by 4 D D D D D D D D D U : Up Count D : Down Count Figure 4.2. Sample Count for Two-phase Input Setting Single-phase input In single-phase input, the counter counts up at the rising edge of Phase A (UP) pulse and counts down at the rising edge of Phase B (DOWN) pulse. A count cannot be performed properly, if Phase A (UP) pulse and Phase B (DOWN) pulse are generated at the same time. A A B B U U D D U : Up Count D : Down Count Figure 4.3. Sample Count for Single-phase Input Setting SMC-4DF-PCI, SMC-8DF-PCI 47 4. Functions Pulse output signal Apart from the independent pulse (CW, CCW), this product can also generate the following pulses : common pulse (pulse output, direction output), 90°C phase-different pulse (leading pulse output, trailing pulse output). This allows you to use (or select) the most suitable one in accordance with the pulse motor drive unit to be used (or connected). As these pulse outputs are line driver outputs, check the specifications of the motor driver unit to be used before connecting them. CAUTION This product cannot directly drive the stepping motor. These pulse output signals must therefore be connected to the motor driver unit prepared for the stepping motor. CW (Positive-direction pulse output), CCW (Negative-direction pulse output) CW (forward pulse output) is the pulse output signal to rotate (operate) the stepping motor clockwise (CW). CCW (backward pulse output) rotates the motor counterclockwise. These signals are independent of each other. When a command for rotation is executed, the pulse signal for the specified direction outputs the preset number of operation pulses. When positive direction operates When negative direction operates CW CCW Figure 4.4. Specification for Output Pulse in Independent Pulsing Method OUT (Pulse output), DIR (Direction output) OUT (pulse output) is the serial pulse output that carries the above CW and CCW signals on a single line. The CW and CCW directions are indicated by the signal status of DIR (direction output). Note that the DIR signal is valid only when the OUT signal is active. When positive direction operates When negative direction operates OUT DIR Figure 4.5. Specification for Output Pulse in Common Pulsing Method 48 SMC-4DF-PCI, SMC-8DF-PCI 4. Functions OUT (leading pulse output) and DIR (trailing pulse output) The OUT (leading pulse output) signal and the DIR (trailing pulse output) signal are generated. The motor is operated (rotated) in the positive direction (clockwise), when there is a phase difference of +90° between DIR (trailing pulse output) and OUT (leading pulse output). On the other hand, the motor is operated (rotated) in the negative direction (counterclockwise), when there is a phase difference of -90° between DIR (trailing pulse output) and OUT (leading pulse output). When positive direction operates When negative direction operates OUT DIR Figure 4.6. Specification for Output Pulse in 90°C phase-different Pulsing Method General-purpose input signals This product has general-purpose input signals (IN1 - IN7) in addition to limit input and encoder input signals. IN1 - IN7 (General-purpose input signals) IN1 - IN7 (general-purpose input signals) can be used to read data from I/O ports. Since these are independent of motor control, they do not affect pulse output even during motor operation. There are 7 pins for each axis, which are used for input of positioning completion signals or alarm signals from motor driver units as well as for general-purpose input. By software, IN1-IN6 can be switched to serve as alarm input, positioning completion input, deceleration (decelerated stop) input, counter latch, positioning control start input, and counter clear input respectively. The input logic can also be changed by software. ALM (Alarm input signal) ALM is the input signal to detect the alarm signal from the motor driver. The input logic can be changed by software. INP (positioning completion signal) INP is the signal to detect the positioning completion signal from the motor driver unit. The input logic can be changed by software. SD (deceleration (decelerated stop) input) SD is a signal to detect the position at which to start deceleration. The input logic can be changed by software. SMC-4DF-PCI, SMC-8DF-PCI 49 4. Functions LTC (counter latch input) Signal to latch with the counter value, allowing the counter value to be cleared immediately after latching or an interrupt request to be generated upon latching. The input logic can be changed by software. PCS (positioning control start input) Signal for overriding (replacing) the target position, allowing positioning to be performed by the set amount of shifting from the input-ON timing. The input logic can be changed by software. CLR (counter clear input) It is a signal to reset a specified counter. Selecting edge input or level input and resetting multiple counters are available. The input logic can be changed by software. General-purpose output signals This product has general-purpose output signals (OUT1 - OUT3) in addition to pulse output signal. In addition, output signals can be switched to alarm clear output, driver differential clear output, or comparator output by software. OUT1 - OUT3 (General-purpose output signals) OUT1 - OUT3 (general-purpose output signals) can be used to write data to I/O ports. Since these are independent of motor control, they do not affect pulse output even during motor operation. There are 3 pins for each axis, which are used for the output of level output signals for servo-on and hold-off to the motor driver unit, one-shot pulse signals for various clear signals, and comparator output signals. The output logic can also be changed by software. ALMCLR (alarm clear output signal), ERC (driver differential clear output) ALMCLR and ERC are signals to output clear one-shot pulses to the alarm clear and deviation counter clear inputs of the motor driver unit. The width of one-shot pulses (output logic changeable) can be selected from among 12 µsec, 102 µsec, 408 µsec, 1.6 msec, 13 msec, 52 msec, 104 msec. CP1, CP2 (comparator output) CP1 and CP2 compare the count value with the set comparator value. Signals will be output when the set criteria are satisfied. The output logic can be changed by software. P.COM (Plus common) P.COM is the plus common signal for limit input signals (+LIM, -LIM, SD, ORG) and general-purpose input/output signals (IN1 - IN7, OUT1 - OUT3). GND (Ground) GND is the ground line for the general-purpose output signals (OUT1 - OUT3). 50 SMC-4DF-PCI, SMC-8DF-PCI 4. Functions Connecting the synchronization control connectors There are synchronization signal control connectors (CN2, CN3) which enable synchronization operations of multiple pieces of this product. These connectors are used for connecting synchronization signal cables. Connection method For synchronous operations of two or more boards, connect them with synchronization signal cables. Use a synchronization signal cable to connect the CN2 of a smaller ID board to the CN3 of the board with a greater board ID number. ID = 0 ID = 1 ID = 2 Figure 4.7. Connection method of a cable SMC-4DF-PCI, SMC-8DF-PCI 51 4. Functions Configuration examples for synchronization operations (for SMC-8DF-PCI) Cable connection Unconnection Hardware Synchronization connector number CN3 BoardID number Axis number Connection CN2 First piece (ID = 0) Connection CN3 CN2 Unconnection CN3 Second piece (ID = 1) CN2 Third piece (ID = 2) Axis Axis Axis Axis Axis Axis Axis Axis Axis Axis Axis Axis Axis Axis Axis Axis Axis Axis Axis Axis Axis Axis Axis Axis 0 1 2 3 4 5 6 7 0 1 2 3 4 5 6 7 0 1 2 3 4 5 6 7 Group A (24-axis synchronization operations) Configuration example 1 Configuration example 2 Group A (12-axis synchronization operations) Group B (12-axis synchronization operations) Group B Group A (4-axis (20-axis synchronization operations) synchronization operations) Configuration example 3 < Description for the above figure > - Configuration example 1: - Configuration example 2: when all axes (24 axes) working synchronously by using 3 pieces of SMC-8DF-PCI When divided into 2 groups of 12-axis synchronization operations by using 3 pieces of SMC-8DF-PCI - Configuration example 3: When divided into 1 group of 20-axis synchronization operations and a group of 4-axis synchronization operations by using 3 pieces of SMC-8DF-PCI CAUTION - Connectors for synchronization signals control of this product (CN2, CN3) are dedicated for SMC-4DF-PCI, SMC-8DF-PCI. Please do not connect this synchronization cable with products other than SMC-4DF-PCI and SMC-8DF-PCI. - Please make up synchronization groups from axis 0 or axis 4. 52 SMC-4DF-PCI, SMC-8DF-PCI 4. Functions Motion control system System configuration Stepping motor Servo motor Limit sensor Driver unit Conversion cable CCB-SMC2 PCB-100PS SMC-4DF-PCI SMC-8DF-PCI +12V +24VDC DC Power Supply Figure 4.8. System configuration Table 4.3. Component features Item SMC-4DF-PCI SMC-8DF-PCI (Main board) PCB-100PS (Option) Description When installed on the PC, this board generates pulses required for position control. This cable connects the board to the CCB-SMC2. This screw terminal is used to efficiently connect the devices (the board, driver unit, CCB-SMC2 (Option) DC power supply, limit sensor) required for position control. The screw terminal can connect a four-axis motion control system alone. The shape of the control connector of each driver unit is largely different depending Conversion cable (User) on the manufacturer and type. A conversion cable must be prepared to connect each driver unit to the CCB-SMC2. Driver unit (Motor maker) Motor and driver unit to be subject to motion control. Stepping motor Servo motor Available in various types by motor capacity, power-supply voltage, and motor (Motor maker) shape. Select the ones that best fit your needs. Limit sensor (Switch maker) positions. When a table is used in the system, the sensor is bundled with the table. This sensor is installed at the forward/backward limit and origin detection For a self-made system, use commercially available switches. DC Power supply (Power supply maker) Power supply to the CCB-SMC2. Use a 12 - 24-VDC power supply. SMC-4DF-PCI, SMC-8DF-PCI 53 4. Functions 54 SMC-4DF-PCI, SMC-8DF-PCI 5. About Software 5. About Software CD-ROM Directory Structure \ |– Autorun.exe | Readmej.html | Readmeu.html . . |–––APIPAC | |––AIO | | |––DISK1 | | |––DISK2 | | |––…… | | |––DISKN | |––AioWdm | |––CNT | |––DIO | |––…… . . | ––HELP | |––Aio | |––Cnt | |––…… . . | ––INF | |––WDM | |––Win2000 | |––Win95 . . |––linux | |––cnt | |––dio | |––…… . . | ––Readme . . | ––Release | |––API_NT | |––API_W95 . . |––UsersGuide Installer Main Window Version information on each driver (Japanese) Version information on each driver (English) Driver file for Windows HELP file Each INF file for OS Driver file for Linux Readme file for each driver Driver file on each API-TOOL (For creation of a user-specific install program) Hardware User's Guide (PDF files) SMC-4DF-PCI, SMC-8DF-PCI 55 5. About Software About Software for Windows The bundled CD-ROM “API Function Library Package API-PAC(W32)” contains the functions that provide the following features: - Function to easily set and control the position of the stepping motor or servomotor - Function to set and execute basic motor operations such as PTP and JOG operations - Capable of digital input/output of specified axes For details, refer to the help file. The help file provides various items of information such as “Function Reference”, “Sample Programs”, and “Q&A”. Use them for program development and troubleshooting. Accessing the Help File (1) Click on the [Start] button on the Windows taskbar. (2) From the Start Menu, select “Programs” – “CONTEC API-PAC(W32)” - “SMC” - “API-SMC-D HELP” to display help information. 56 SMC-4DF-PCI, SMC-8DF-PCI 5. About Software Uninstalling the Driver library To uninstall API-PAC(W32), follow the procedure below. (1) Click on the [Start] button on the Windows taskbar. From the Start Menu, select “Settings” – “Control Panel”. (2) Double-click on “Change/Remove Programs” in the Control Panel. (3) Double-click on “Change or Remove Programs” in the Control Panel. Select “CONTEC API-SMC(WDM) driver” from the application list displayed, then click on the [Change/Remove] button. Follow the on-screen instructions to uninstall the function libraries. SMC-4DF-PCI, SMC-8DF-PCI 57 5. About Software 58 SMC-4DF-PCI, SMC-8DF-PCI 6. About Hardware 6. About Hardware This chapter provides hardware specifications and hardware-related supplementary information. For detailed technical information For further detailed technical information (“Technical Reference” including the information such as an I/O map, configuration register, etc.), visit the Contec's web site (http://www.contec.com/support/) to call for it. Hardware specification Tables 6.1 - 6.6 list the hardware specifications of the board. Table 6.1. Common Section Specification Item SMC-4DF-PCI SMC-8DF-PCI Control target Stepping motor or servo motor driver unit (pulse train input type) Number of axes to control 4axis Device used PCL6045B (Nippon Pulse Motor CO., LTD.) or equivalence to it Interrupt 1 ch Interrupt factor When stopping by positive-direction end limit input ON When stopping by negative-direction end limit input ON At the time of stop by alarm input on When stopping by simultaneous stop operation When stopping by deceleration (decelerated stop) input on When occurring the encoder input error The other event (setting by the software) 8axis The number of sheets that can 16 sheets be used simultaneously I/O address Any 128 ports boundary Current consumption (Max.) 5VDC 800mA Operating condition 0 - 50°C, 10 - 90% (No condensation) PCI bus specification 32-bit, 33MHz, Universal key shapes supported *1 Dimension (mm) 176.41(L) x 106.68(H) Connector used HDRA-EC100LFDT+ [mfd by HONDA TSUSHIN KOGYO CO., LTD.] or equivalence to it HDRA-E100W1LFDT1EC-SL+ [mfd by HONDA TSUSHIN KOGYO CO., LTD.] or equivalence to it Weight 120g 150g *1 5VDC 1600mA This board requires power supply at +5V from an expansion slot (it does not work on a machine with a +3.3V power supply alone). SMC-4DF-PCI, SMC-8DF-PCI 59 6. About Hardware Board dimensions 106.68(H) 176.41(L) The standard outside dimension (L) is the distance from the end of the board to the outer surface of the slot cover. [mm] Table 6.2. Encoder Input Section Item Encode type Specification Incremental Maximum counter value 8000000h - 7FFFFFFh(-134,217,728 - 134,217,727), 28 bit Input signal type Single-phase input (UP/DOWN/Z) / Phase input (A/B/Z) Supported output type Differential output, TTL level output, open-collector output Device used AM26LS32(T.I) or equivalence to it Terminal resistor 150Ω (Separatable with SW) Receiver input sensitivity ±200mV In-phase input voltage range ±7V 10m (Depending on the time of connecting the differential output, wiring environment and input frequency) Distance in which signal 3m (Depending on the time of connecting the open-collector output, wiring environment and input frequency) can be extended 1.5m (Depending on the time of connecting the TTL level output, wiring environment and input frequency) Response frequency (Max.) 5MHz duty (When connecting the differential output, 2-phase Input, Multiply by 4, duty 50%) 3MHz duty (When connecting the TTL level output, 2-phase Input, Multiply by 4, duty 50%) 1MHz duty (When connecting the open-collector output, 2-phase Input, Multiply by 4, duty 50%) Table 6.3. Limit Input Section Item Specification Signal channel 3channels/axis (original point, Forward limit, reserve limit) Input signal name ORG : origin input +LIM : positive direction end limit input -LIM : negative direction end limit input Input logic Enables selecting the positive/negative logic by using the Software Input type Opto-coupler input (corresponding to current sink output) Response time (Max.) 200 µsec Input resistance 4.7kΩ Input ON current 2.0mA or more Input OFF current 0.16mA or less External circuit power supply 60 12V - 24VDC(±10%) SMC-4DF-PCI, SMC-8DF-PCI 6. About Hardware Table 6.4. General-purpose Input Section Item Specification Signal channel 7channels/axis Input signal name IN1/ALM : alarm input, general-purpose input IN2/INP : positioning completion input, general-purpose input IN3/SD : deceleration (decelerated stop) input, general-purpose input IN4/LTC : counter latch input, general-purpose input IN5/PCS : positioning control start input, general-purpose input IN6/CLR : counter clear input, general-purpose input IN7 : general-purpose input Input logic Enables selecting the positive/negative logic by using the Software Input type Opto-coupler input (corresponding to current sink output) Response time (Max.) 200 µsec Input resistance 4.7kΩ Input ON current 2.0mA or more Input OFF current 0.16mA or less External circuit power supply 12V - 24VDC(±10%) Table 6.5. Pulse Output Section Item Specification Pulse rate 0.1 - 6.5 Mpps Output signal name CW : pulse / CW output CCW : direction / CCW output Output signal system 2 Pulse types (pulse for positive/negative direction) or the common pulse type (pulse signal/directional signal) 90ºC phase difference pulse (lead/lag pulse) Output form Un-isolated differential line driver output Device used AM26LS31(T.I) or equivalence to it H level output voltage 2.5V - 5.25V L level output voltage 0V - 0.5V Rated output current (Max.) 20mA SMC-4DF-PCI, SMC-8DF-PCI 61 6. About Hardware Table 6.6. General-purpose Output Section Item Specification Number of signal channel 3channels/axis Output signal name OUT1 : general-purpose output OUT2 : general-purpose output OUT3 : general-purpose output (Each output pin can be switched with the following functions) ALMCLR : alarm clear output ERC : driver differential clear output CP1 : comparator1 output CP2 : comparator2 output Signal specification Un-isolated open collector output (current sink type) Response time (Max.) 10µsec (when using the loading on the input side 510Ω, +24VDC) Rated output current (Max.) 100mA per 1ch, 300mA per 1axis Rated output withstanding voltage (Max.) 50VDC (Enables selecting the positive/negative logic by using the Software) 62 SMC-4DF-PCI, SMC-8DF-PCI 6. About Hardware Block Diagram Driver Pulse output Receiver Encoder input Photo-coupler Limit input - - Motor controller PCL6045B Driver Pulse output Receiver Encoder input PCI Bus* Photo-coupler Control circuit FPGA Driver Pulse output Receiver Encoder input Limit input - - Driver Pulse output Receiver Encoder input Photo-coupler - Axis 3 Limit input Photo-coupler Motor controller PCL6045B Axis 0 Axis 4 - Axis 7 Limit input * Only SMC-8DF-PCI Transistor General-purpose output Photo-coupler (Each axis 3ch) General-purpose input SMC-4DF-PCI SMC-8DF-PCI (Each axis 7ch) Synchronization signal Figure 6.1. Block Diagram SMC-4DF-PCI, SMC-8DF-PCI 63 SMC-4DF-PCI SMC-8DF-PCI User’s Guide CONTEC CO.,LTD. March 2007 Edition 3-9-31, Himesato, Nishiyodogawa-ku, Osaka 555-0025, Japan Japanese http://www.contec.co.jp/ English http://www.contec.com/ Chinese http://www.contec.com.cn/ No part of this document may be copied or reproduced in any form by any means without prior written consent of CONTEC CO., LTD. [03092007] [03092007] Management No. A-51-318 Parts No. LYGQ961